Odoo 16 Community Book
Accounting
Invoicing and accounting operations are impartial elements of a business that require an efficient system for management. To run your business successfully, the financial operations of your business should be governed in a proper manner. Otherwise, your business will face severe financial failure in the future. In order to avoid manual errors in accounting and save time and effort for the accounting department of your company, you can use the Odoo ERP system. This software will ensure enhanced performance in financial management in your business. For managing all kinds of invoicing operations, Odoo offers the Invoicing module in the community edition. This module is a great assistance in creating and managing invoices, sending them to concerned customers on scheduled dates, and managing bills and payments of the respective invoices. You can integrate this module with other functional modules in Odoo, like Sales, Purchase, Inventory, and many more.
In the Community edition of Odoo, you will get the Invoicing module instead of the Accounting module. Some features and functions of the Accounting module will be missing in the Invoicing module. But, it is possible to get access to the full accounting features in the Community edition by following a few steps.
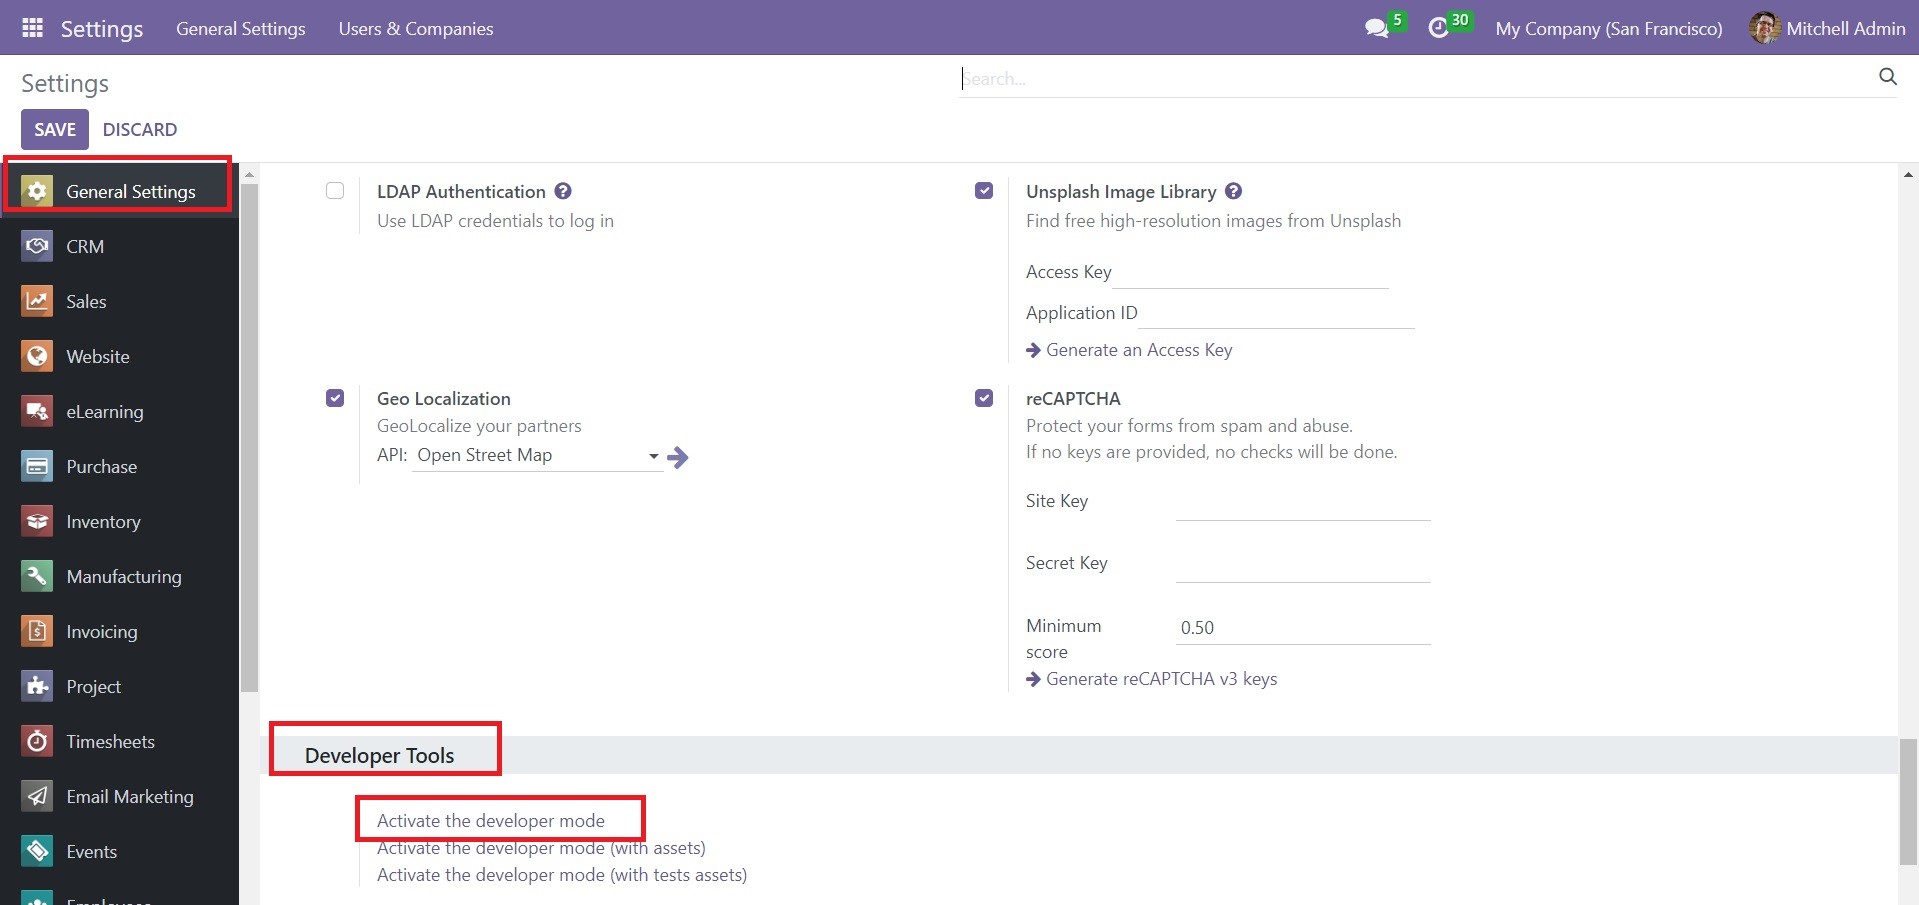
First, go to the General Settings option of the Community edition and activate the Developer mode as shown in the image below.
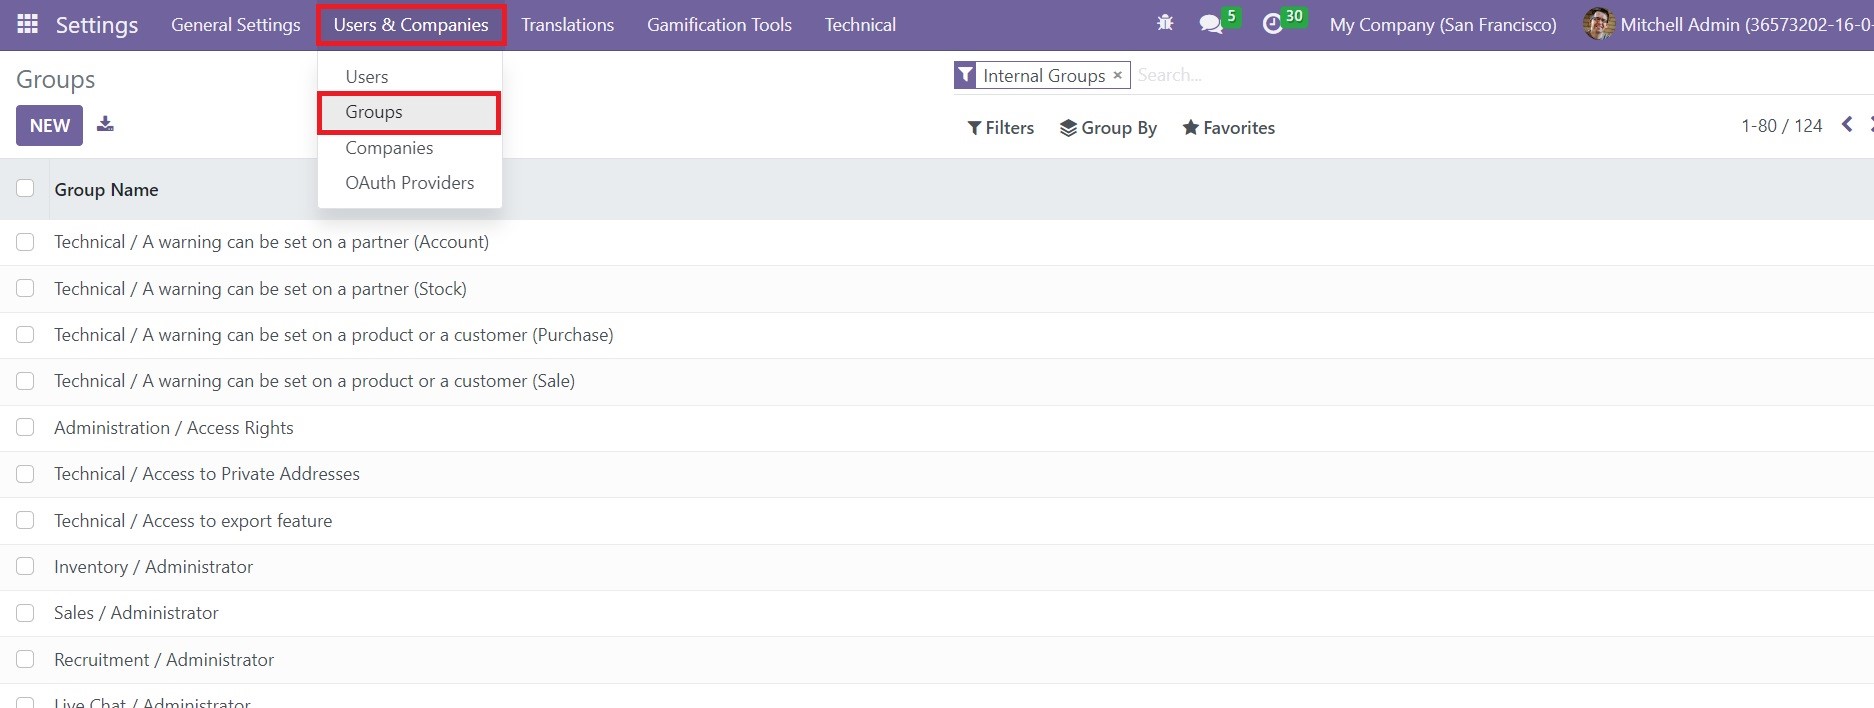
The next step is to select the Users & Companies menu available in the main menu bar of the Settings window. Under this menu, you can find the Groups sub-menu. Click on that option.
Now, you can use the Search bar to search for the Accounting group.
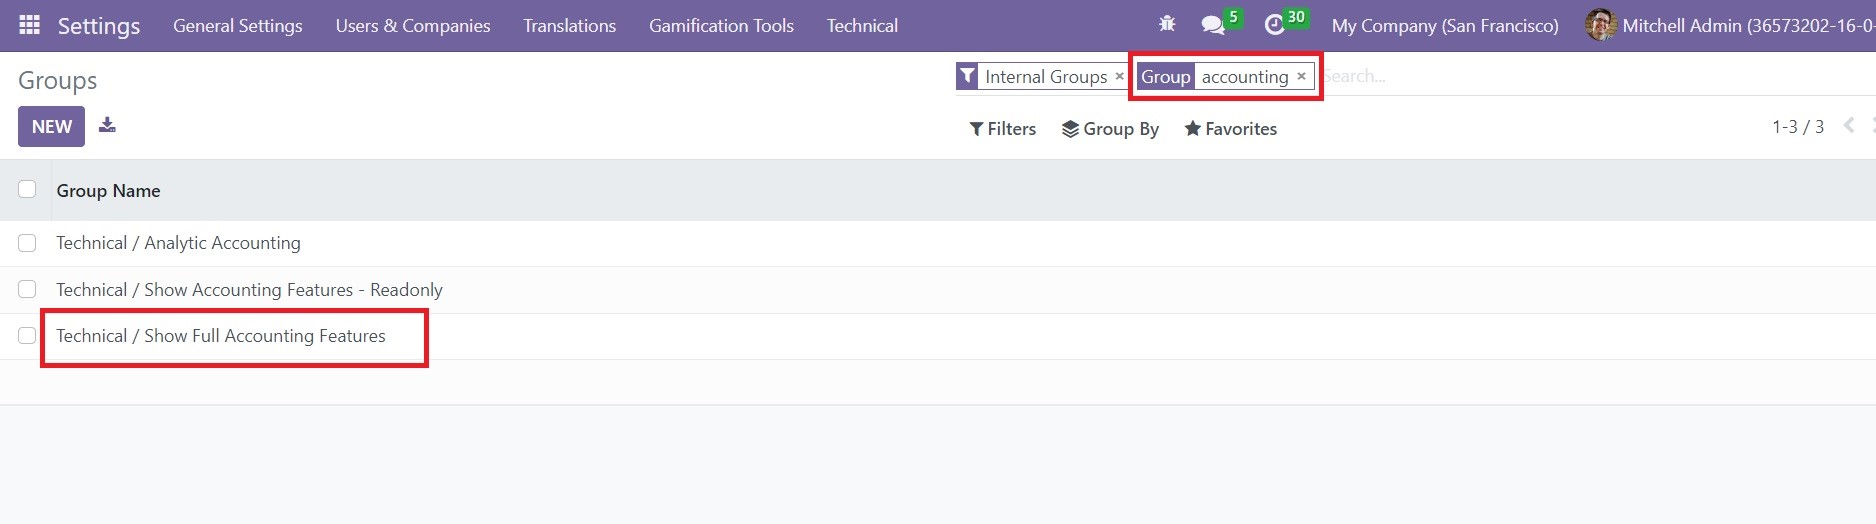
From the given list, you can select the Show Full Accounting Features option.
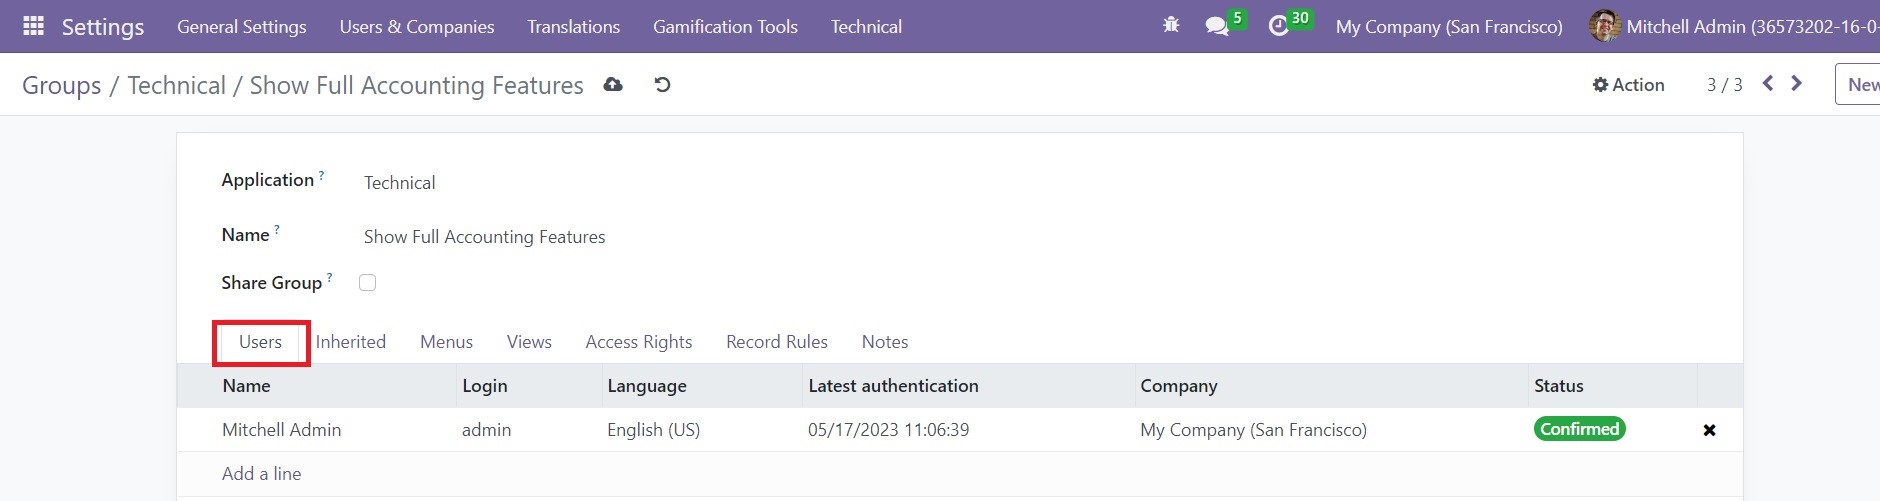
This will open a new window as shown in the screenshot above. The name of the user can be added under the Users tab. This is how we enable full accounting features in the Community edition of Odoo. Now, you can check the Invoicing module to observe the new changes.
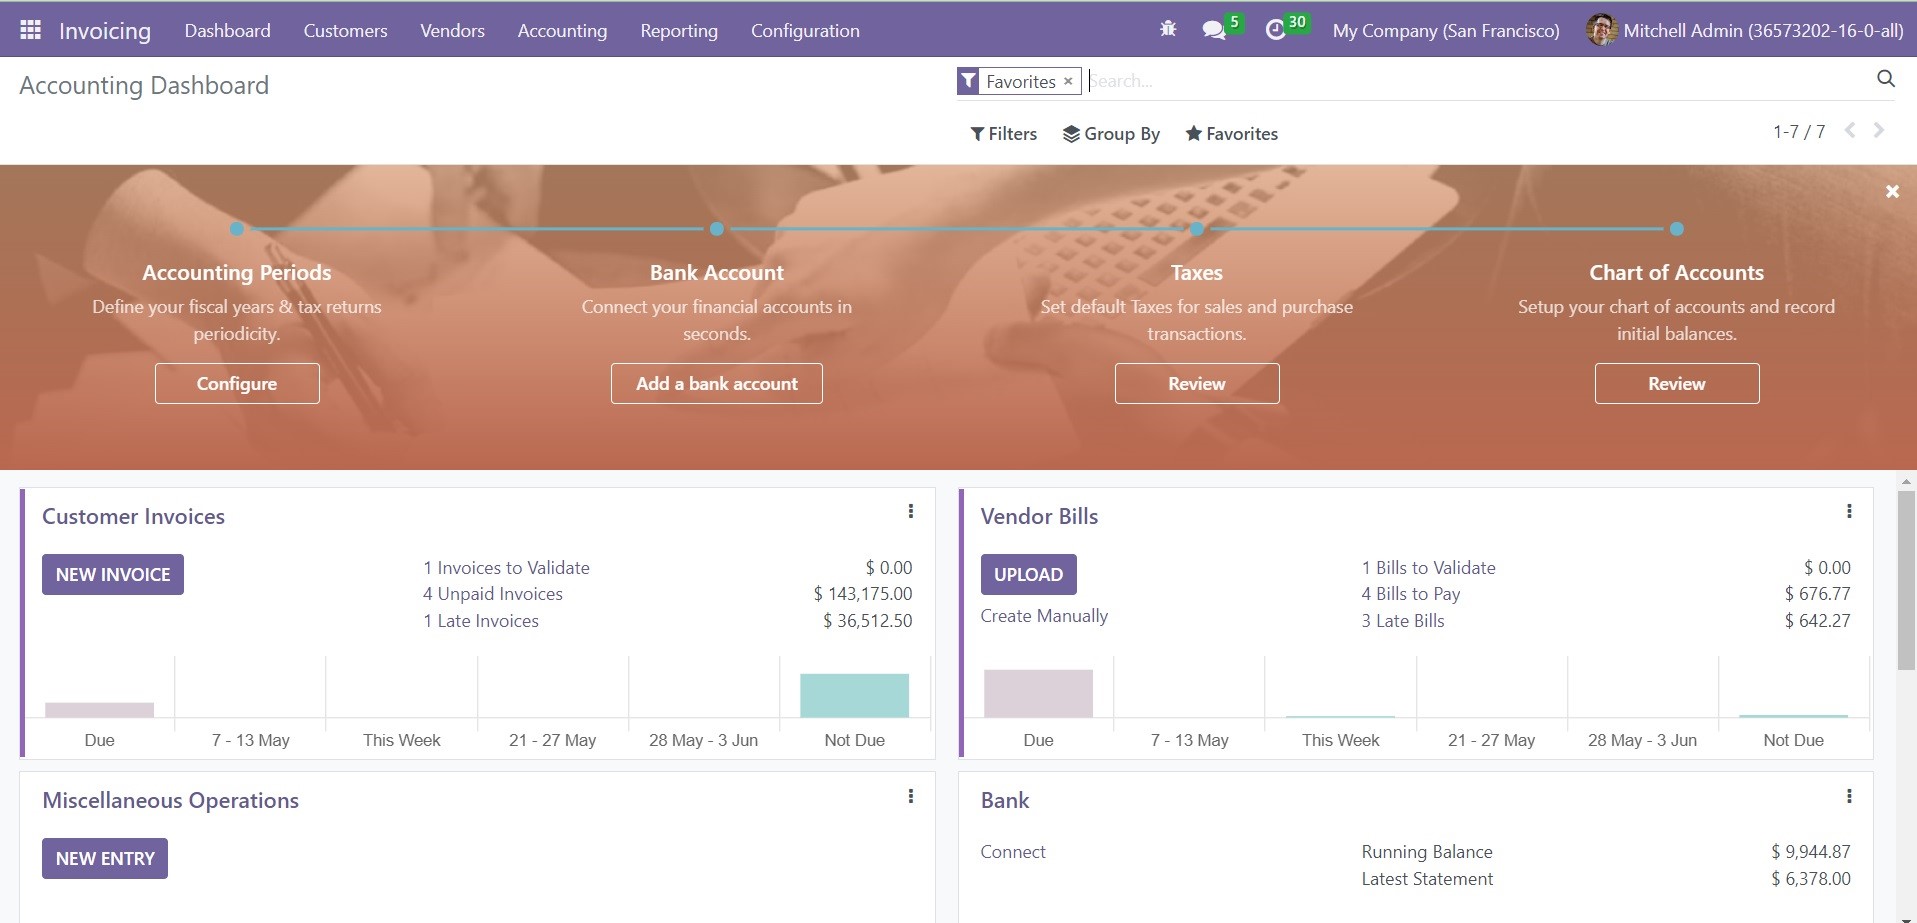
Here, you will get a new Accounting Dashboard that will provide an overview of the operations of the Invoicing module. The configuration options for Accounting Periods, Chart of Accounts, Taxes, and Bank Accounts will be available in the configuration panel. From the dashboard itself, it is possible to manage various journals of your accounting operations such as Customer Invoices, Vendor Bills, Miscellaneous Operations, Bank, Cash, Expenses, and many more.
Let’s check the journal for Customer Invoices available on the dashboard. Using the New Invoice option, you can create new invoices from this window.
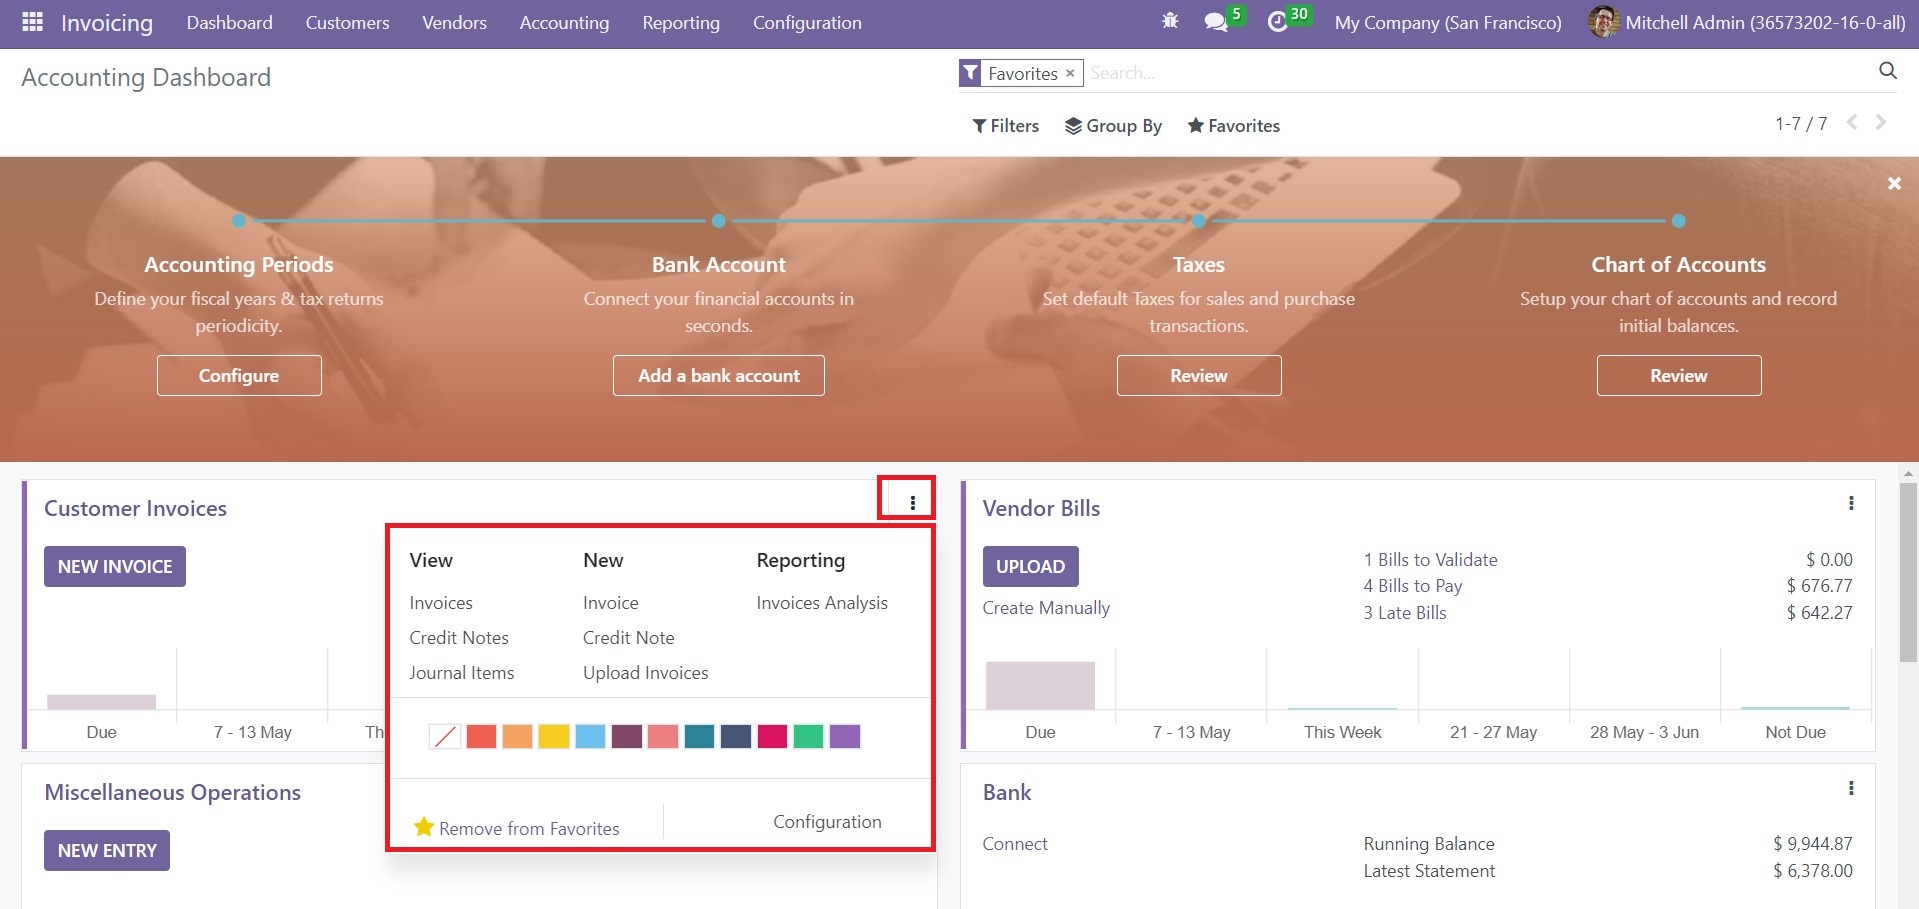
You will get additional operation tools by clicking on the three vertical dots in the right corner of the respective journal. Here, you can see the tools available for the Customer Invoices as shown in the screenshot above. You can use these options to view Invoices, Credit Notes, and Journal Items. To create a new Invoice and a Credit Note, you can use the respective options. In order to upload an invoice to your database, you can use the Upload Invoices option. You will also get the Reporting option to perform Invoice Analysis. Using this accounting dashboard, you can monitor and control operations in one place.
Configuration Panel
You can go to the Invoice menu to manage the invoices available in the module. Here, you can find a Configuration Panel, which can be used to configure the necessary details for managing an invoice.
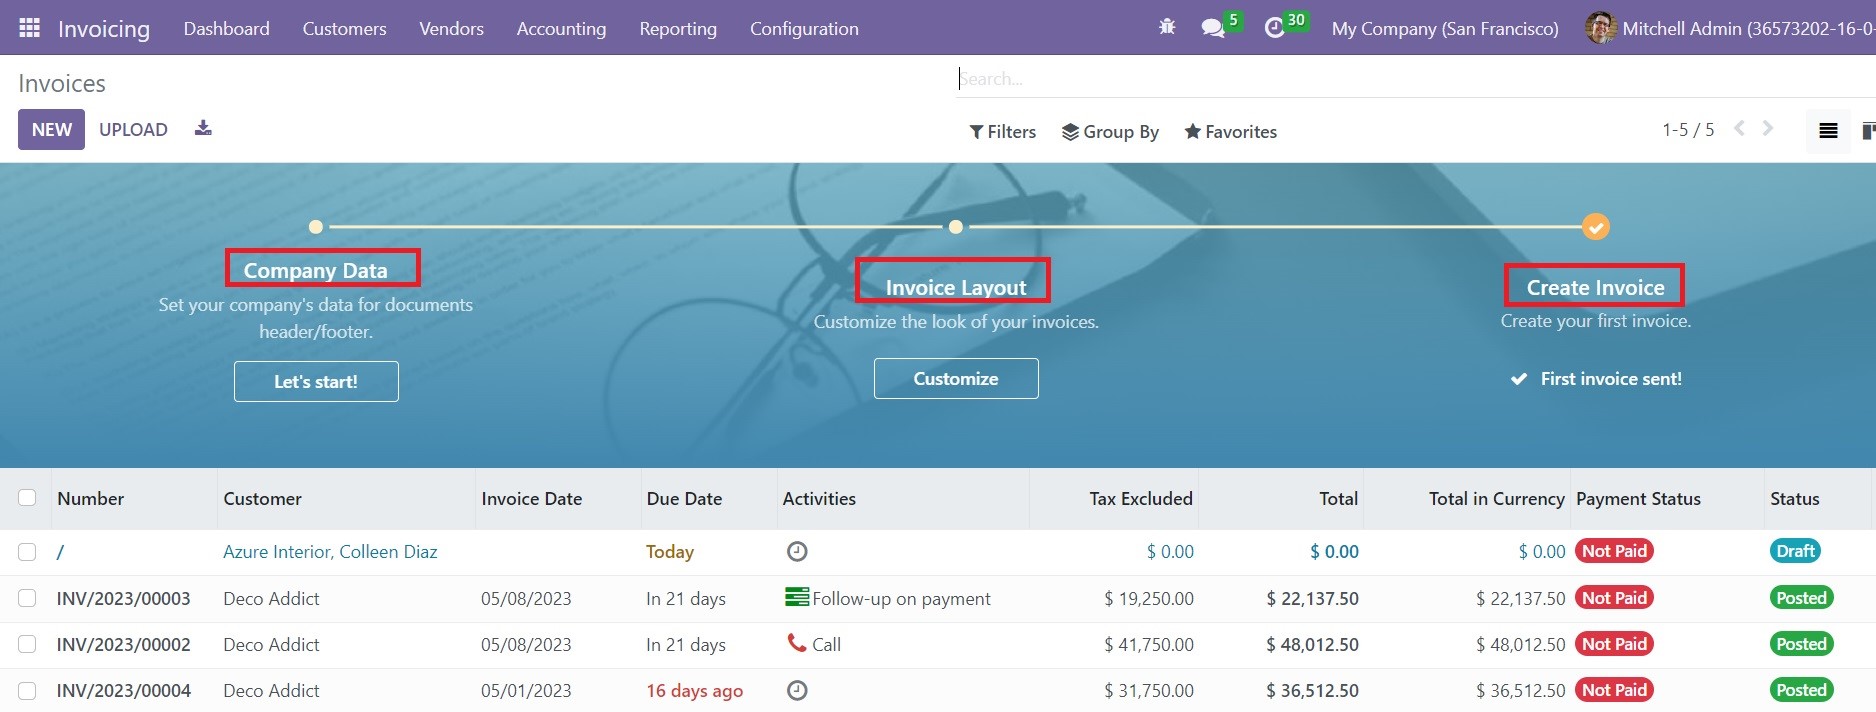
You will get options to configure Company Date, Invoice Layout, and Invoice from this panel.
In order to configure your company’s data, you can click on the ‘Let’s Start’ button. This data will appear on the header/footer of the documents that you create in this module. As shown in the image below, you will get a new pop-up window to mention the details of your company.
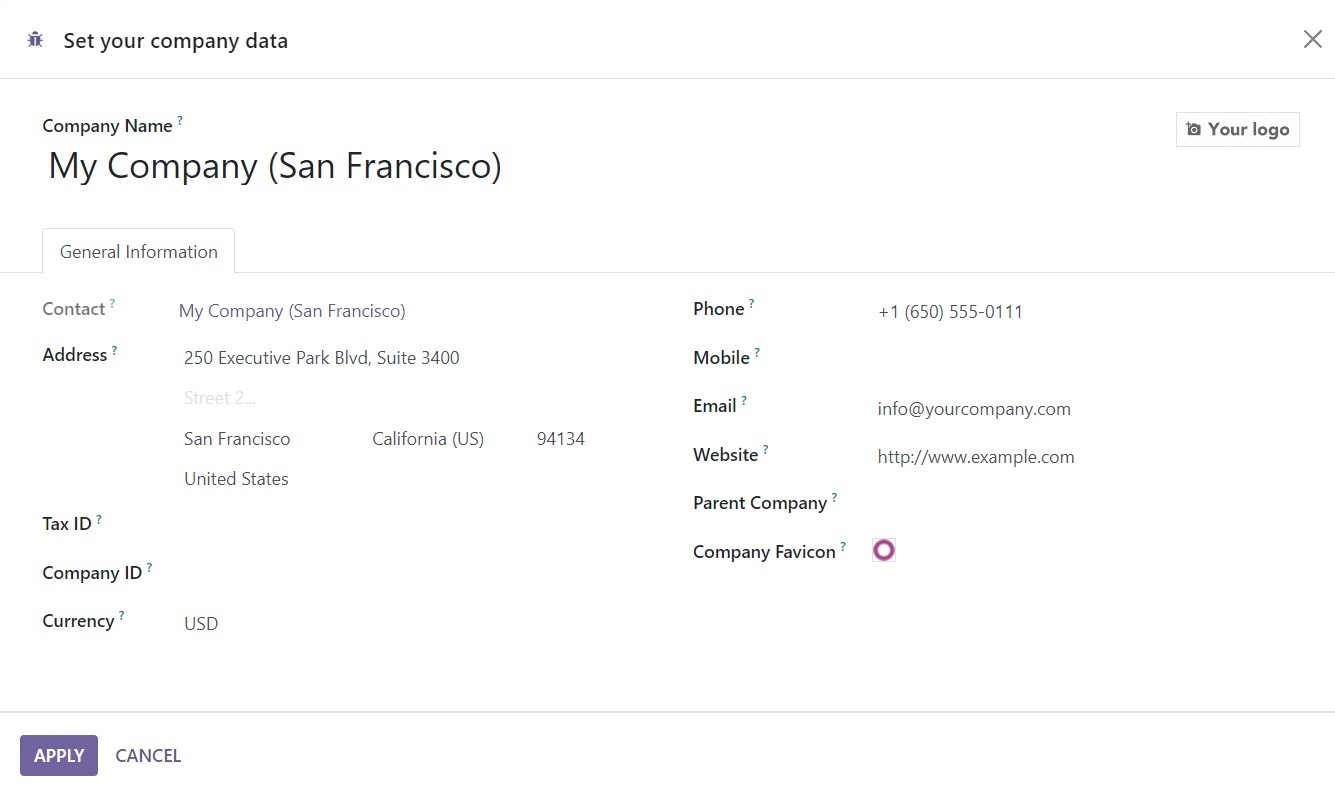
Provide the Name of the company and its Logo in the given spaces. Under the General Information tab, you can add the details of the Contact, Address, Tax ID, Company ID, Currency, Phone, Mobile, Email, Website, Parent Company, and Company Favicon. Use the ‘Apply’ button once you complete the configuration. These details will be saved in your system as your company’s data.
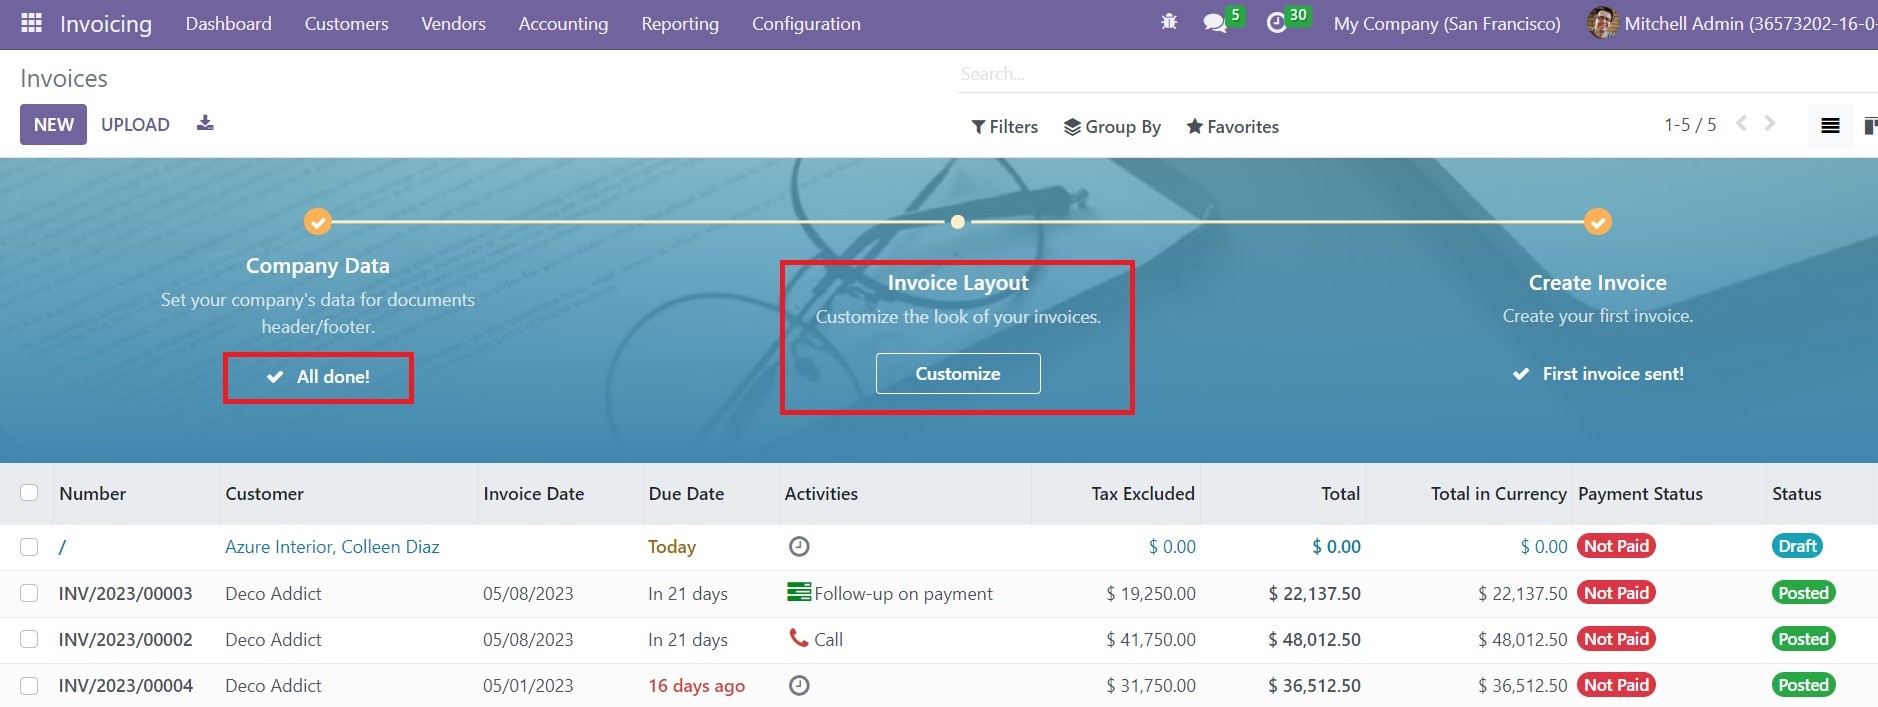
The configuration of the Company Data is completed. Now, you can customize the look of your invoices using the Customize button available in the Invoice Layout session. You can use the pop-up window shown below to customize the layout of your invoices.
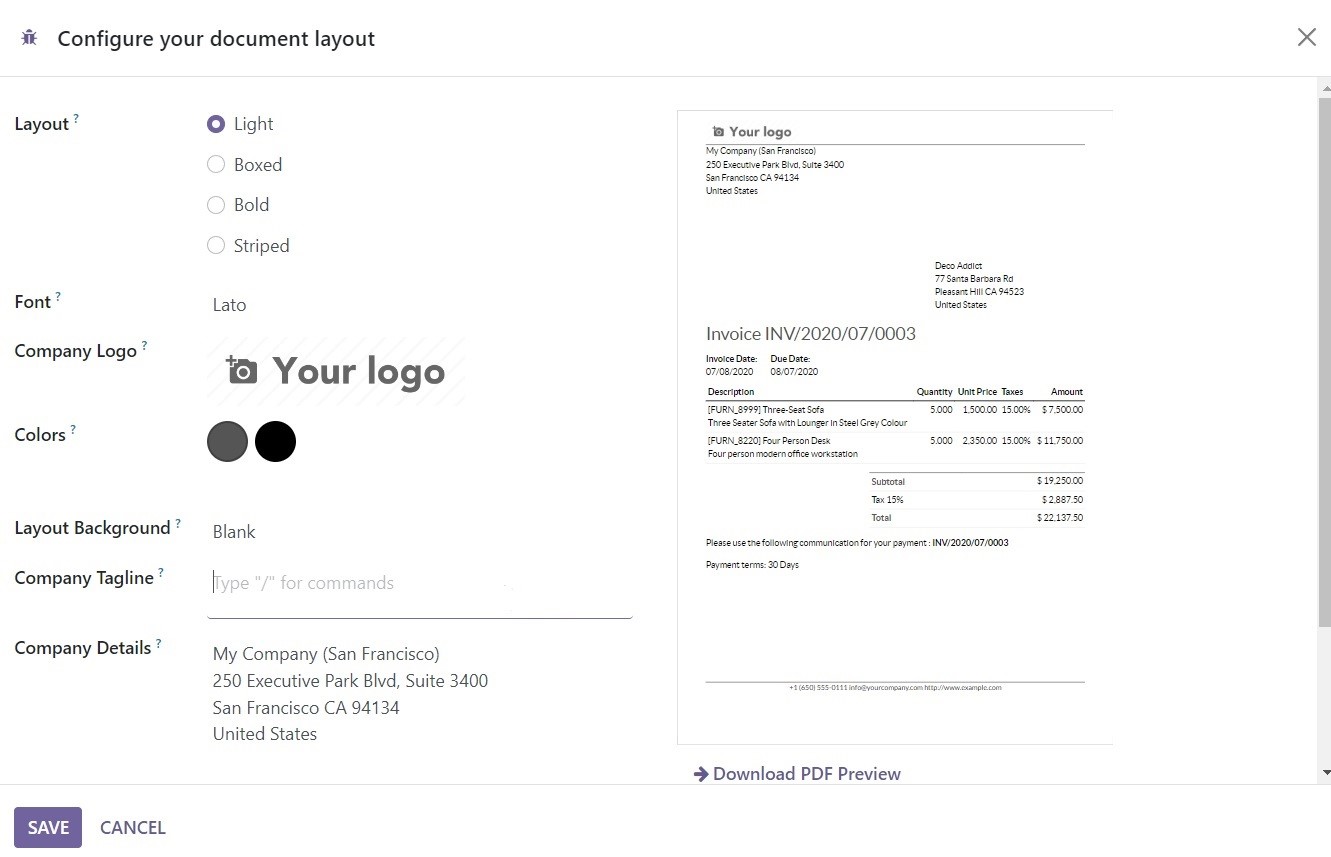
From the given options, you can select suitable Layouts for your invoices. It can be Light, Boxed, Bold, or Stripped. In the given spaces, define the Font, Company Logo, Colors, Layout Background, Company Tagline, and Company Details. Based on the options you select, a preview will be displayed on the right side of the window. After selecting the layout according to your demand, you can click on the Save button. Once you complete the configuration, you can create new Invoices on this platform.
Customer Invoices
In the Odoo Invoicing module, you will get a dedicated platform to manage all your invoices. Odoo offers multiple methods to automate the invoicing creation processes in accordance with the operations you manage and the module you use. For example, Odoo will automatically create a draft invoice in the Sales module when you confirm a sales order. The details available in the draft invoice are auto-populated based on the sales order. You don’t need to enter details manually in this case. All you need to do is validate the invoice and send it to the concerned customer. The Customer Invoices menu available in the Odoo Invoicing module will collect and record all such invoices from different modules. You can use this platform to manage all such invoices at one place. Here, you can create new invoices manually also.
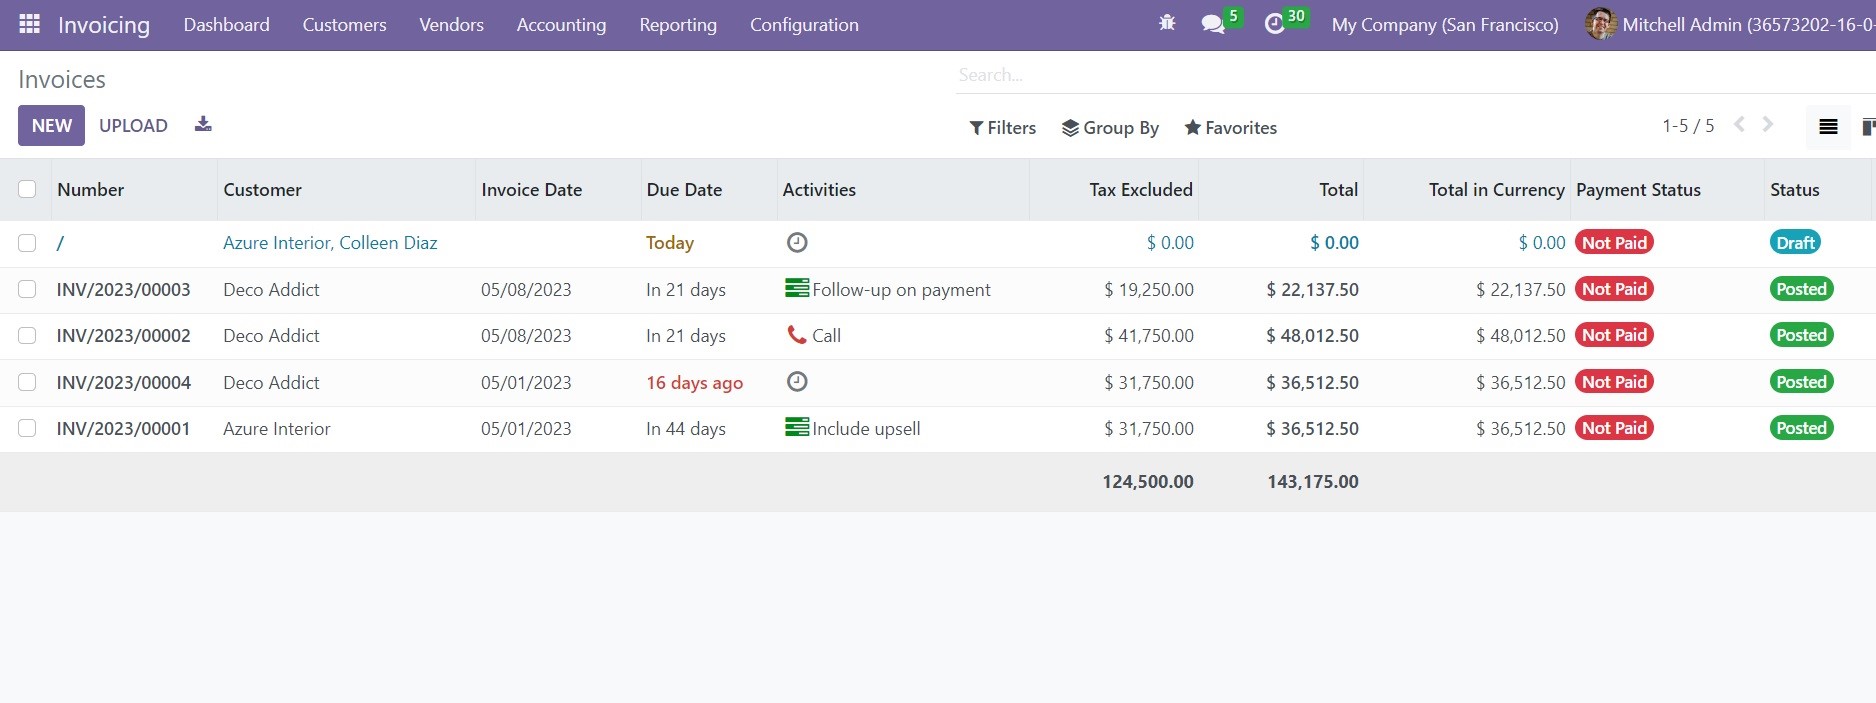
The screenshot above shows the list view of the Invoices recorded in the module. This is the list view of the platform which gives a preview of the Number, Customer, Invoice Date, Due Date, Activities, Tax Excluded, Total, Total in Currency, Payment Status, and Status. This window can be viewed in Kanban view also by selecting the respective icon. If you wish to expand the list view with more information, you can click on the icon shown in the screenshot below.

Here, you will get more options to activate to add them to the list view of the invoices. The available options are Invoice Date, Due Date, Source Document, Reference, Salesperson, Sales Team, Activities, Company, Tax Excluded, Tax, Total, Total in Currency, Amount Due, Invoice Currency, To Check, Payment Status, Electronic Invoicing, and Status.
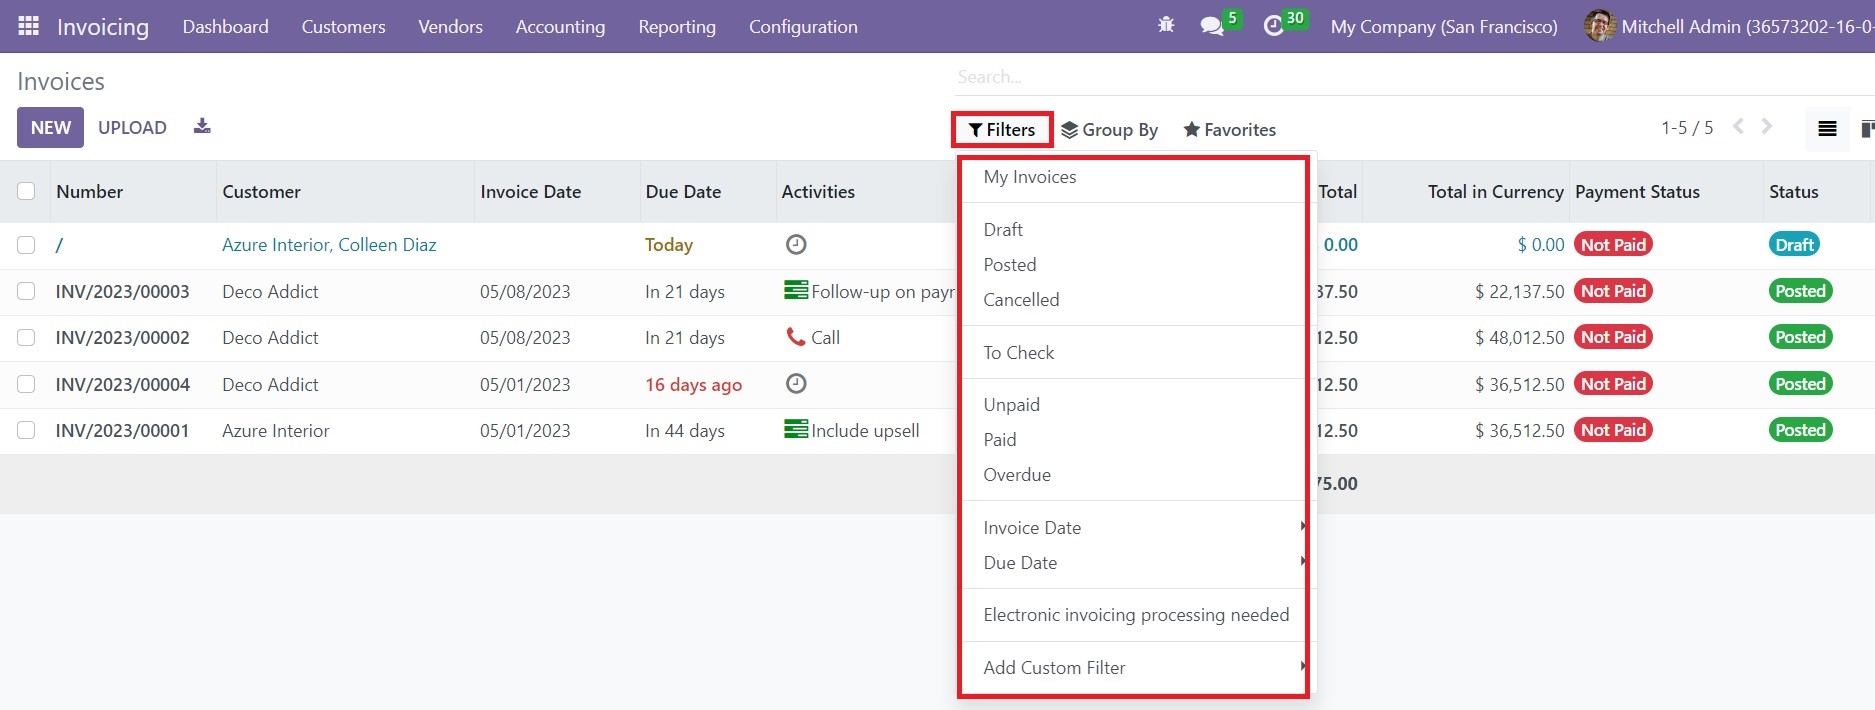
It is possible to filter the invoices based on My Invoices, Draft, Posted, Canceled, To Check, Unpaid, Paid, Overdue, Invoice Date, and Due Date using the default filters. In order to create additional filters, you can use the Add Custom Filter option.
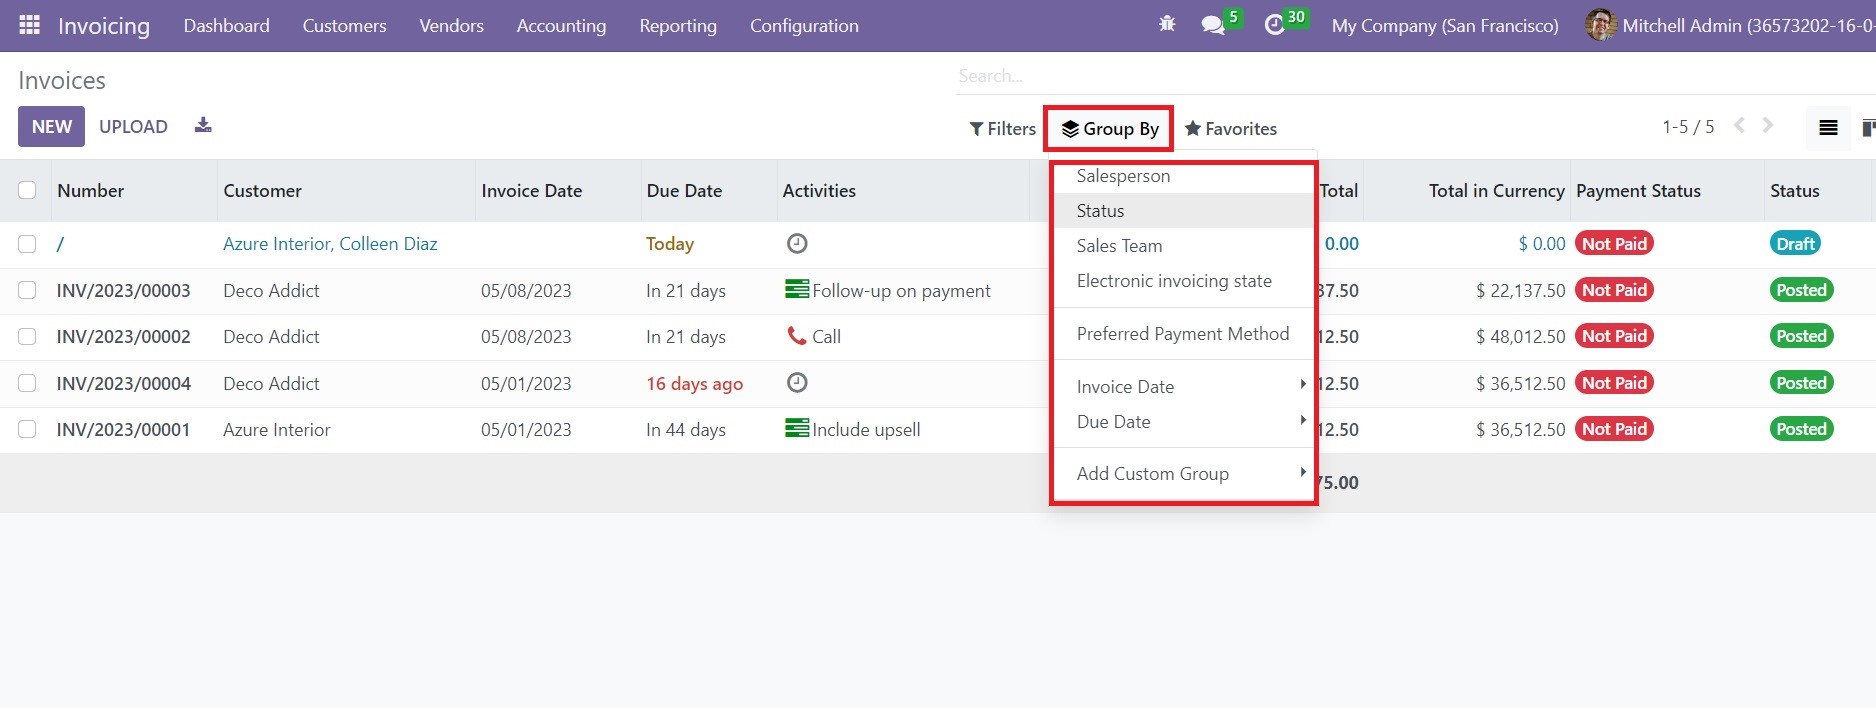
You can group the available invoices according to the Salesperson, Status, Sales Team, Electronic Invoicing State, Preferred Payment Method, Invoice Date, Due Date, and Referrer using the default Group By options. To customize the grouping options, use the Add Custom Group option.
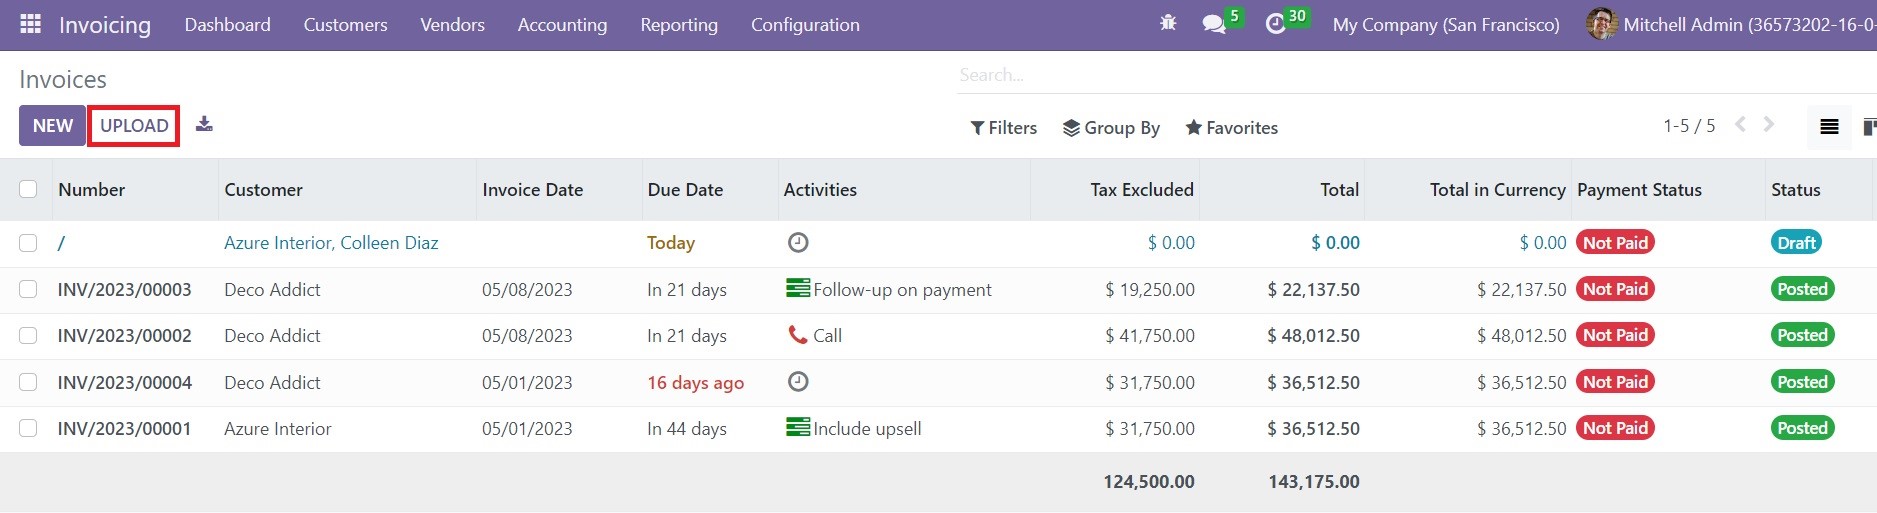
Additionally, the list will show the total invoiced amount and tax-excluded amount in the bottom of the list. The Upload button will assist you to upload the invoice from your system. The New button can be used to create a new invoice in the module.
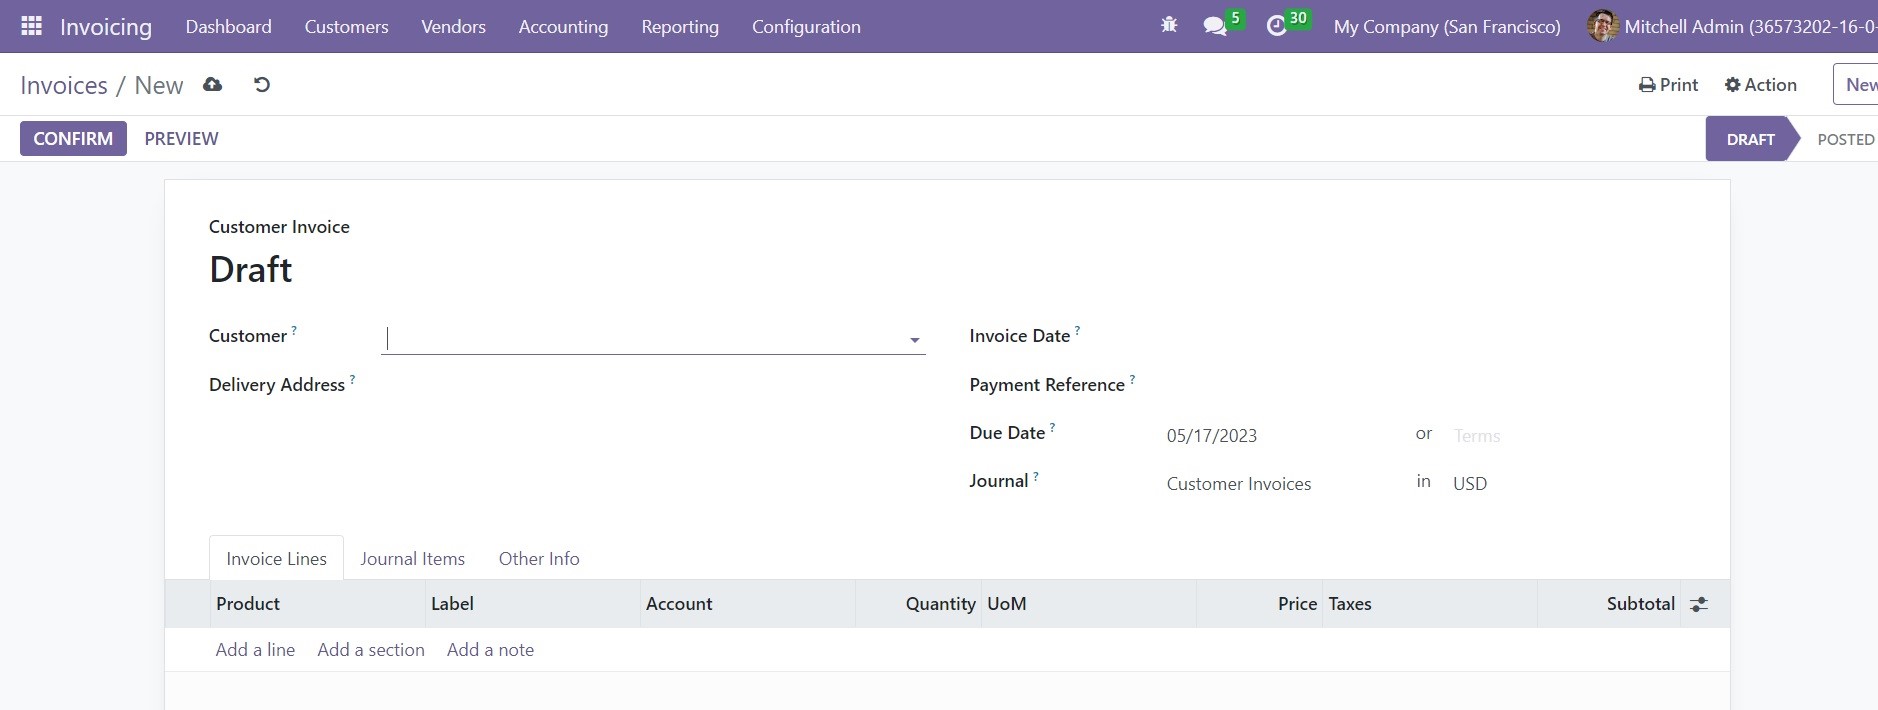
This is the form view of the invoice creation window that appears after clicking on the New button. Let’s create a draft invoice in this form. The name of the Customer and their current Delivery Address can be specified in the respective fields. The date of the invoice can be added in the Invoice Date field. You can add Payment Reference in the given field to set it on the concerned journal items. The Payment Terms will appear in the form based on the configuration as soon as you mention the Customer details. In case the payment term is not configured for the selected customer, you can set a Due Date for this particular invoice which will define the deadline for paying the invoice. Mention a suitable Journal to record the accounting details in the corresponding field.
The user will get three tabs in the invoice from view to mention the Invoice Line, Journal Item, and Other Info. In the Invoice Lines tab, you can add the product that you want to invoice using the Add a Line button. The details of the products include Product, Label, Account, Quantity, UoM, Price, Taxes, and Subtotal.
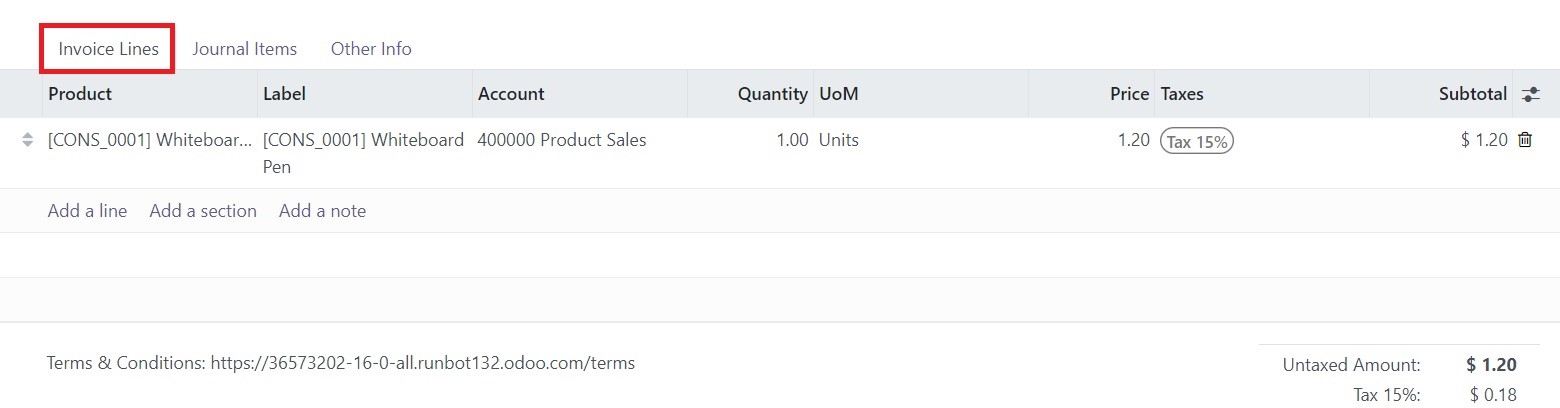
Once you complete the Invoice Line, you will get the details of the Untaxed Amount, Taxes, and Total at the bottom of the tab. You can add sections to the invoice line using the Add a Section button. In case of adding notes to this field, you can use the Add a Note option. Additionally, you will get the Terms & Conditions field in this tab to specify the terms and conditions used for this particular invoice.
The Journal Items tab will show the respective journal items in accordance with the products you mentioned in the invoice line. The fields will be auto-populated based on the journal items configured for the mentioned products.
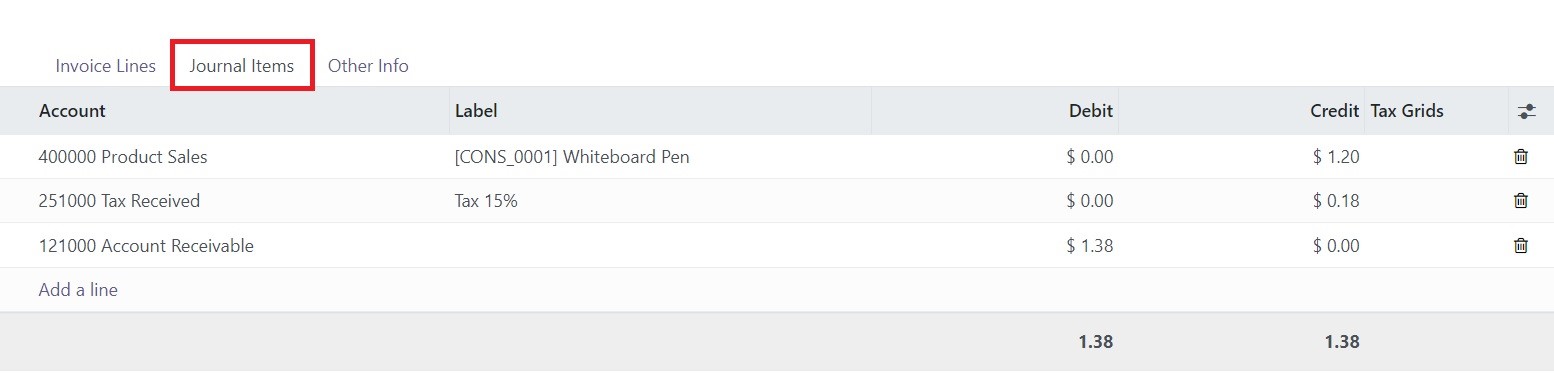
The details include the Account, Label, Debit, Credit, and Tax Grids. To add additional journal items, use the Add a Line button.
You will get the Invoice, Accounting, and Marketing fields to complete in the Other Info tab. The Customer Reference field can be used to specify the customer reference related to this particular invoice. You can assign a Salesperson and Sales Team in the respective fields to who will be in charge of managing this invoice. In the Recipient Bank field, specify the bank account details to which the invoice amount will be credited.
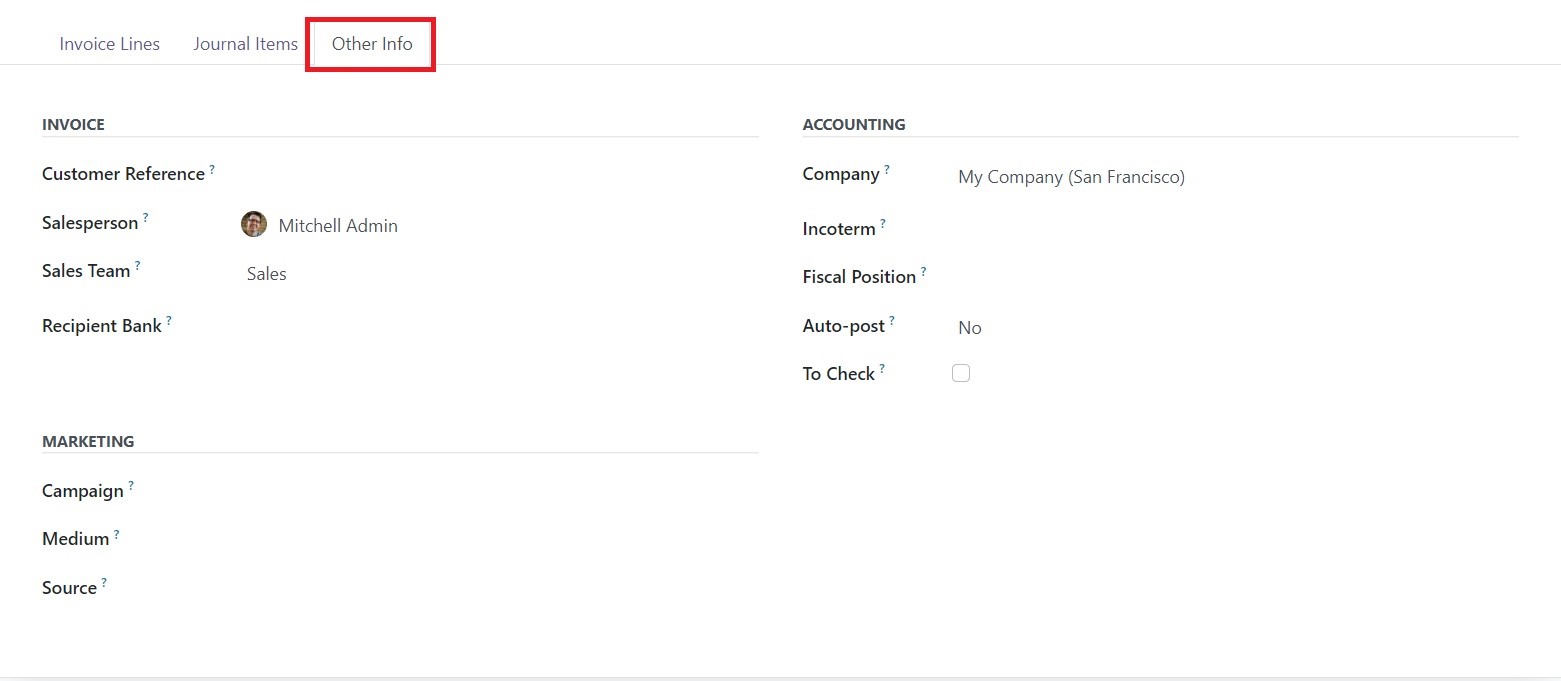
The Marketing field can be used to mention the Campaign, Medium, and Source of this invoice. The Company details will be displayed in the respective field under the Accounting section. The Incoterms used for international transactions and Fiscal Position to adapt taxes and accounts for particular customers or sales orders/invoices can be specified in the respective fields. You can post this entry automatically by selecting the period from the Auto Post field. If you want to do it manually, you can select the No option from the Auto Post field. In case, if you have doubts about the details mentioned in the invoice at the time of creation, you can activate the To Check field. Enabling this field indicates that the move needs to be checked again. The creation of the draft invoice is completed.
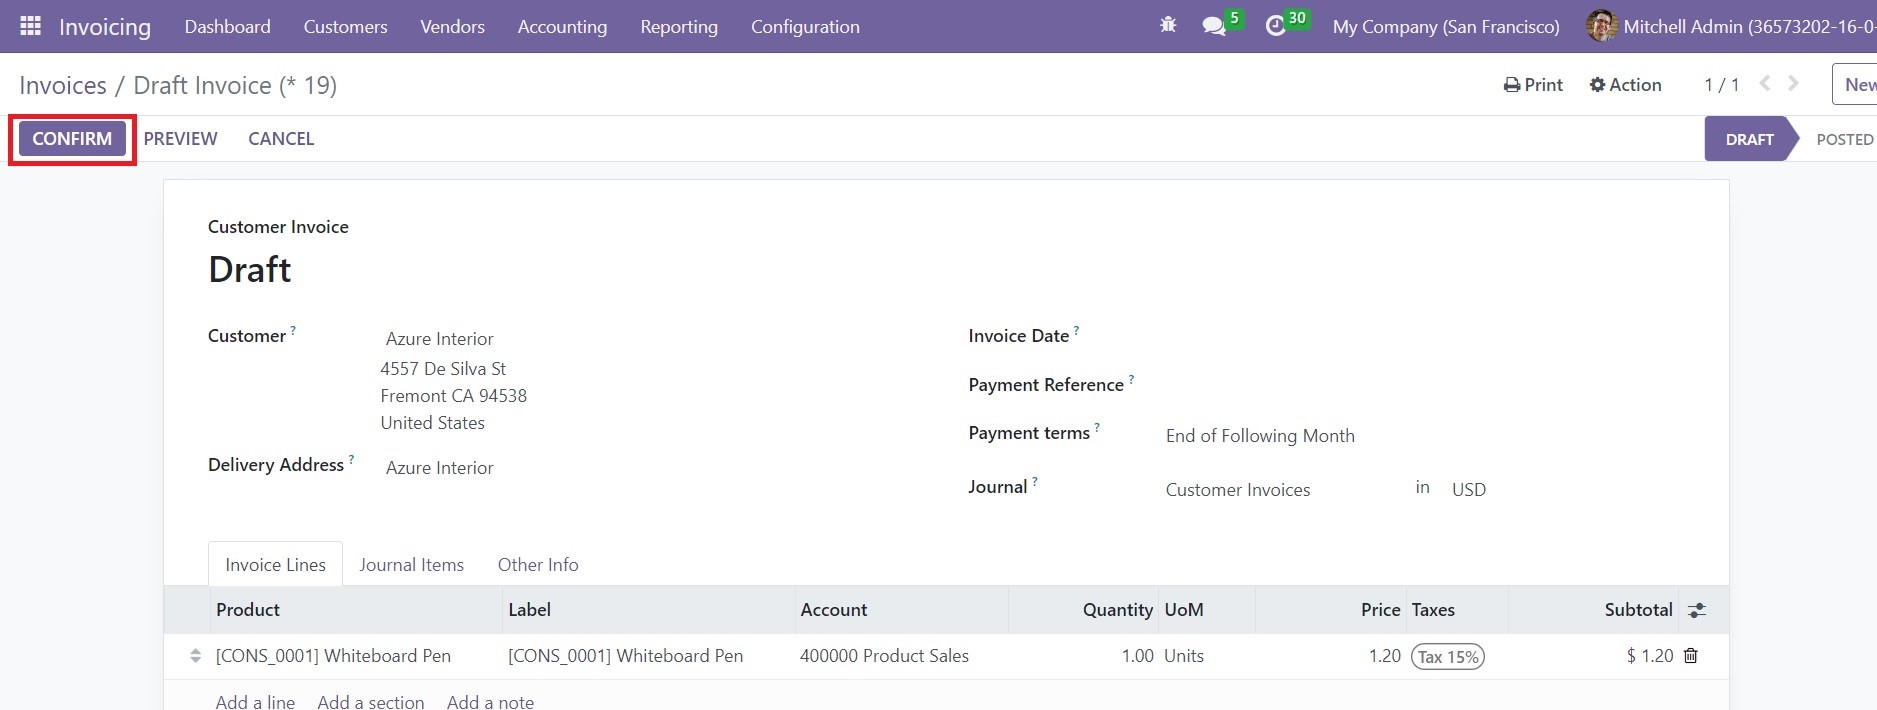
Now, you can use the Confirm button to confirm the draft invoice. The preview button will provide a customer preview of the invoice. Use the Cancel button to cancel the invoice.
Sending Invoice
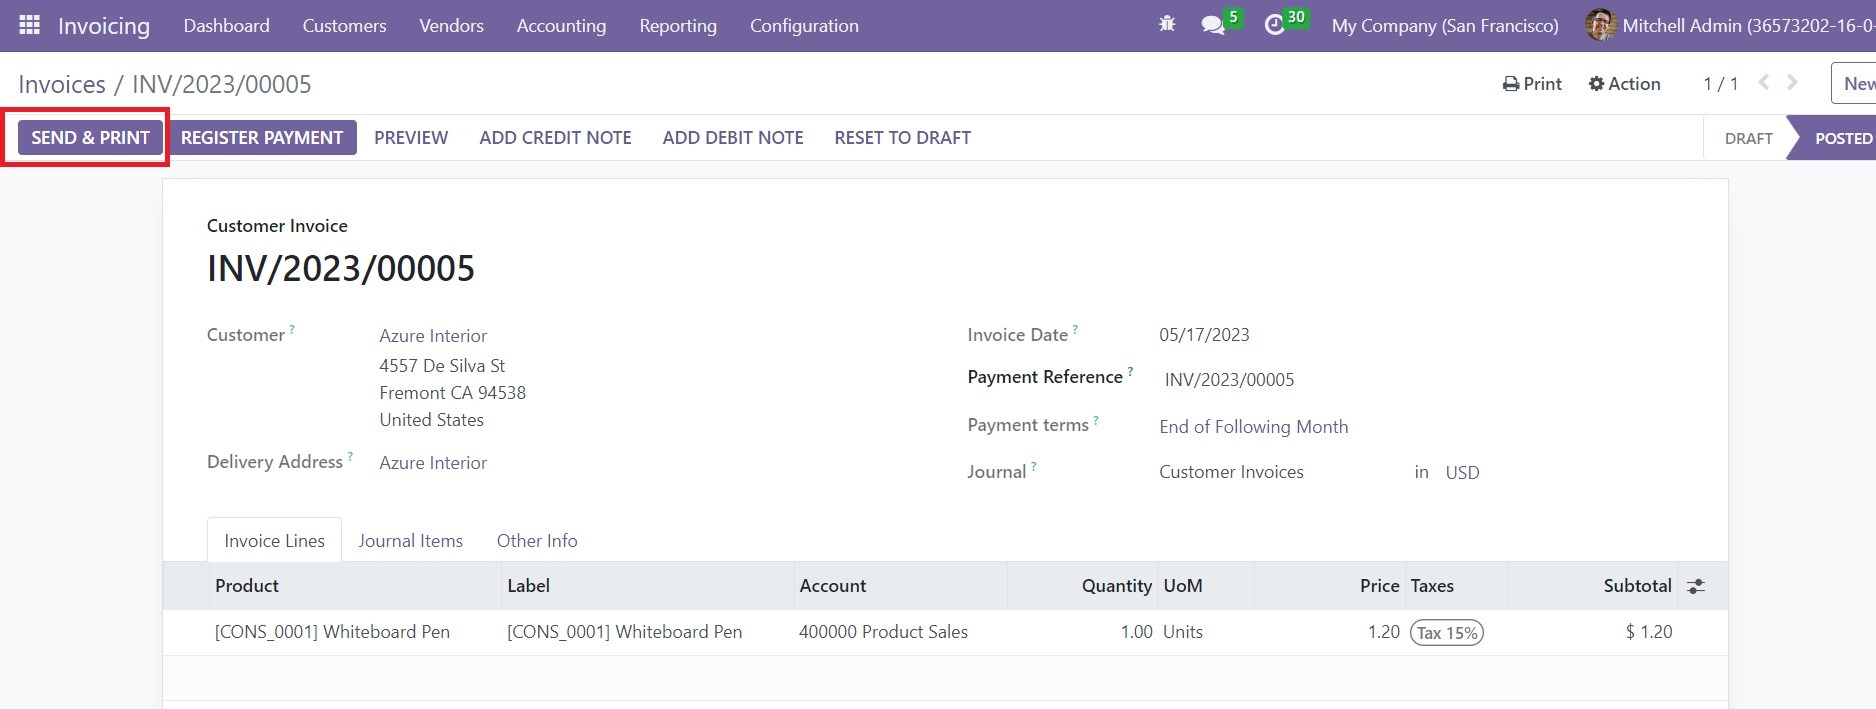
After confirming the invoice, you can send the invoice to the concerned customer. For this operation, you can use the Send & Print button available on the form view.
Clicking on this button will open an auto-generated mail as shown in the screenshot below.
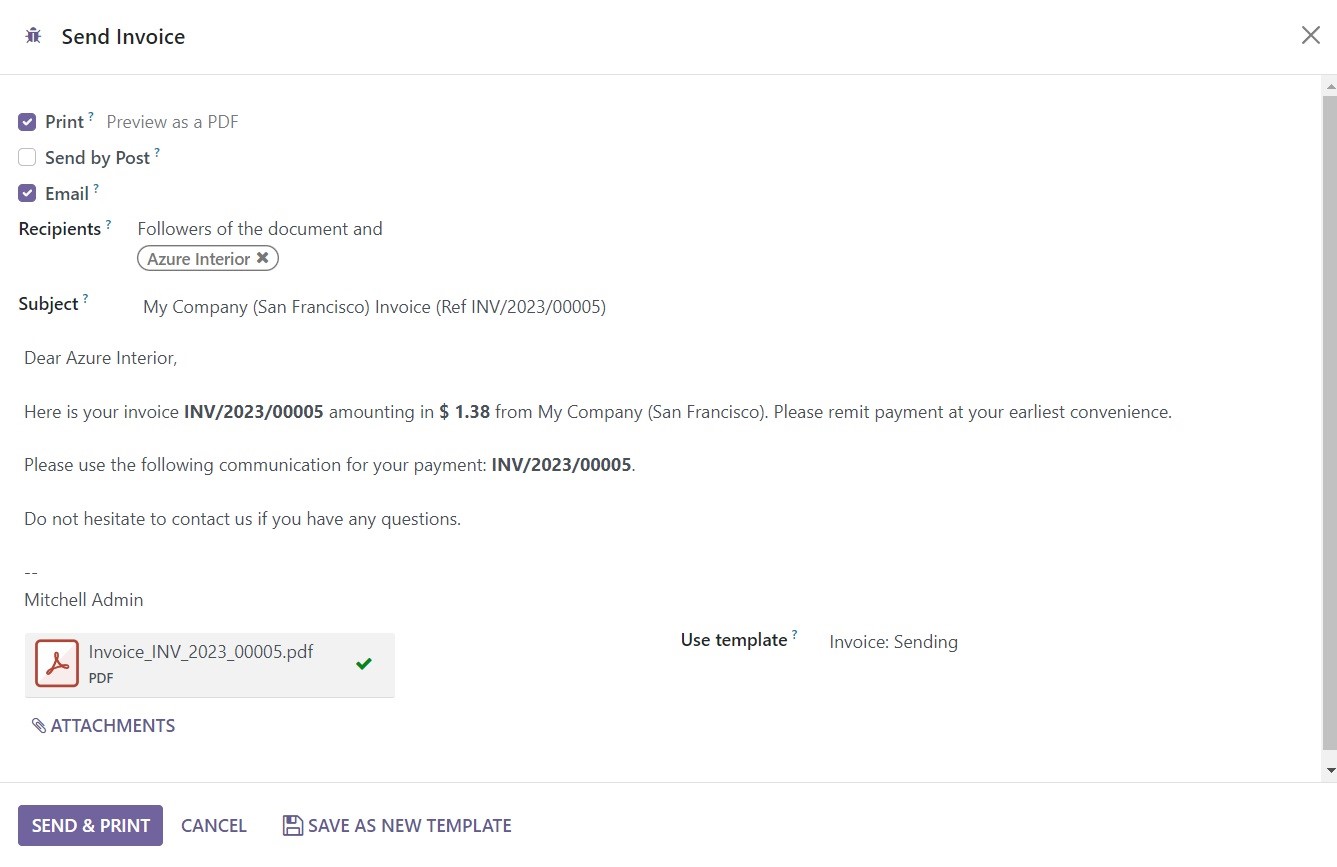
Here, you will get the details of the Recipients in the respective field. The content of the mail can be checked and edited if necessary. The newly generated invoice will be added as an attachment with the mail. You can use the Send & Print button to send this mail to the recipients. A copy of the invoice will be printed along with this.
Register Payment
Once you send the invoice to the respective recipients, the customer can check the invoice and complete the payment. Registering payment should be done after generating an invoice in the Odoo Invoicing module. The option for registering the payment will appear on the form view once you confirm the invoice.
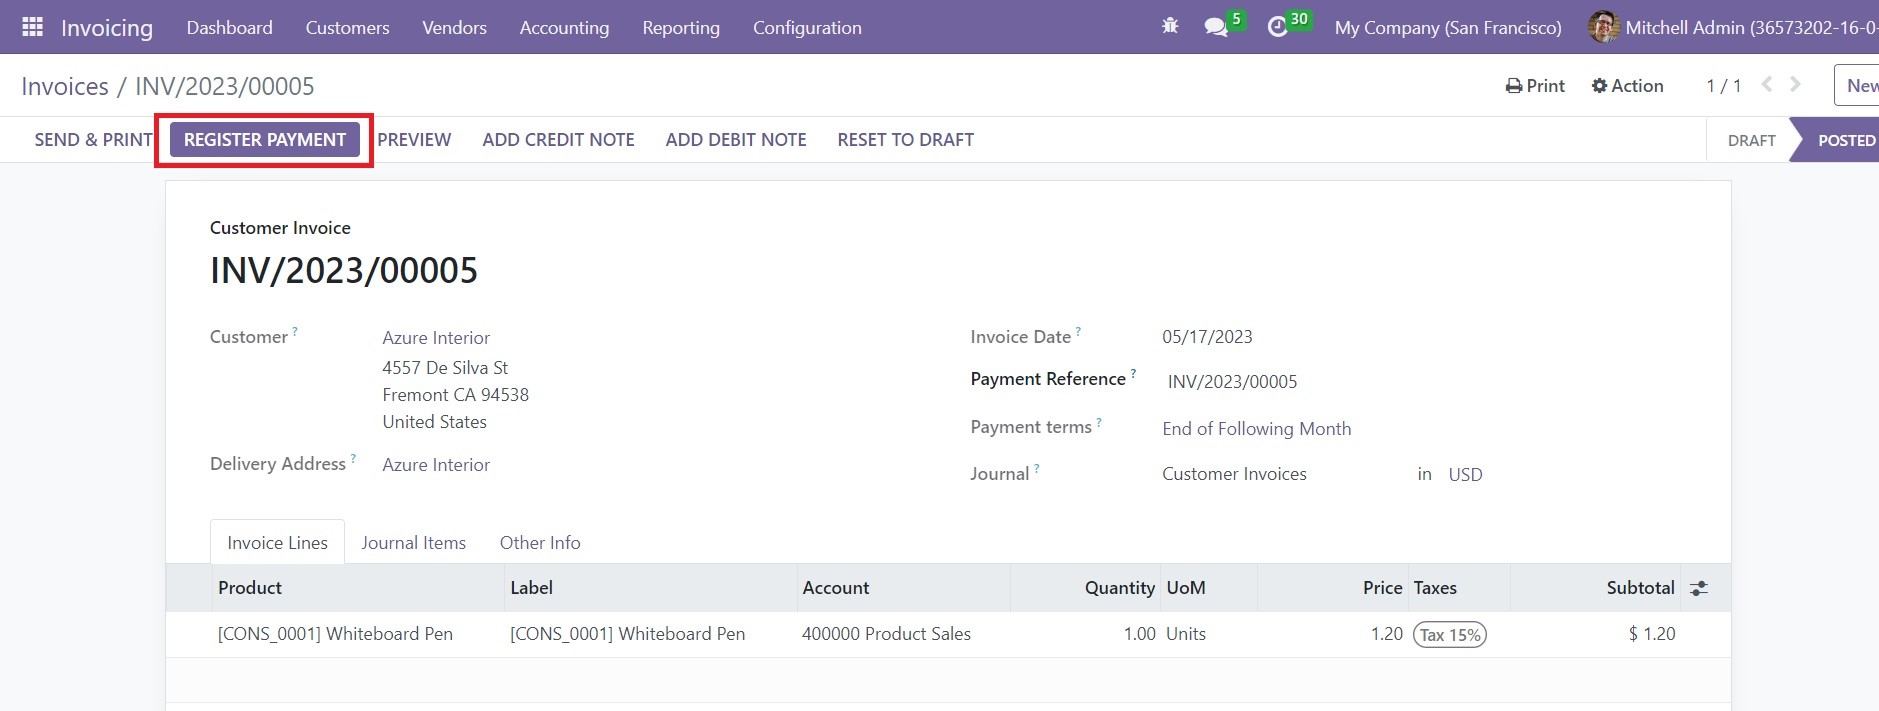
Clicking on the Register Payment button will open a new pop-up window as shown below.
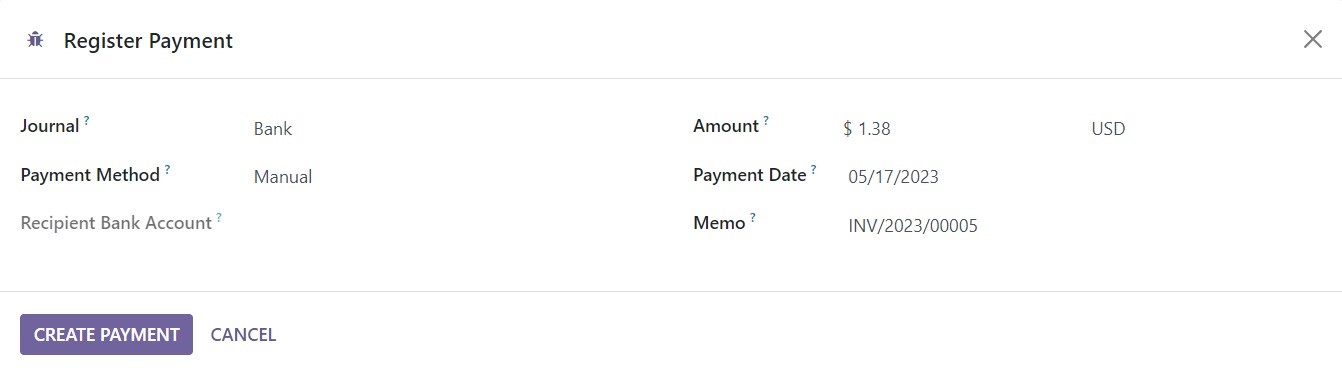
The Register Payment window will show the details of the Journal, Recipient Bank Account, Amount, Payment Date, and Memo. The payment will be registered in the journal specified in this window. After checking the details, you can click on the Create Payment button.
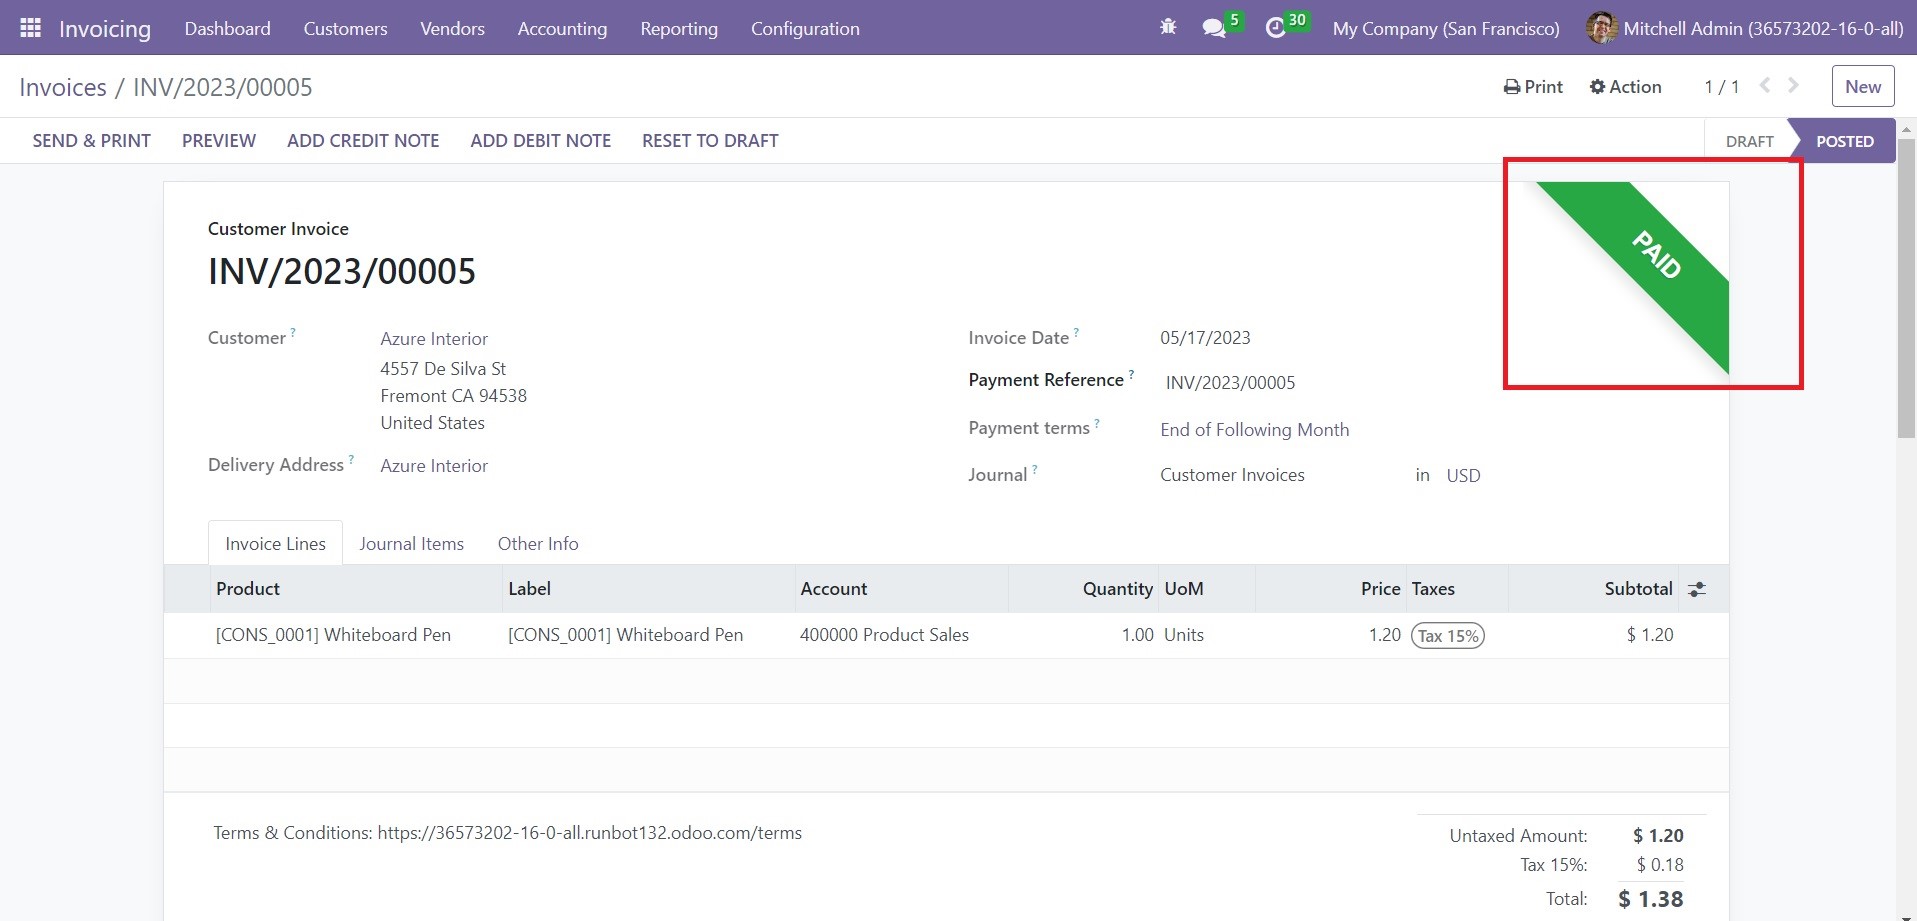
Once you complete this step, you can find the status of the corresponding customer invoices as paid.
In order to manage all such payments, you will get a specified platform under the Customers menu of the Invoicing module. This platform will record all customer payments in Odoo.
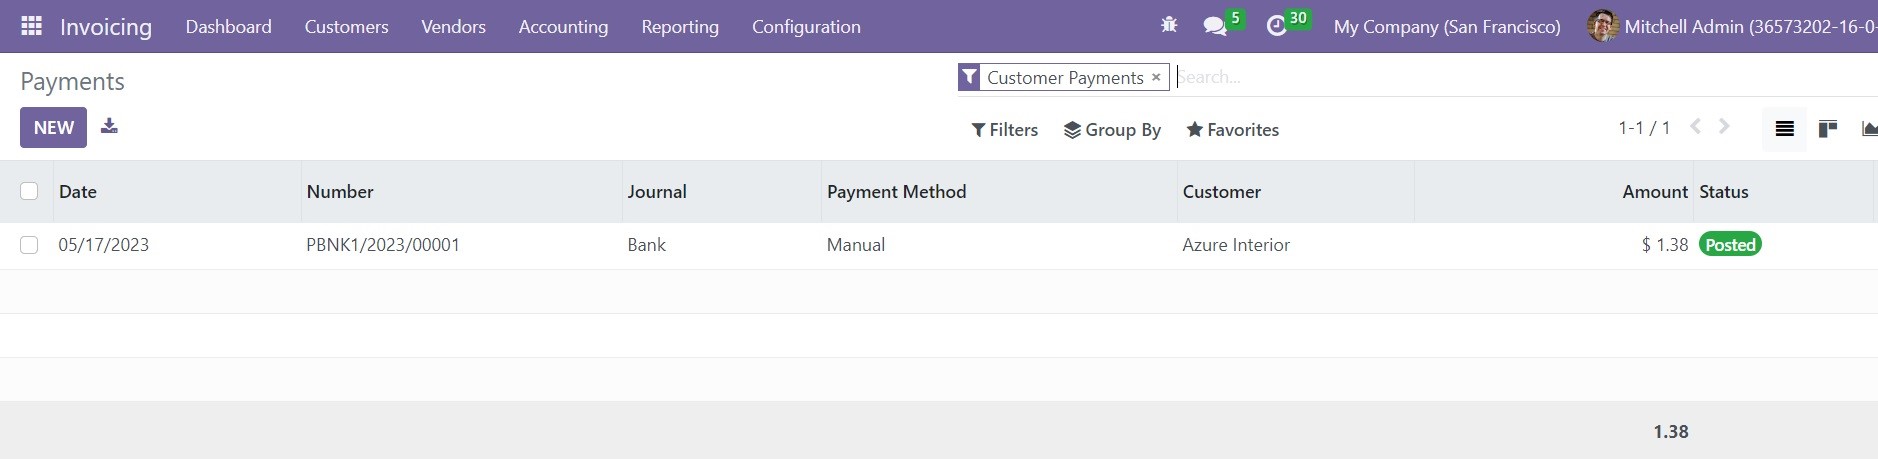
The list view of the Payments is shown above. The preview of the list includes the details of the Date, Number, Journal, Payment Method, Customer, Amount, and Status of the payment. You can also shift the view into Kanban and Graphical views.
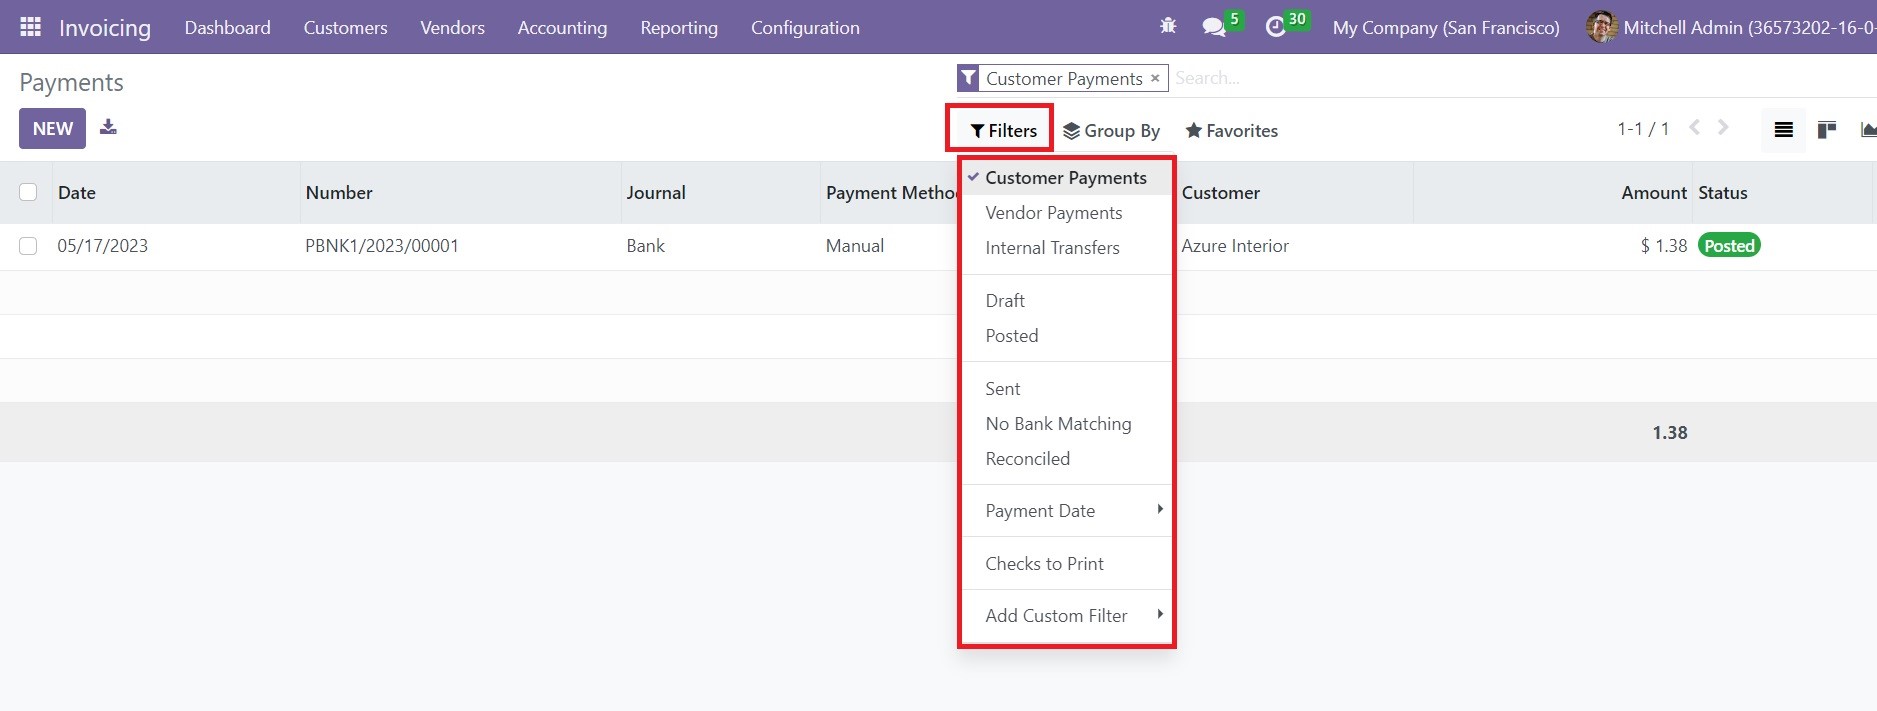
Here, you can use Customer Payments, Vendor Payments, Internal Transfers, Draft, Posted, Sent, No Bank matching, Reconciled, Payment Date, and Check to Print as default filters. Use the Add Custom Filter option to create filters according to your demand.
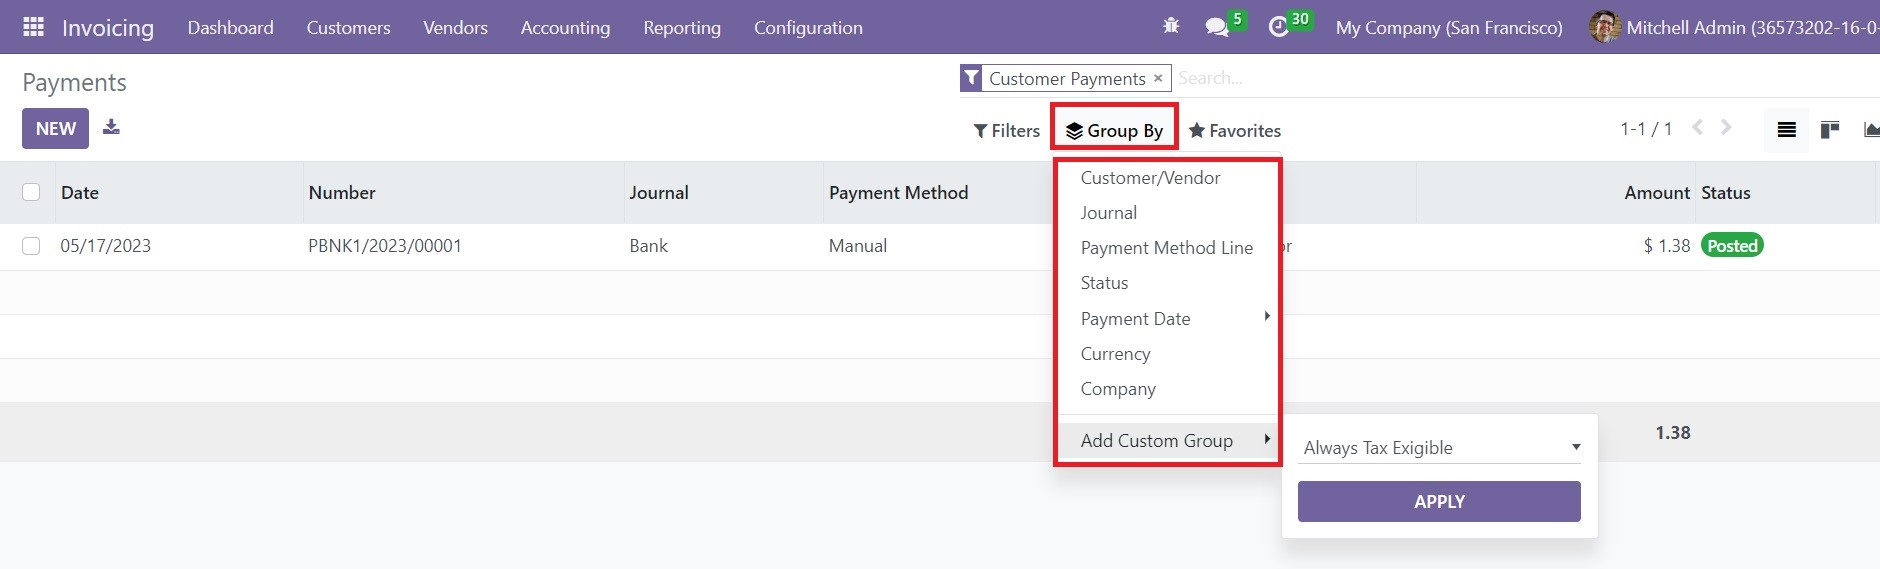
In the Group By option, you will get Customer/Vendor, Journal, Payment Method Line, Status, Payment Date, Company, and Currency. Now, you can click on the New button to register a new payment from your customer. As shown in the image below, a new form view will appear where you can add details related to the payment.
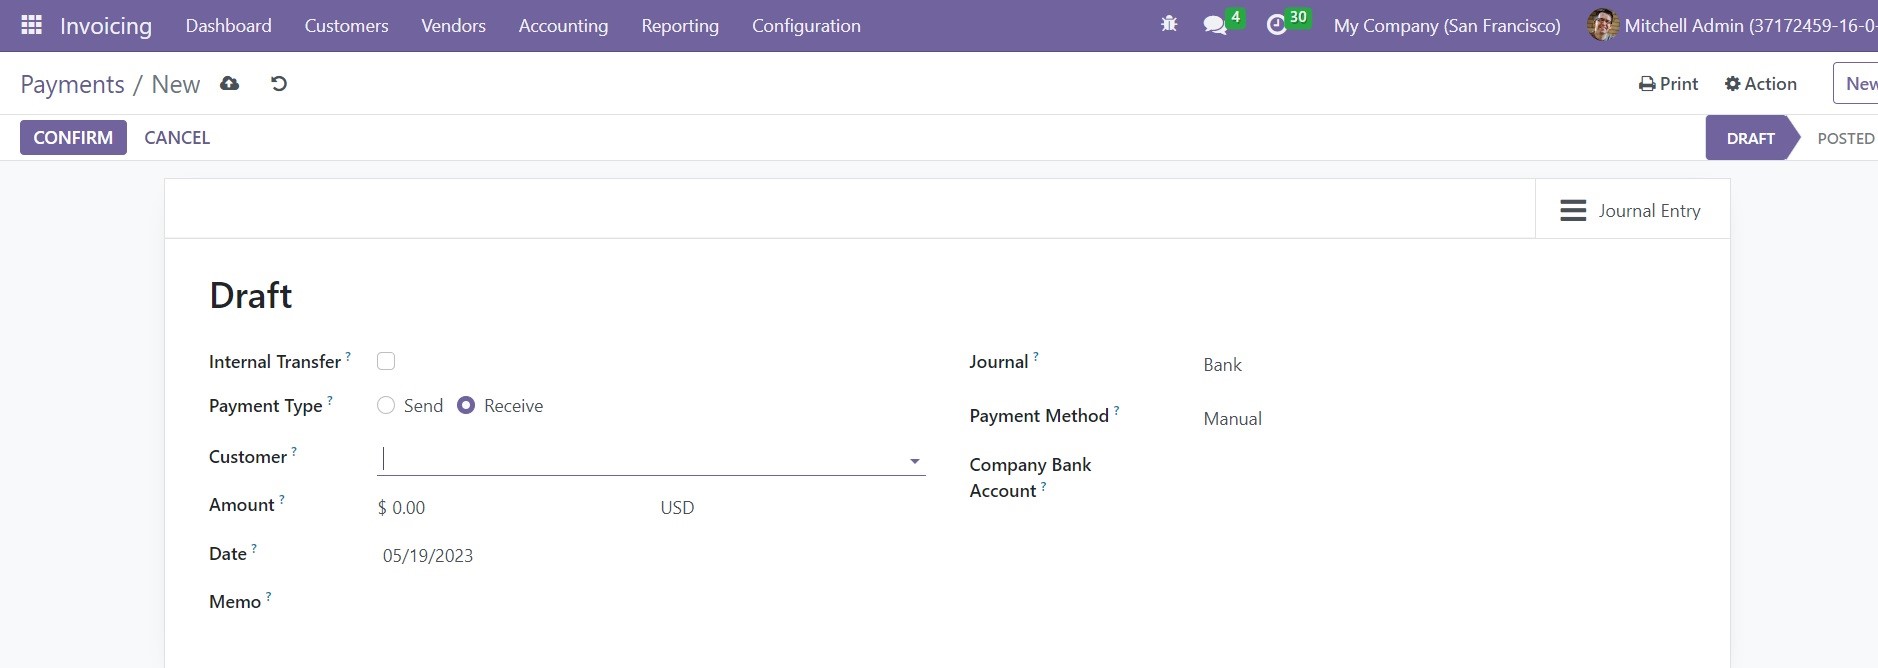
If you are registering this payment for a transaction within the company, you can activate the Internal Transfer option. For customer payment, the Payment Type will be marked as Receive. You can specify the name of the Customer, Amount of the bill, Date, Memo, Journal to record the transaction, Payment Method, and Customer Bank Account in the corresponding fields. Once you mention the required details, you can confirm the payment using the Confirm button.
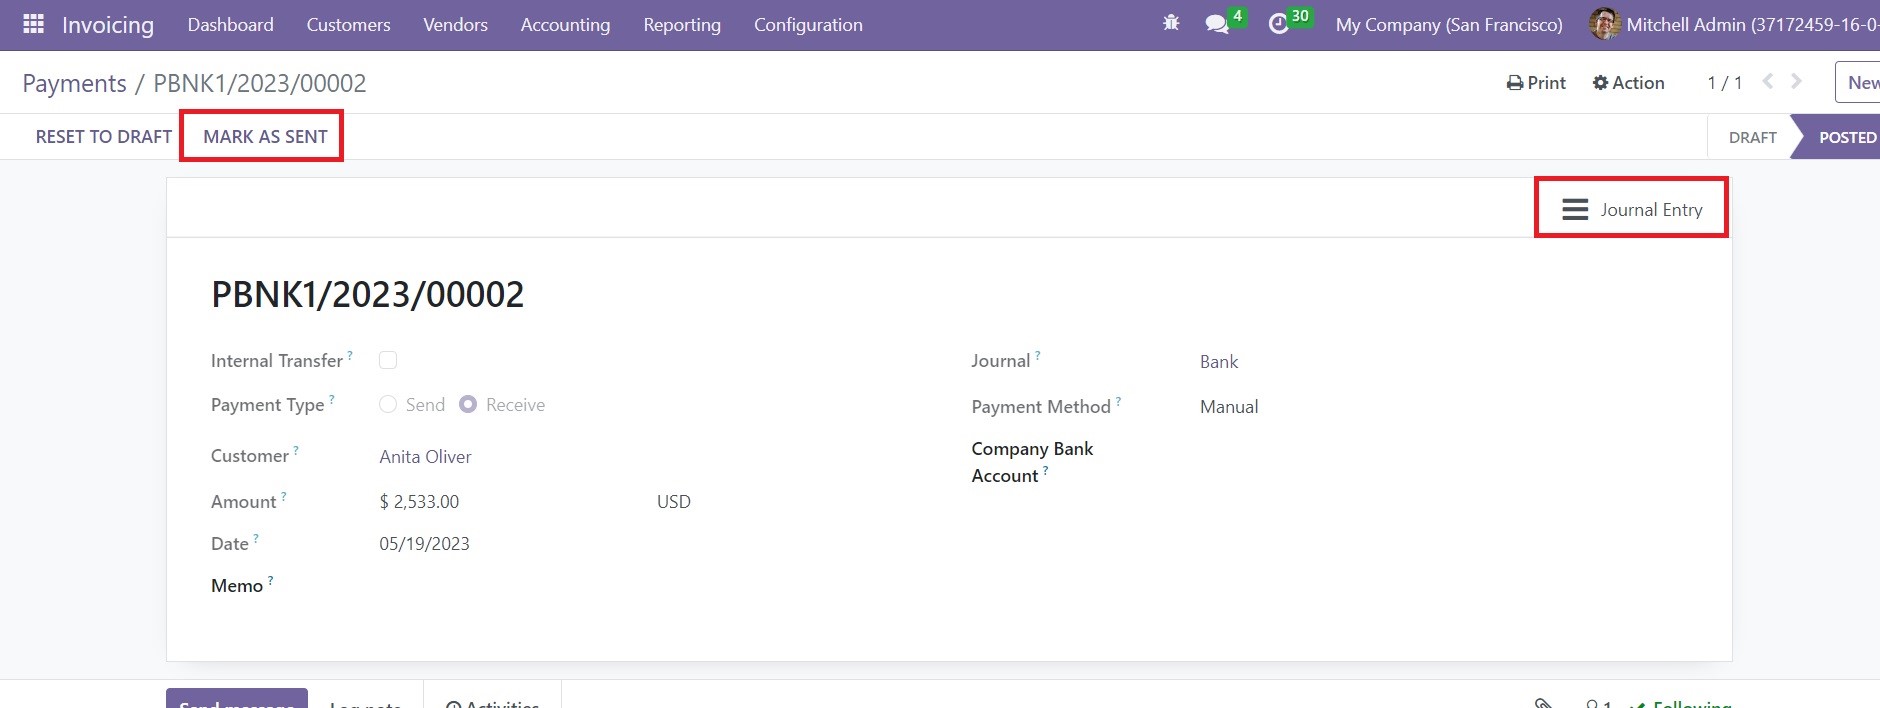
The window will show the Journal Entry smart button where you can observe the correposing journal entries recorded in the Odoo for this particular payment. If you have already sent the details of the payment to the respective customer, you can click on the Mark as Sent button.
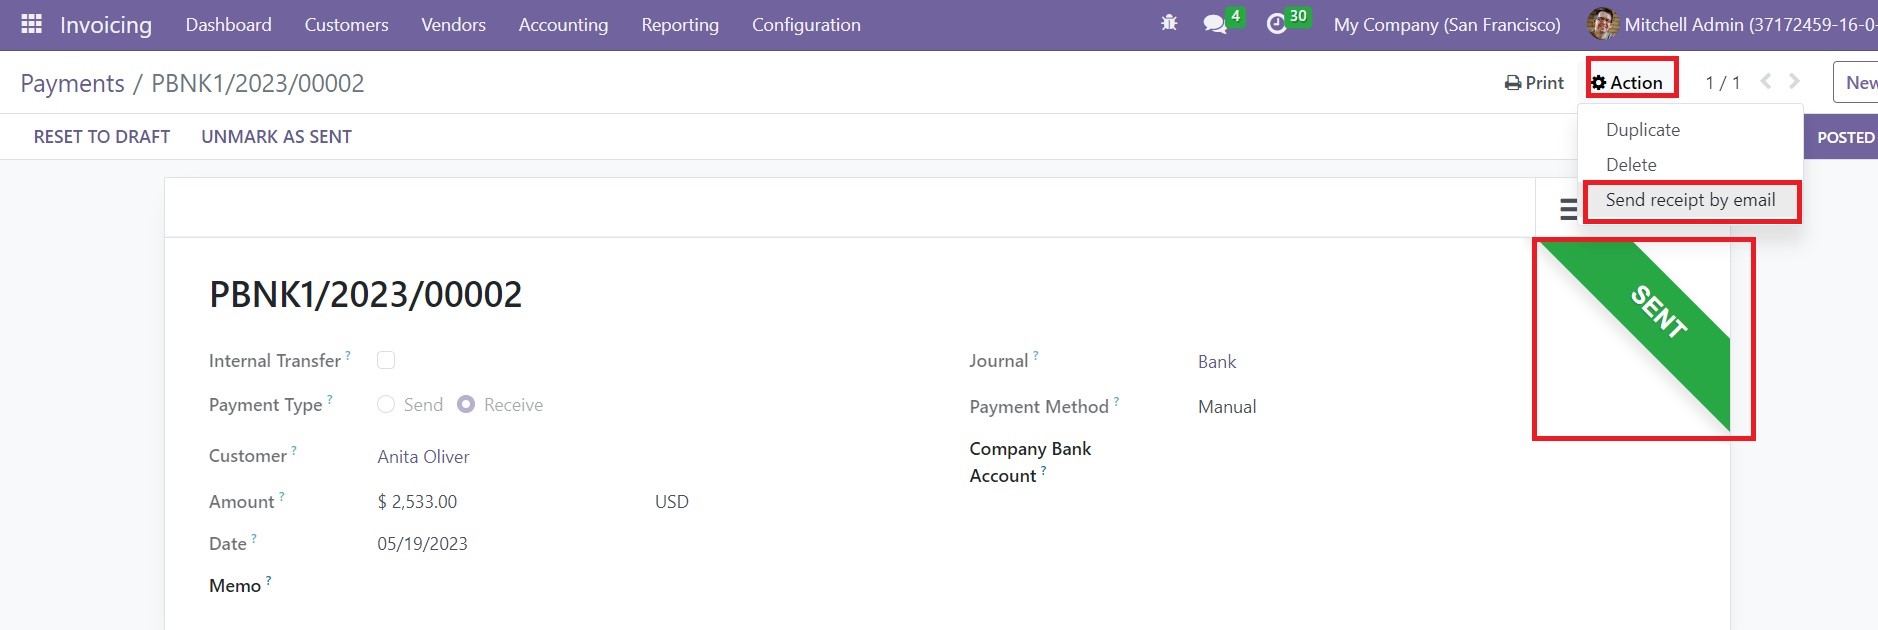
In the Actions menu, you will get the Send Receipt By Email option that will help you to send the receipt of the payment to the concerned customer via mail. This is how we manage customer payment in Odoo 16.
Under the Vendors menu, you will get the Vendor Payment option which will help you to manage and monitor the vendor payments.
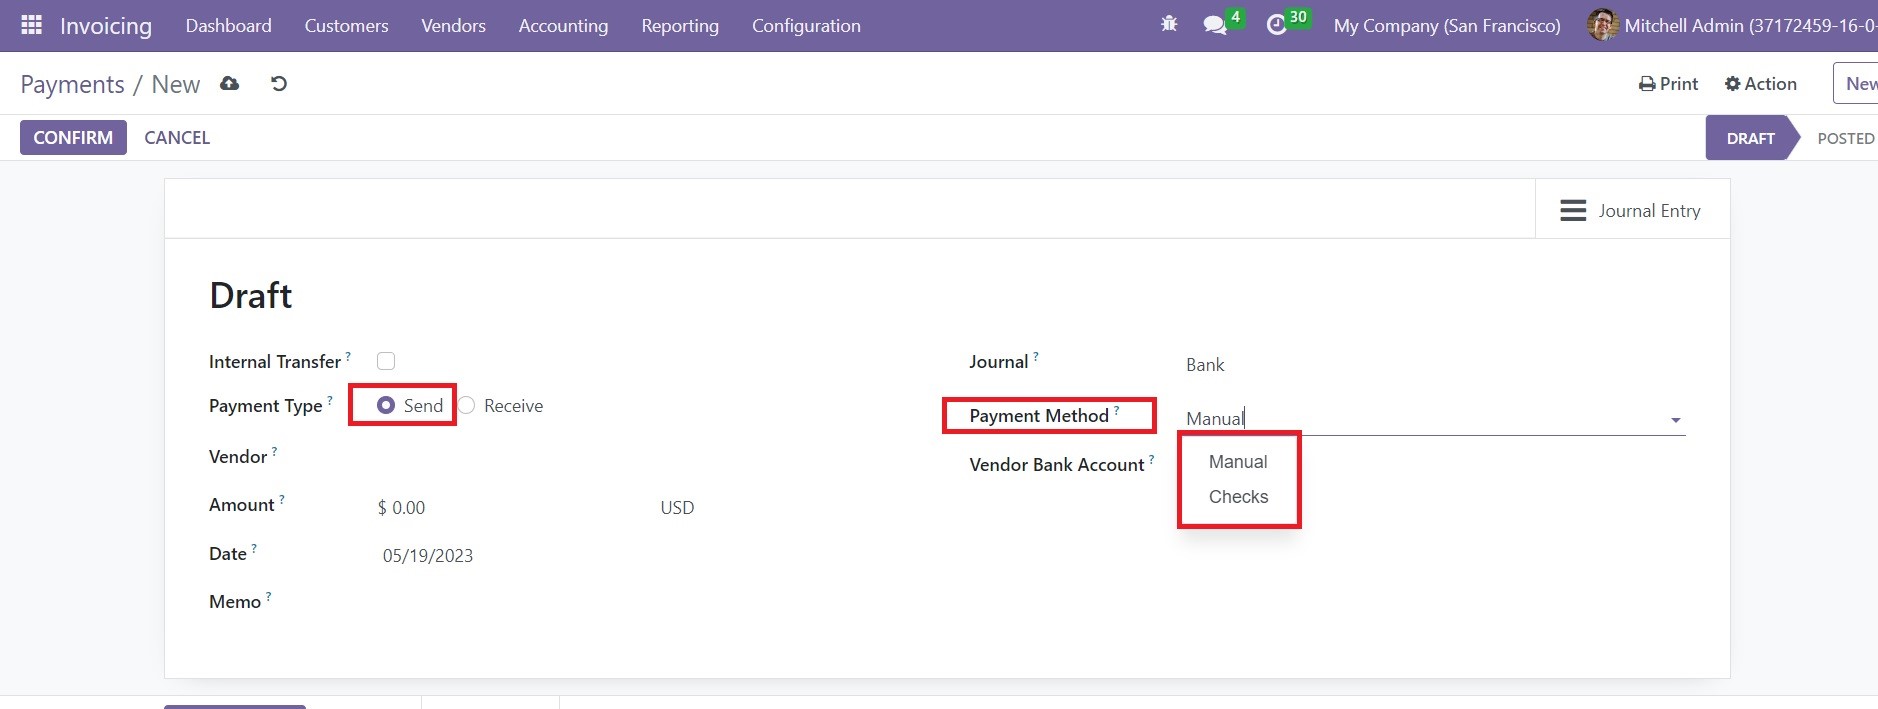
You can configure a new vendor payment by following the same method as that of the customer payment. Here, you can find that the Payment Type is marked as sent since we are sending the amount to the concerned vendor. In the Payment Method field, you will get Manual and Checks options to select. The checks option will allow you to pay the bill using a check. The window will show the Print Check option after confirming the payment.
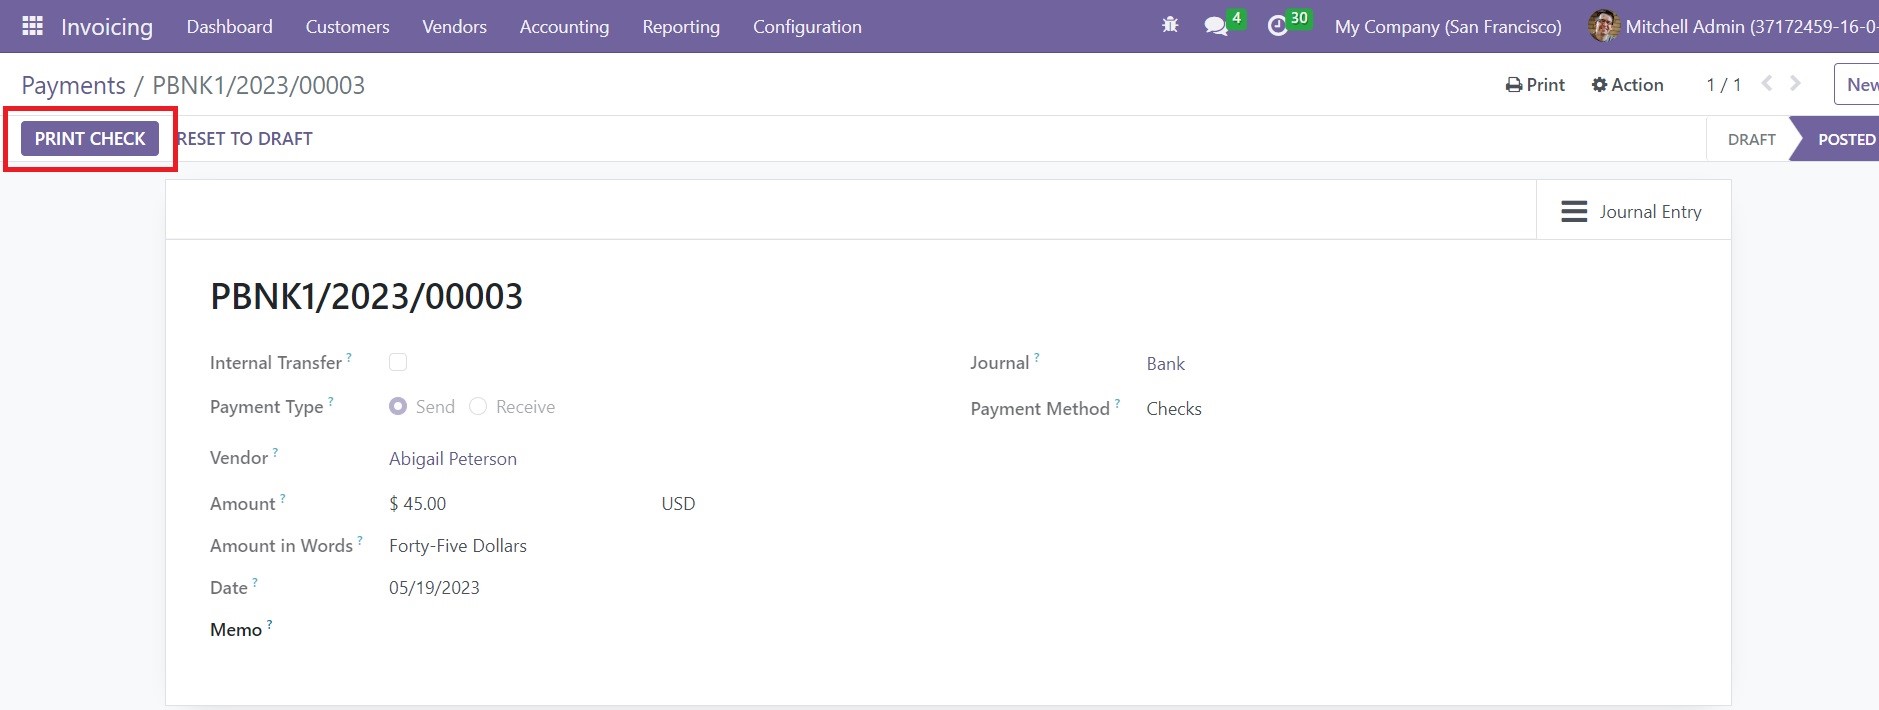
You can click on this button to get a print of the check.
Credit Notes
In case of error in the invoice or bill, product damage, return, or product cancellation, you can generate credit notes in Odoo. You can reverse a bill as well an invoice by generating credit notes. The invoice form view will show the Add Credit Note button once you complete the payment procedures. You can use this button to generate credit notes for customer invoice. You will get the same button in the vendor bill also.
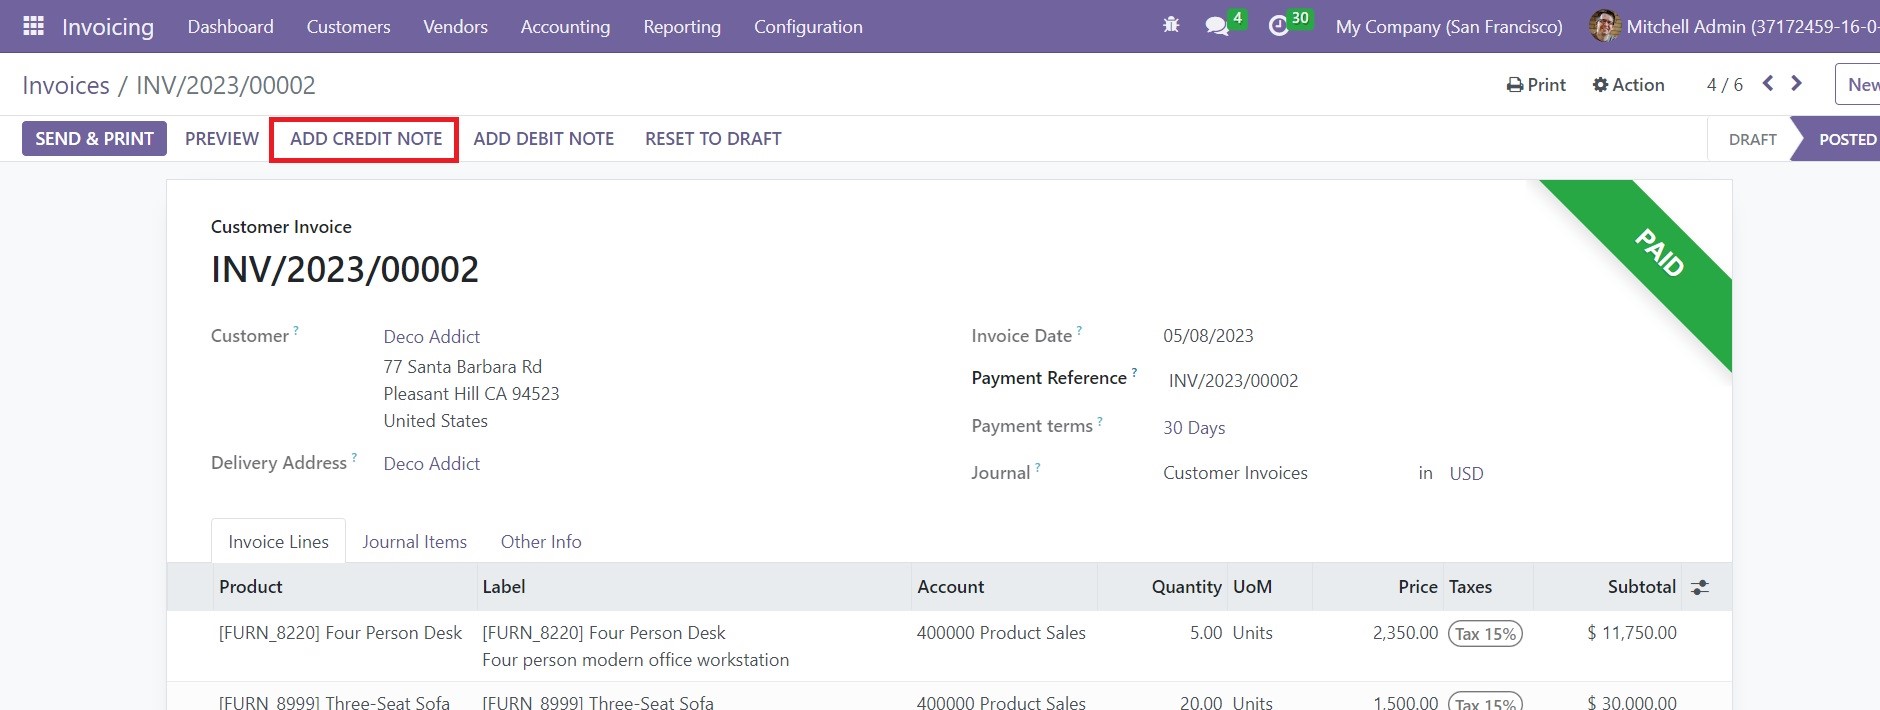
In order to generate a credit note, click on the respective button given on the window. This will open a new pop-up window as shown in the screenshot below.
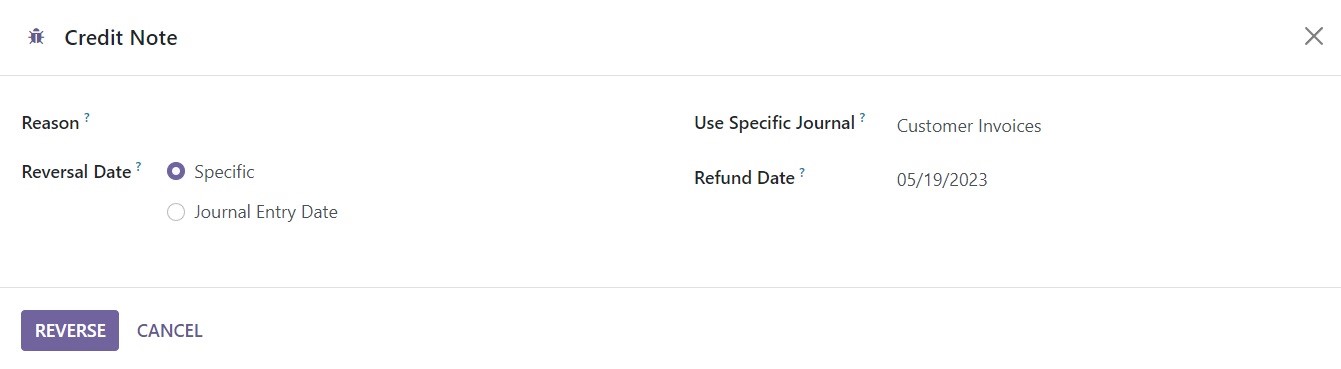
The Reason for the credit note can be specified in the given space. Set the Reversal Date, Use Specific Journal, and Refund Date in the respective fields. Now, click on the Reverse button which will reverse the customer invoice. Once you reverse the invoice, it will be automatically moved to the draft stage.
In Odoo, you will get a separate platform to manage the Credit Notes under the Customers menu. In the Vendors menu, you will get the Refunds option to manage the credit notes from vendor bills.
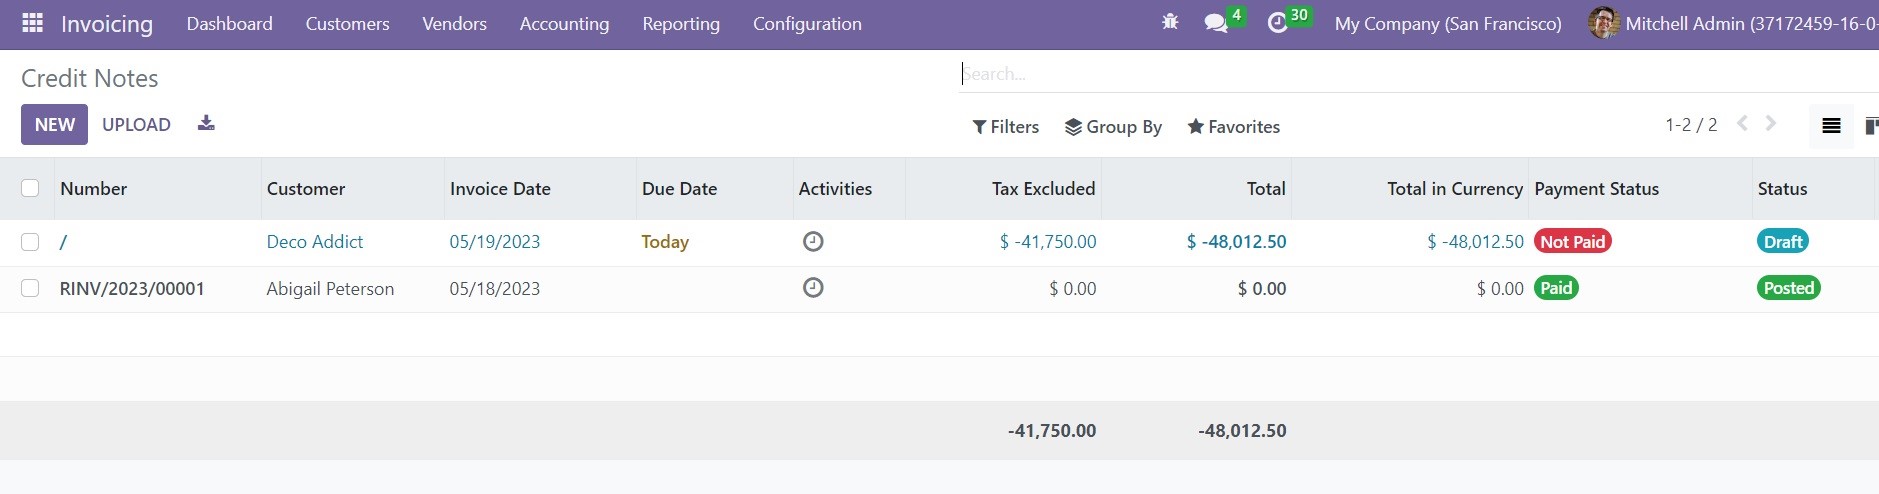
The list view of the customer credit notes will show the Number, Customer, Invoice Date, Due Date, Activities, Tax Excluded, Total, Total in Currency, Payment Status, and Status. You can use the New button to create a new credit note. This will lead you to the form view of customer invoices or vendor bills based on the menu you select. You can create a customer invoice or a vendor bill first and then use the Credit Note option from the respective windows.
Vendor Bill
The vendor bills can be generated to get the details of the payment to a vendor after making a purchase. After confirming a purchase order in Odoo, you will get the option to generate vendor bills from the purchase order form view itself. All these vendor bills will be recorded under the Bills option in the Vendors menu of the Invoicing module.
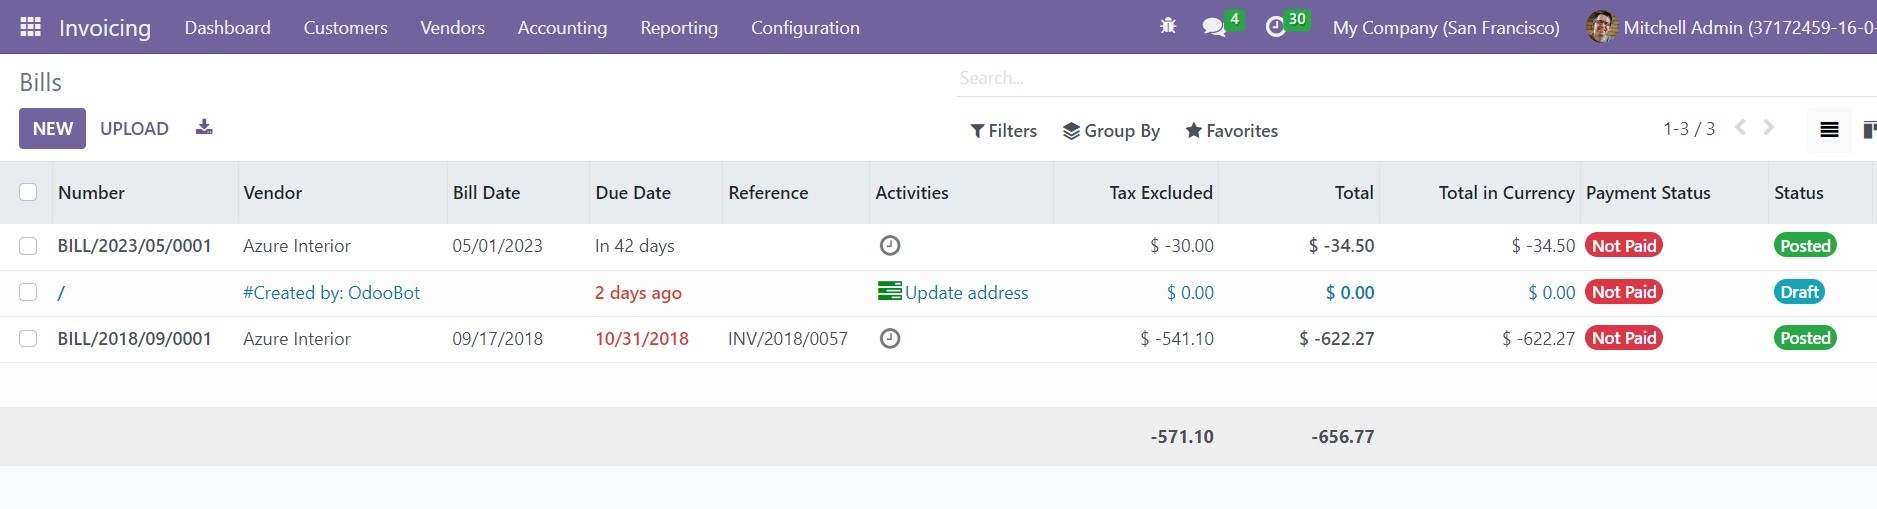
This is the list view of the Vendor Bills. It shows the Number, Vendor, Bill Date, Due Date, Reference, Activities, Tax Excluded, Total, Total in Currency, Payment Status, and Status. You can use the Kanban view icon to get the Kanban view of the vendor bills.
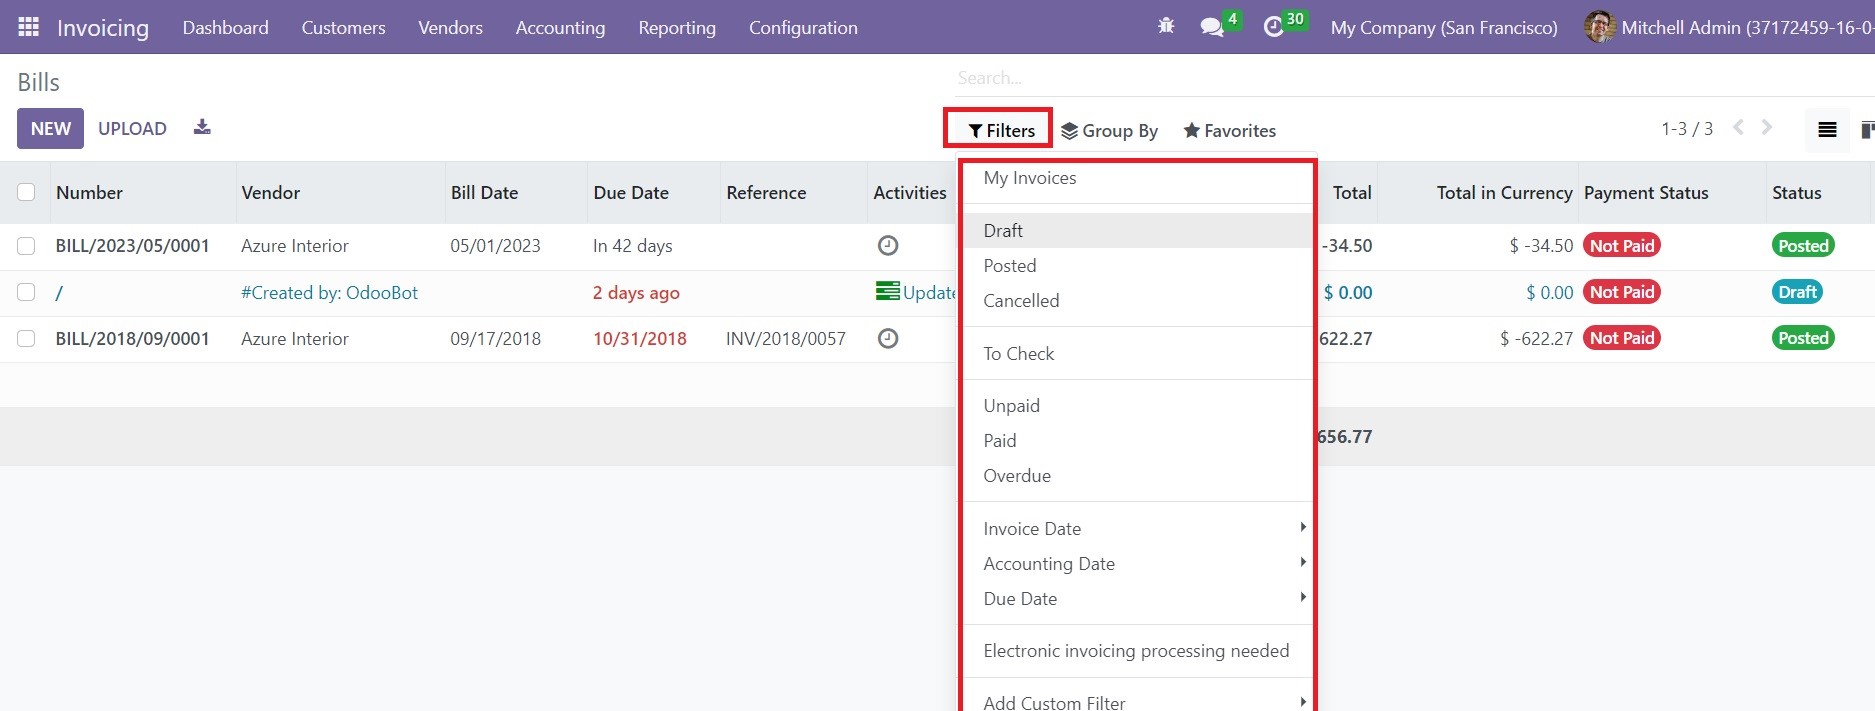
The Filters option shows the default filters such as My Invoice, Draft, Posted, Canceled, To Check, Unpaid, Paid, Overdue, Invoice Date, Accounting Date, Due Date, and Electronic Invoicing Processing.
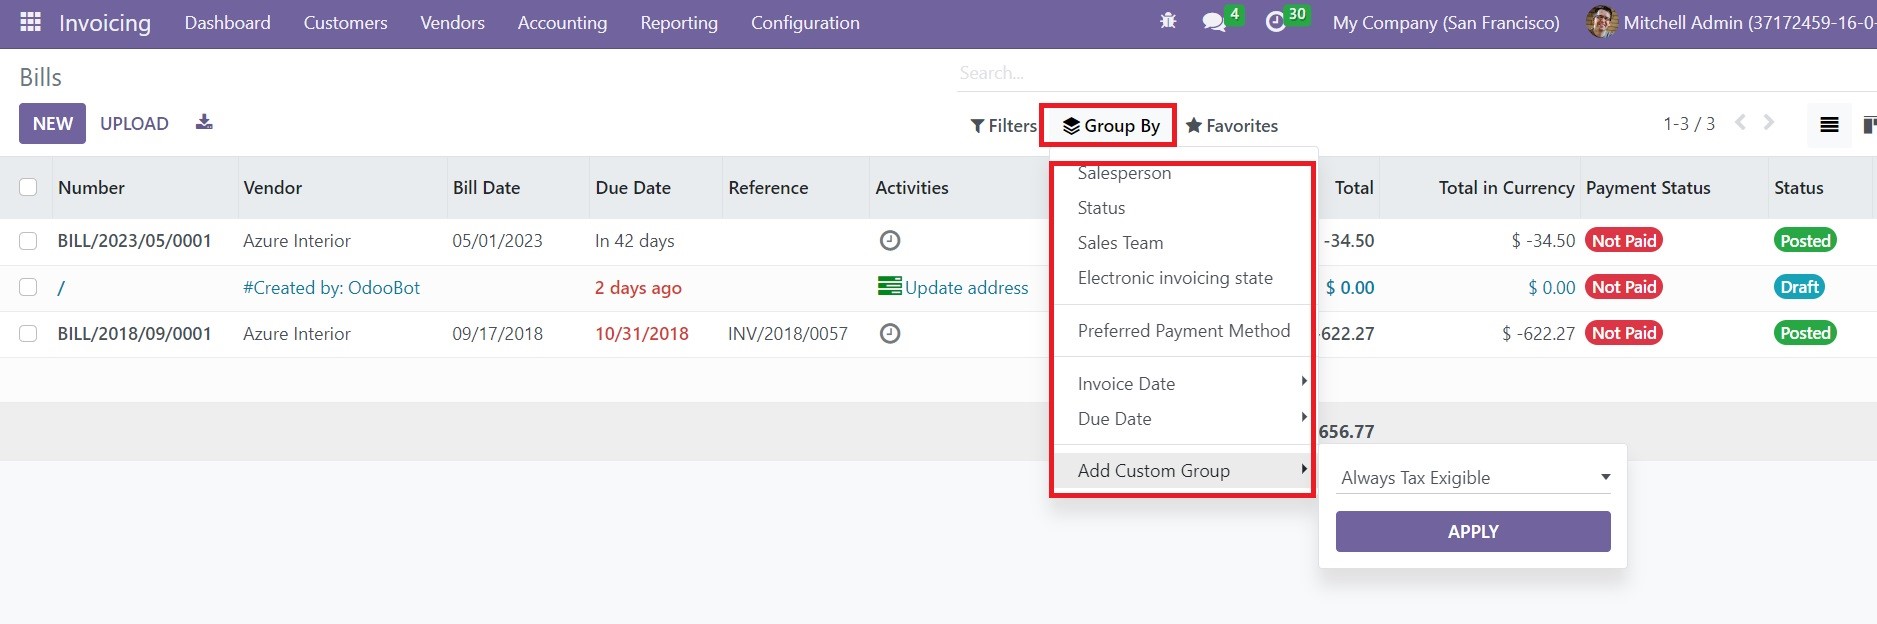
You can use Salesperson, Status, Sales Team, Electronic Invoicing State, Preferred Payment Method, Invoice Date, and Due Date as Group By filters on this platform. You will get customization options in the Filters and Group By options to customize the sorting options. Now, click on the New button to create a new vendor bill in the Odoo Invoicing module. You can use the Upload button to upload a vendor bill from your system.
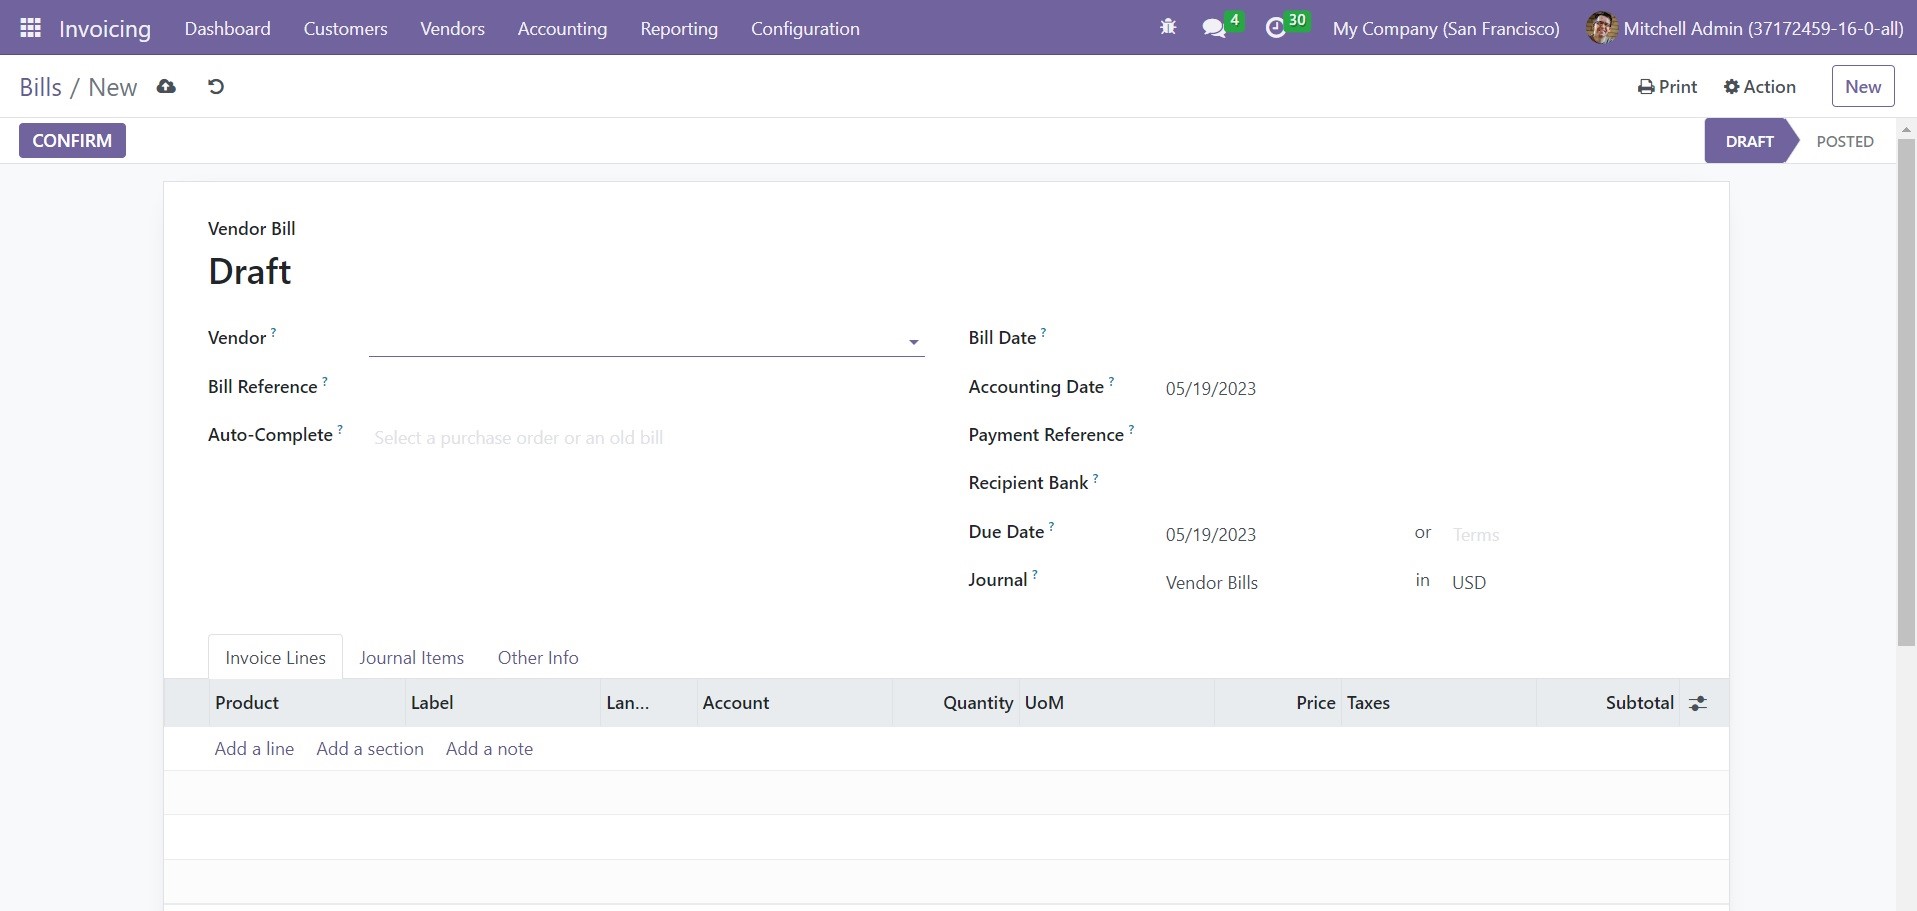
This is the form view of the vendor bill creation window. We are going to create a draft of a vendor bill. The name of the Vendor can be selected from the dropdown. If the bill owns any reference, you can add it in the Bill Reference field. If you are creating this bill based on a previous purchase order created in Odoo, you can mention it in the Auto-Complete field. By doing so, Odoo will automatically complete the necessary fields based on the data specified in the purchase order. The date on which you want to generate this vendor bill can be specified in the Bill Date field. The Accounting Date will be available in the form view which indicates the date on which the accounting details related to this particular bill have been updated to the record. In the corresponding fields, you can specify the Payment Reference, Due Date, Journal, and Payment Terms.
The Invoice Lines can be used to add products that you purchased from the respective vendor. You can use the Add a Line button to add products one by one.
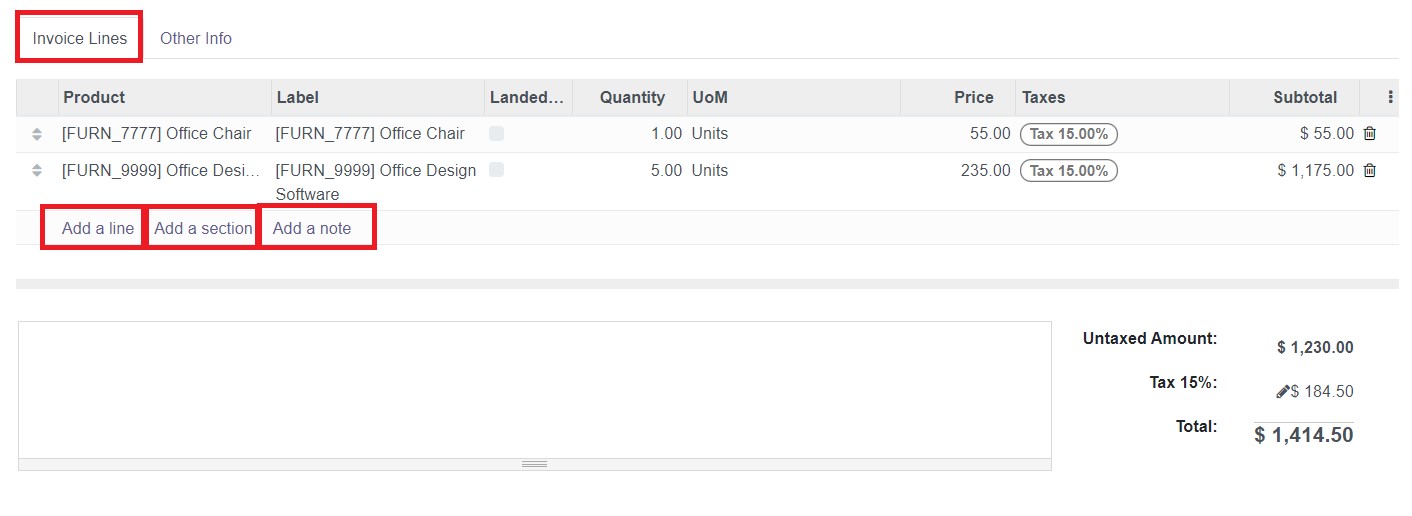
The tab will show the Product, Label, Landed Cost, Quantity, UoM, Price, Taxes, and Subtotal. You can add sections to the Invoice Line using the Add a Section button. Use the Add a Note button to specify any notes under the invoice line.
Based on the product you mention in the invoice line, corresponding journal items will appear under the Journal Items tab. It will depend on the journal items you configured on products while creating them in Odoo.

As you can see in the image above, the Journal Items will show the Account, Label, Debit, Credit, and Tax Grids. You can use the Add a Line button to add additional journal items to the vendor bill.
The Other Info tab can be used to add Accounting details regarding this particular vendor bill.

The name of the Company will be available here. In the corresponding fields, you can mention the Incoterm and Fiscal Positions. In order to automatically post the entry on the mentioned date in the vendor bill, you can activate the Post Automatically option. The To Check option will help you to check the data entered in the vendor bill.
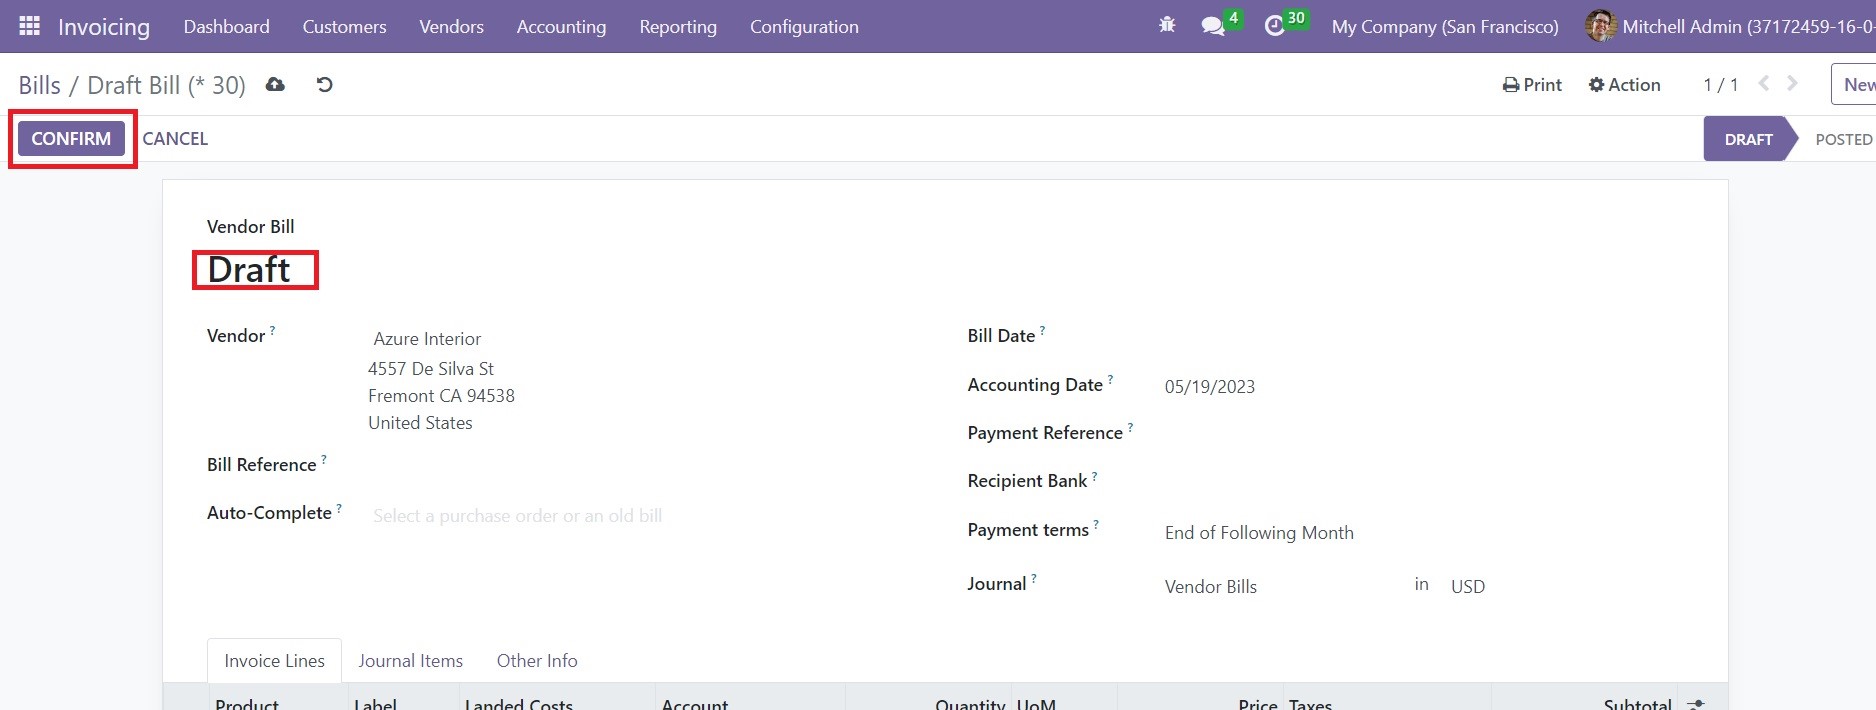
Now, you can click on the Confirm button to confirm the new vendor bill. Later, you can register payment by following the same procedures we discussed in the customer invoice section.
Cutoff Journal
You can define the Cutoff date as the break-off of the deadline of any bill, invoice or agreement that delineates when there are more business transactions to be registered in the following reporting period. Sometimes, the invoices and payments which are not approved or fully matched cannot be recorded in the accounts added in Odoo. In such cases, the company must ensure whether the liability or expense has been incurred at the end of every accounting period.
Let’s check the Cut-Off feature available in Odoo through an example. Imagine, a customer made a payment of 75% of the amount mentioned in the invoice. You can make corresponding changes in the journal entries using the Cut -Off option available in the bill as shown below.
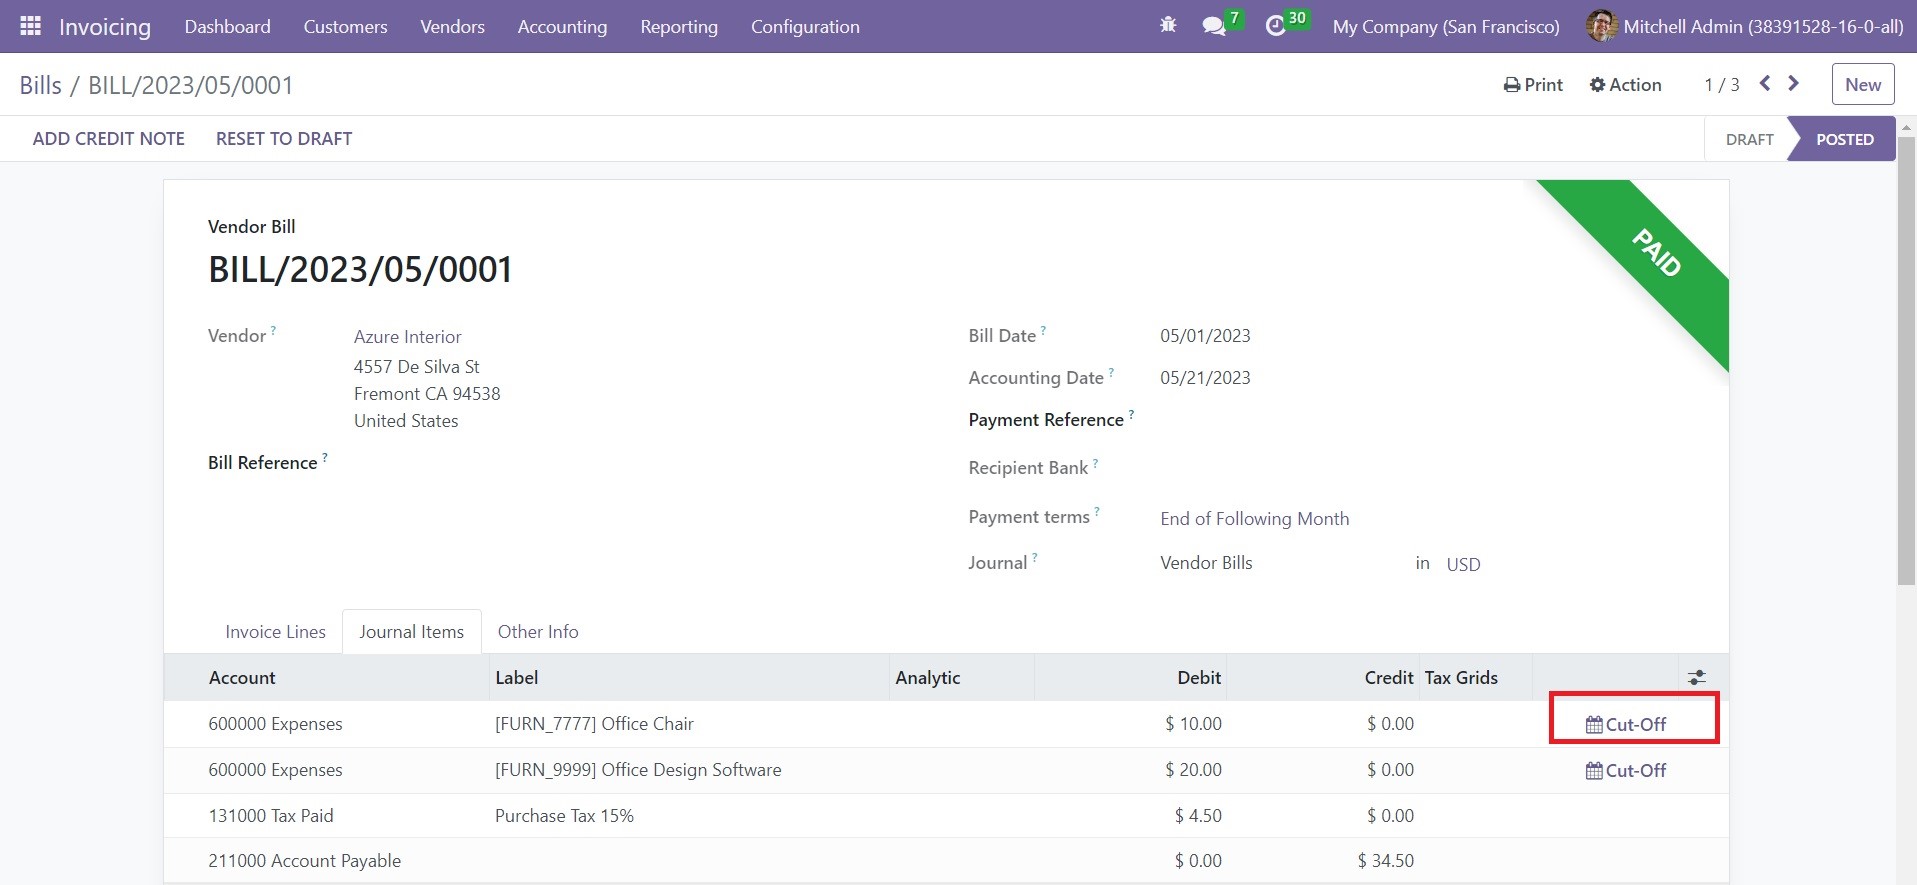
As we mentioned above, the customer paid only 75% of the amount. The balance amount will be recorded in the company loss account. This can be recorded in the loss account using the Cut-Off button.
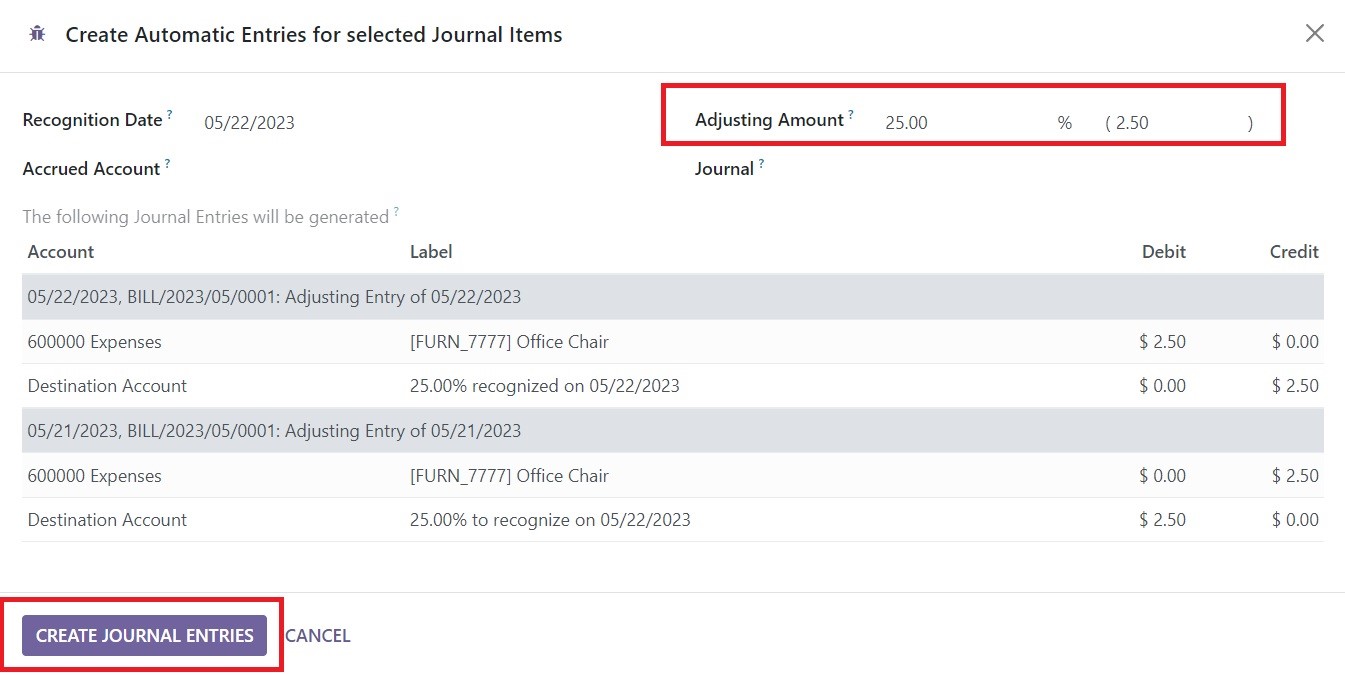
You will get a pop-up window here where you can adjust the journal entry. You can mention the remaining 25% in the Adjusting Amount field. These types of adjustment entries are required to record the liabilities and expenses in the financial statements of your company at the end of the accounting period. We use the Cut-Off feature to make adjustment entries. After mentioning the Adjustment Amount, Accrued Account, and Journal, you can click on the Create Journal Entries button.
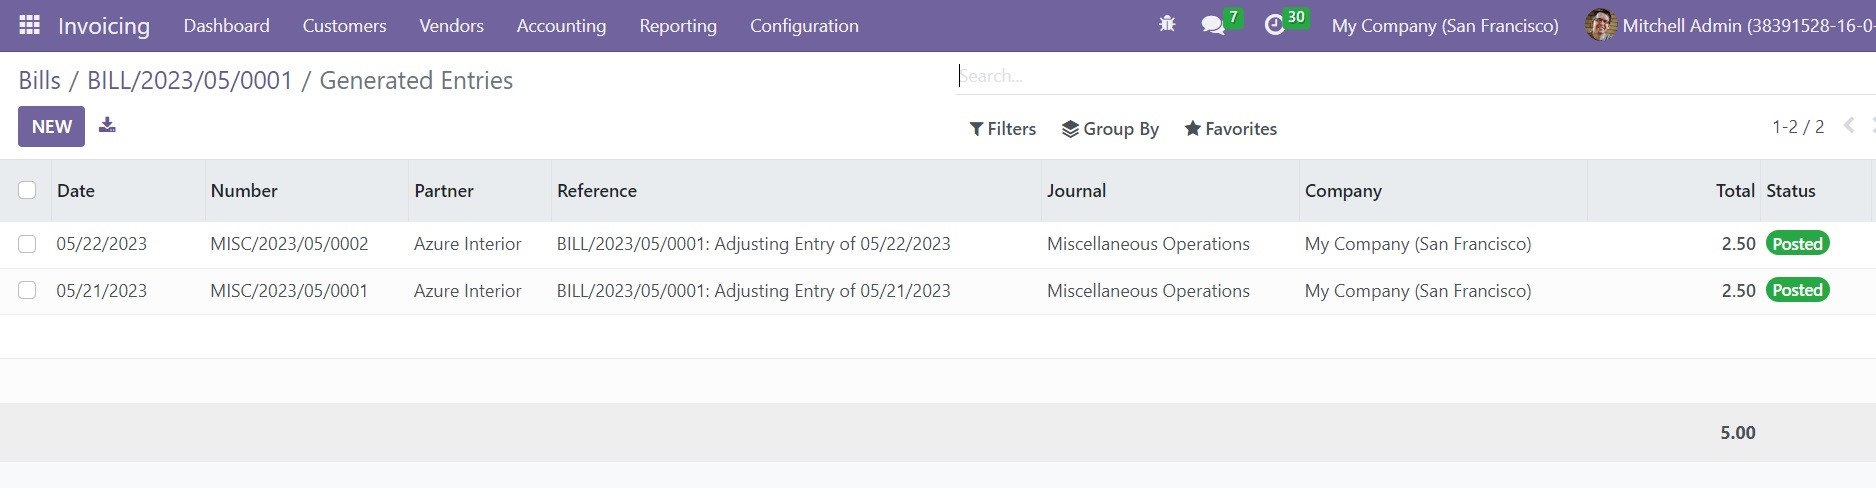
The generated entries are shown in the screenshot above.
Employee Expenses
The invoices module will help you to manage and monitor the expenses of your employees. This platform is similar to that of the Expense management module in Odoo. After creating new expenses, you can submit them to the concerned manager to get approval. Under the Vendors menu, you can find the Employee Expenses option, which will lead you to a platform, as shown in the image below.
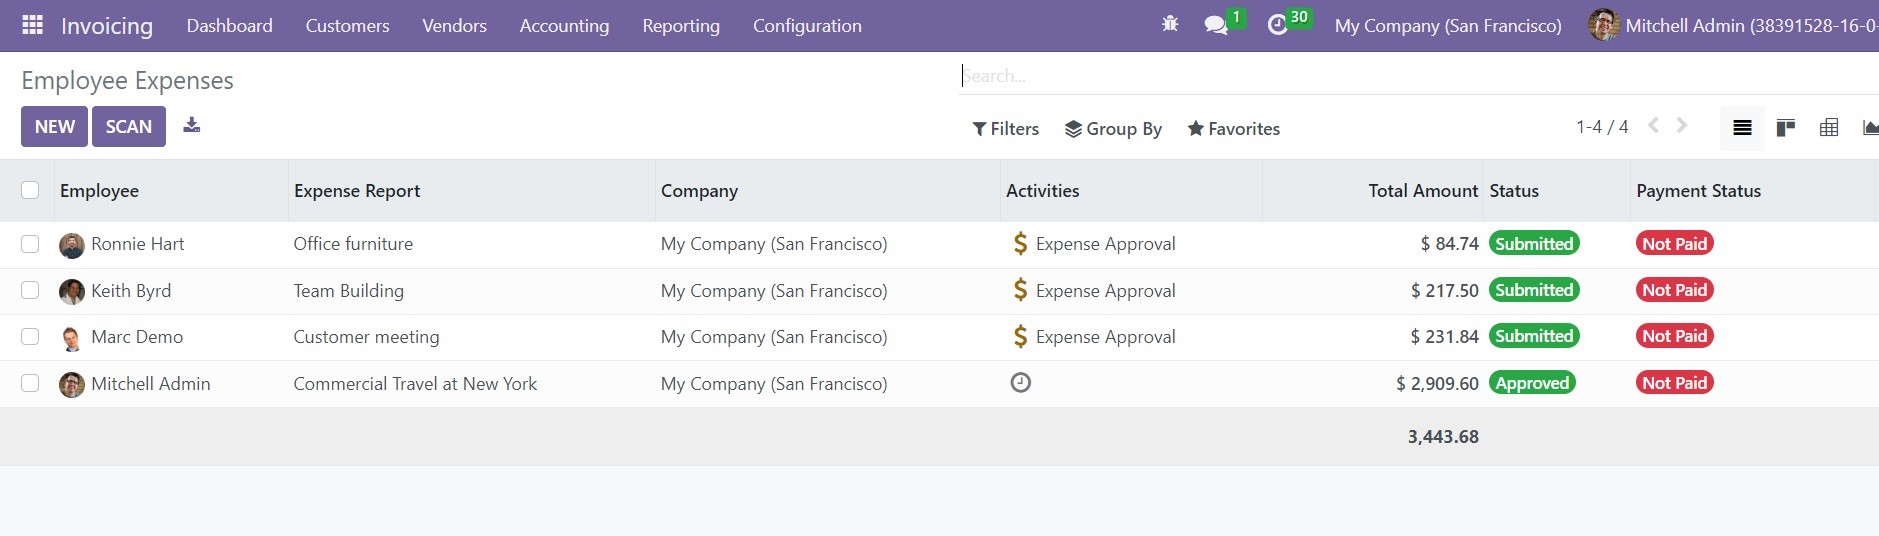
The list view of this platform shows the Employee, Expense Report, Company, Activities, Total Amount, Status, and Payment Status. You can change the view of the platform to Kanban, Graph, and Pivot views. The expenses can be filtered based on My Reports, My Team, Date, and Former Employees. You will get Employee, Department, Company, Date, and Status as the grouping option in this platform. The Scan button can be used to scan the expense reports. Use the New button to create a new expense.
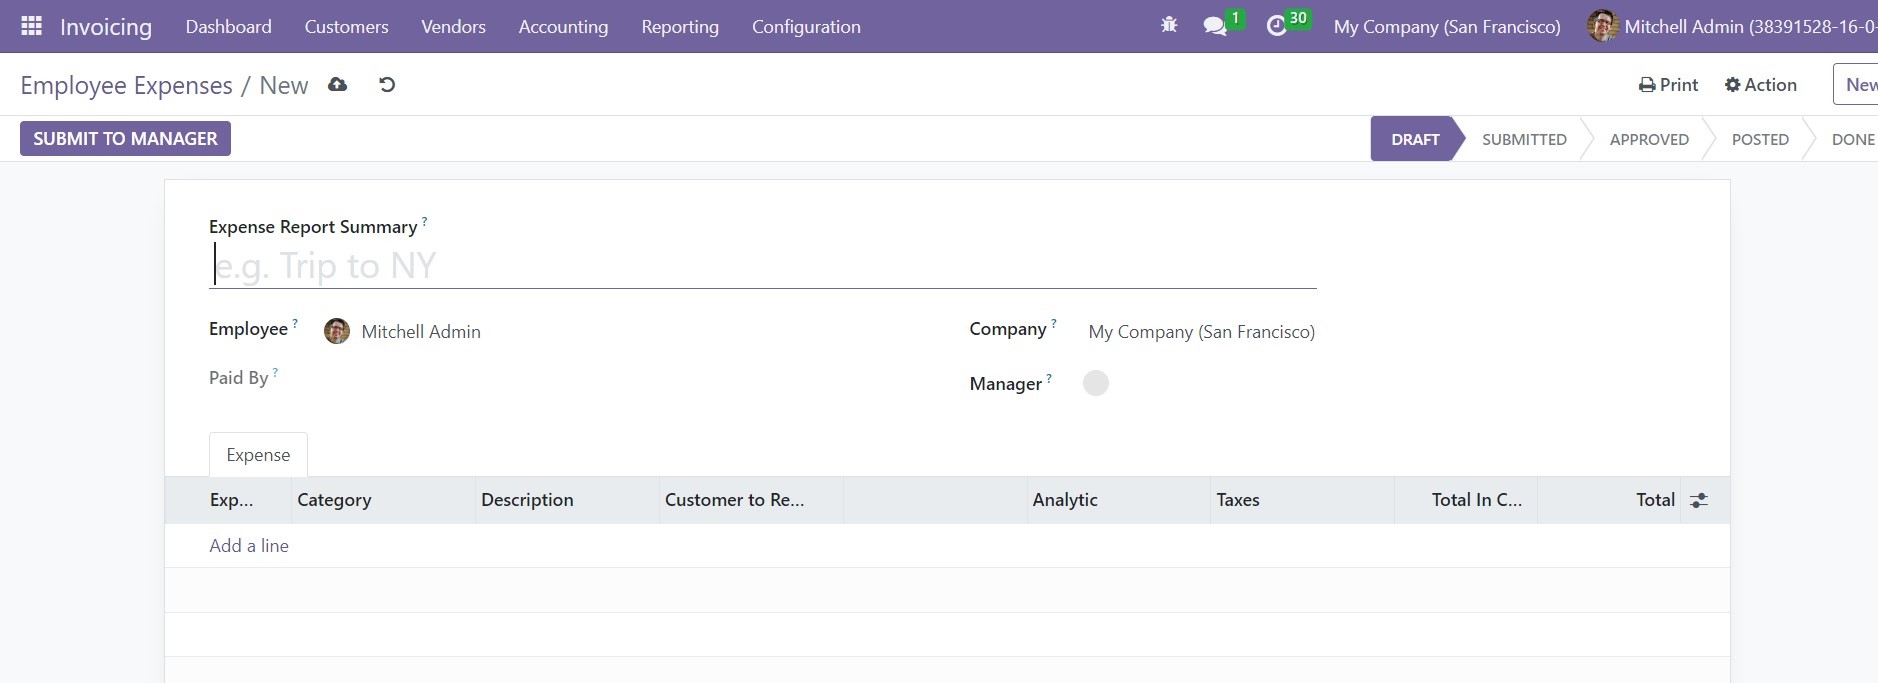
Specify the Expense Report Summary, Employee, Manager, and Company name in the given fields. The details of the expense can be mentioned under the ‘Expense’ tab.
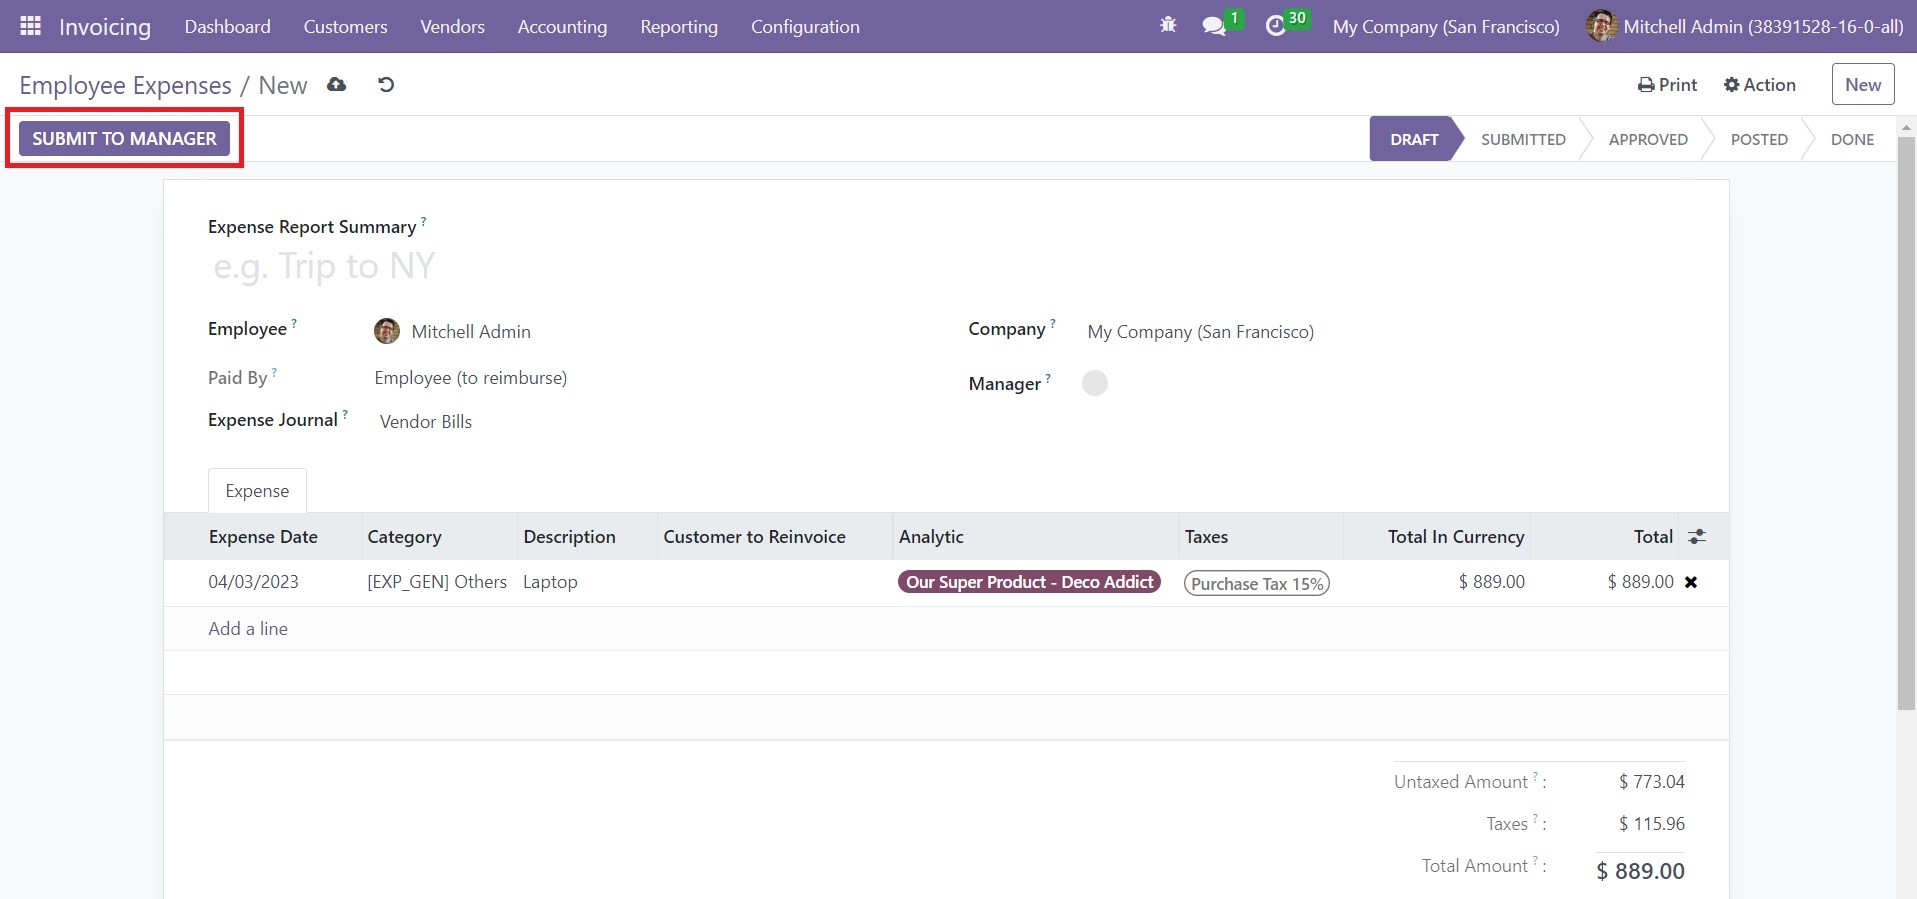
Under the Expense tab, you can use the ‘Add a Line’ button to add details about the Expense Date, Category, Description, Customer to Re Invoice, Analytic, Taxes, Total in Currency, and Total. It is possible to select the expense reports created in the Expense module In this field. Once you add all necessary information to the expense report the expense report is ready.
The Submit to Manager button can be used to submit this newly created report to the respective manager.
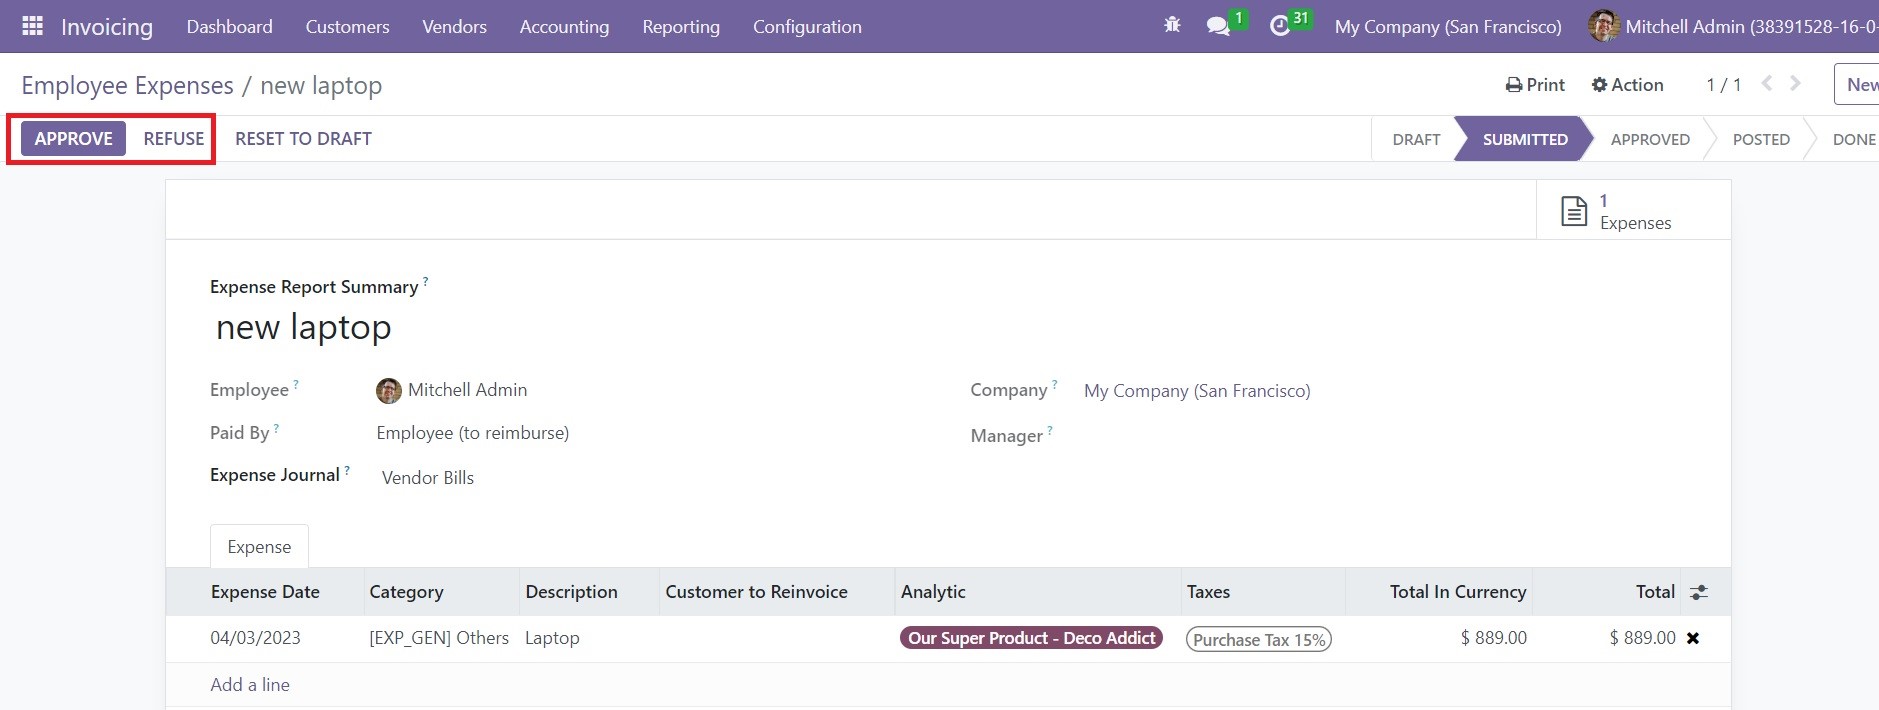
When you click on this button, the report will be submitted to the manager. The concerned manager can now manage the report. They will get Approve and Refuse buttons on the screen to perform the respective operations.
You will get the ‘Post Journal Entries’ option after approving the expense report to post journal entries for this particular report.
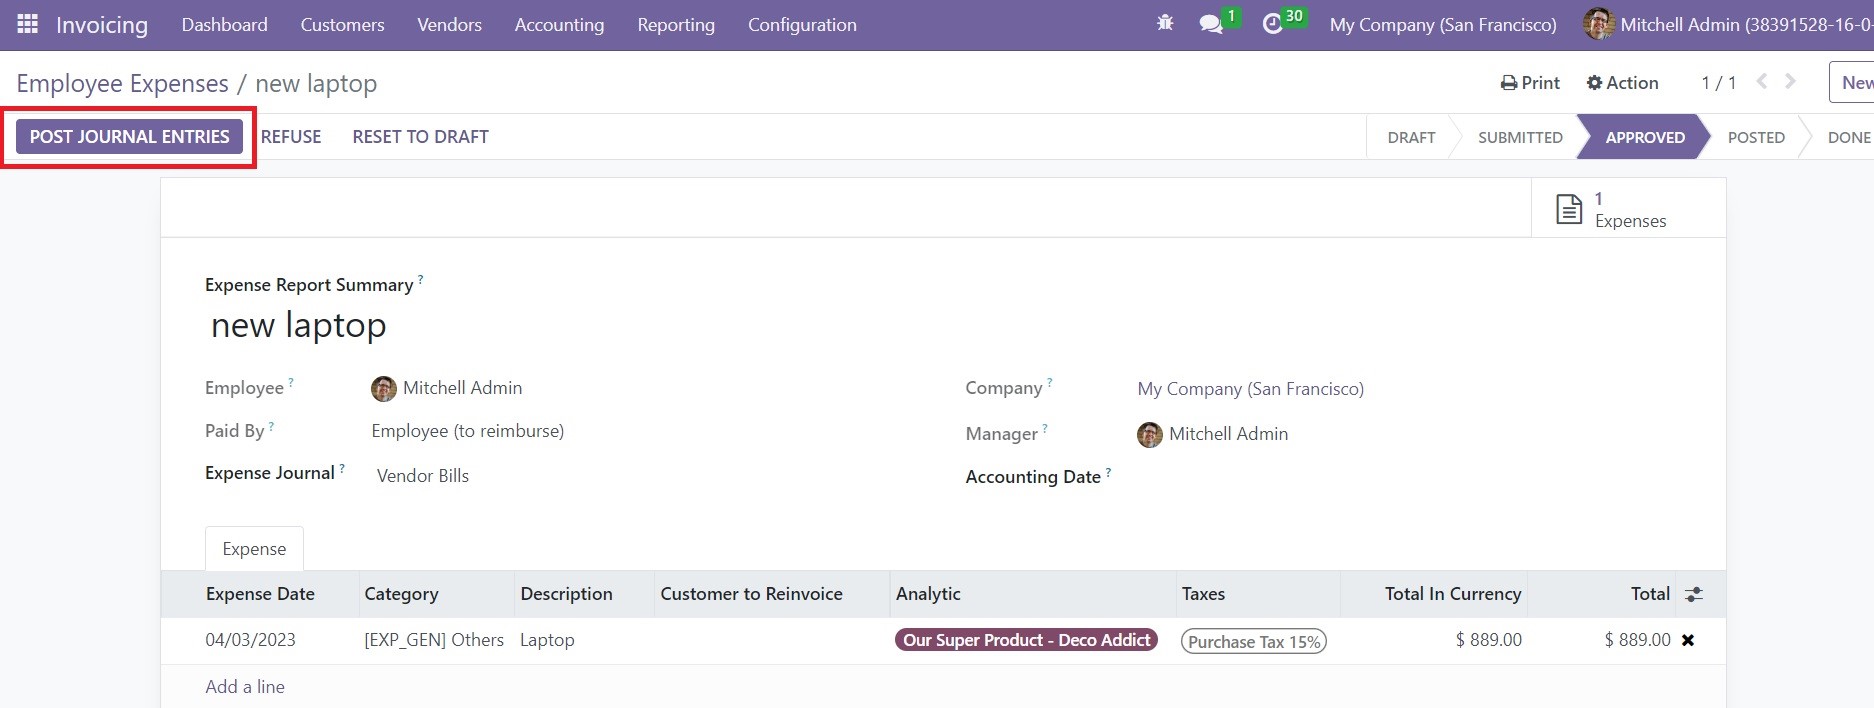
Use this button to post corresponding journal entries. Such generated entries can be observed using the Journal Entry smart button available on the screen as shown below.
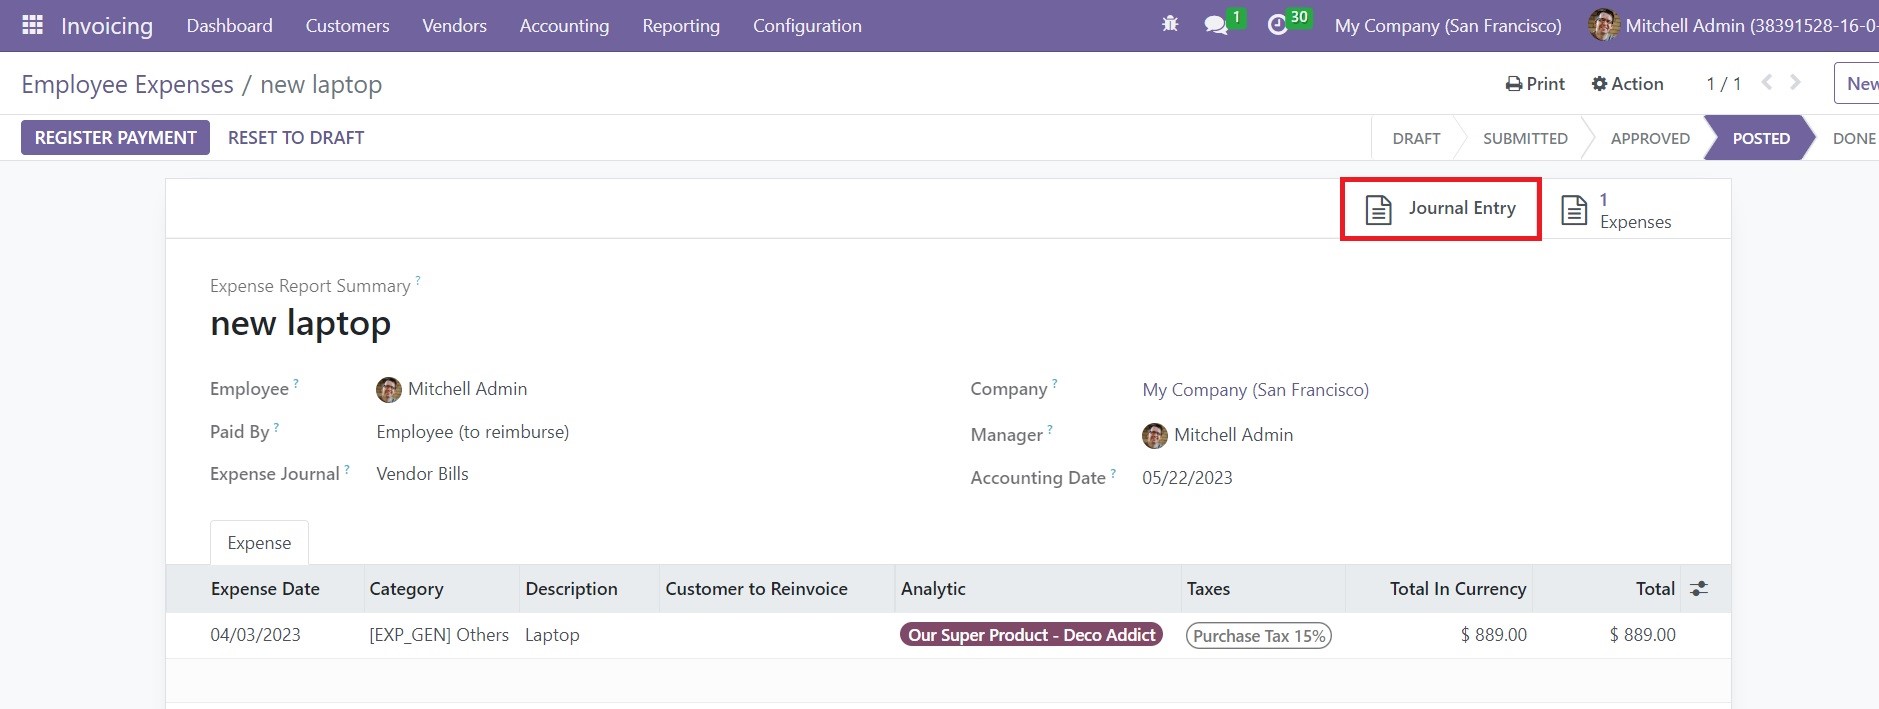
Using the Register Payment button, you can register payment for this expense. By doing so, the amount will be transferred to the employee’s account and the status of the expense report will be marked as Done.
Payment Terms
In order to manage transactions smoothly, companies often choose multiple payment methods and payment providers for their business. No matter what payment method you associate with your business, it is essential to define appropriate payment terms to get paid within a predictable date. Payment terms play a crucial role in setting conditions for payments which is beneficial to keep the transactions on track. It is possible to create multiple payment terms in the Odoo Invoicing module. These payment terms can be used while configuring new bills, invoices, or agreements in Odoo.
You can access the Payment Terms platform from the Configuration menu of the Invoicing module. The window will display pre-configured payment terms in your system.
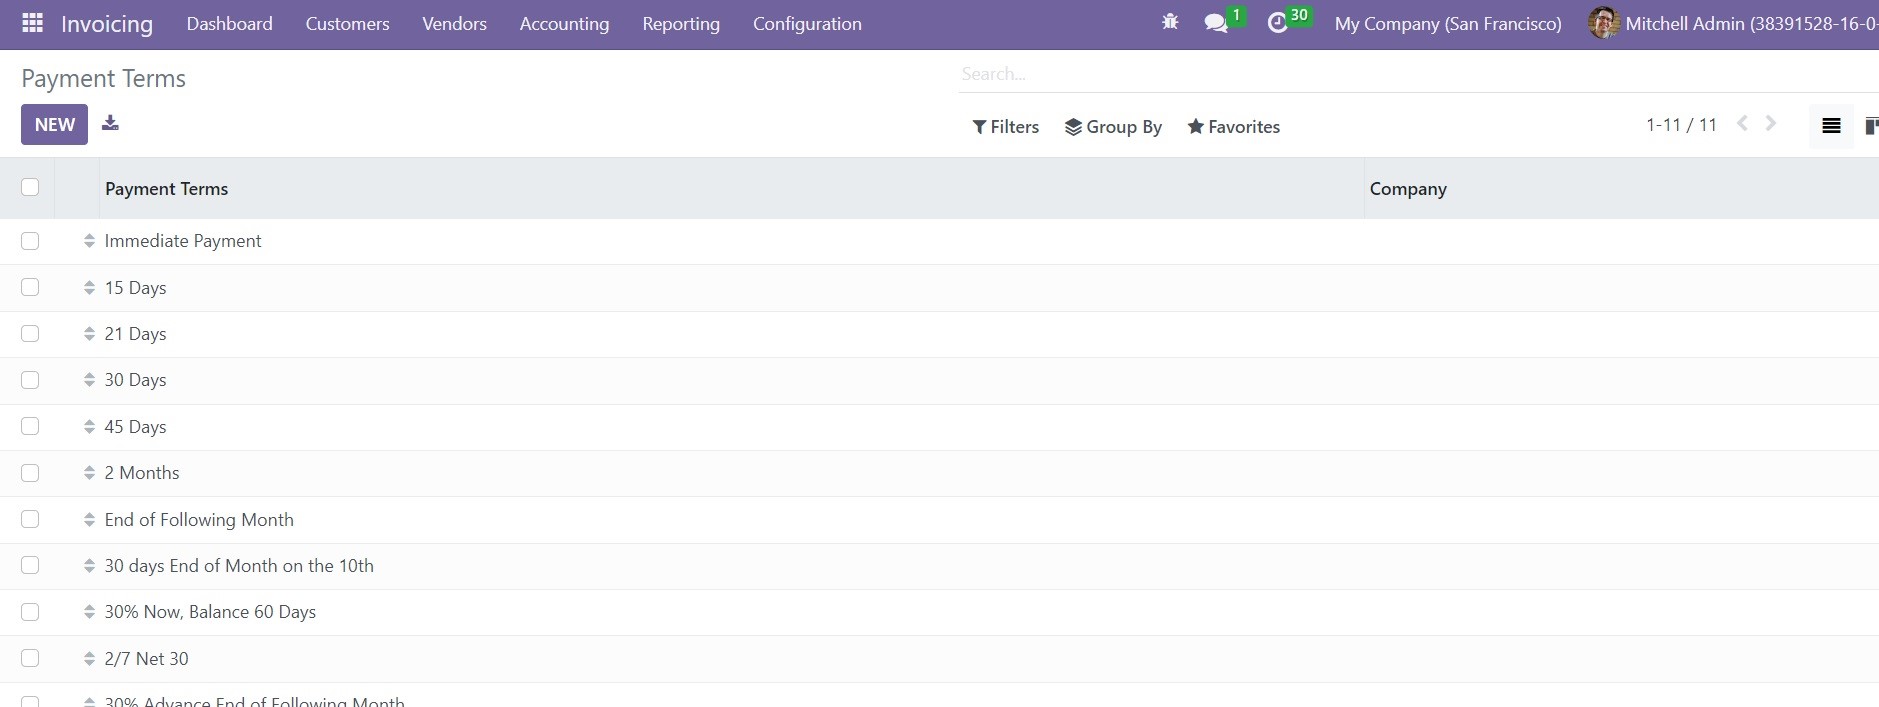
To edit one of the available payment terms, you can click on the respective one. You can select a suitable view for this platform from the given options.
You can click on the New button to get the new creation window. The form view of the payment term creation window is shown below.
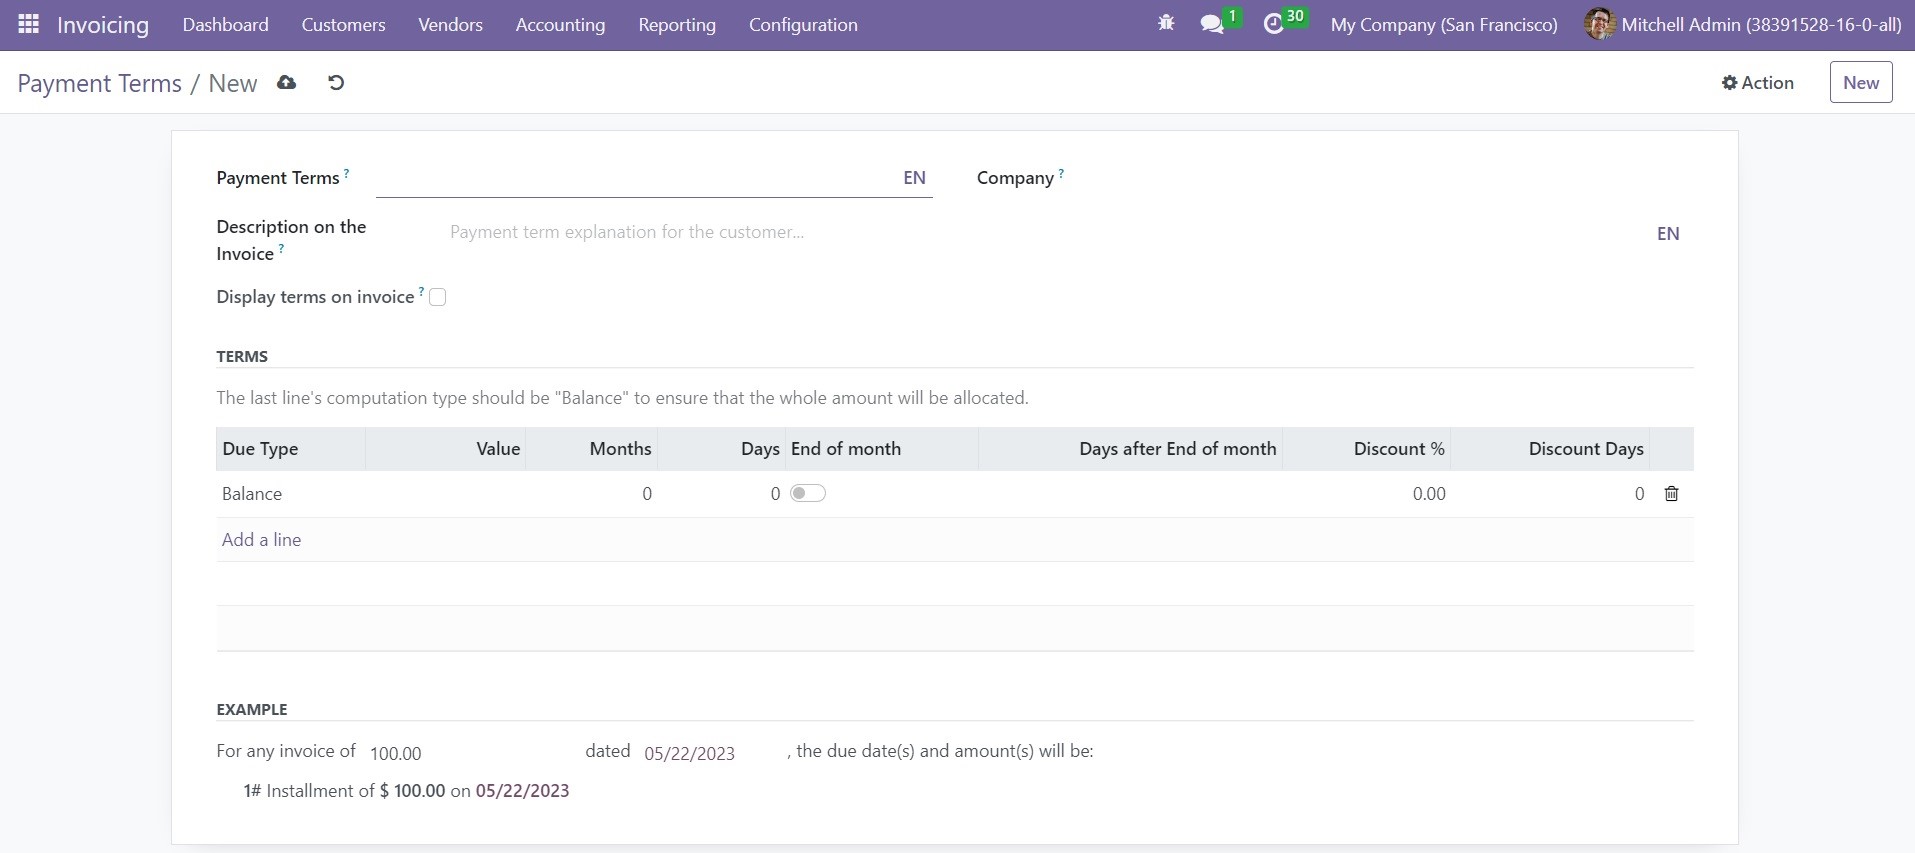
In the given space, mention the new Payment Term. The details you add in the Description on the Invoice will provide payment term explanation for customers. In the Company field, mention your company name. Activating the Display terms on invoices will display payment deadlines and respective due amounts on invoices.
The terms for this payment can be added in the window by using the ‘Add a Line’ button. The list will show the Due Type, Value, Months, Days, End of Month, Days after the End of Month, Discount, and Discount Days. The Due Type can be Balance, Percent, or Fixed Amount. The last line's computation type should be "Balance" to ensure that the whole amount will be allocated. You can create new payment terms by following this method.
Incoterms
Incoterms can be defined as international commercial terms used in business. These terms will define sales and responsibilities between a seller and buyer. These fixed terms are accepted worldwide to ensure smooth business operations internationally. In Odoo, you can configure such Incoterms in the Invoicing module and use them while managing international commercial activities related to your business.
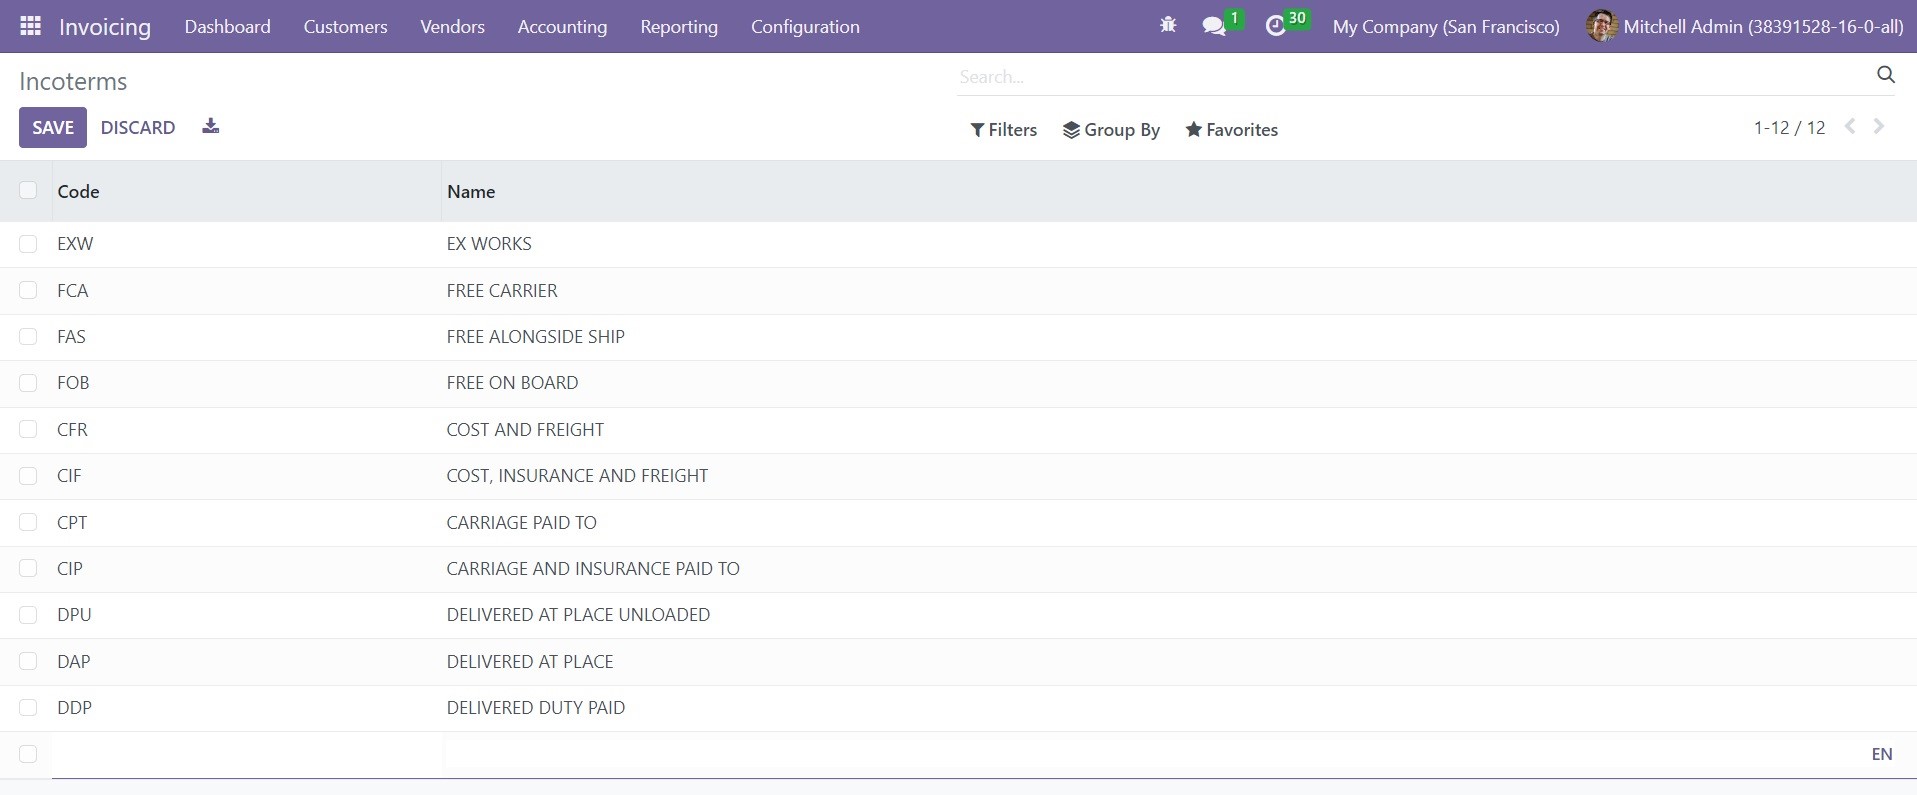
In the Configuration menu of the Invoicing module, you can find the Incoterms option which will give access to the platform shown below. The pre-configured list of incoterms can be observed here. You can use the New button to add a new Incoterm to the module.
As soon as you click on the New button, the window will show a new line where you can add the Code and Name of the Incoterm. Use the Save button to save the new changes.
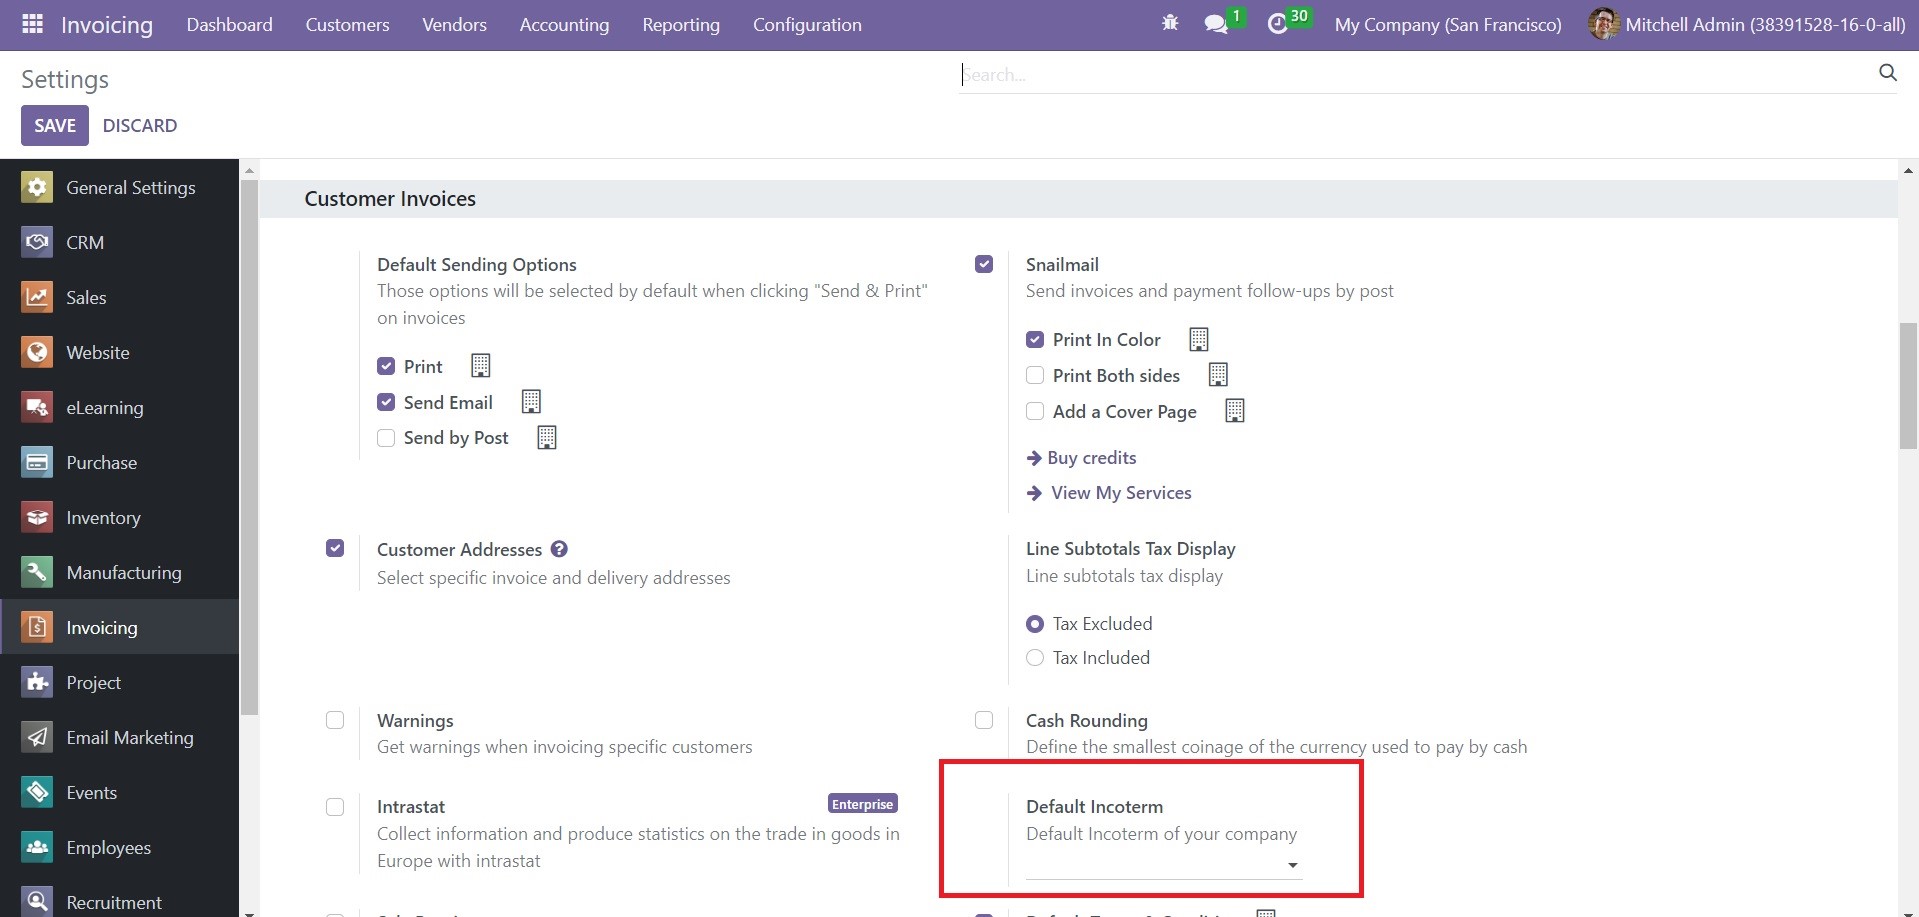
If you want to set a default incoterm for your business operations in Odoo, you can go to the Settings menu of the Invoicing module.
Here, you can mention the Default Incoterm of your company in the specified field available under the Customer Invoices tab.
Add a bank account
In order to add new bank account details to the Odoo Invoicing module, you can use the Add Bank Account option available under the Banks menu in the Configuration menu of the module. It is essential to configure the bank account details in the Invoicing module to ensure the smooth functioning of transaction and accounting operations.
As soon as you click on the ‘Add a Bank Account’ option, a pop-up window will appear on the screen, as shown in the screenshot below. Use this window to create a bank account.
In the given field, you can mention the Account Number, Bank, Bank Identifier Code, and linked journal id. Click on the Create button and Odoo will add this bank account to your Invoicing module.
Reconciliation Models
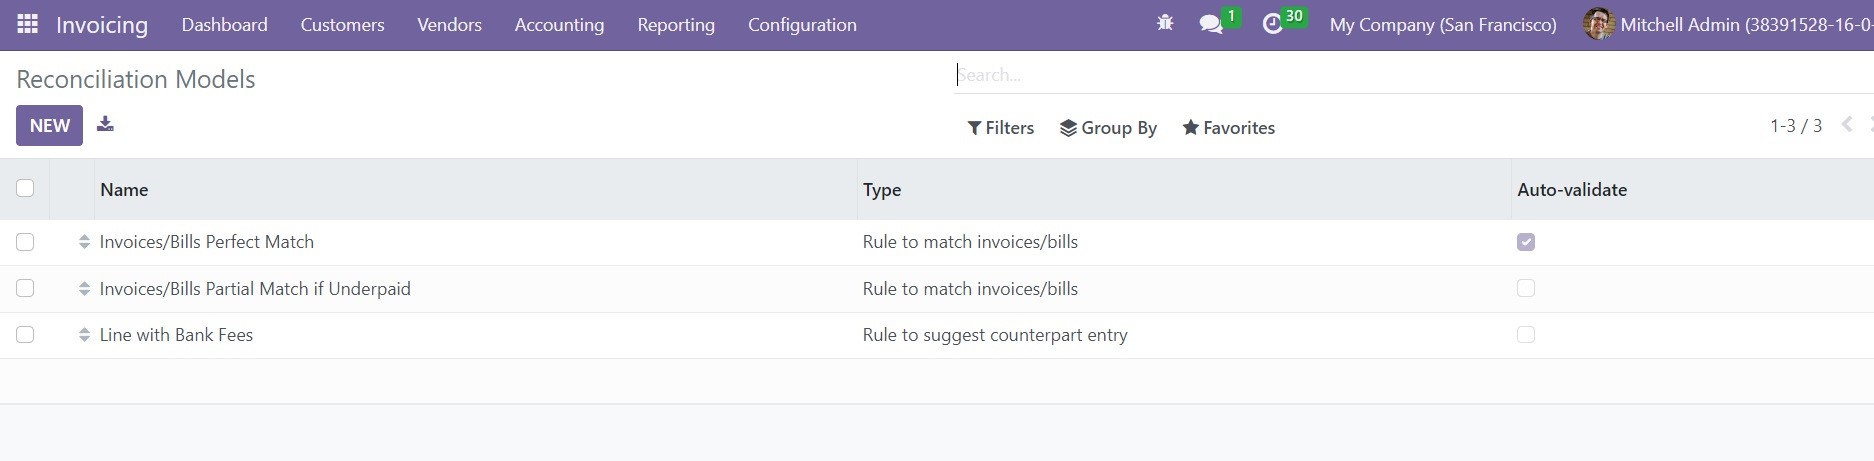
While performing various financial operations in a company, it is crucial to ensure that the cash account details are matched with financial statements. You can use the Invoicing module in Odoo to match the cash details with the bank with the help of the Bank Reconciliation feature. With this feature, it is easy to reconcile accounts. From the Configuration menu of the module, you will get access to this platform. The transaction should be accurately recorded in the cash as well as the bank account to ensure transparency. The platform will show already-created Reconciliation models.

You can observe the Name of the Reconciliation Model, Type, and Auto-Validate status from the preview of the list. If you want to create a new bank reconciliation model, you can use the New button available in the window. A new creation window will appear as shown in the image below where you can provide the details of the new reconciliation model.
You can mention the name of the new reconciliation model in the given space. You will get three options to decide the reconciliation Type. The available reconciliation types are listed below.
- Button to generate counterpart entry
- Rule to suggest counterpart entry
- Rule to match invoices/bills
We are going to check each of these types in detail.
Button to Generate Counterpart Entry
In the case of the Button to generate counter entry, you can mention the name of the reconciliation model first and then select the corresponding type.

By enabling the To Check option, this matching rule will be used when the user is not certain of all information of the counterpart. In the Bank Transactions Conditions, specify a journal entry in the Journals Availability field. This will make sure that the reconciliation model will be only available from the journal you mentioned.
You can add the Counterpart Entries under the Bank Transactions Conditions tab using the Add a Line button. By clicking on this button, you can mention the Account, Amount Type, Amount, Analytic, and Journal Item Label. In the Amount Type field, you can select Fixed, Percentage of Balance, Percentage of Statement Line, or From Label option as the amount type. These counterpart entries will be used to generate counterparts on the button click.
Rule to Suggest Counterpart Entry
In the second case, select the ‘Rule to Suggest Counterpart Entry’ as the type of reconciliation.
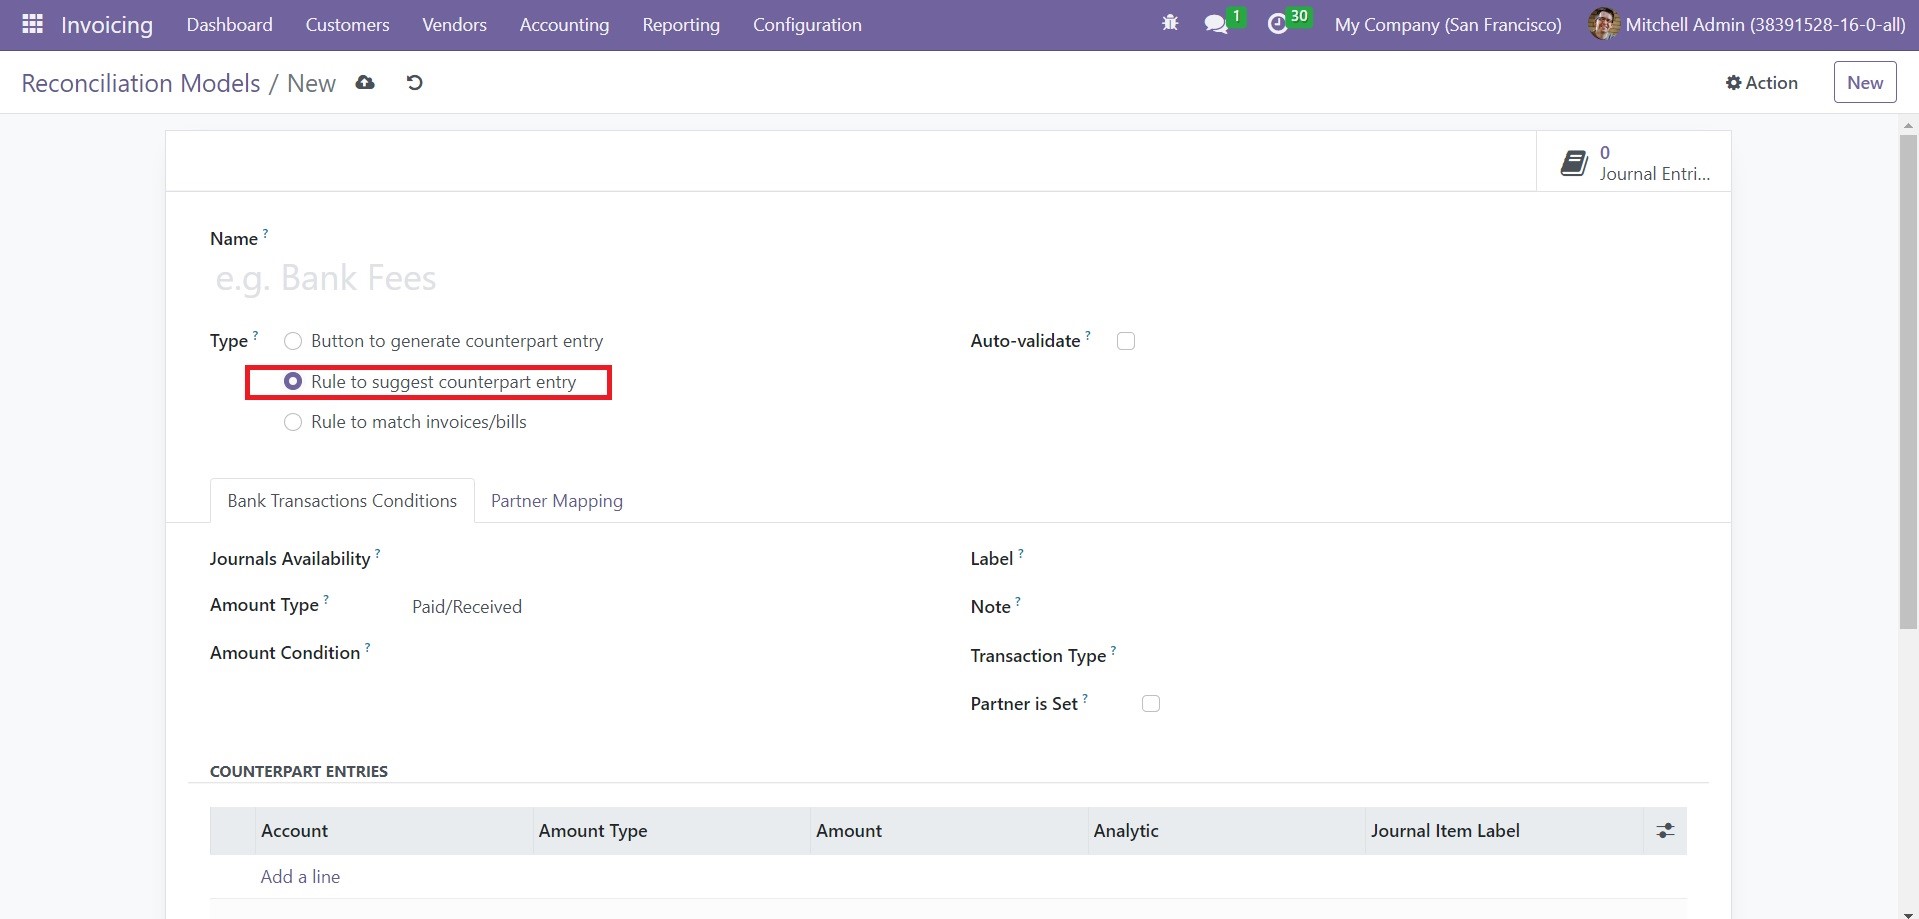
Here, you will get the Auto-Validate field to activate. Activating this feature will help you to validate the statement line automatically. You can set rules for the Journals Availability, Amount Type, Amount Condition, Label, Note, and Transaction Type using the given options. By activating the ‘Partner should be Set’ option, the reconciliation model will only be applied when a customer or vendor is set.
Under the Partner Mapping tab, add Find Text in Label, Find Text in Notes, and Partner details using the ‘Add a Line’ option.

You can mention the Account, Amount Type, Amount, Analytic, and Journal Item Label details by clicking on the ‘Add a Line’ button under the Counterpart Entries, just like we mentioned in the first case.
Rule to Match Invoices/Bills
In the third case, select the reconciliation Type as ‘Rule to Match Invoice/Bills.’ You can activate the Auto-validate field as we discussed above. Here, you will get the Search Months Limit to mention, which will define the number of months in the past to consider entries from when applying this model. The Matching Order can be set as Oldest First or Newest First.

In the Bank Transactions Conditions tab, specify the Journal Availability, Amount Type, Amount Condition, Label, Note, and Transaction Type in the corresponding fields. The Partner is Set field can be activated if necessary. If you activate the Payment Tolerance, the difference will be accepted in case of underpayment. Activating the Same Currency will restrict to propositions having the same currency as the statement line. Set conditions for Match Invoices/Bills with particular Label, Note, and Transaction Type from the given list. Complete the Partner Mapping field as mentioned earlier.
You can select a suitable type for the reconciliation model and use it for reconciling your bank accounts.
Charts of Accounts
The chart of accounts, as the name indicates, includes all configured accounts in Odoo. All these accounts are used to perform different types of financial operations in a company. It will precisely track and record all transactions in a business. You can use these accounts to keep a regular record of financial transactions. The chart of accounts will help you to ensure smooth finance management within your organization.
According to your business requirements, you can manage and configure a chart of accounts in the Invoicing module. You will get access to this platform from the Configuration menu of the module. You can use this platform to manage your multiple business accounts.
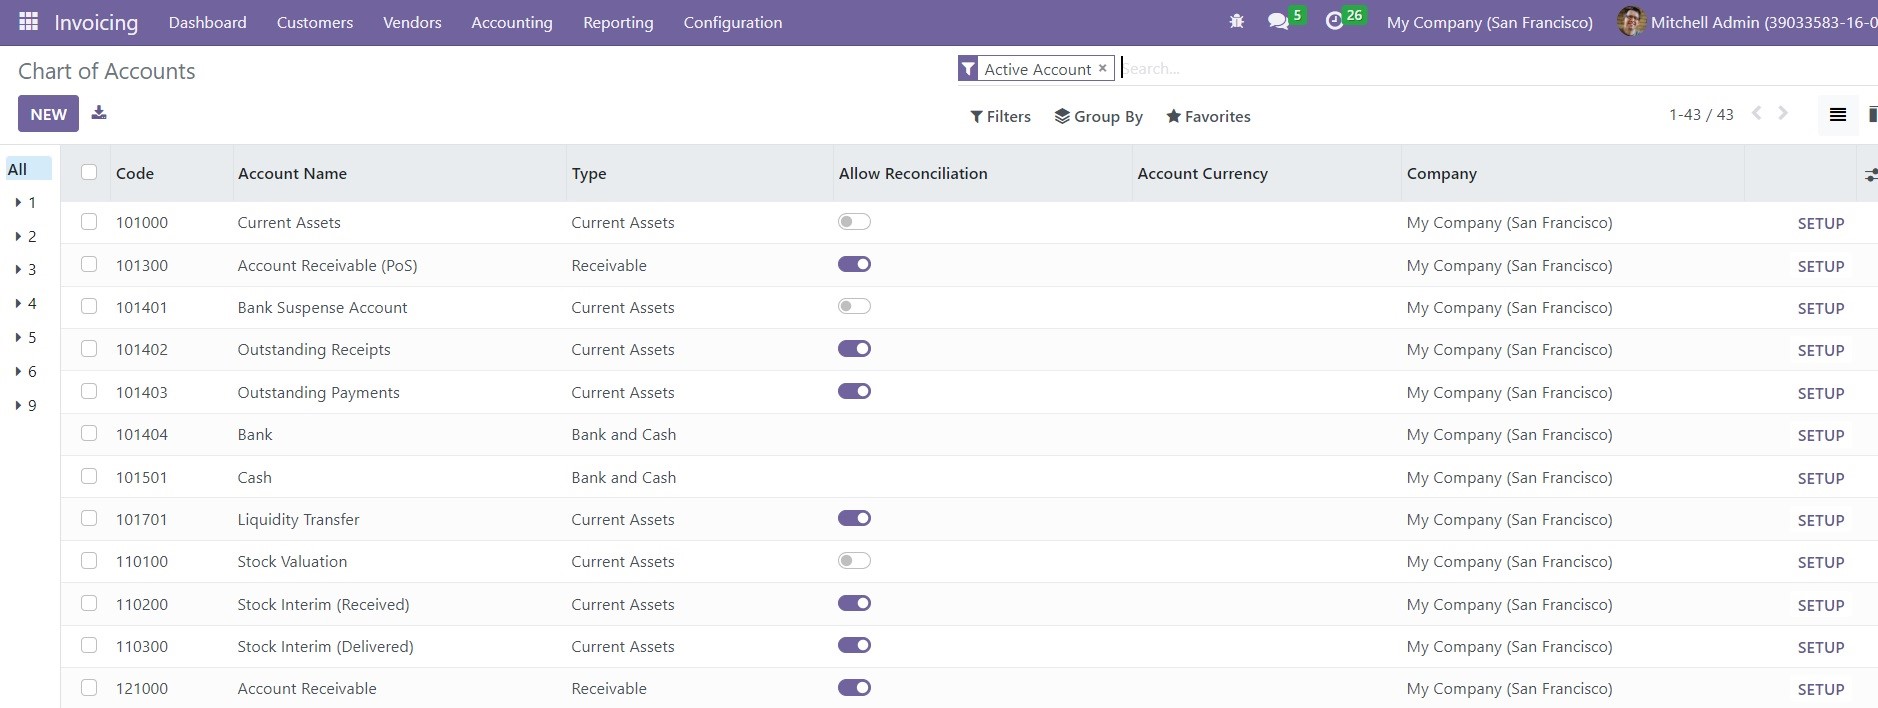
As you can see in the screenshot above, the platform will show the list of already configured charts of accounts with the details of the Code, Account Name, Type, Allow Reconciliation, Account Currency, Company name, and Setup option. You can use Receivable, Payable, Equity, Assets, Liability, Income, Expense, Account with Entries, and Active Accounts as Filters. The Account Type can be used as a Group By option.
You can use the New button to create a new account in this chart.
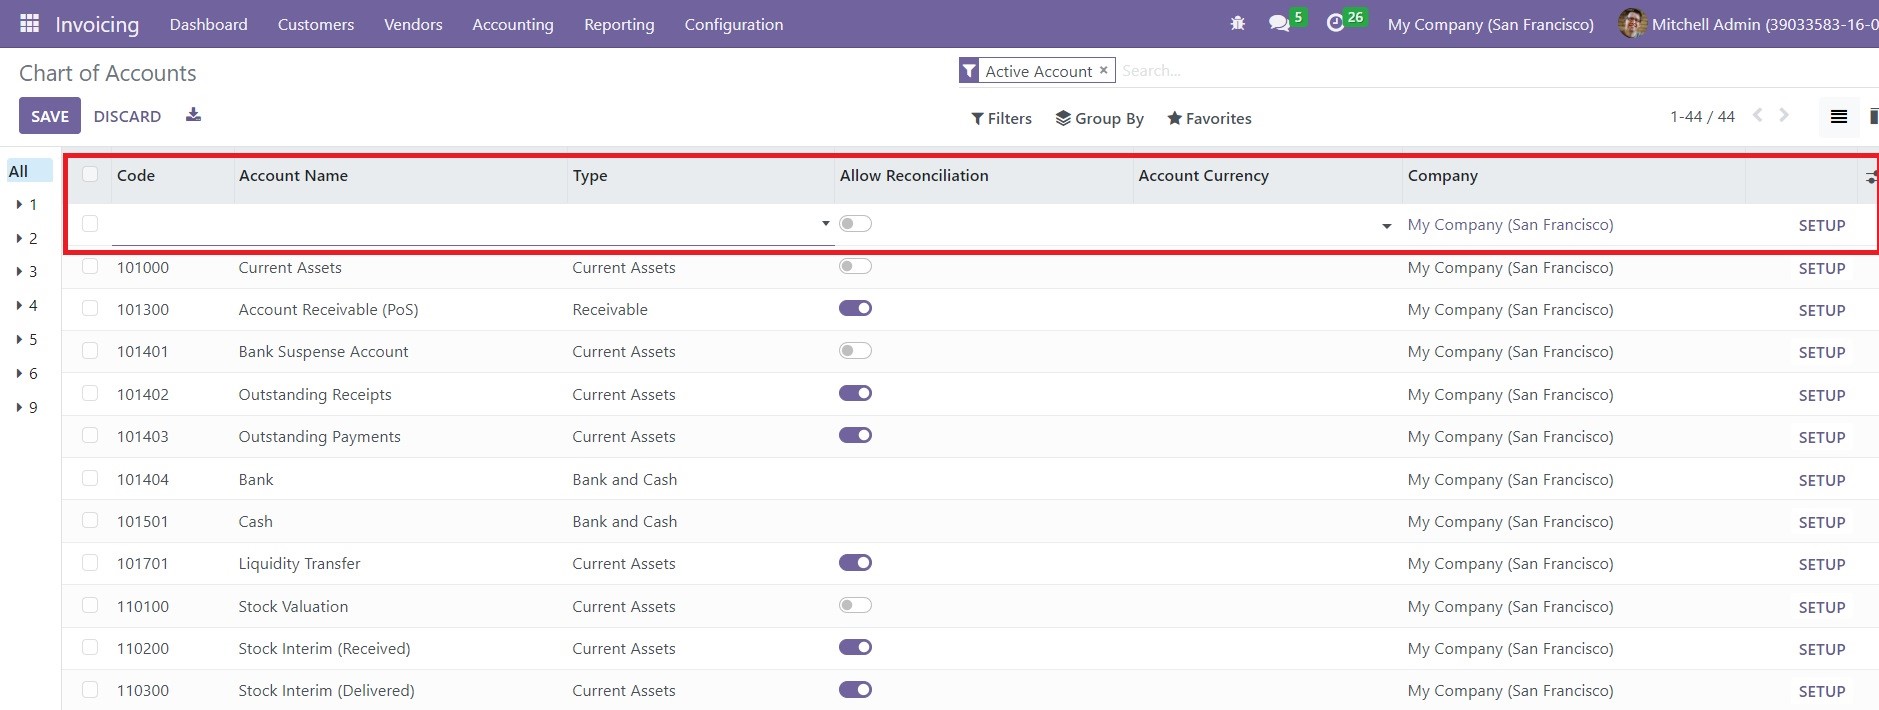
As soon as you click on the New button, you will get a new line as highlighted in the screenshot above. In the respective fields, you can mention the Code, Account Name, Type, Account Currency, and Company. If you want to allow reconciliation for this new account, you can activate the Allow Reconciliation field. The Setup option available on the screen can be used to edit the accounting details of the respective account.
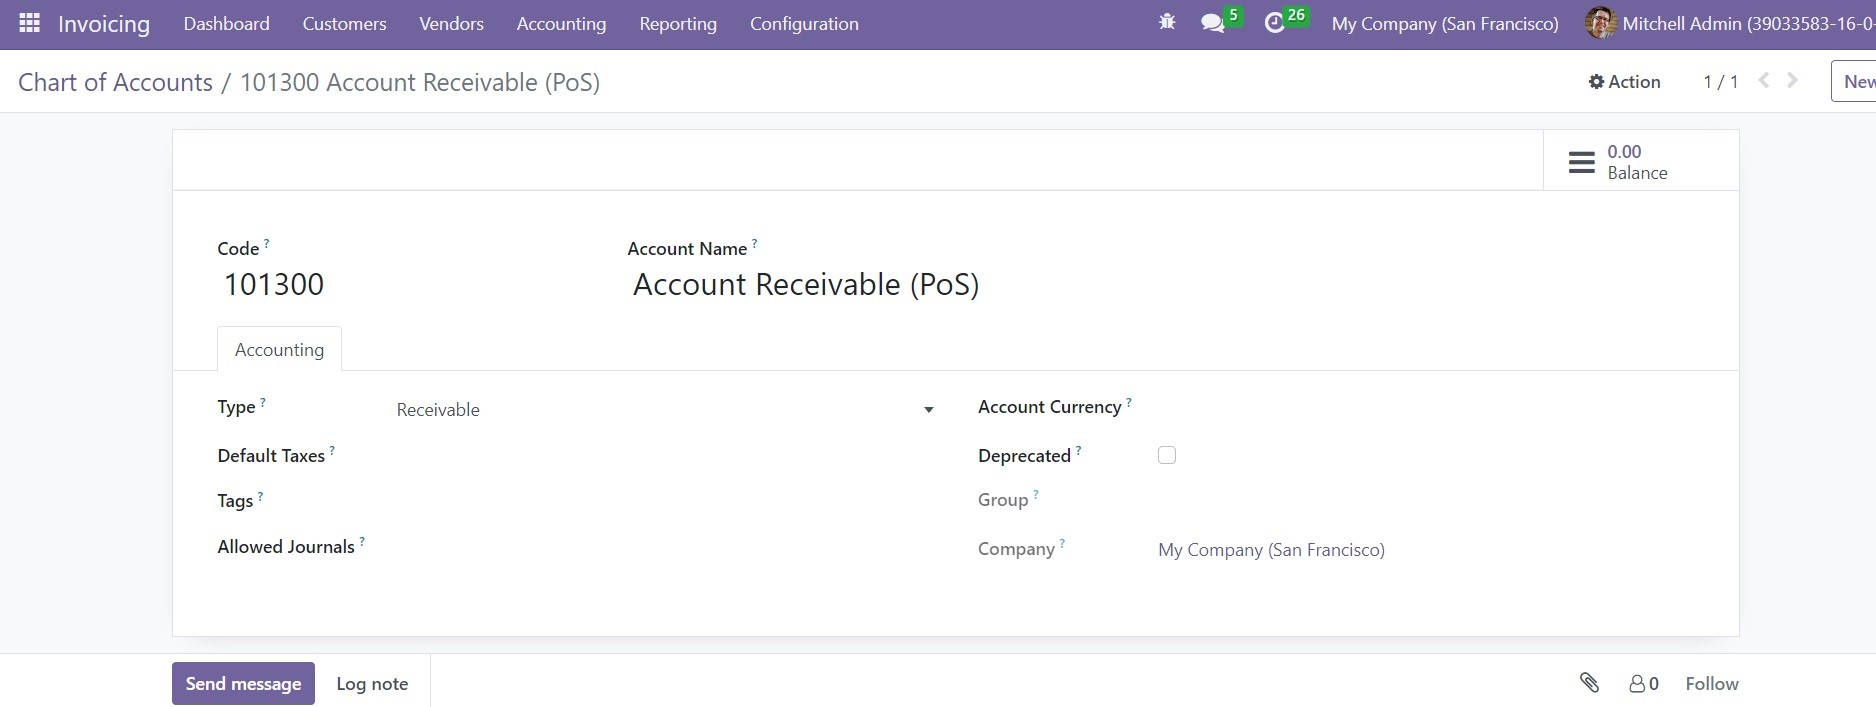
Odoo will lead you to the form view of the respective account as shown in the image above. The Code and Account Name will be available in the corresponding fields. The Accounting Type is meant for information purposes, which can be used to generate country-specific legal reports, and to configure the rules to close a fiscal year and generate opening entries. Set Default Taxes in the given space. Mentioning Tags will help you in custom reporting. Specify the Allowed Journals in which this account can be used. By enabling the Deprecated option, Odoo will allow you to deactivate the account without deleting it. Mention the Account Currency, Group, and Company in the corresponding fields.
Once you complete the configuration, you will get the Balance smart button to observe the balance of the account.
Taxes
In the accounting management of a business, managing and computing taxes are considered as one of the difficult operations which require more attention and accuracy. The comprehensive accounting management system offered by Odoo ERP can help you in ensuring transparency and accuracy in tax-related operations. You can use the Invoice module to configure different taxes for your business and manage them effortlessly. The Taxes option will be available under the Configuration menu of the module.
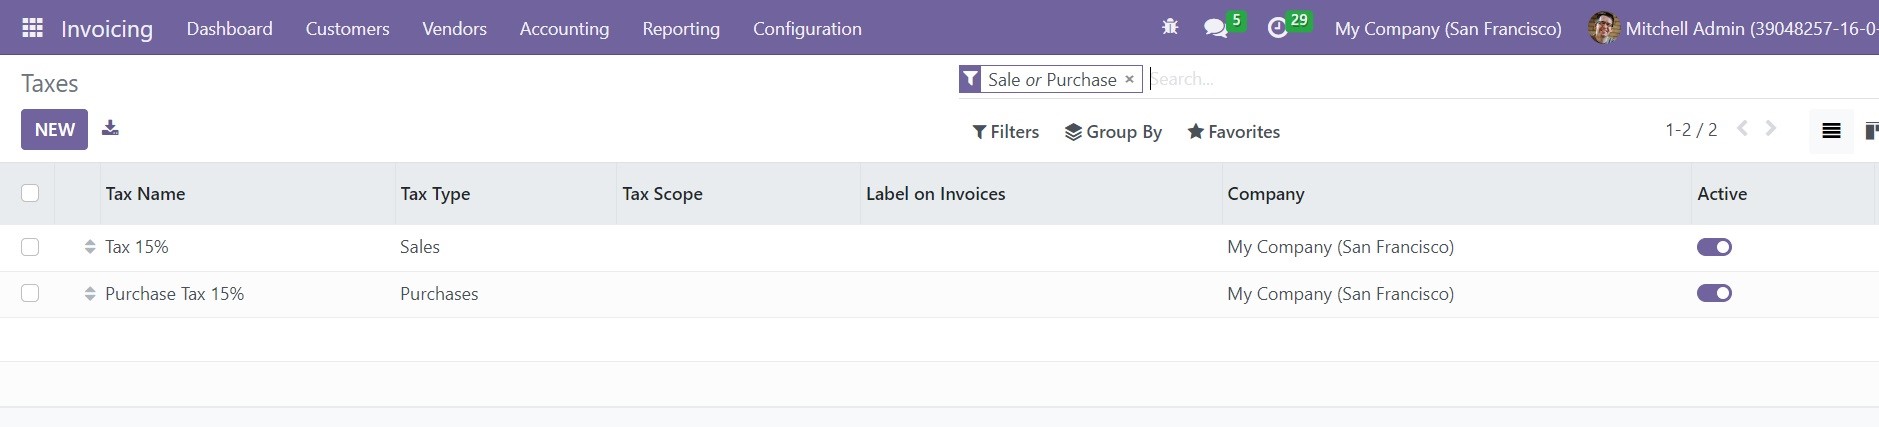
This is the list view of the Taxes window. The list will show pre-configured taxes in the module. The platform can be viewed in Kanban view also by selecting the corresponding icon. The window displays the details of the Tax Name, Tax Type, Tax Scope, Label on Invoice, Company, and Active status. In order to make any changes in the available taxes, you can click on the respective ones and edit them. You will get Sales, Purchase, Services, Goods, Active, and Inactive options as the default Filters. You can use Company, Tax Group, and Tax Scope as default Group By option. The Custom option will allow you to customize filters and group by options as per your requirement.
Now, click on the New button to configure a new tax for your company. You will get a new form view as shown below that will help you to configure the details required to create a new tax.
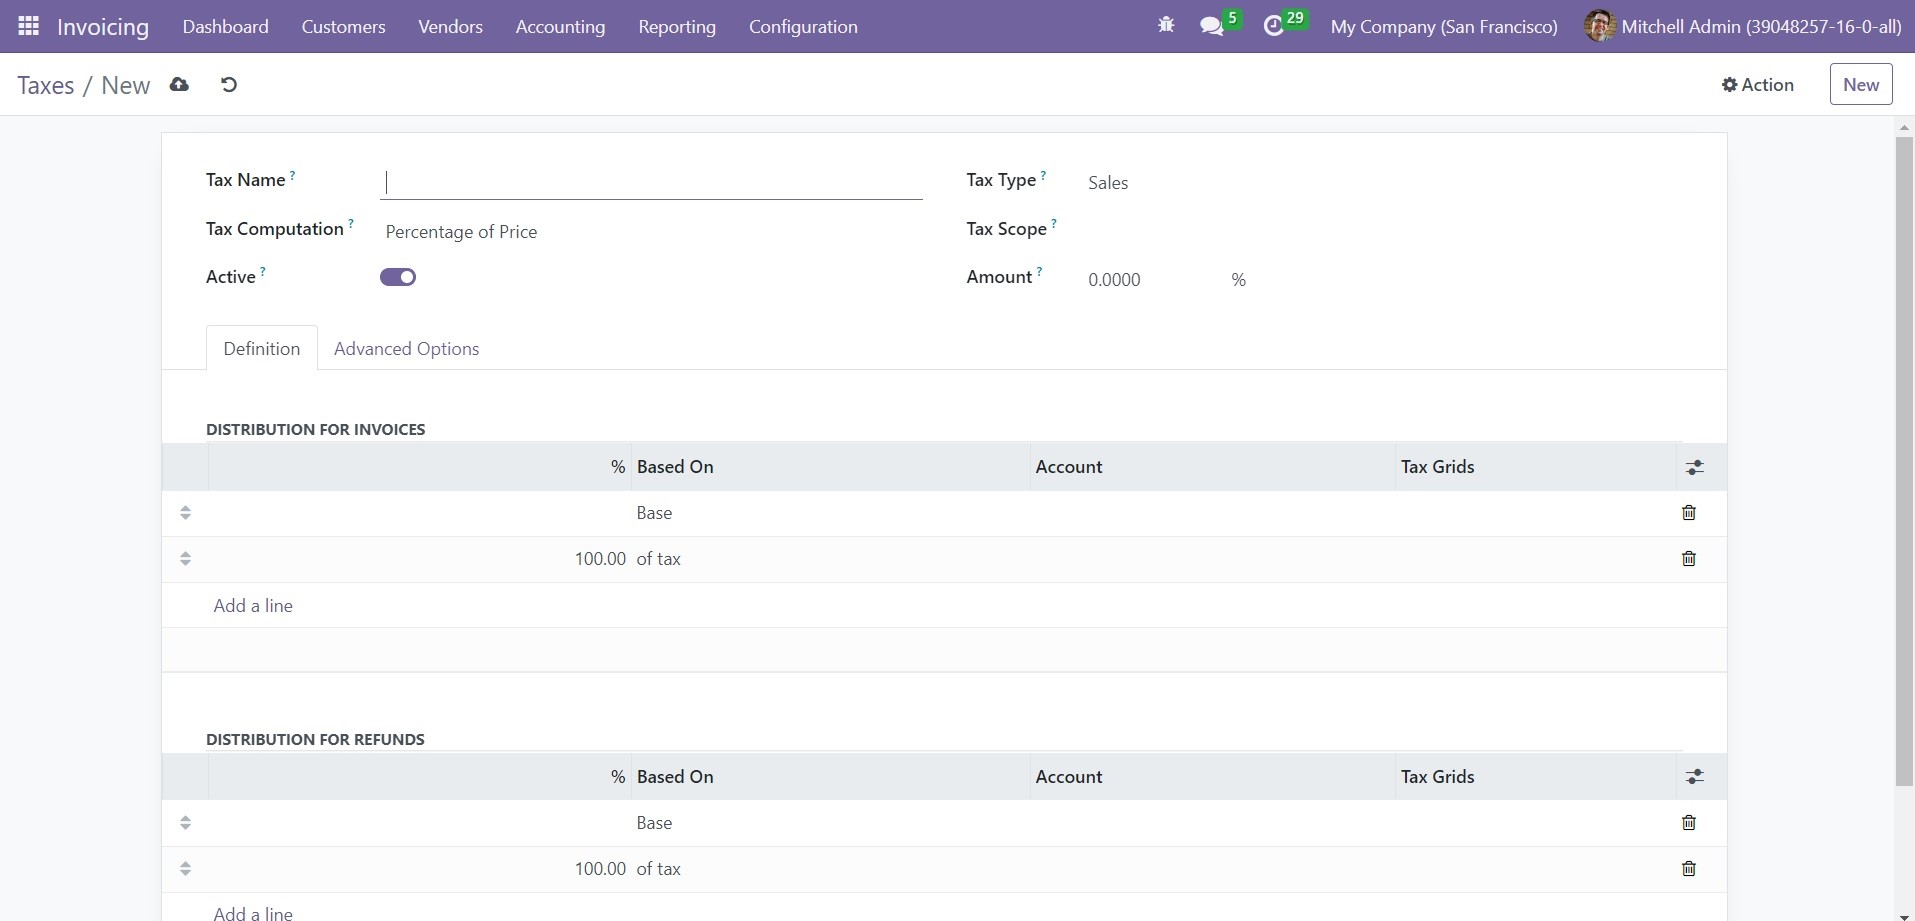
In the Tax Name field, you can provide the name of the new tax. The Tax Computation field will help you to define the computation method used for this particular tax. In the drop-down menu, you will get Group of Taxes, Fixed, Percentage of Price, Percentage of Price Tax Included, and Python Code as options to select a suitable computation method for tax.
- Group of Taxes- The tax will be a set of sub-taxes.
- Fixed- The tax amount will be the same even if the price changes.
- Percentage of Price- The tax amount will be a % of the price.
- Percentage of Price Tax Included- The tax amount will be a division of the price.
The Tax Type will define the places where this particular tax is selectable. It can be either Sales or Purchases. If you want to restrict the use of this tax only to a type of product, you can mention it in the Tax Scope field. You can set this option as Goods or Services. For all tax computation methods except the Group of Taxes option, you need to mention the Amount in the given space. In the case of the Group of Taxes, the tax will be calculated based on the set of sub-taxes added to the configuration.
Under the Definitions tab, you can add the tax rule for the Distribution for Invoices and Distribution for Refunds.
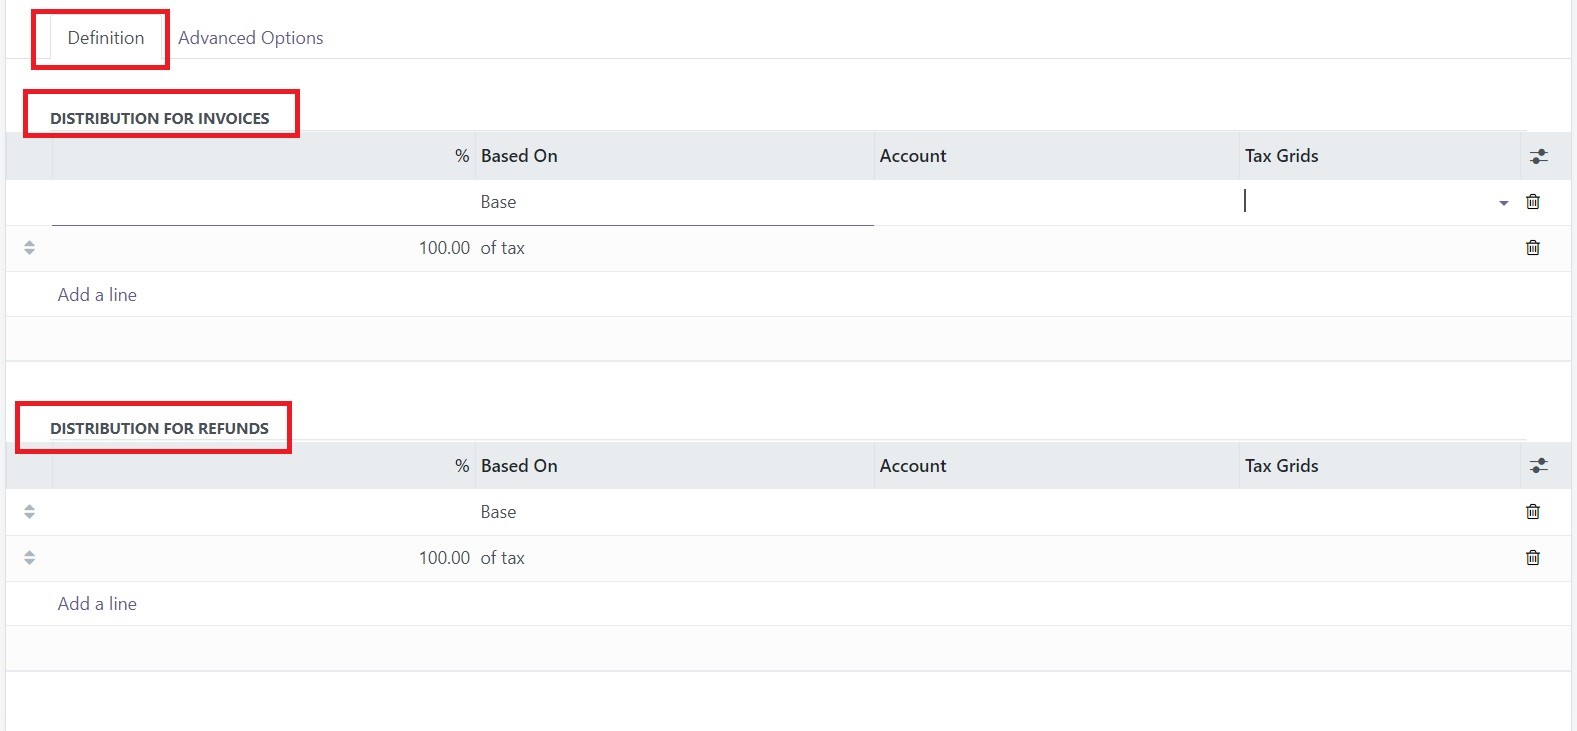
The details you mention in the Distribution for Invoices field will be useful if the tax is used on an invoice and the Distribution for Refunds will be used when the tax is used to create a refund. You can use the Add a Line button to mention the required details.
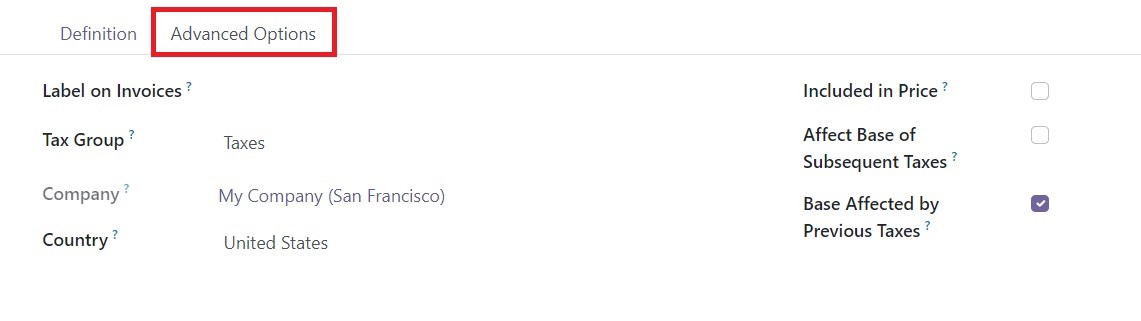
In the Advanced Options tab, you can add a description in the Label on Invoices field, which will appear on the invoices when you use this particular tax on invoices. Mention Tax Group, Company, and Country in the respective fields. You can activate the Included in Price field if the price you use on the product and invoice includes this particular tax. If you activate the Affect Base of Subsequent Taxes field, the taxes which are computed after this one will be computed based on the price tax included. When you activate the Base Affected by Previous Taxes, the taxes with a lower sequence might affect this one. This is how we create and manage new taxes in the Odoo Invoicing module.
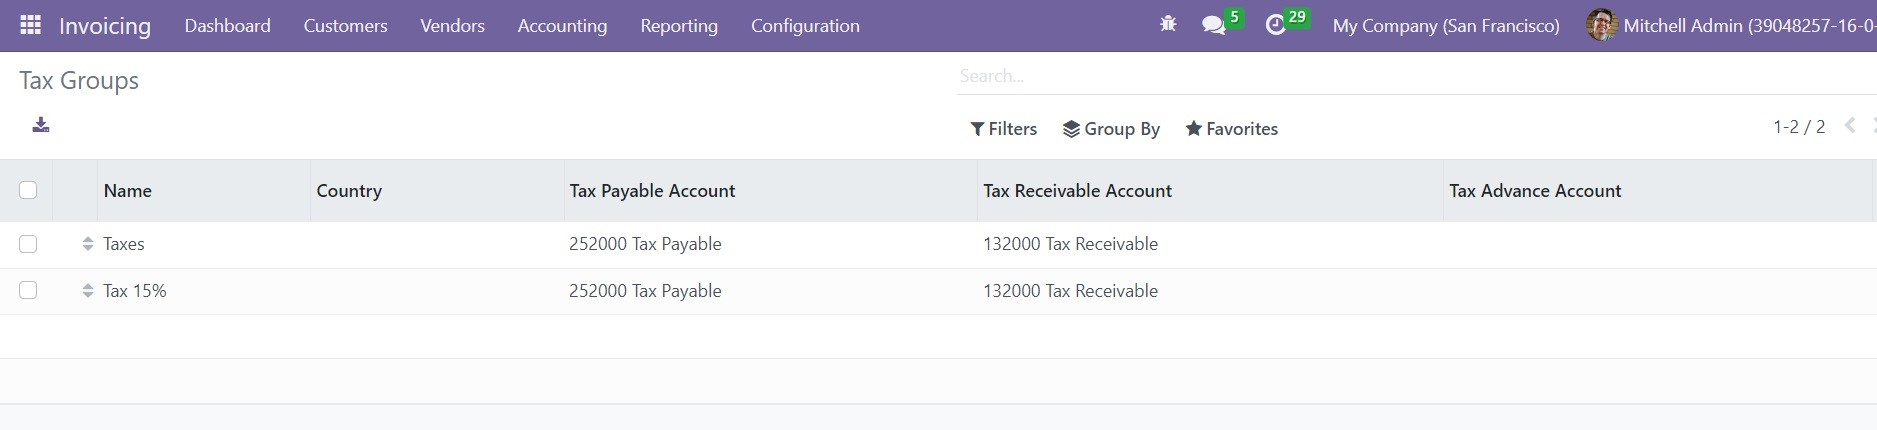
Under the Configuration menu, you can find the Tax Group option, which will record all tax groups mentioned while creating a new tax, as shown in the image above. This window shows the Name, Country, Tax Payable Account, Tax Receivable Account, and Tax Advance Account details of the Tax Groups.
In the Settings menu of the Invoicing module, you can set default taxes under the Taxes tab. The default taxes will be automatically selected for accounting operations when there are no other taxes mentioned in the configuration of the operation. It will be automatically applied to new products also. If you want, you can change the tax later from the form view of the product. You can set Sales and Purchase Taxes in the respective fields as shown in the screenshot below.
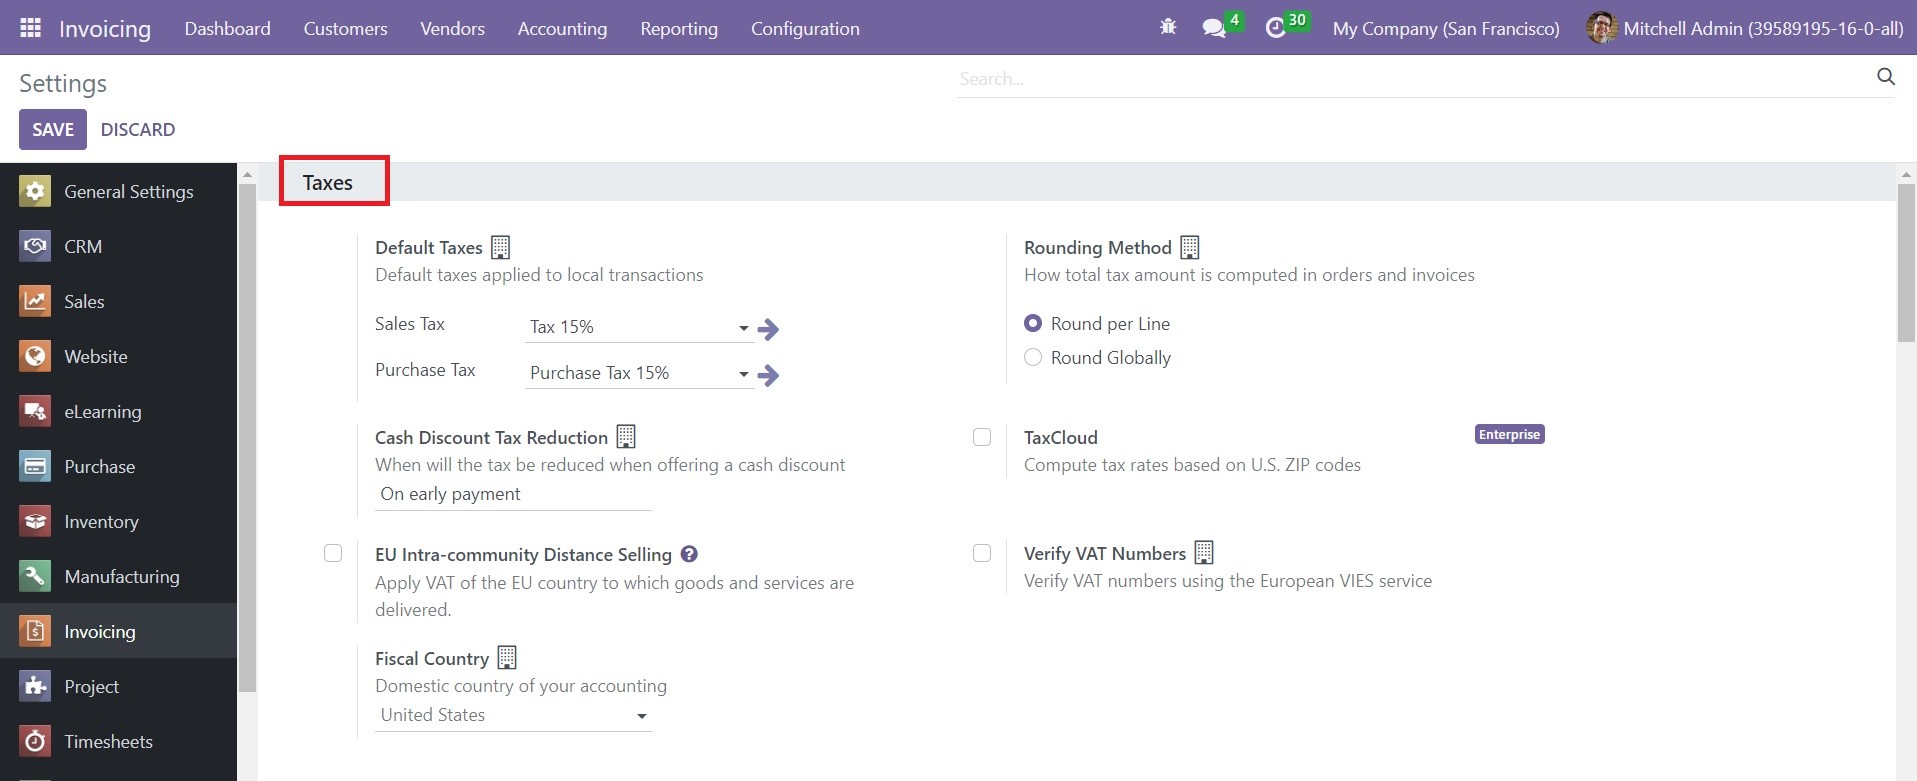
You can use the Cash Discount Tax Reduction field to define when the tax will be deducted while offering a cash discount. You can set the reduction option as On early payment, Never, or Always (upon invoice).
When you sell goods and services to customers from a foreign EU country, you can impose VAT based on the delivery address. The EU Intra-community Distance Selling feature available in the Settings menu of the Invoicing module will help you to perform this operation. Regardless of the location, this rule can be applied. Based on the country of the customer, Odoo will automatically apply appropriate taxes and fiscal positions for each EU member state. You can use the Verify VAT Number feature to verify VAT using the European VIES service. By activating this feature, the contact will be saved only after its VAT number has been verified by the European VIES service.
The Rounding Method option will define the method to calculate the total tax amount in orders and invoices. You can choose either Round per Line or Round Globally method for the tax rounding. A rounding per line is advised to use if your prices are tax-included. That way, the sum of line subtotals equals the total with taxes.
Journals
All accounting entries of a company will be recorded in accounting journals. Accounting journals are considered as the records of transactions in chronological order. In a business, we create a sales journal for customer invoices, a purchase journal for vendor bills, a bank journal for bank transactions, and a general journal for other miscellaneous operations. You can manage such journals effectively with the assistance of the Invoicing module. The transaction records are added to these journals in the form of journal entries. It is possible to keep a track of all your financial documents related to different business operations and transactions as journal entries in journals.
To get access to the Journals platform, you can go to the Configuration menu of the Odoo Invoicing module. The list view of the Journals window is shown below.
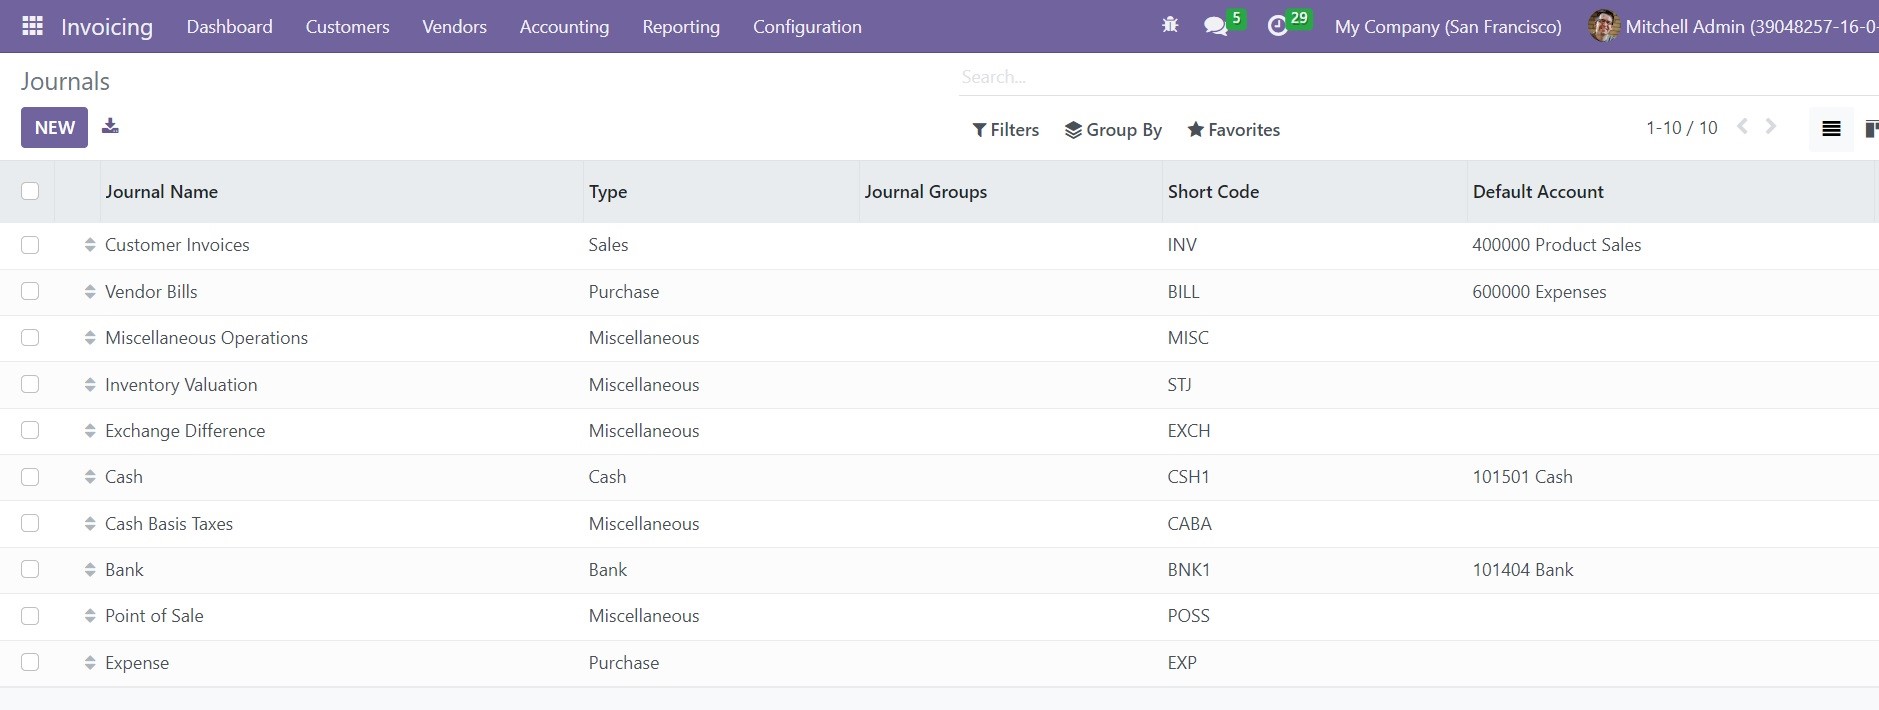
The window can be viewed in Kanban view also. You can observe the Journal Name, Type, Journal Groups, Short Code, and Default Account from the list view. Clicking on a particular journal will provide a detailed view of the data specified in the respective journal and you can make changes to the data if necessary. You can use default and customizable options to simplify the sorting processes. As default, you will get Favorites, Sales, Purchase, Liquidity, Miscellaneous, and Archived as filters.
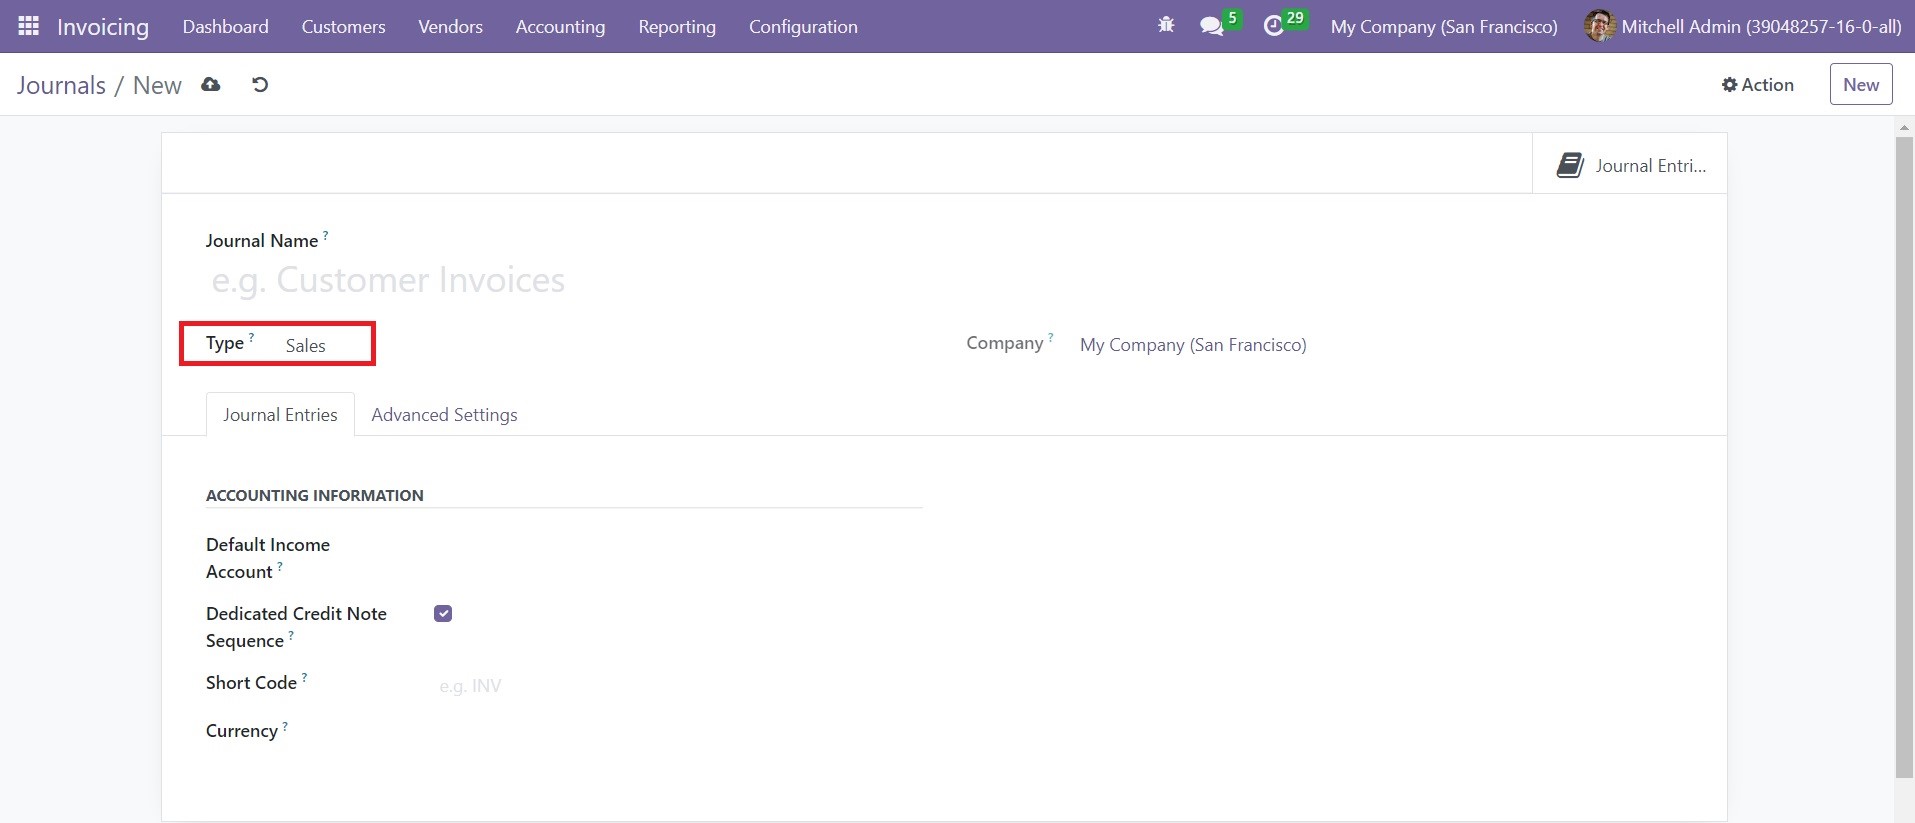
Use the New button to create a new journal for your accounting operations. Clicking on the New button will lead you to a form view as shown below which can be used to create a new journal.

Here, you can specify the name of the Journal and Company in the respective fields. You can create five types of journals in Odoo which are Sales, Purchase, Cash, Bank, and Miscellaneous. Based on the type you select, the remaining tabs in the form view will change. Let’s check each journal type separately.
Sales
In order to create journals for customer invoices, you can select the option Sales in the Journal Type field. After selecting the Type, you can set a Default Income Account for this journal under the Journal Entries tab. You can activate the Dedicated Credit Note Sequence field if you don’t want to share the same sequence for invoices and refunds made from this journal. Mention a Shirt Code, which will be used as a short name for display. The Currency used to enter a statement can be specified in the given space.
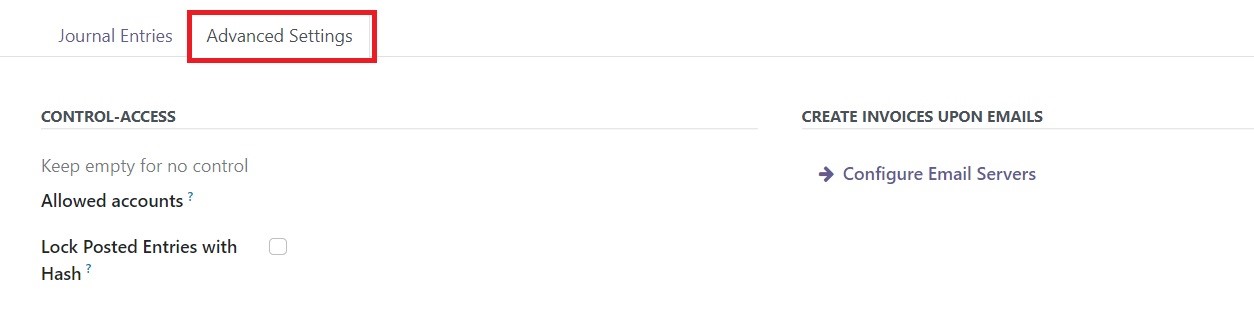
Under the Advanced Settings tab, you can set Control-Access. You can keep the fields empty for no control. Specify the Allowed Accounts in the respective field.
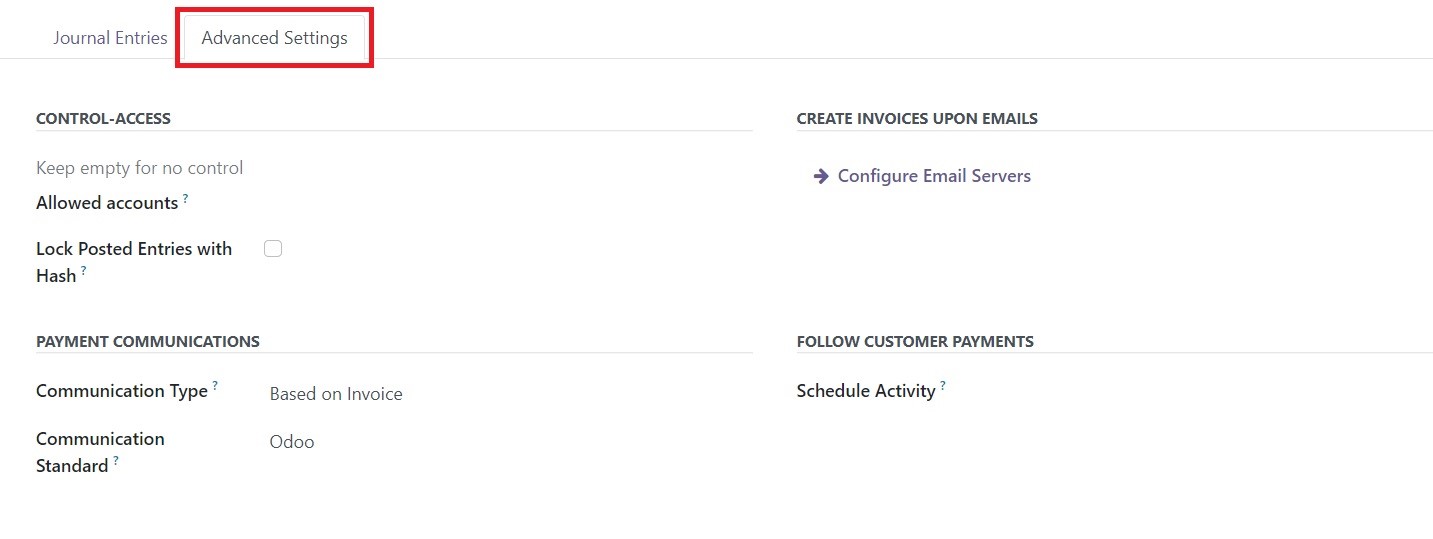
If the Lock Posted Entries with Hash feature is activated, the accounting entry or invoice receives a hash as soon as it is posted and it cannot be modified anymore. In the Payment Communications section, you can set a Communication Type that will appear on the customer invoices, once validated, to help the customer to refer to that particular invoice when making the payment. Set suitable Communication Standards in the given space. You will get a field to configure email servers to create invoices upon emails in Odoo. The activity you mention in the Schedule Activity field will be automatically scheduled on the payment due date to improve the collection process.
Purchase
The option Purchase can be selected in the Type field if you want to create journals for vendor bills.

In the Journal Entries tab, you can specify the Default Expense Account, Short Code, and Currency in the respective fields. Activate the Dedicated Credit Note Sequence if necessary.
Under the Advanced Settings tab, you can specify the Allowed Account in the Control-Access field. Configure email servers to create invoices upon Emails. Based on the requirement, you can activate the Lock Posted Entries with the Hash option.
Cash and Bank
When you select the Cash or Bank as the Type of Journal, you will get two additional tabs to complete which are Incoming payment and Outgoing Payment. You can use Cash and Bank journals to record your cash transactions and bank statements.
For the Cash option, you need to mention the Accounting Information under the journal Entries tab.
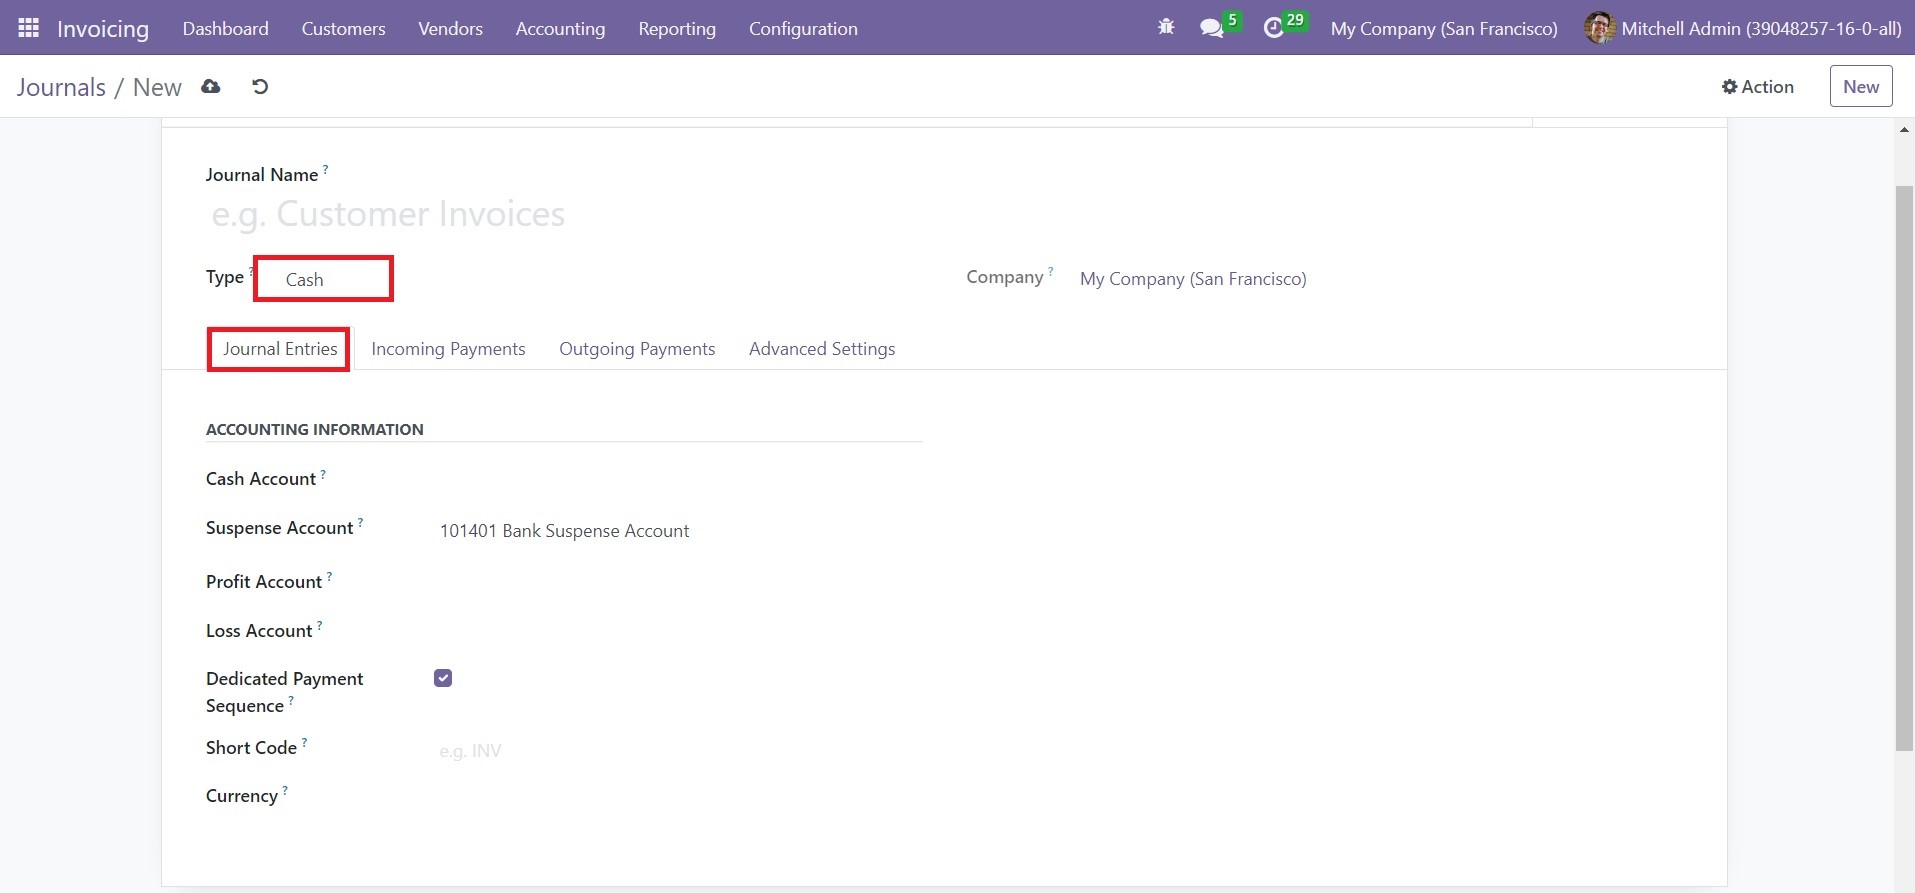
Here, you can mention Cash Account, Suspense Account, Profit Account, and Loss Account. The other fields are the same as those we mentioned earlier. The bank statement transactions will be posted on the suspense account until the final reconciliation allowing finding the right account. The profit account and loss account will be used to register a profit or loss, respectively when the ending balance of a cash register differs from what the system computes.
For the Bank option, you need to mention Bank Account and Account Number in the corresponding fields.
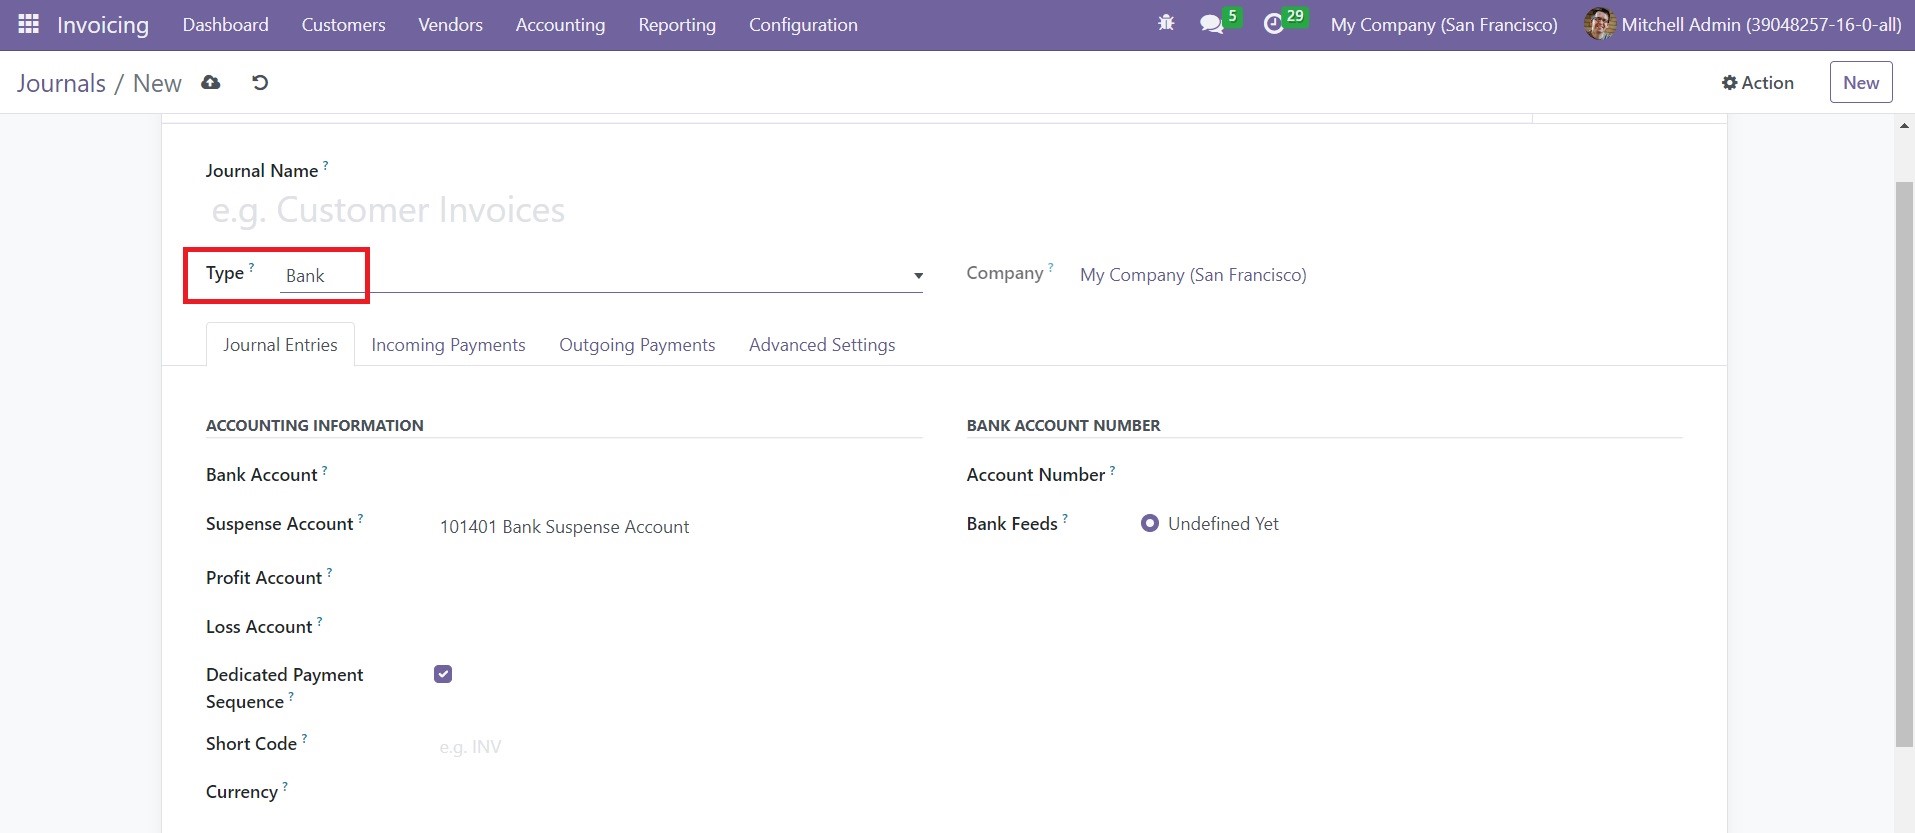
The Incoming Payments, Outgoing Payments, and Advanced Settings tabs are the same for both Bank and Cash options.
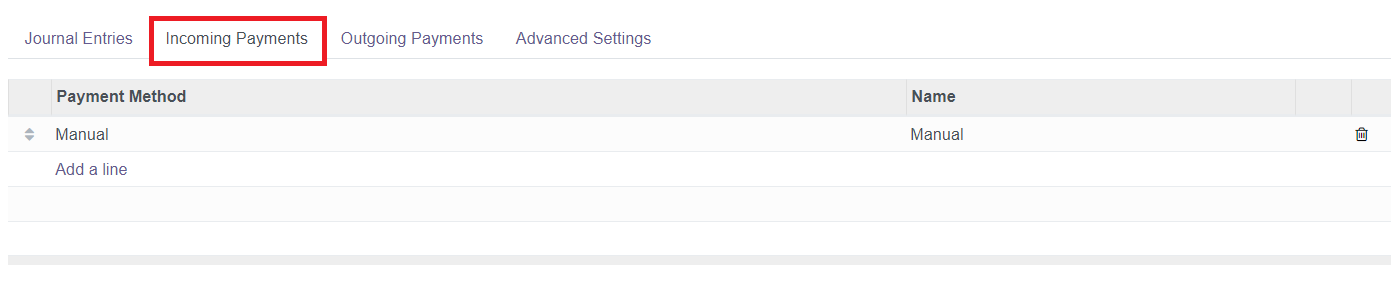
You can use the Add a Line button to add Payment Method and Name under the Incoming Payments and Outgoing Payments tabs.

All other business transactions can be recorded in the Miscellaneous Journals. You can create a suitable journal for your accounting operations from this window.
Journal Groups
Configuring different journal groups will allow you to easily categorize the journals in the Odoo Invoicing module. You can use the journal group as a filter option in the Journal window. From the Configuration menu of the module, you can select the Journal Groups option. This platform can be used to create and manage various types of journal groups. You can use the New button to create a new journal group for the module.

As you can see in the screenshot above, a new line will appear on the screen as soon as you click on the New button. Here, you can specify the Journal Group, Excluded Journals, and Company in the corresponding fields. Finally, click on the Save button to save the new data.
Journal Entries
The financial transactions and statements concerning the business operations of your company will be added to the accounting journals in the form of journal entries. In the Odoo Invoicing module, you will get the Journal Entries feature under the Accounting menu once you activate the Show All Accounting feature from the General Settings of Odoo. The Journal Entries platform will show all entries added to various journals in the Invoicing module.
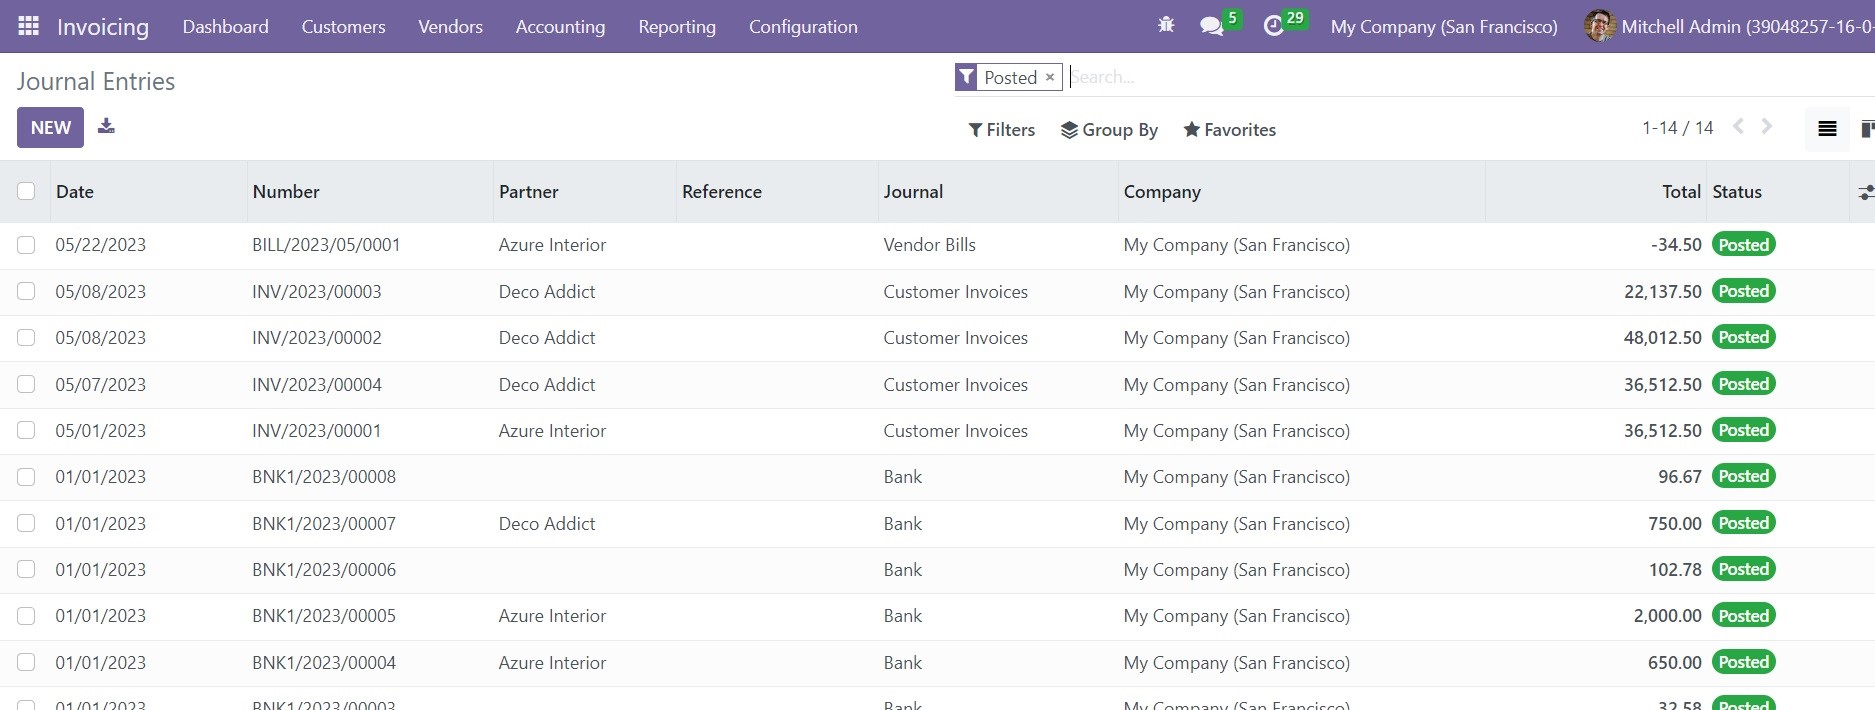
Here, you will get the list view of the Journal Entries with the details of the Date, Number, Partner, Reference, Journal, Company, Total, and Status. You will get Unposted, Posted, Reversed, To Check, Sales, Purchase, Bank, Cash, Miscellaneous, and Date as default filters. You can use Partner, Journal, Status, Date, and Company as the default group by options.
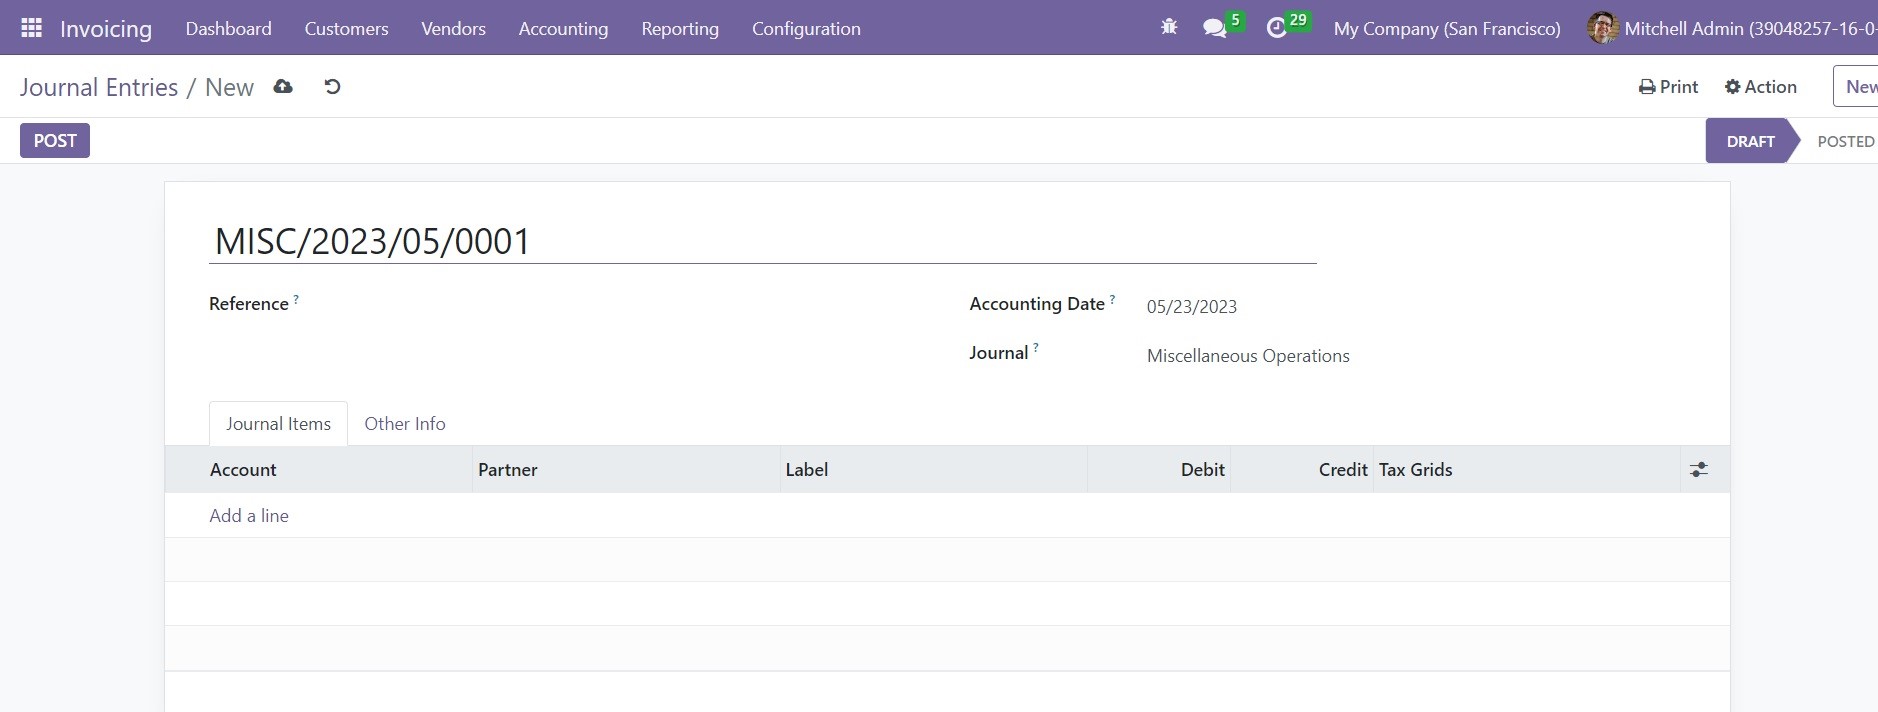
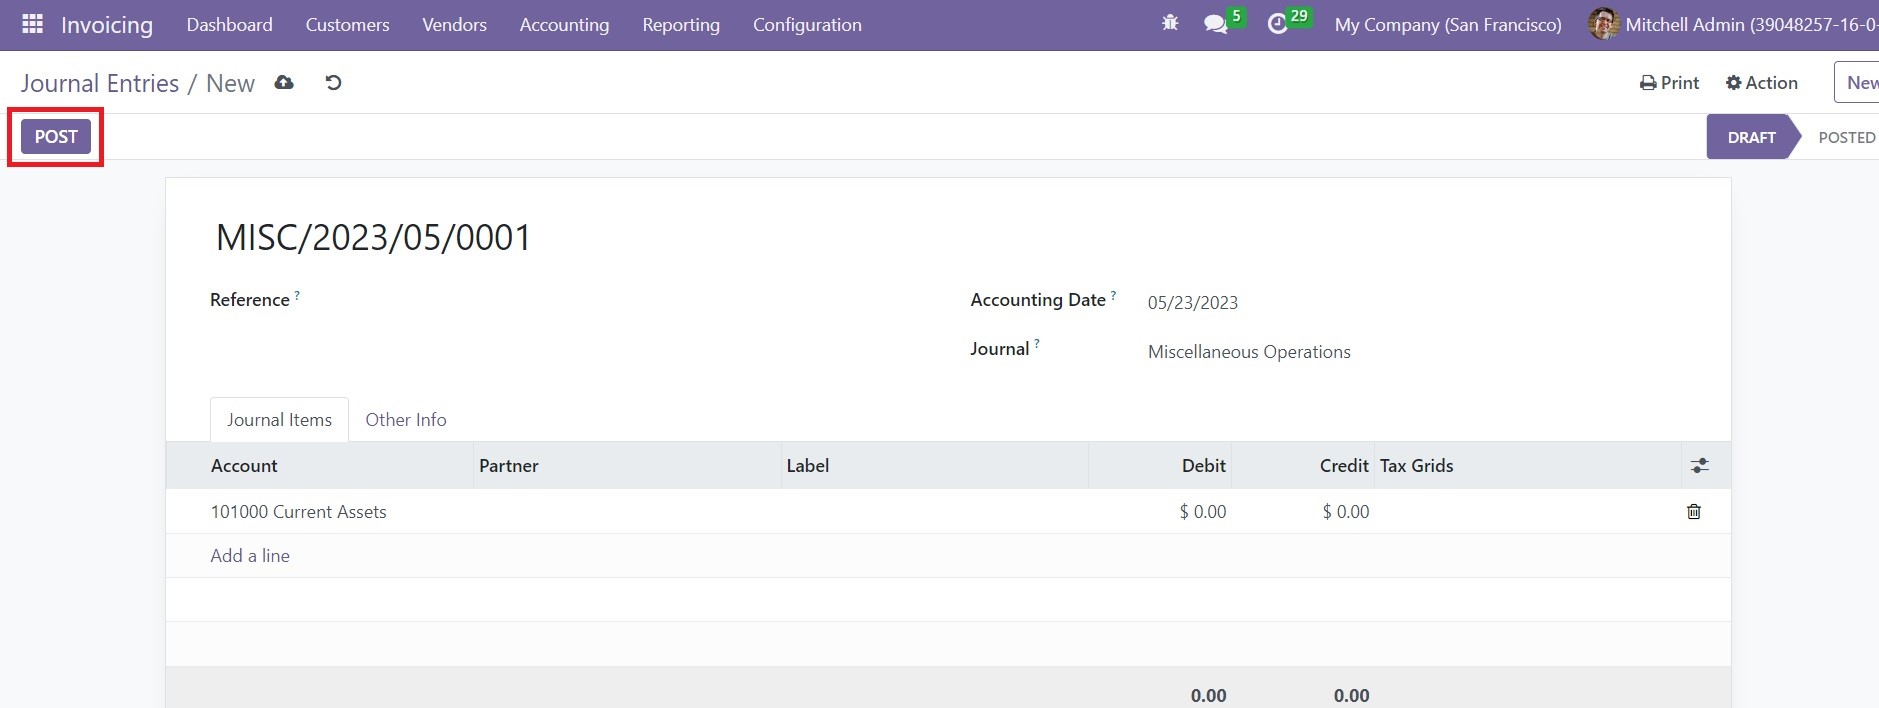
You can mention the Reference of this journal entry in the given space. Specify the Accounting Date and Journal in the corresponding fields. In the Journal Items tab, add the Account, Partner, Label, Debit, Credit, and Tax Grids details using the Add a Line button.

Under the Other Info tab, enable the Auto-Post option if you want to post the entry automatically on the mentioned date. The ‘Reversal of’ field will show the reversed entry id if this journal entry belongs to a reversal entry. Activating the To Check option will allow you to recheck the information added to the journal entry. You can add the Fiscal Position and Company in the respective fields. In the given space, you can add an internal note related to this particular journal entry.
You can click on this button which will open a new pop-up window that can be used to mention the details required for reversing the current journal entry.

You can click on this button which will open a new pop-up window that can be used to mention the details required for reversing the current journal entry.
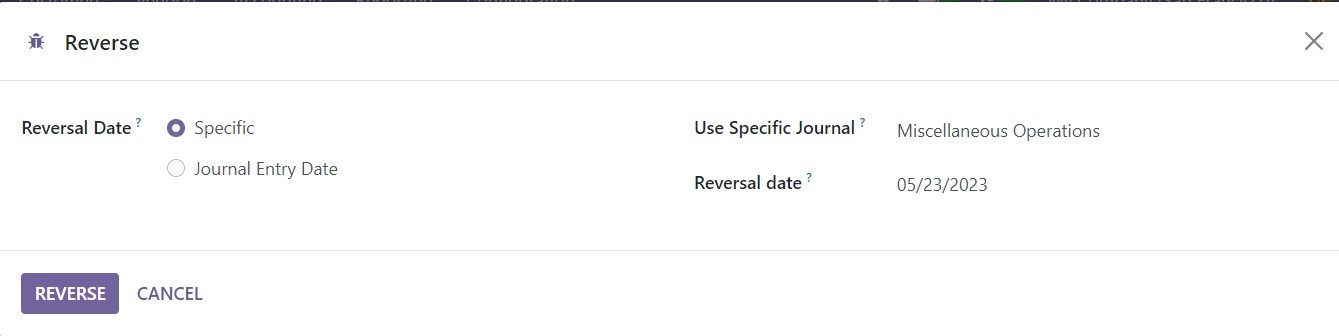
Once you add the required details, you can click on the Reverse button to reverse the journal entry. The Journal Items that you added to journal entries will be recorded in a specified platform in Odoo which is available under the Accounting menu. The Journal Items will record the details of all journal items configured in different journal entries in the Odoo Invoicing module.
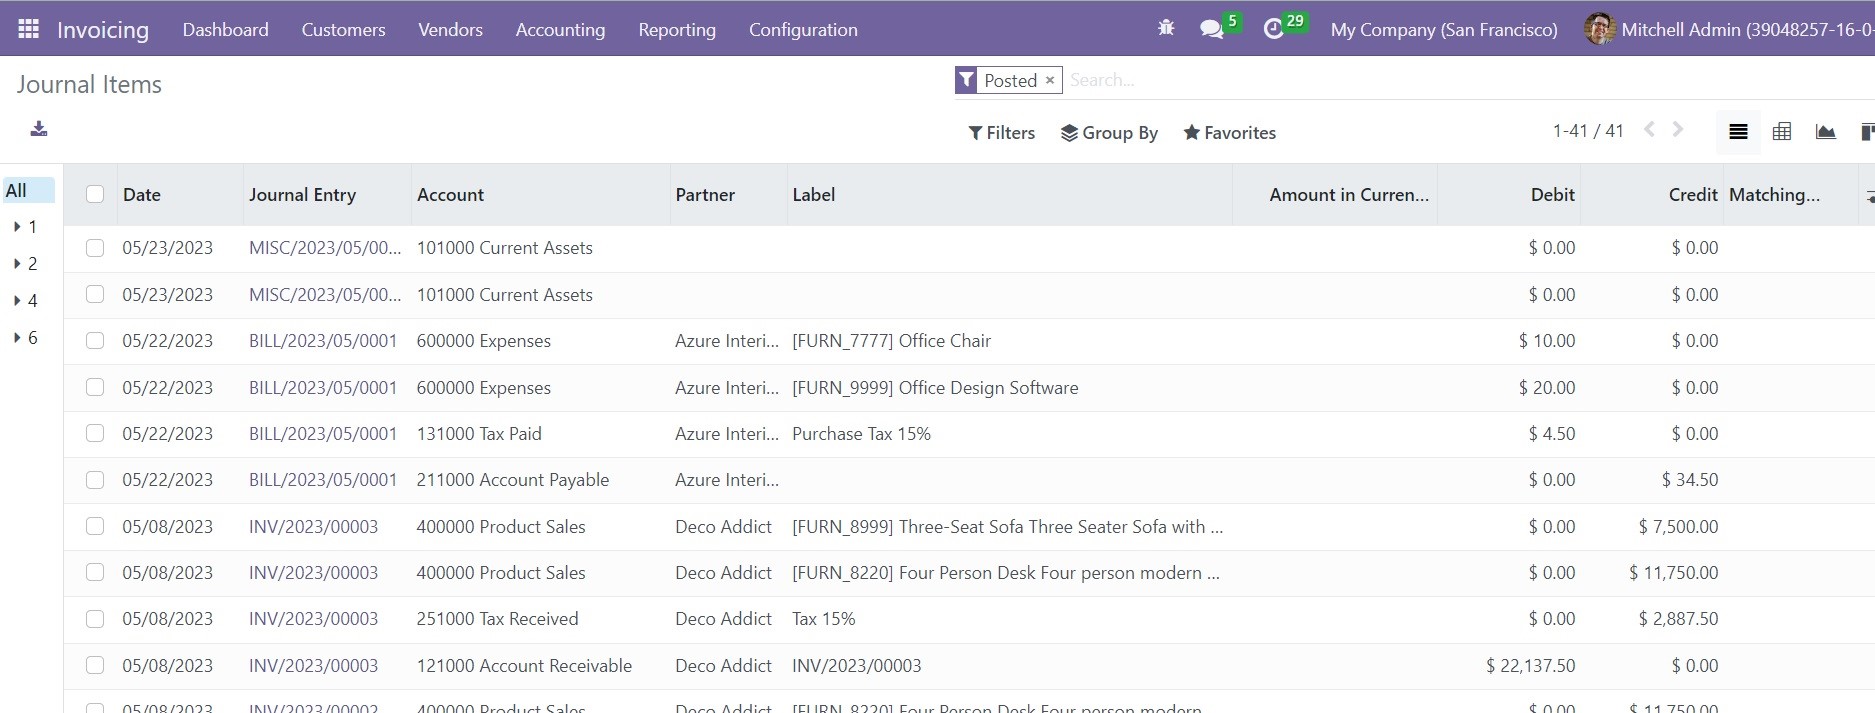
The view of the platform can be altered into List, Kanban, Pivot, and Graphical views. From the list view, you will get the details of the Date, Journal Entry, Account, Partner, Label, Amount in Currency, Debit, and Credit details.
Fiscal Position
Fiscal Position in Odoo will assist you to easily fix the tax computation in accordance with your company tax policies. It is possible to map taxes and accounts with concerned tax and accounts with respect to the countries or a group of countries. You can use the Fiscal Position feature available in Odoo to configure suitable rules so that the system can automatically choose the taxes and accounts of a country when you are doing business transactions.
To get access to the platform to define various Fiscal Positions, go to the Configuration menu of the Odoo Invoicing module. The window will show the list of pre-configured fiscal positions. From this window you can create a new fiscal position using the New button.

Provide the name of the new Fiscal Position in the given field. The name of the Company will be available in the corresponding field. If you want to apply this fiscal position automatically, you can activate the Detect Automatically option. The tax ID of your company in the region mapped by this fiscal position can be added in the Foreign Tax ID field. By mentioning the Country, the fiscal position will be applied only when the delivery country matches.
In the Tax Mapping tab, mention the Tax on Product and Tax to Apply details using the ‘Add a Line’ option. Odoo will use these details to map taxes. You can add Legal Notes which will later appear on invoices.

In the Account Mapping field, you can mention the Account on Product and Account to Use Instead details which will help you to map accounts. You can configure new fiscal positions in Odoo like this.
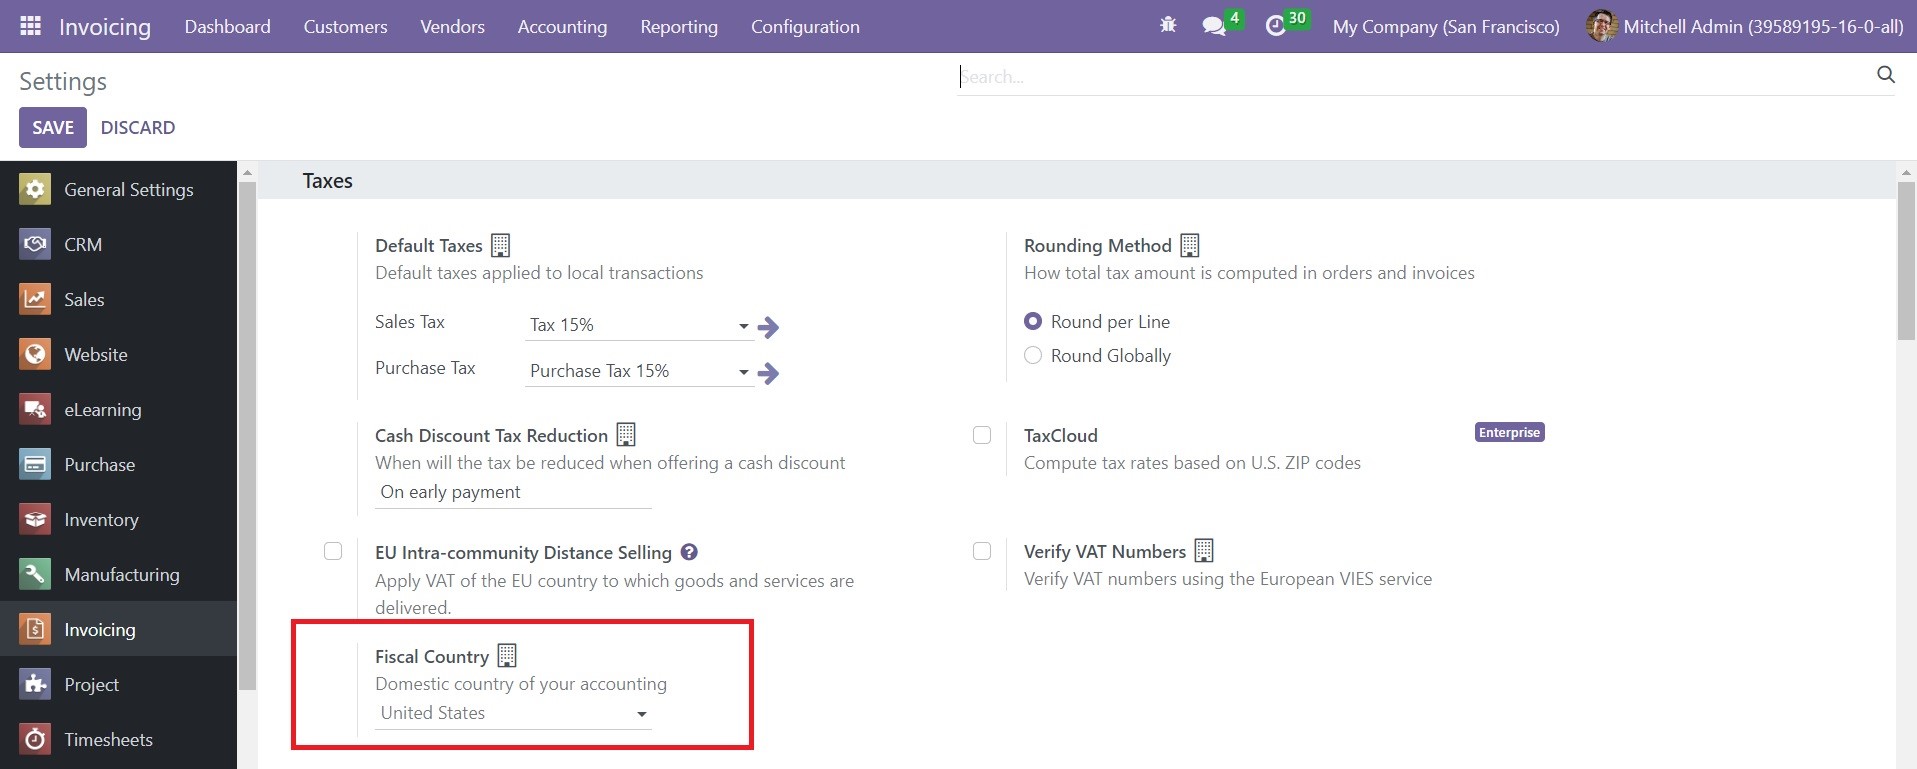
In the Settings menu of the module, you will get the Fiscal Country option under the Taxes tab which can be used to mention the domestic country of your accounting.
Payments
When you check the Configuration menu of the Invoicing module, you can find different options under the Payments tab to manage the payments in Odoo. You will get Payment Providers, Payment Icons, Payment Tokens, and Payment Transactions options in the Payments tab. We are going to detail each of these options separately.
Payment Providers
The Payment Providers in Odoo will let the customer choose the most appropriate method to pay their bills using e-payment portals. Odoo ERP system offers the support of multiple payment providers which will help the company to improve the online transactions easily and efficiently. It also provides an opportunity for the customers to choose a suitable payment method based on their convenience.
You can click on the Payment Providers option which will direct you to a window as shown in the image below.

You can observe all payment providers supported by Odoo in this window. The Activate button given on each payment provider will help you to activate the respective one. In case, if you want to make any changes in the settings of a payment provider, you can click on the respective one and edit it.
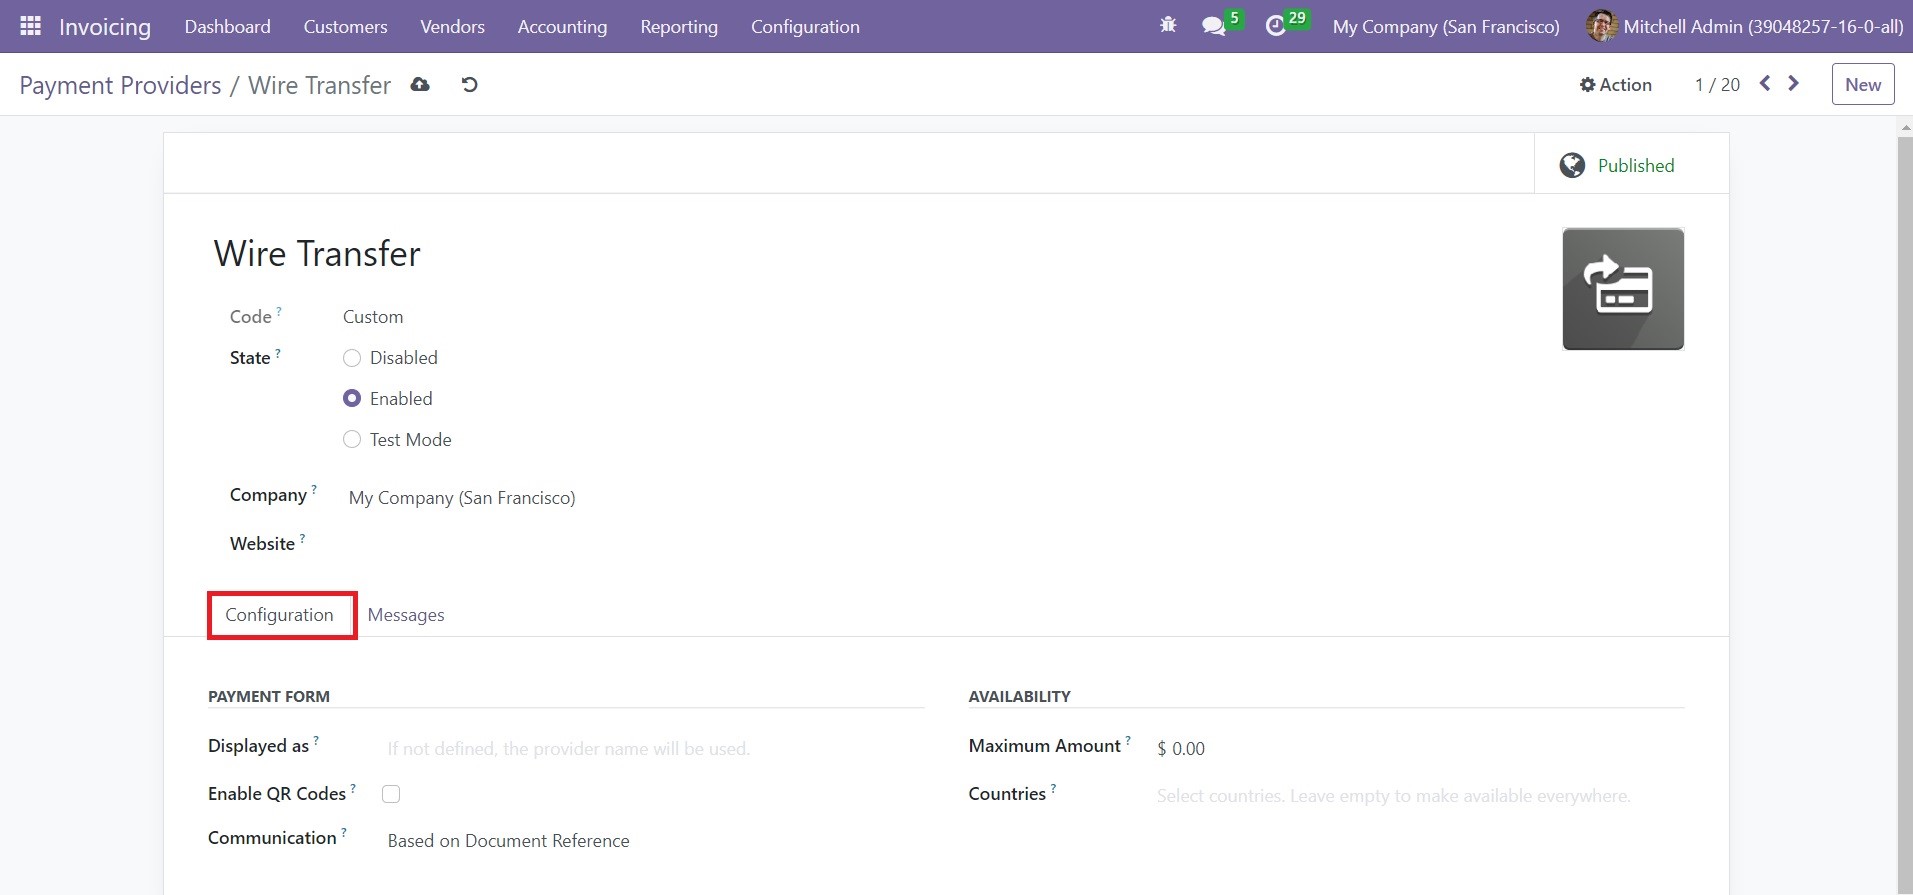
The name of the payment provider will be available in the form view. In the Code field, you will get the technical code of this particular payment provider. The State of the payment provider can be set as Disabled, Enabled, or Test Mode according to the purpose. You can find the name of the Company and Website in the respective fields.
You can use the Displayed as field in the Configuration tab to add the description of the provider for the customers. Activating the Enable QR Codes option will enable the use of QR Codes while making a payment with this payment provider. The communication type you set in the Communication field will appear on sales orders. The maximum payment amount that can be transferred using this payment provider can be specified in the Maximum Amount field. You can set the countries in which this payment provider is available in the Countries field.
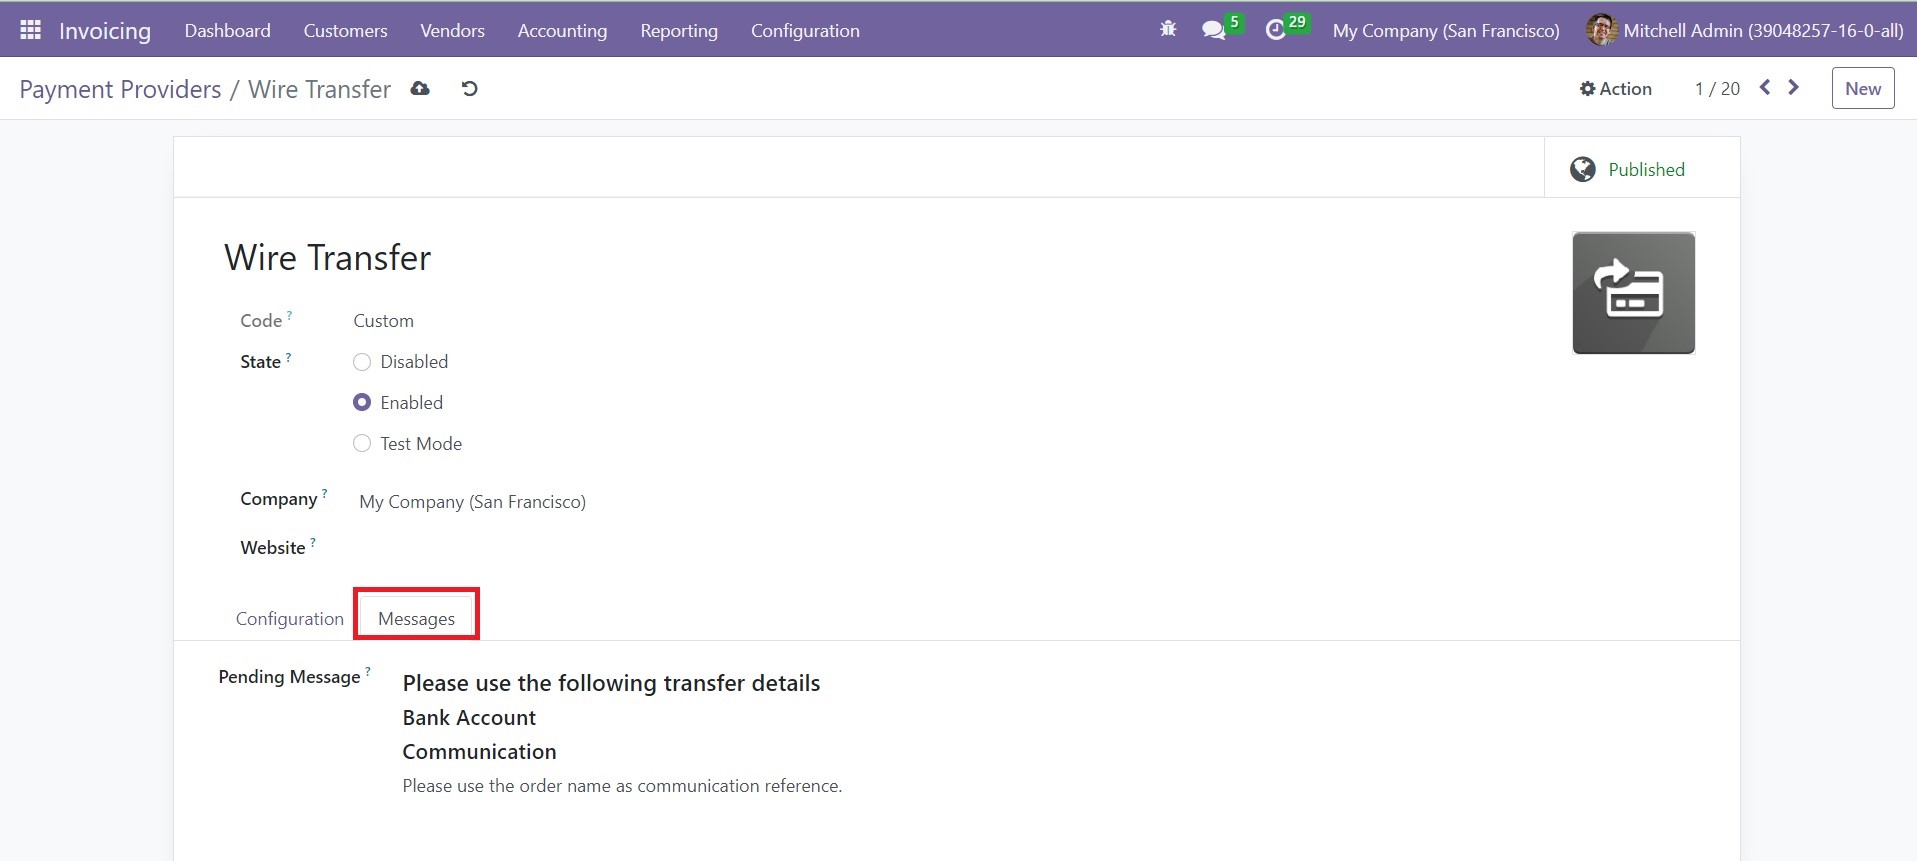
If the order is pending after the payment process, the message you mention in the Pending Message field will be shown to the customer. Like this, you can make necessary changes in the available payment providers in the Invoicing module.
Payment Icons
The Payment Icons can be used as identifiers in Odoo which will help you to improve the process of online payment. When you configure payment icons in Odoo, the customer will get a clear insight related to the online payment or payment gateway accepted by the eCommerce portal of your company. In the Configuration menu of the Invoicing module, you can select the Payment Icons option to manage and create payment icons.
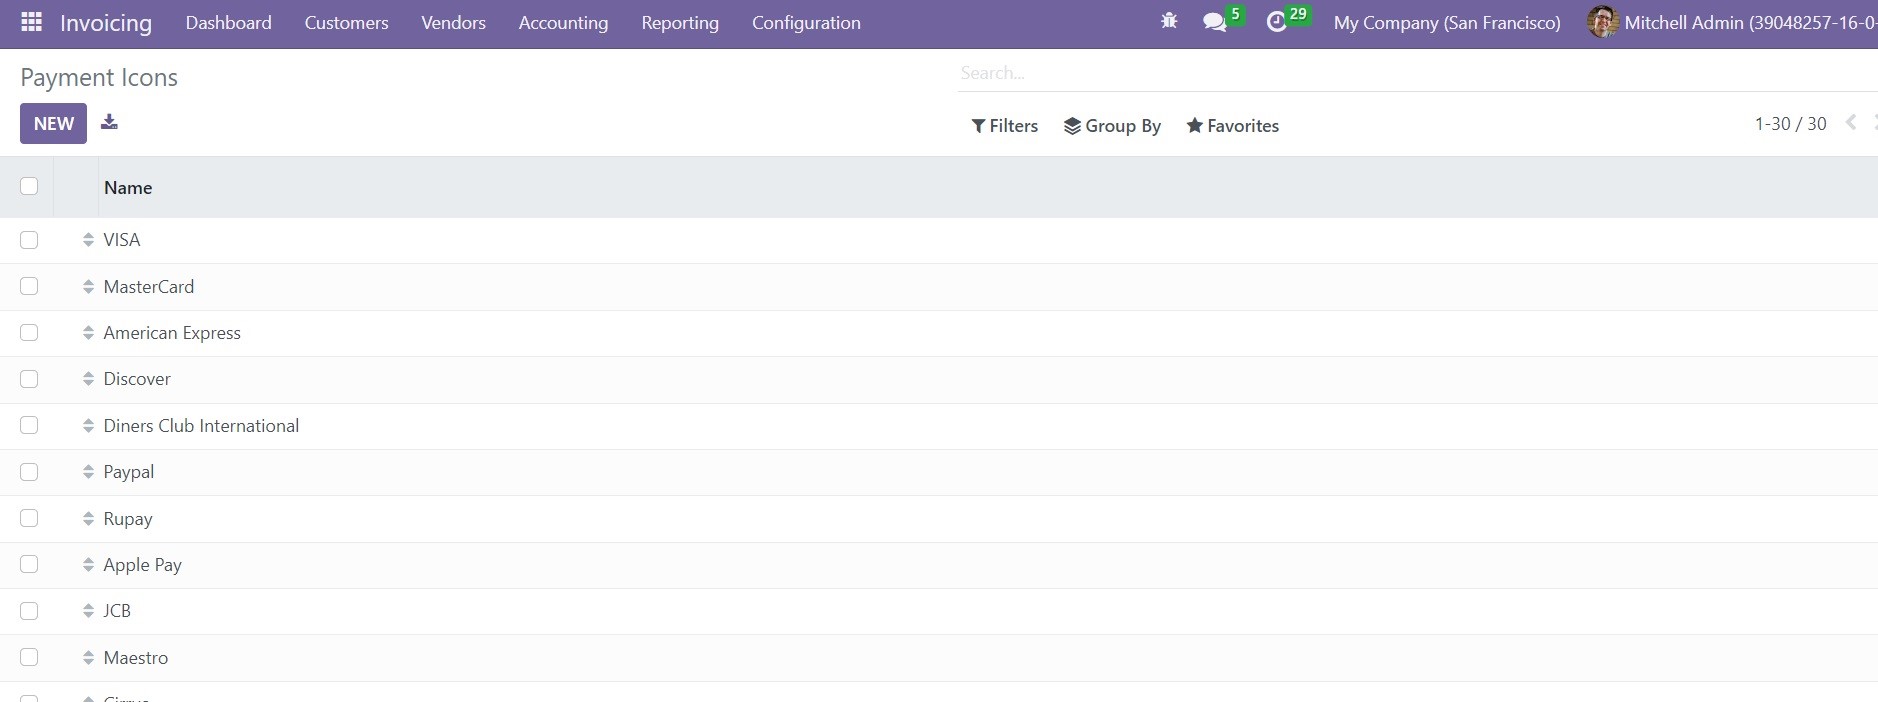
You can observe the pre-configured list of payment icons on this window. Use the New button to create a new payment icon.
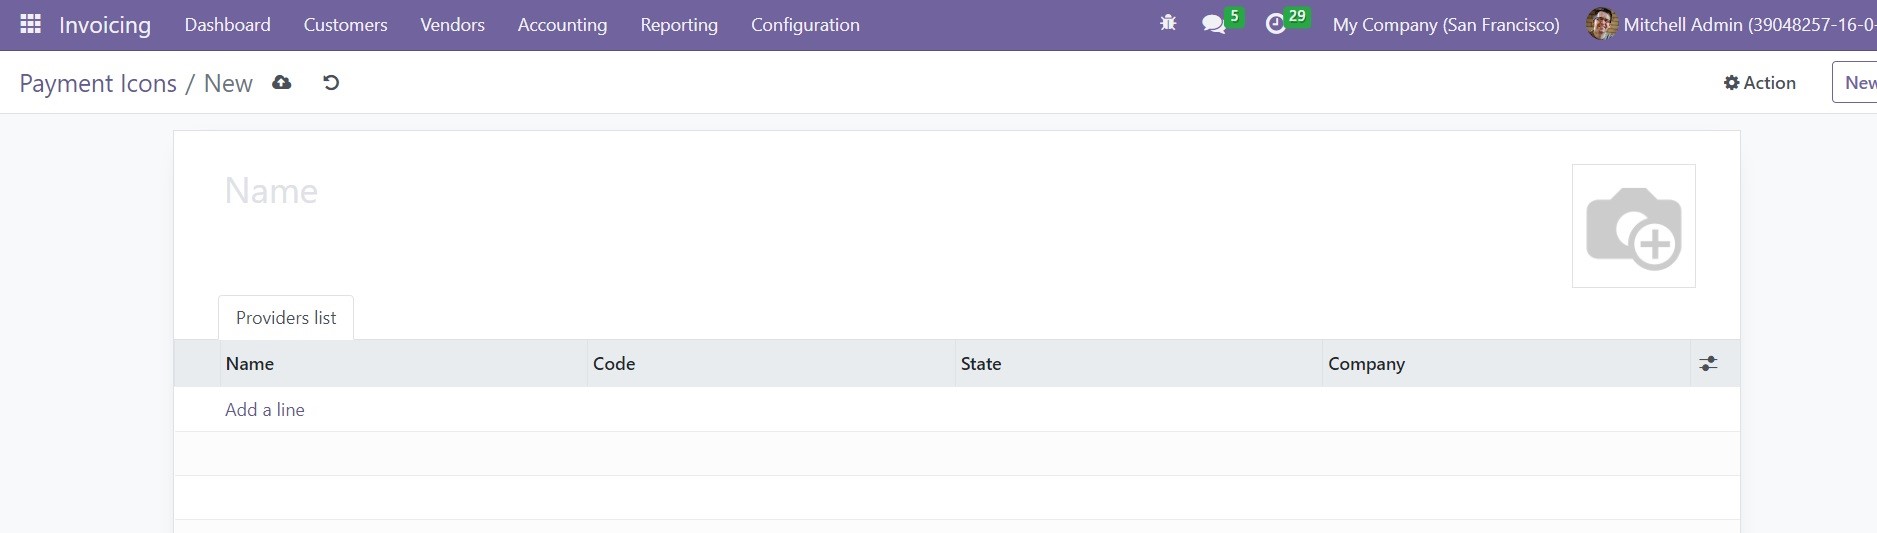
Here, you can mention the name of the Payment Icon and add a suitable image for the icon in the given fields. In the Providers List tab, you can mention the payment providers that you want to add to this payment icon.
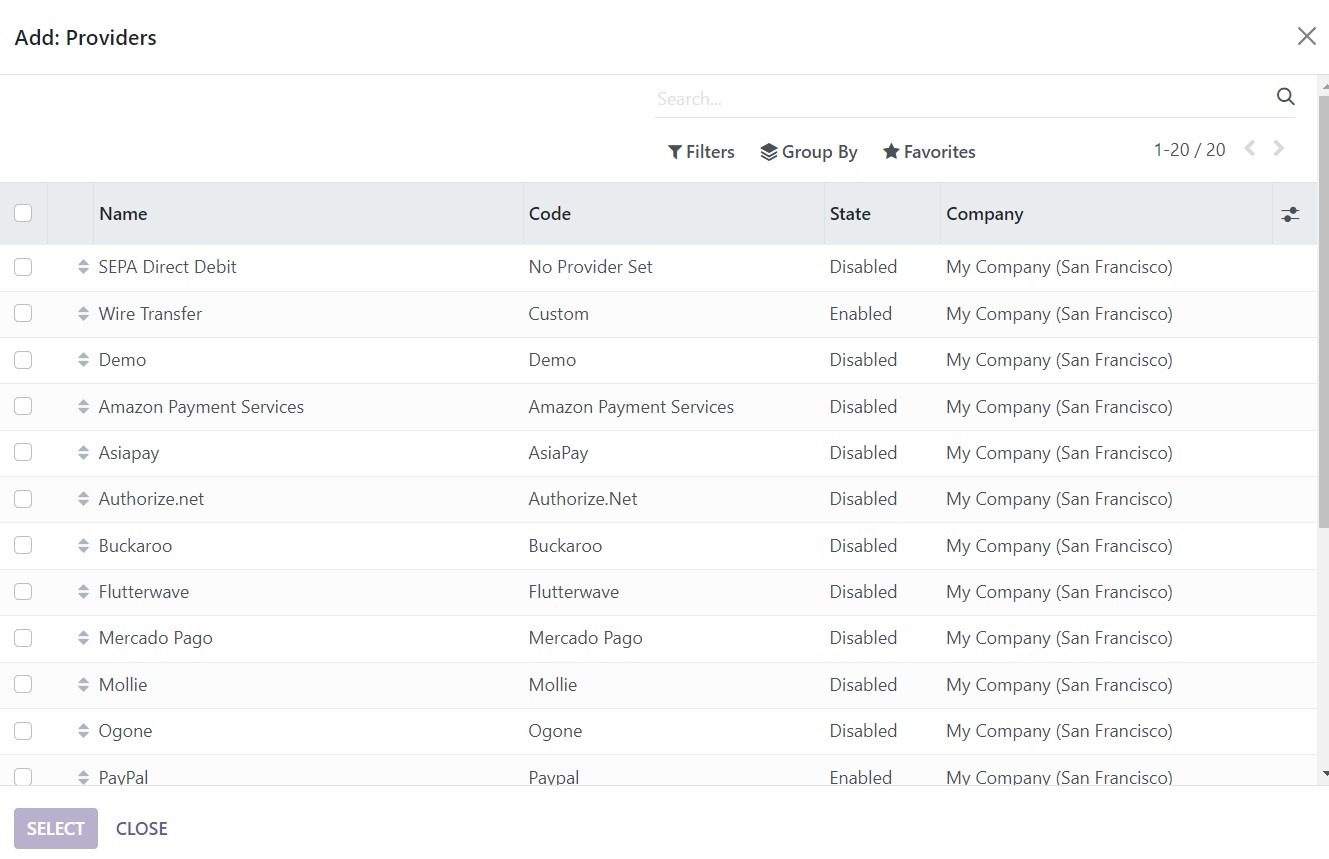
When you click on the Add a Line button, a pop-up window will appear from where you can select suitable payment providers for your payment icon using the Select button. You can use this method to create multiple payment icons for your eCommerce portal.
Payment Tokens
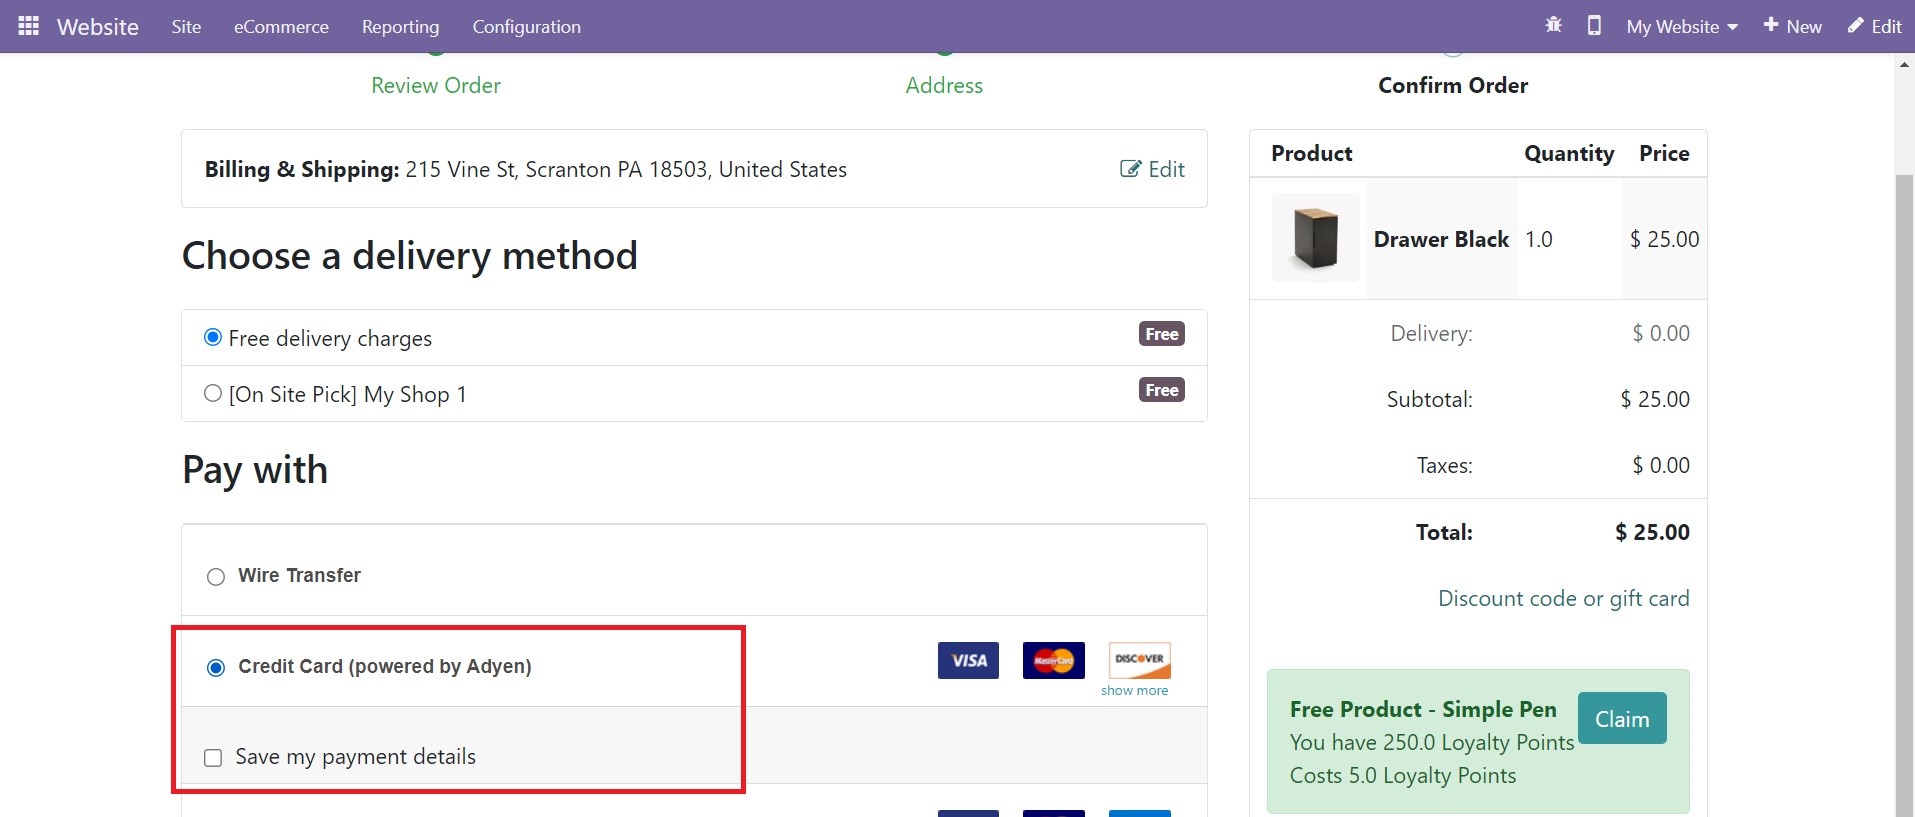
According to the payment providers configured in your system, it is possible to record the payment details as tokens when a customer pays for the very first time. You can use the saved payment details next time to pay the amount automatically. The save card details option will be available on the eCommerce page when a customer tries to make payment using a convenient payment provider. Using this option will save the payment details in the form of payment tokens in the Odoo Invoicing module. The customer can use this option for recurring payments.
You can observe such saved cards in the backend by clicking on the Payment Tokens option from the Configuration menu of the Invoicing module.
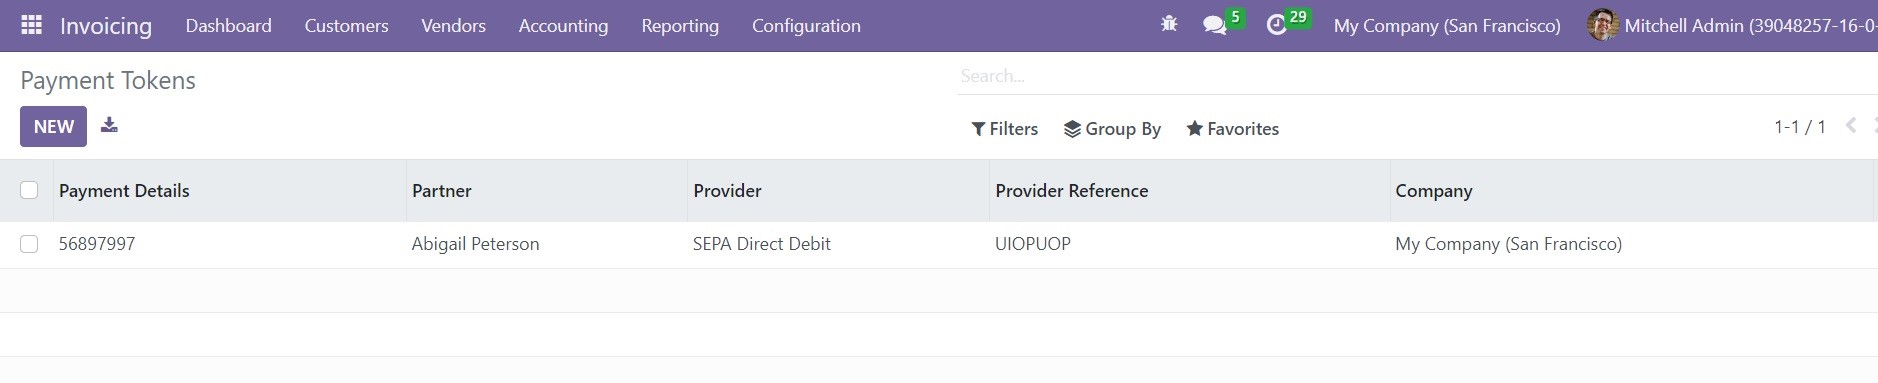
To get the details of the token, you can click on it.
As you can see in the image, the payment token will show the payment Details, Partner, Provider, Provider Reference, and Company. The customer makes a purchase on the e-Commerce page next time, the saved card details will be available on the screen to make payment.
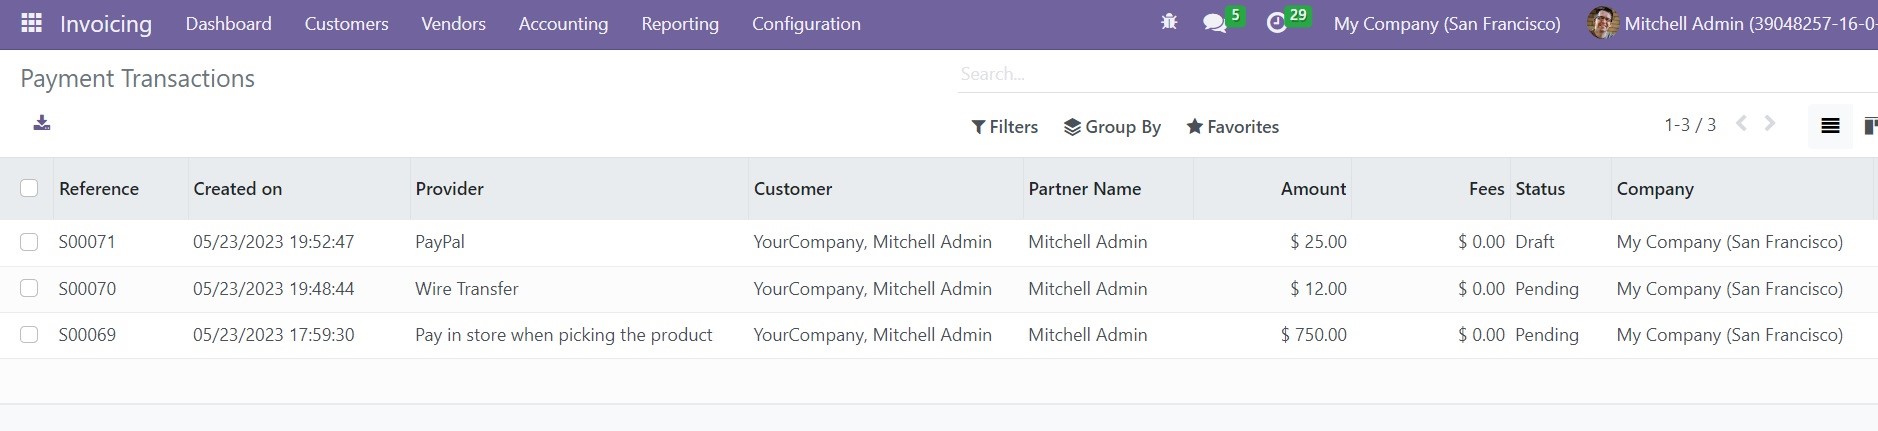
The record of all online transactions can be observed using the Payment Transactions option from the Configuration menu. This platform will display the records of various transactions made using different payment methods in the Odoo Invoicing module.

You will get the Reference, Created On, Provider, Customer, Partner Name, Amount, Fees, Status, and Company details in the transaction history window.
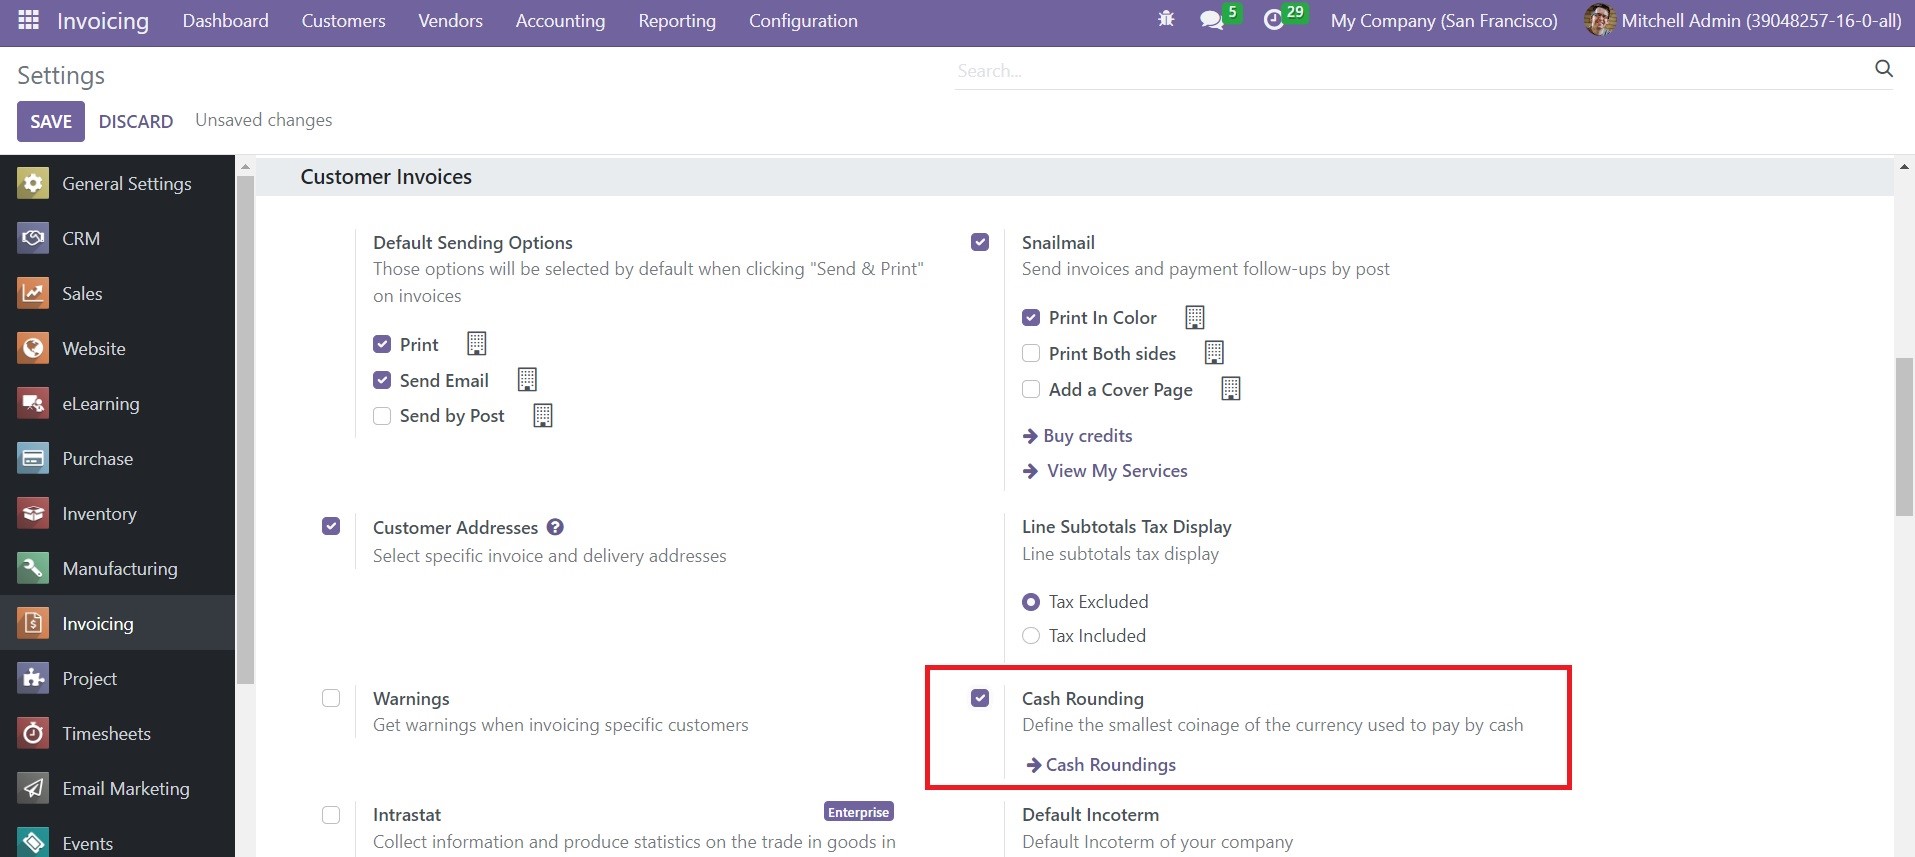
Cash Rounding Methods
In order to round the total amount of the bill to the nearest full figure, you can use the Cash Rounding feature available in the Odoo Invoicing module. This feature will help to get bills with a rounded total amount. To get access to this feature, you need to go to the Settings menu of the Invoicing module. As shown in the screenshot below, you can find the Cash Rounding option under the Customer Invoices tab.
When you activate this field, you will be able to get the Cash Rounding option under the Configuration menu.
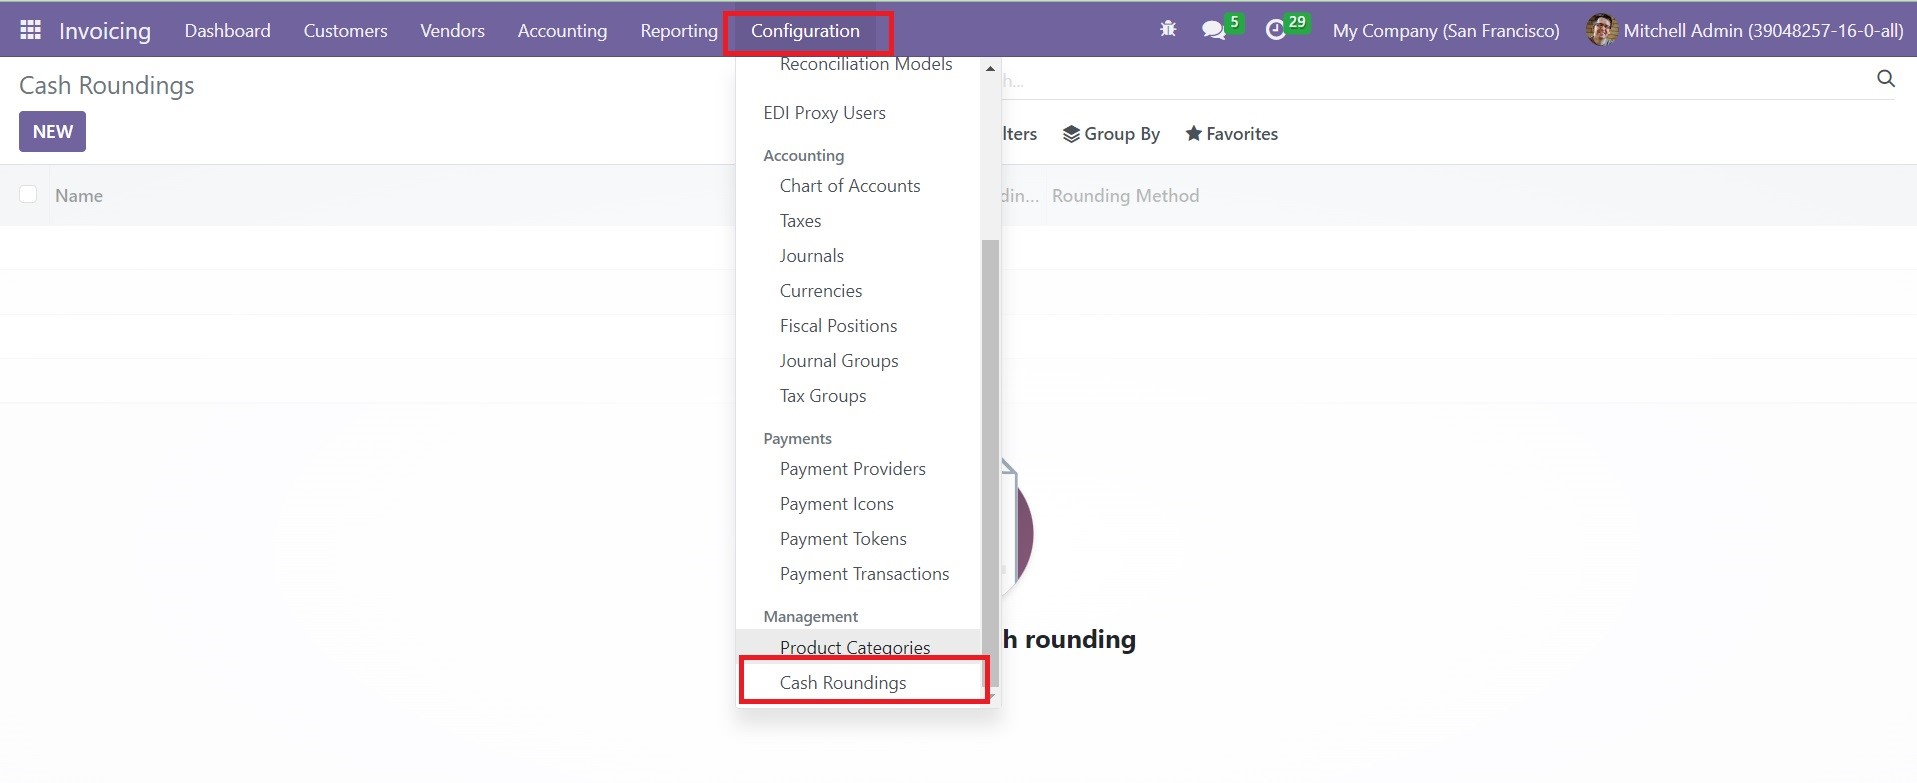
You can use the New button to create a new cash rounding in this module.
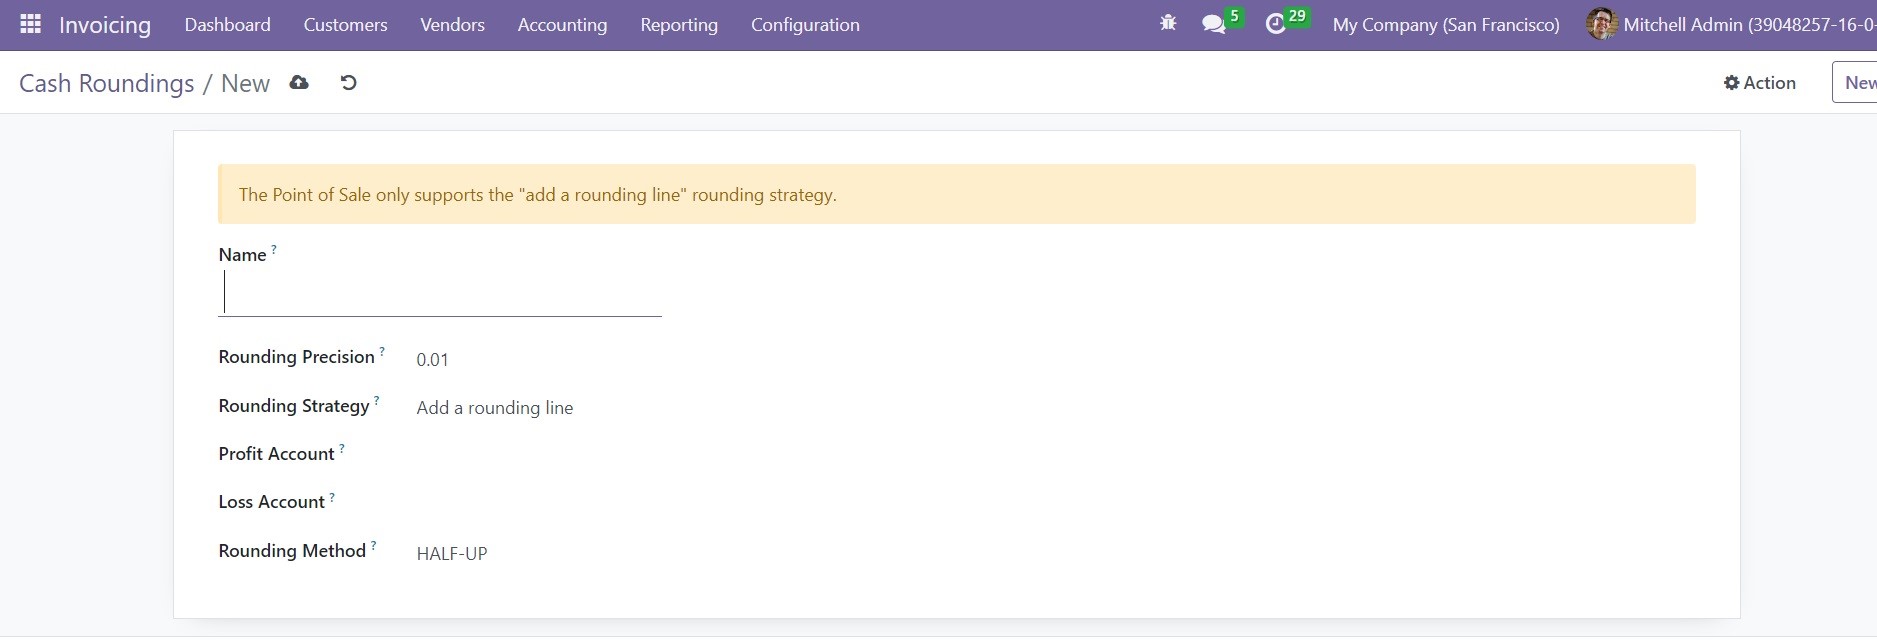
Provide a name for the cash rounding in the given space. In the corresponding fields, you can mention the Rounding Precision and Rounding Strategy. The rounding strategy will define how to round the invoice amount to the mentioned rounding precision. It will be either Add a Rounding Line or Modify Tax Amount. Add the Profit Account and Loss Account in the given spaces. You can set the Rounding Method from the given list such as UP, DOWN, and HALF-UP. In the UP option, the value will round up to the highest infinity, and in the DOWN option, it will round down the value to the lowest infinity. In the HALF-UP option, if the value of the decimal part is greater than or equal to 0.5, the value will be rounded up towards plus infinity otherwise rounded down towards minus infinity.
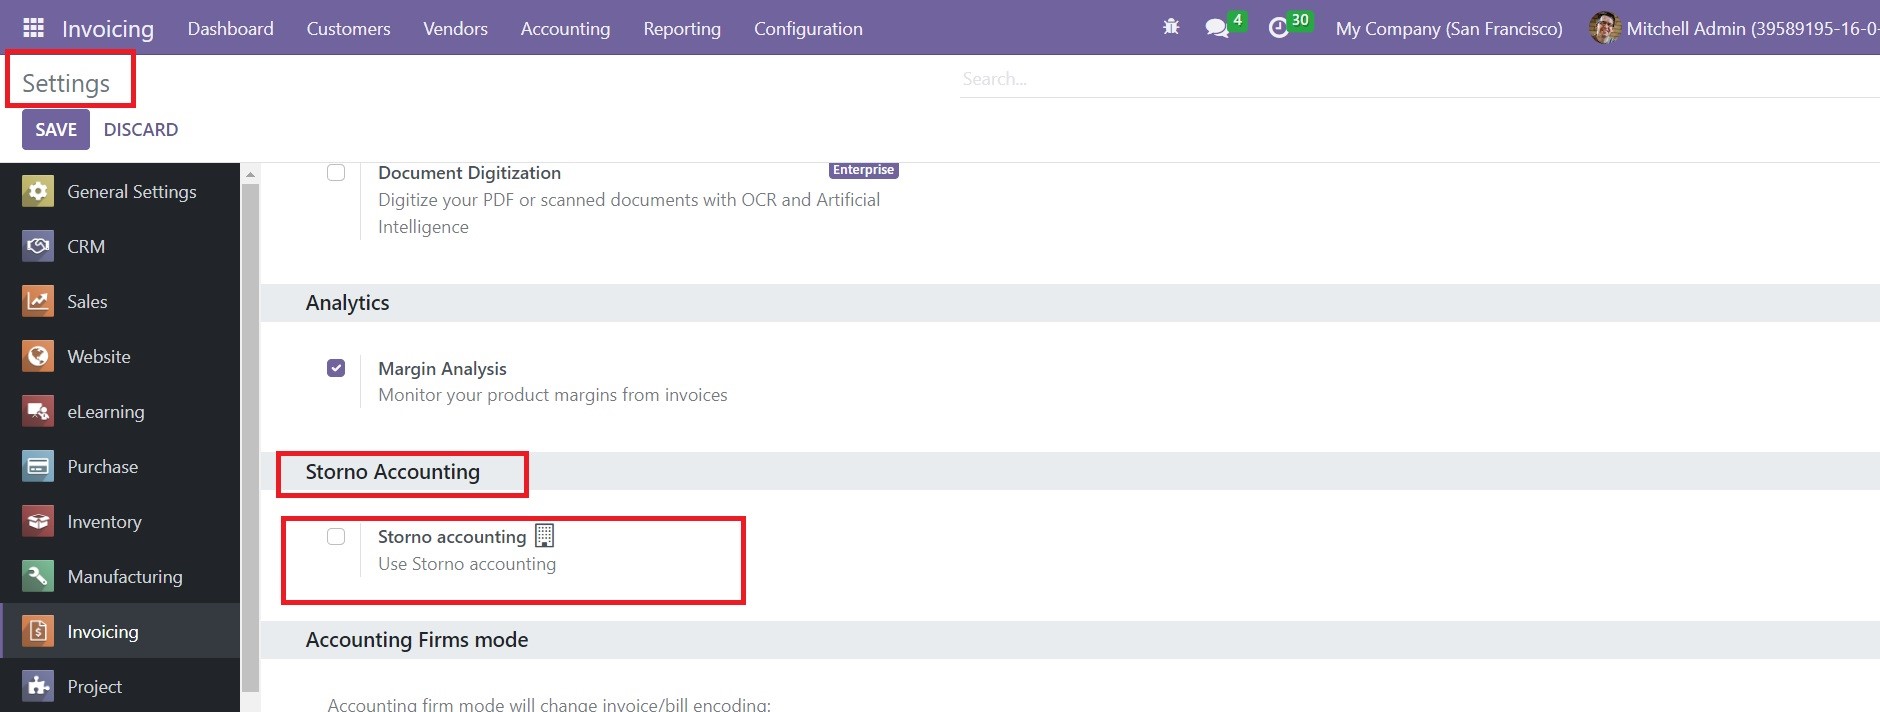
Storno Accounting
Storno Accounting is one of the newly introduced accounting features in the Odoo Invoicing module. This accounting method will use negative credit or debit amounts tracked in your account to reverse the original journal entries. This new feature will help you to cancel the files with incorrect accounting data concerned with the recorded amount. Once you cancel the incorrect accounting data, you need to make sure that the actual data is entered correctly.
Odoo creates a copy of the original entry in the Storno Accounting mode. In this mode, the amount mentioned in the reverse entry can be observed in a negative sign.
We are going to explain this feature with an example. While managing a customer invoice, you found that the amount was mistakenly entered as $170 instead of $150. Here, you can create Storno for the original entry. Once you complete the reversal of the original entry, Odoo will help you to create a correct invoice for the amount of $150.
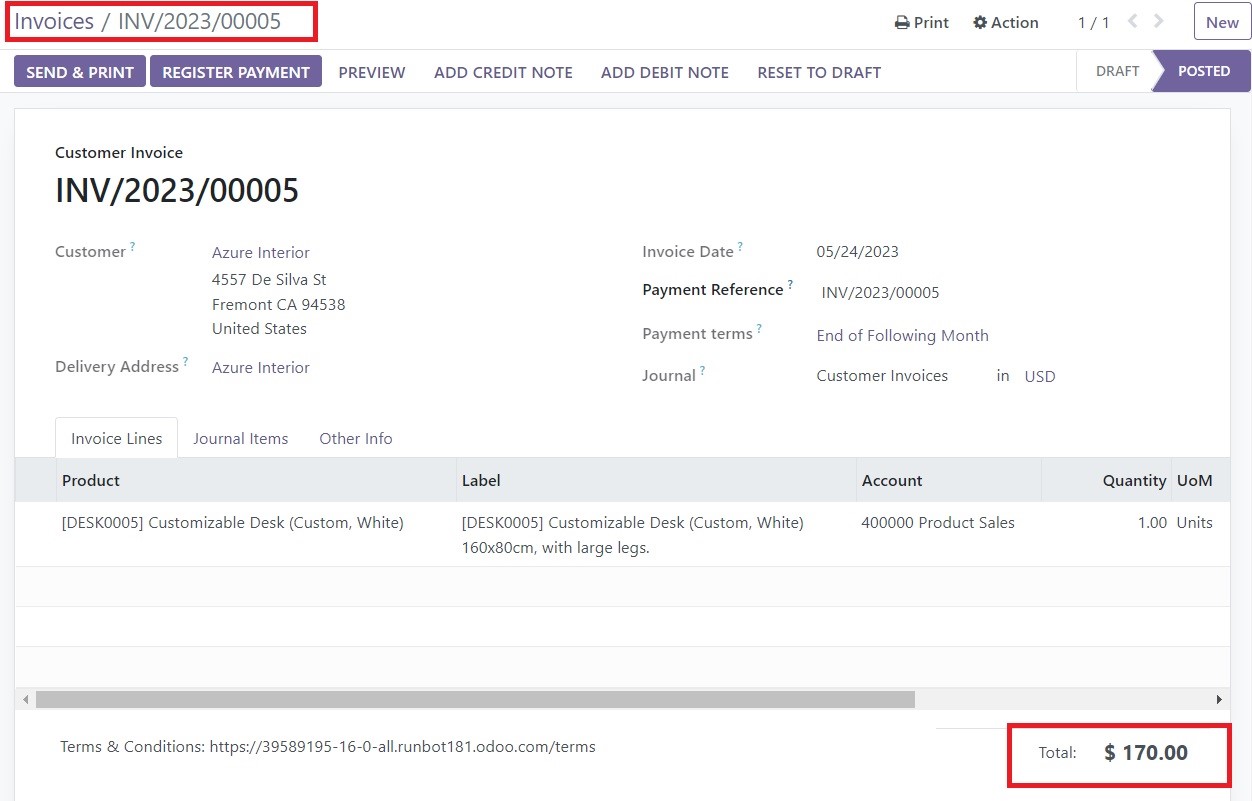
This is the customer invoice for the amount of $170. Under the Journal Items tab, you can observe the items generated for this particular invoice.
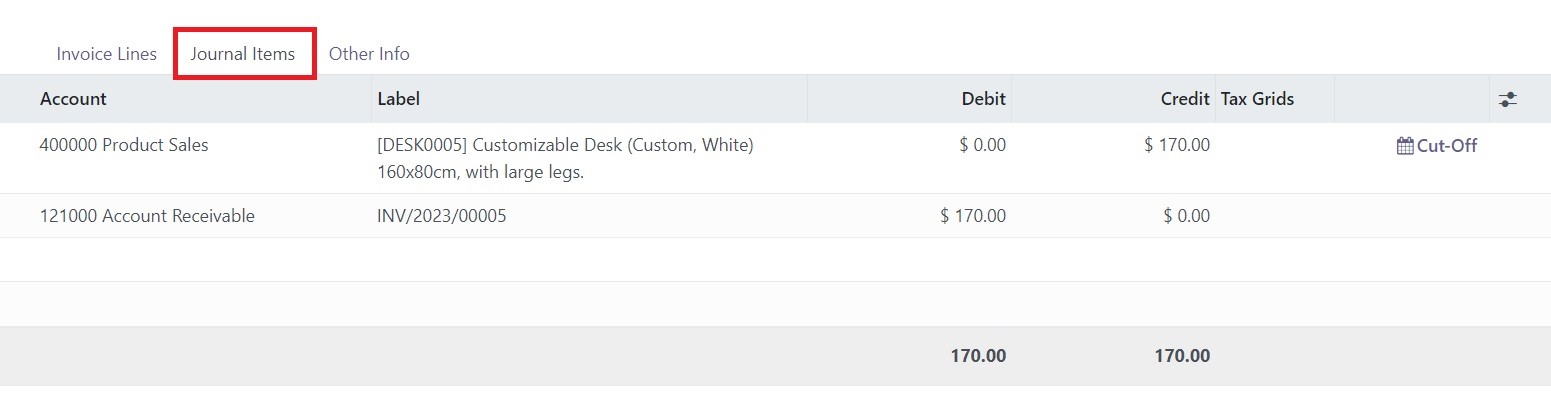
Go to the Journal Items option available under the Accounting menu. Here, the journal item posted for the amount of $170 can be found as shown in the image below.
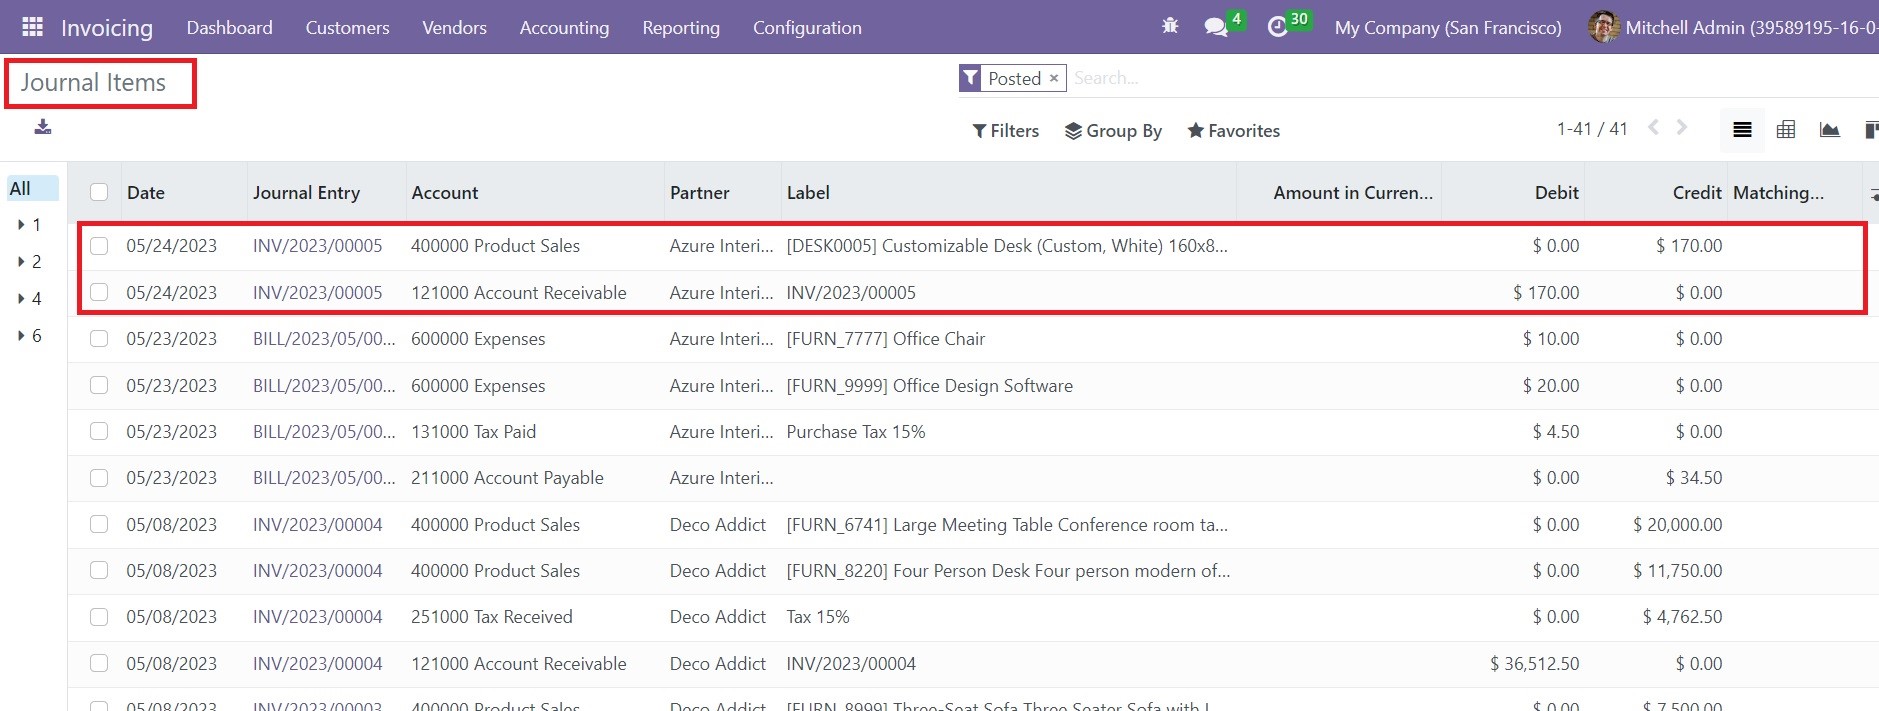
Since it is not the actual amount, you can reverse the journal entry.
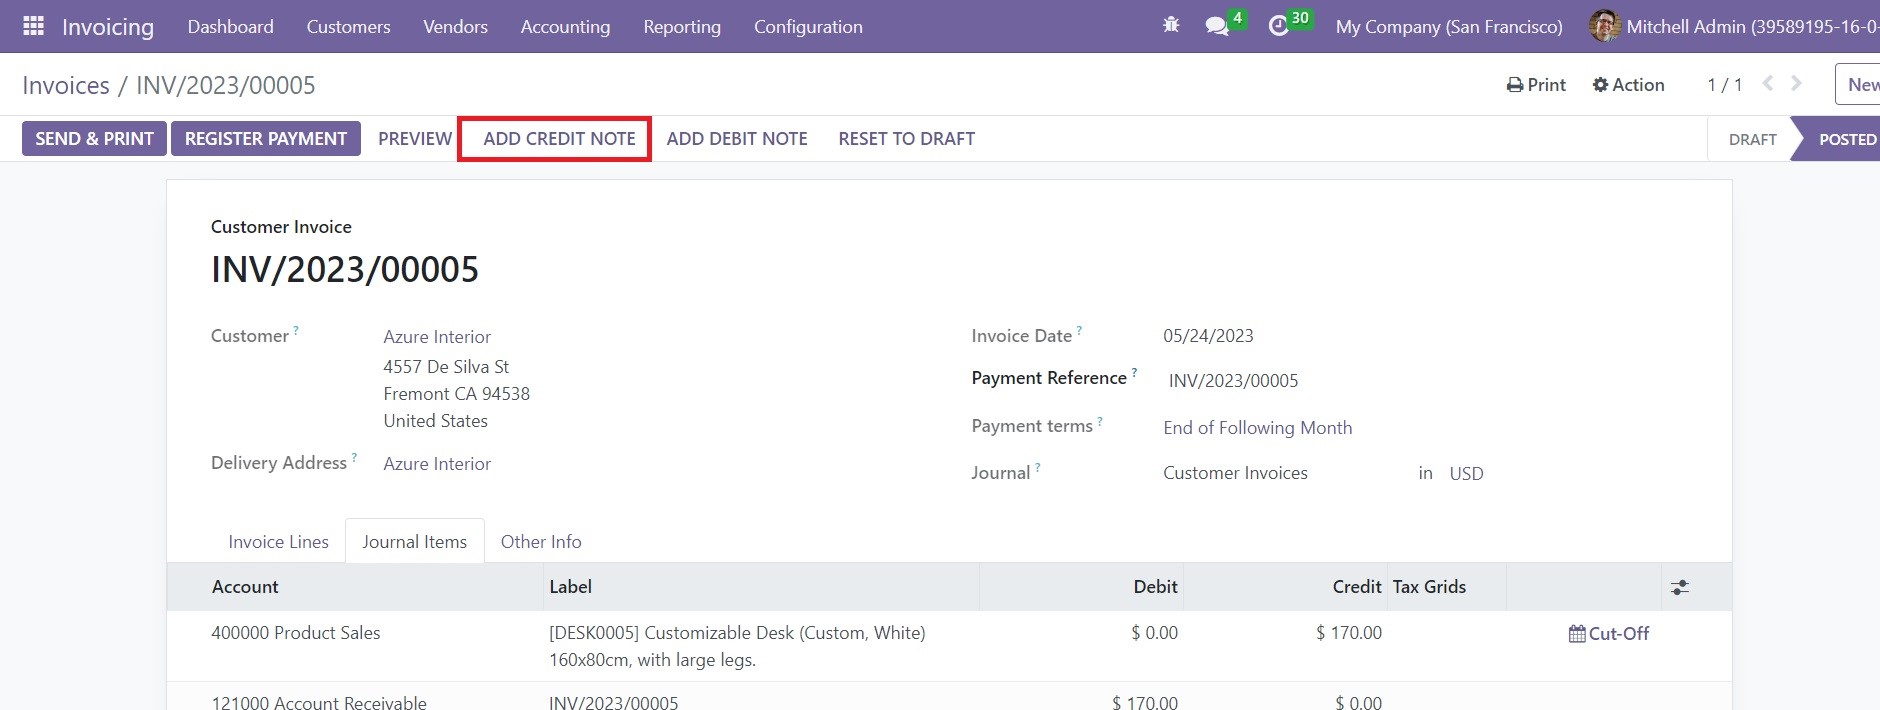
Using the Add Credit Note option, you can create a reverse entry for the mentioned amount.

The posted entry will be reversed as soon you click the Reverse button and confirm the customer credit note. When you check the amount in the journal item window, you can observe the amount in a negative sign.
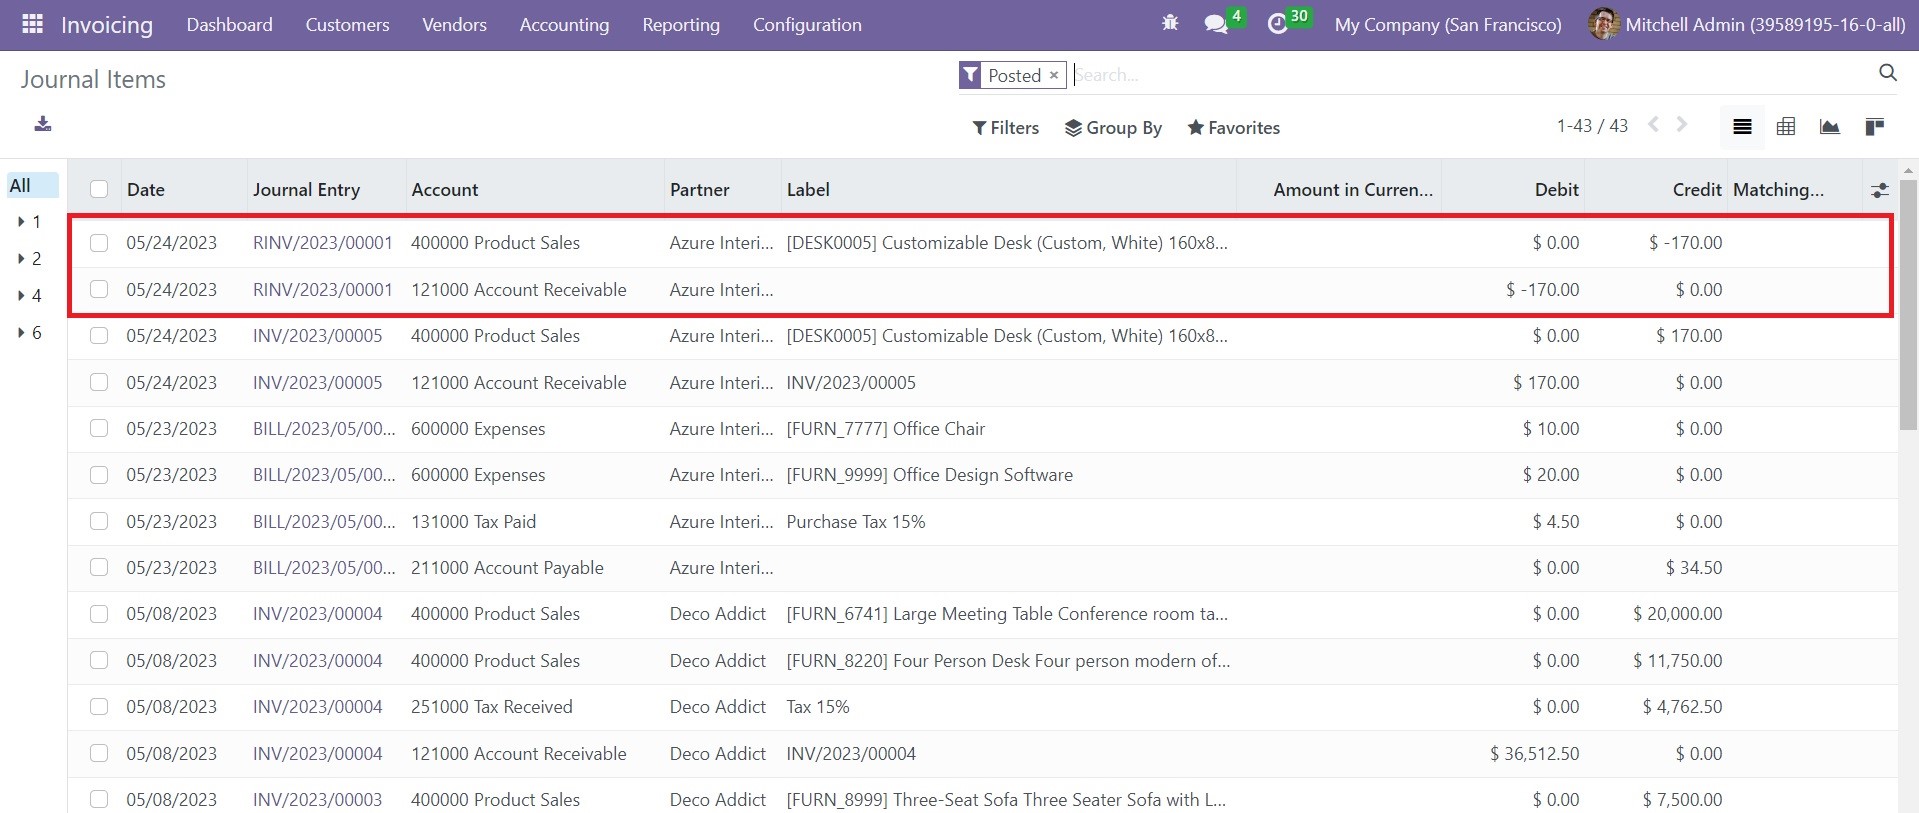
We have reversed the incorrect journal entry, so you can create a new journal entry for the actual amount.
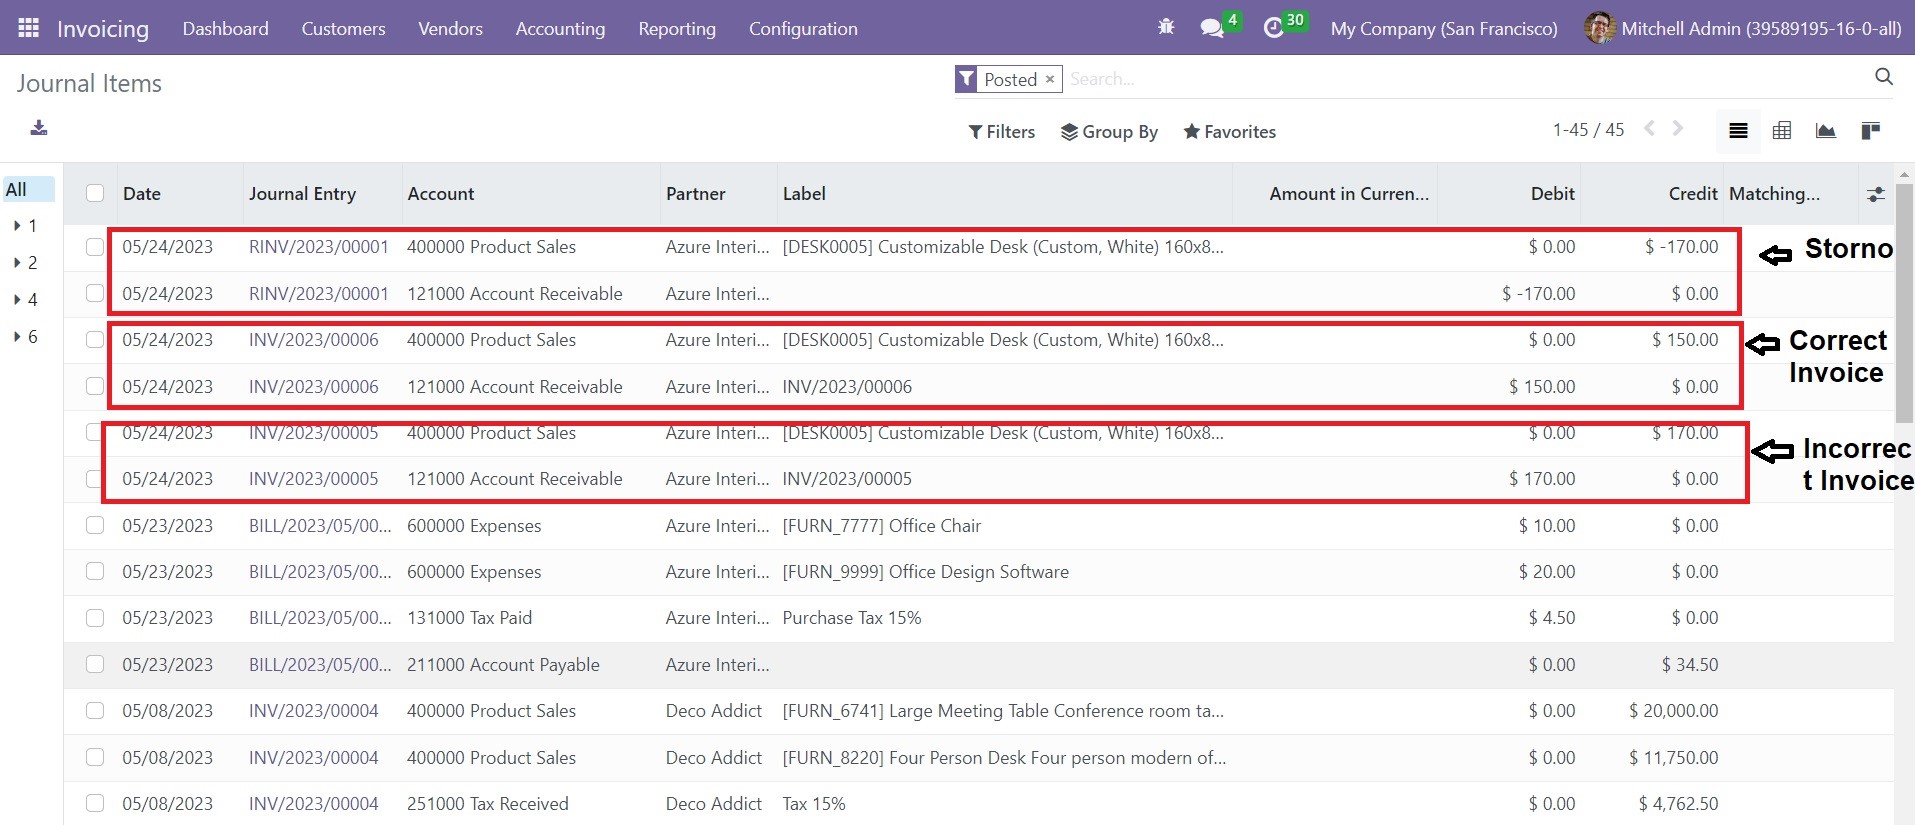
The journal items of the incorrect invoice, Storno, and correct invoice can be seen in the Journal Items option of the Accounting menu, as shown in the screenshot above.
Sales Credit Limit
The Sales Credit Limit feature offered by the Odoo 16 Invoicing module can be used to trigger an alert at the time of the creation of invoices and sales orders for partners with a total receivable amount exceeding a limit. From the Settings menu, you can enable this feature as shown in the image below.
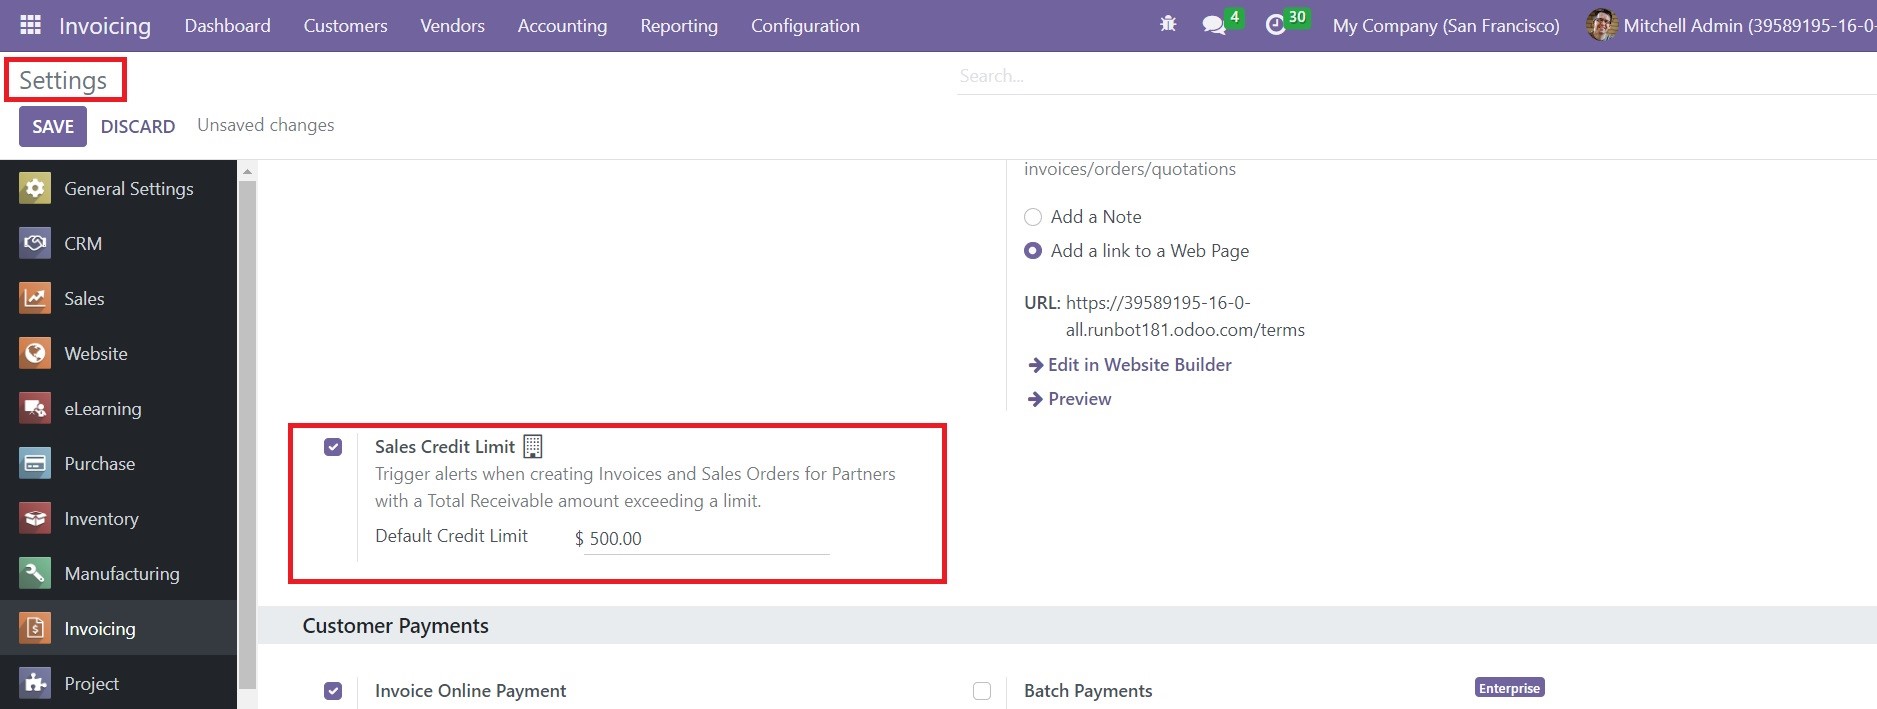
The Default Credit Limit field can be used to mention the credit limit allowed for partners. For example, we can set the amount of $500 as the Sales Credit Limit. Now, we are going to check what happens when you create an invoice or sales order for a partner whose credit limit has already exceeded $500.
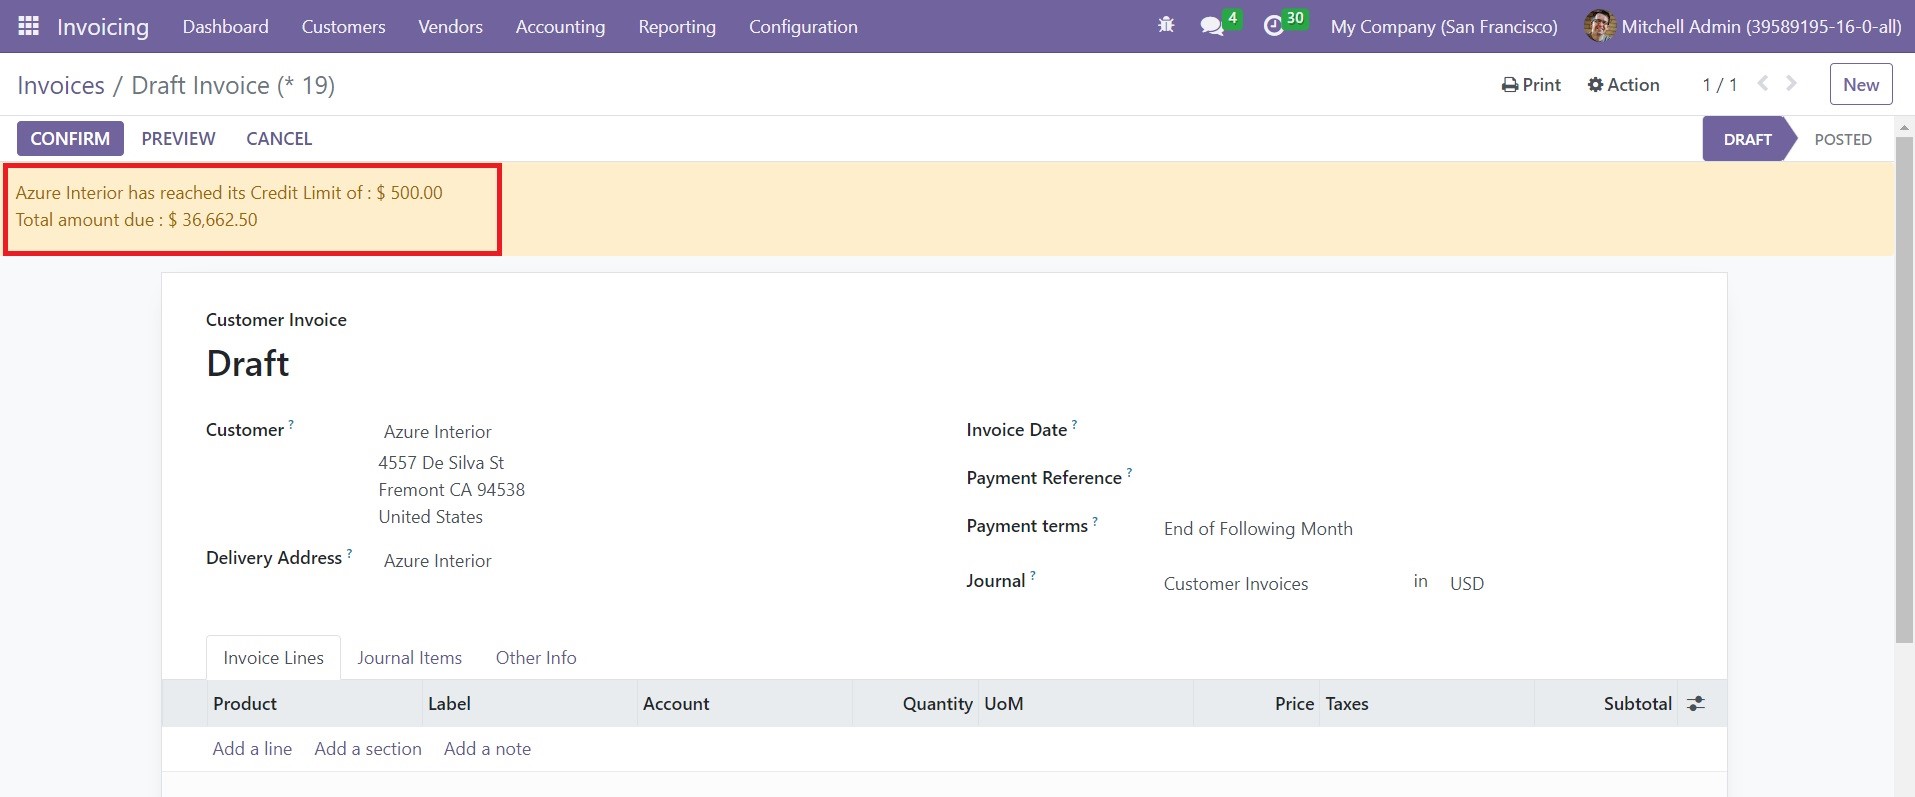
Here, you can see that an alert message appears on the window to inform that the customer has already reached the limit. You can observe the total amount due of the partner from this alert.
In case, if you want to set a credit limit for individual customers, you can go to the Customers menu available in the Invoicing module. Under the Invoicing tab, you will get the Credit Limits options to set Partner Limit.
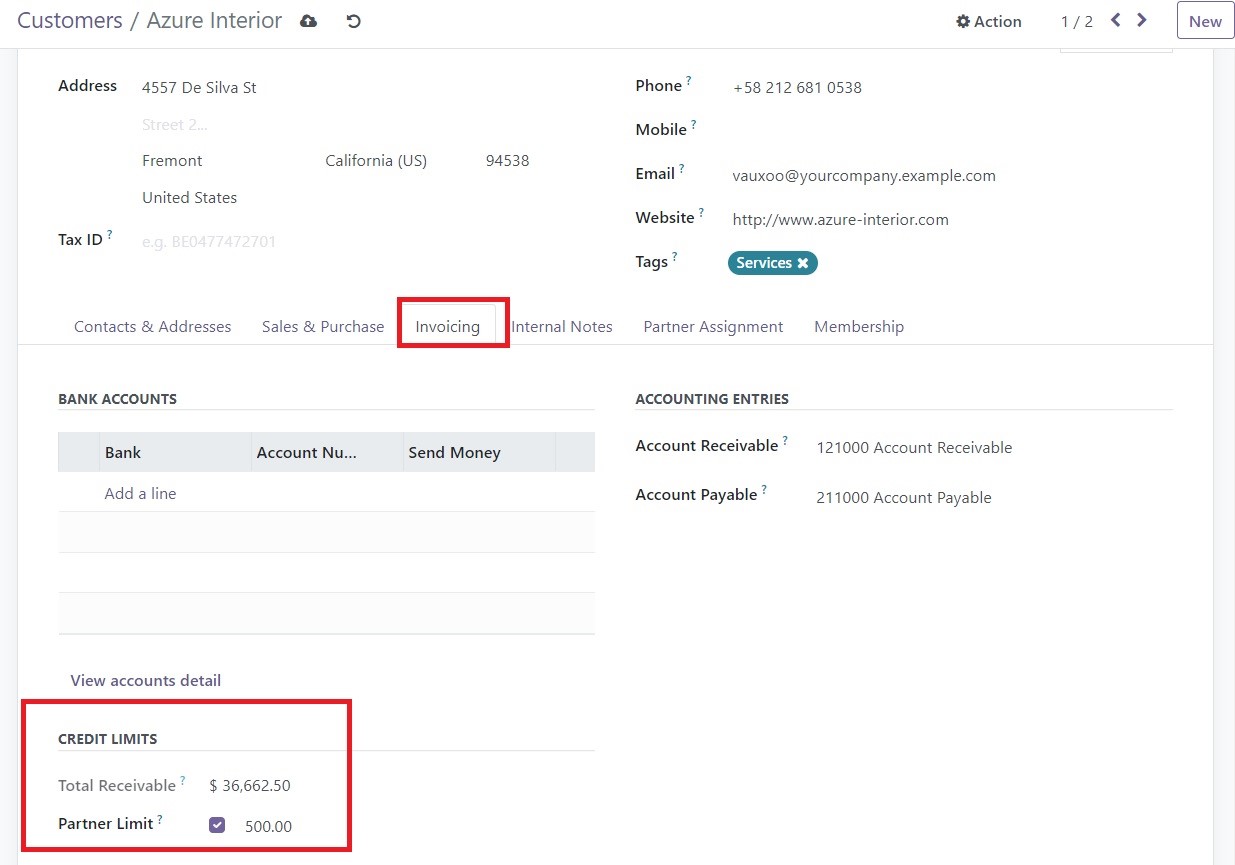
Activate this feature and mention the credit limit in the given space. The Total Receivable field will display the total amount this customer owes you. By following this method, it is possible to set sales credit limits for each customer in your system.
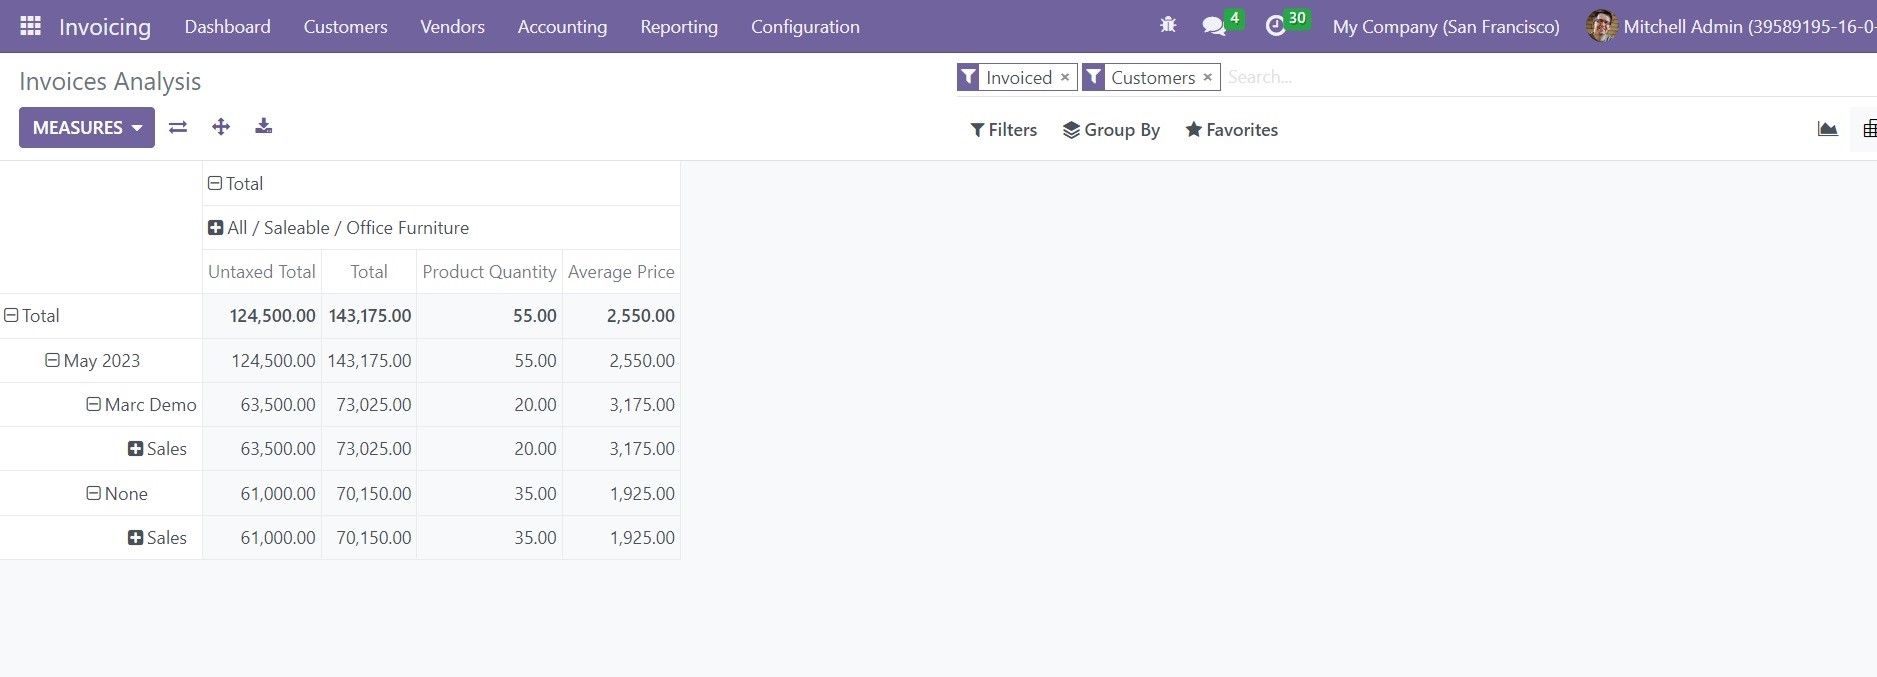
Invoice Analysis
To get a proper idea related to the invoice operations done in the Odoo Invoicing module, you can use the Reporting feature of the module. This feature is a great help for the user to get accurate reports of accounting-related operations. In a single place, you can create graphs and pivot tables of the invoice reports. To perform efficient invoice analysis, you can select the Reporting menu of the module.
According to your requirements, you can change the view of the report between Graph and Pivot. The graphical view of the invoice analysis is given below. You will get the icons to change the graphs into Line, Bar, and Pie charts.
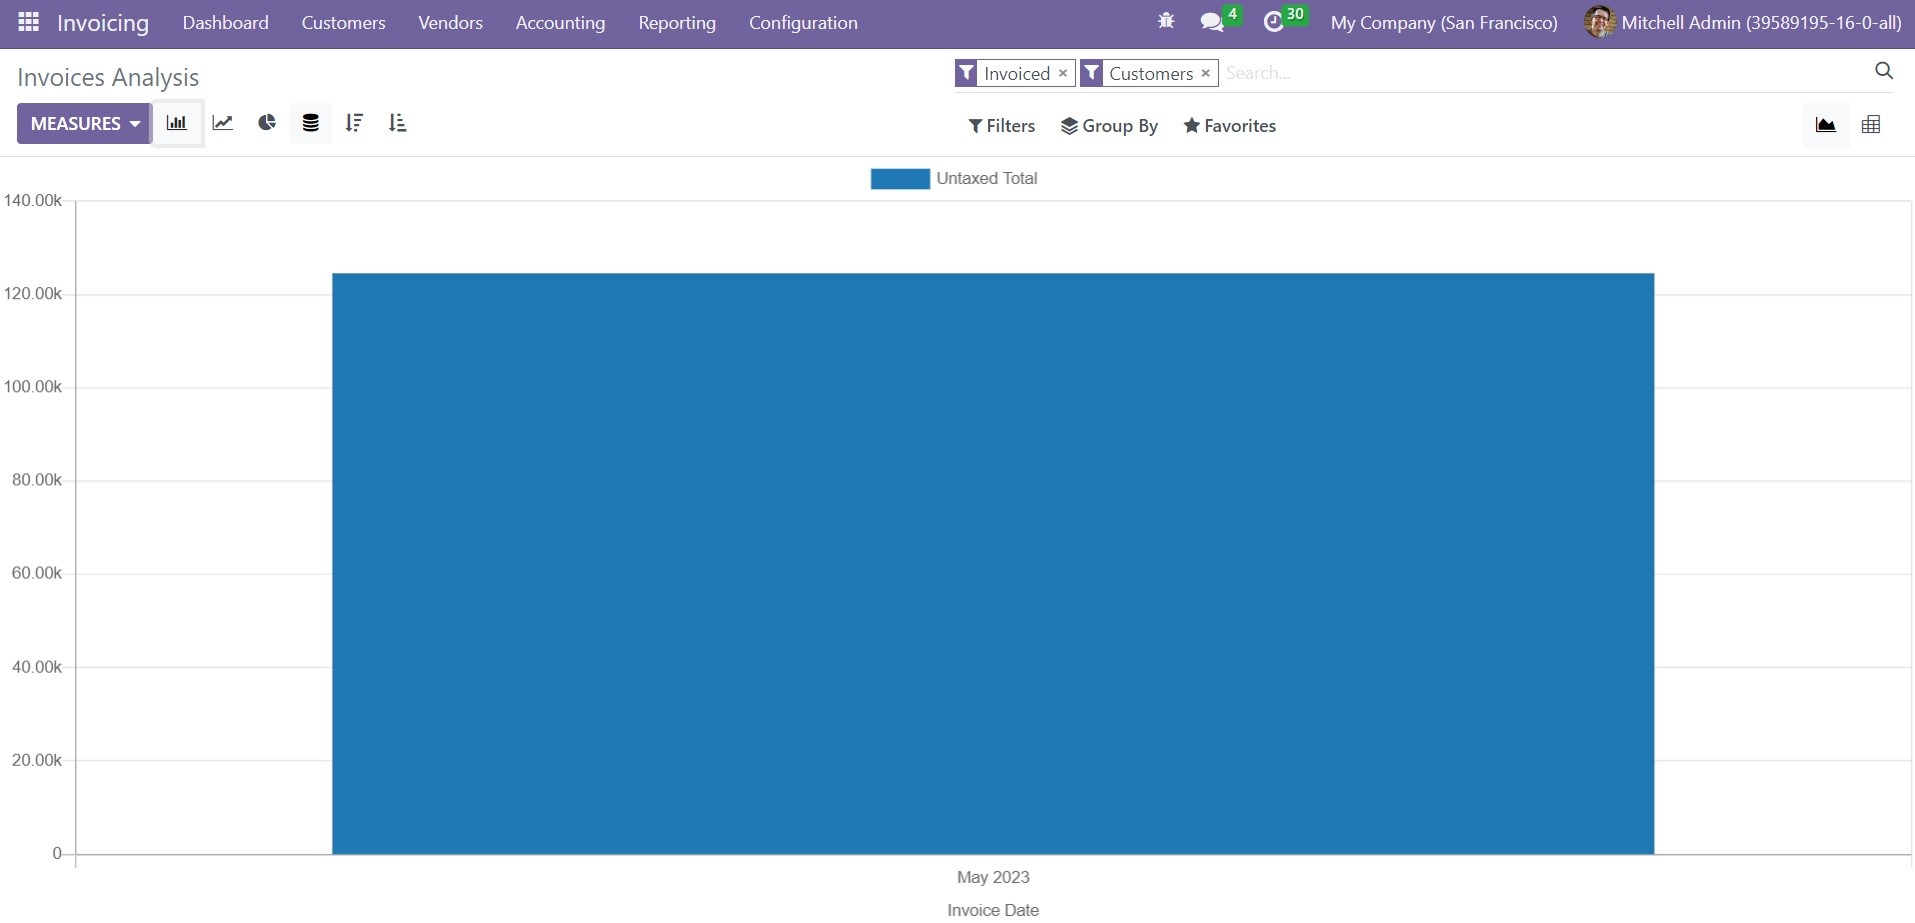
You can use Average Price, Product Quantity, Total, Untaxed Total, and Count as Measures in the report.
To get customized reports, you can use the custom options available in the Filters and Group By options.
The Odoo Invoicing module offers efficient tools and advanced features which will help you to improve your accounting operation. With this module, you can perform the invoice management effortlessly.