Odoo 16 Community Book
Purchase
You can manage all the operations related to purchasing your products in the Purchase module. The advanced purchase management system in Odoo 16 makes purchase order tracking, product configuration, vendor management, and pricing of products/services effortless. Besides, you can supervise the requests for purchase orders and quotations using this module. Integrating the functionalities of the Purchase module with the other modules in Odoo 16, like Accounting, Inventory, Sales, and Invoicing, guarantees a hassle-free purchasing process.
Product Management
Odoo 16 has provisions for configuring and managing products in the Purchase module using its advanced features. The Products menu in this module allows you to govern the products list, variant details, and their cost. You have the options – Products and Product Variants – under the Products tab, where you can assess and alter the details of your company’s products/services and their variants.
If you click on ‘Products’ from the dropdown list of the Products menu, you will get a window displaying the entire list of products already created. This window’s view will be Kanban by default, but you can change it to the List view according to your convenience. In the Kanban view, the product previews display details like name, internal product reference, price, and product image. The Filters and Group By buttons help you locate a specific product entry based on the variables you apply.
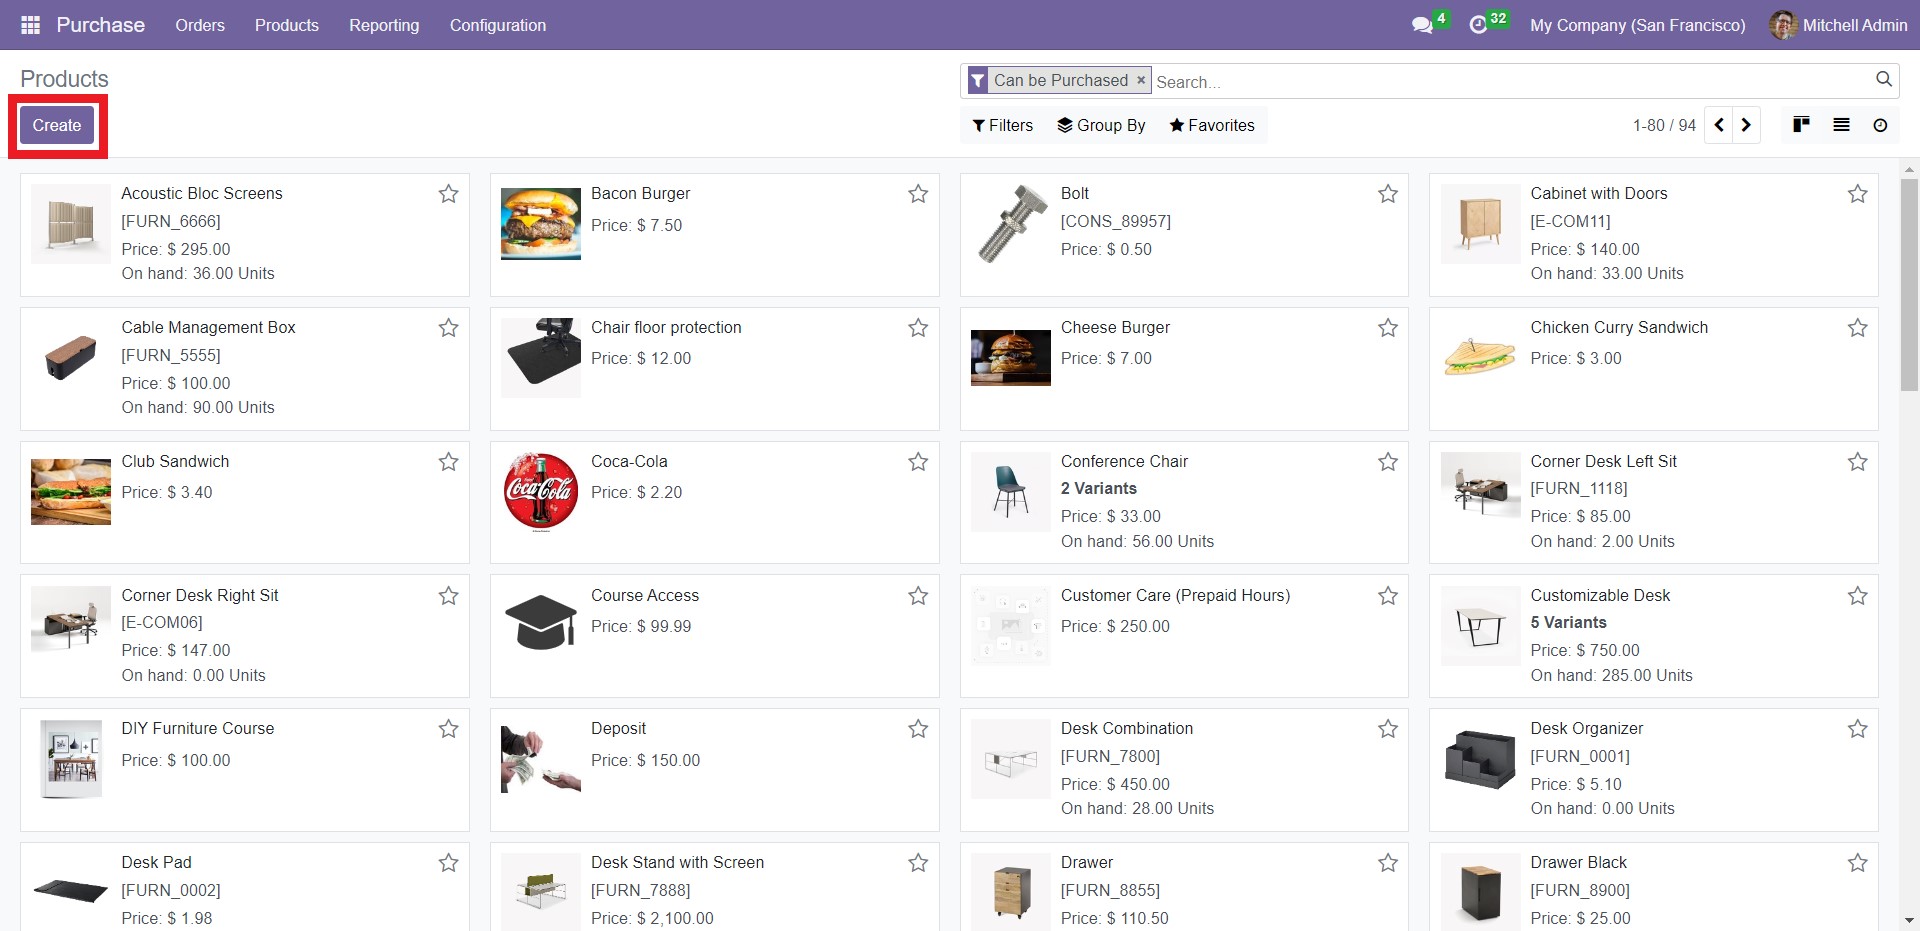
Click on the Create button to add a new product to this list. A window will appear where you can fill in the details of the new product.
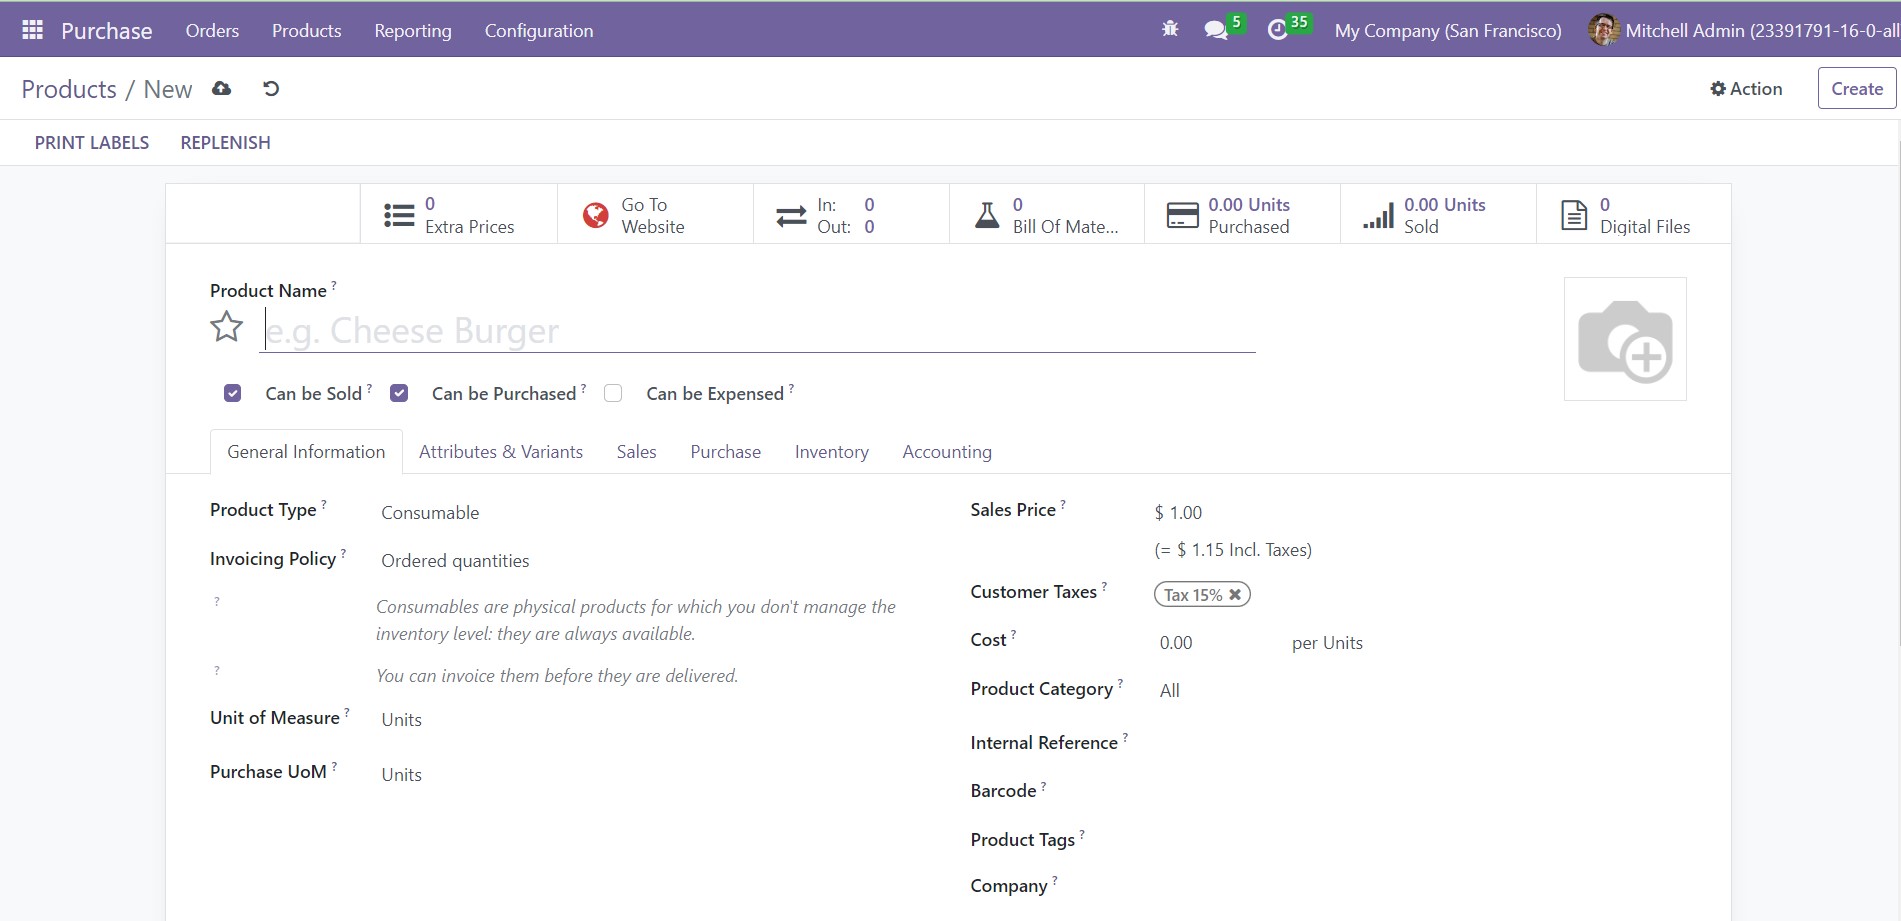
Assign the Product Name in the respective field. Click on the camera icon to upload a picture of the product. You can also see three options – Can be Sold, Can be Purchased, and Can be Expensed. Choose the ones applicable to the product.
The dropdown list of ‘Product Type’ shows options like Consumable, Service, Storable Product, Event Ticket, Course, and Event Booth. Select the type of your product from these options. In the field of Invoicing Policy, you can choose between ‘Ordered Quantities’ and ‘Delivered Quantities.’ Select ‘Ordered Quantities’ if you want to generate an invoice when someone orders a product. If you want to produce an invoice when a product is delivered, click on ‘Delivered Quantities.’
Fill in the fields – Unit of Measure, Purchase UoM, Sales Price, Customer Taxes, Cost, Product Category, Internal Reference, Bar Code, and Product Tags – applicable to the product. You can select your organization's name from the dropdown list of ‘Company,’ which will configure the product to that particular company.
If the product has variants, you can add them under the Attributes & Variants tab. We already detailed the configuration products in the Sales module. You can follow the same method to configure a new product in the Purchase module also. Under the Purchase tab, you can mention the Vendors of the product one by one using the Add a Line button. You can assign multiple vendors for a product under this tab.
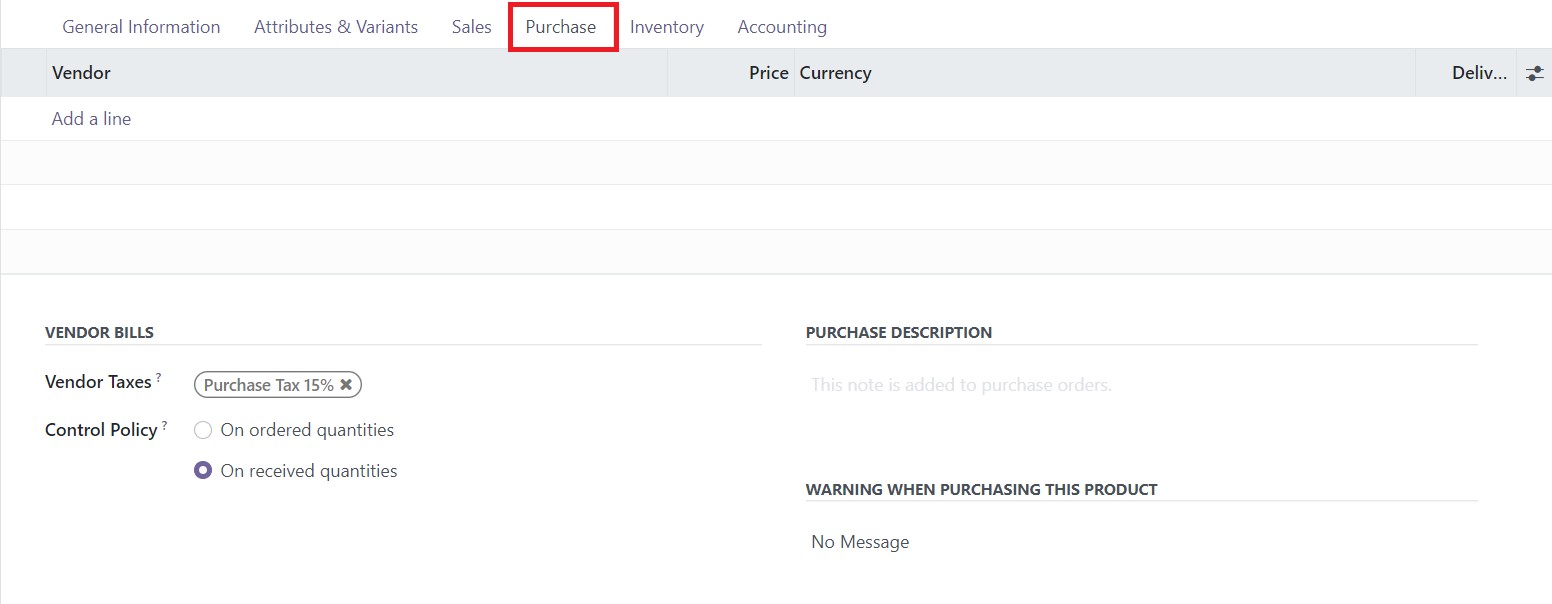
In the respective fields, mention the Price to purchase this product, Currency, and Delivery lead time. The default taxes used when buying this product can be specified in the Vendor Taxes field. The Control Policy for this particular product can be set on Ordered Quantity or Delivered Quantity.
If you want to set a default Control Policy for all products in the Purchase module, you can go to the Settings menu. Here, you will get the Bill Control option to set the bill control policy for all products.

This will be applied to all new products as default. You can change the control policy of a particular product from the form view of that product.

If you want to add any notes on purchase orders, you can specify it in the Purchase Description field. You can set a warning under the Purchase tab. This will help you to generate warning messages when purchasing this product.

In order to get this feature, you need to activate the Warnings option from the Settings menu. Now, let’s check how to create a new vendor in the Purchase module.
Vendor Management
A business organization deals with different types of purchases in bulk or retail. Depending on the product purchased, you might have to store and manage the details of multiple vendors. Odoo 16 allows you to configure all the vendors related to a particular product, making it easier for customers to buy from the vendor of their choice. With the advent of Odoo’s flexible and advanced user interface, monitoring the vendor directory and assembling the vendor attributes has become more efficient. Besides, you can link the vendor data with the associated product to easily track new purchase orders.
To manage the vendor details, click on the Vendors menu from the dropdown list of the Orders tab. You will get the detailed Kanban view of all the vendors added to the module.
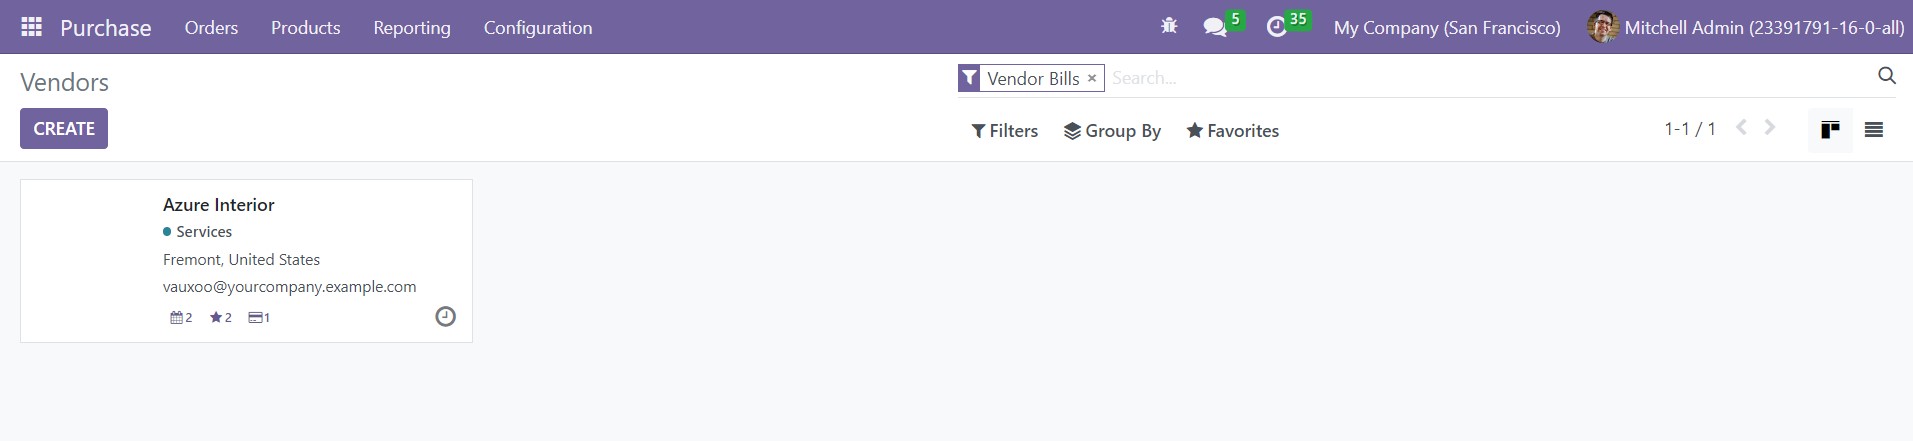
The basic information related to a vendor can be viewed in the Kanban view. The information includes the name, tags, communication address, and Email. You will get icons to manage meetings, opportunities, and purchases assigned for the respective vendor.
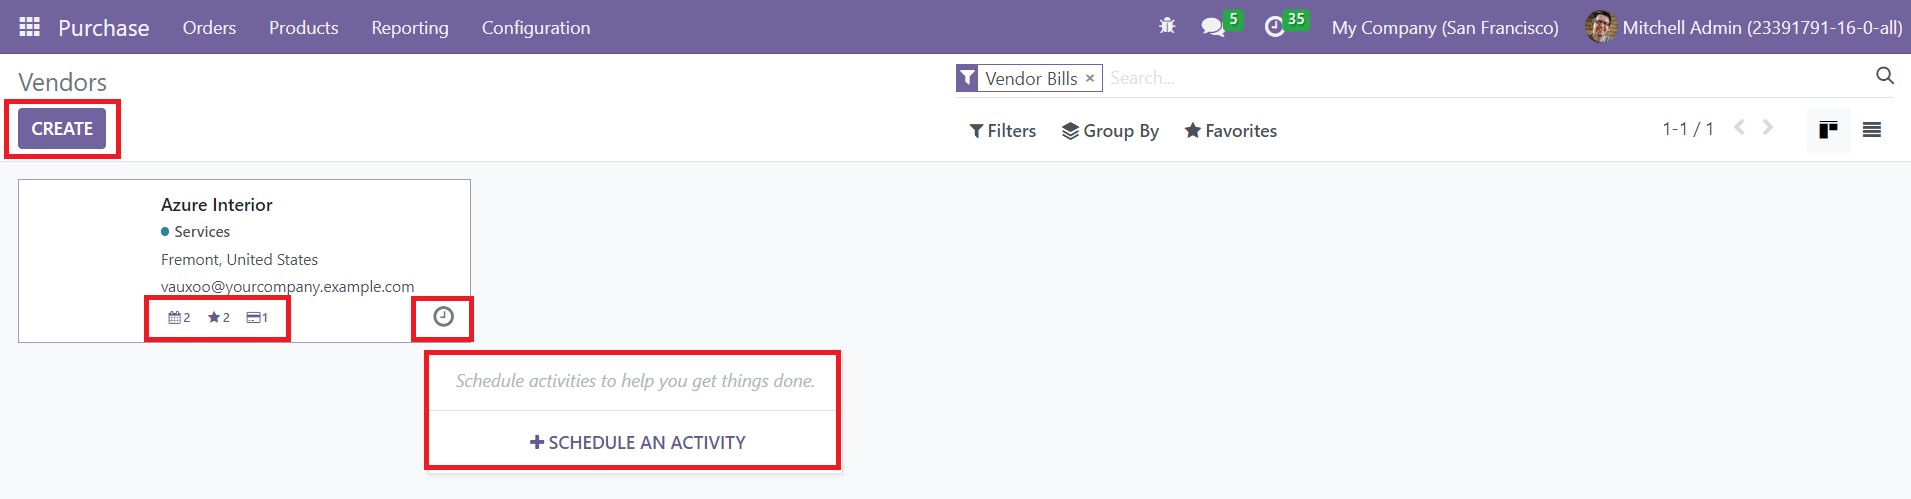
The small clock icon can be used to schedule activity with the vendor. You can shift the view into a list which shows Name, Phone, Email, Salesperson, Activities, City, Country, and Company.
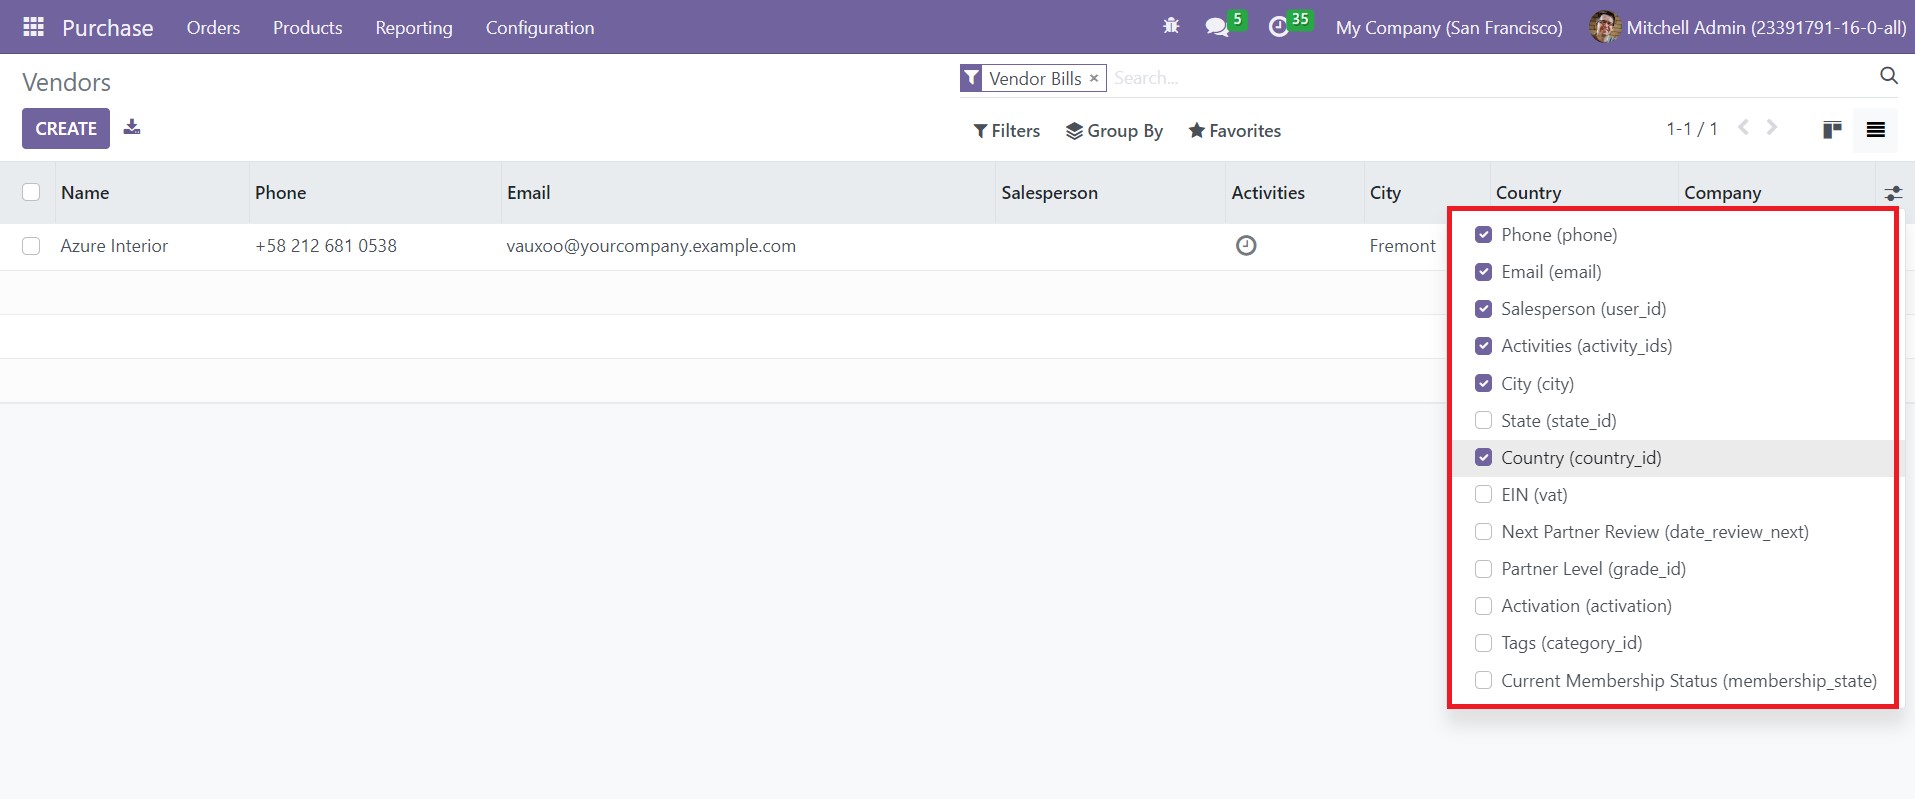
The list view can be expanded by enabling required options from the advanced toolbar. It includes State, EIN, Next Partner Review, Partner Level, Activation, Tags, and Current Membership Status.
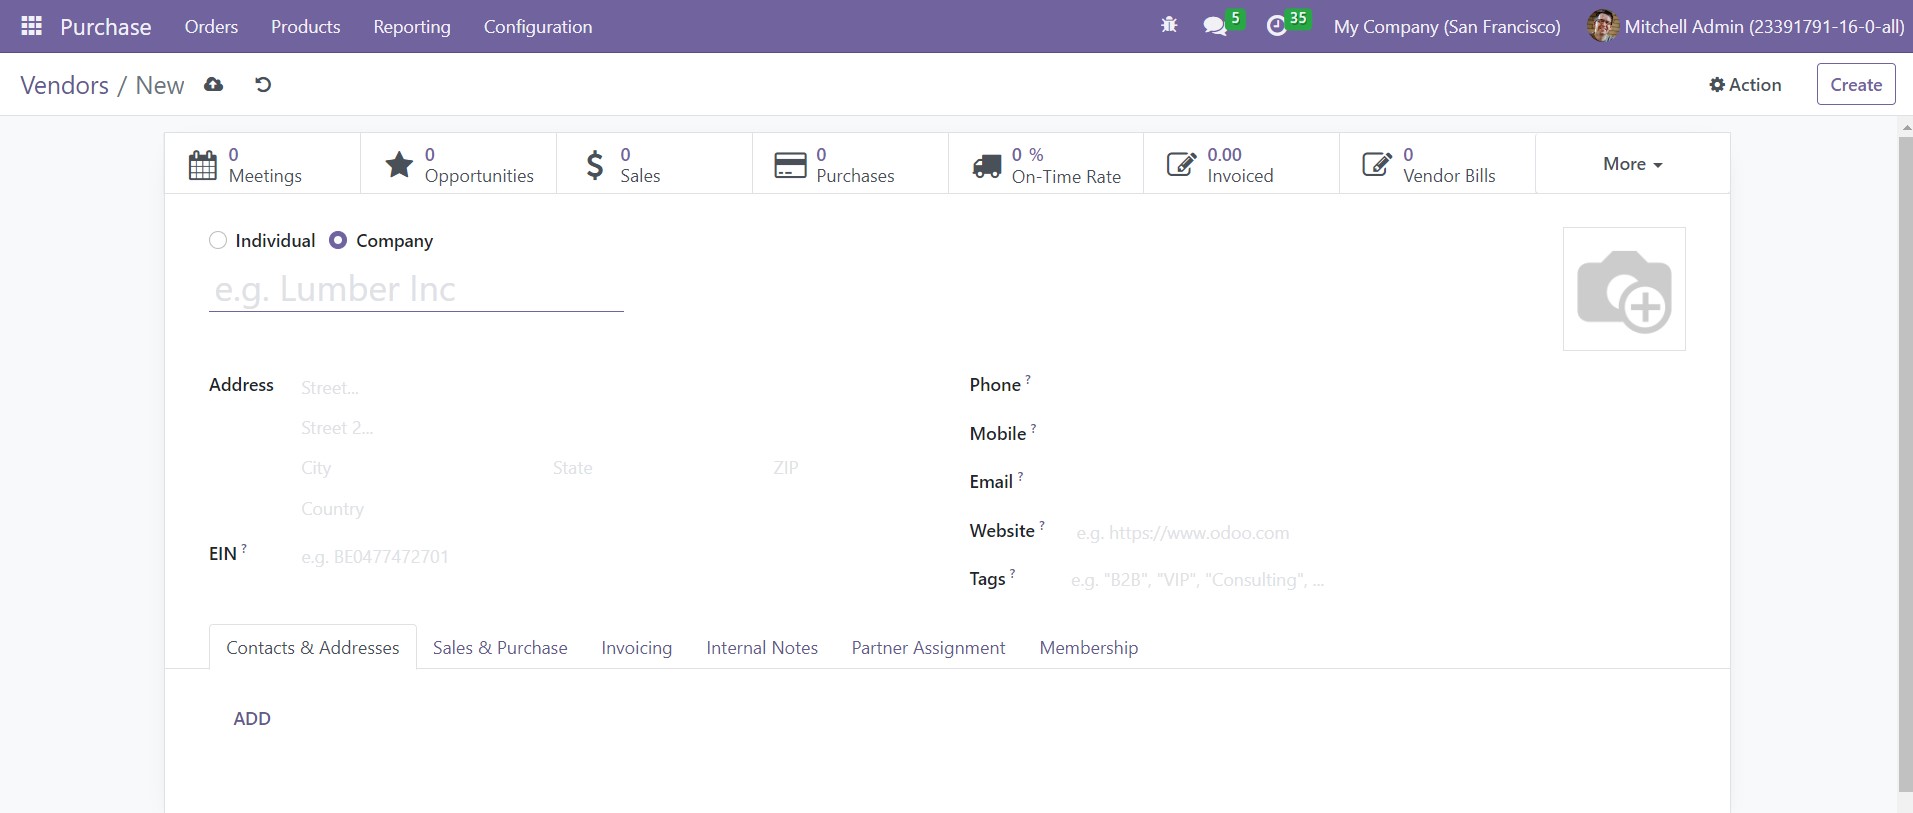
Clicking on the Create button will lead you to a new platform where you can configure the details of the vendor. The process of vendor configuration is the same as that of the customer configuration we discussed in the Sales module. So, you can follow the same steps here. Complete the Contact & Addresses, Sales & Purchases, Invoicing, Internal Notes, Partner Assignment, and Membership tabs. After configuring Vendors, you can manage the Vendor Price List in the Odoo Purchase module.
Vendor Pricelist
Pricelist is an important part of the sales and purchase operations of a company. Using the Vendor Pricelist feature available in the Odoo Purchase module, you can configure a specific pricelist for particular vendors for a particular period of time. You can apply these vendor pricelists while purchasing the specified products from that vendor. Go to the Configuration menu where you can find the Vendor Pricelist option.
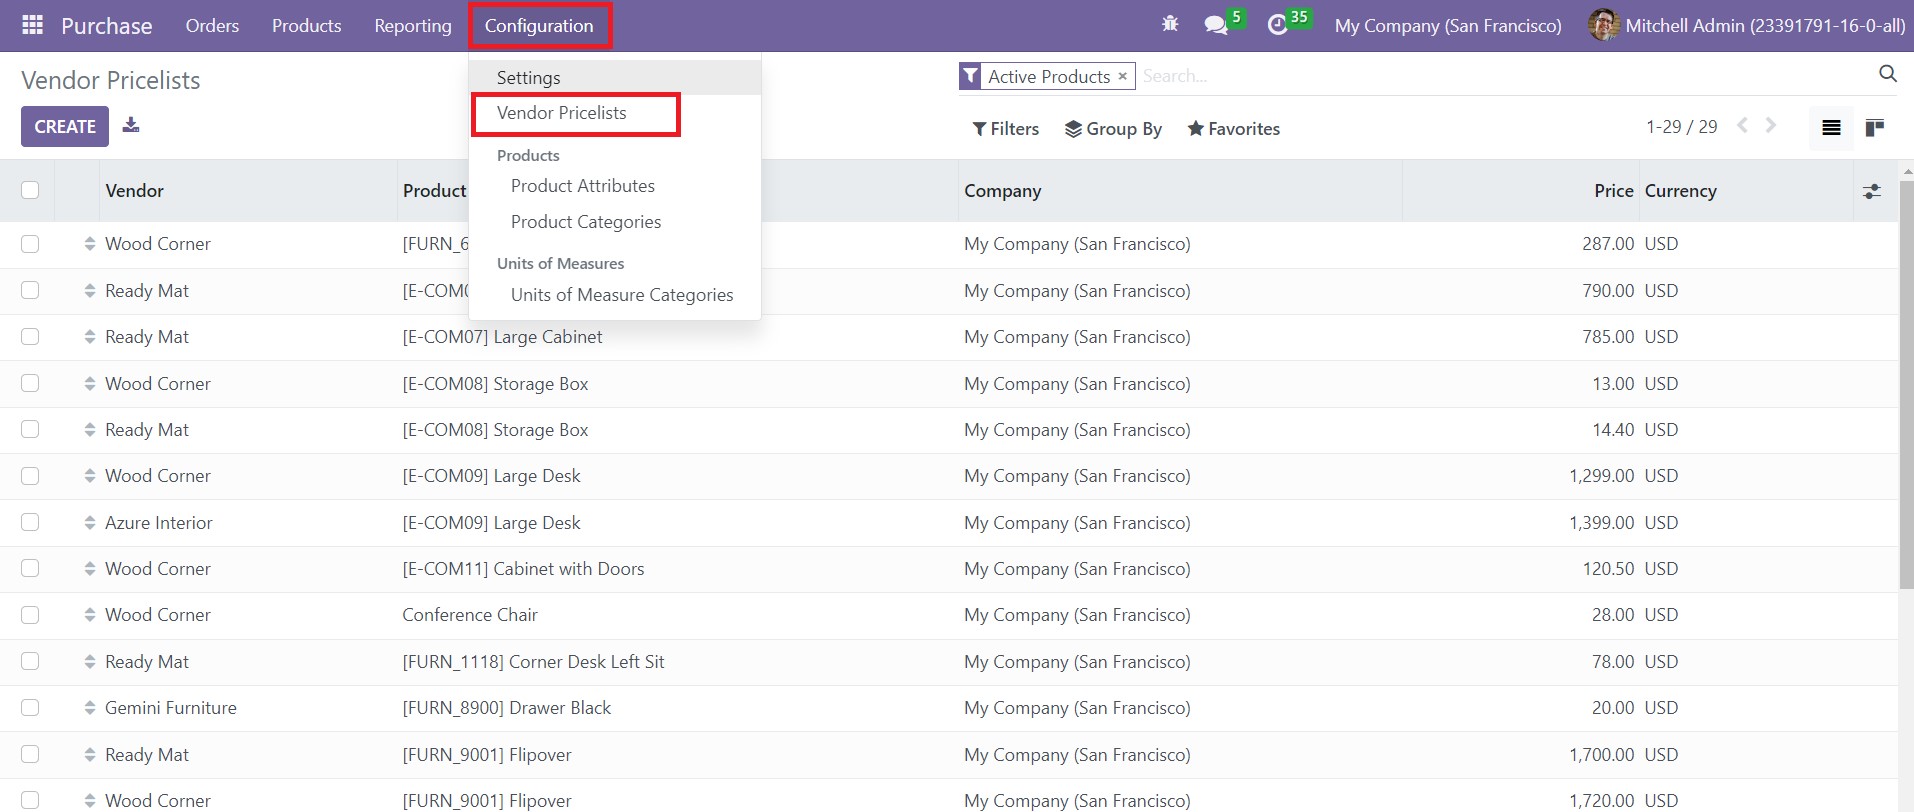
Click this option and you will get a list view of the already configured vendor pricelist with the details of the Vendor, Product, Company, Price and Currency.
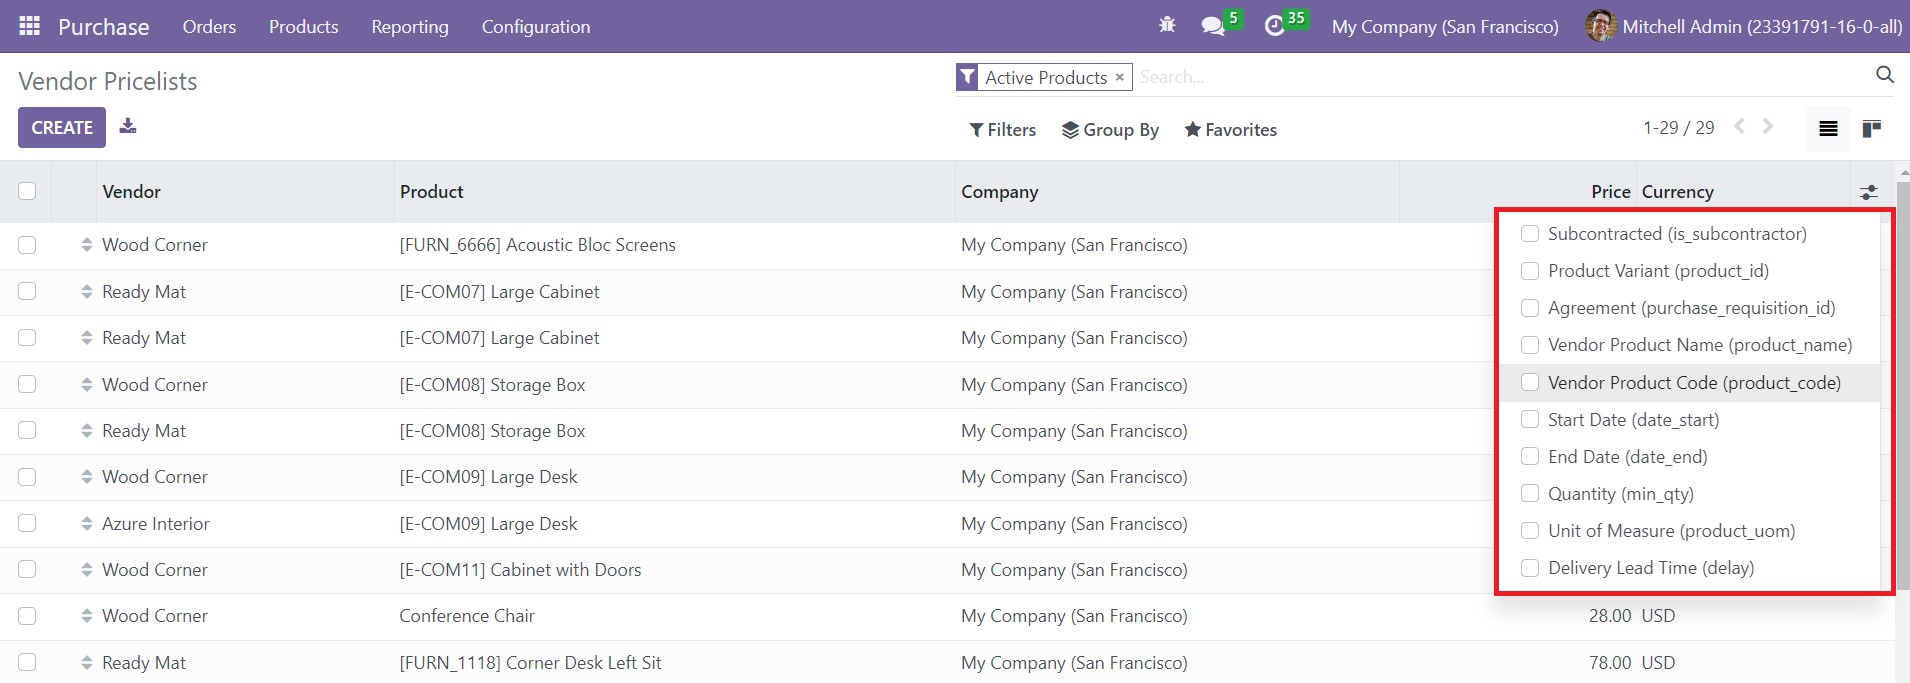
If you want, you can add additional fields to the list view. On the right side of the screen, you will get a specified list as highlighted in the image above, from where you can activate the required fields for the list view. You can additionally activate the Subcontracted, Product Variant, Agreement, Vendor Product Name, Vendor Product Code, Start Date, End Date, Quantity, Unit of Measures, and Delivery Lead Time. Now, click the Create button.

You will get a new form view to create a new vendor pricelist. Mention the Vendor, Vendor Product Name, Vendor Product Code, and Delivery Lead Time in the respective fields. The specified Vendor Product Name and Code will be used when printing a request for quotation using this pricelist. Under the Pricelist tab, you can add the Product, Product Variant, Quantity, Unit of Price, Validity, and Company. This is how we create a new vendor pricelist in the Odoo Purchase module.
Request for Quotation
For every sizable purchase your company makes for business, the concerned vendor shall draft you a quotation for the purchased items upon request. You can convert the response to your Request for Quotation (RFQ) into a purchase order. Using these quotations, you can compare the product’s price range and quality with similar suppliers, which will help you pick the right vendor.
The home window of the Purchase module will showcase all RFQs created on the platform. You can see the details of these quotations like Reference number, Vendor name, Company name, Buyer, Order Deadline, Activities, Source Document, Total cost, and Status of the RFQ.
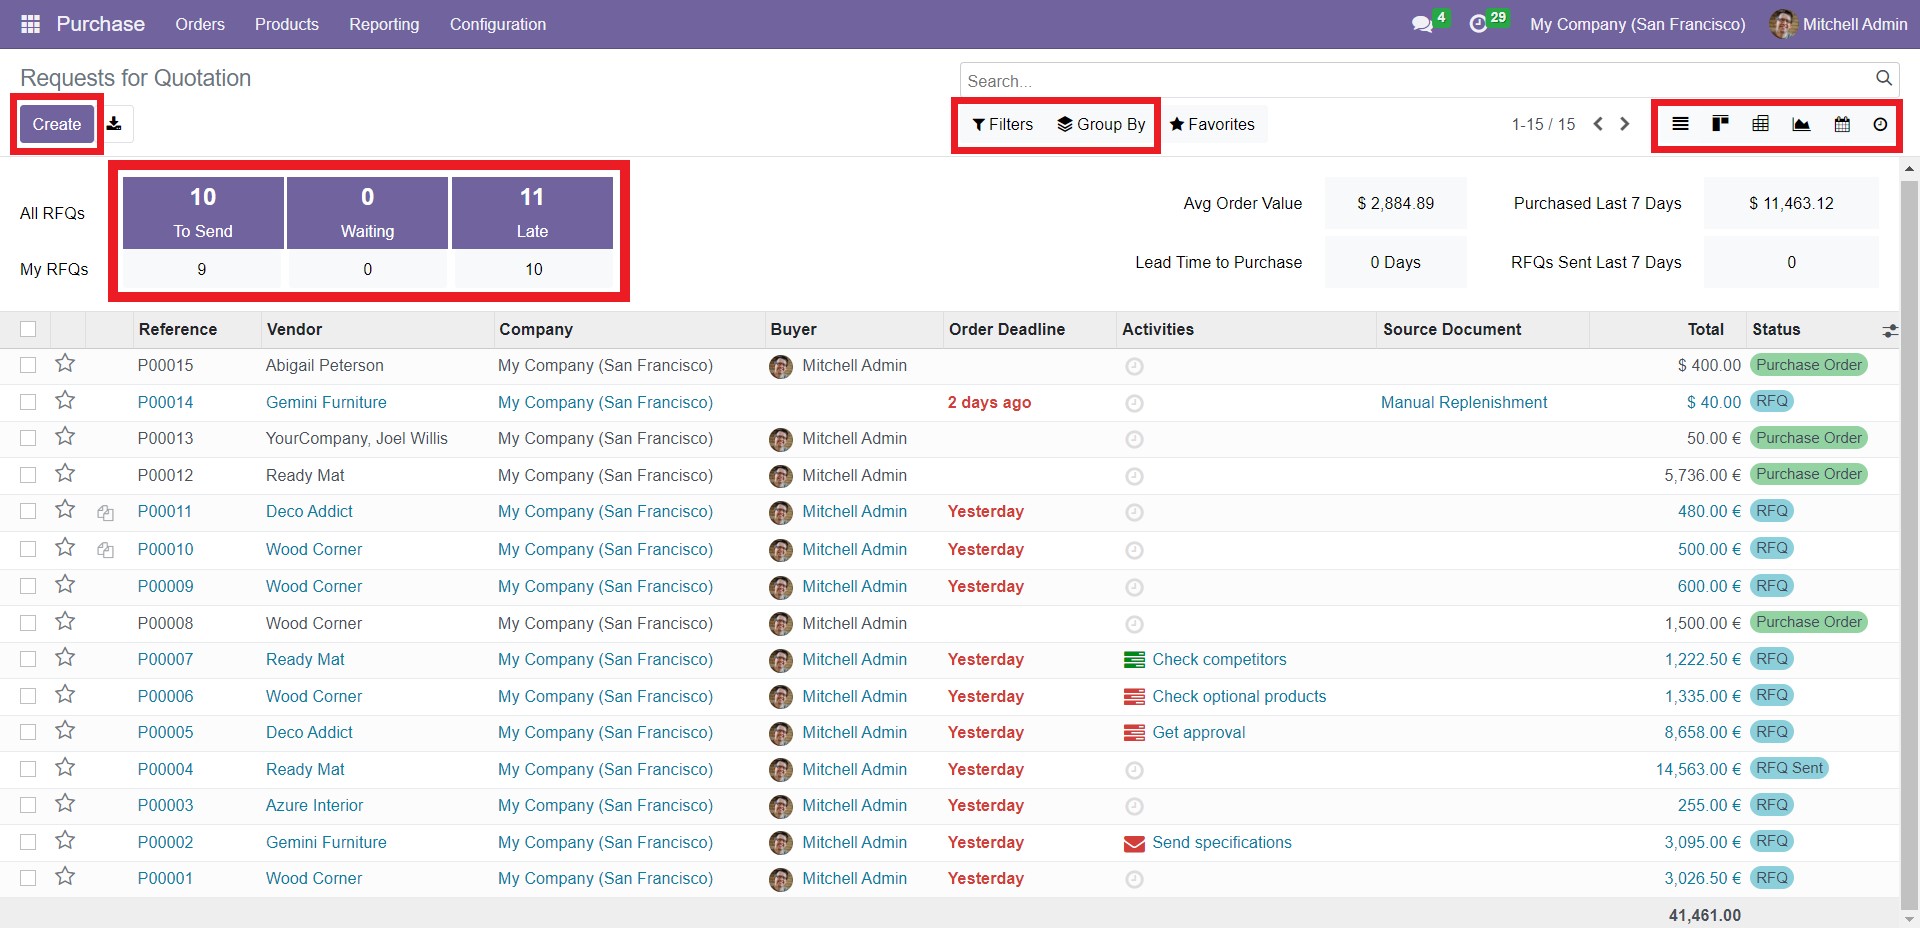
There are two sections in the window shown above – All RFQs and My RFQs – displaying the number of RFQs To Send, Waiting, and Late. When you click on ‘To Send,’ the window will list the details of the requests you need to send. The RFQs waiting for the vendors’ reply will appear under ‘Waiting.’ Lastly, under ‘Late,’ you can see the RFQs of orders that are past their deadlines. All RFQs contain the quotation requests already configured in the module, whereas My RFQs show the quotation requests for the purchases made by you (the admin).
You can view the details like Avg Order Value, Purchased Last 7 Days, Lead Time to Purchase, and RFQs Sent Last 7 Days. Avg Order Value gives you the mean value of the orders listed in the window. This value changes as you apply different filters. The section ‘Purchased Last 7 Days’ shows the total cost of all the purchases made in the last seven days. Refer to ‘Lead Time to Purchase’ to know the time between the day of making an order and the day of purchasing it.
In the top right corner, you can click on the icons for different views like List, Kanban, Pivot, Graph, and Calendar. If you want to separate a particular set of records based on specific criteria, you can use the Filters and Group By options. The dropdown list of Filters has the options – My Purchases, Starred, RFQs, Purchase Orders, Requisitions, To Approve, Order Date, Draft RFQs, Waiting RFQs, Late RFQs, and Warning.
The Create button will help to create a new request for a quotation in the Purchase module.
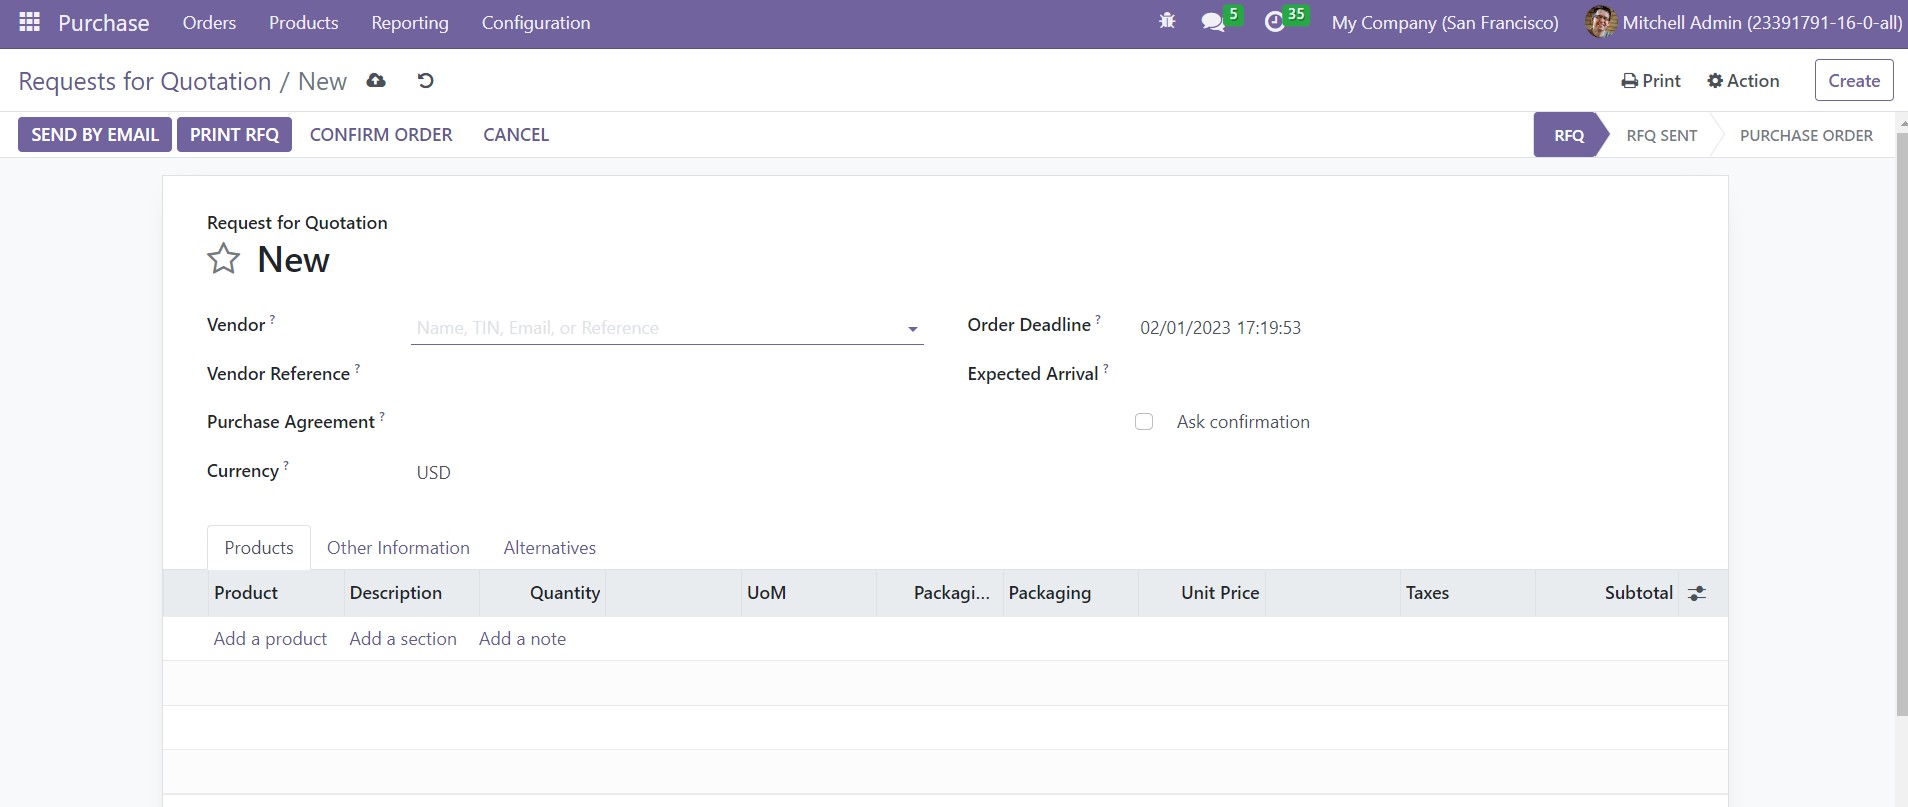
Select the Vendor’s name with whom you want to purchase and mention the Vendor Reference in the given field. Attach the purchase agreement to the RFQ, which will define the conditions between vendor and buyer. The Order Deadline will determine the date of the conversion of RFQ into an order. While mentioning the Receipt Date, you can enable the ‘Ask Confirmation’ button, which will send a confirmation mail to the vendor regarding the receipt date
Under the Product tab, you can configure the product list to the RFQ. Click the ‘Add a product’ option and select a product that you want to purchase from the configured product list in the module. While selecting a product, the other fields, such as Description, Quantity, UoM, Unit Price, Taxes, and Subtotal, will be automatically filled in with respect to the product you have selected. You can change the quantity of the product as per your demand, and the total price will change accordingly.
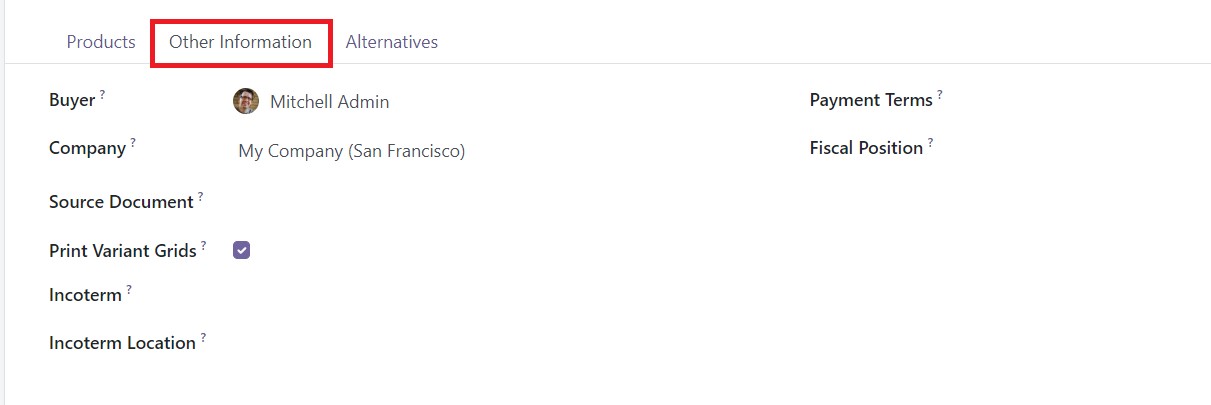
Below the ‘Other Information’ tab, add the Purchase Representative, Company, Payment Terms, Fiscal Position, and Incoterm details.
https://www.images.cybrosys.com/images/odoo-book-16/community/odoo-book-16-community-purchase-17.jpg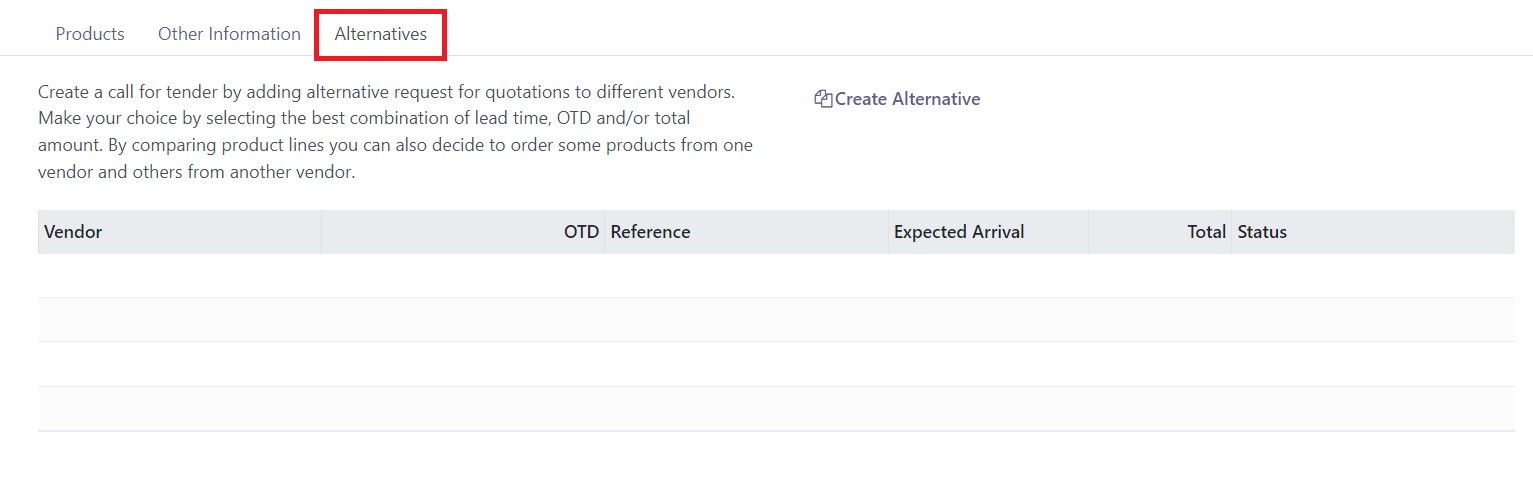
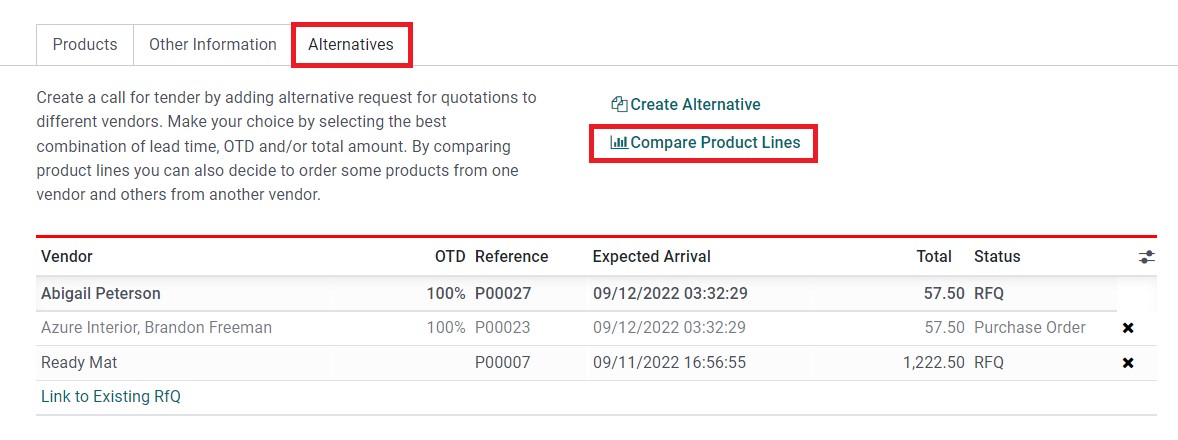
The Alternatives tab is a new feature in Odoo 16. This tab can be used to add alternative purchase orders with the same product from different suppliers. It will create a call for tender when you add alternative orders. You can compare the alternatives and select the best option. Click the Create Alternative button to create alternatives. You will get a pop-up window as shown below.
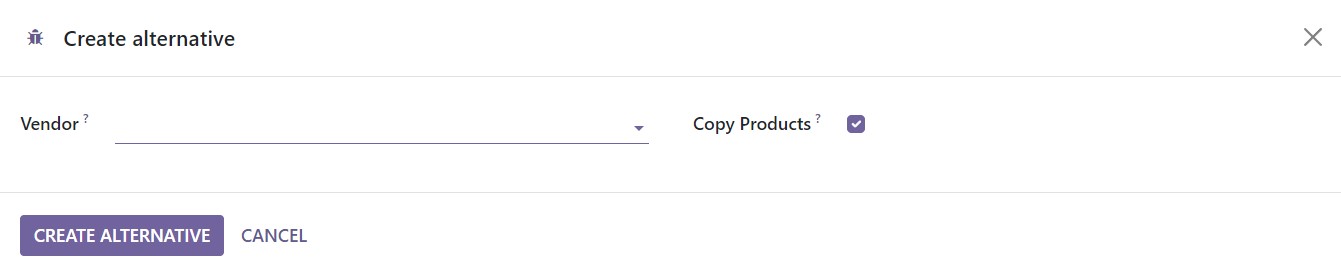
You can select the alternative Vendor in the given space. The Copy Products option will help you to copy the product details of the actual purchase order. Now, click the Create Alternative button. You can check the alternative orders under the respective tab.
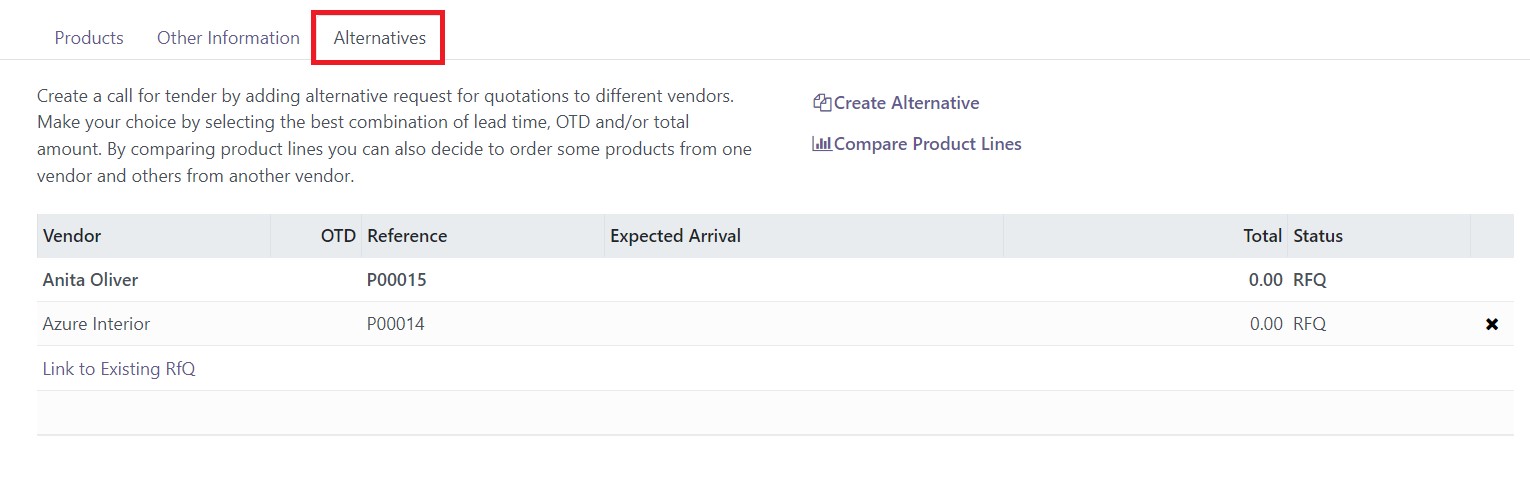
The Link to Existing RFQ can be used to link the alternative to the existing RFQ. In order to compare the product lines of the alternatives, you can use the Compare Product Lines button.
Clicking on this option will open a new window where you can observe the Product, Vendor, Reference, Status, Description, Expected Arrival, Quantity, Unit of Measure, Unit Price, Total, and Currency.
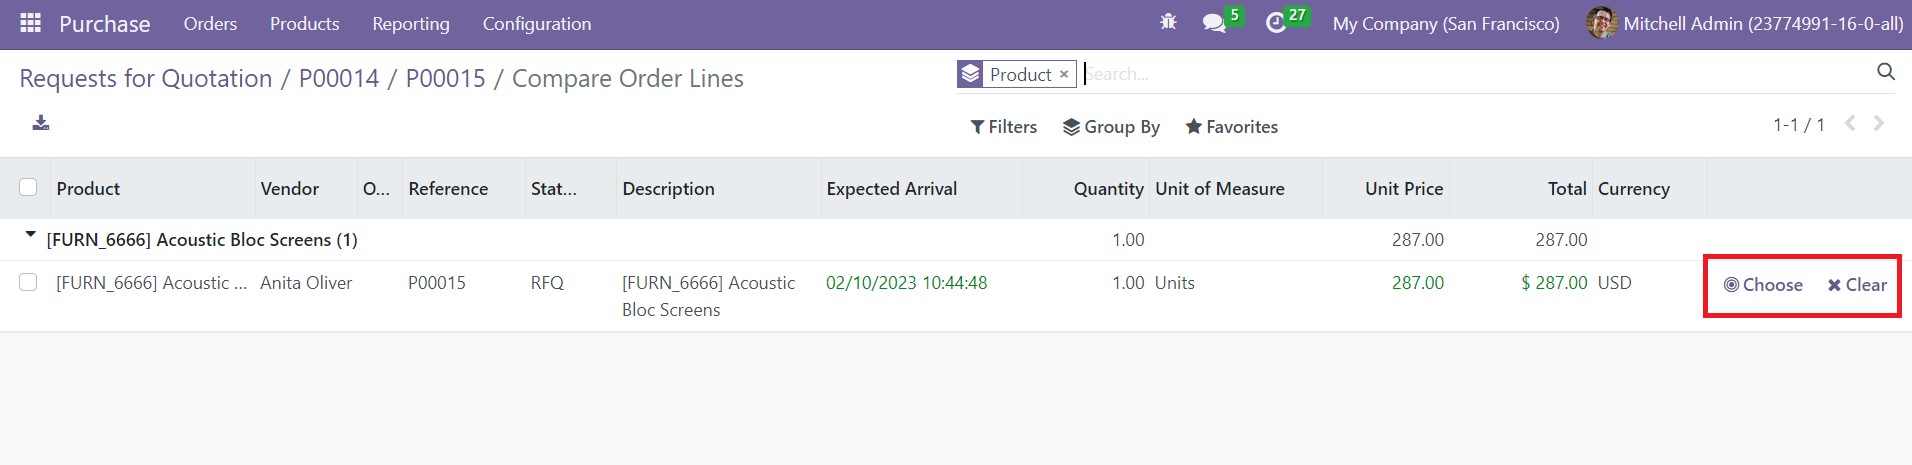
You can select the best option from the alternatives by clicking on the Choose button. Otherwise, you can use the Crear button.
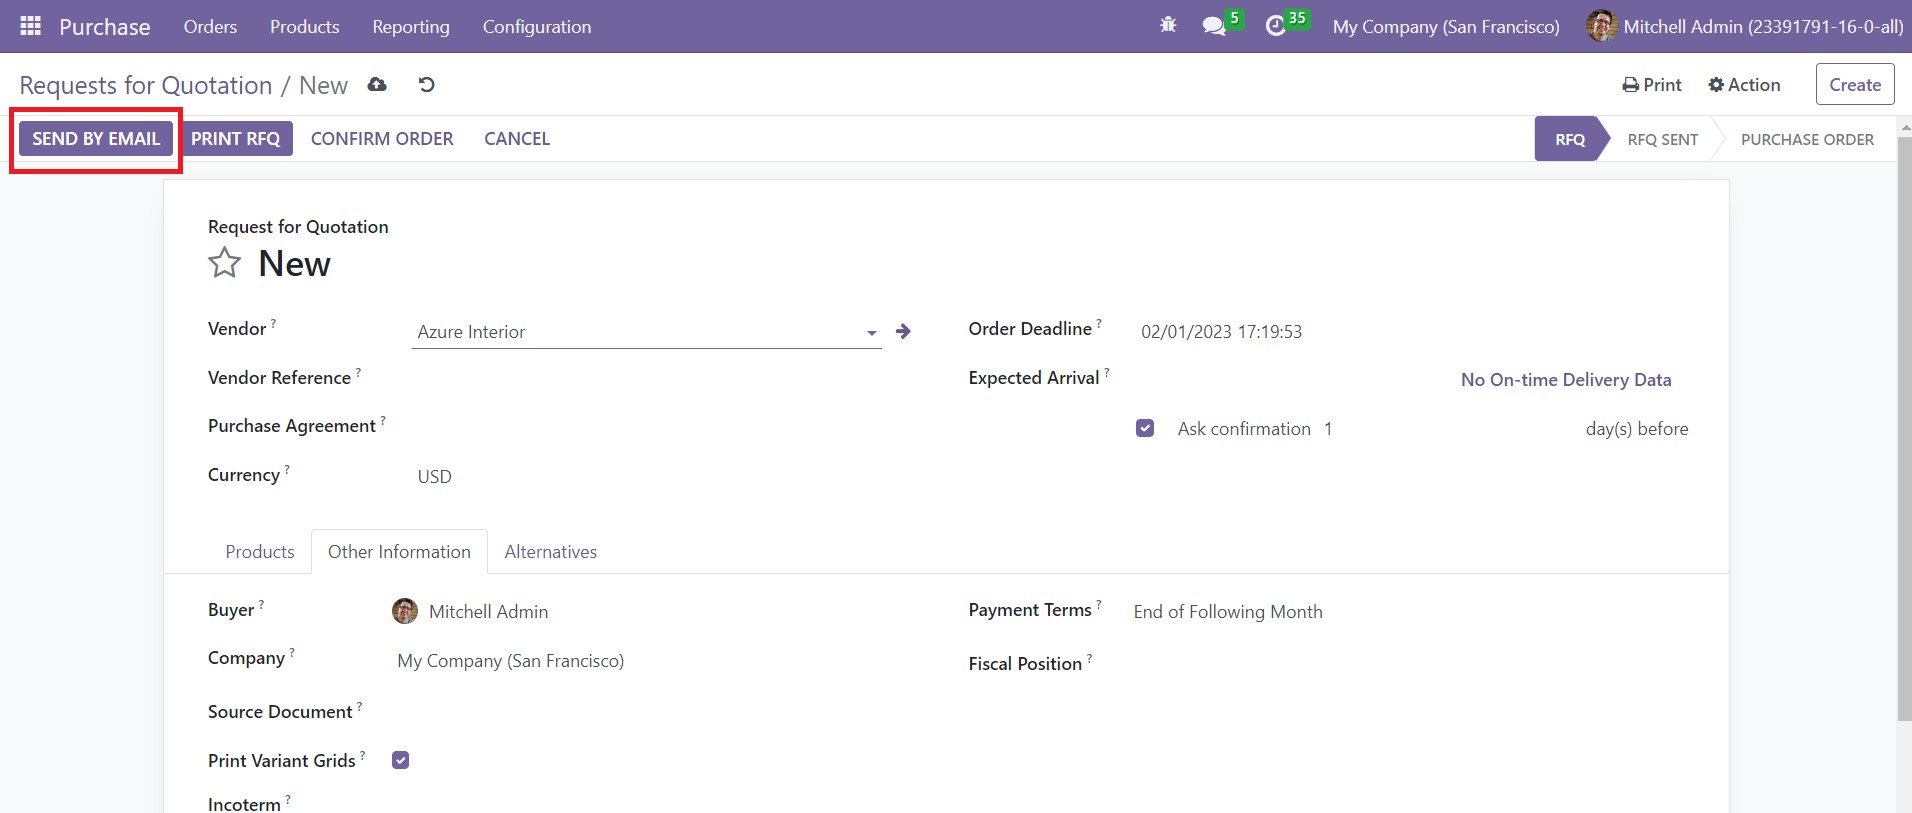
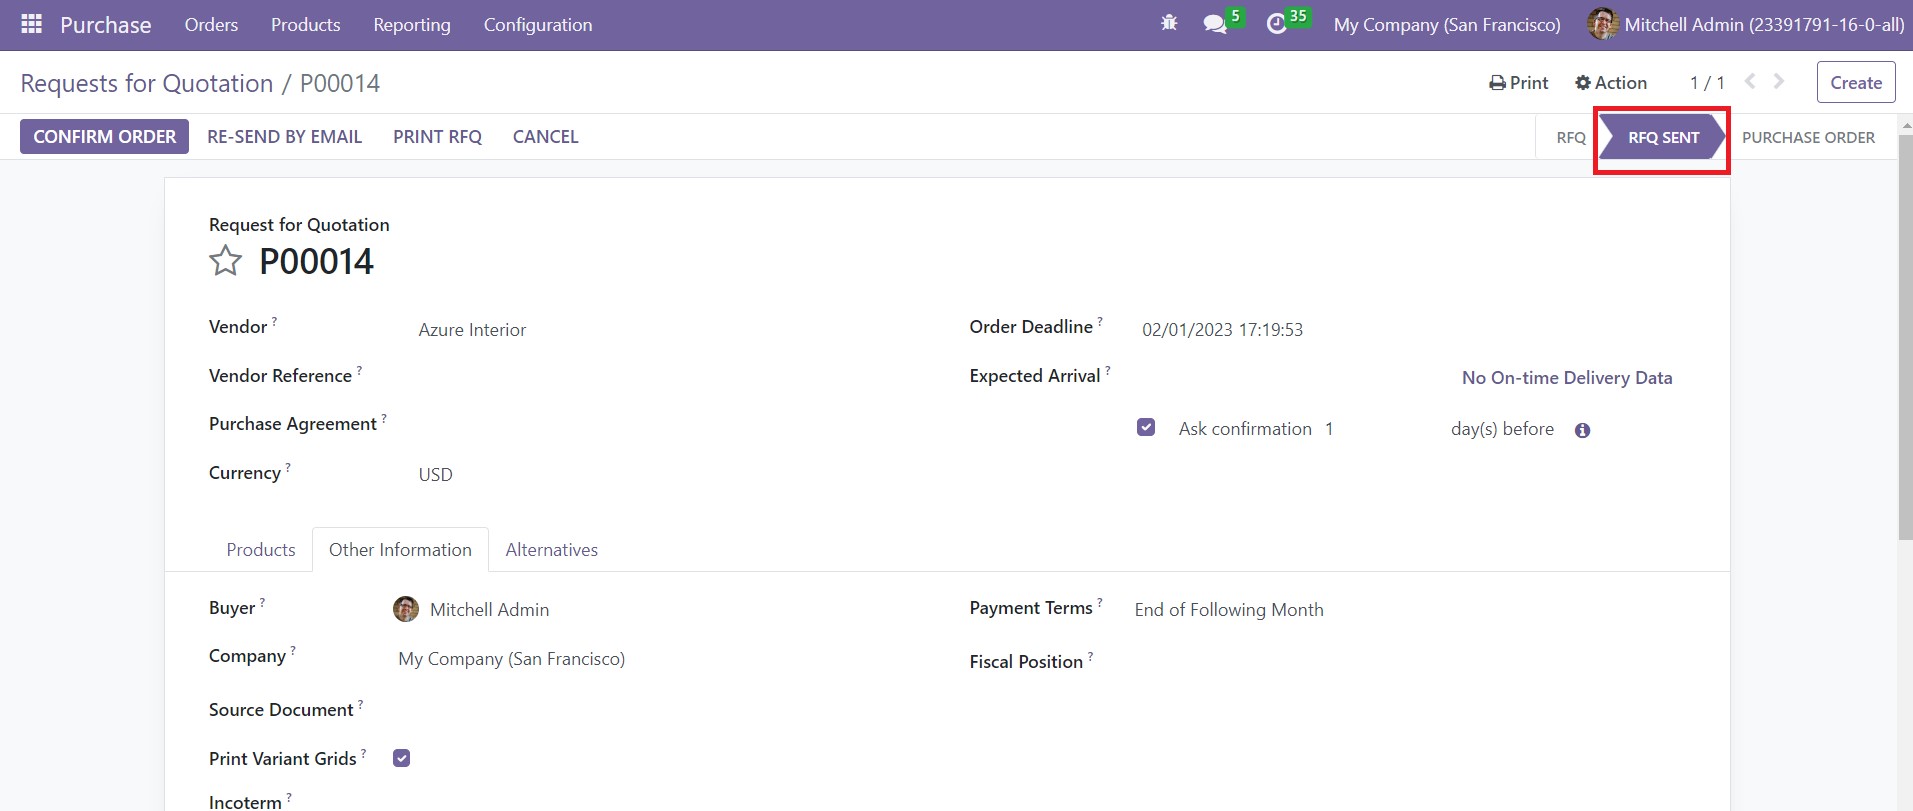
After saving the RFQ, you will be able to see an option to send the RFQ through Email. While clicking the ‘Send by Email’, an auto-generated mail will appear and you can send this to the respective vendor. After sending the mail, you can view the status of the newly created RFQ that has changed into the ‘RFQ Sent’.
vendor-bills
In Odoo, you can generate vendor bills on ordered quantities and delivered quantities according to company policies. You can go to the Settings menu of the Purchase module to set the Bill Control policies.
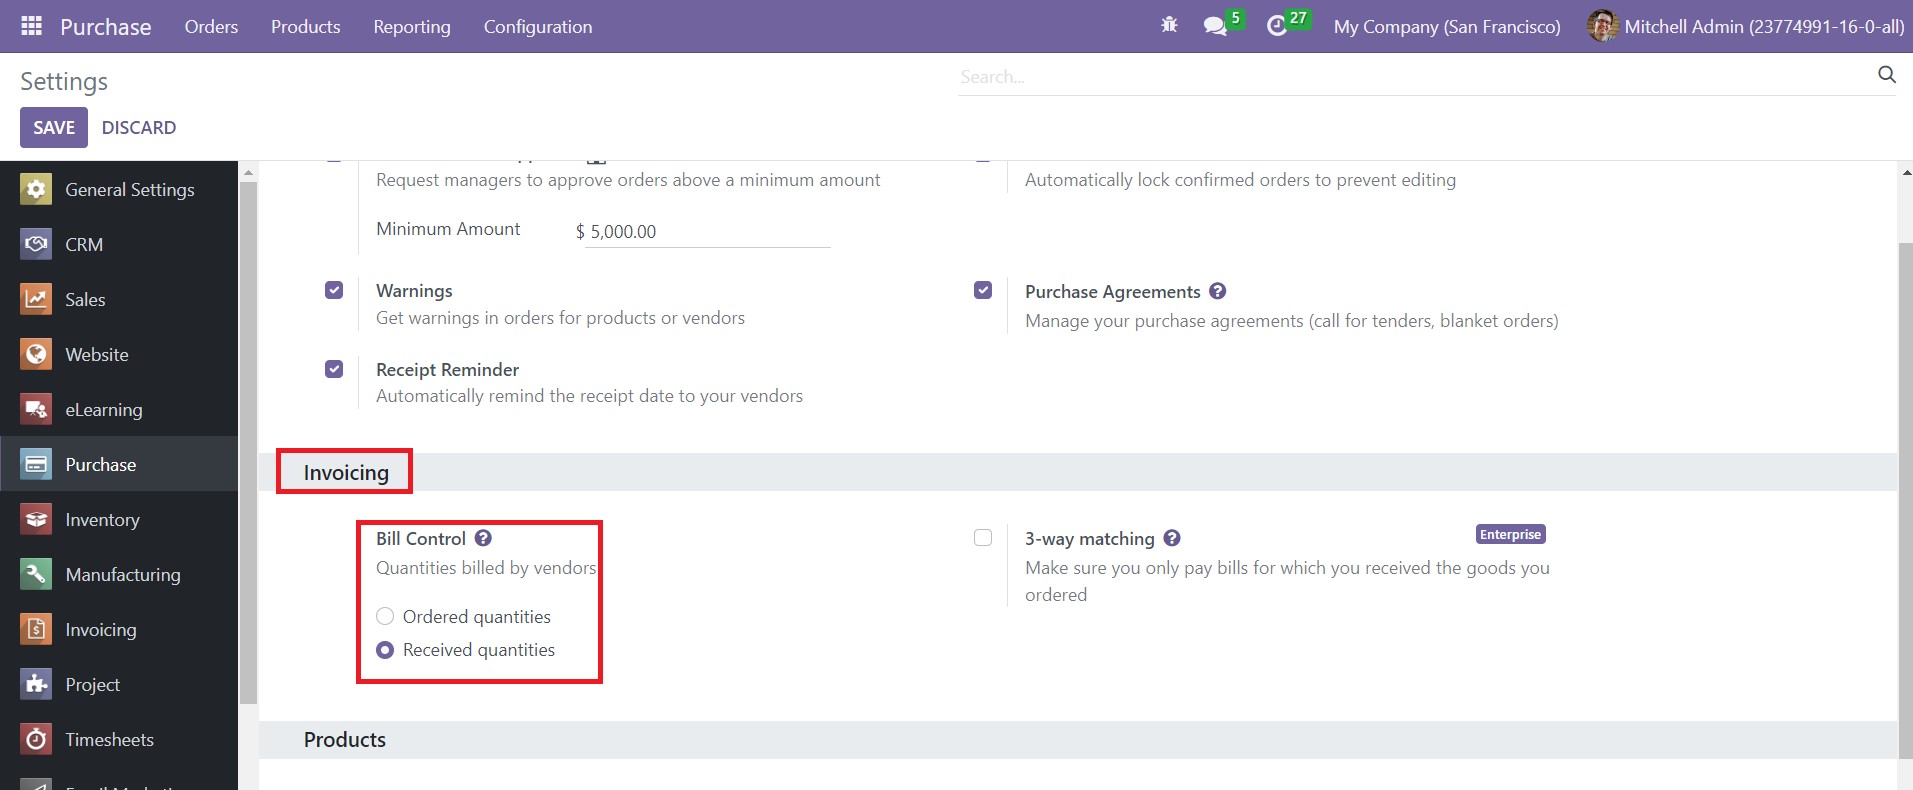
You will get the Bill Control option under the Invoicing tab. This field will help you to define how to generate bills for purchases. The option you set here will be applied for all products as the default bill control policy. Later, you can change the invoicing policy of a product from its form view. Here, you can generate bills before and after delivery. If you want to generate vendor bills for all ordered quantities, you can select the Ordered Quantities as the Bill Control. By selecting this option, you will be able to generate bill for all the quantities mentioned in the purchase order. But in the case of the Received Quantities, Odoo will only bill the delivered quantities.
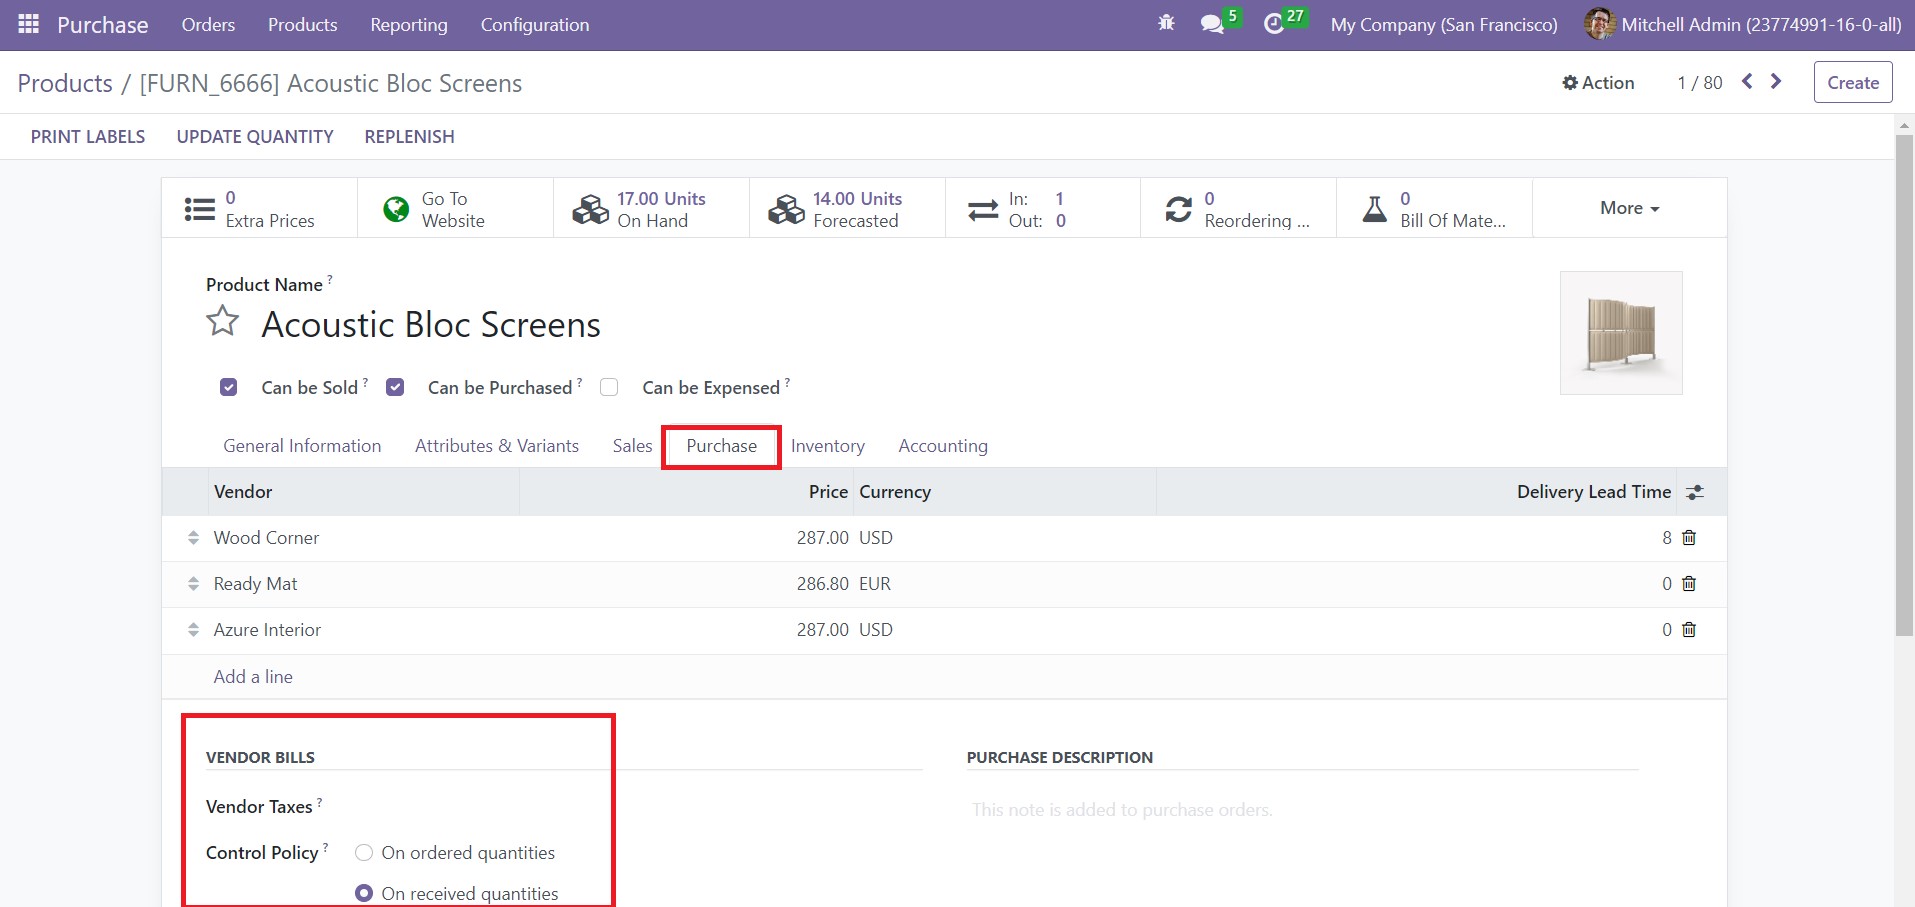
It is possible to set the control policy from the form view of each product. Under the Purchase tab, you will get the respective option as shown below.
Now, let’s check how to generate a vendor bill for a purchase order.
You will get the Create Bill option once you confirm the purchase.
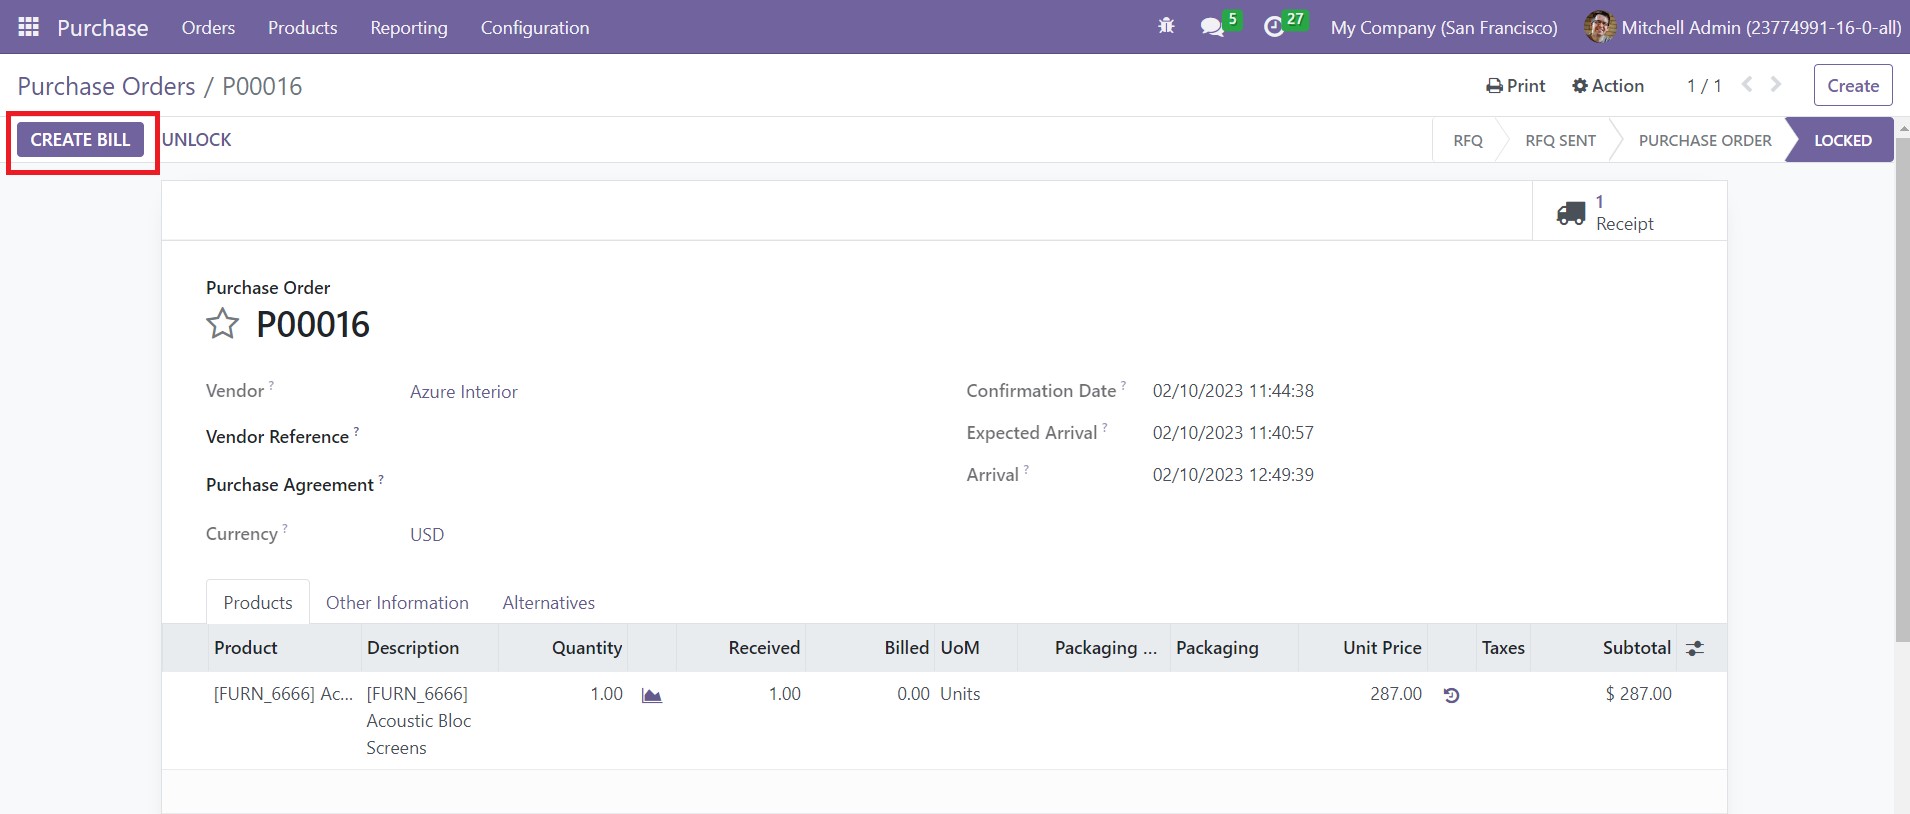
Clicking on this button will lead you to a new window where you can observe the draft form of the vendor bill.
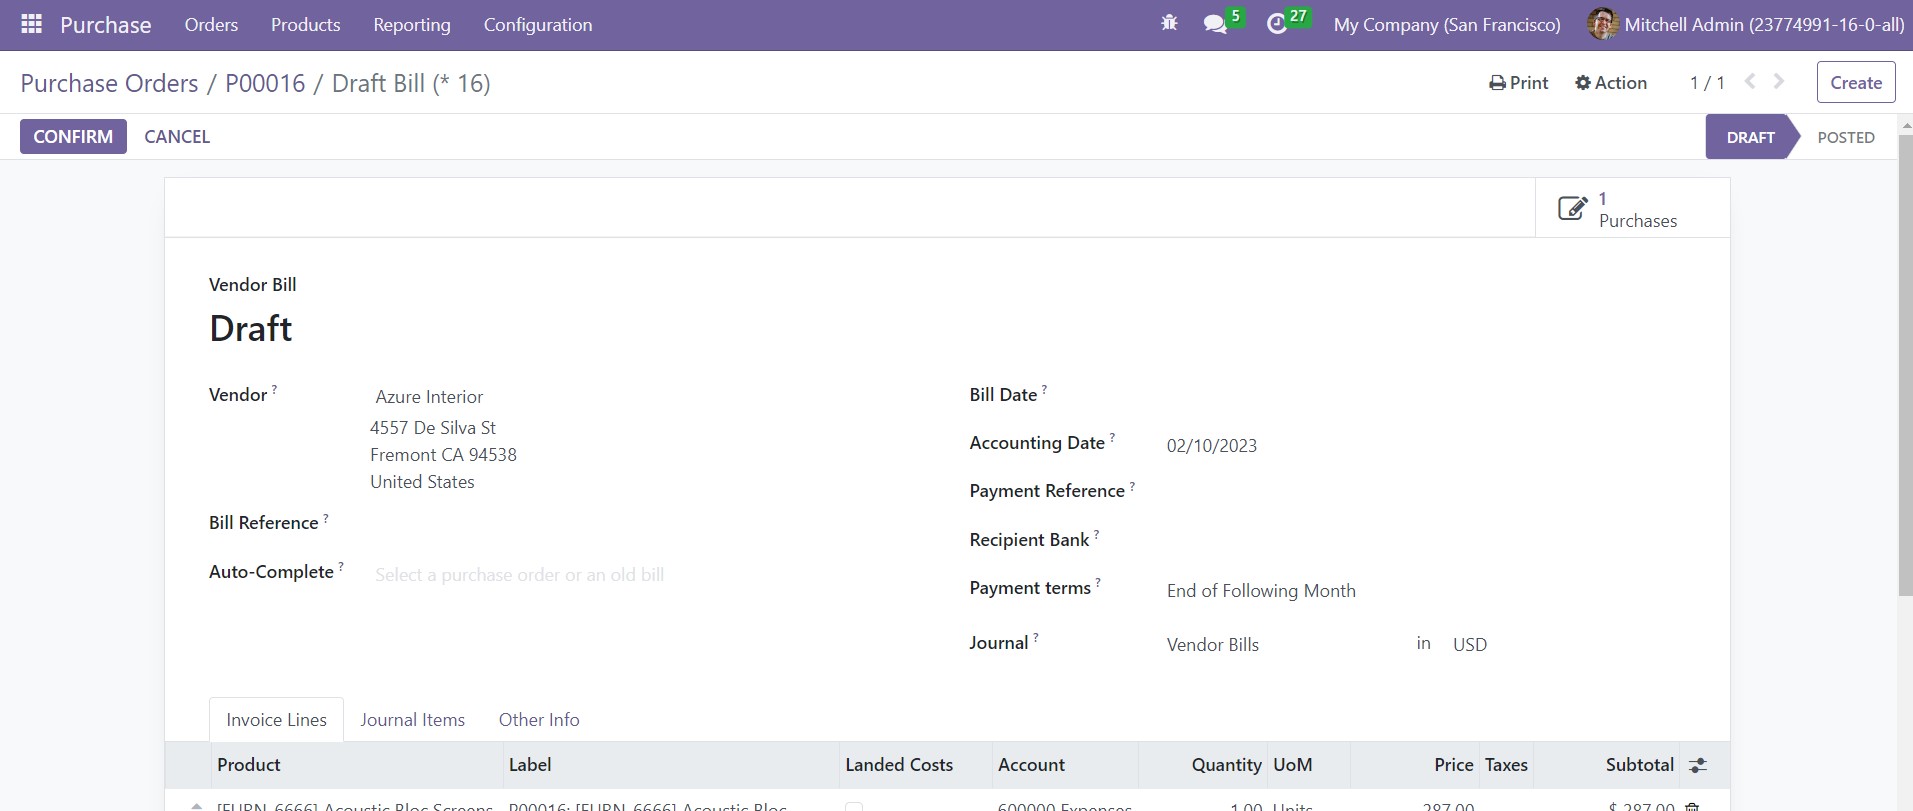
The draft bill includes the details of the Vendor, Bill Reference, Accounting Date, Payment Reference, Receipt Bank, Payment Items, and Journal. Don’t forget to mention the Bill Date so that you can confirm the bill. Additional details will be available under the Invoice Lines, Journal Items, and Other Info tabs. Now, click the Confirm button. Your vendor bill is ready for payment.
Purchase-agreement
The terms and conditions meant to be agreed upon between the customer and the vendor can be specified in a Purchase Agreement. Before creating a purchase order, it is important that both parties agree to the terms and conditions specified in the purchase agreement. You will get a separate platform in Odoo to manage such purchase agreements. These purchase agreements can be used by creating purchase orders.
First, you need to activate the Purchase Agreements option from the Settings menu. It will be available under the Orders tab as shown in the screenshot below.
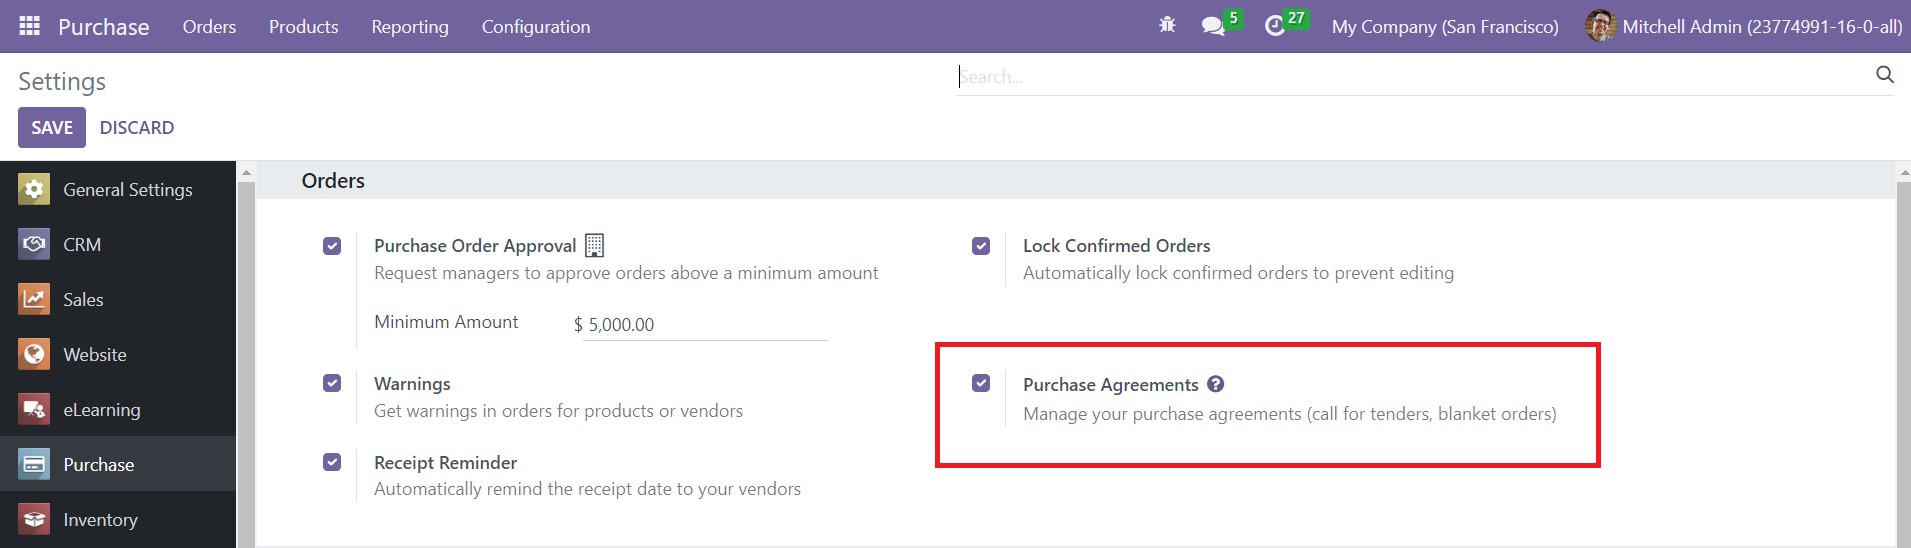
Activate this feature from the Settings menu. You will get two types of purchase agreements in Odoo 16, which are Call for Tender and Blanket Order. You can use the Call for Tender option when you want to compare the offers of multiple vendors for the same product. You will get this option while creating c new RFQ in the Purchase module. We already detailed this while mentioning the Purchase Order.
Here, the Alternatives tab can be used to create a call for tender by configuring alternative purchase orders from various suppliers. This feature will assist you in easily comparing the product line and choosing the best option.
You can use Blanket Orders to create agreements with your regular customers. Using this feature you can create customized products and pricelists for your regular clients. This type of purchase agreement will help you if you are doing regular purchases from the same supplier, for the same product from various vendors, or for different products from the same supplier within a regular time period. In order to create Blanket Orders, you can go to the Orders menu of the Purchase module.

The list view of the Blanket Orders will show the Reference, Purchase Representative, Company, Ordering Date, Agreement Deadline, Source Document, and Status. Use the Create button to create a new blanket order.
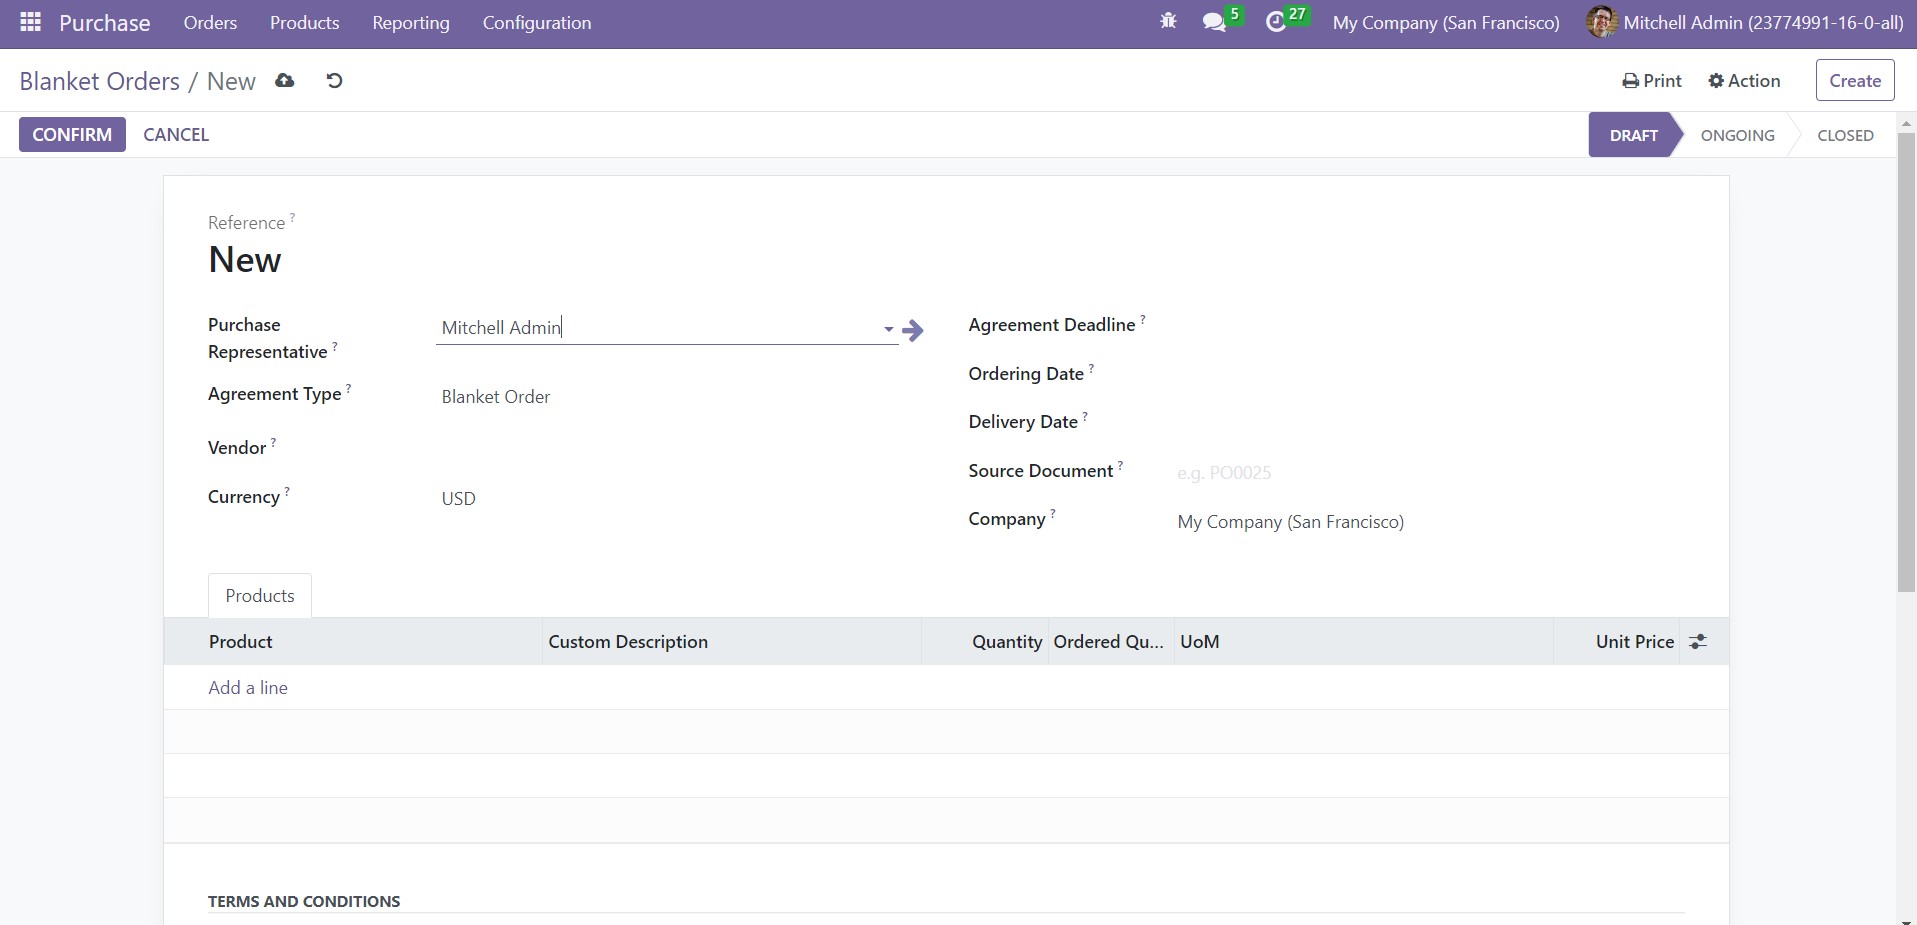
You will get a new form view to create a blanket order. Mention the Purchase Representative, Agreement Type, and Vendor in the respective fields. The Currency used for the transaction between the parties can be specified in the given field. You can set an Agreement Deadline to define the end date of the agreement. In the corresponding fields, you can specify the Ordering Date, Delivery Date, Source Document, and Company. Use the Add a Line button to mention the product details such as Product, Custom Description, Quantity, Ordered Quantity, UoM, and Unit Price. An additional field will be available to mention the Terms and Conditions used for the purchase order. Now, click the Confirm button, and the status will be changed to Ongoing.
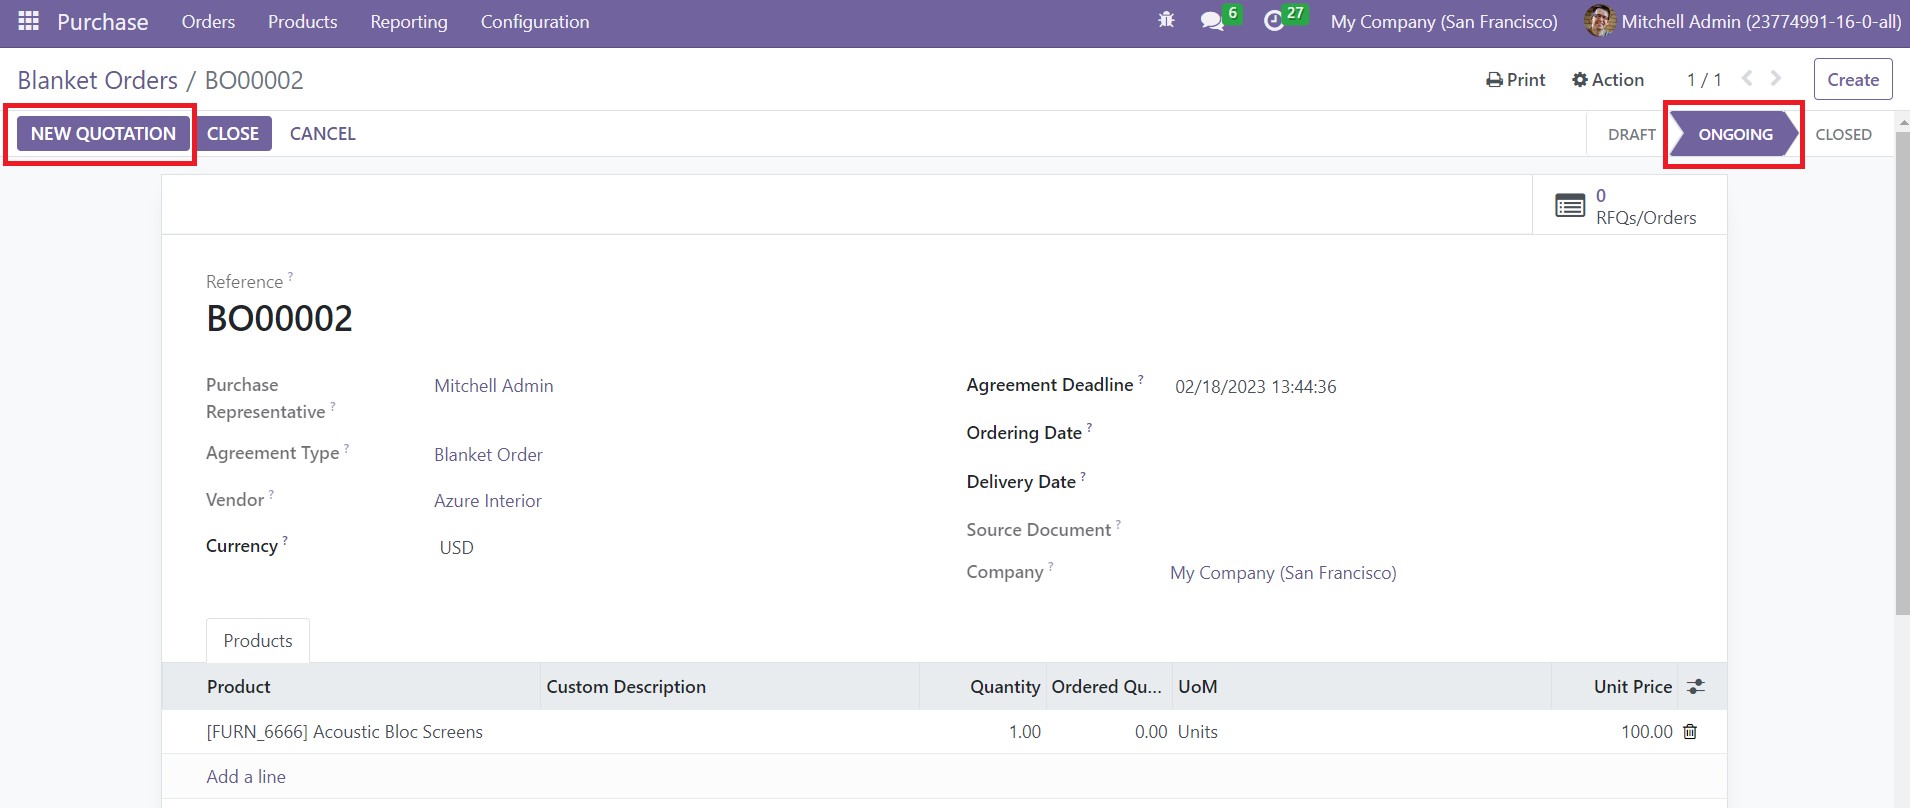
It will be moved to the Closed state once it reaches the Agreement Deadline. Now, you can use this while creating new purchase quotations.
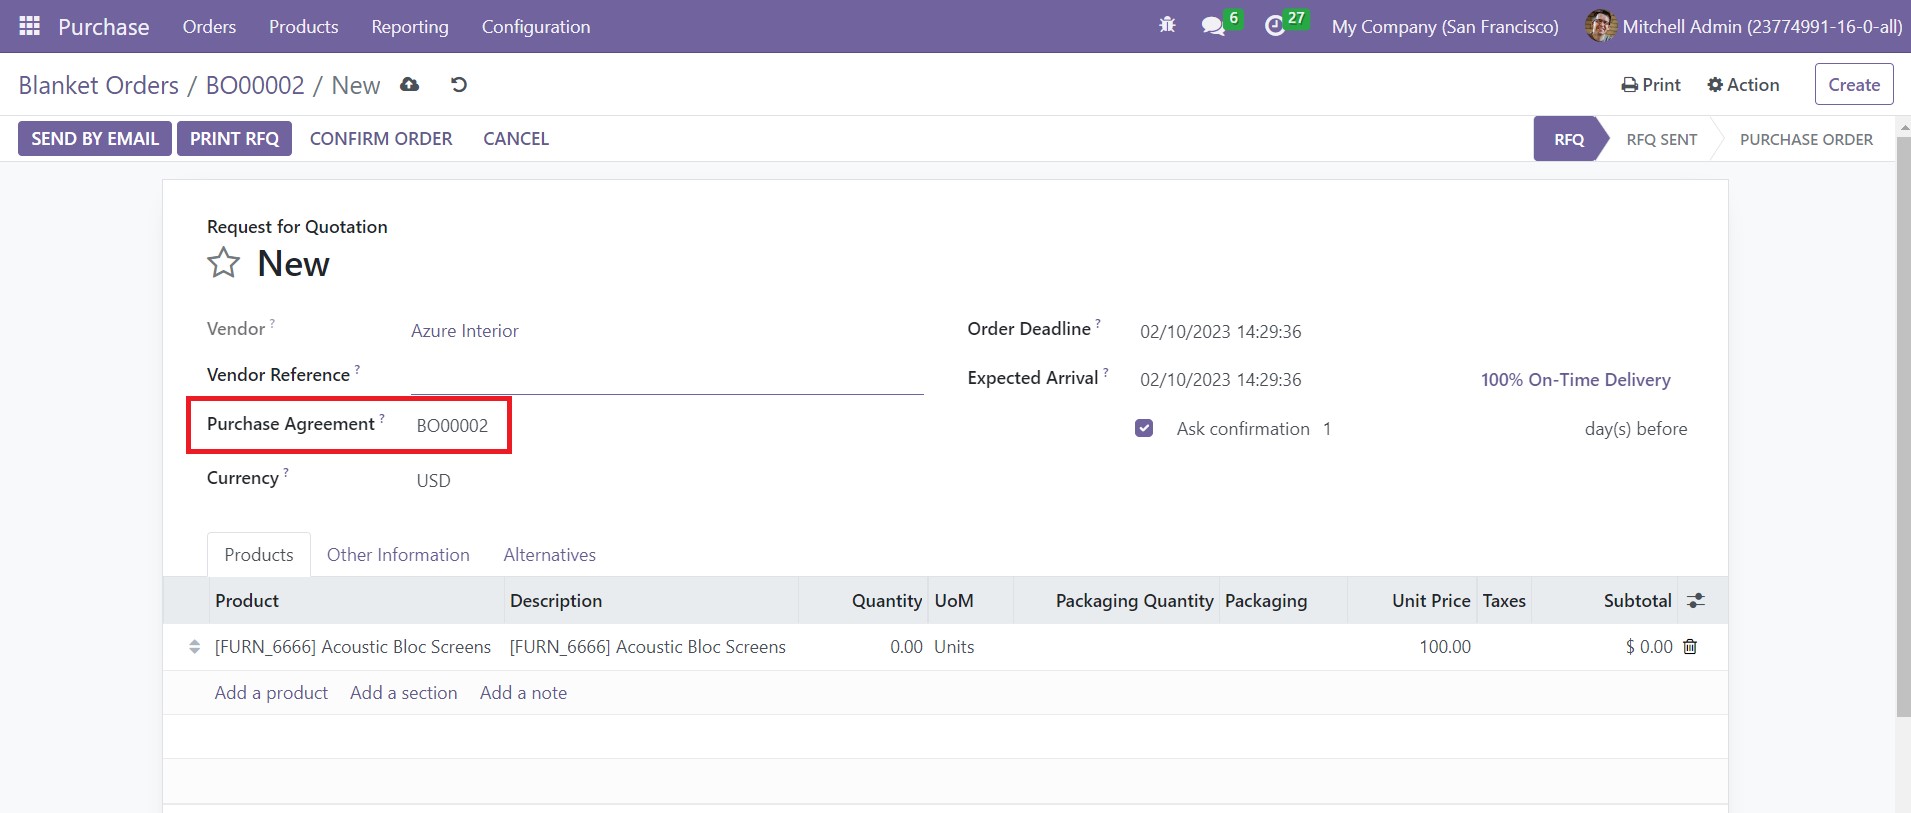
The details mentioned in the purchase agreement will automatically appear in the respective fields of the purchase order.
purchase-analysis
Under the Reporting tab, you can generate reports on the operations related to your purchases. You can analyze these reports and influence your company's overall productivity by improving its purchase-related performance. To get the Purchase Analysis window, click on the Purchase menu from the Reporting tab.
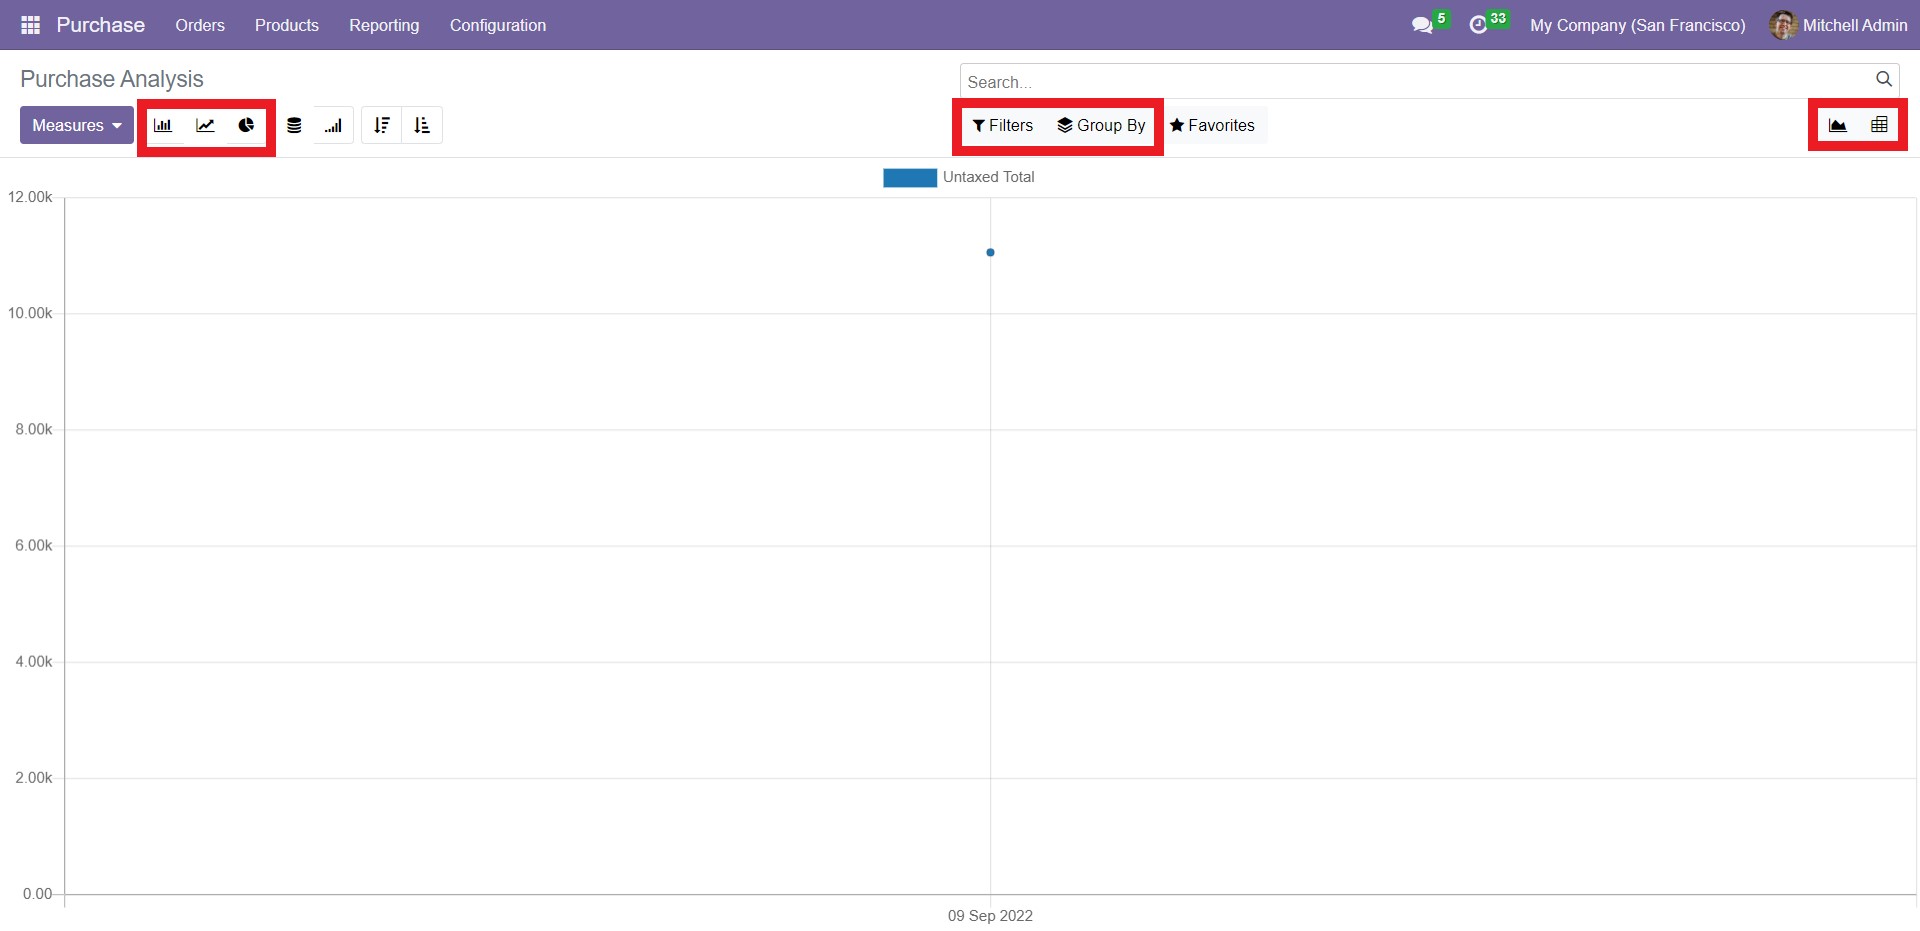
On the top left side of the window, you can see the icons – Bar Graph, Line Graph, and Pie Chart. Choose the view according to your preference. Next to these options, you can also see the icons like Stacked, Cumulative, Descending, and Ascending. Select any option depending on how you would like to arrange your graph. On the top right side, you can see the two icons for Graph view and Pivot view, from which you can pick the desired option.
The Filters and Group By options allow you to locate and analyze specific records.
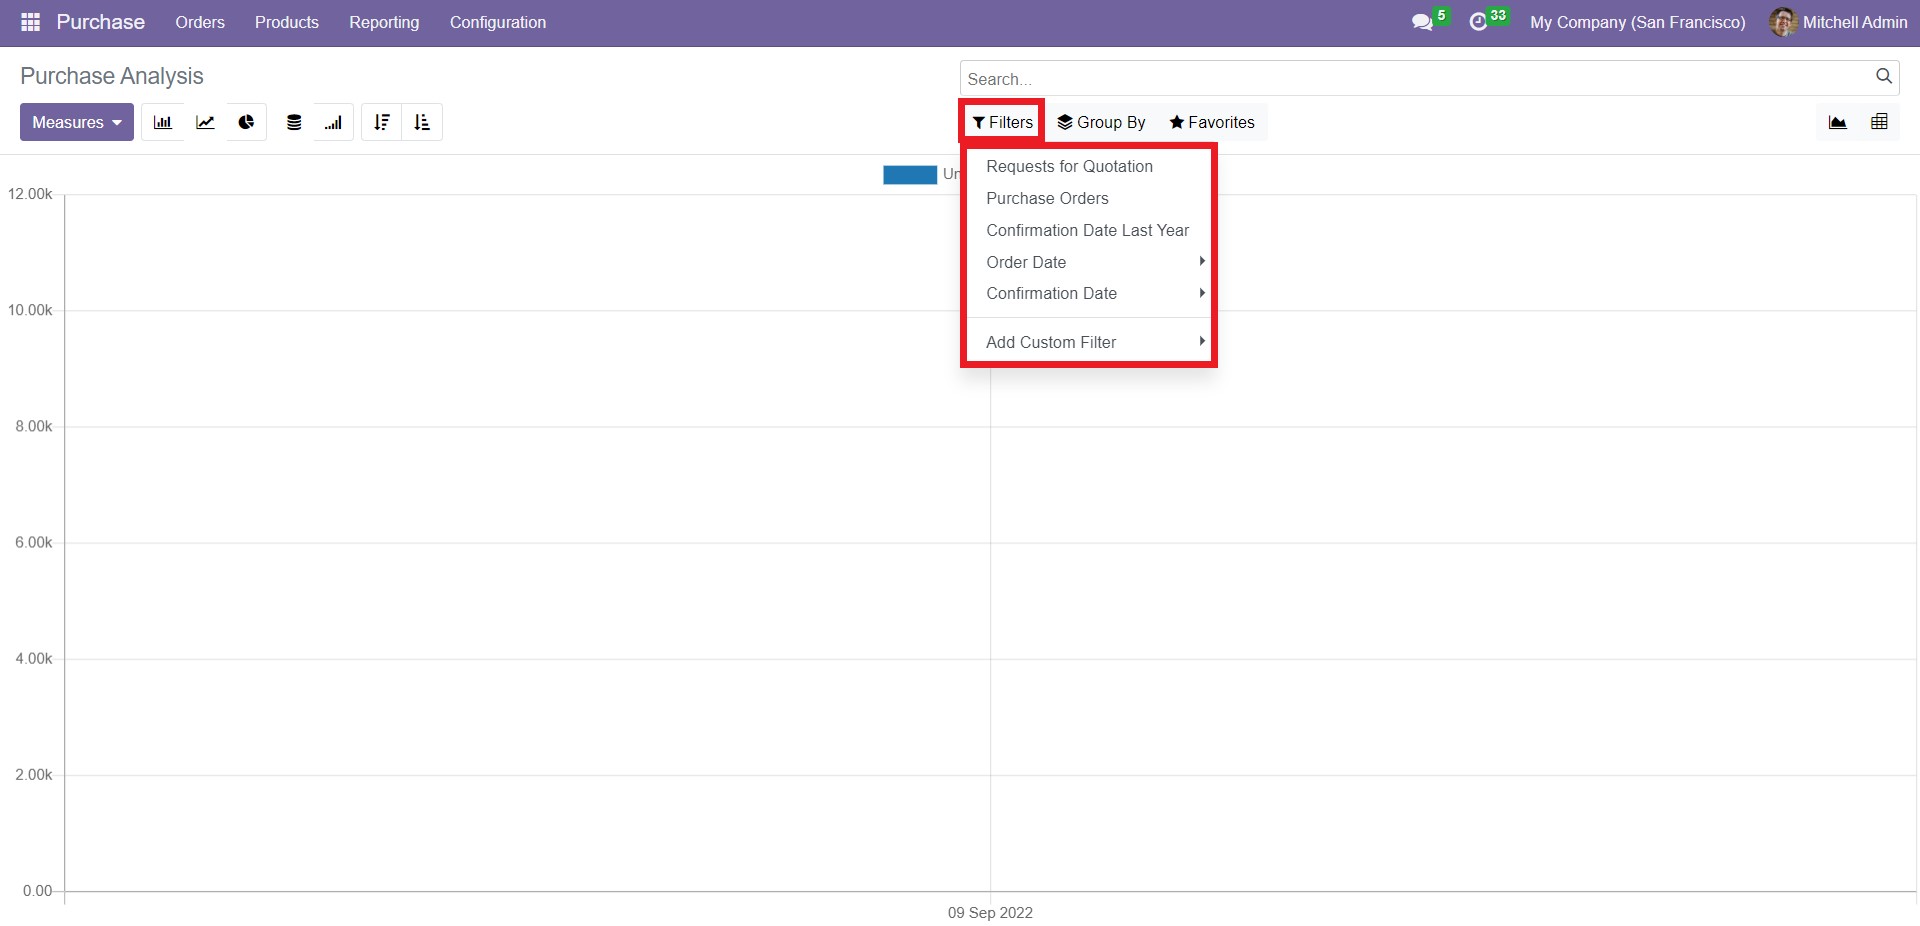
When you click on ‘Filters,’ you get a dropdown list of options to filter out your records like Requests for Quotation, Purchase Orders, Confirmation Date Last Year, Order Date, Confirmation Date, and Add Custom Filter. Select the criteria by which you want to isolate your records.
The Group By section has the options like Vendor, Vendor Country, Purchase Representative, Product, Product Category, Status, Company, Order Date, Confirmation Date, and Add Custom Group. They offer provisions for grouping your data as per the parameter of your choice. The pivot view of the purchase analysis is given below.
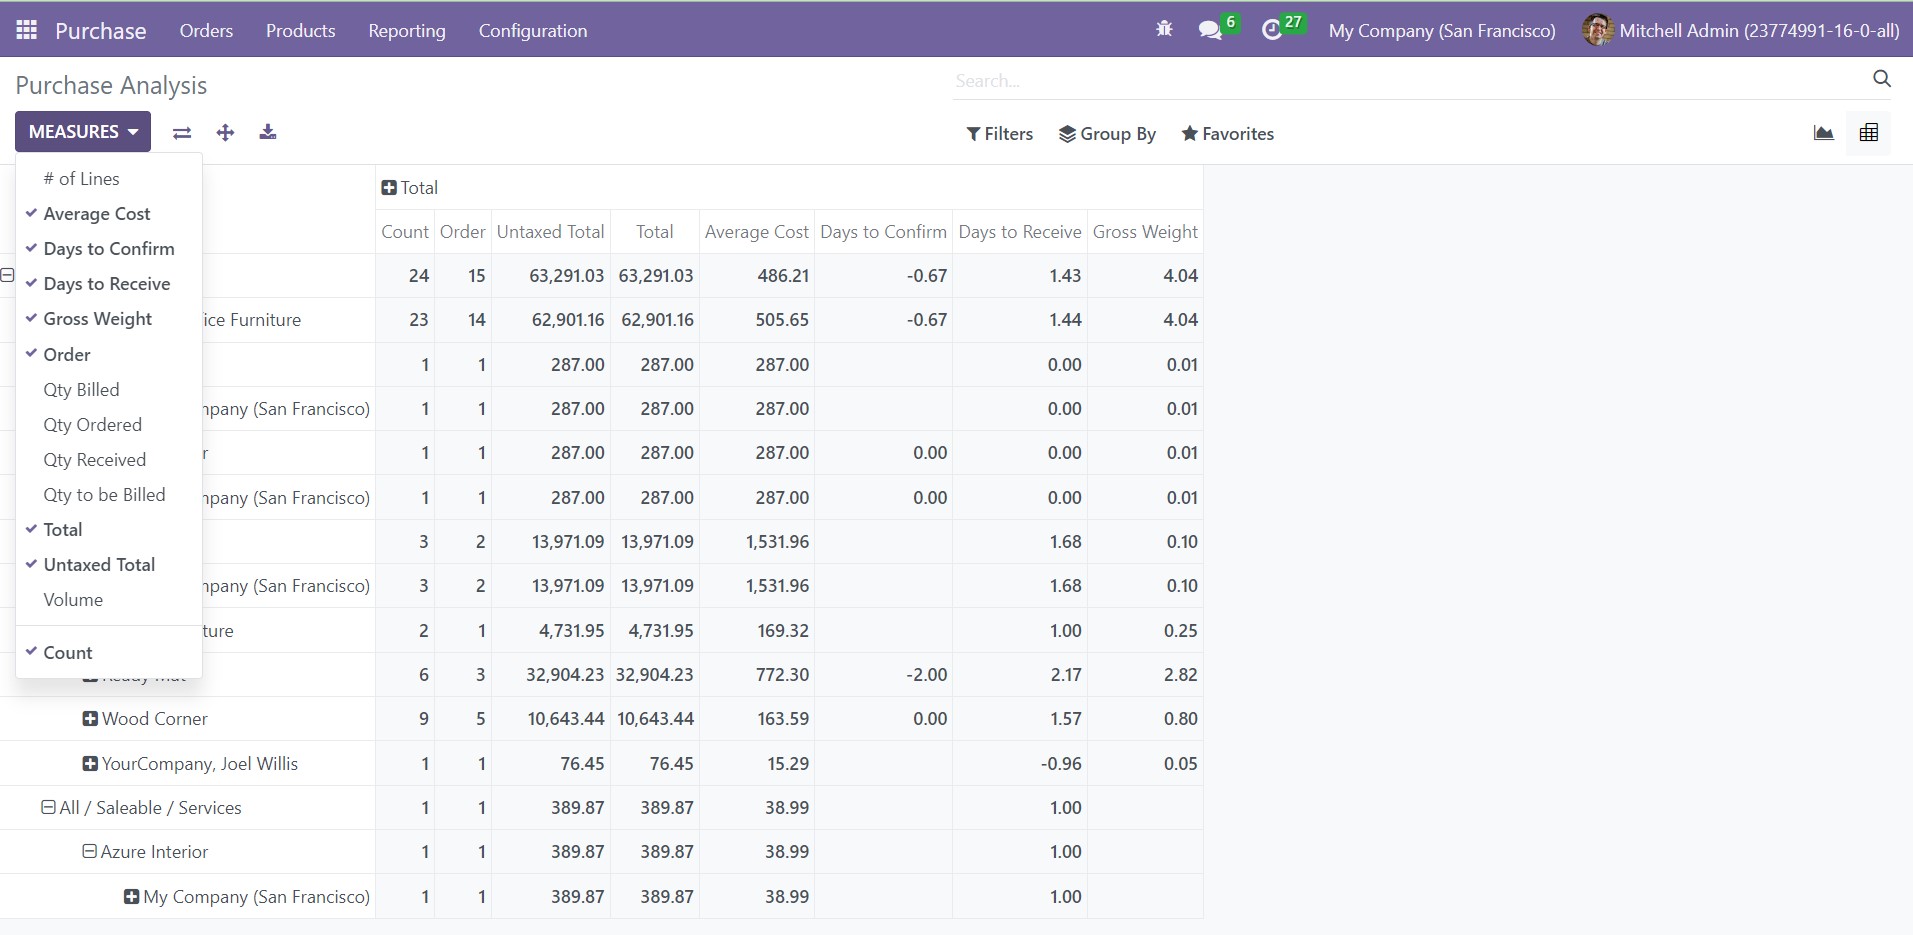
The available measures for the analysis are Average Cost, Days to Confirm, Days to Receive, Gross Weight, Order, Quantity Billed, Quantity Ordered, Quantity Received, Quantity to be Billed, Total, Untaxed Total, Volume, and Count. You can use the features of the new version of the Odoo Purchase module to enhance the management of purchase related operations in your organization.