Odoo 16 Community Book
Sales
The Sales module in Odoo 16 cooperatively manages the sales transactions in a corporate enterprise. It collaborates with the functionalities of the CRM module to bring about a coherent and easily accessible output. You can strategically prompt Sales orders from the quotations created from leads and opportunities in Odoo CRM. This intersectionality proves that the Sales and CRM modules function hand in hand.
Since a well-functioning Sales department is integral to a successful business venture, an advanced module solely for the documentation of its affairs and workflow adds to the convenience of sales management. The Sales module in Odoo 16 has many provisions for organizing sales orders and quotations to prioritize customer satisfaction. You can also boost your sales prospects by generating orders from eligible opportunities. Let us discuss some critical features of the Sales module.
Features of the Sales Module in Odoo 16
Futuristic User Interface
Odoo's advanced user interface ensures swift accessibility to all the features in the Sales module. This amenity, in turn, fuels the dynamics of the system's overall performance by allowing the salespersons to acquire and monitor the required data. Besides, the dashboard of each section displays precise yet comprehensive data of their records.
Minimize Data Entry
You can create a sales order from it effortlessly when a quotation or opportunity qualifies for the next stage. This feature minimizes the hassle of manually entering the data while generating sales orders.
Initiate Sales Warning
Initiating sales warnings alerts you regarding a specific product or customer. This way, you can avoid potentially ill-suited business transactions, eventually benefiting your company.
Advanced Quotation Building System
Odoo efficiently detangles the process of creating a new quotation in the Sales module. You can easily make a quotation with a pre-configured price list and product list. You can also personalize your quotation template to craft professionalism, which you can save and reuse.
Upselling to Increase Profit
Upselling targets to improve profitability by suggesting similar products, offering discounts and coupons, etc. These tools are deemed successful in keeping the customers hooked, prompting them to buy more.
Effective Sales Order and Contract Management
The Sales module in Odoo 16 productively manages all the sales orders created. You can easily monitor the conversion of a quotation to a sales order, followed by the generation of an invoice. This arrangement makes it easier to track invoices and oversee payments from customers.
Effortless Communication with Customers
Odoo helps to maintain a solid professional relationship between your company and its customers. Salespeople can schedule appointments with their customers to further their relationship and discuss business prospects. You can also configure a custom email template with product details to send your customers.
Predefined Product and Price List
The Configuration menu in the Sales module has various features that enable product list creation. Defining product variants and customizing attributes, including color and size, have also become effortless. You can also offer discounts on select products. The revamped Sales module allows you to create product price lists and reward coupons.
Integrations
Integrating the Sales and CRM modules will effectively micromanage the sales pipeline and facilitate lead acquisition. Integrating with the Inventory module allows you to check the availability of products from quotations. Moreover, the eCommerce platform offers a fully consolidated online store to sell your products and services.
Now, we shall delve into product management and configuration in the Odoo 16 Sales module.
Products
A strategically organized product configuration directly determines the perfect functioning of the Purchase, Inventory, Sales, eCommerce, and Rental modules. Hence, a coherent arrangement of products indicates the smooth performance of these modules. Odoo 16 allows you to categorize products with their variants, which aids your convenience in identifying and modifying a particular product.
Click the Products tab on the main menu bar and select ‘Products’ from the dropdown list. The Products window displays the list of products already created in the module.
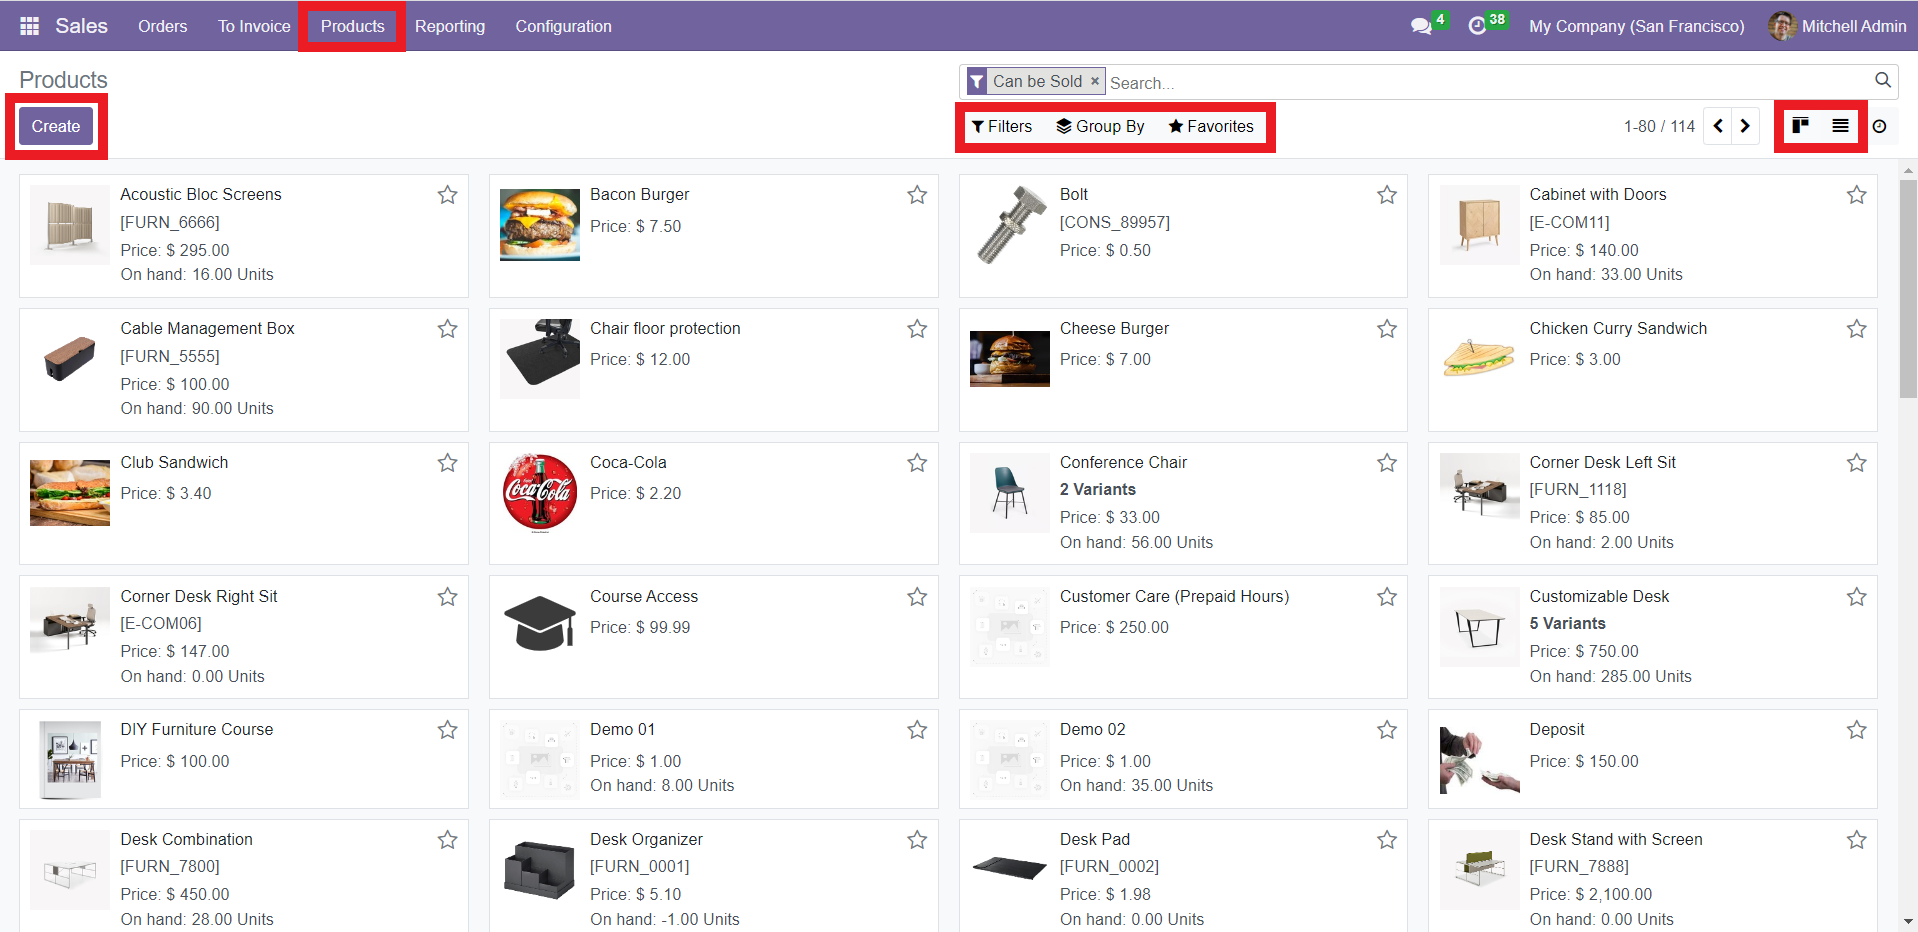
This window offers both Kanban and List views for the products. Options like Filters, Group By, and Favorites are available for effortlessly grouping these items. As default Filters, you will get My Quotation, Quotations, Sales Orders, and Create Date options. The products can be grouped based on Salesperson, Customer, and Order Date. You can also click on a particular product to view its details. The small star icon can be used to add the product as your favorite.
As you can see in the form view, the Edit button is absent. You can directly edit every field by placing your cursor on it. The placement of the Create button is on the right, unlike in previous Odoo versions. These two additions are unique to Odoo 16. You can also track and analyze your product info using the tabs – Extra Prices, Go to Website, number of Units On Hand, number of Units Forecasted, details of In and Out product transit, Reordering, Bill of Materials, and More. When you click on the More button, you will get a dropdown list with the options to view the Putaway Rules, Storage Capacities, Purchase History, Sales Analysis, and Digital Attachments.
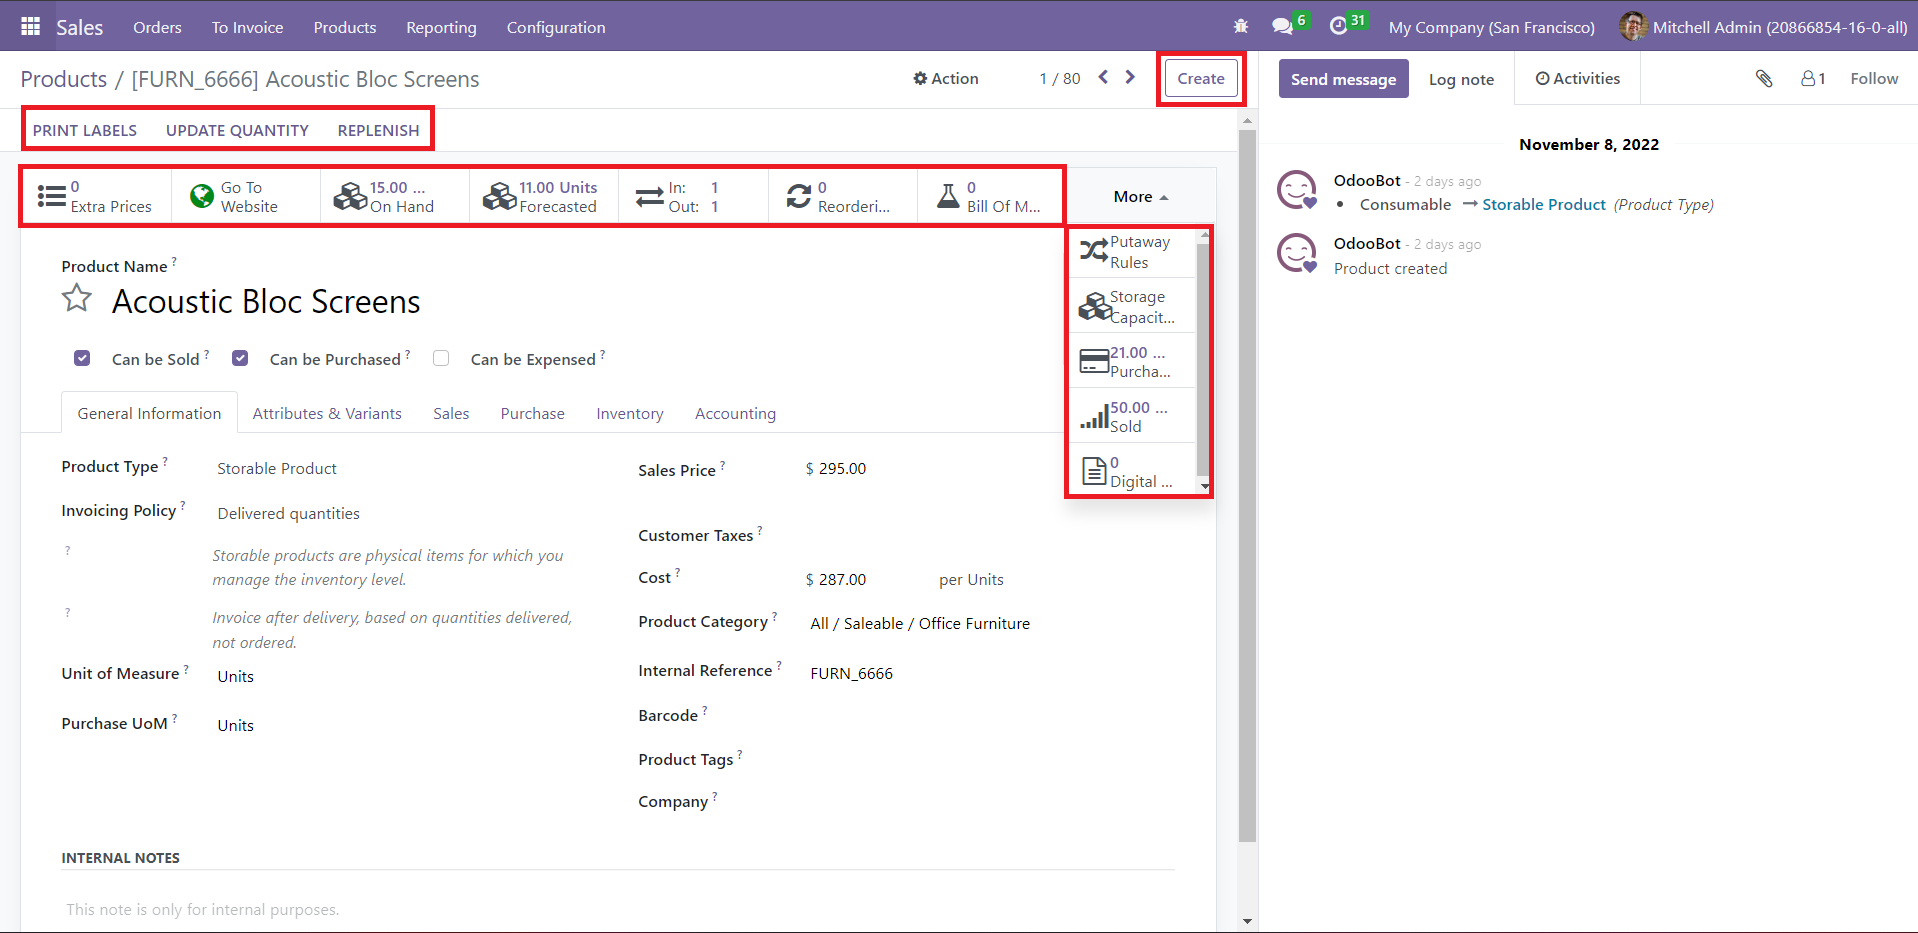
Click on the Create button to add and specify the details of a new product to the system. This action will take you to a window where you can assign the product specifications under the tabs – General Information, Attributes & Variants, Sales, Purchase, Inventory, and Accounting.

Give your product’s name and insert its picture in the respective fields. Then, check the options applicable to your product, i.e., Can be Sold, Can be Purchased, and Can be Expensed. Under the General Information tab, you can choose the Product Type from the dropdown list – Consumable, Service, Storable Product, Event Ticket, Course, or Event Booth.
Set the Invoicing Policy as ‘Ordered quantities’ or ‘Delivered quantities.’ The former will generate an invoice for ordered products and the latter for delivered products. Similarly, assign Unit of Measure, Purchase UoM (Unit of Measure), Sales Price, Customer Taxes, and Cost. Select the Product Category from the list of options available. You can also add Internal References, Barcode, and Product Tags. Finally, select the Company associated with your product, which is vital, especially if you’re working in a multi-company setup.
If your product has multiple variants, you can specify and link them to the product under ‘Attributes and Variants.’
Click ‘Add a Line’ to configure the product's variant Attributes and Values. You can also manage and compose these variants using the Product Variants option under the Products tab. Similarly, ‘Attributes’ under the Configuration tab allows you to specify a product’s attributes and corresponding values.
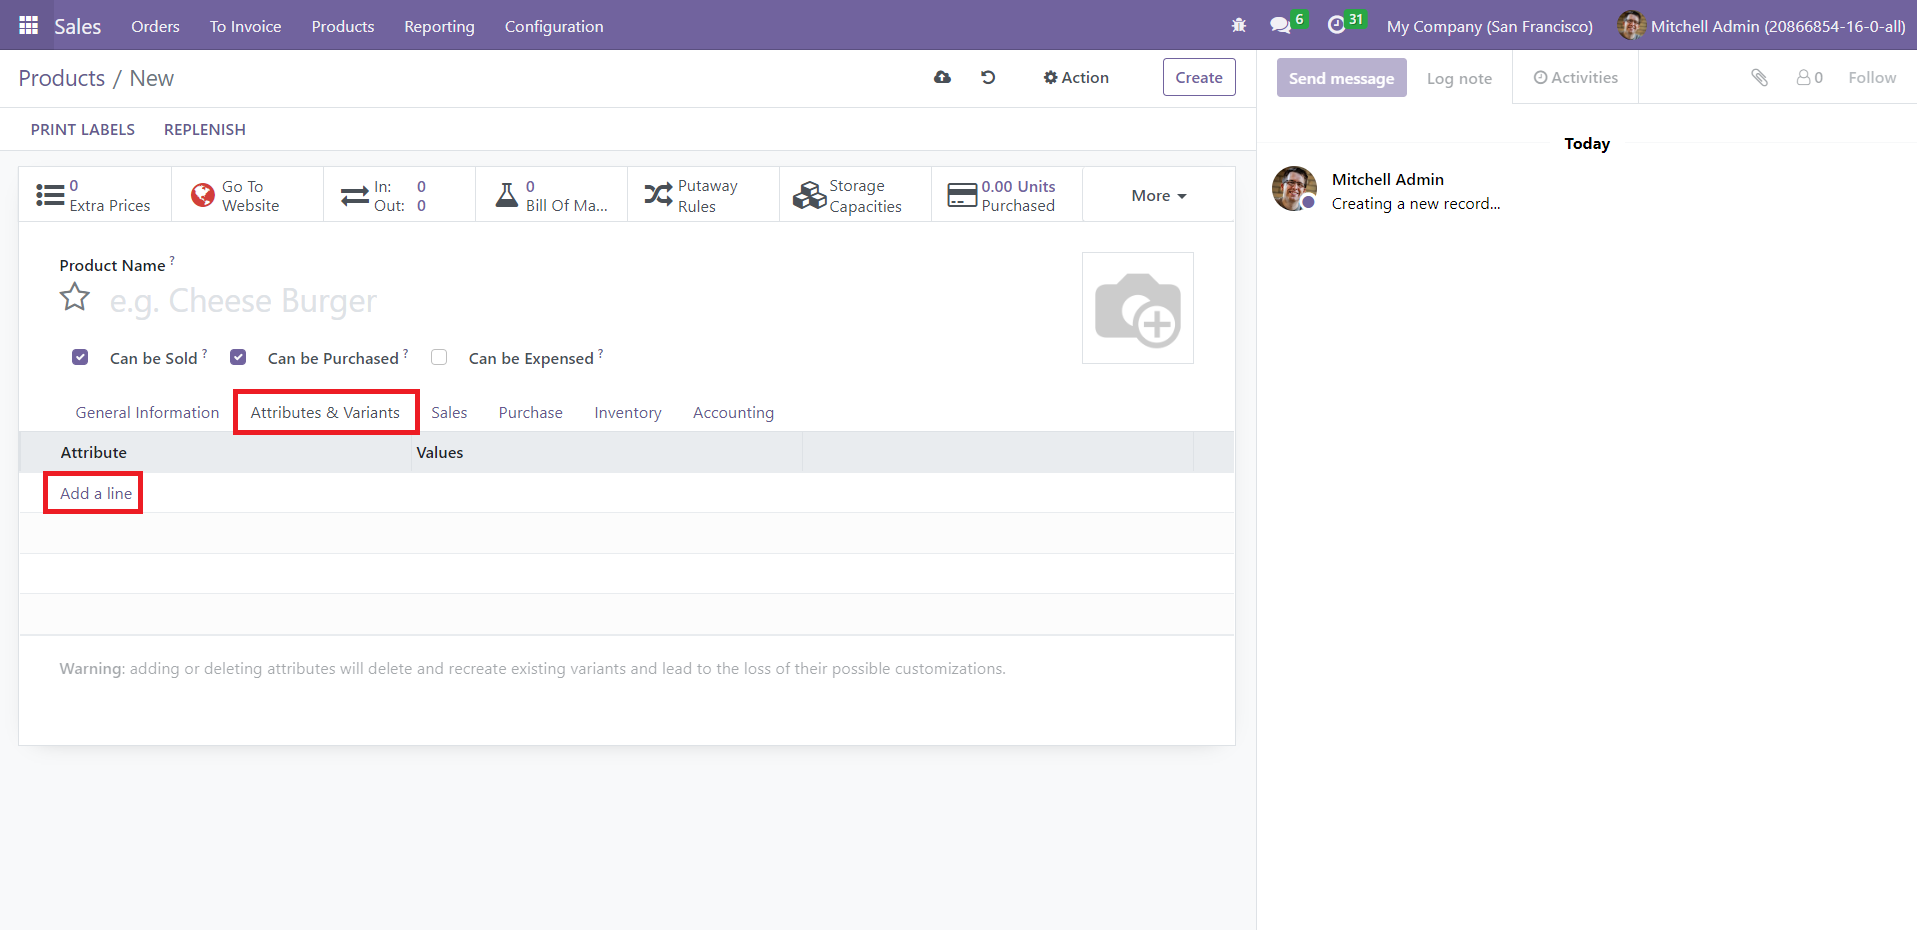
Under the Sales tab, you can configure the sales aspects of the product.
In the Upsell & Cross-Sell section, three fields are available – Optional Products, Accessory Products, and Alternative Products. ‘Optional Products’ appear on the screen when the customer clicks on ‘Add to Cart.’ The system suggests ‘Accessory Products’ when the customer reviews the cart before payment,’ while ‘Alternative Products’ show up on the product page to sell alternatives.
Under ‘eCommerce Shop,’ you can add the website address to publish the product. The Website Sequence field determines the display order in the website eCommerce. In the Categories field, mention the eCommerce categories in which you want to include the product. You can also assign a ‘Ribbon’ to the product, i.e., Sale, Sold Out, Out of Stock, etc. Add a note under ‘Sales Description,’ which will appear on sales orders and invoices.
Activate the option ‘Available in POS’ if you want to include this product in the Point of Sale module. You can also attach additional product media by clicking on ‘Add a Media.’
Now, go to Configuration → Settings. Under ‘Quotations & Orders,’ activate the Sales Warnings feature.
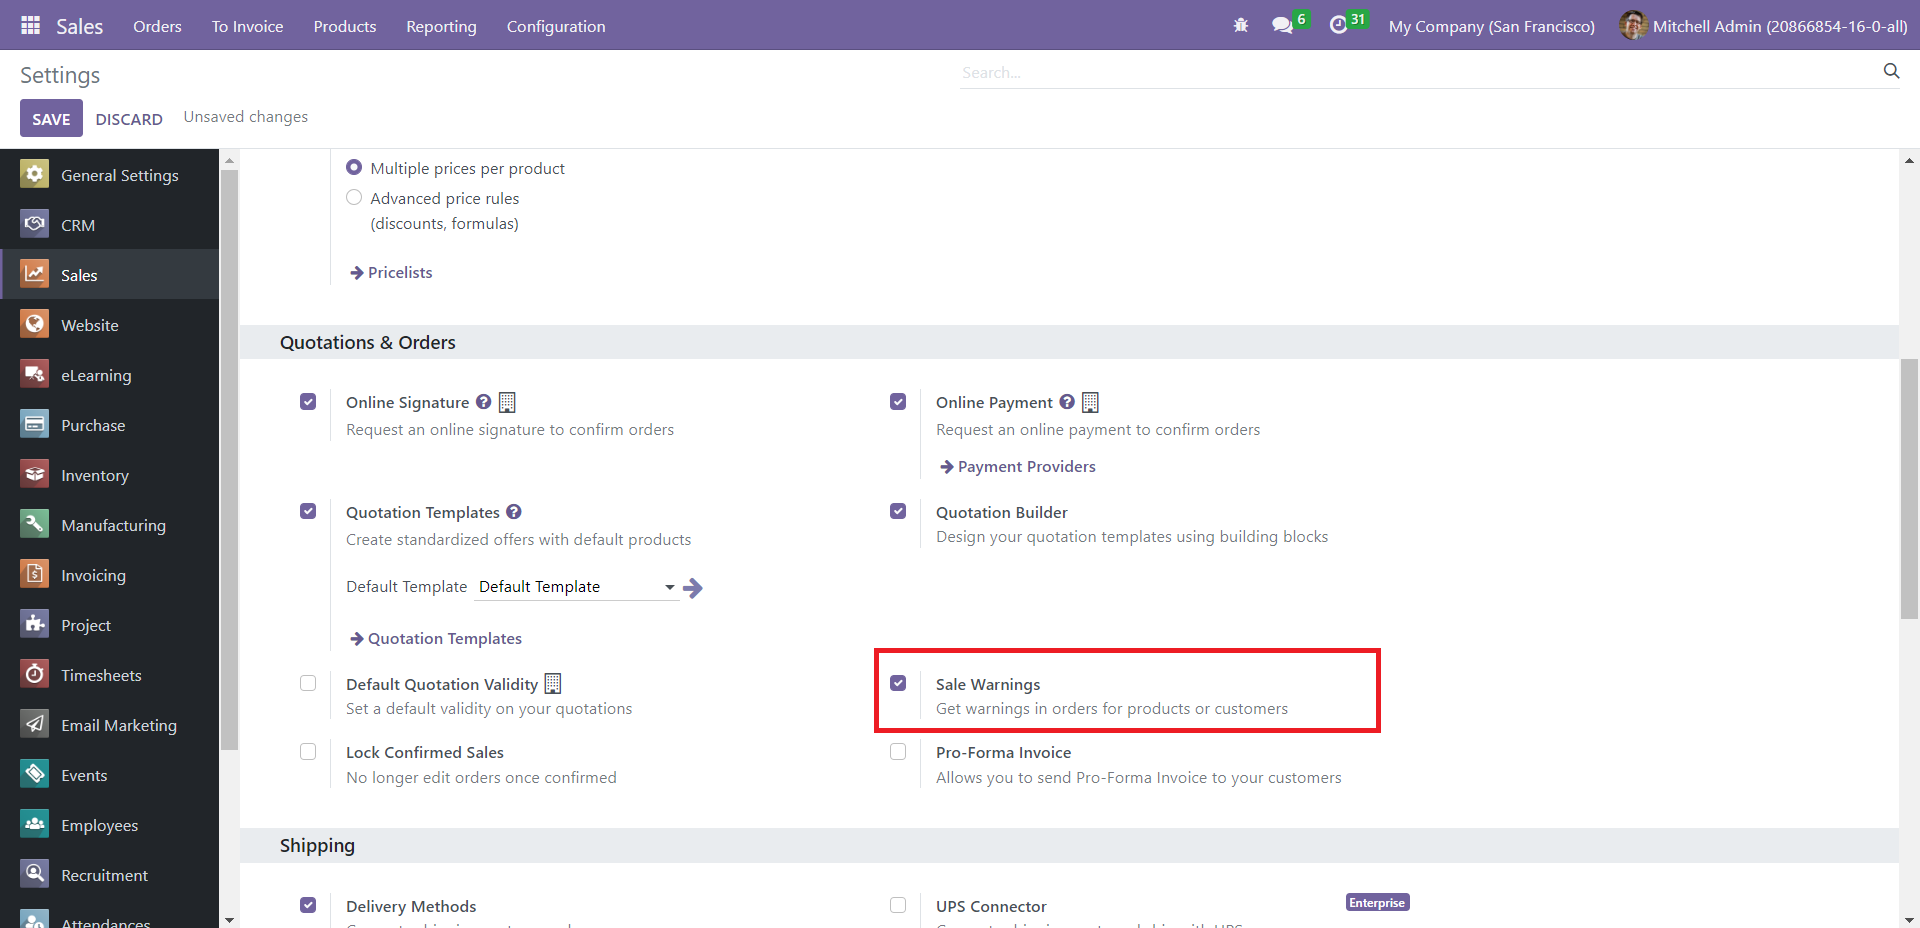
This action will generate a new section called ‘Warning when Selling this Product’ under the Sales tab.
Product Variants & Attributes
If a product has multiple variants, you can easily configure them using the Product Variants option available in the Sales module. In order to get this feature, you need to activate the Product Variants option from the Settings menu of the module as shown in the image below.
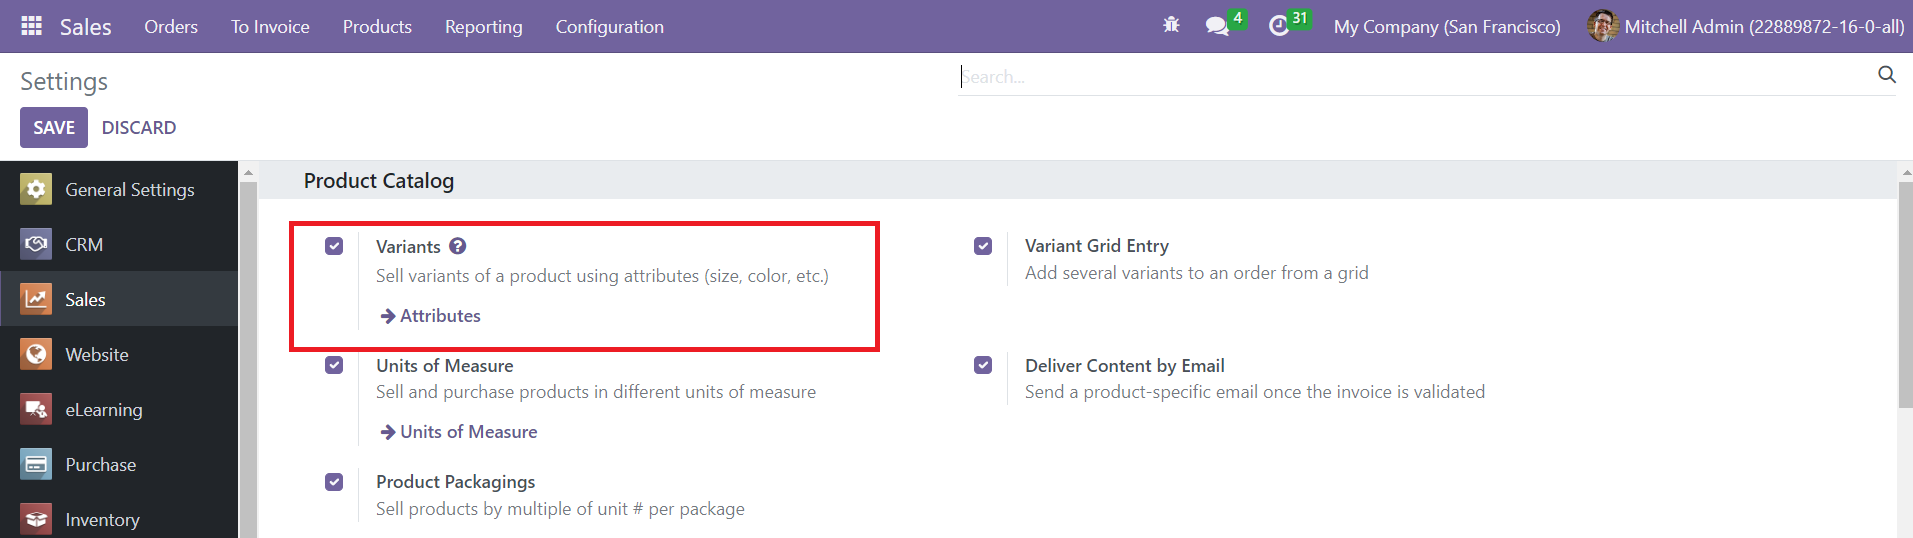
Activating this feature will give access to a new option under the Products menu which is Product Variants. This will allow you to sell products using different attributes.
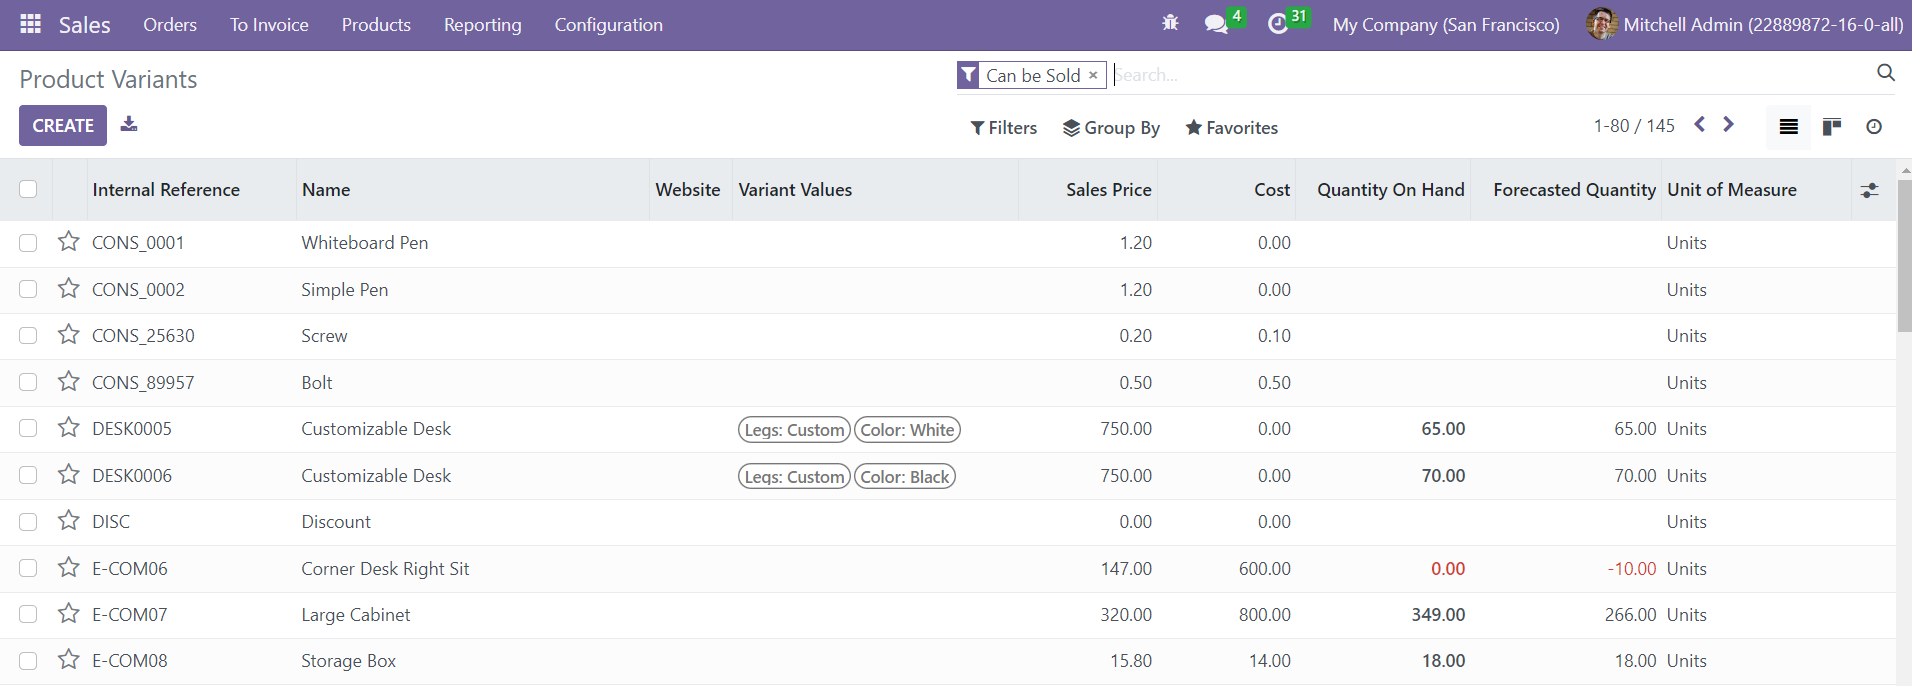
The Product Variants widow is shown above. The preview of the list includes the Internal Reference, Name, Website, Variant Values, Sales Price, Cost, Quantity on Hand, Forecasted Quantity, and Unit of Measure. Using the Create button, you can effortlessly configure a new product variant. The steps of configuring a new product variant are the same as that of the product configuration that we detailed above.
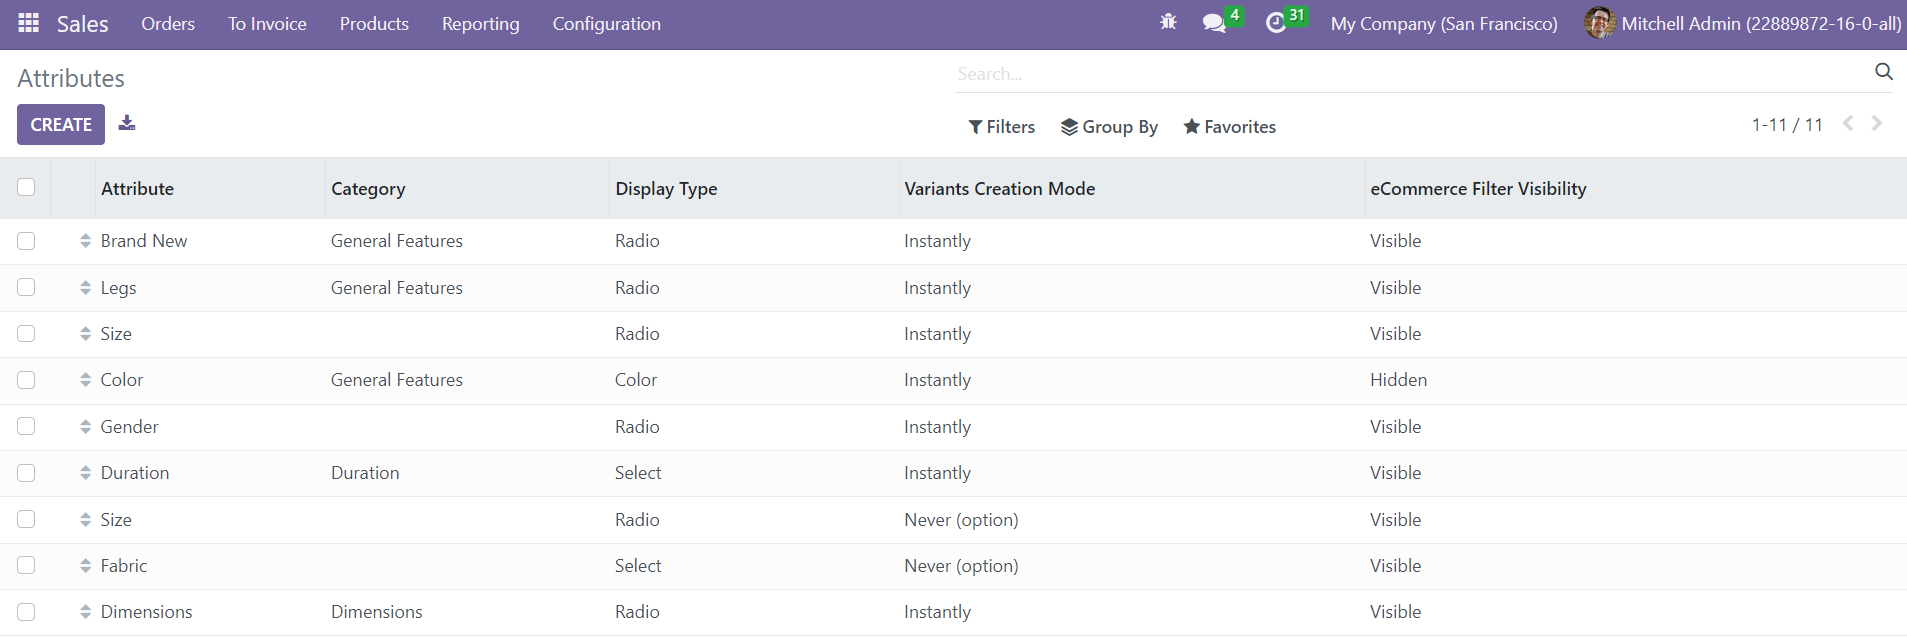
In order to define the attributes of a product variant, you can go to the Configuration menu of the module. Here, you can find the Product Attributes option. Clicking on this option will lead you to a new platform as shown below where you will get the list view of Attributes, Categories, Display Type, Variants Creation Mode, and eCommerce Filter Visibility.
You can create a new attribute using the Create button.
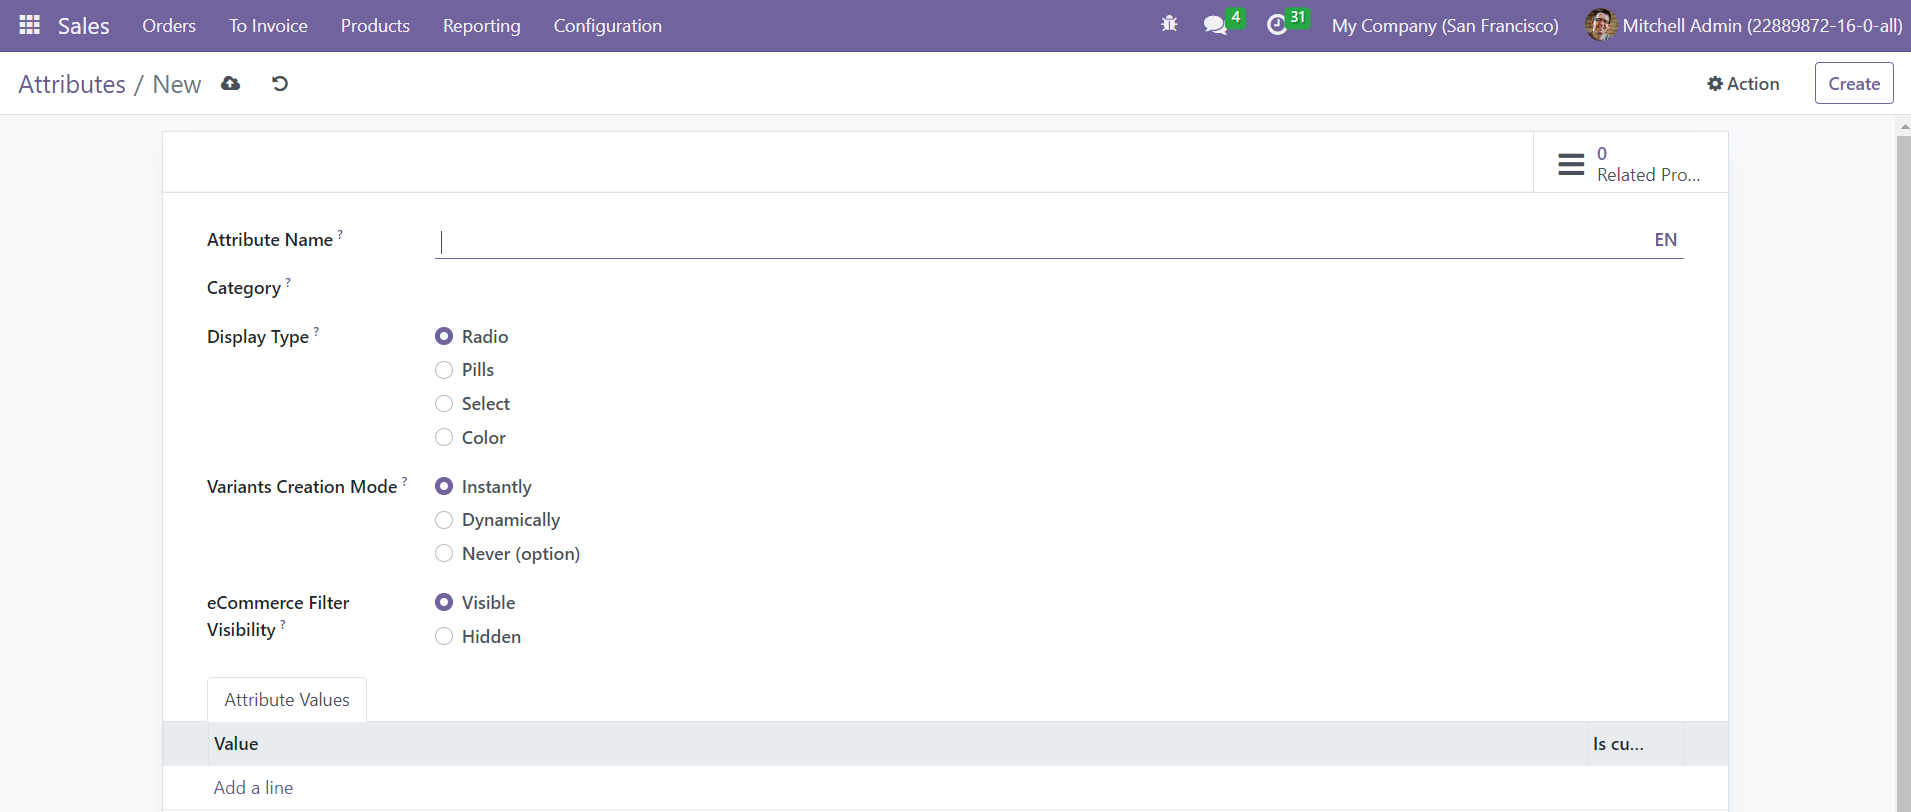
Mention the Attribute Name and set a Category to group similar attributes together in the comparison page of eCommerce. Select the DisplayType used in the product configurator of eCommerce. It can be Radio, Pills, Select, or Color. The available Variant Creation Modes are given below.
Instantly: All possible variants are created as soon as the attribute and its values are added to a product.
Dynamically: Each variant is created only when its corresponding attributes and values are added to a sales order.
Never: Variants are never created for the attribute.
The variant creation mode can not be changed once the attribute is used on at least one product. In the eCommerce Filter Visibility field, you can decide whether you want to make the attribute Visible or Hide it from the available filters on eCommerce. Under the Attribute Values, you can add values using the Add a Line button. The products with this attribute can be observed using the smart button Related Products available in the form view.
Pricelists
In order to define the pricing strategy of your company, you can seek assistance from the Odoo Sales module. You will get the Pricelists feature in this module that will help you to configure suitable pricelists for your customers. Based on your relationship with the customers, you can customize pricelists using this feature. From the Settings menu, you can activate the Pricelists option from the Pricing tab as shown below.
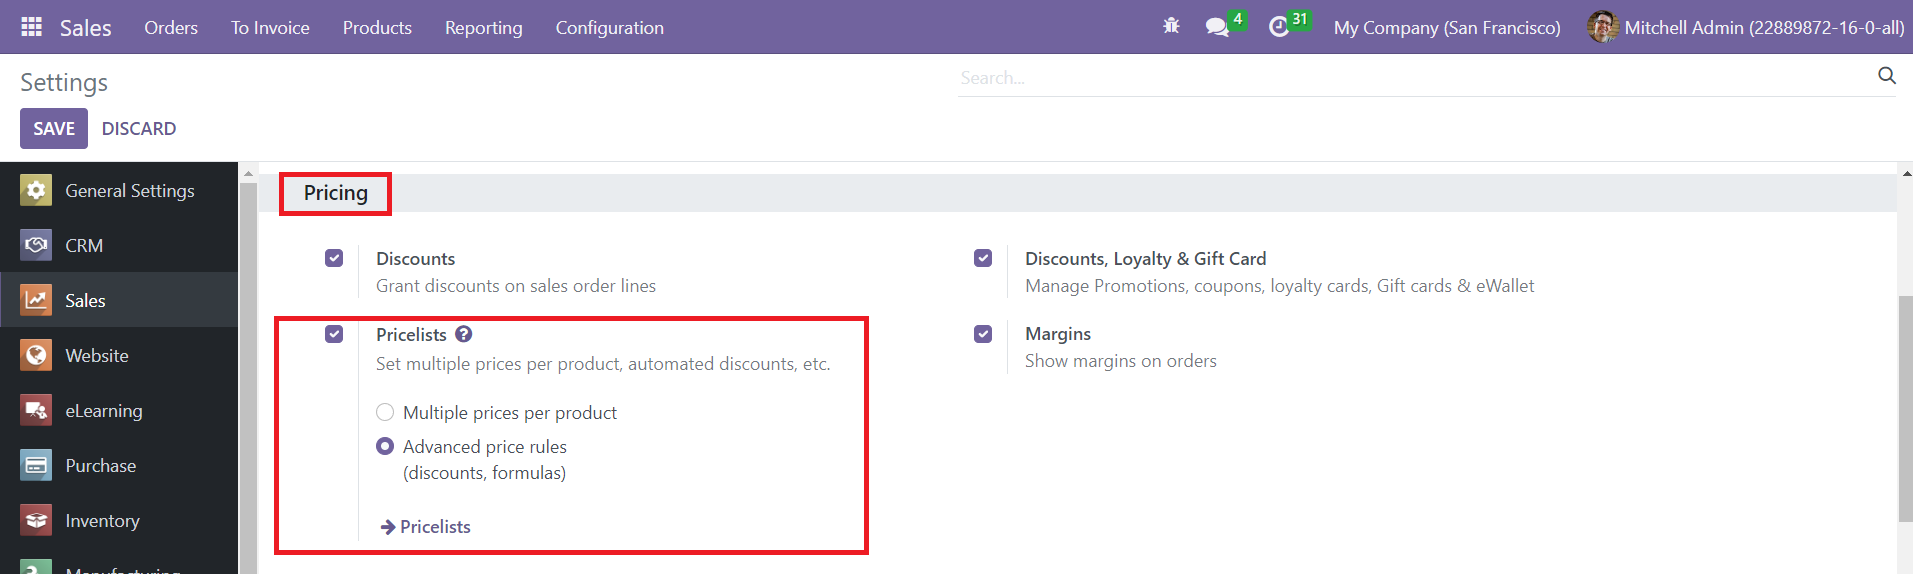
Here, you can create two types of pricelists which are, Multiple Prices per Products and Advanced Price Rules. We will discuss each of these options in detail. Once you activate the pricelist and select the suitable type, you can use the external link available in the Pricing tab to configure a new pricelist. Or else, you can go to the Products menu and select the Pricelist option.
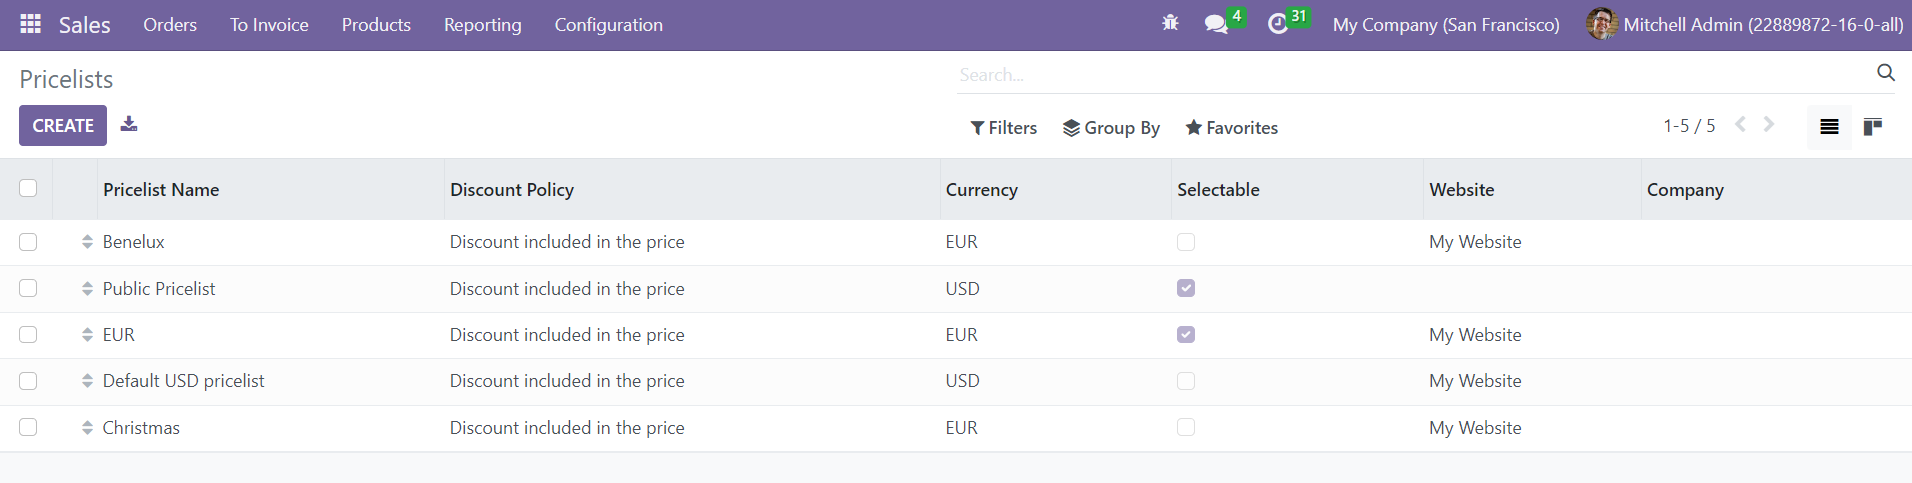
The list view will show the Pricelist Name, Discount Policy, Currency, Selectable, Website, and Company. Using the Create button, you can create a new pricelist.
Advanced Price Rules
Selecting the Advanced Price Rules option while activating the Pricelist feature from the Settings menu will help you to create an advanced price list for products. Clicking on the Create button will open a form view as shown below. You can mention the name of the pricelist in the given space.
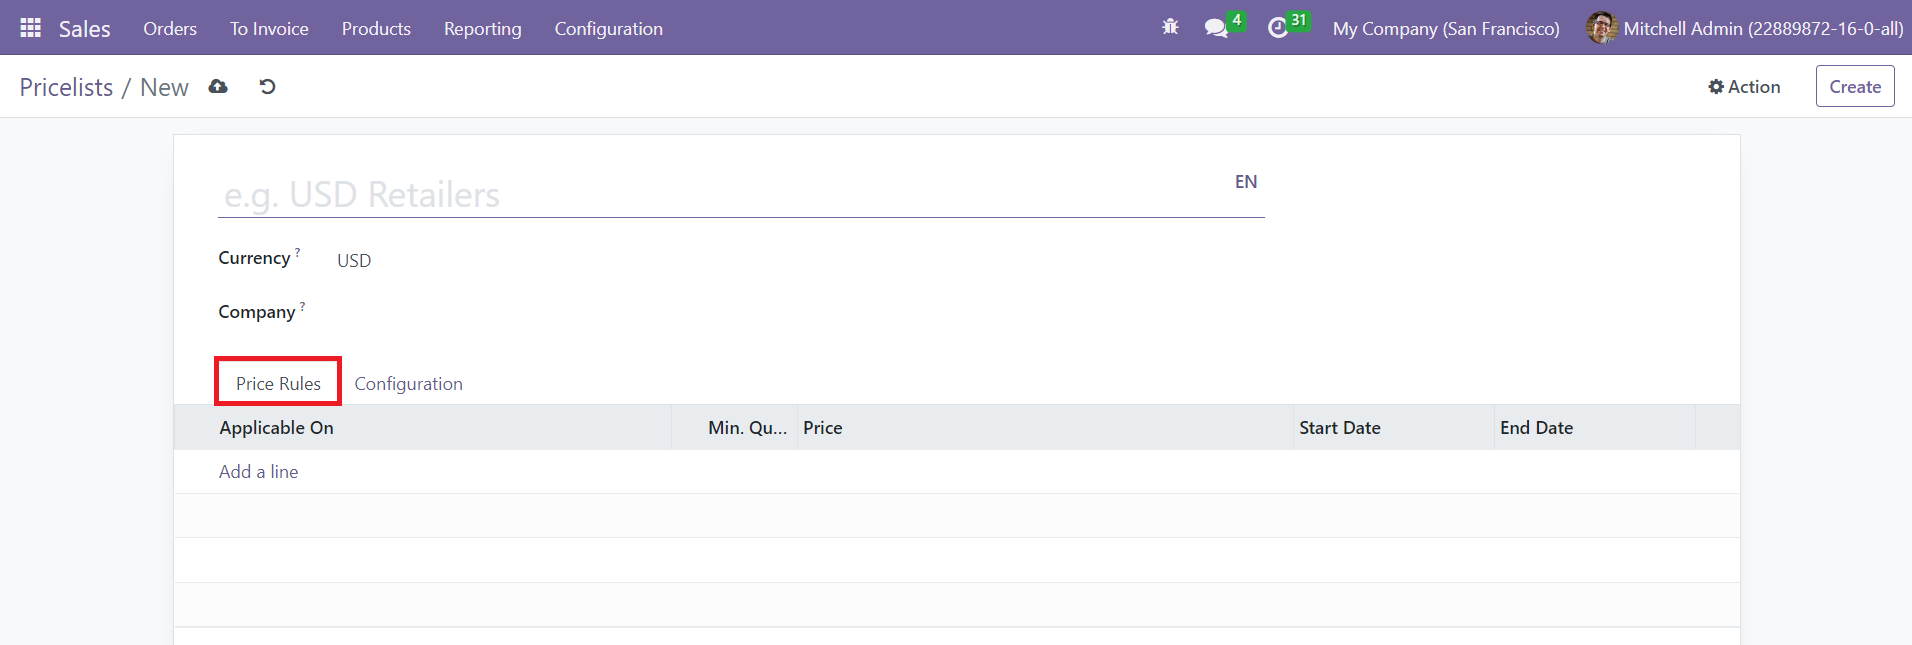
Set a suitable Currency for this pricelist and mention your Company. Now, you can specify Price Rules for products using the Add a Line button. Clicking on this button will open a new pop-up as shown below.
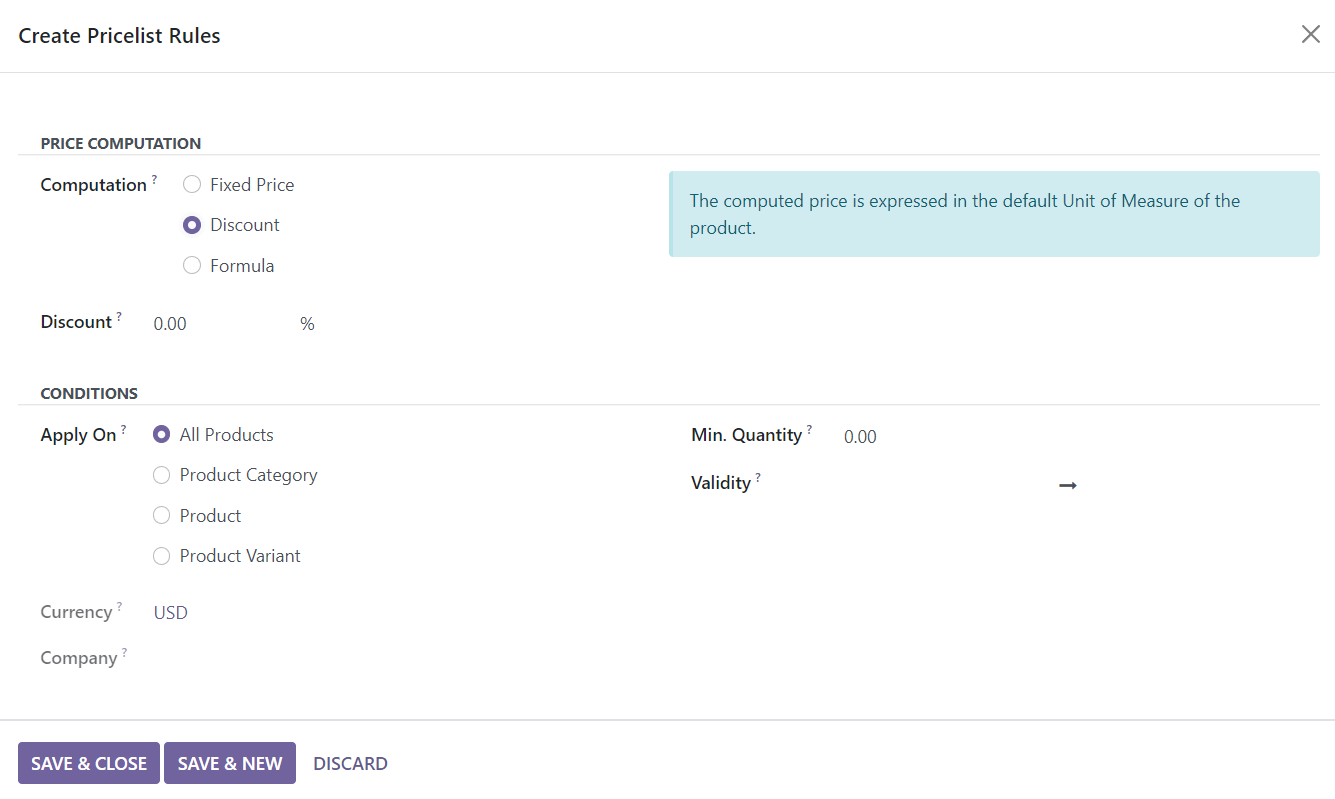
This window can be used to create pricelist rules. You decide the price computation method in the Computation field. It can be computed based on fixed price, discount, or formula. Based on the option you select, you will get specific fields to mention the particular computation. For example, selecting the Discount option as computation will give an additional field to mention the discount allowed on this pricelist. Now, you can decide where to apply this rule. You can apply this rule to All Products, Product Categories, Products, or Product Variants. Set the Currency and Company in the respective fields. Additionally, you need to mention the Minimum Quantity of the product required to apply this rule and the Validity period of this price rule. Once you complete all fields, you can click the Save button.
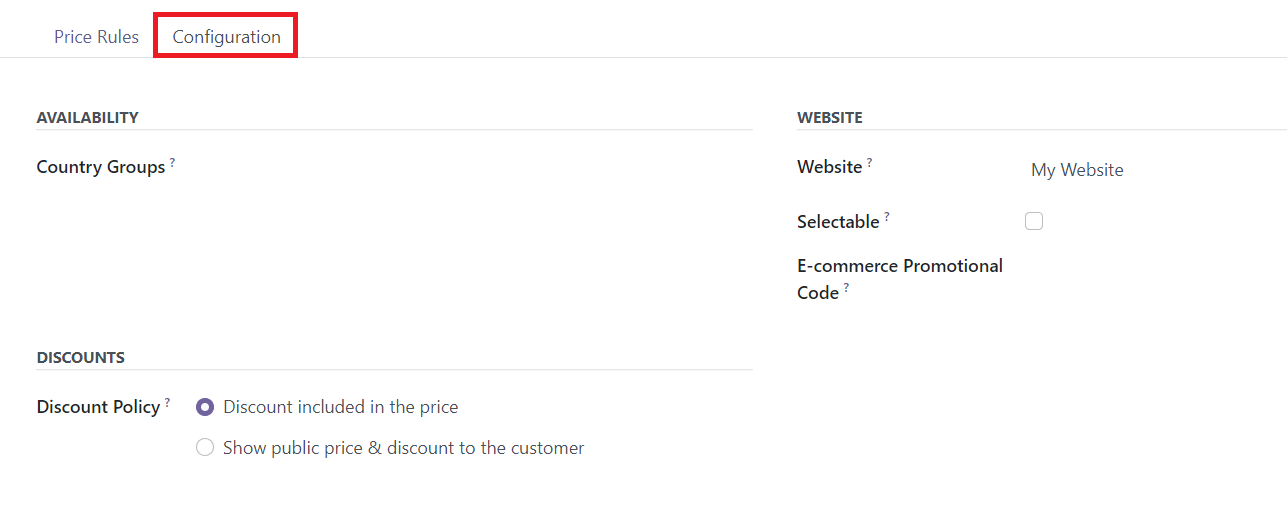
Under the Configuration tab, you can specify the Country Groups where this price rule will be available to use. You can set the Discount Policy as a Discount included in the price or Show public price & discount to the customer. Mention the Website to make this pricelist available on the website. If you want to allow the end user to choose this pricelist, you can activate the Selectable field. Finally, add the E-commerce Promotional Code to use this pricelist on eCommerce. This is how we create an advanced price rule
Multiple Prices per Product
You can create multiple prices for a product by selecting the corresponding option from the Settings menu while activating the Pricelist feature. Using this feature, you can create various price list for a single product. The configuration of the Multiple Prices per product is the same as that of the advanced price rule we detailed above.
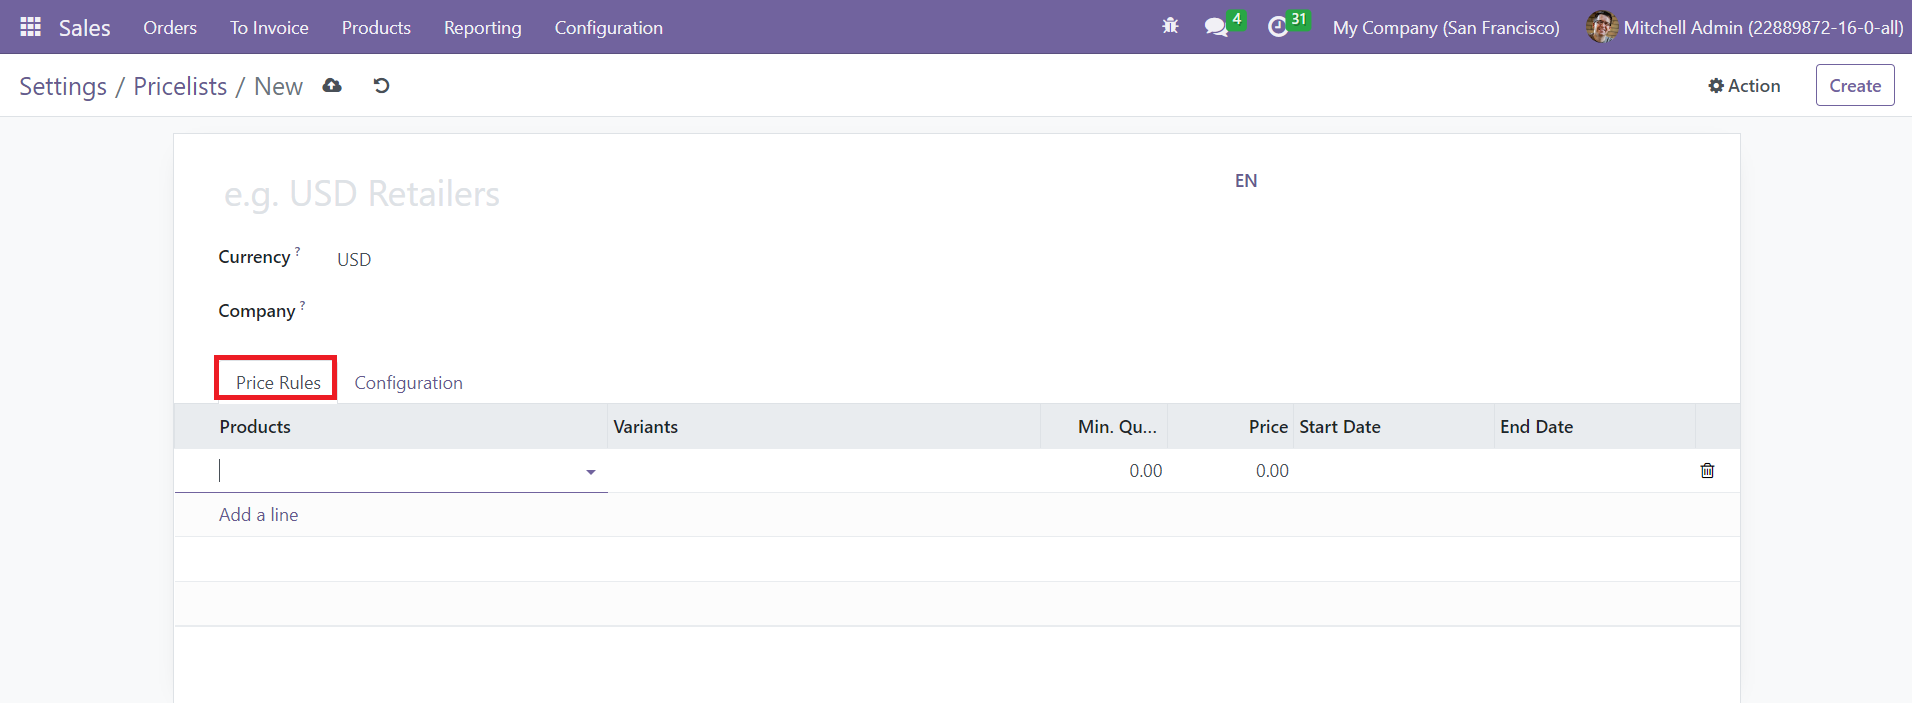
The only difference is that, while clicking on the Add a Line button under the Price Rule tab, you will be able to add various products to this price list. Here, you can mention the Product, Variants, Minimum Quantity, Price, Start Date, and End Date.
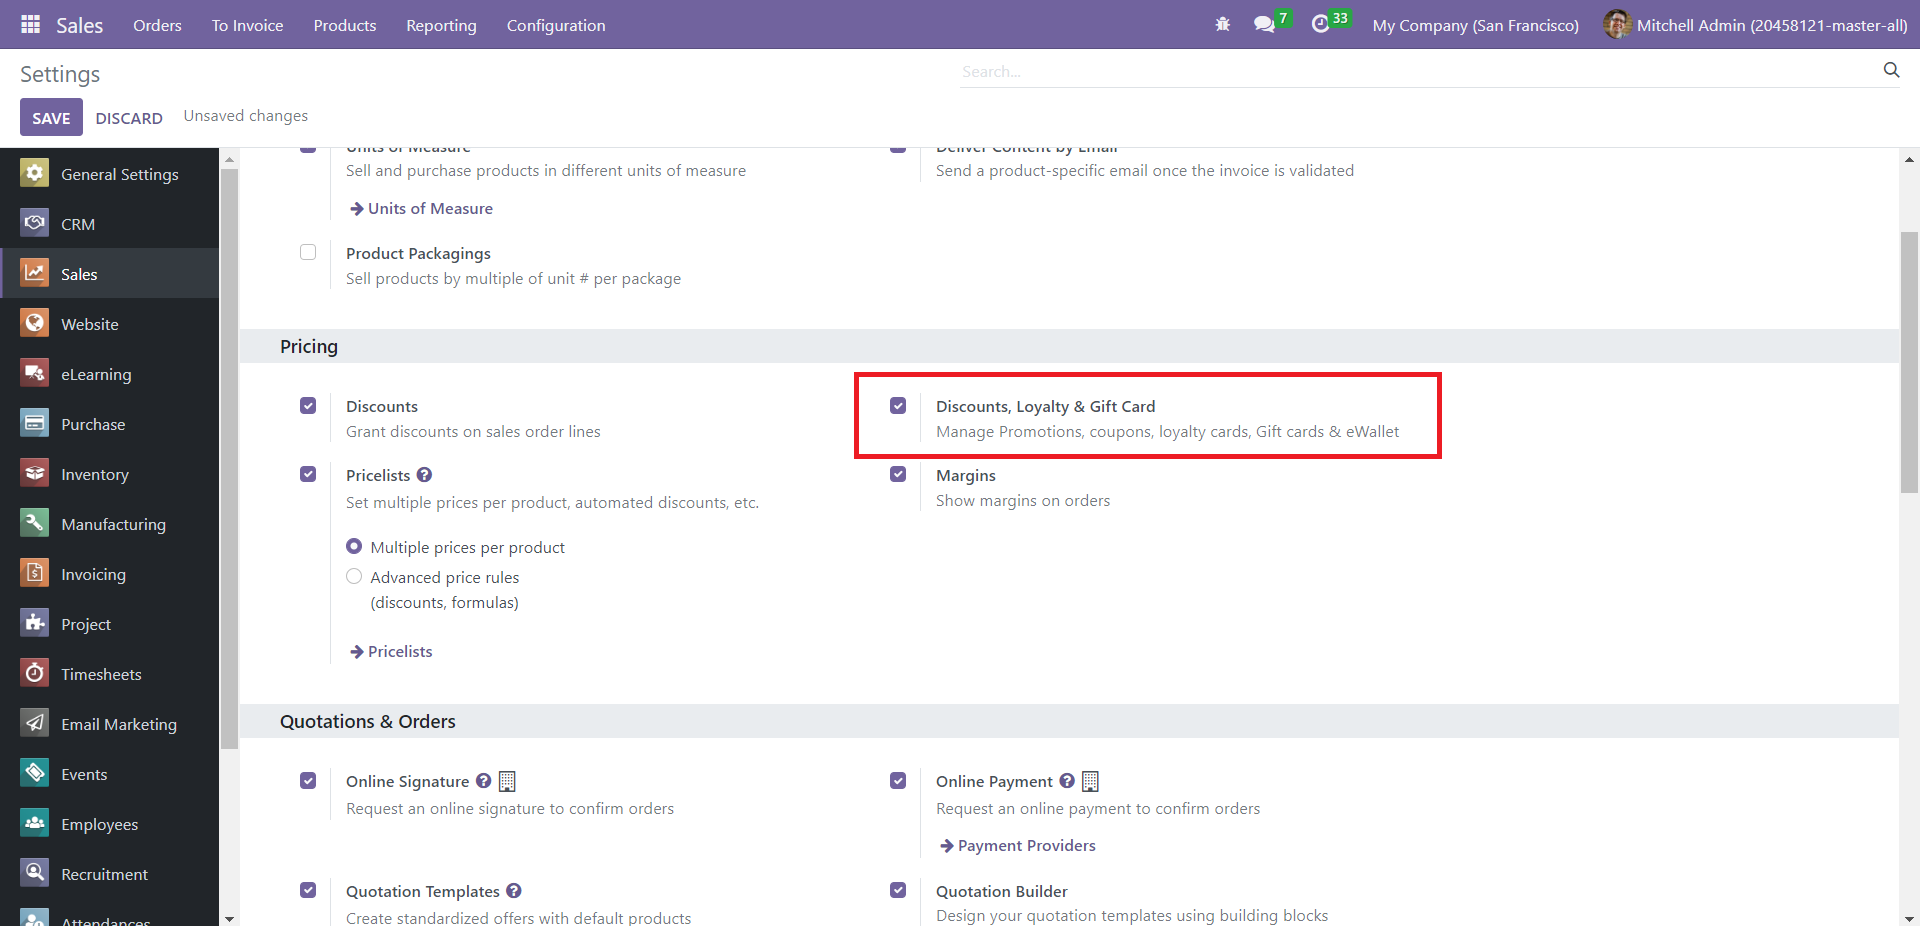
Discounts, Loyalty& Gift Cards
Promotions, coupons, gift cards, etc., can boost your product’s reach and improve sales. To enable this feature, select the Settings option from the Configuration menu. Activate ‘Discounts, Loyalty & Gift Card’ in the Pricing section.
This settings update will add two new options to the dropdown list of the Products tab – ‘Discount & Loyalty’ and ‘Gift cards & eWallet.’
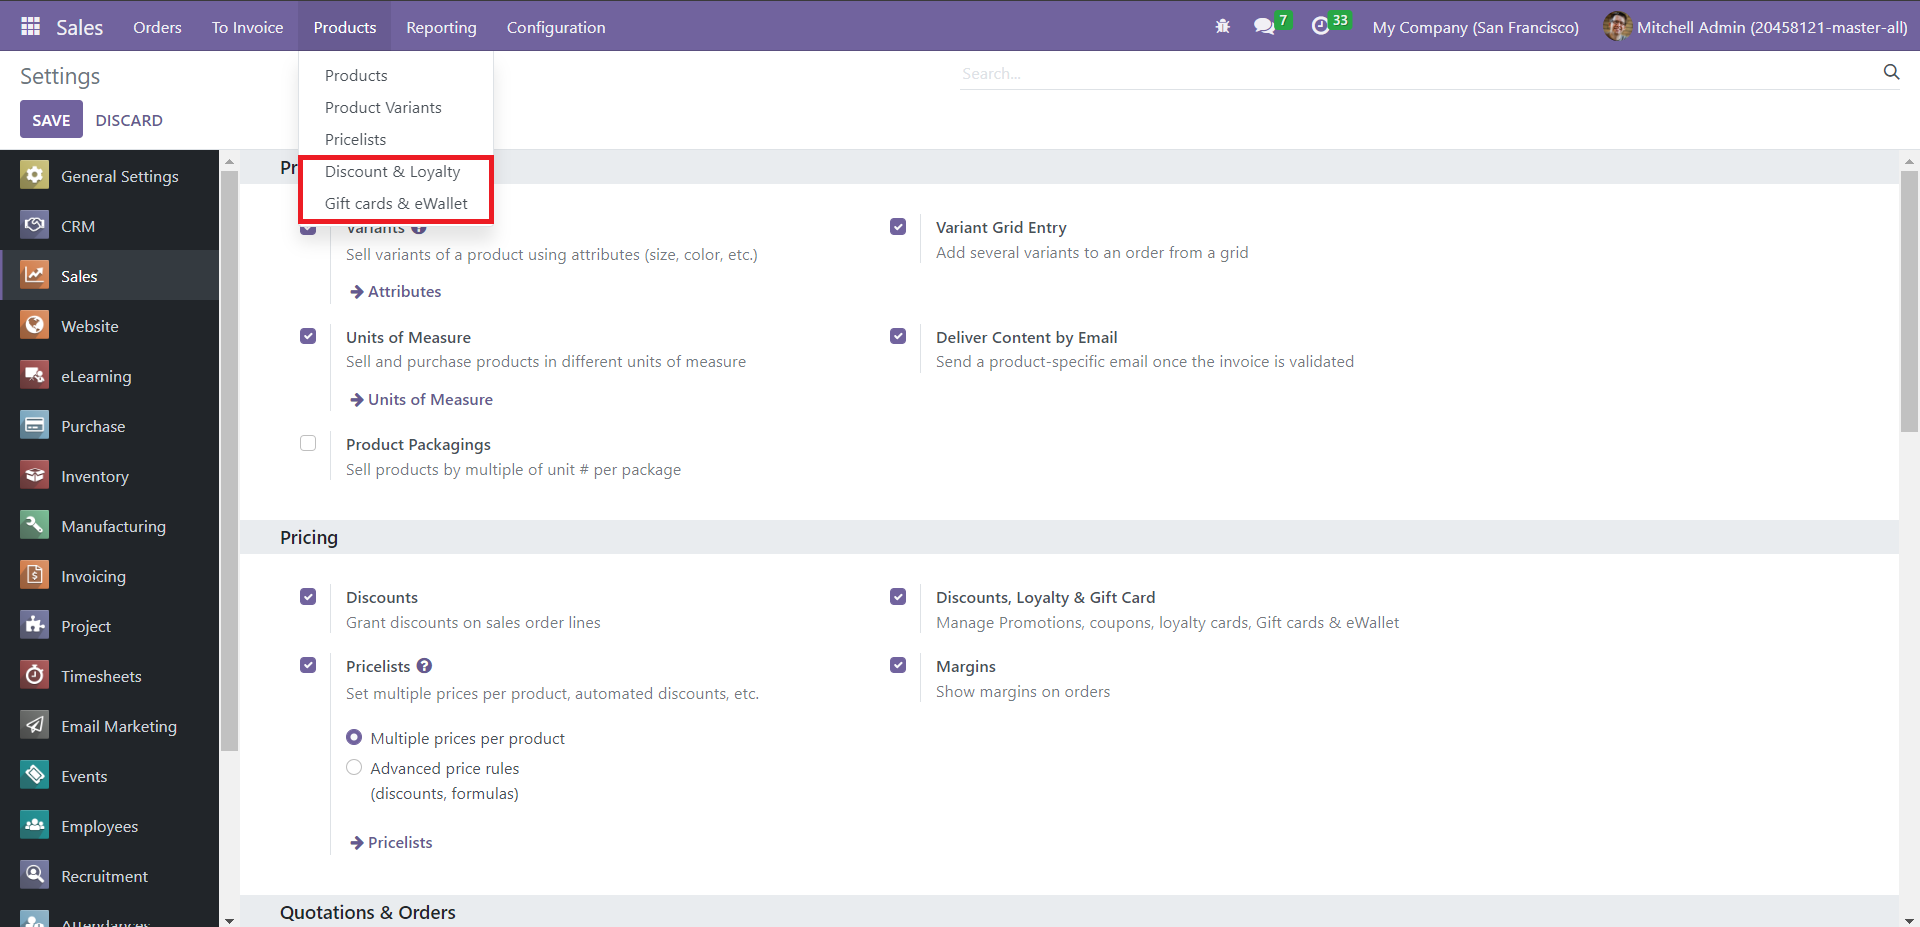
Let us analyze each of these features in detail.
Discount & Loyalty
This feature helps to monitor discounts and provide special offers to loyal customers. The Discount & Loyalty window lists the already created promotion programs and the associated discounts, coupons, and loyalty cards.
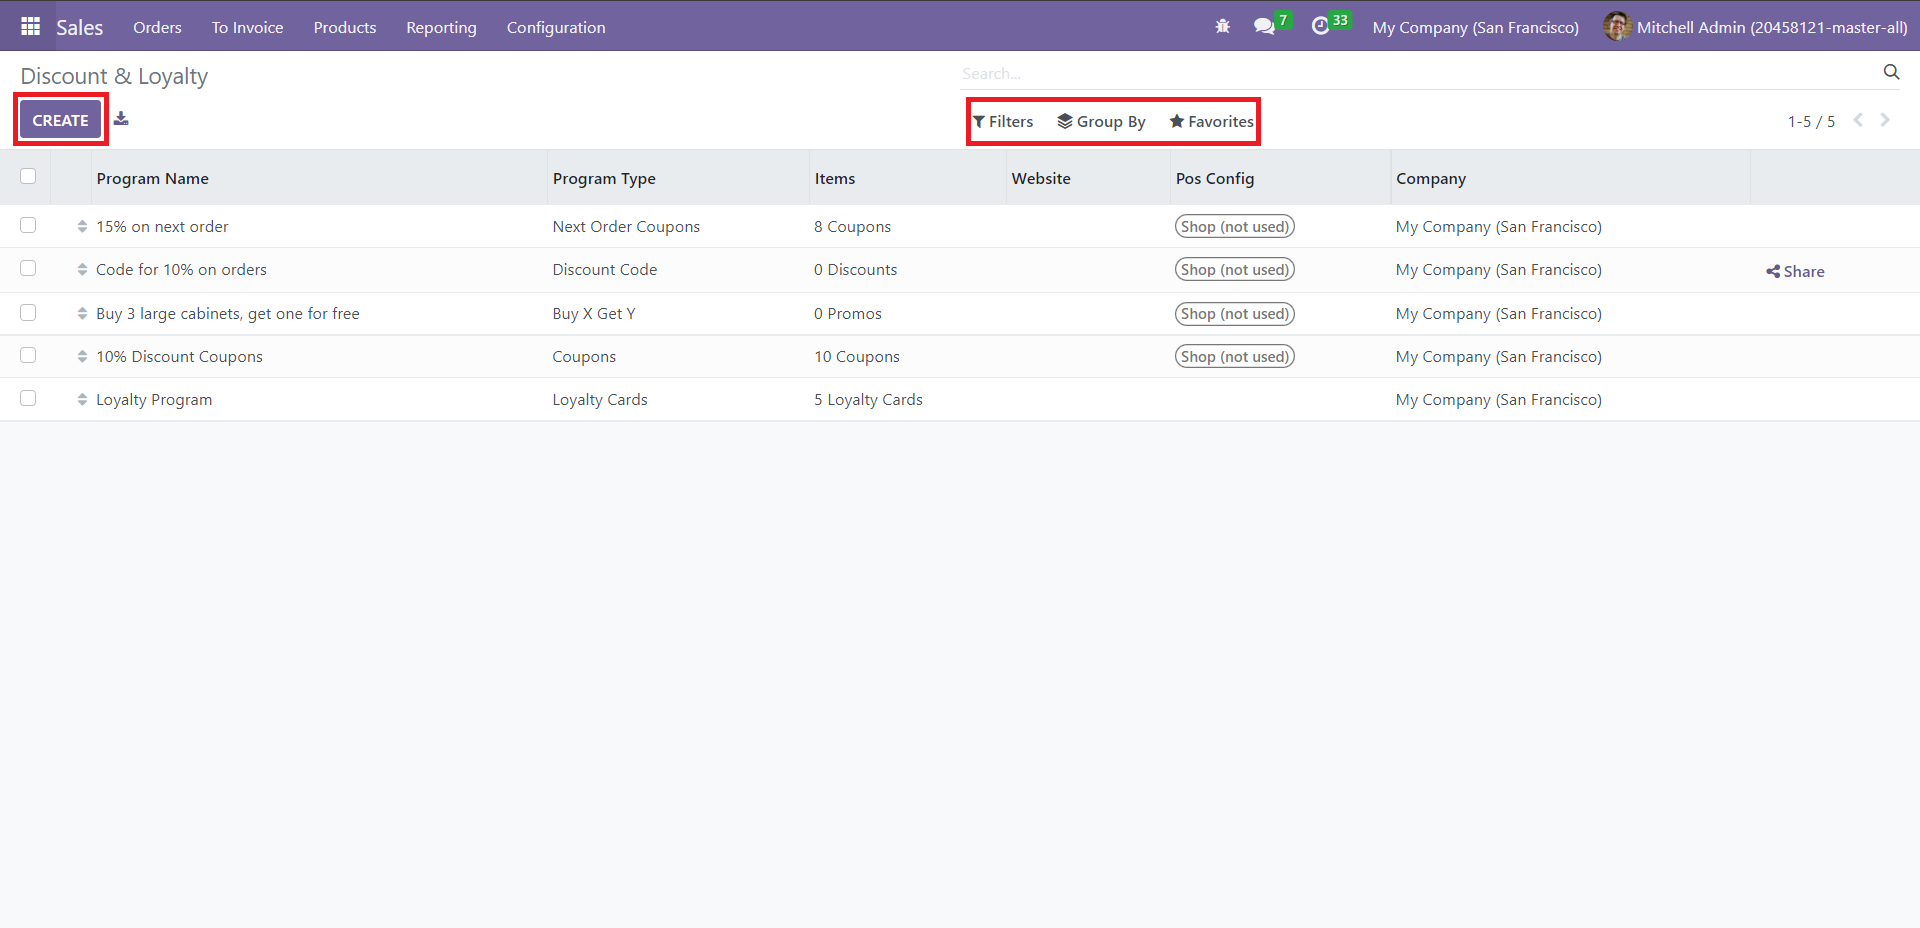
Here, details like Program Name, Program Type, Items, Website, POS Config, and Company are available. You can use ‘Filters’ and ‘Group By’ to filter and categorize these records according to various criteria. The Favorites option allows you to save the most frequently used filters and groups for easy operation. Click on the Create button to add a new program to the list.
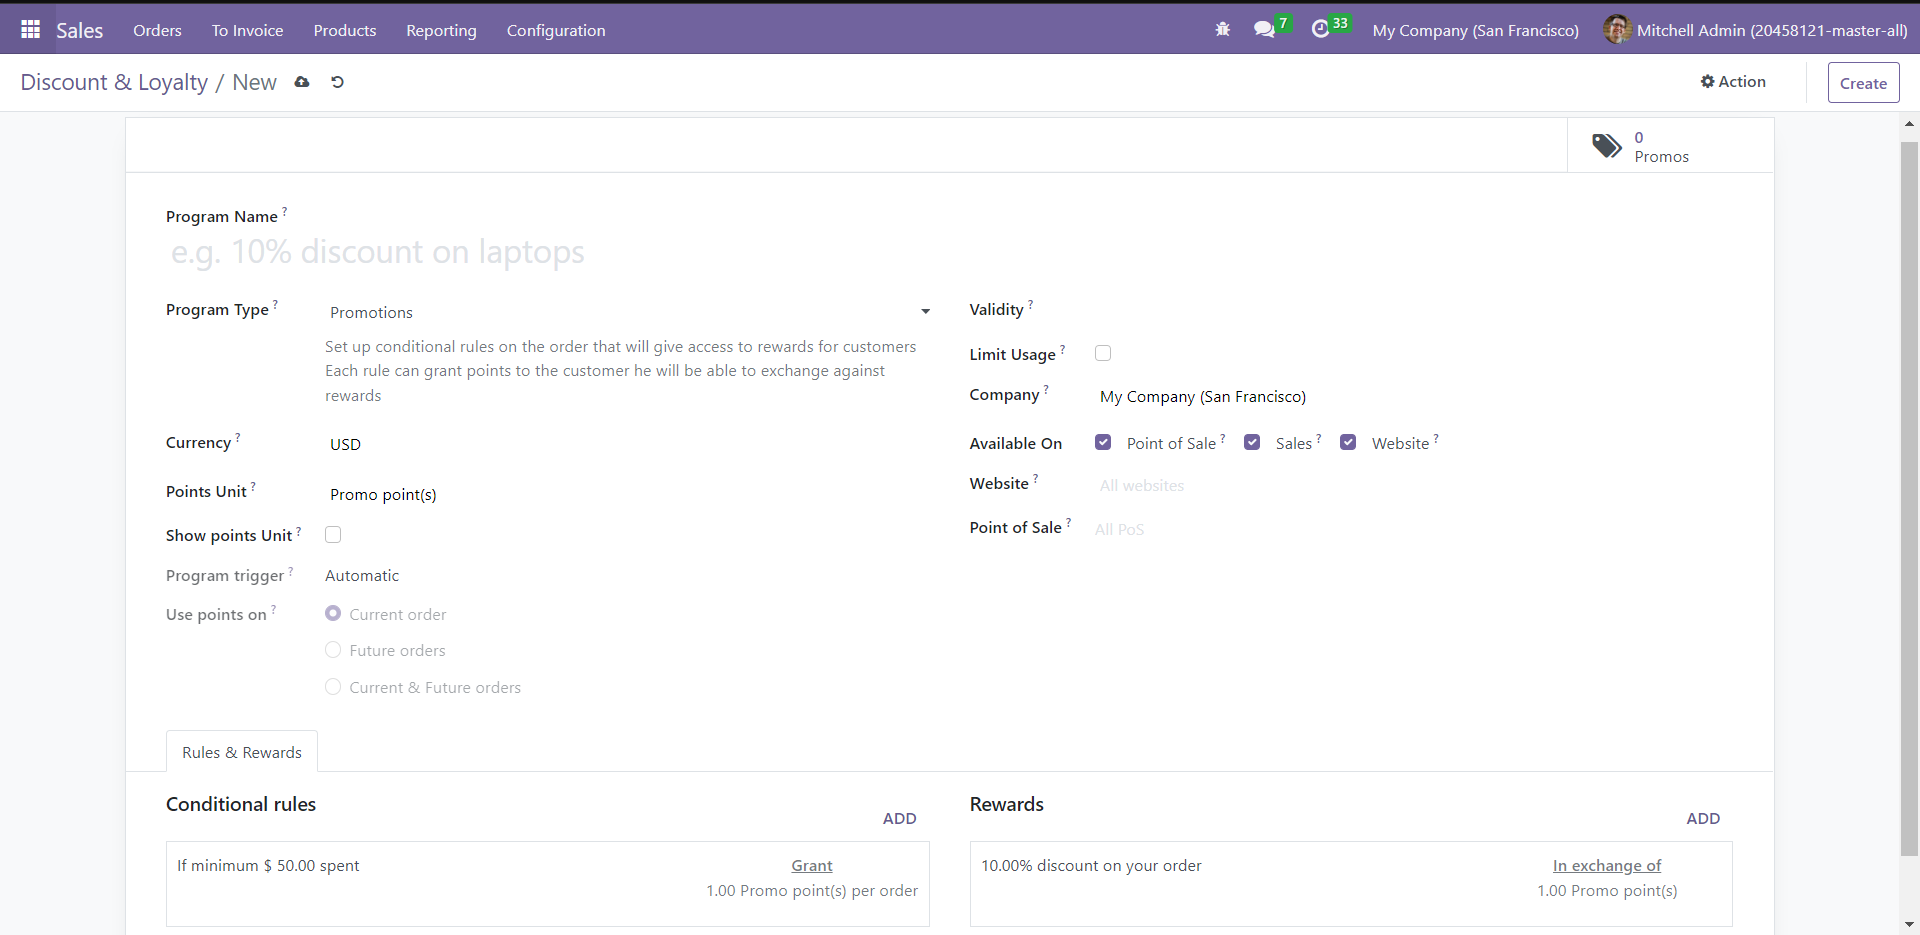
Provide a name for the new program in the Program Name field. The dropdown list of ‘Program Type’ has the options – Coupons, Loyalty Cards, Promotions, Discount Code, Buy X Get Y, and Next Order Coupons – from which you can select the type applicable to the record.
Coupons allow you to generate and share coupon codes manually. Use these coupons in eCommerce, Point of Sale, or regular orders to claim the reward. You can define constraints on its usage via ‘Conditional rules.’ Loyalty Cards help to accumulate points while making a purchase, which they can exchange for rewards in future purchases. Using Promotions, you can set conditional rules for an order to grant your customers access to rewards. Each rule can offer customers points, which they can exchange for rewards. Use a ‘Discount Code’ with conditional rules, which the customers can exchange for benefits. ‘Buy X Get Y’ allows you to grant one credit for each item bought by the customer and reward them with Y items in exchange for X credits. By using ‘Next Order Coupons,’ you can send a single-use coupon code to the customer to drive repeat purchases when they order a product.
Select the Currency from the dropdown list. The Points Unit field gets automatically updated depending on the ‘Program Type’ (for example, Coupon point(s) for Coupons, Loyalty point(s) for Loyalty Cards, etc. ). If you activate ‘Show points Unit,’ you can see the number of points available and used by reward in PoS customer tickets, web portal, and eCommerce checkout.
The Program Trigger gets updated according to the ‘Program Type.’ If the trigger is ‘Automatic,’ customers will automatically be eligible for a reward in their cart. If it is set as ‘Use a code,’ customers will get rewards only upon entering a code. Similarly, the ‘Use points on’ field gets automatically updated too. Define Validity, Limit Usage, Company, Available On, Website, and Point of Sale.
Under the Rules & Rewards tab, you can define the conditions under which the customers can avail of the rewards. To create and manage these rules for granting points, click on ‘Add’ under ‘Conditional rules.’
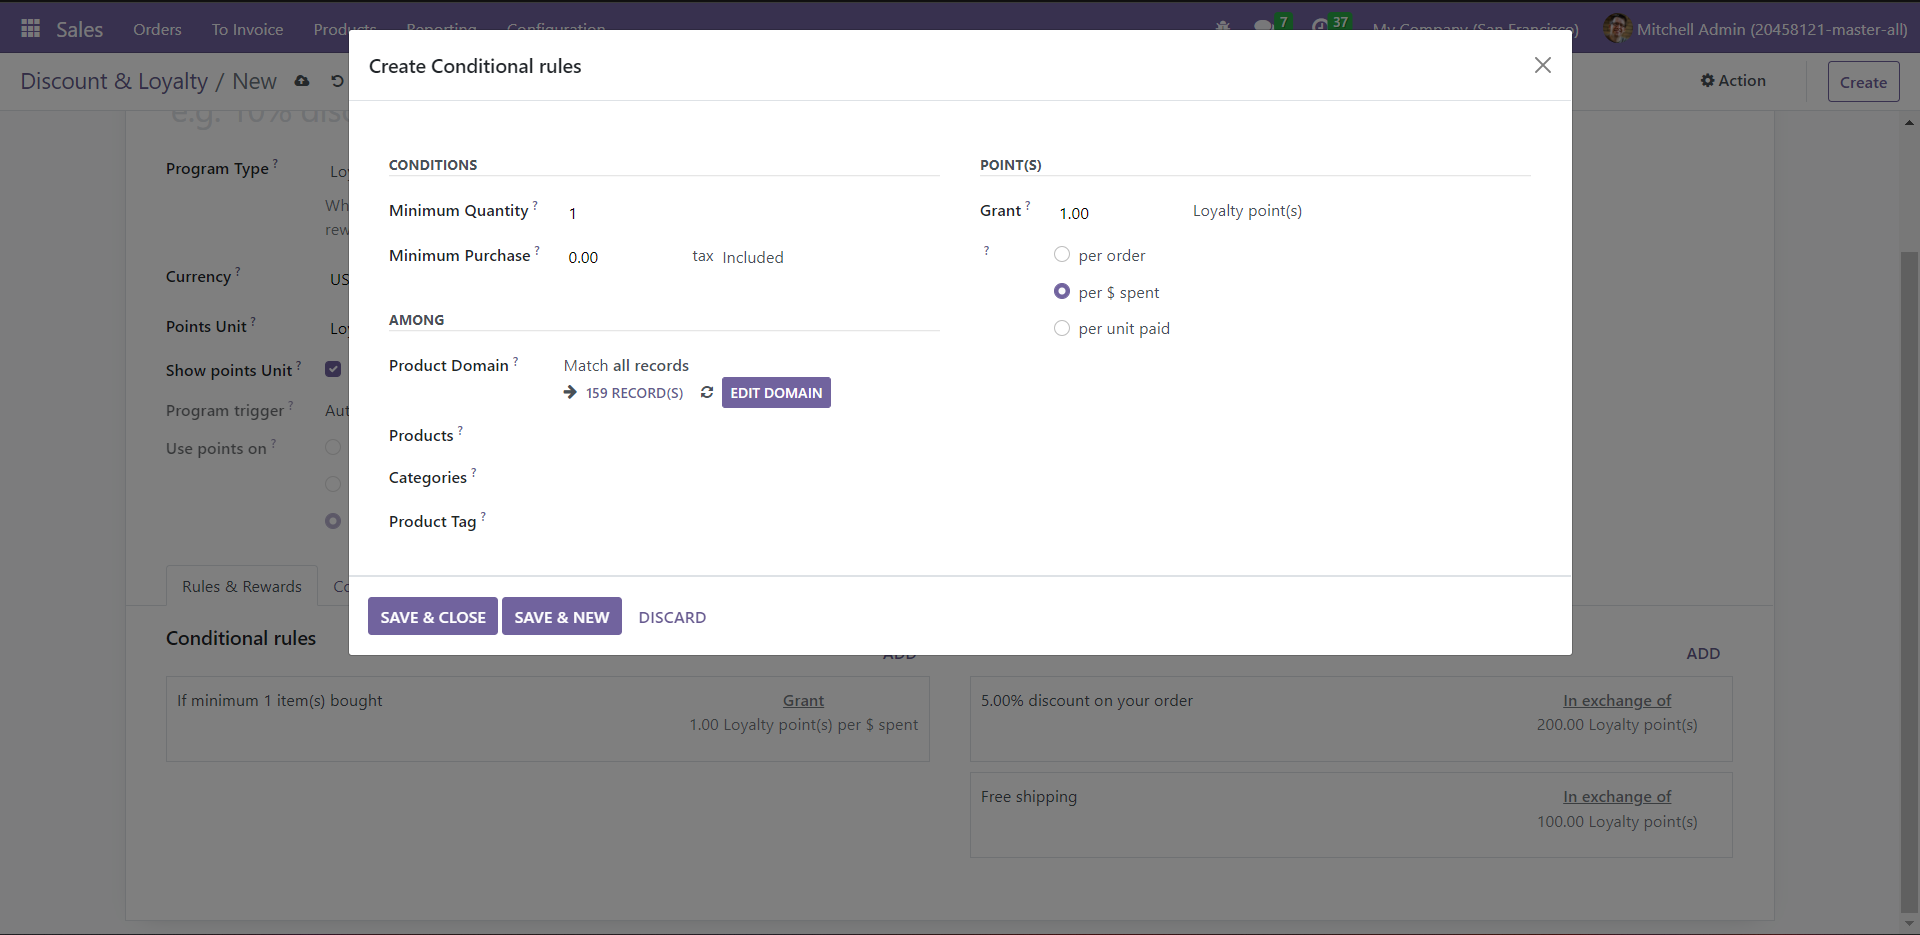
Under ‘Conditions,’ provide Minimum Quantity and Minimum Purchase (rate). The ‘Among’ section allows you to enter details related to the customers to which the rule is applicable. Define Product Domain, Products, Categories, and Product Tags. You can set the reward points and their details in the Point(s) section. Give the number of points in the Grant field along with its conditions, i.e., ‘per order,’ ‘per $ spent,’ or ‘per unit paid.’ After adding these details, click on ‘Save and Close.’
The Rewards section helps you set the perks(like a discount) in exchange for reward points. Click on ‘Add’ under ‘Rewards’ to manage these transactional benefits.
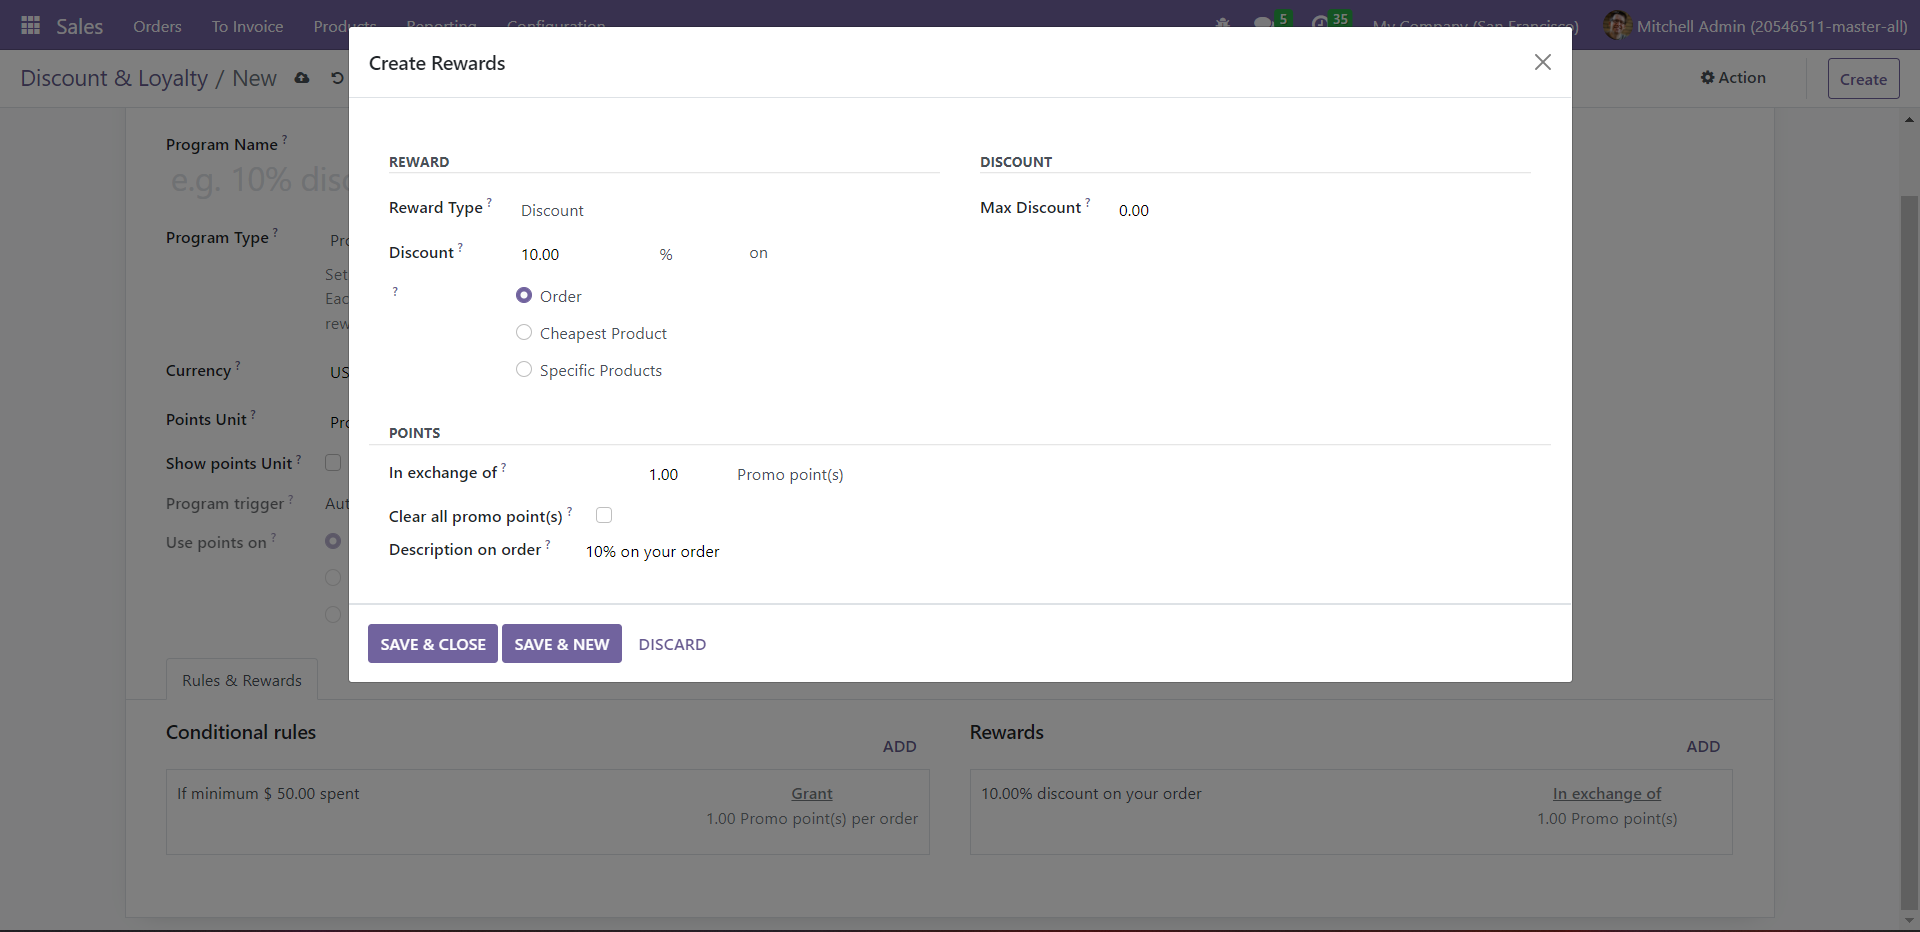
Select the appropriate type from the dropdown list of ‘Reward Type.’ This attribute allows you to choose from three options – Free Product, Discount, and Free Shipping. Let us take ‘Discount’ as an example. As you can see above, you can set a specified discount value on Order, Cheapest Products, or Specific Products. Specify the maximum discount in the Max Discount field.
Using ‘In exchange of,’ you can indicate the number of promo points the customer has to trade in to get the reward. After specifying the Clear all Promo Points and Description on Order, you can click the Save button.
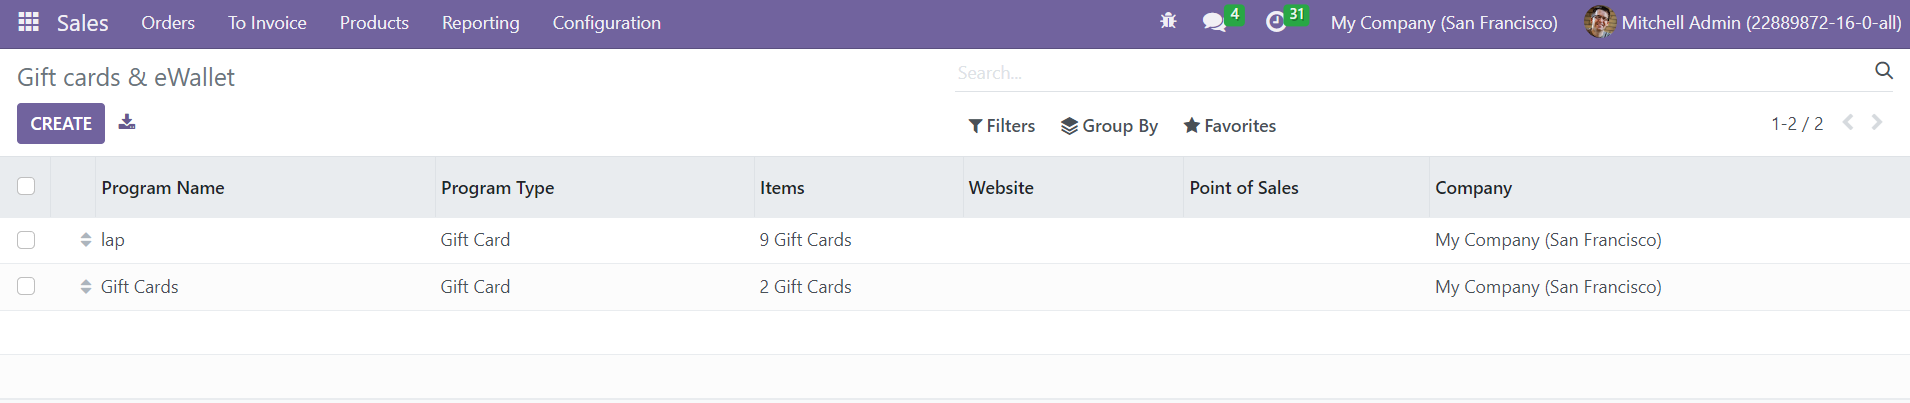
Gift Cards & eWallet
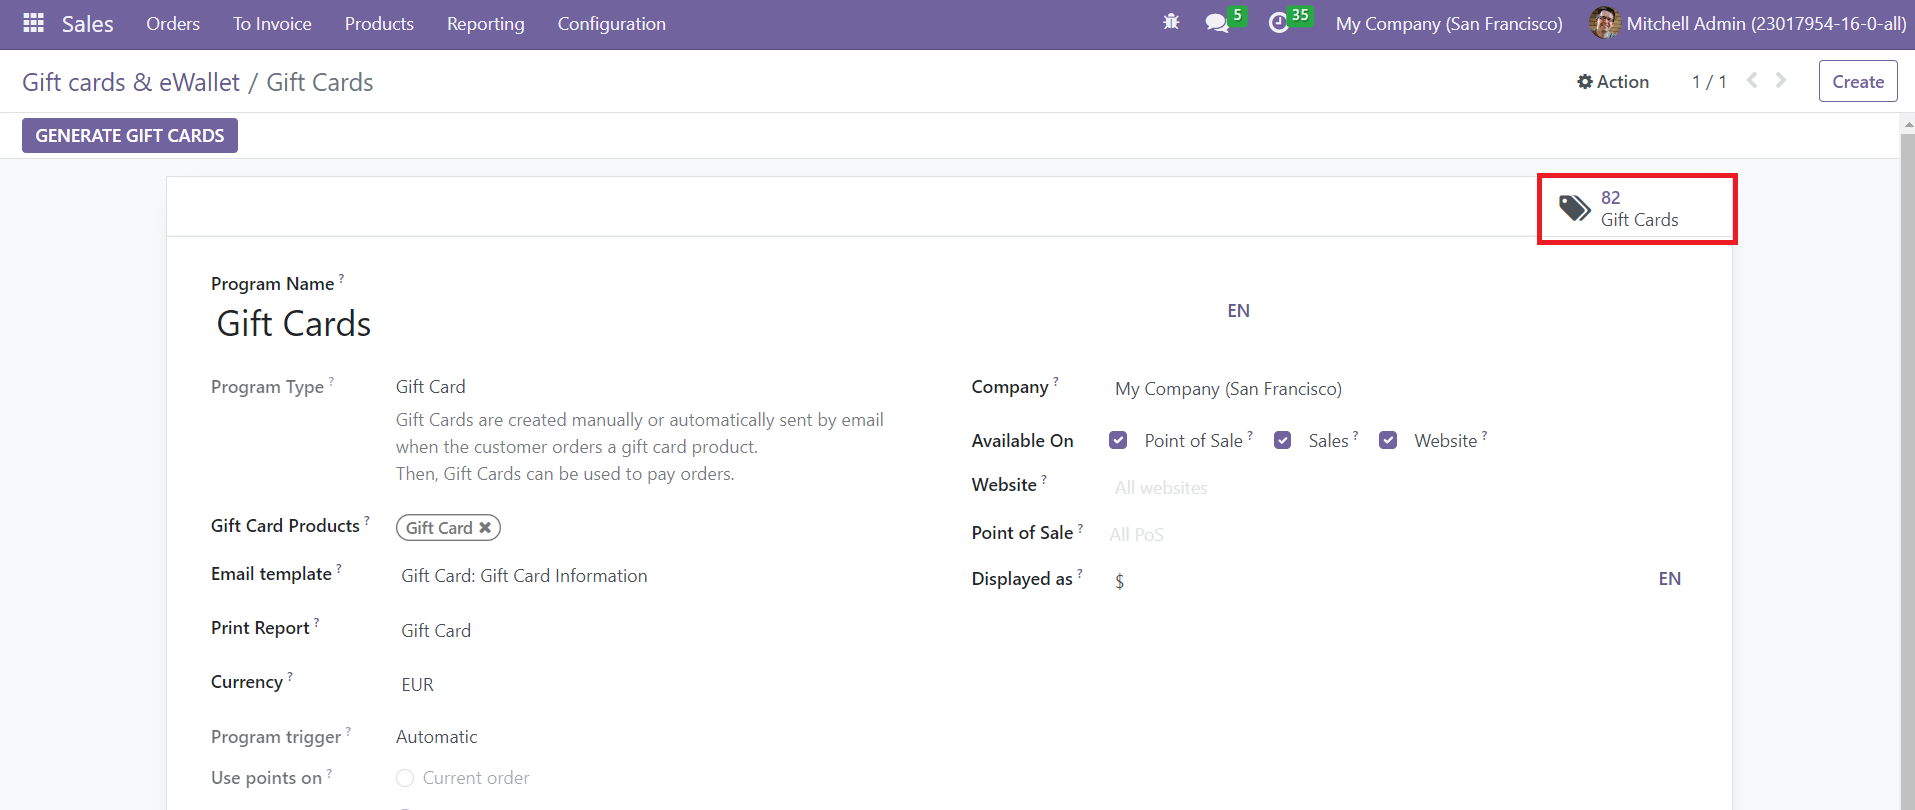
In Odoo 16, you will get a separate platform to create and manage Gift Cards and eWallets. As shown below, the platform will show the Program Name, Program Type, Items, Website, Point of Sales, and Company of all pre-configured gift cards and eWallets.
You will get a new form view as soon as you click on the Create button.
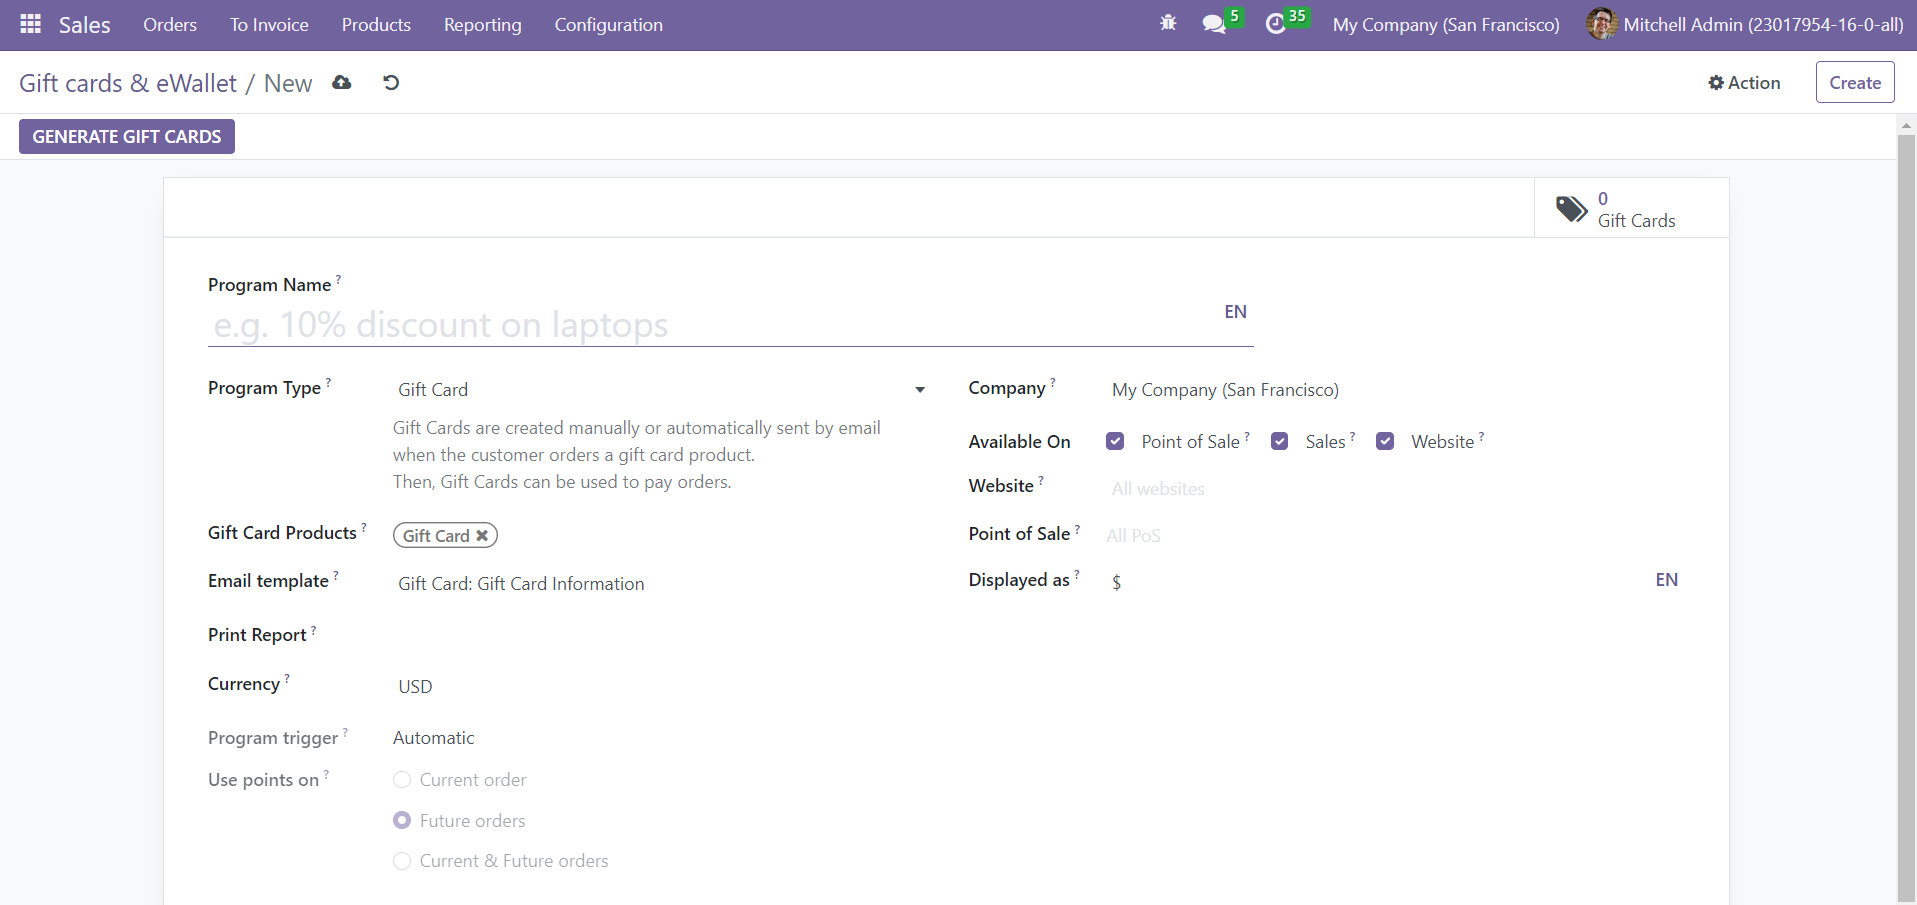
Specify the Program Name and Program Type in the respective fields. The Program Type can be either Gift Cards or eWallets. You can create gift cards manually or automatically when a customer orders a product that comes under the category gift card product. You can send them by email and the customer can later use them to pay orders. The Gift Card Products you offer can be added in the corresponding field. Set an Email Template in the given field to send the gift card to the qualified customer. The Print Report will be used for printing the generated gift cards from the point of sale. Mention the Currency used for the operations and set the Program Trigger as Automatic or Use a Code. The Automatic will trigger a reward in their cart when customers become eligible for this gift card. In another method, the customer can use a code to get this gift card. Mention your Company and activate the PoS, Sales, and Website options to make the gift card available on the enabled platforms. The corresponding Website and PoS can be specified here. The Displayed as field can be used to specify the point portal name. Once you complete the configuration, you can click on the Generate Gift Cards button. This will open a pop-up as shown below.
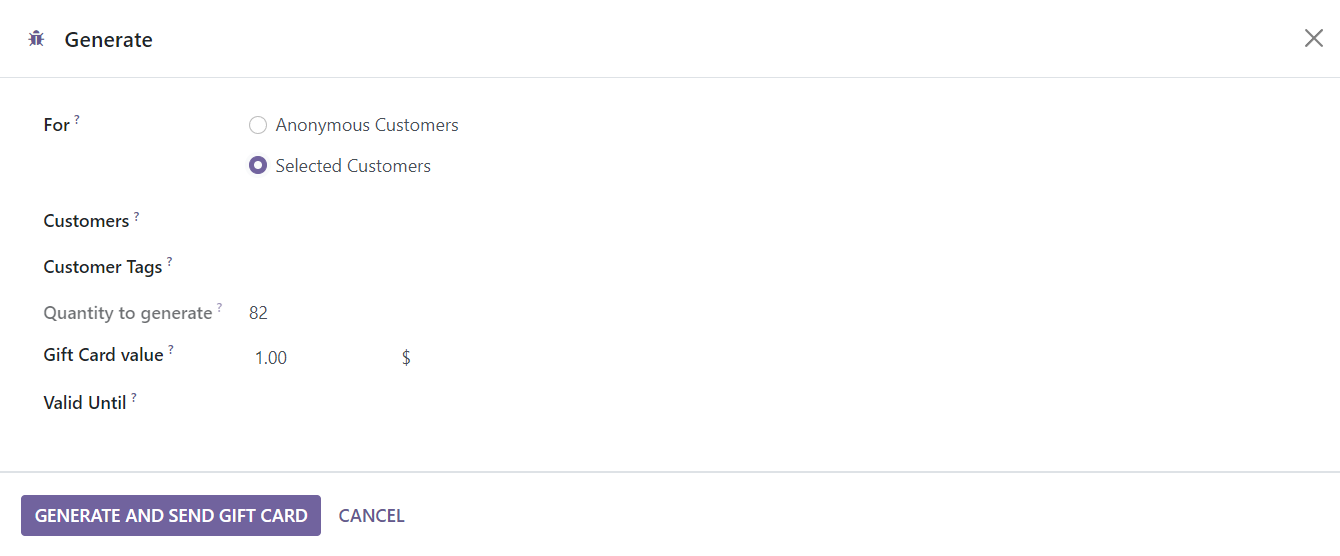
You can generate gift cards for anonymous customers as well as selected customers. In the case of selected customers, you can specify their name and tags in the given fields. Mention the number of gift cards that you want to generate in the Quantity to Generate field. The points granted per one gift card can be added in the Gift Card Value field. Use the Valid Until field to set the validity of the generated gift cards. Now, click the Generate and Send Gift Card button. This will generate the mentioned amount of gift cards and send them to the selected customers. From the form view, you can observe the newly created gift cards using the smart button.
It will show all newly generated gift cards.
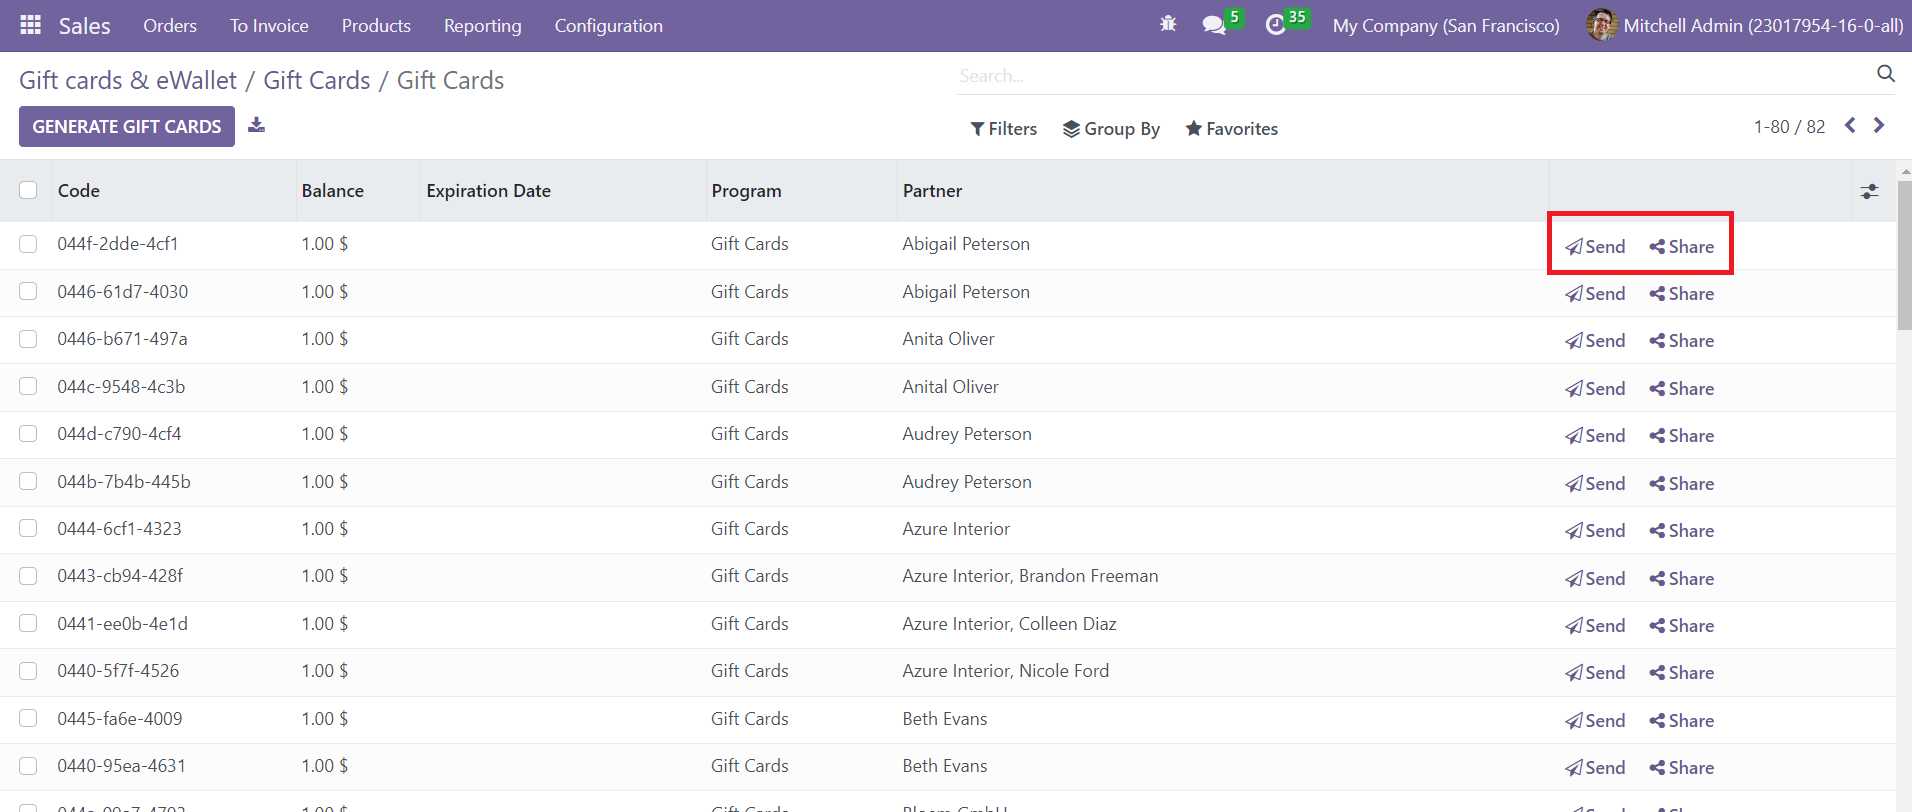
You can use the Share button to share the gift card of various platforms. Clicking on the Send button will help you to send the gift card to a particular customer.
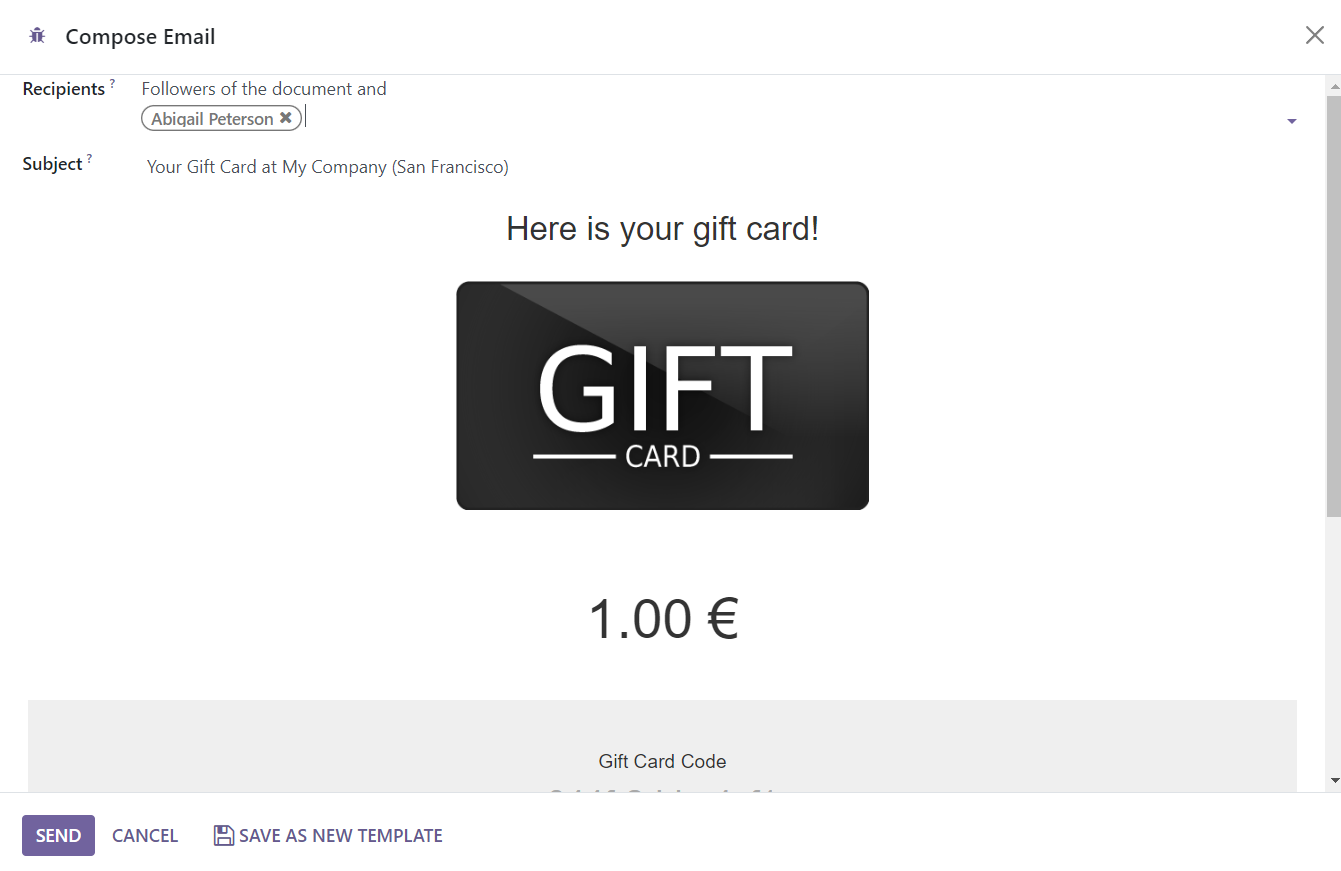
Here, you can add the Recipients and specify the Subject of the email. This auto generated mail will include a gift card with a gift card code. Use the Send button to send to the mentioned recipients.
If you want to create eWallets, you can use the same platform as that of the gift card, where you will be requested to select the Program Type as eWallet. The customer can use eWallets to pay for orders. The configuration of the eWallets is the same as that of the gift card.
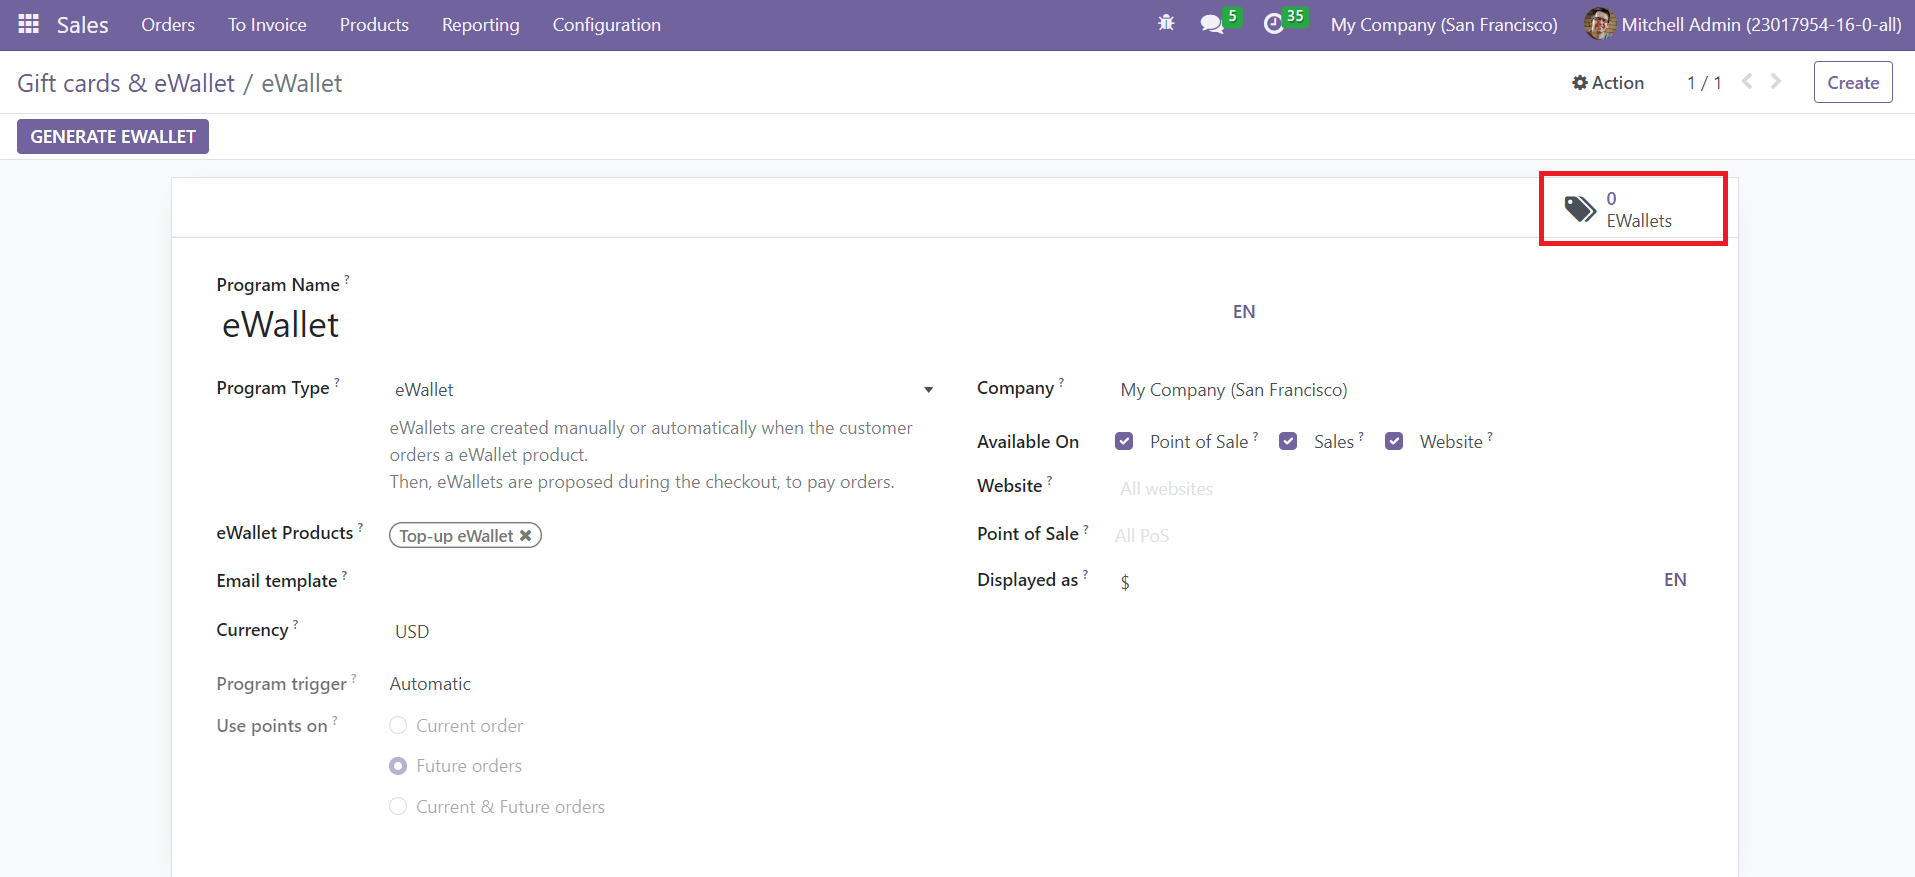
The total eWallets generated from this program can be obtained from the smart button available on the window. You can easily generate new eWallets using the Generate Ewallet button.
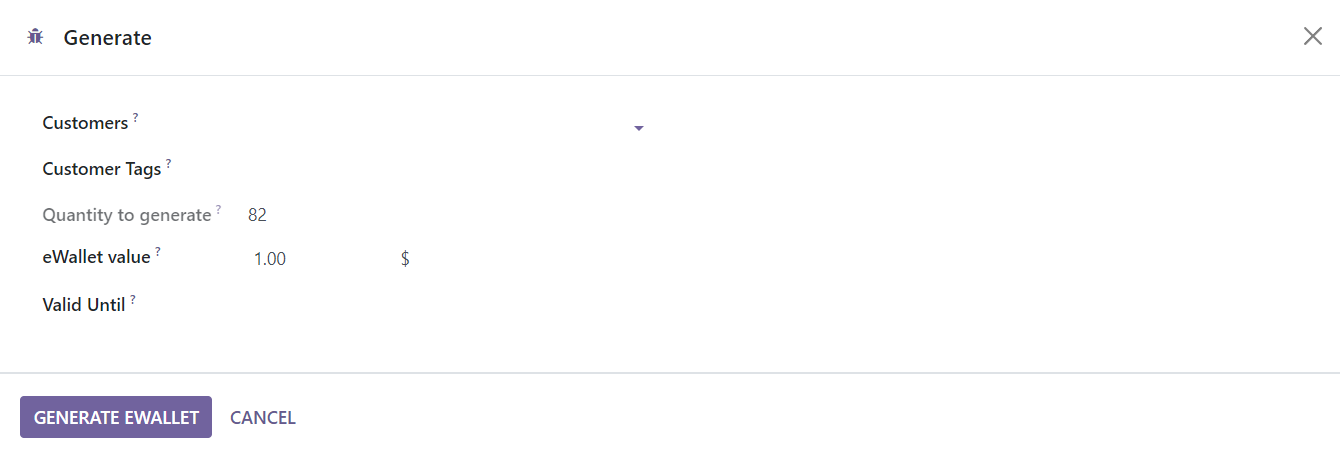
You will get a pop-up window where you set Customers, Customer Tags, Quantity to Generate, eWallet Value, and Valid Until in the respective fields. After creating gift cards and eWallets, you can send them via mail and share them on different platforms to improve the sale.
Customers
Having a dedicated platform for keeping a record of all your customers will benefit you in improving your sales. Odoo offers a centralized system for recording customer’s data. It enables easy access to required information related to your customers whenever you want. You can find this platform under the Orders menu of the Sales module. The Kanban view of the platform is shown below.
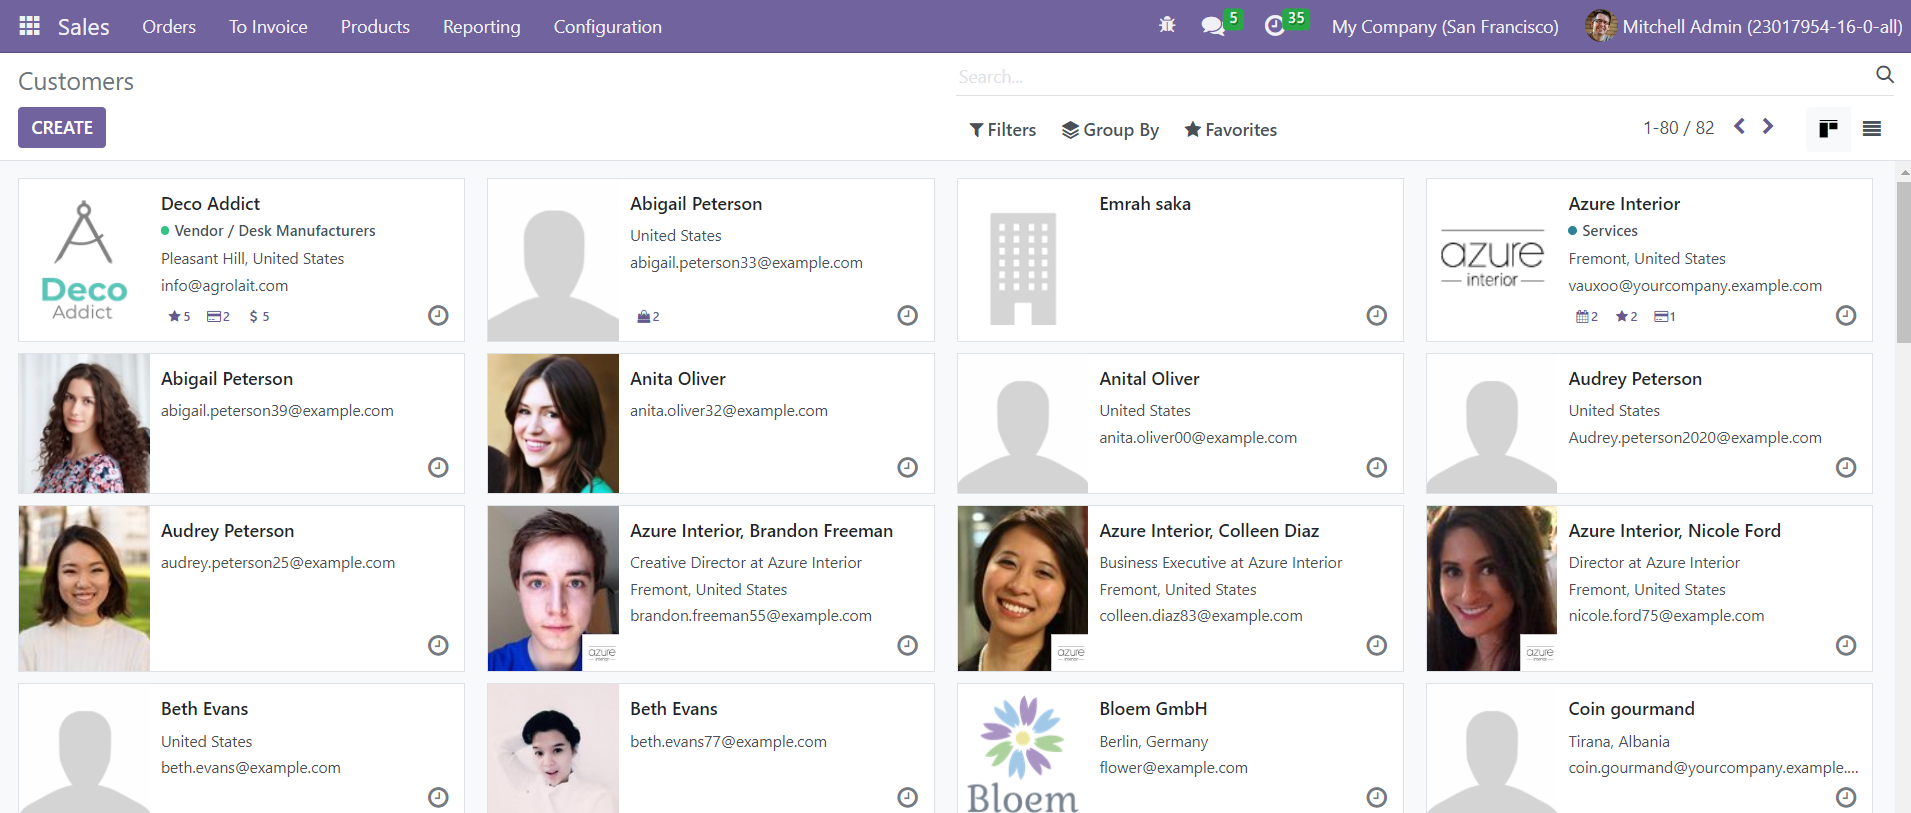
The window shows the details of the customers along with their images. The small clock icon can be used to schedule sales-related activities with them. You can filter them as Individual, Companies, Customer Invoices, Vendor Bills, Subcontractors, and Archived. The Group By option includes Salesperson, Country, and Company. Now, click the Create button to create a new customer in the Sales module.
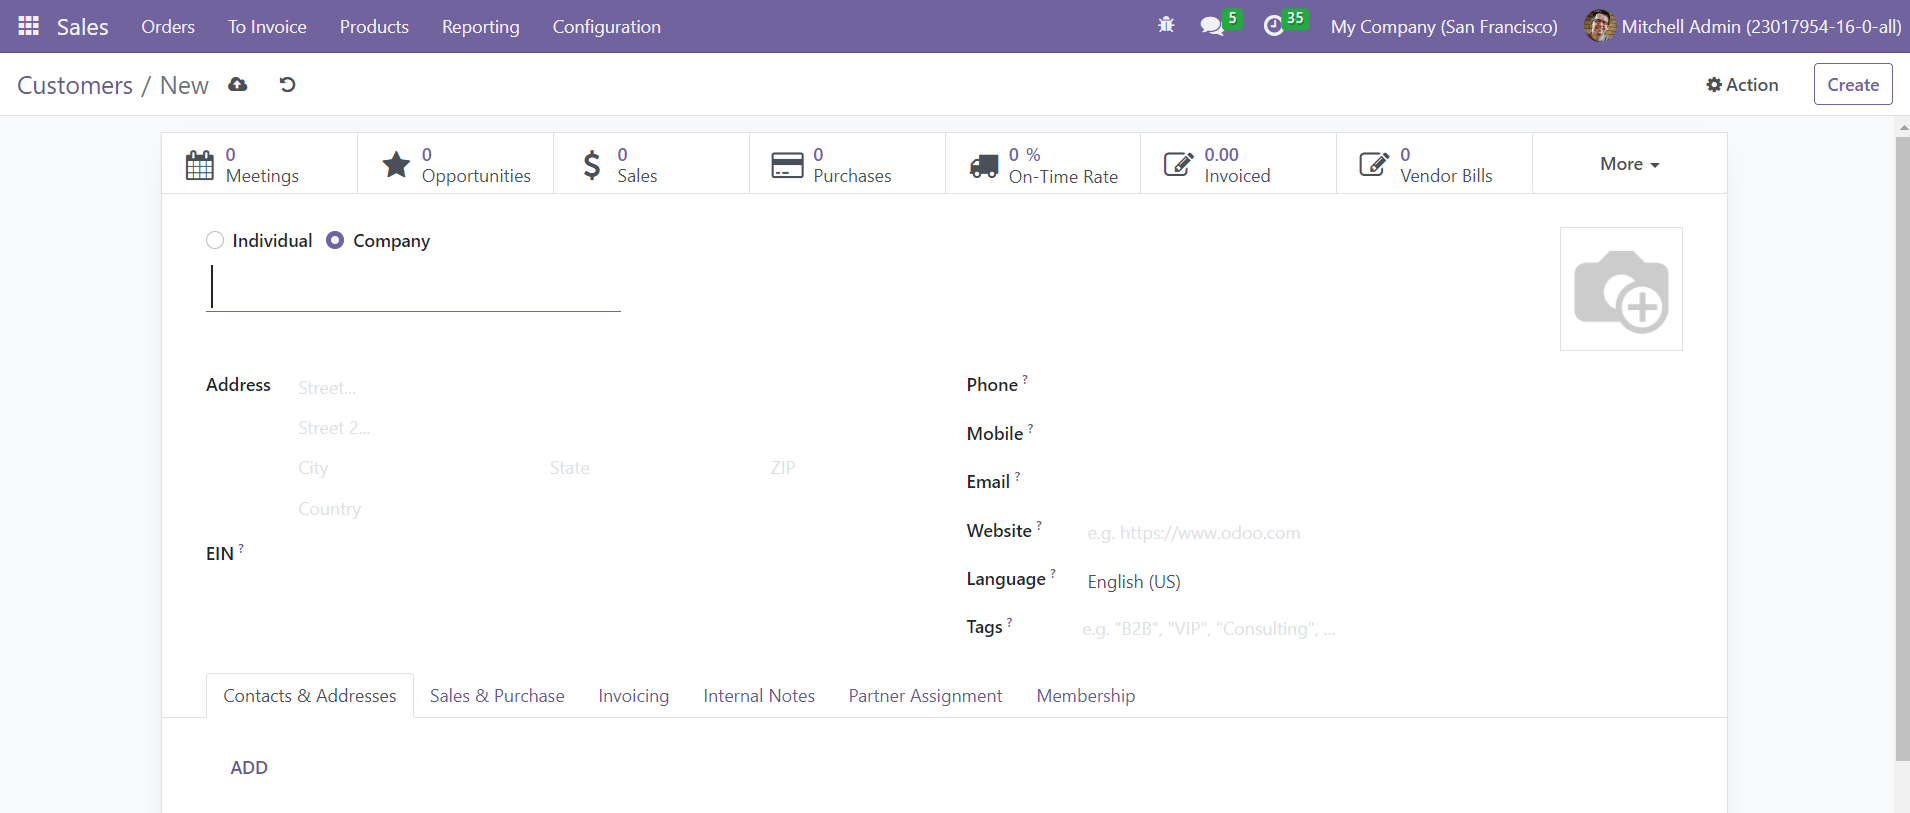
You can create a customer record as an Individual or Company. In the respective fields, you can specify the Name, Address, Phone, Mobile, Email, Website, Language, and Tags of the customer. Under the Contacts & Addresses tab, you can add different addresses and contact details of the customer using the Add button.
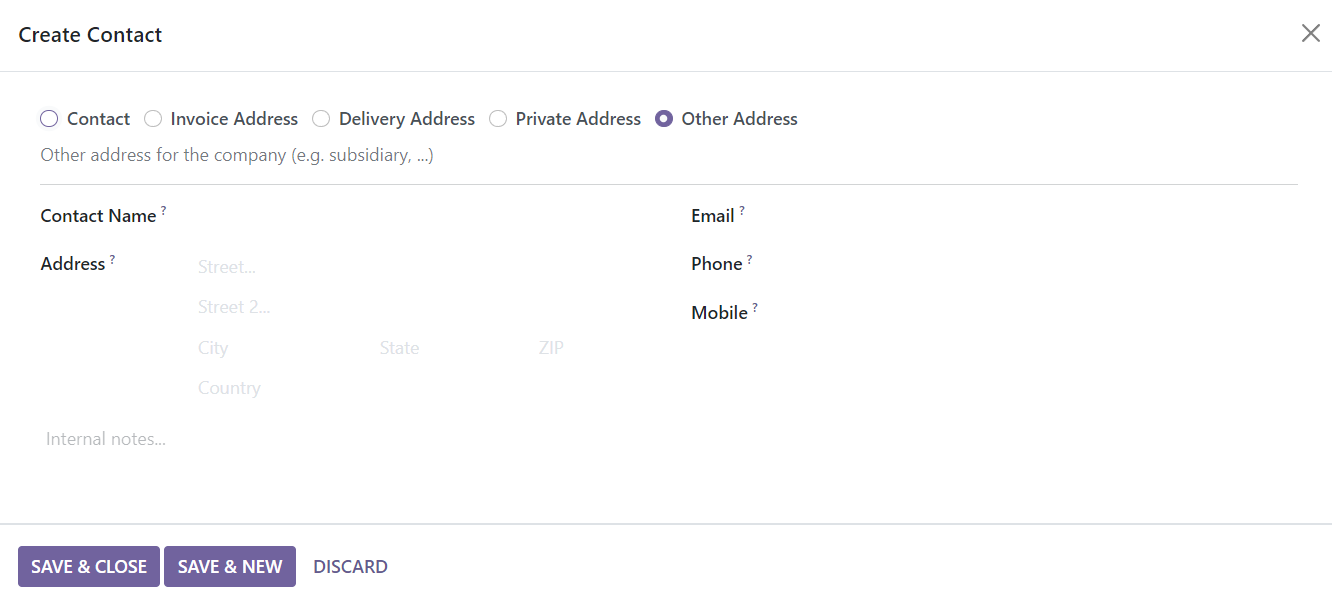
The address can be Contact, Invoice, Delivery, Private, or Other Address. You can mention the Contact Name, Address, Email, Phone, and Mobile in the pop-up window.
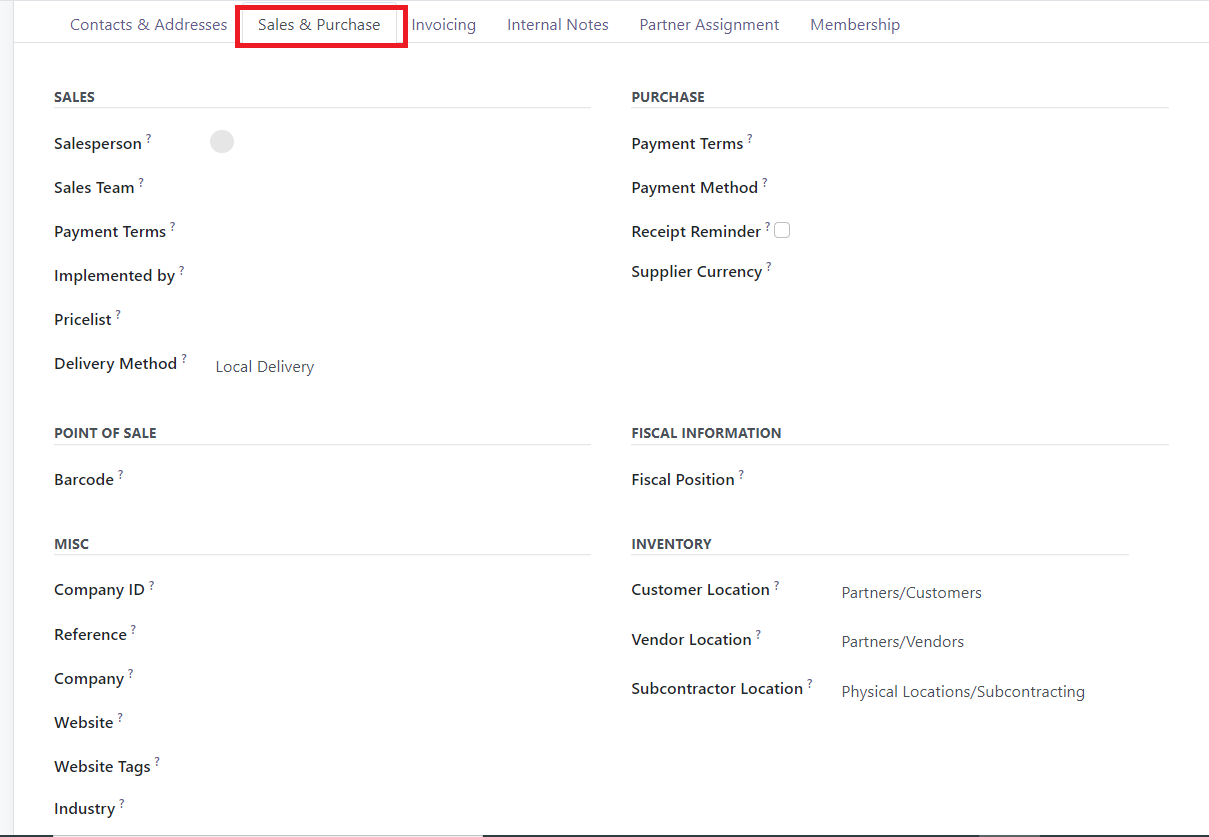
The details regarding Sales & Purchases can be specified in the respective tab. For managing sales operations, you can set a Salesperson and Sales Team for the customer. By mentioning the Payment Terms and Pricelist, Odoo will use the mentioned one for sales orders and customer invoices instead of the default one. Specify the assigned partner id in the Implemented By field and the default delivery method used for the sales orders of the customer in the Delivery Method field.
Under the Purchase section, you can mention Payment Terms which will be used instead of the default one in the purchase orders and vendor bills. The preferred Payment Method for paying this customer can be defined in the given space. If you want to send a Receipt Reminder to the customer, you can set them in the respective field. This will send an automated reminder to the customer particular days before the expected receipt date to confirm the exact receipt date. You can mention the Supplier Currency used for the purchase operations with this customer. Set a Barcode in the given field to identify this customer in the Point of Sale session. The Miscellaneous section can be used to specify the Company ID, Reference, Company, Website, Website Tags, and Industry. Mention the Fiscal Position in the Fiscal Information section, which will determine the taxes or accounts used for this contact.
In the Inventory section, you can specify the Customer Location, which indicates the destination stock location when sending products to this contact. The source location when receiving products from this contact can be mentioned in the Vendor Location. Subcontractor Location indicates the stock location used in the subcontracting operations.
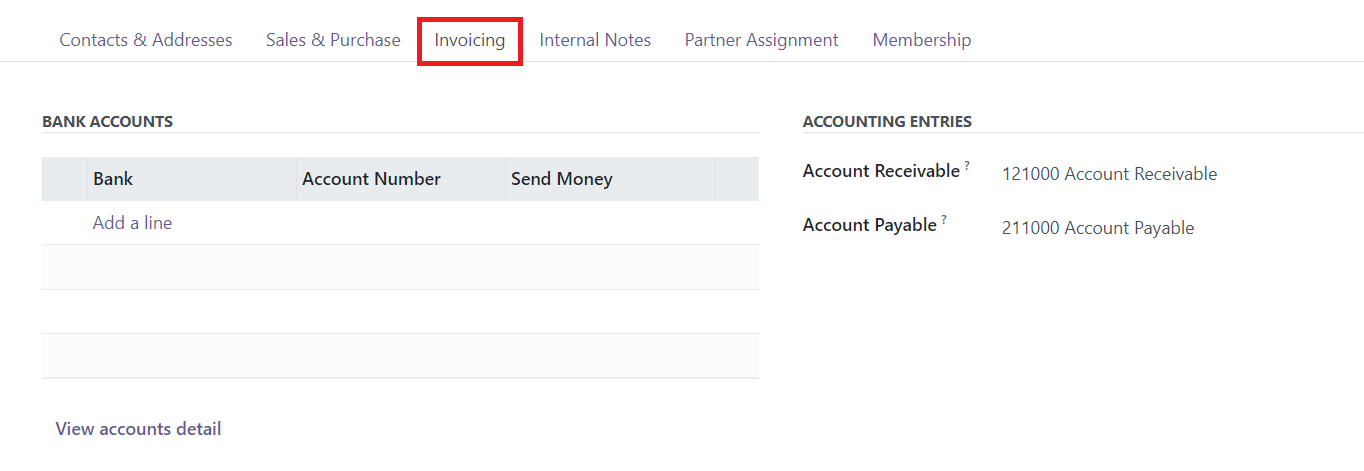
Using the Add a Line button, you can add the bank account details under the Invoicing tab. It includes the details of the Bank, Account Number, and Send Money. In the respective fields, you can mention the Account Receivable and Account Payable. The View Accounts Details button will show a detailed view of the account.
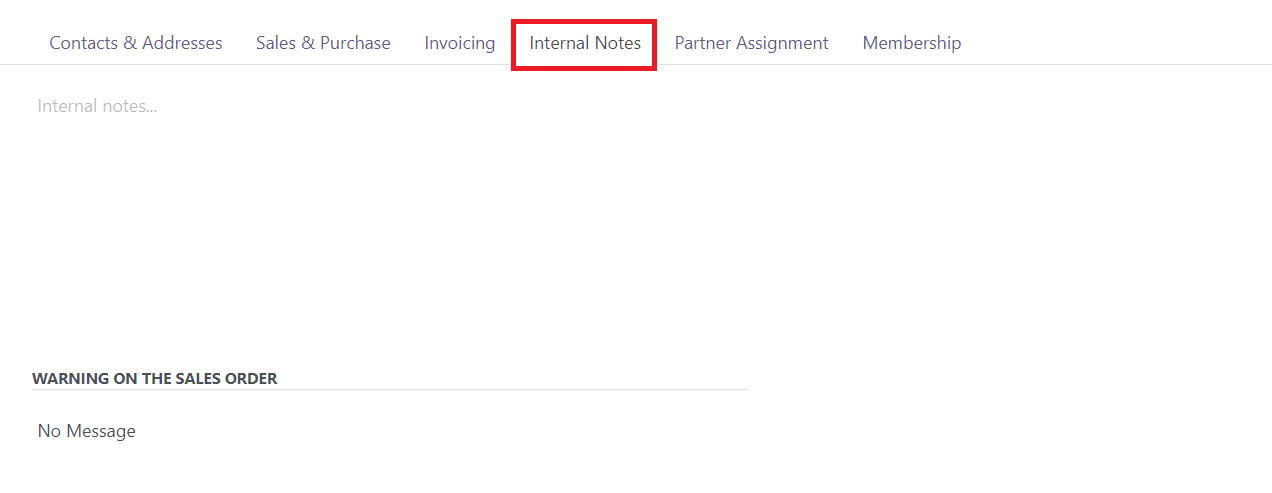
Any sales-related internal notes can be added under the Internal Notes tab. Once you activate the Sales Waring option from the Settings menu, you can set Warning on the Sales Order whenever you create a sales order with this contact.
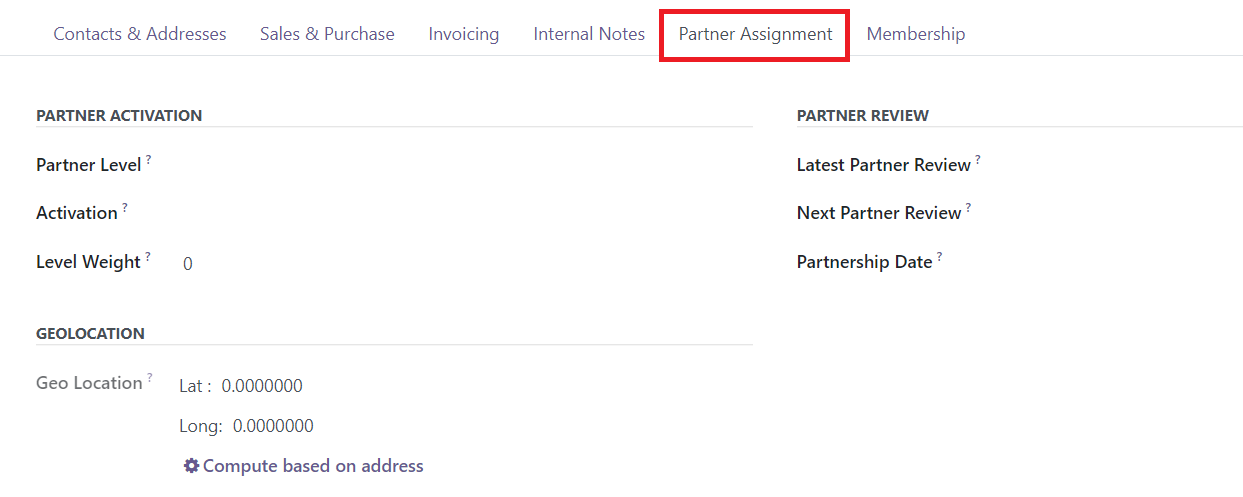
The Partner Assignment tab includes the Partner Activation and Partner Review details. You can specify the Partner Level, Activation, Level Weight, Latest Partner Review, Next Partner Review, and Partnership Date in this tab. Set the Geo-Location in the specified field. You can do it manually or use the Compute based on the address to get Geolocation.
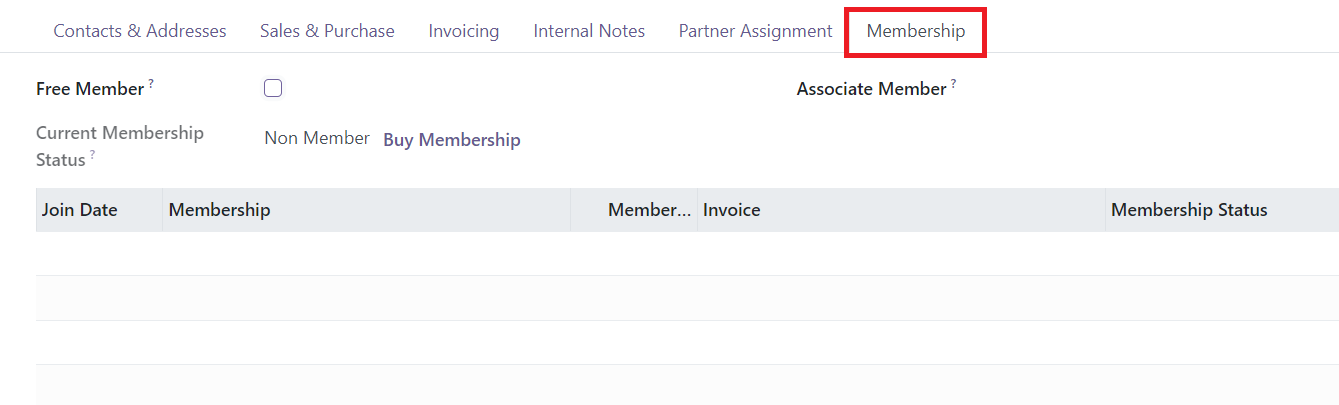
Select the Free Member field from the Membership tab if you want to provide free membership. The Current Membership Status will be available in this tab along with the details of the Join Date, Membership, Membership Price, Invoice, and Membership Status. The entries will be automatically saved in Odoo once you complete the configuration.
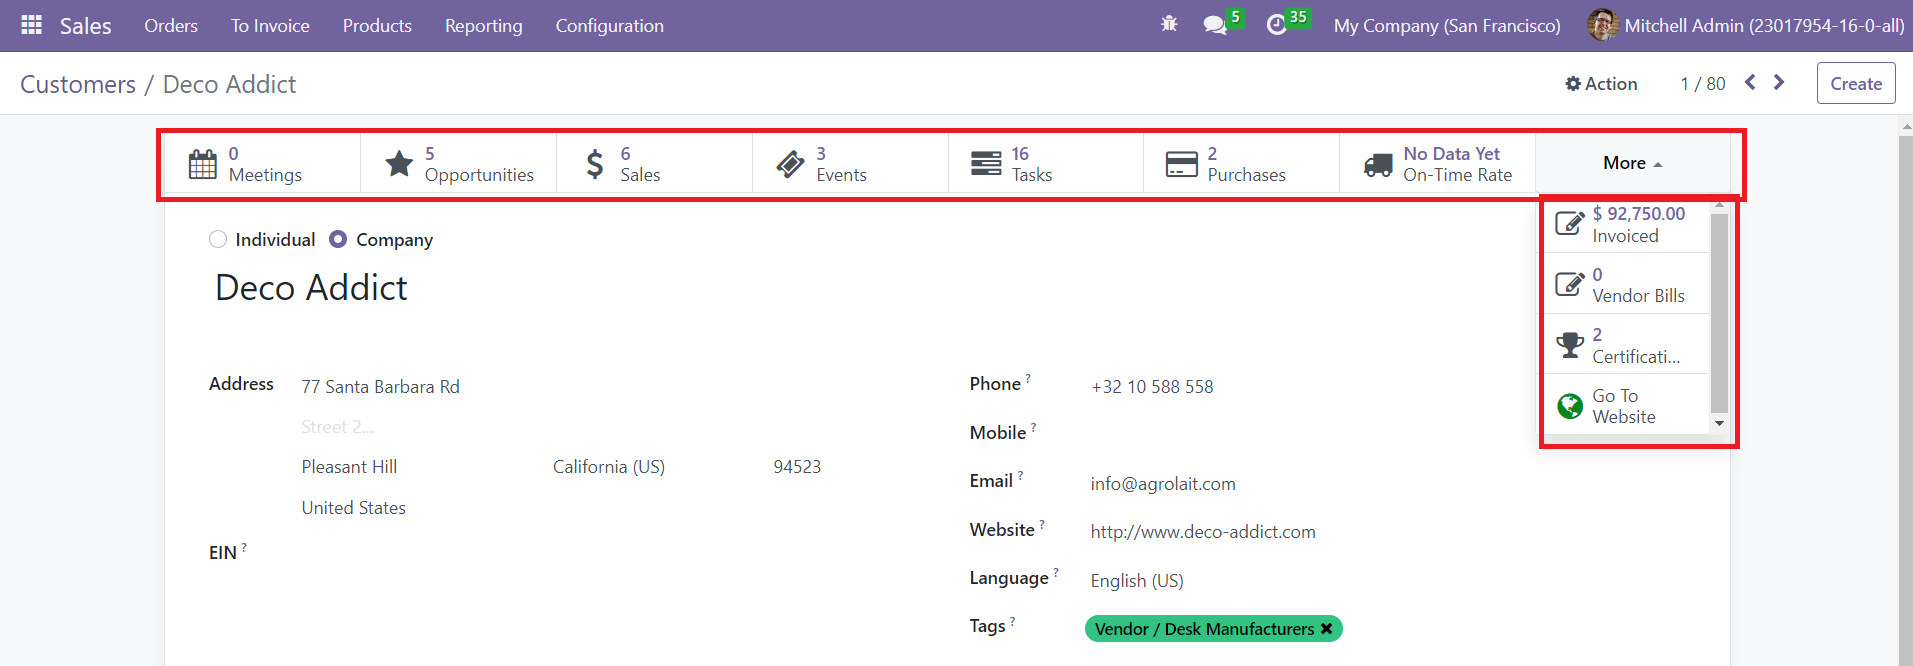
Additionally, you will get some advanced smart buttons to monitor the operations with this contact. It includes buttons for managing Meetings, Opportunities, Sales, Events, Tasks, Purchases, Delivery, Vendor Bills, Certifications, and Invoices.
Sales Team
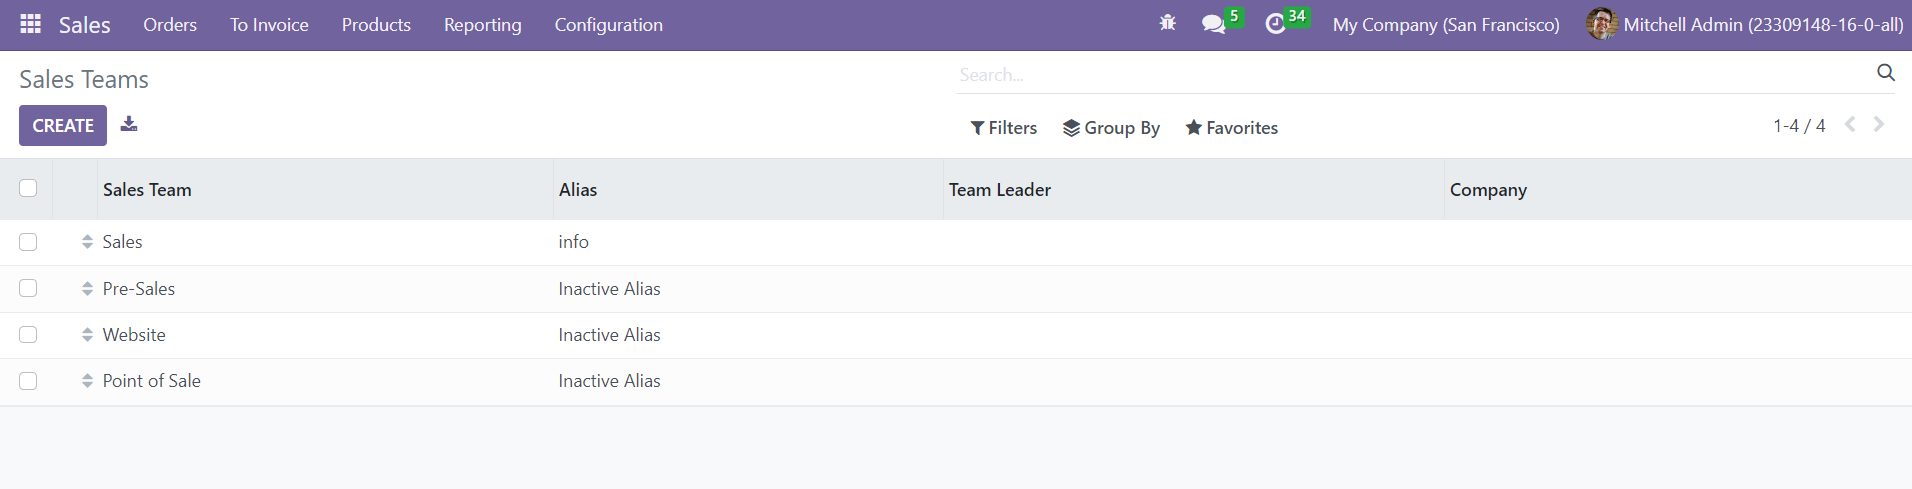
A dedicated team is necessary to manage all sales-related activities within a company. For this purpose, a company can create a group of salespeople to manage and monitor all sales-related activities. When you get a new sales order or quotation, you can assign this sales team to manage all operations. In the Odoo Sales module, you can create such sales teams as per your company's requirements. The option to configure the sales team can be seen under the Configuration menu of the module. The platform will show already configured sales teams as shown below.
You can group the sales team based on Team Leader using the Group By option. Now, click the Create button. A new window will appear to create the new sales team.

Provide a name for the sales team in the given space. By activating the Quotation and Pipeline options, the new sales team will get access to manage these operations. Under the Team Details field, you can set a Team Leader for this sales team. Set Email Alias and policy to post messages on the documents using the mail gateway in the respective fields. The name of the Company will be available in the form view. You can set a monthly revenue in the Invoicing Target field. Now, you can add Members to this sales team using the Add button available under the Members tab.
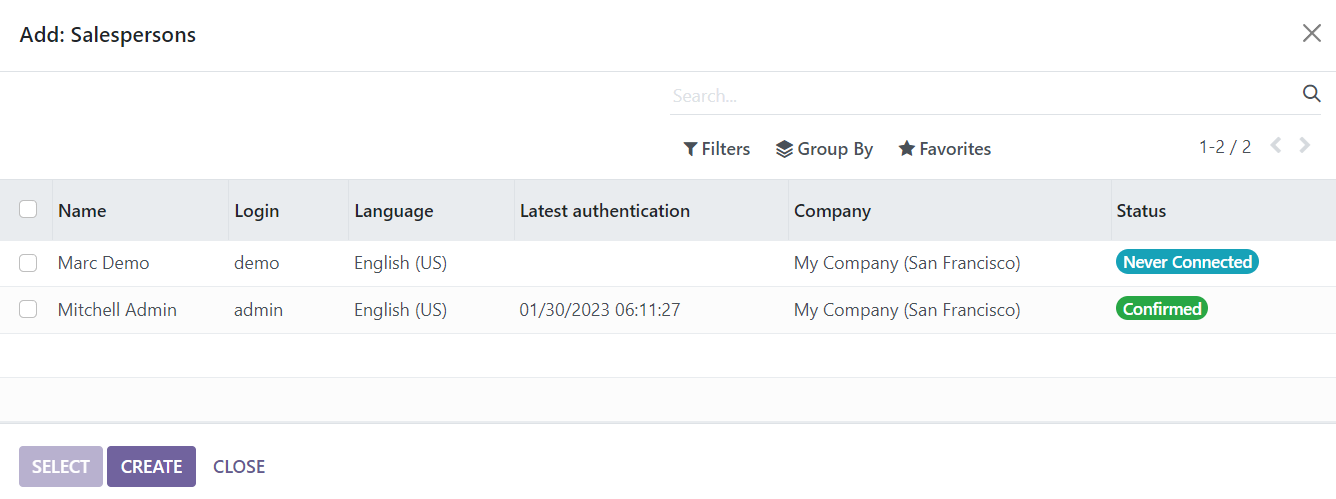
You will get a pop-up to select members for the team. The list will show the Name, Login, Language, Latest Authentication, Company, and Status. After selecting suitable members for the team, the sales team is ready for operations.
Under the Orders menu, you will get a Kanban view of the all configured sales team as shown below. This dedicated platform will provide an organized view of the sales details of each team.
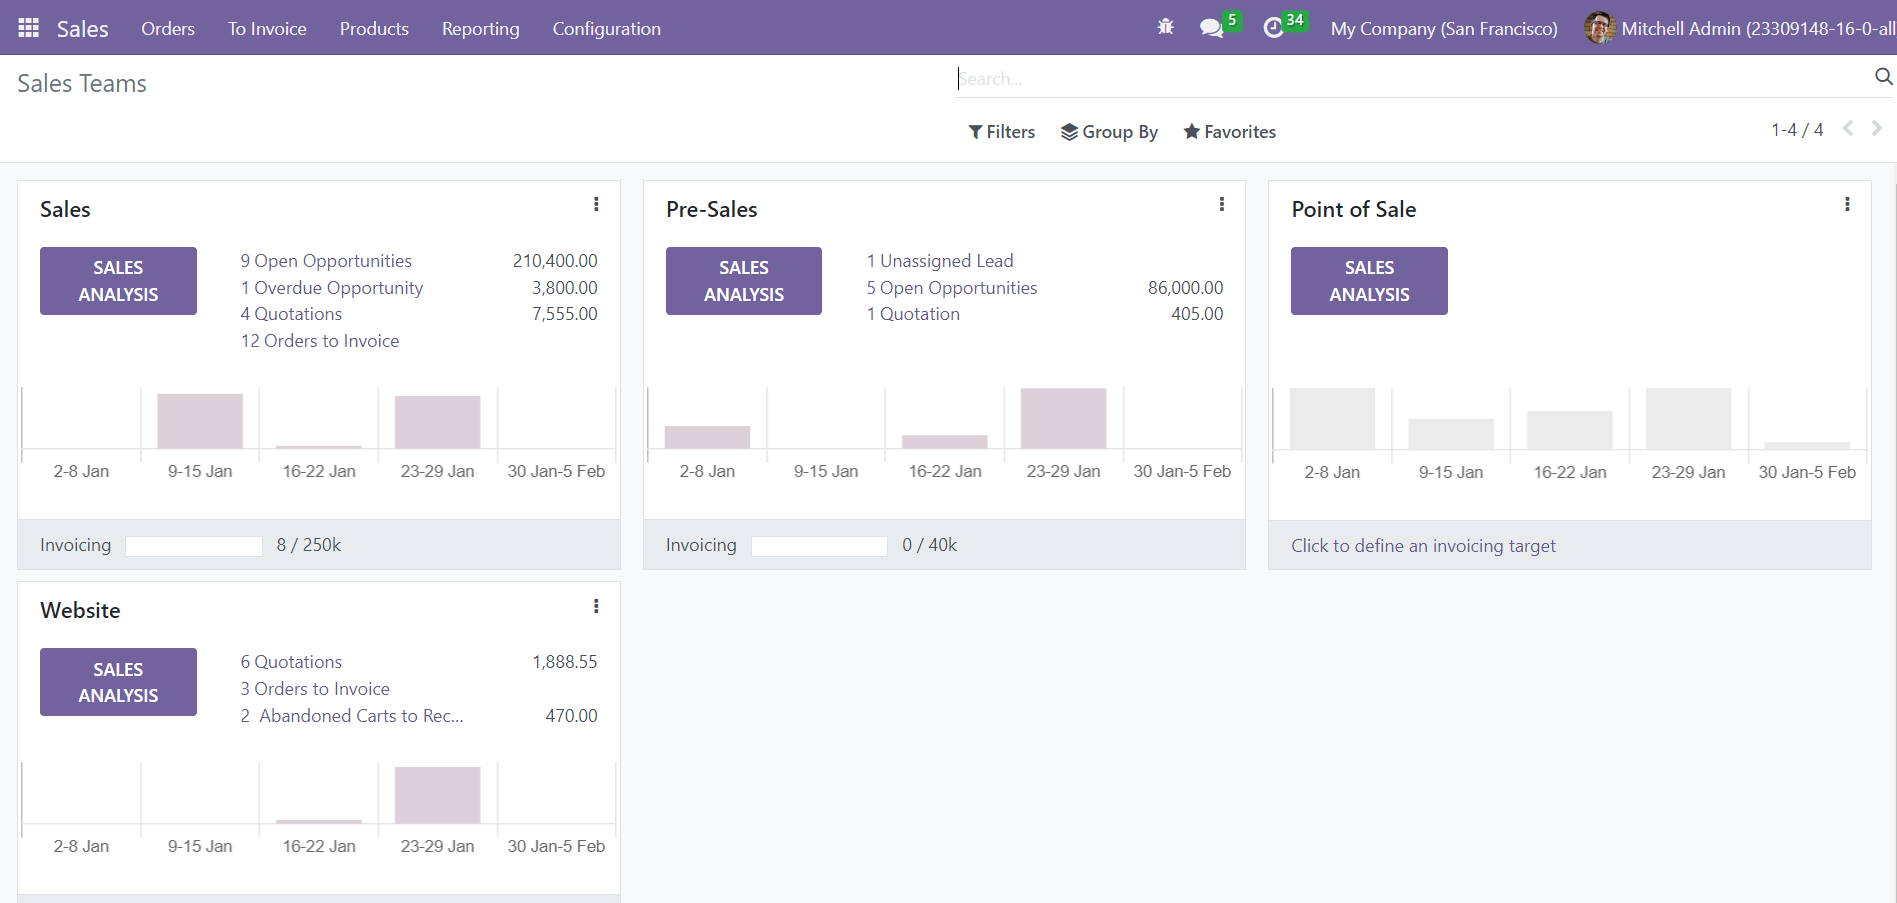
On each sales team tab, you can observe the details of open opportunities, overdue quotations, quotations, orders to invoice, and unassigned leads. Using the Sales Analysis button, you can perform the sales analysis of the respective sales team. It will also show the invoicing target of each sales team. For getting extra tools for the operations, you can use the three small vertical dots available on the top right corner of each sales team as shown in the screenshot below.
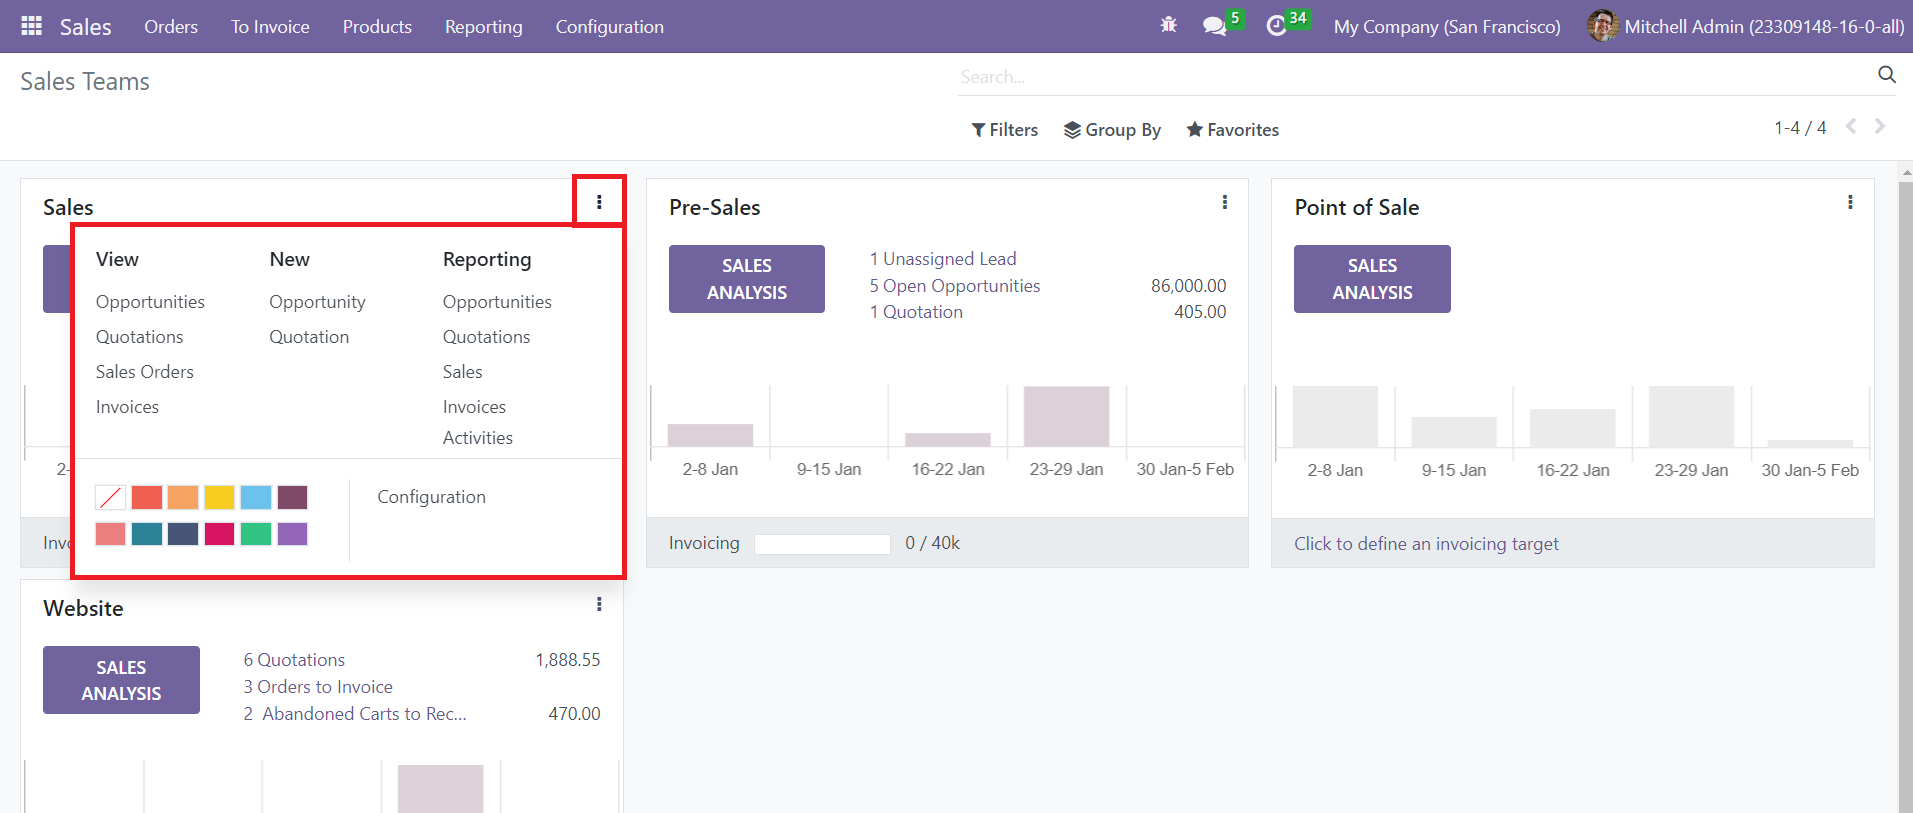
Here, you can use the button to view Opportunities, Quotations, Sales Orders, and Invoices. This also includes options to create new opportunities and Quotations under the respective sales team. The Reporting options available here are Opportunities, Quotations, Sales, Invoices, and Activities. Once you complete the configuration of a sales team, you can use them while creating a new quotation or sales order.
Quotation
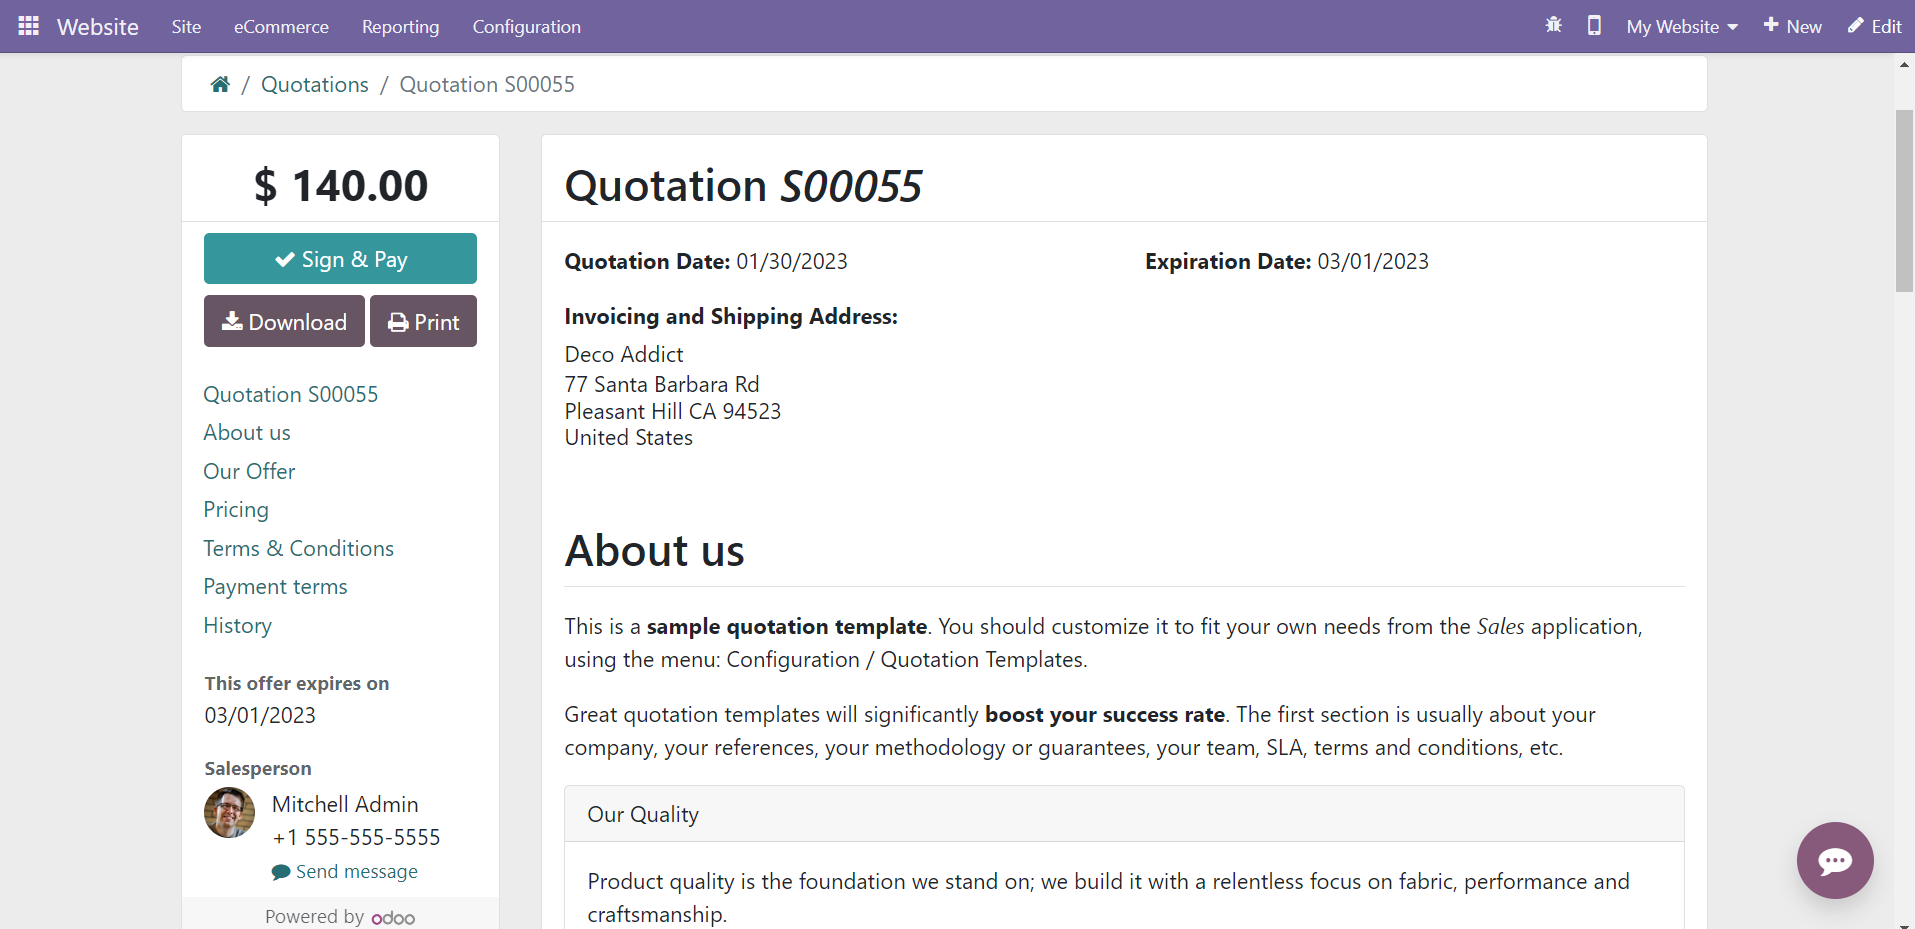
Creating quotations is the first step in building a sales relationship with a customer. When a customer approaches you for sales related services, you can create a quotation for the customer which includes all necessary information related to the customer’s demand. It includes the details of customer, delivery address, payment terms, price list, product information and many more. You can send this quotation to your customer and if they find it as convenient, you can convert it to a sales order after getting confirmation from the opposite party. The list view of the Quotations platform in the Odoo Sales module is given below.
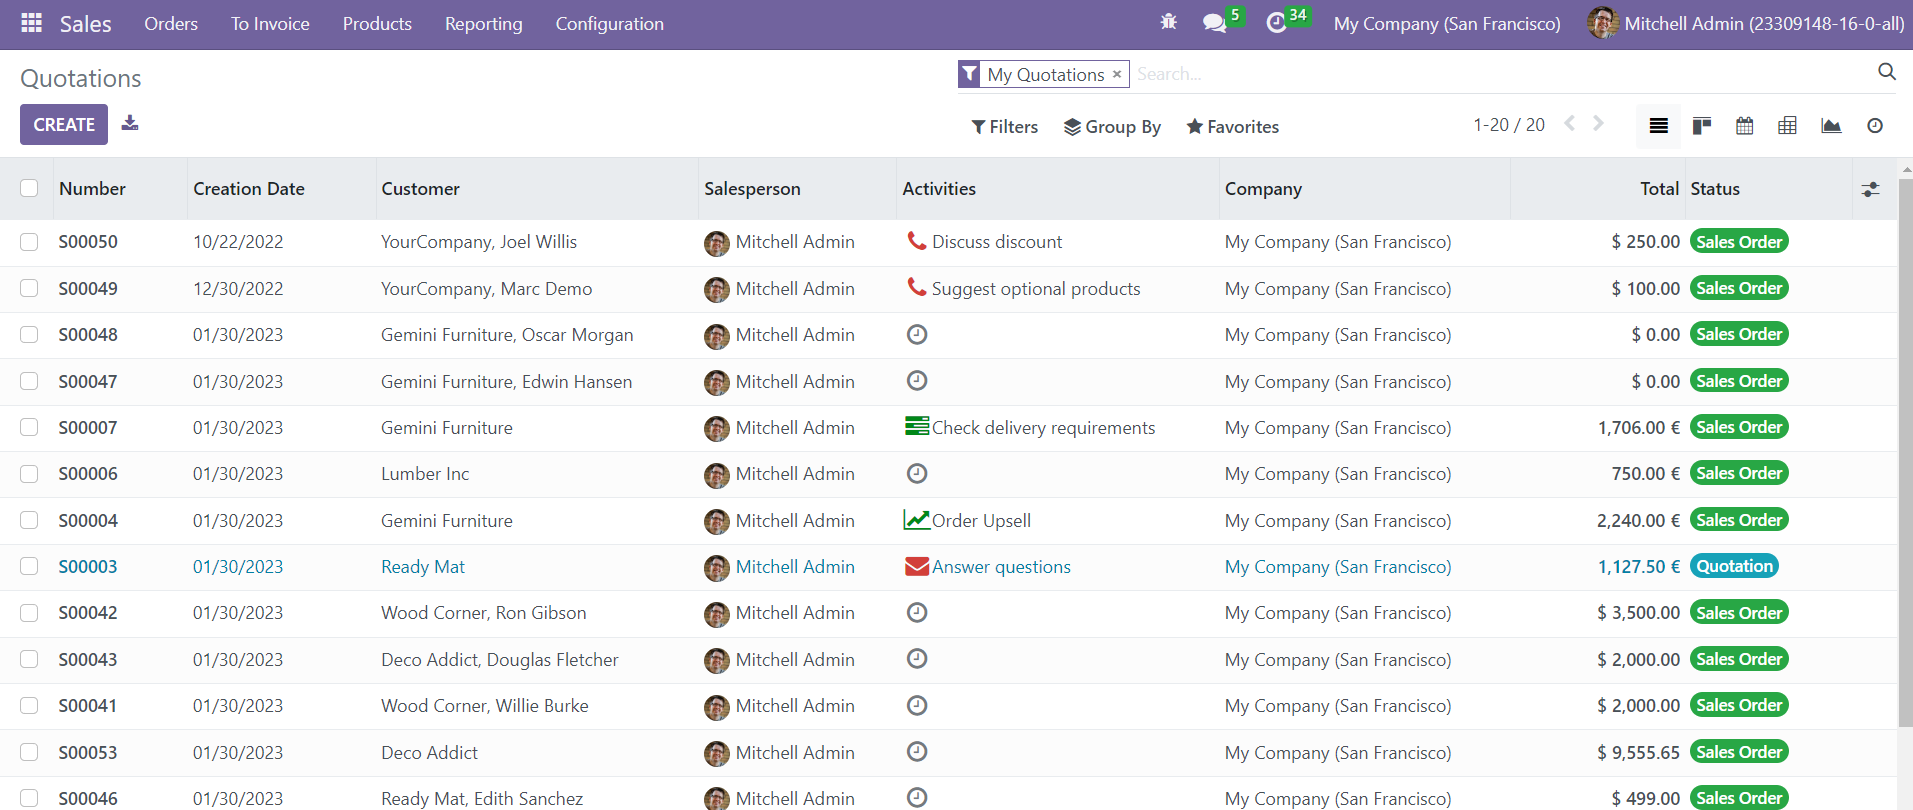
You can observe already created quotations here with the details of Number, Creation Date, Customer, Salesperson, Activities, Company, Total, and Status. Apart from list view, you will get kanban, pivot, calendar, graph, and activity views. The available filters are Quotations, Sales Orders, My Quotations, and Create Date. You can group the quotation based on Salesperson, Customer, and Order Date. Now, click the Create button to create a new quotation for your customer.
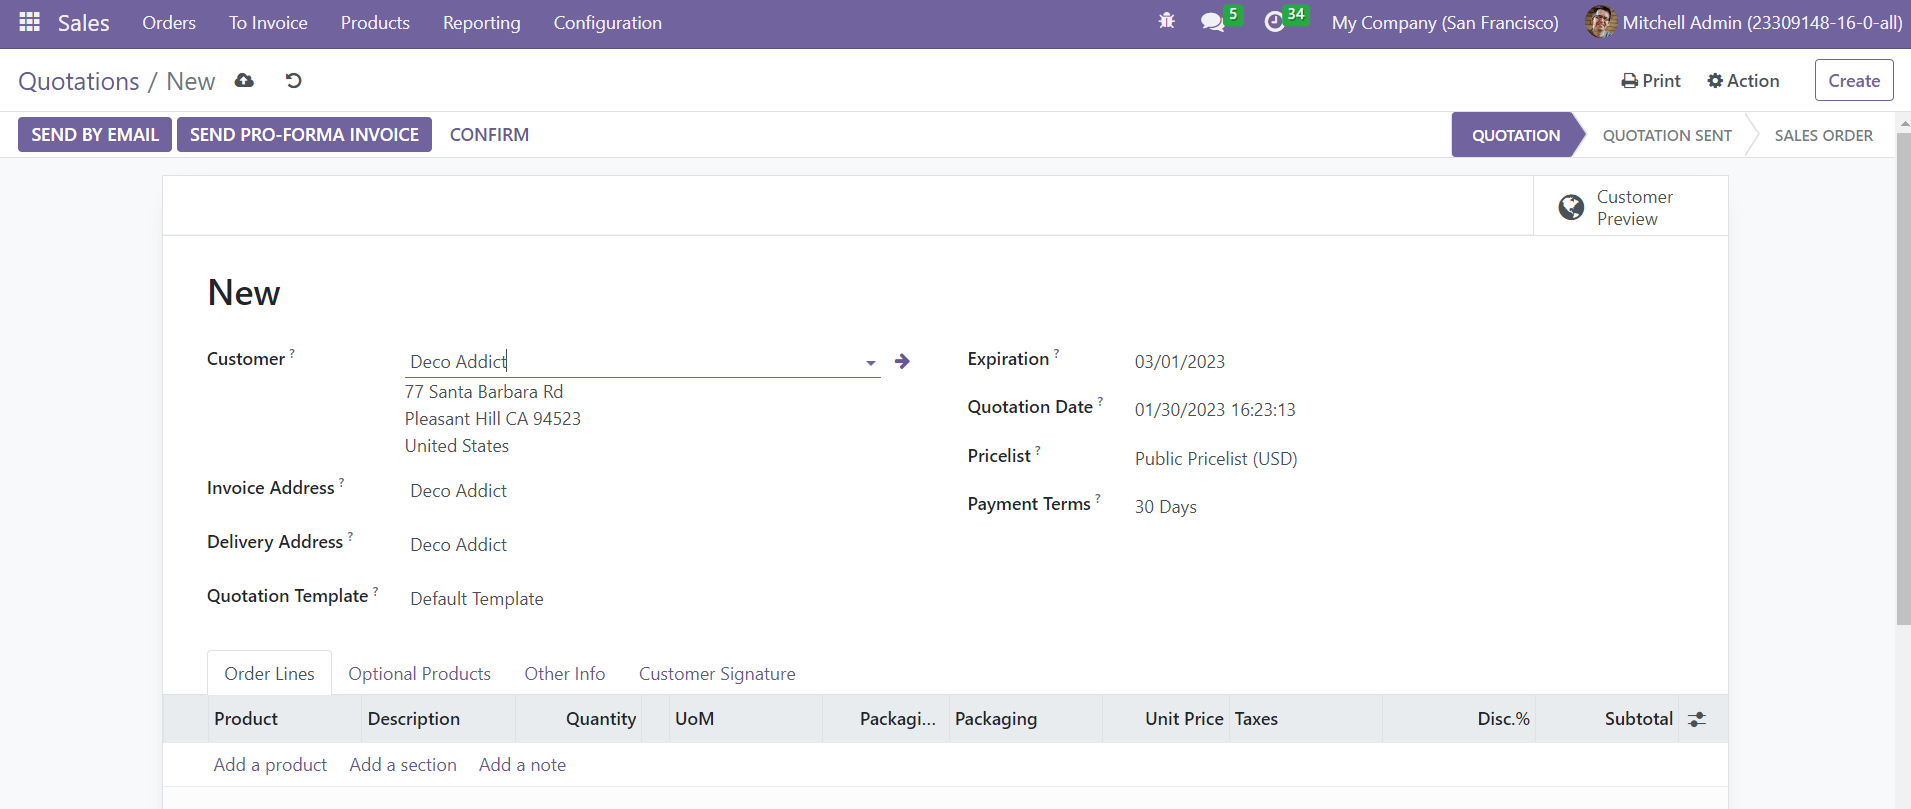
Once you select the Customer name from the list, the Invoice Address, Delivery Address, Pricelist, and Payment Terms will be automatically displayed based on the pre-configured details. Otherwise, you can specify the Invoice address to which you want to invoice the order, and Delivery Address to which you want to send the products in the corresponding fields. In Odoo, you can create sales order templates from the configuration menu. This can be used as templates while creating appropriate quotations. The Expiration will show the expiration date of the quotation. The pricelist used for this quotation can be added under the given field. Define the Payment Terms for the customer in the respective field.
You can set default quotation validity from the Settings menu of the Sales module. By doing so, the Expiration field will be auto populated according to the default quotation validity whenever you create a new quotation.
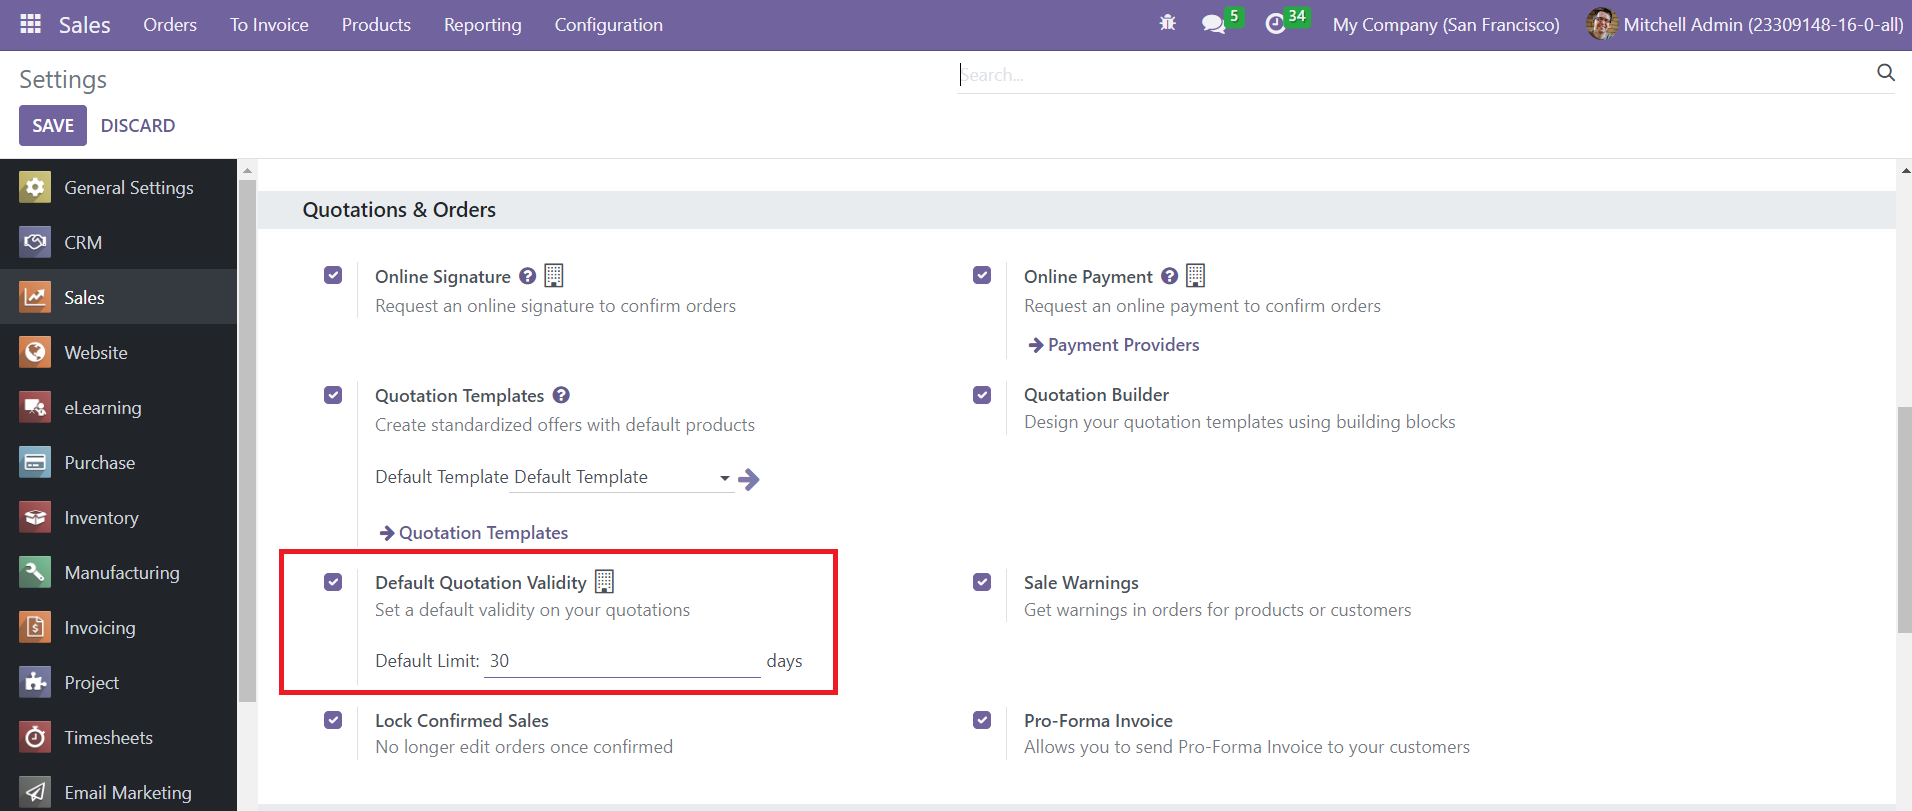
You can set the Default Limit in the given space. Based on this limit, you will get the expiration Date on your new quotation.
Now, go back to the quotation creation window. You can add the products based on the requirements of the customer under the Order Line. Use the Add a Line button to mention products one by one.
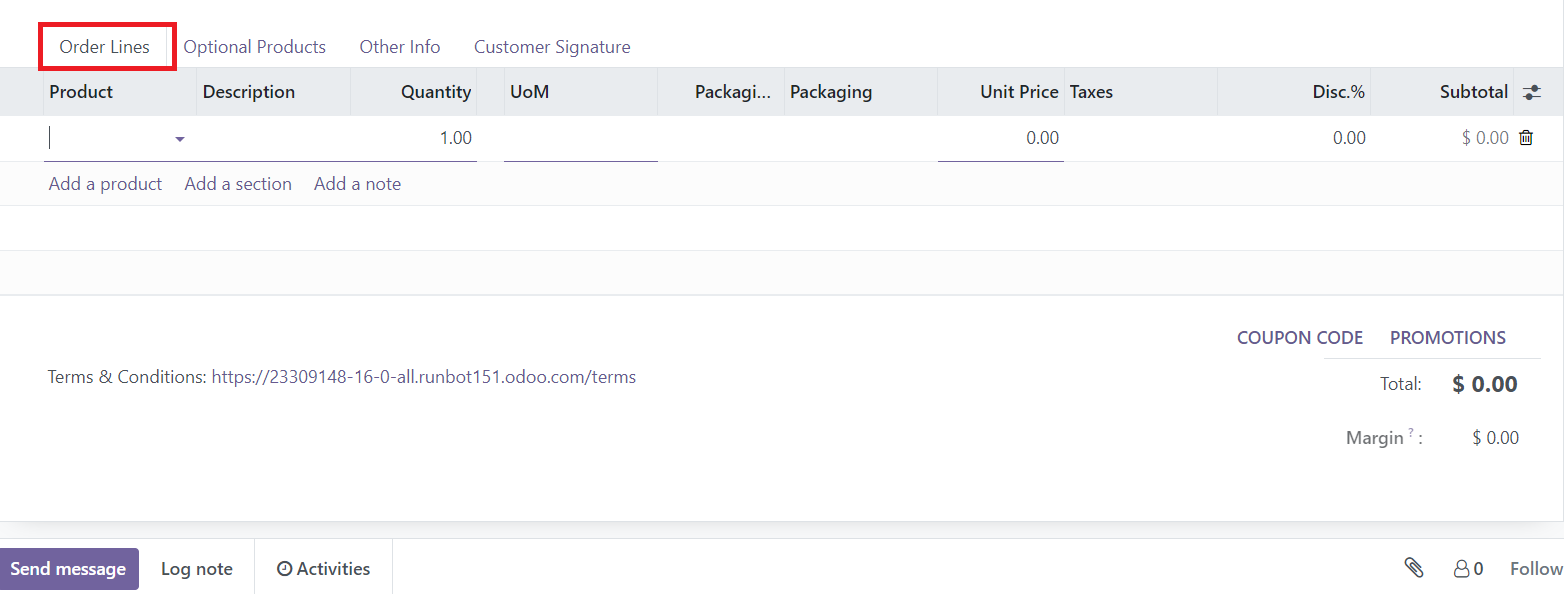
The details include the Product, Description, Quantity, UoM, Packaging, Unit Price, Taxes, Discount, and Subtotal. Once you add all required products, you will get the Total price under this tab. Here, you will get additional options to add Coupon Code and Promotions to get discounts on your products. Along with this, you can specify the Terms & Conditions of the quotation in the corresponding field.

If there is any Optional Product offered to the customer, you can add them under the Optional Products tab using the Add a Line button.
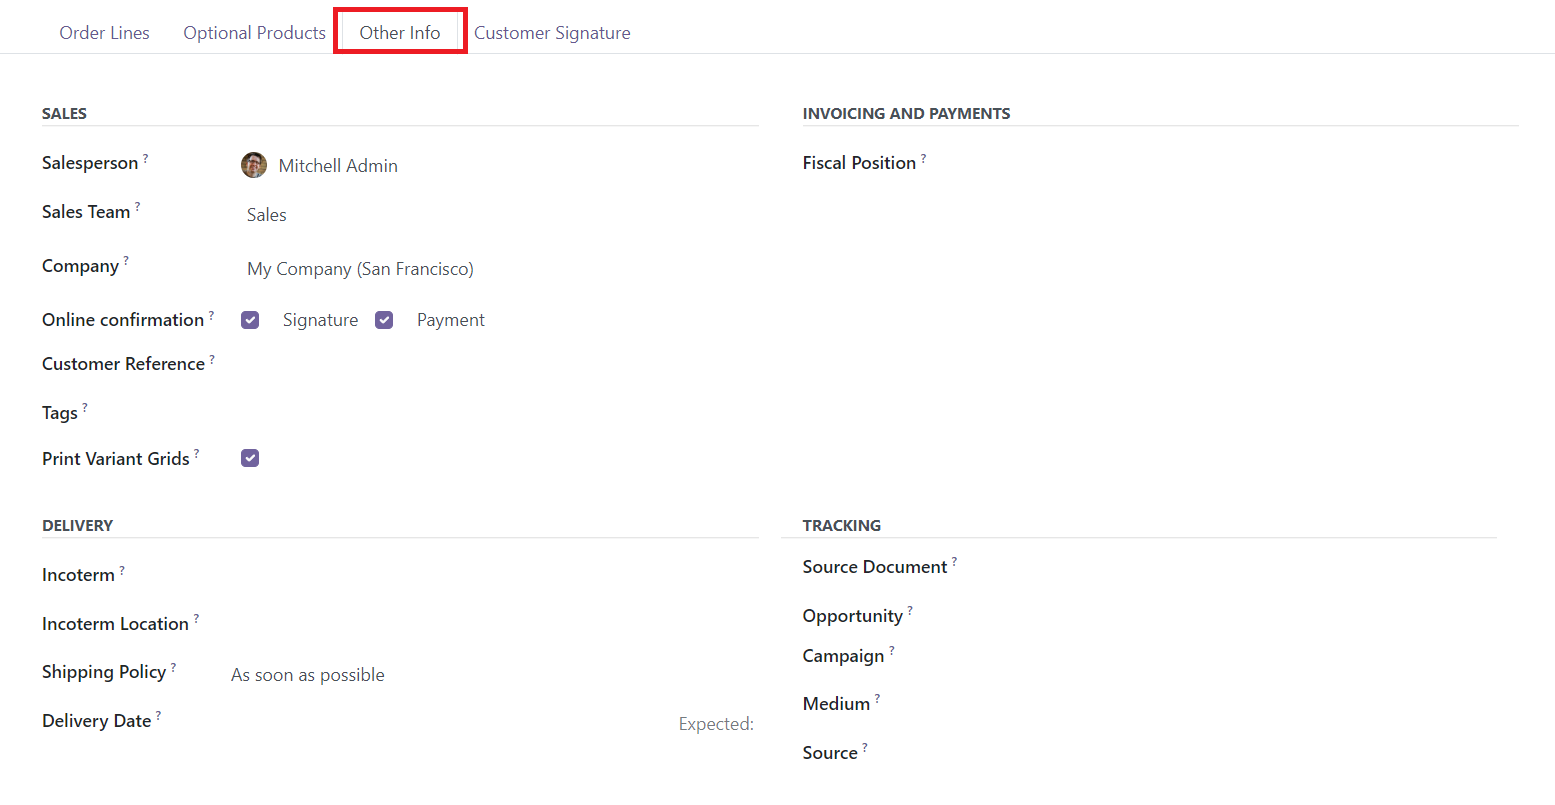
Under the Other Information tab, you can assign a Salesperson and Sales Team for managing this quotation. The Company name will be available in the corresponding field. If you want to ensure Online Confirmation, you can activate the Signature and Payment options which will allow the customer to pay online and confirm the order by adding online signature. Use the Tags field to add suitable tags and activate Print Variant Grids to get several variants to an order from a grid. As Invoicing and Payment details, you can mention the Fiscal Position which will be used to adapt taxes and accounts for particular customers. Specify the Incoterm, Incoterm Location, Shipping Policy, and Delivery Date as Delivery details. For Tracking operations, you can provide Source Document, Opportunity, Campaign, Medium, and Source.
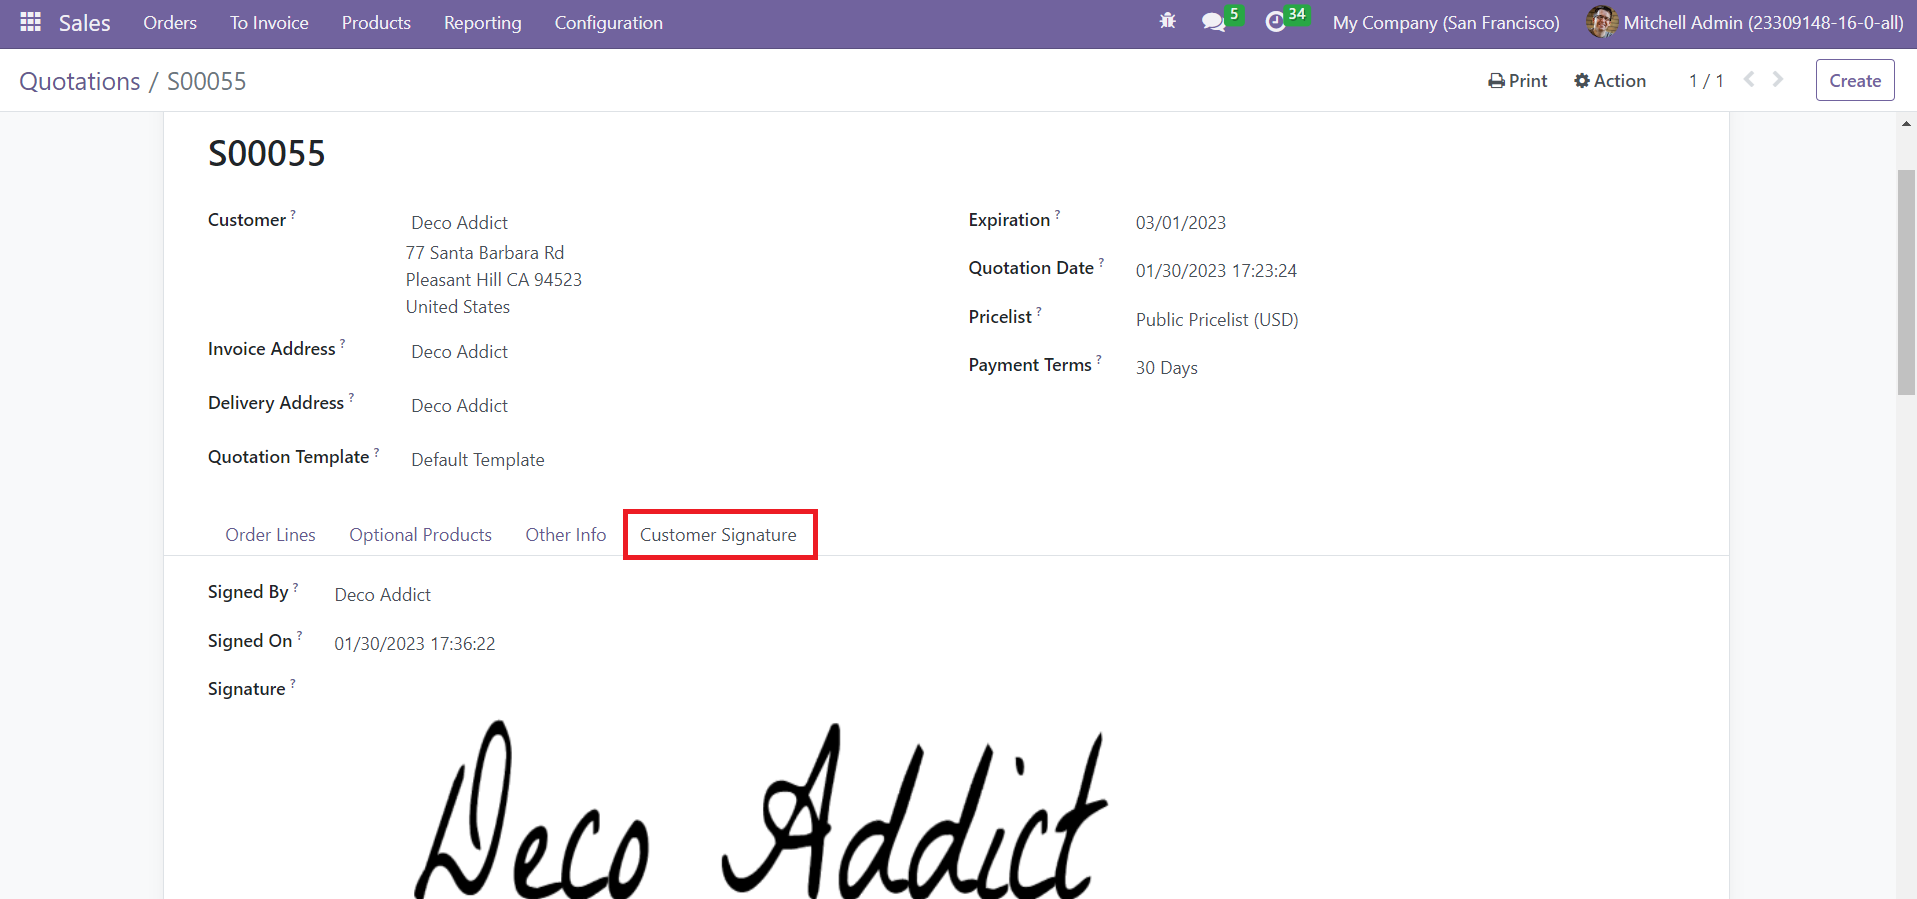
Once the customer confirms and signs the quotation, it will appear under the Customer Signature tab.
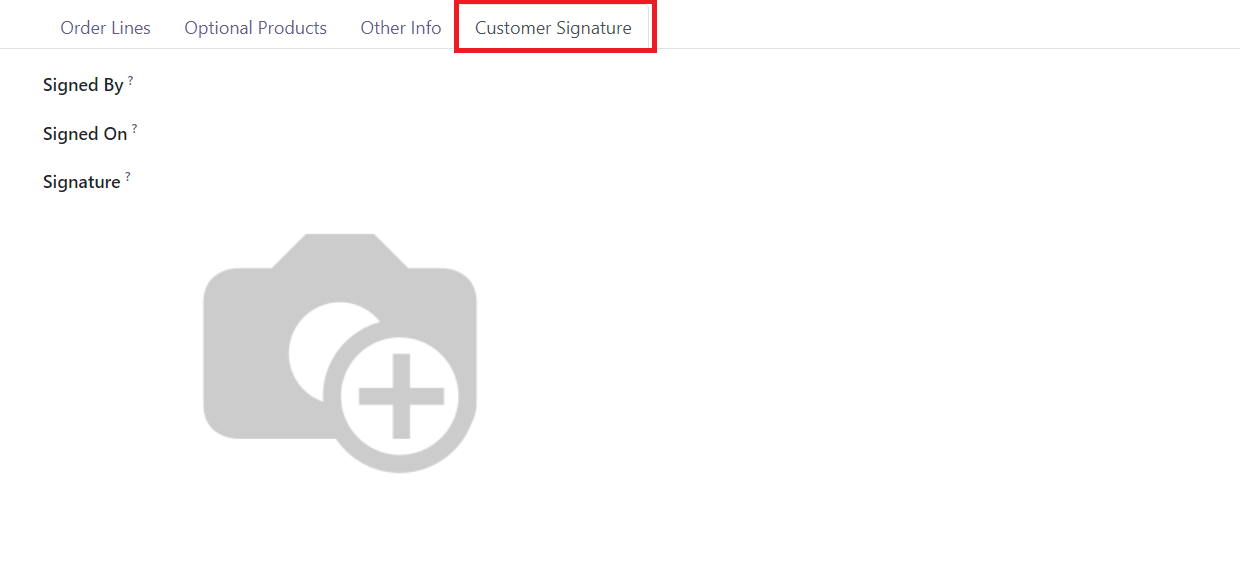
You will get Signed By, Signed On, and Signature under this tab.
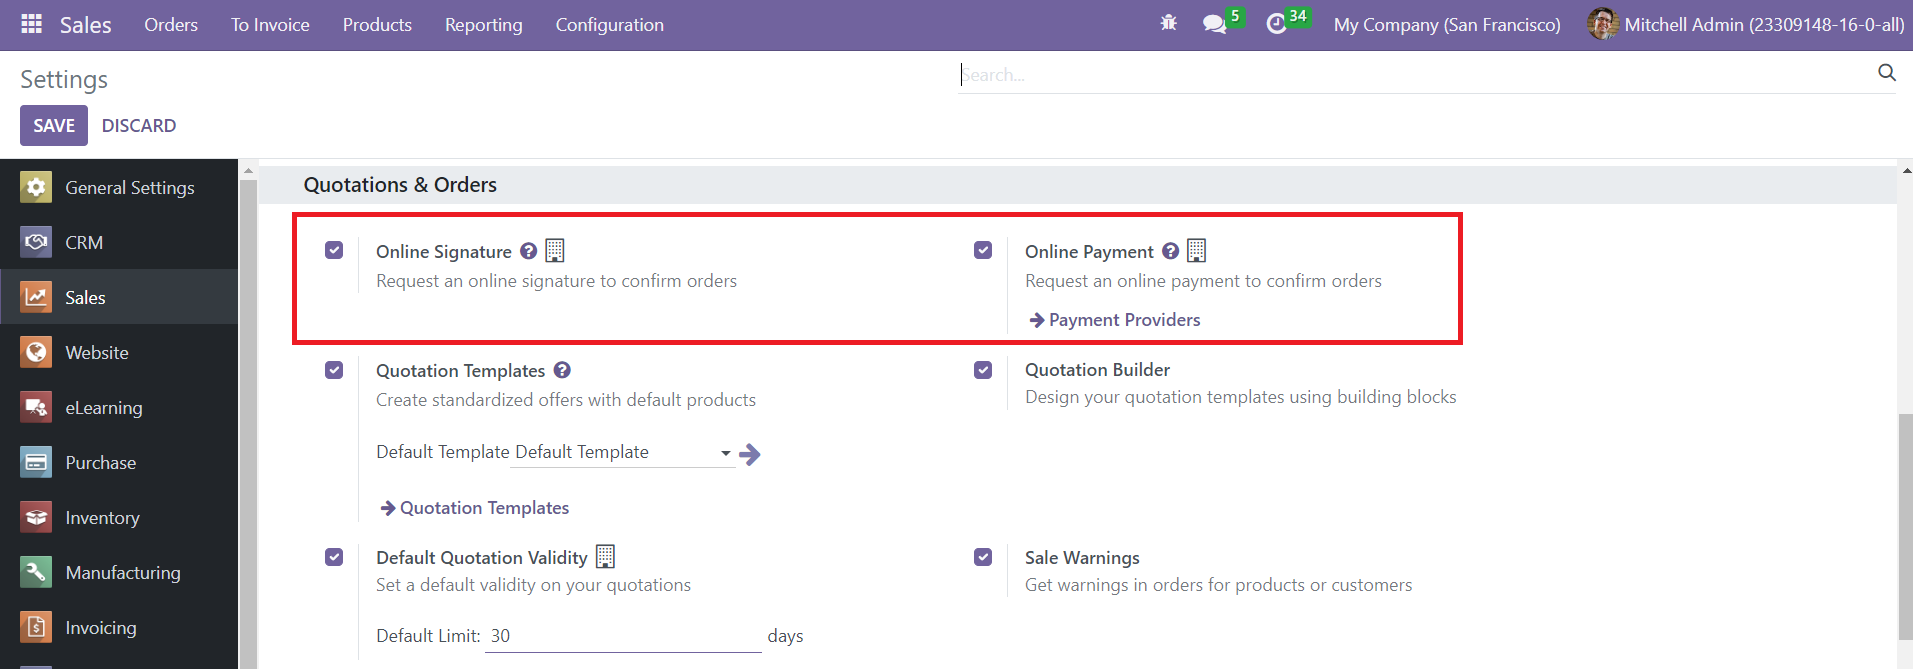
To get the Online Signature and Online Payment feature on quotations, you can activate the corresponding options from the Settings menu of the module. By activating these options, you can request an online signature and payment to confirm the orders.
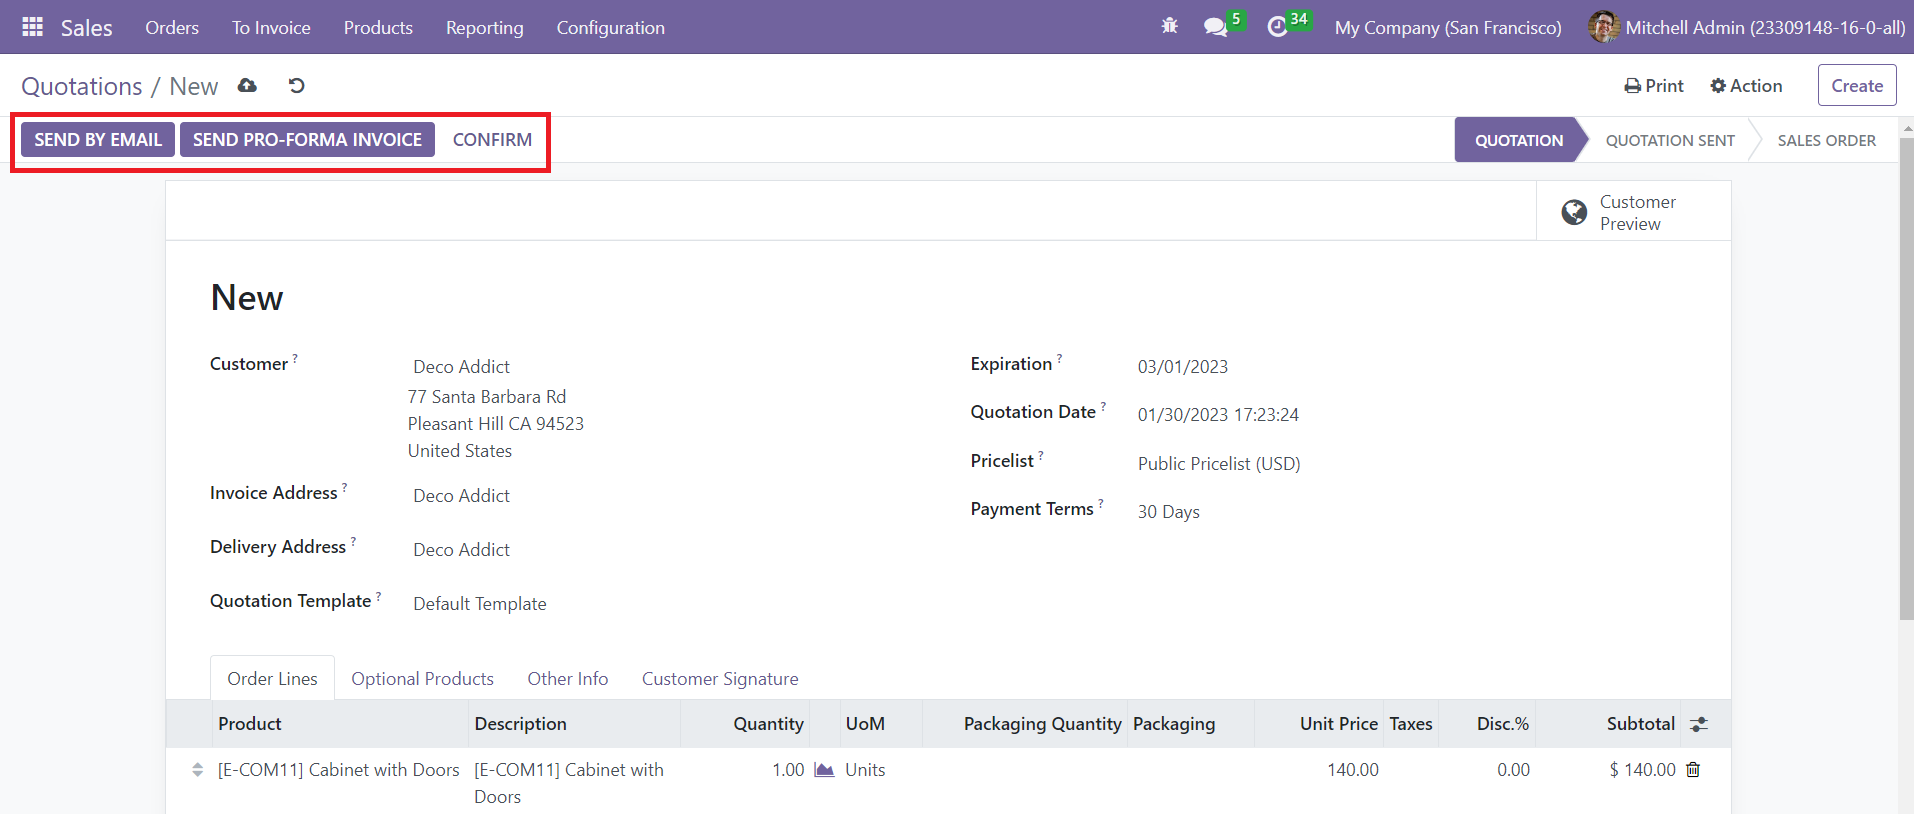
After creating a quotation, you can send this to the concerned customer using the Send By Email button. When you click this button, you will get an automatic email with the details of the quotation.
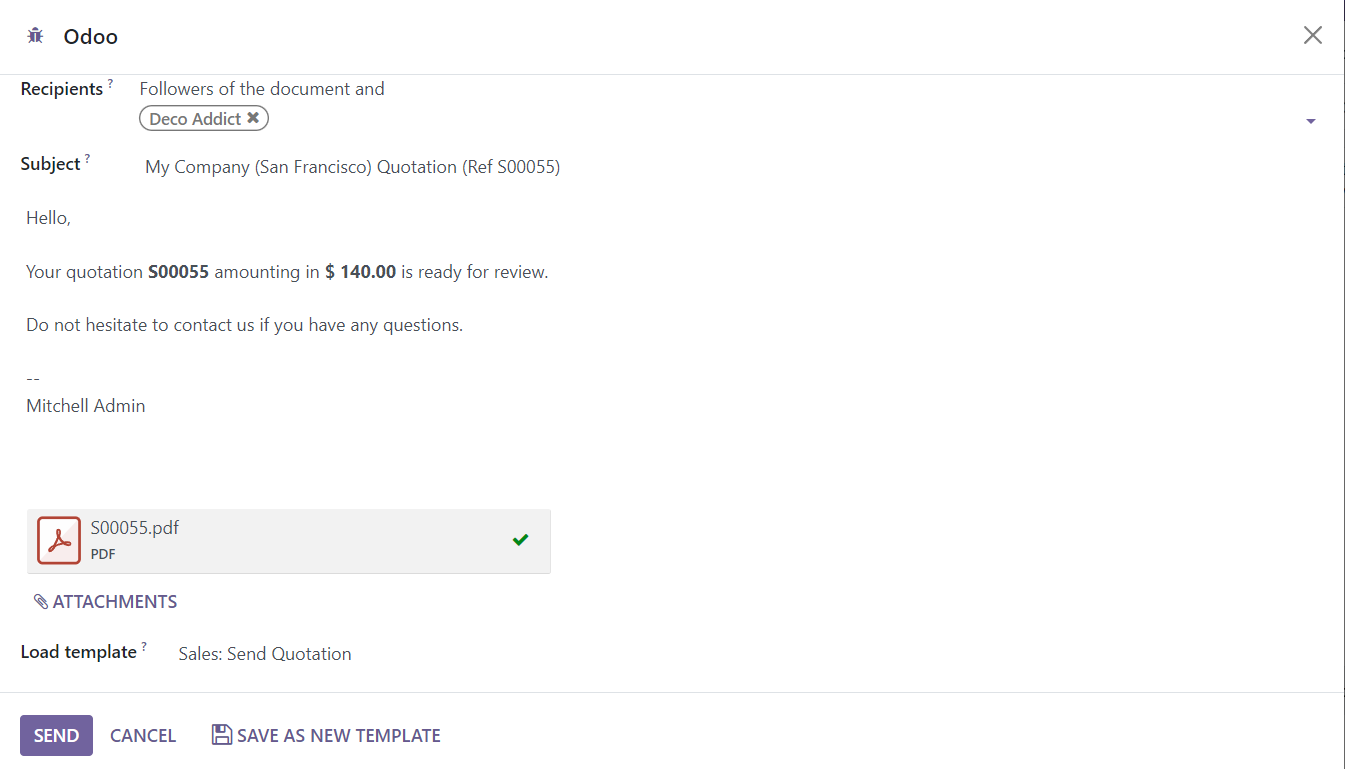
After checking the Recipients and Subject you can click the Send button. The question will be included in the mail as an attachment. Once you send the quotation, the status will be changed to Quotation Sent.
The Customer Preview will provide the preview of the customer portal where the customer can observe the quotation details and confirm it by completing the signature and payment.
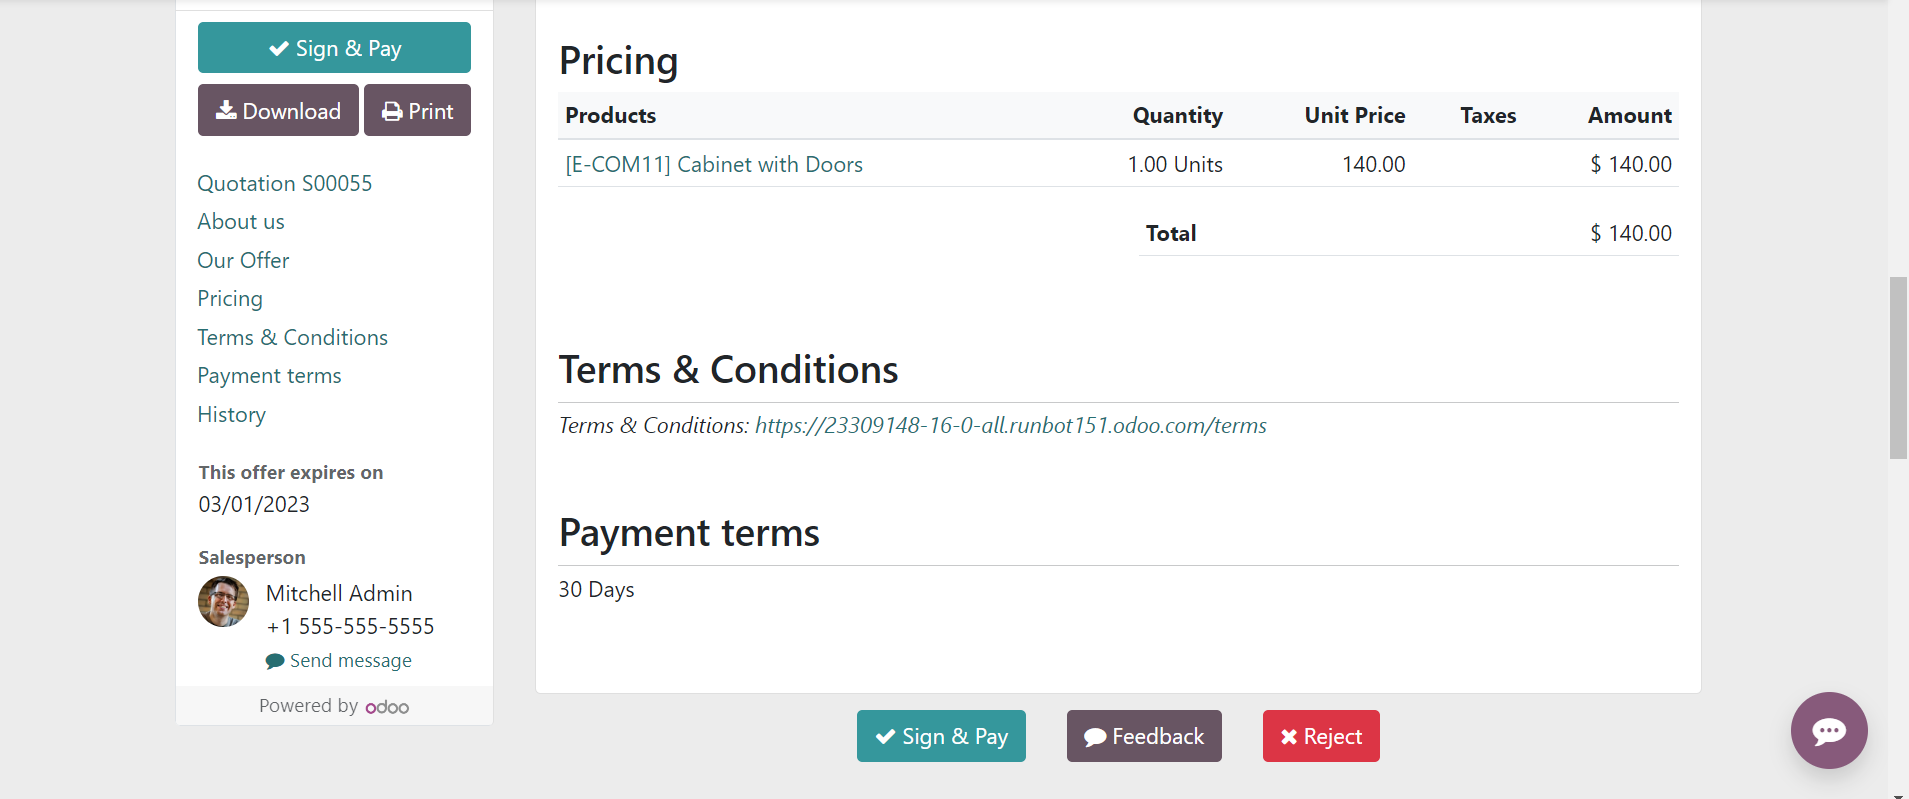
If the customer is not satisfied with the quotation, they can use the Reject button. In order to confirm the quotation, the Sign & Pay button can be used. When the customer confirms the Quotation, it will be coveted into sales order.
Sales Order
The quotation will be converted to a sales order when the customer confirms it. From the customer portal available on the website, they can Sign & Pay the quotation.

When you click on the Sign & Pay button, you will get a pop up as shown below.
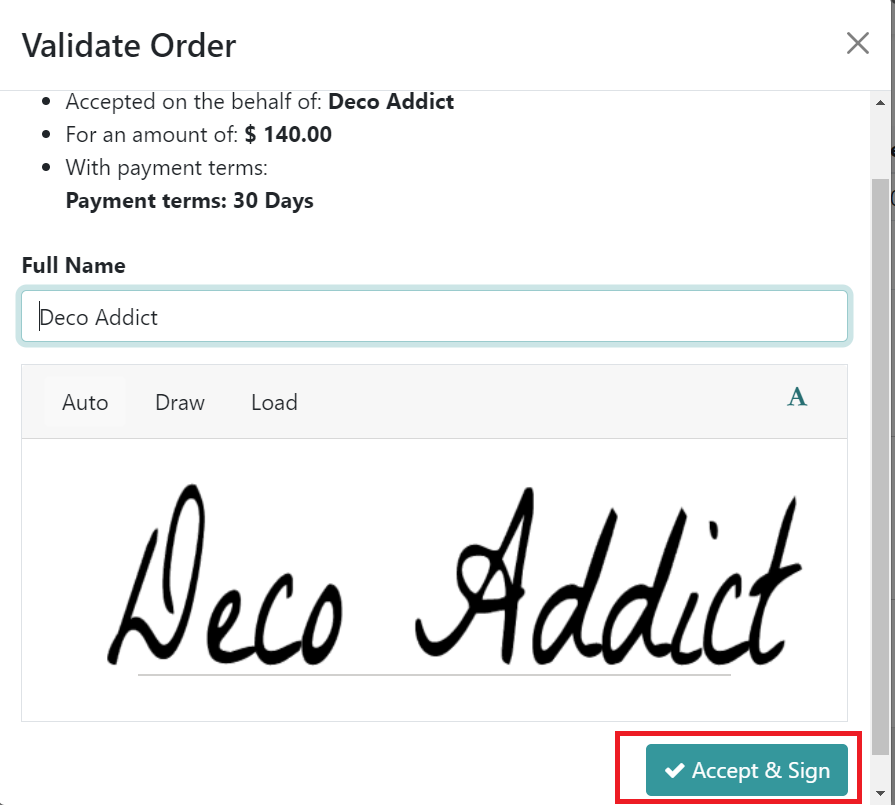
Here, the customer can add a signature. After adding a signature, the customer will get the payment window.
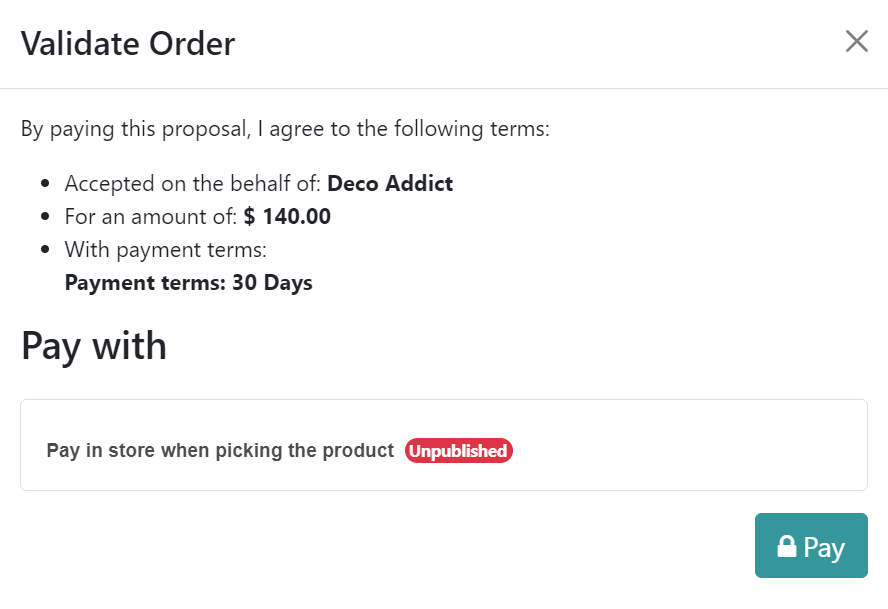
Based on the payment policies, the customer can pay the order. When you check the quotation in the backend, you will get the customer signature under the respective tab.
You can click on the Confirm button and convert the quotation to a sales order.
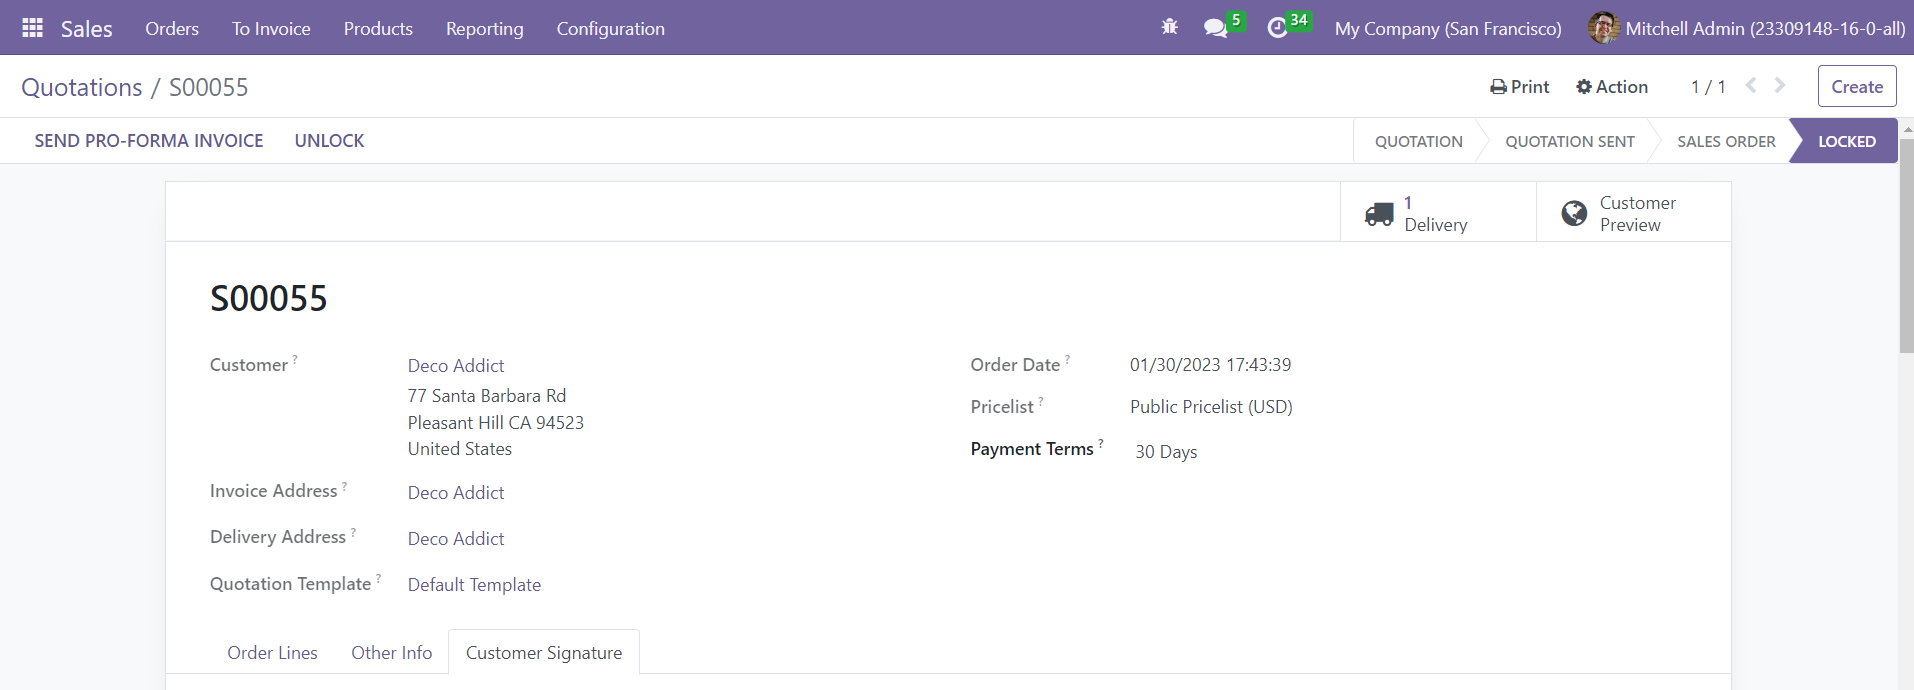
Here, you can find that the sales order is locked. You can Unlock the order by using the respective button available on the window. This locking feature prevents the sales order from any editing after confirming it.
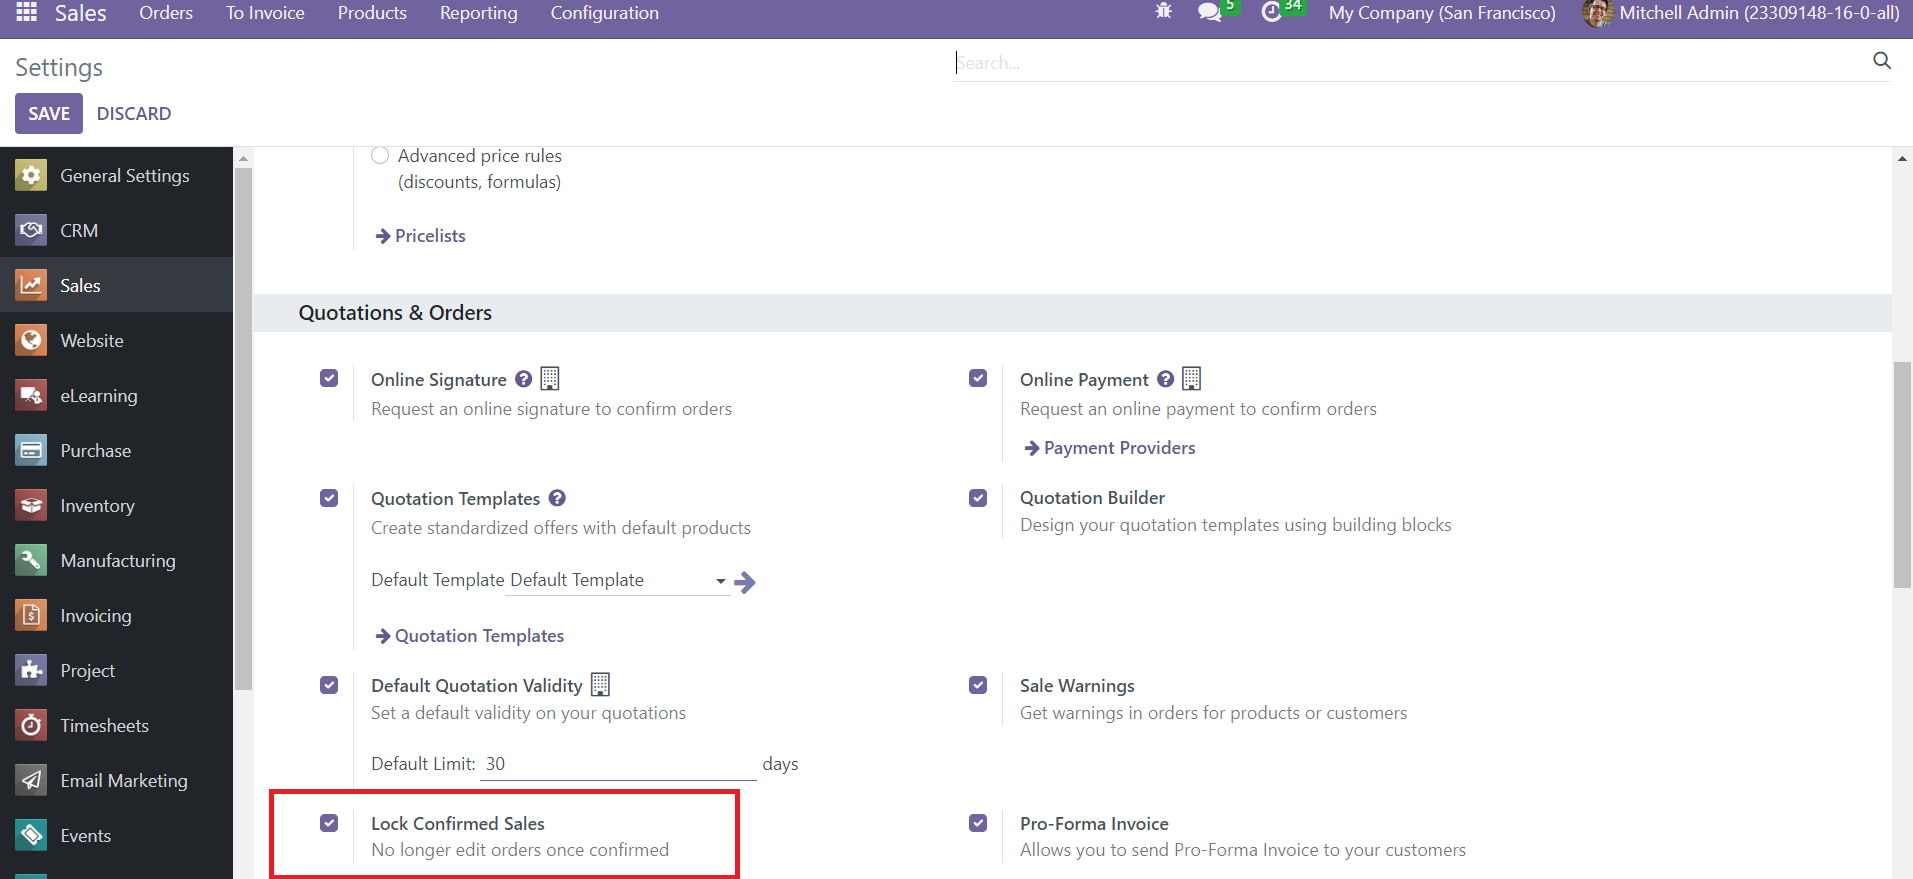
You can activate this feature from the Settings menu of the module as shown above.
You will get the list of all sales orders in your Sales module from the Orders menu.
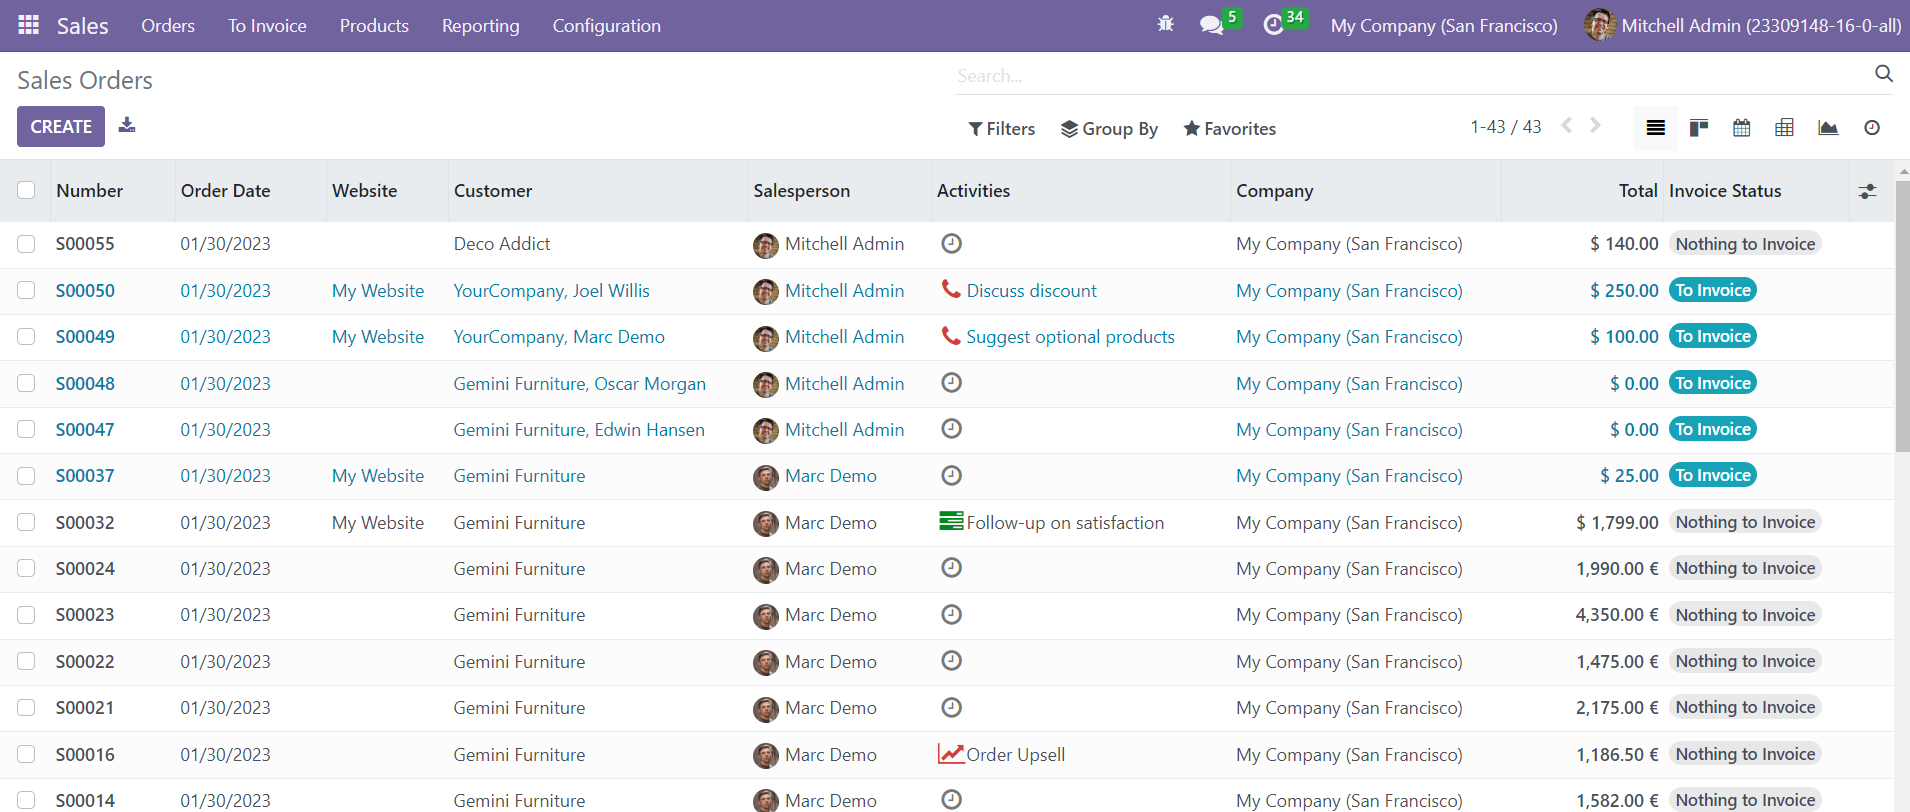
It includes the Number, Order Date, Website, Customer, Salesperson, Activities, Company, Total, Invoice, and Status. Just like the Quotation window, you will get the Kanban, Pivot, Graph, Calendar, and Activities views of the sales orders in this platform.
Invoices
Once you confirm the Sales Order, the next step is generating invoices for the orders. The button for generating invoice will appear on the screen as soon as you confirm the sales order.
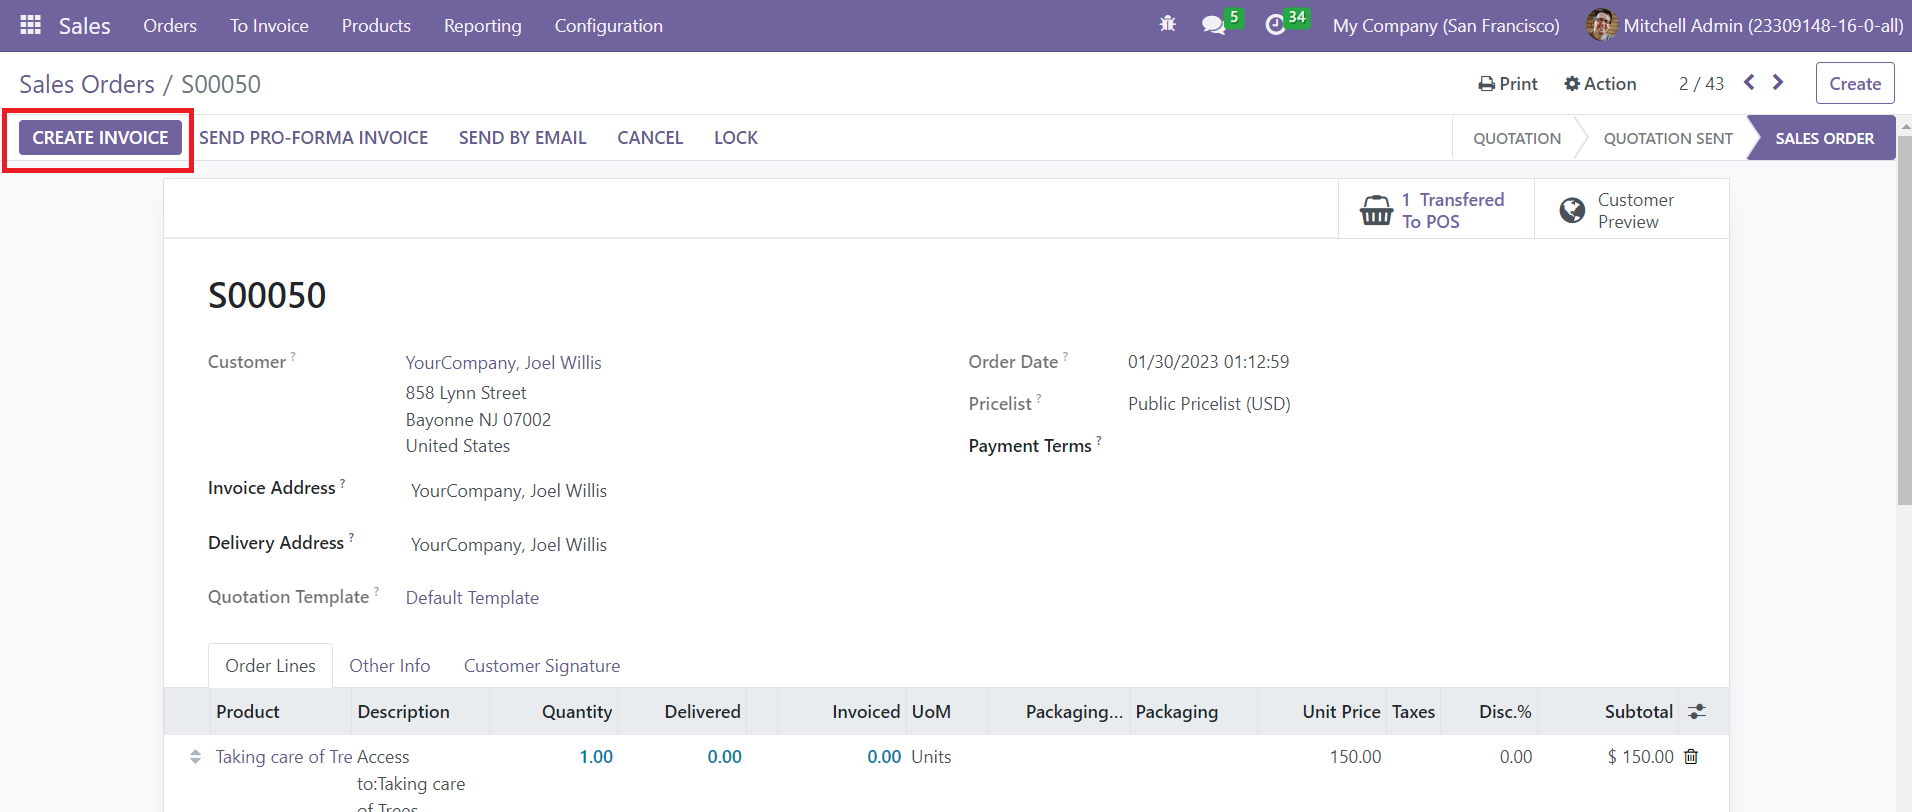
Clicking on the Create Invoice button will give a pop-up window.
Here, you can select the type of invoice. It can be either Regular Invoice, Down Payment (percentage), and Down Payment (fixed amount). Once you select the suitable payment type, click the Create and View Invoice button.
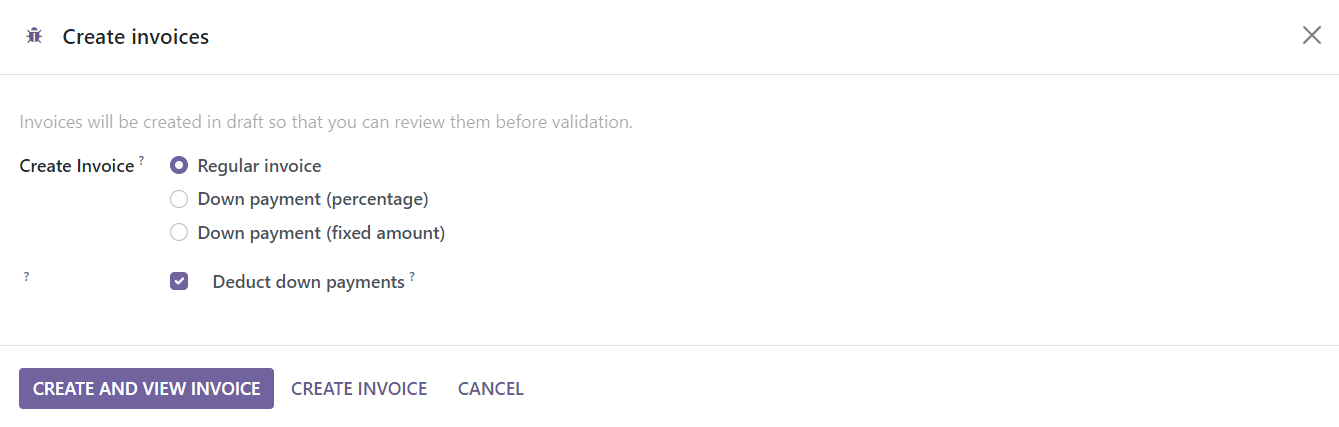
This will give a draft form of the invoice which can be confirmed using the Confirm button.
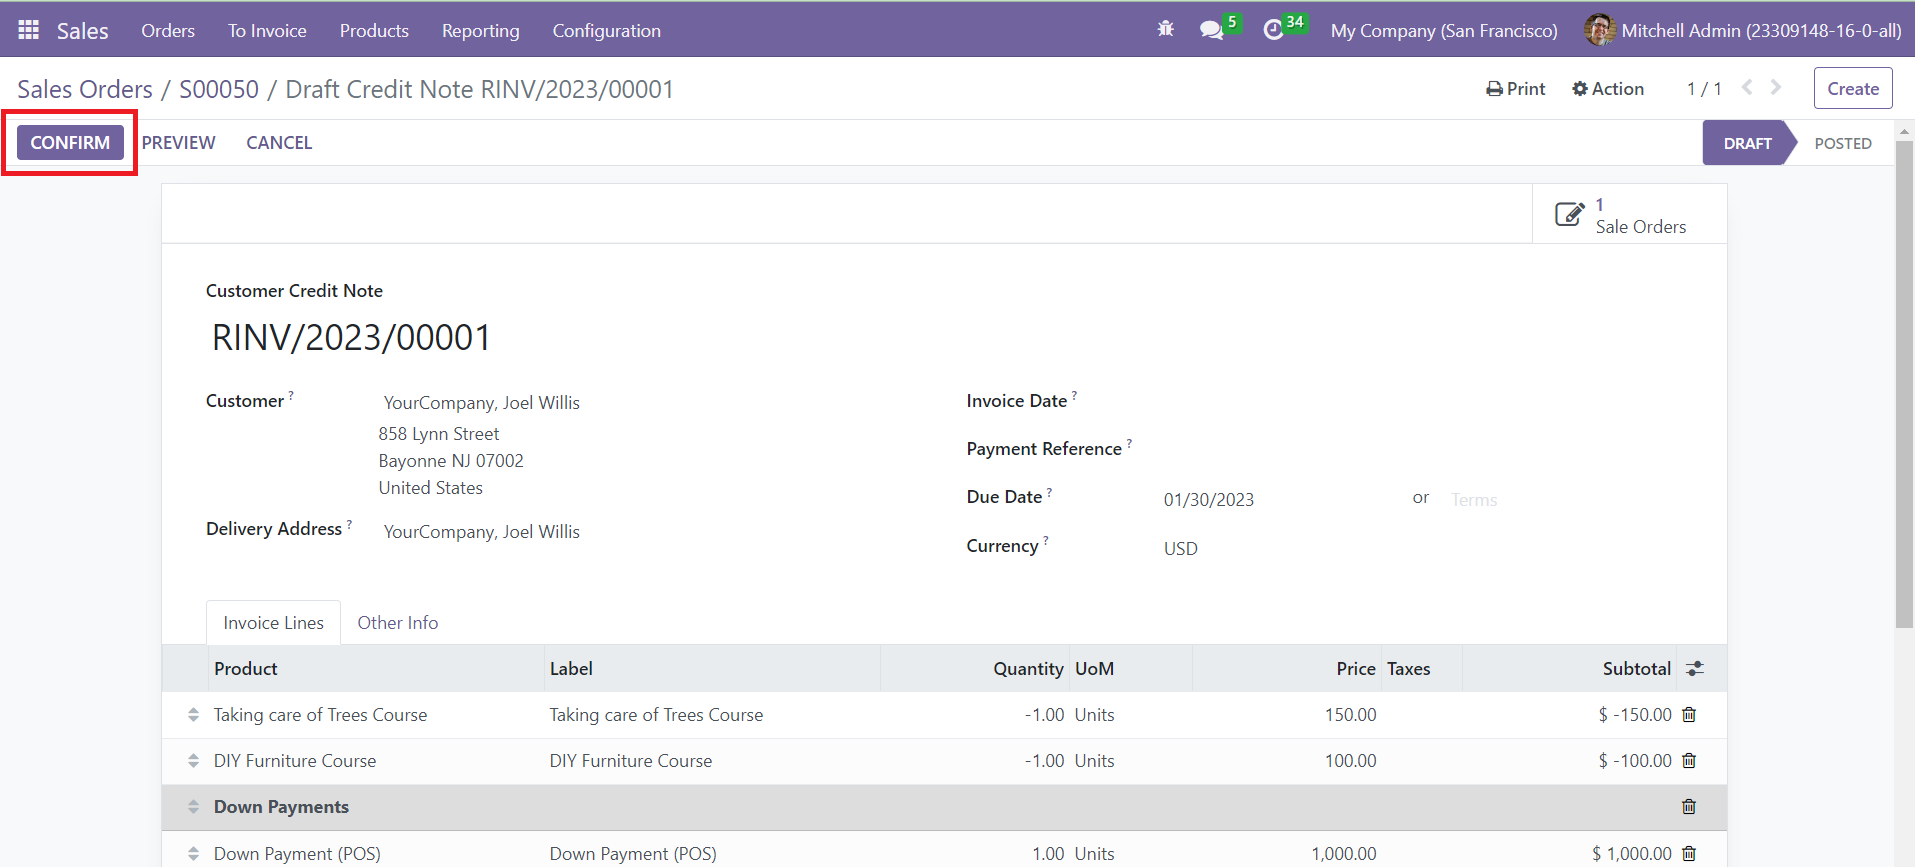
After confirming the invoice, you will get the option to Register the Payment.
Quotation Template
Creating a predefined format for sales quotations will be helpful for managing orders of the same pattern. While creating new quotations, you can use these predefined templates to simplify the operations. In order to get this feature in the Odoo Sales module, you can go to the Settings menu and activate the Quotation Template feature.
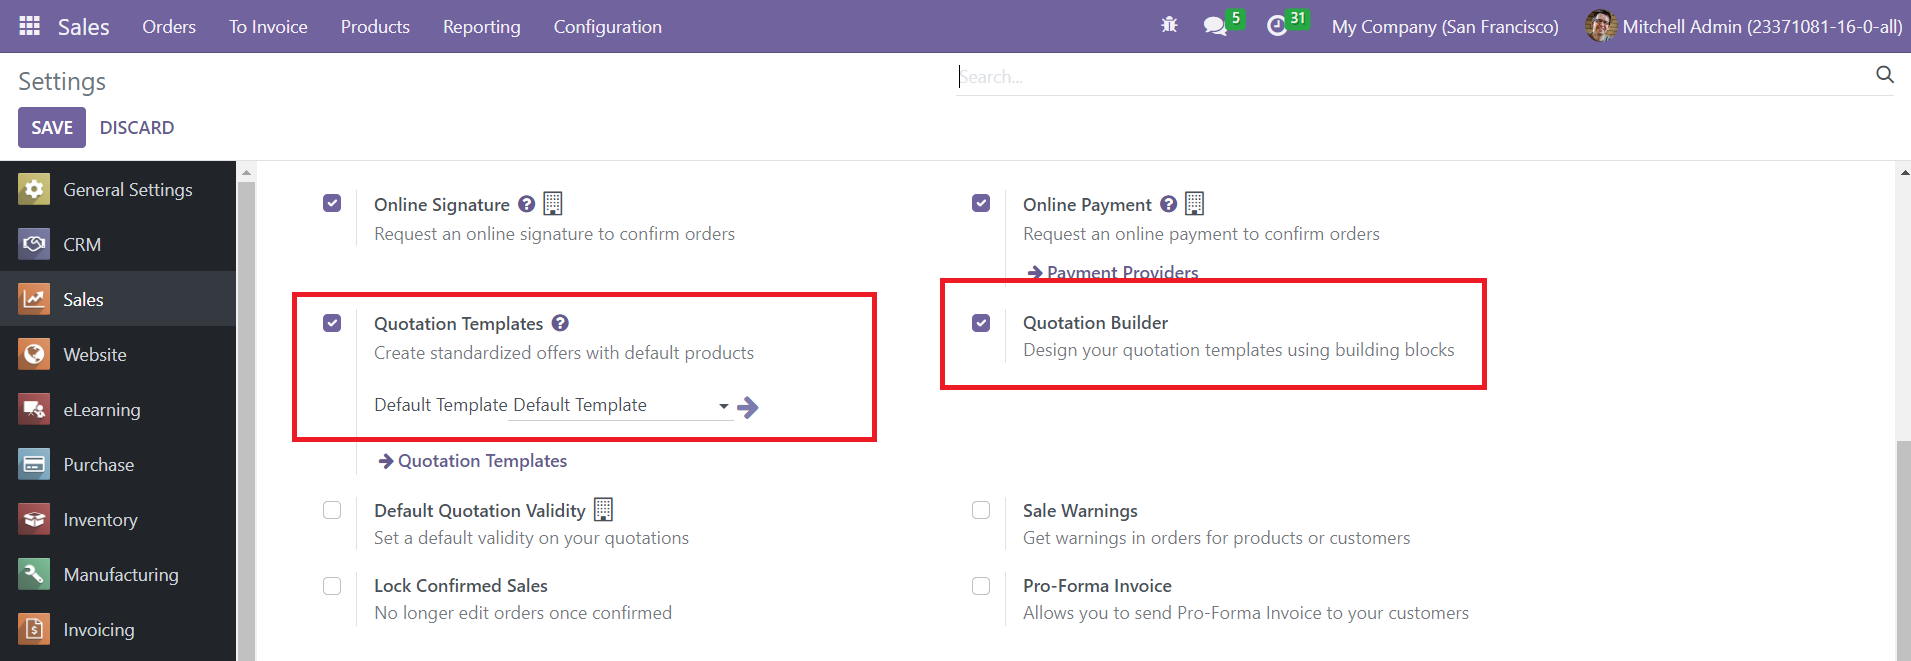
Along with this, you can activate the Quotation Builder option also, which will help you to design your quotation templates using building blocks. Now, go to the Configuration menu and select the Quotation Template button.
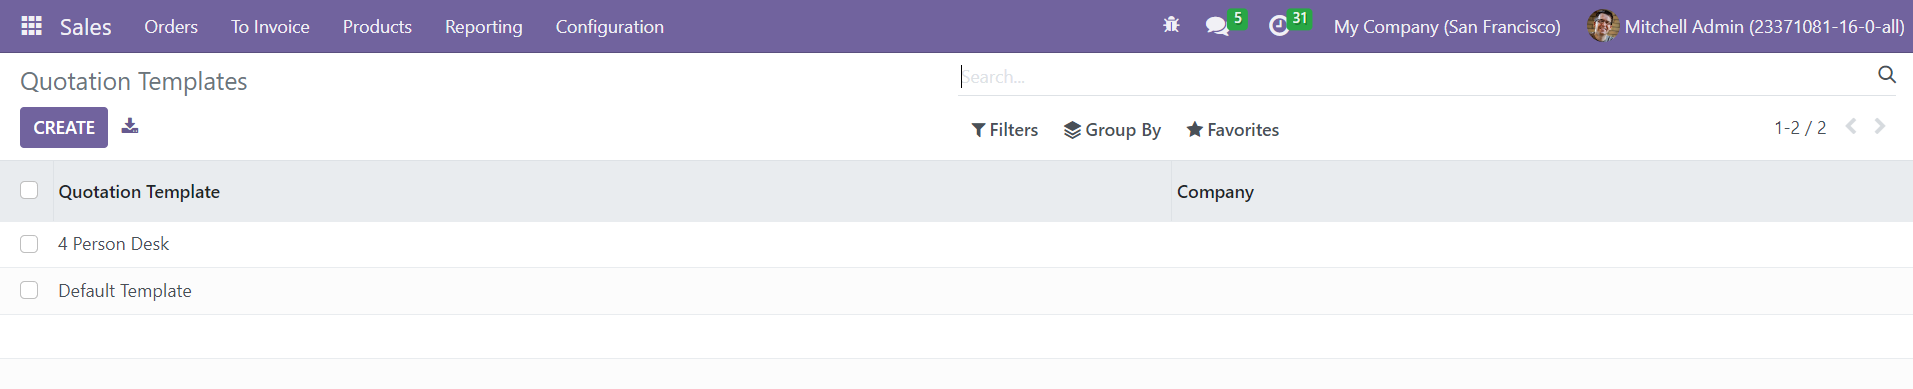
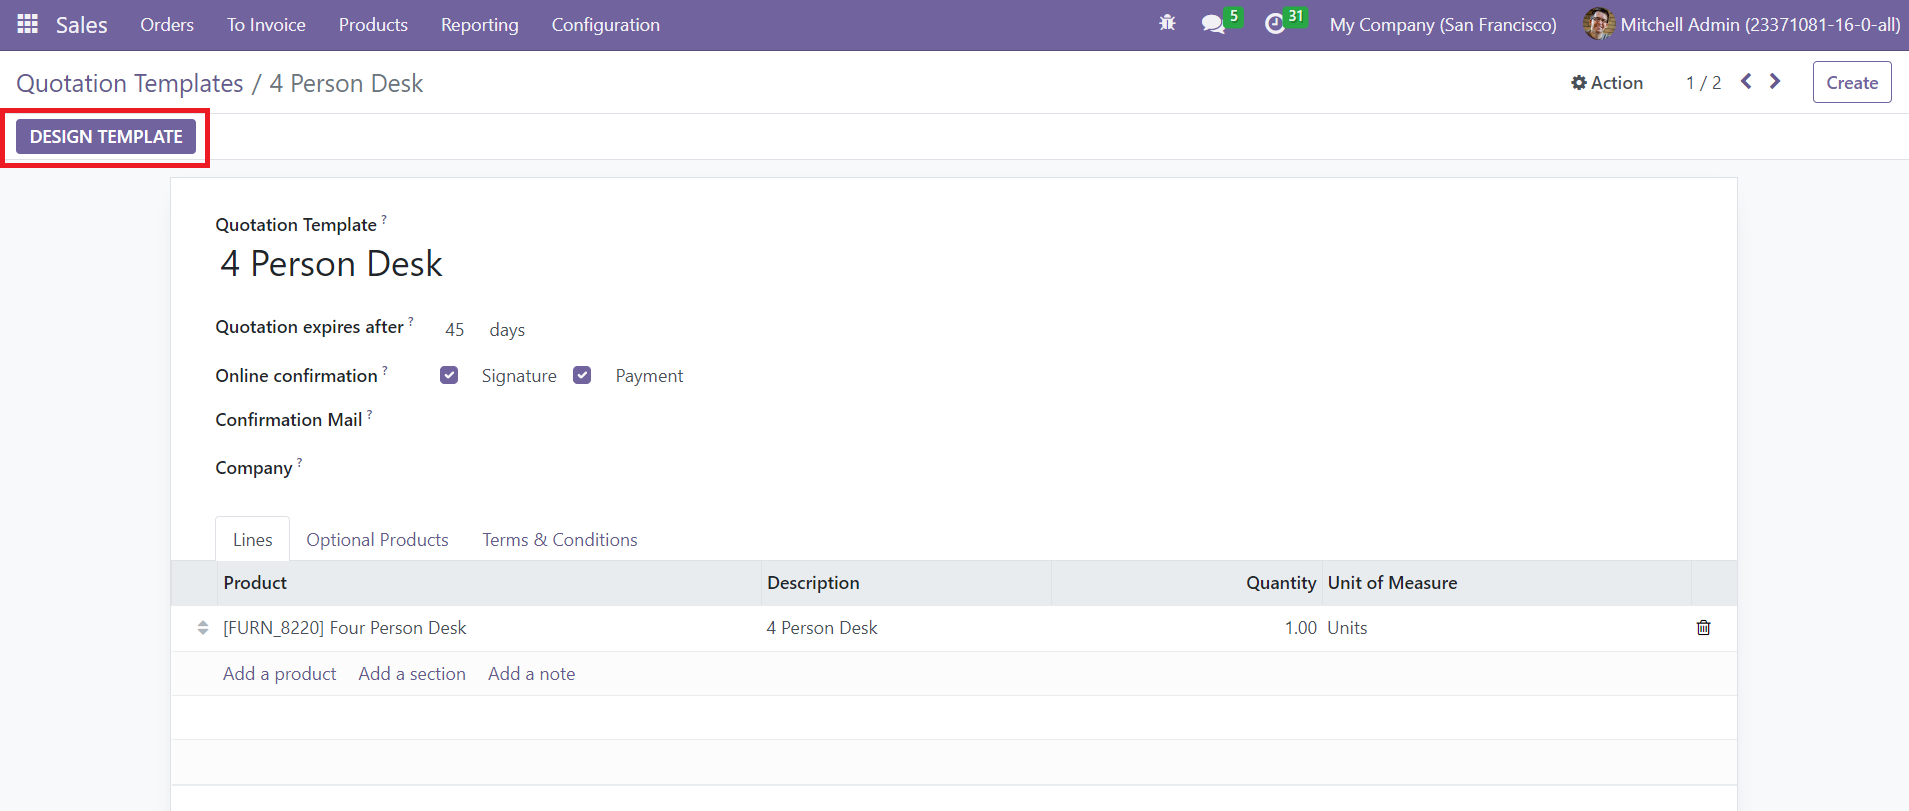
Here, you will be able to see already configured Quotation Templates. Click the Create button to create a new template.
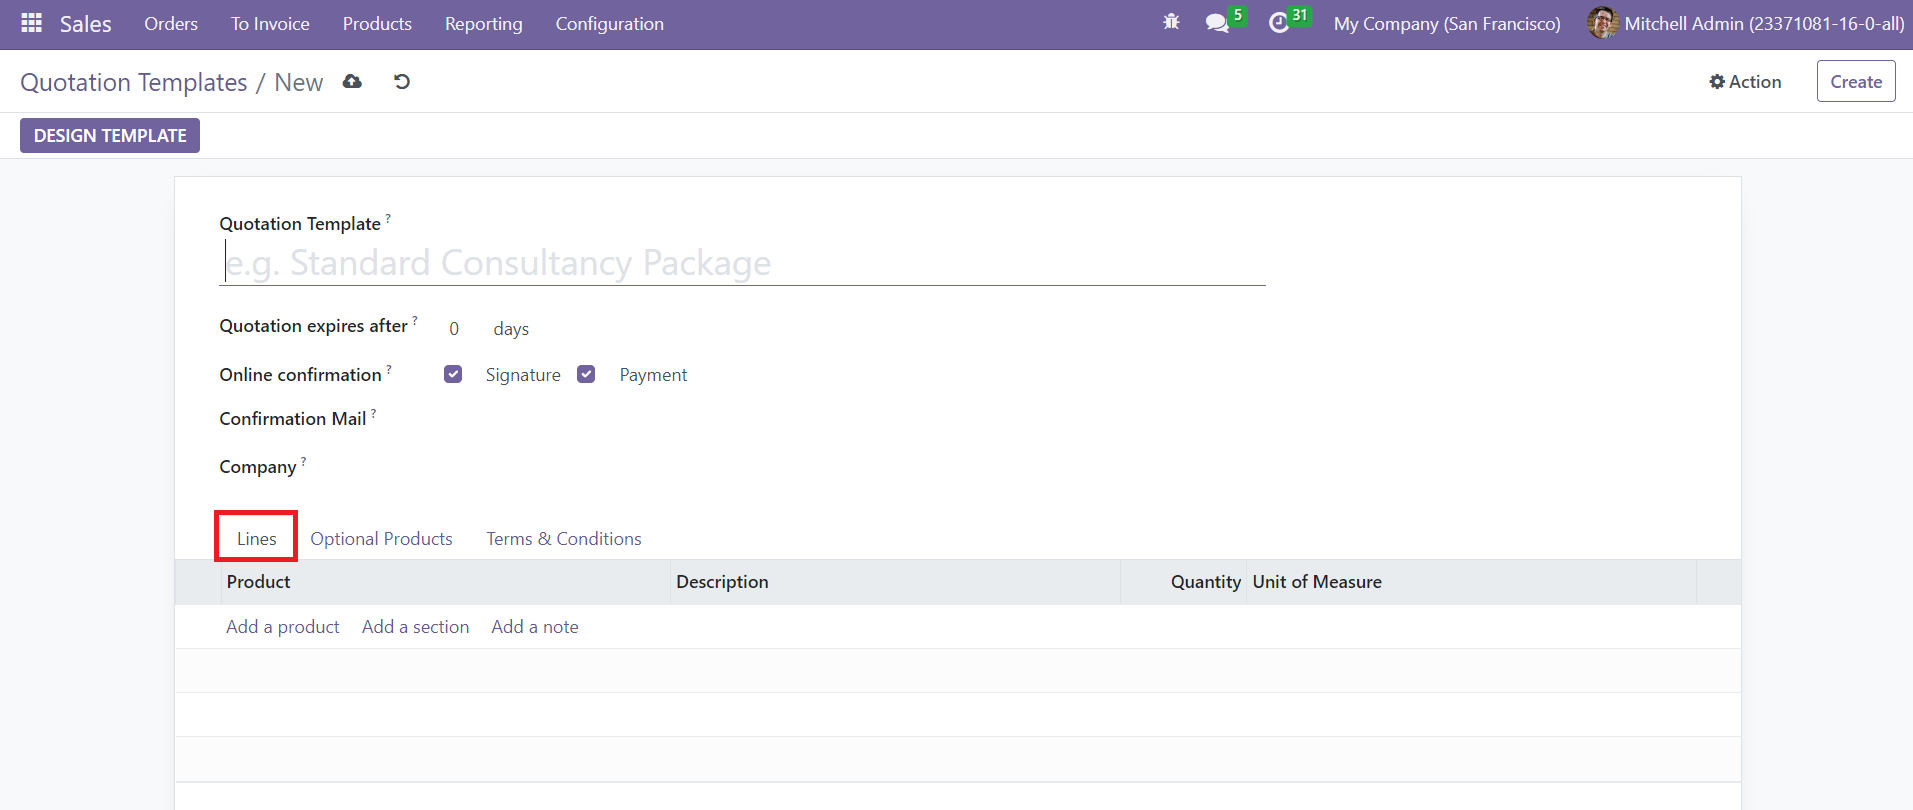
Mention the name of the Quotation Template. The number of days to define the validity of the quotation can be provided in the Quotation Expires After field. If you want to allow the customer to sign the quotation and complete the payment via online, you can activate the corresponding options from the Online Confirmation field. Set a Confirmation Mail to send confirmation to the concerned customer. Mention the name of the company in the Company field. Under the Lines tab, you can specify the default products with Description, Quantity, and UoM.
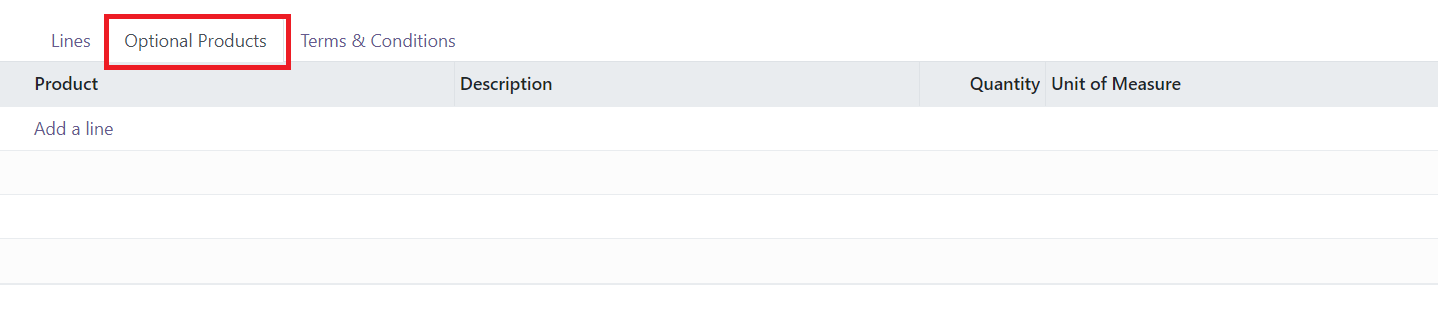
Under the Optional Products tab, specify the optional products for the quotation.
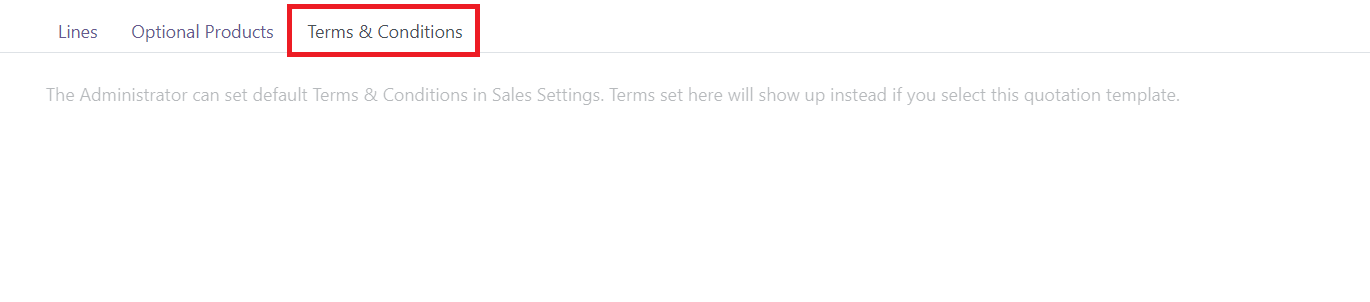
You can set the default Terms & Conditions for the quotation in the give tab. Once you complete the configuration, you will get the Design Template button to design the quotation template using various building blocks.
Clicking on this button will lead you to the website where you can design your template using suitable building blocks.
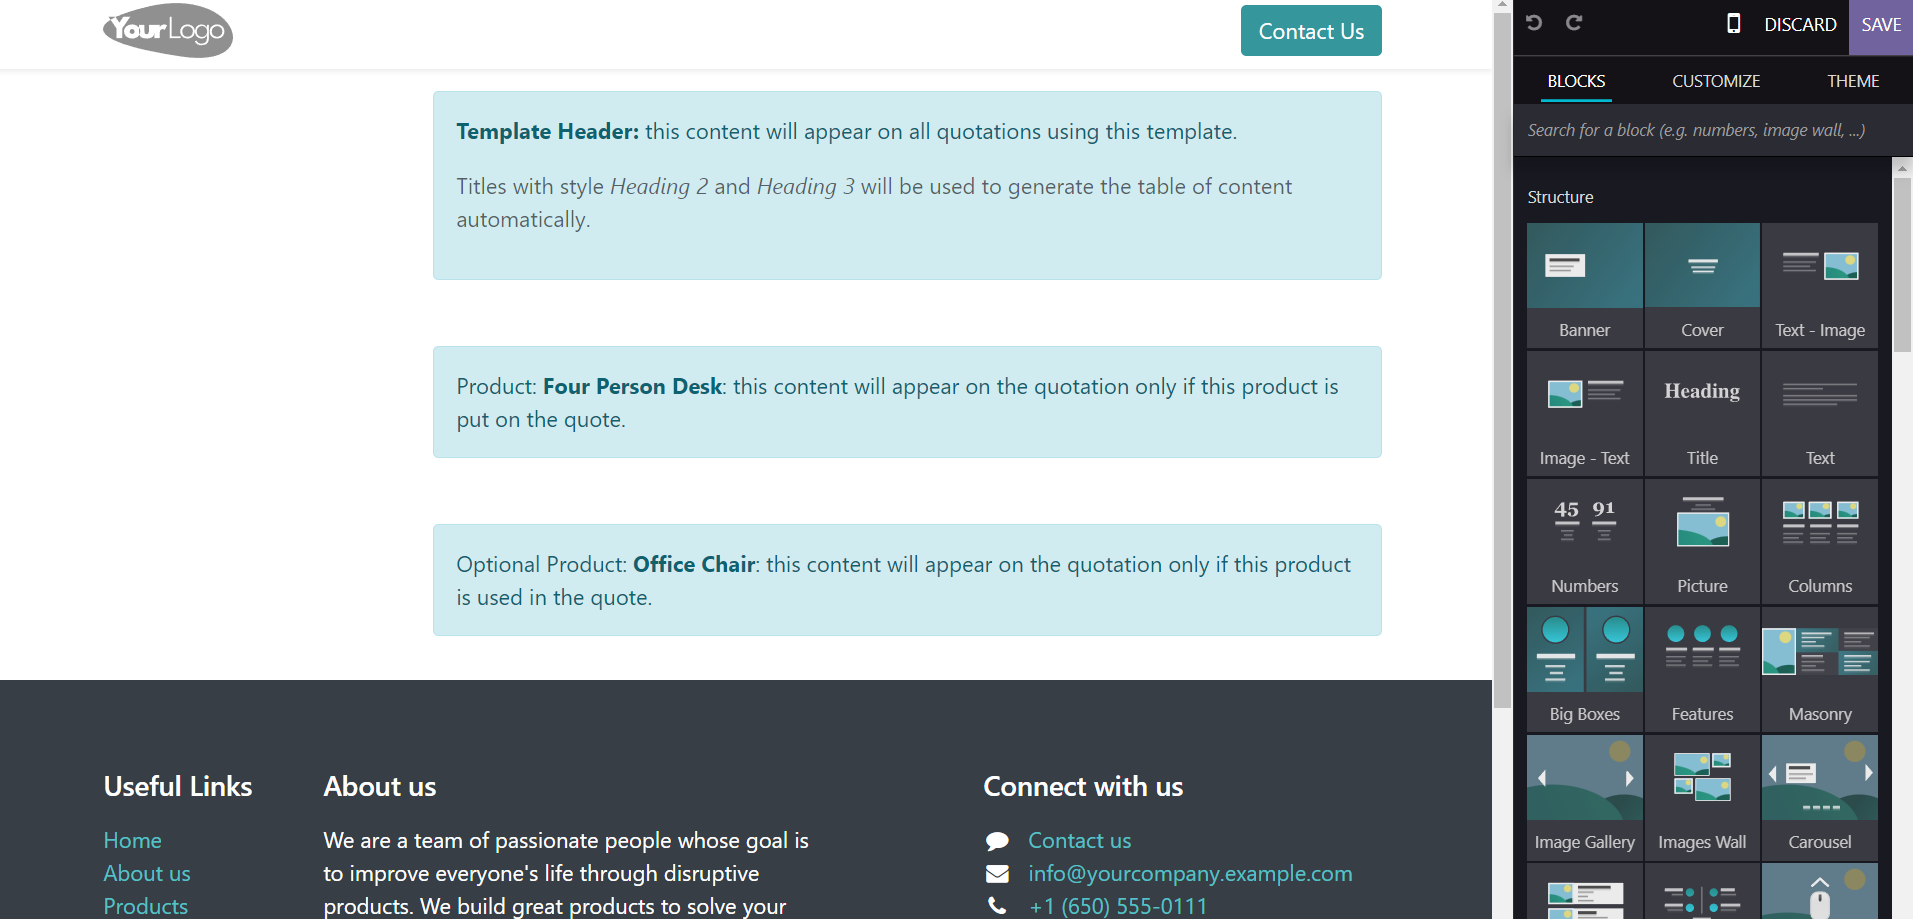
You can drag and drop the required building blocks and design the template as per your demands. After creating the Quotation Template, you can use them while creating new quotations.
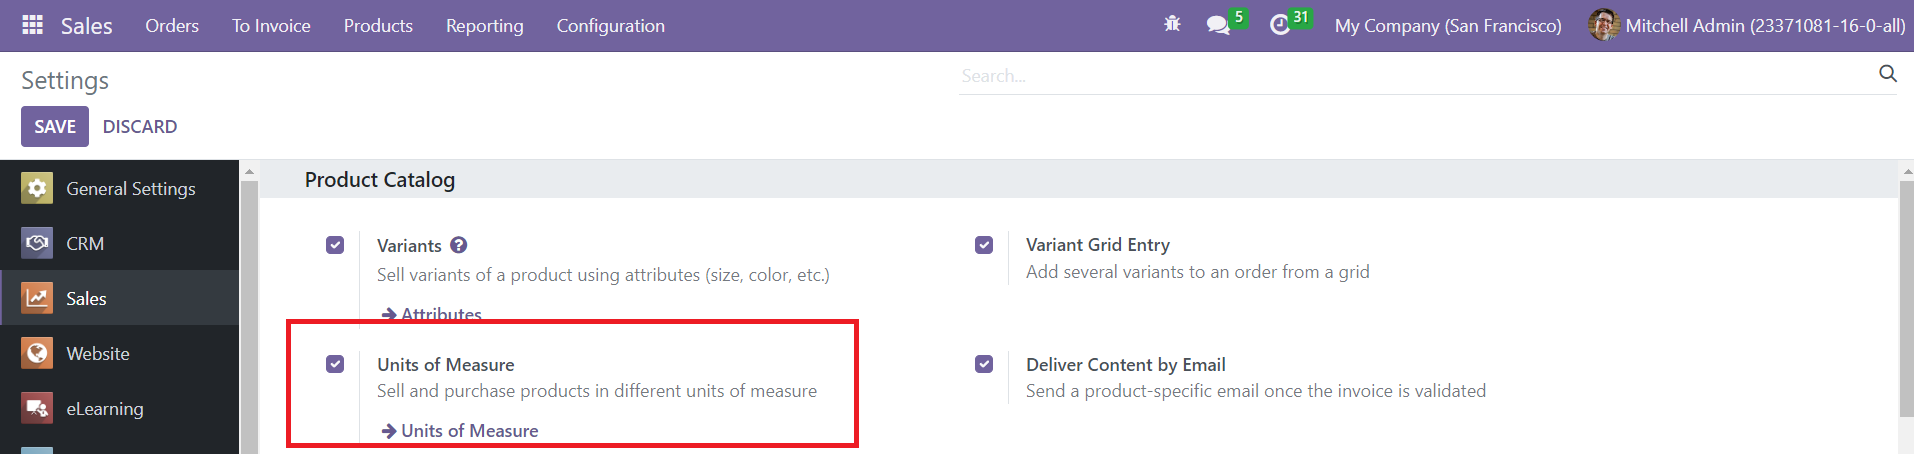
Units of Measure
In order to manage the quantities of various products, it is essential to configure different units of measurement in the Odoo Sales module. The Units of Measure feature can be activated from the Settings menu.
After activating this feature, go to the Configuration menu and select the Units of Measure button.
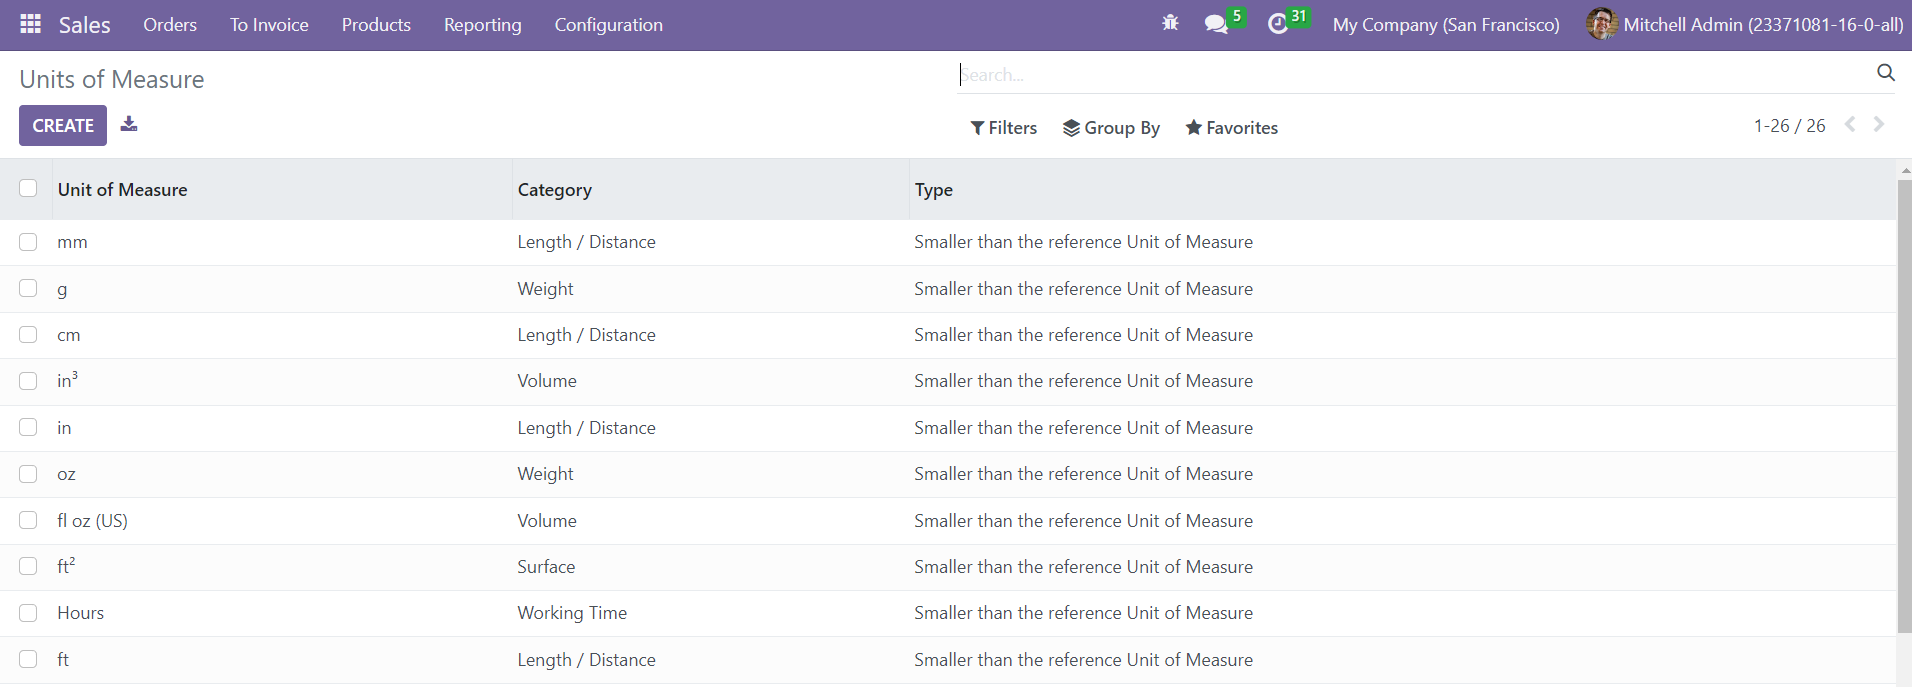
The platform will show the already configured UoM. You can click on the Create button to configure a new UoM.
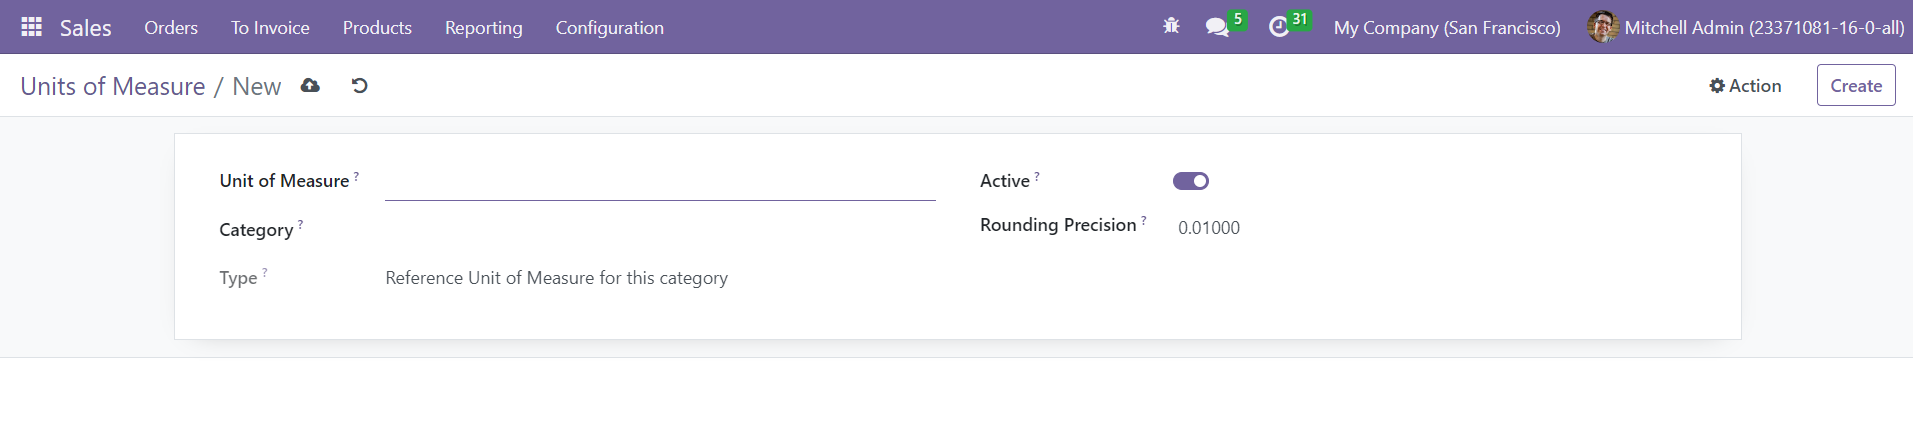
Mention the Unit of Measure, Category, Type, and Rounding Precision in the respective fields. You can enable the Active button to activate this UoM.
For creating various categories for the units of measure, you can select the corresponding option from the Configuration menu of the module. The list of UoM Categories can be seen as shown below.
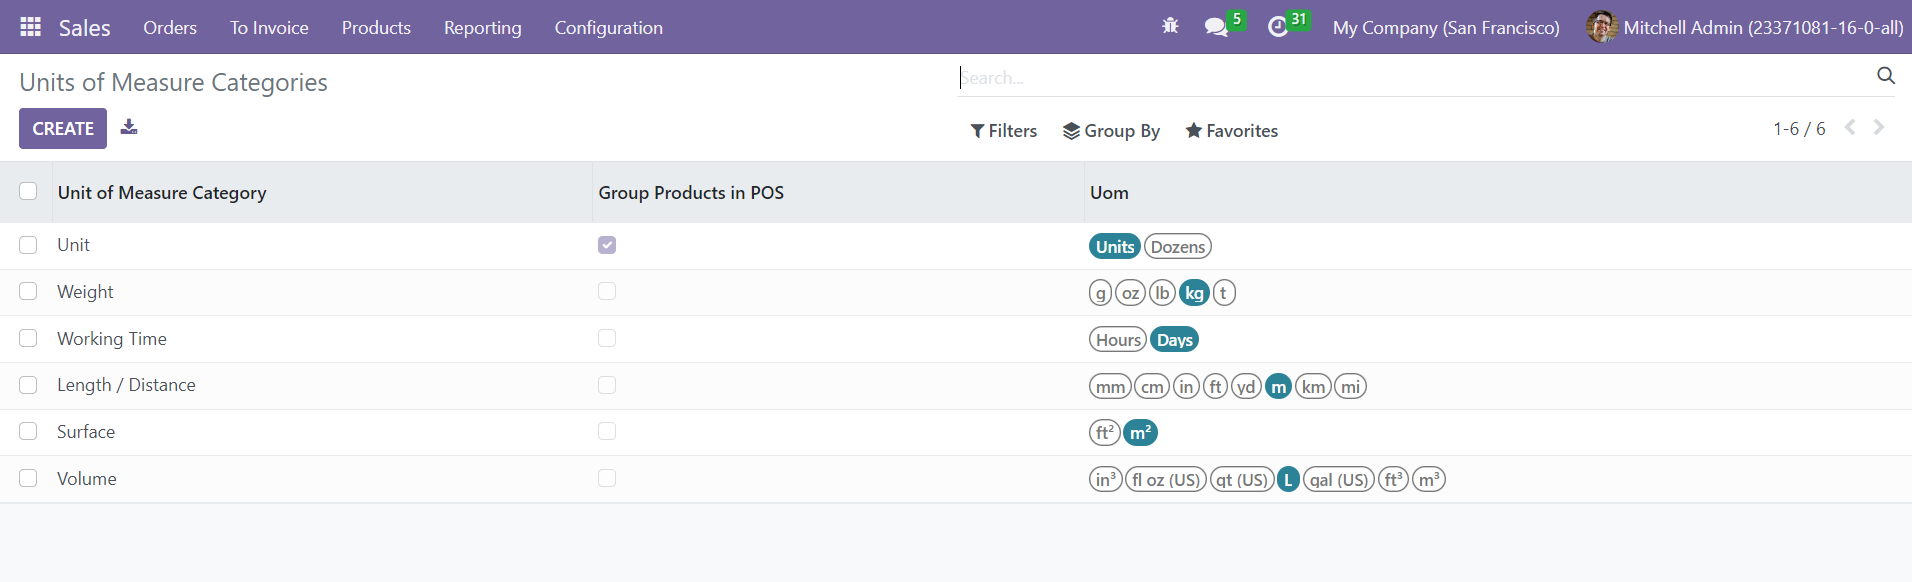
Use the Create button to create a new one.
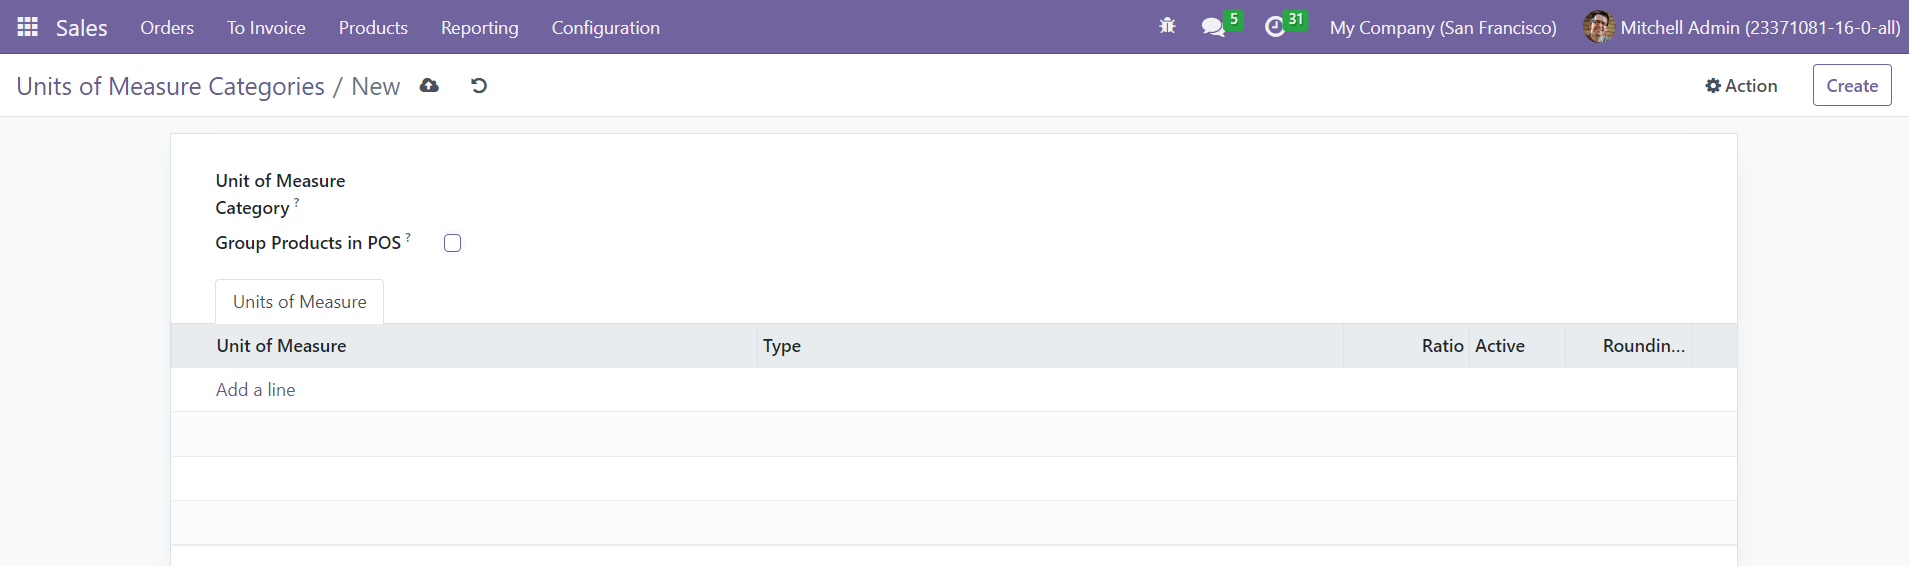
Here, you can specify the Unit of Measure Category and activate the Group Products in PoS from the respective fields. Using the Add a Line button, you can mention the UoM that you want to add under this category.
Tags
Adding tags to sales quotations and orders helps to locate and identify these entries quickly. Odoo also allows you to personalize these tags according to your preference. To view them, select ‘Tags’ from the dropdown list of the Configuration tab.
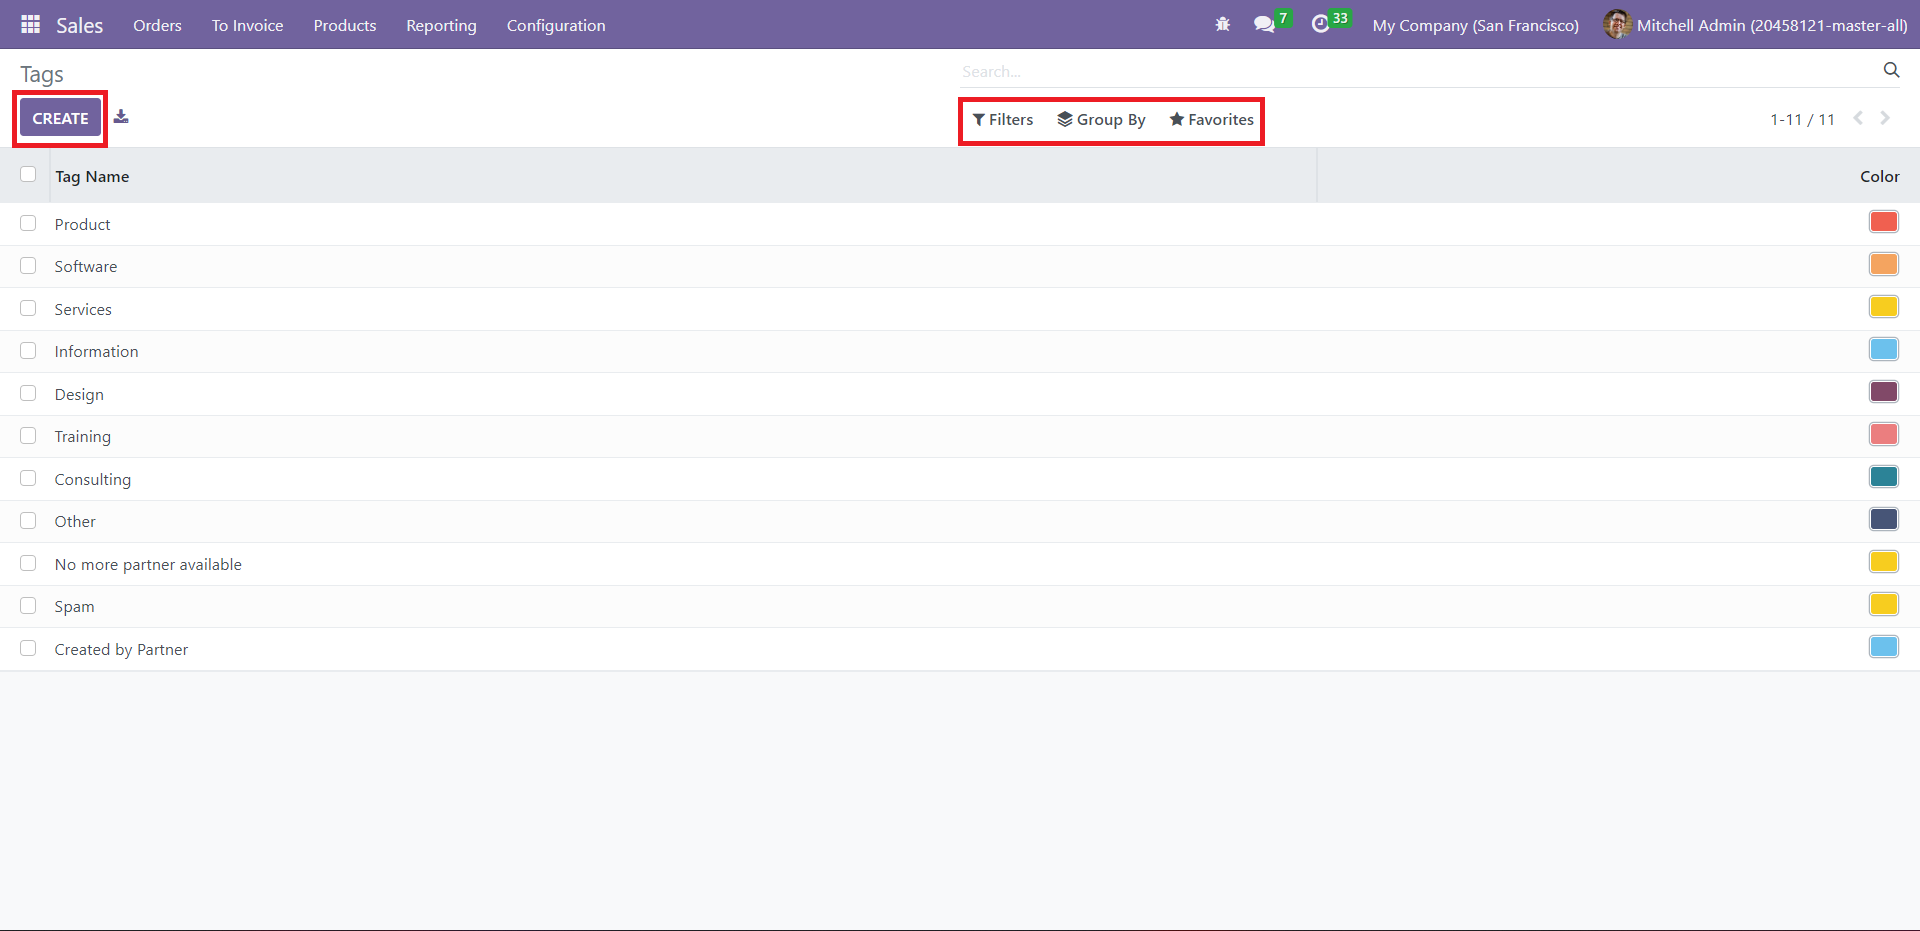
This window shows all the tags created in the module and their details like ‘Tag Name’ and associated ‘Color.’ Use the Filters and Group By options to locate and categorize these entries based on specific criteria. You can save any filter or set it as a default using ‘Favorites.’
Click on the Create button to add a new tag to the list.

A new line appears below the list, as highlighted above. Assign a name for the new tag and pick a color. After adding these details, click on ‘Save.’
Shipping Methods
This section ensures that product delivery and pricing activities are in order, prioritizing customer satisfaction. You can effectively configure shipping methods on sales orders/ quotations to offer hassle-free delivery of products to customers. To avail of this feature, click on ‘Settings’ from the Configuration menu’s dropdown list.
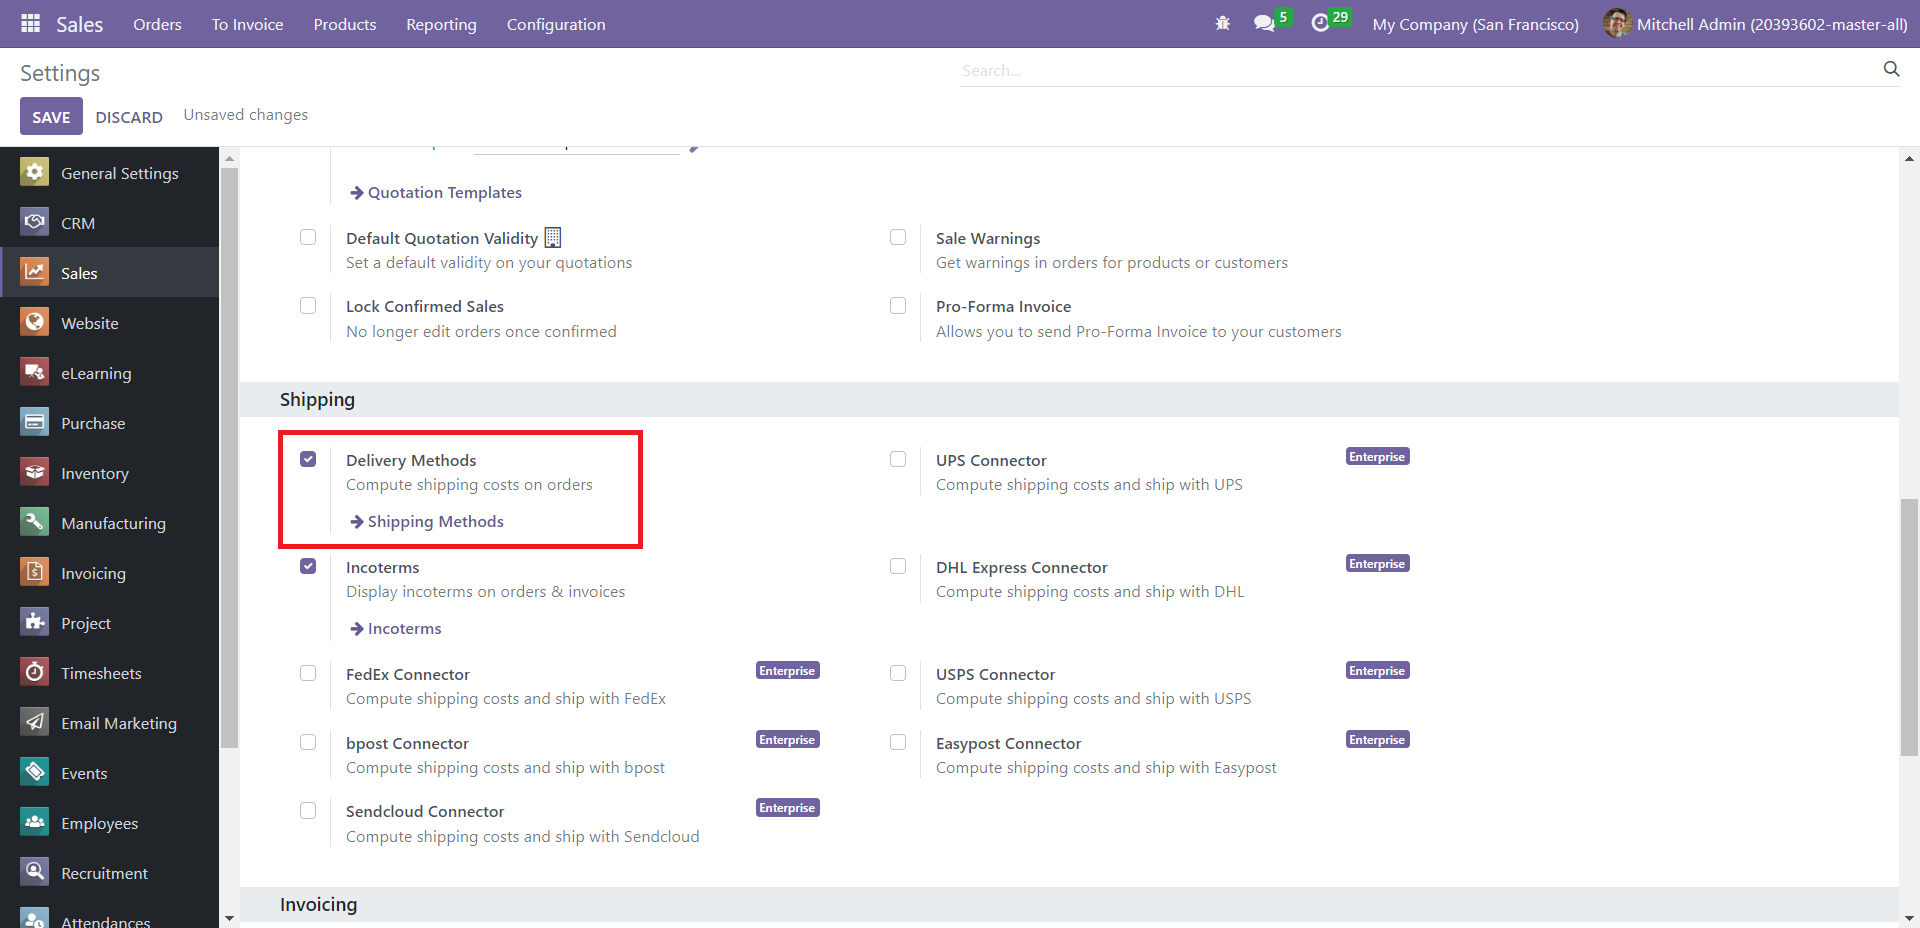
Activate ‘Delivery Options’ under the Shipping section. Click on ‘Shipping Methods’ underneath this option or select the Shipping Methods menu from the dropdown list of the Configuration tab. You will get the following window.
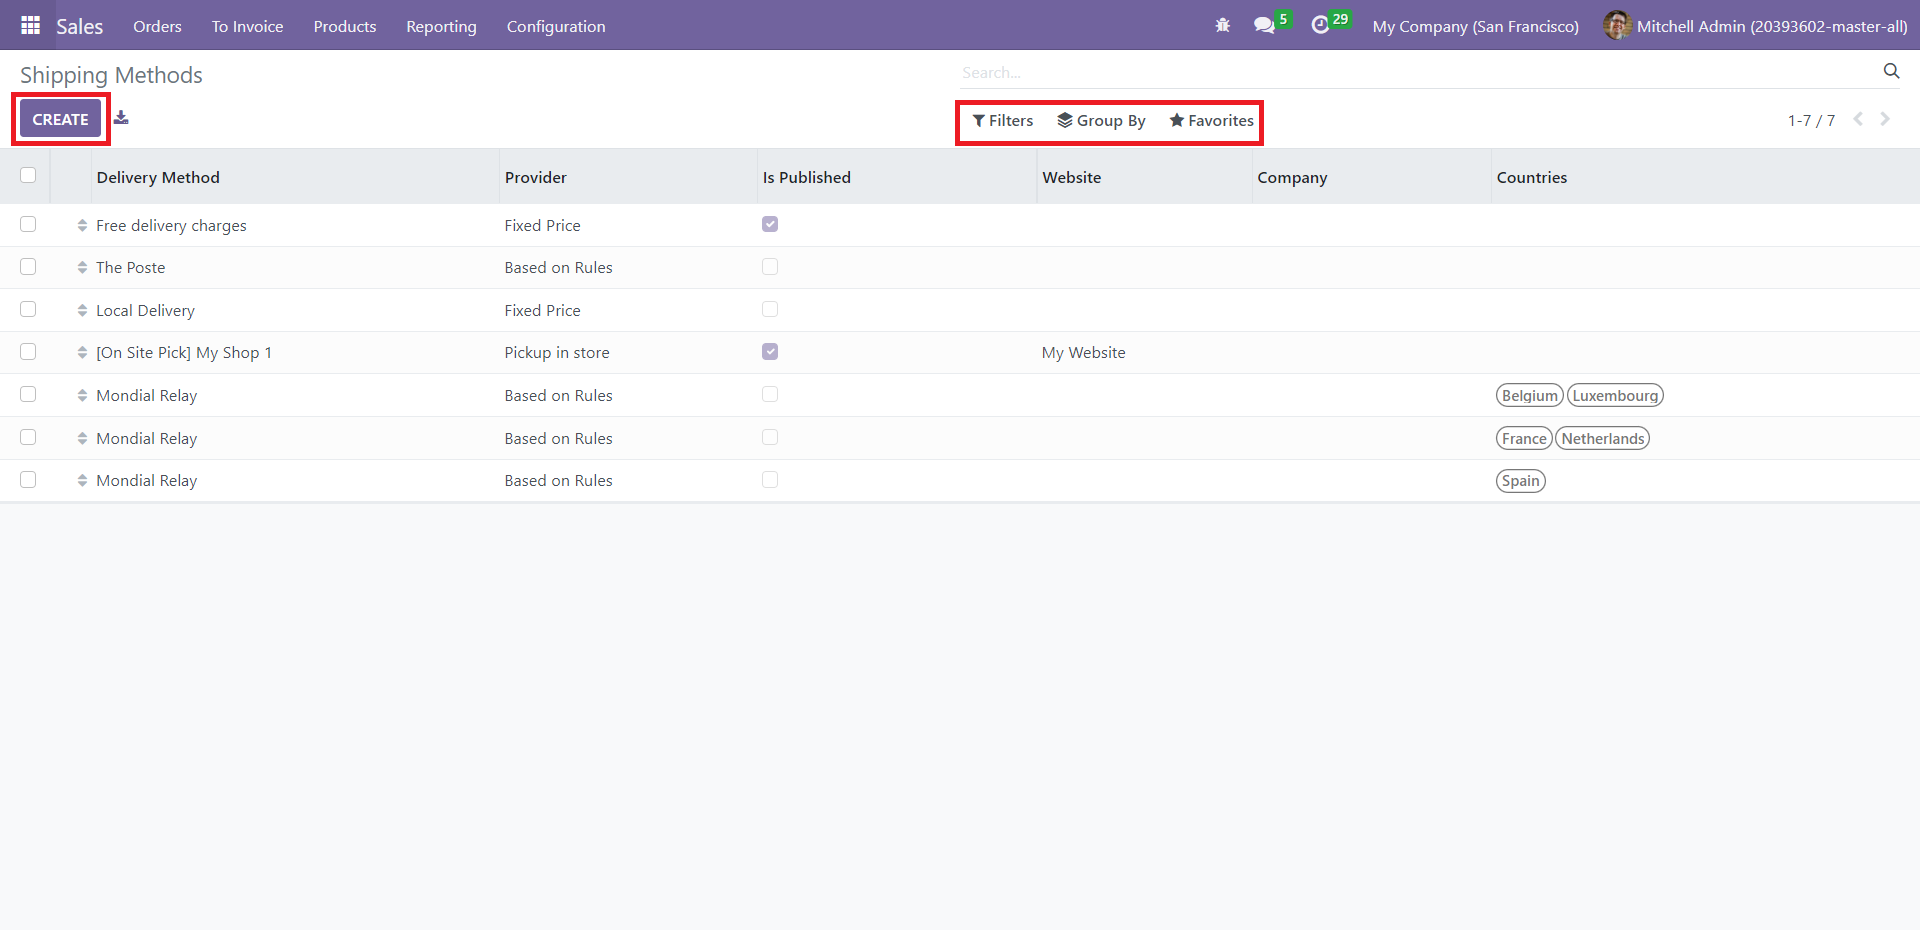
This window displays the shipping methods configured in the module along with the details like Delivery Method, Provide, Is Published (whether or not the record has been published), Website, Company, and Countries. The Filters and Group By options help you isolate and identify these entries based on specific criteria. You can save the frequently used or important filters in ‘Favorites.’
Click on the Create button to add a new shipping method.
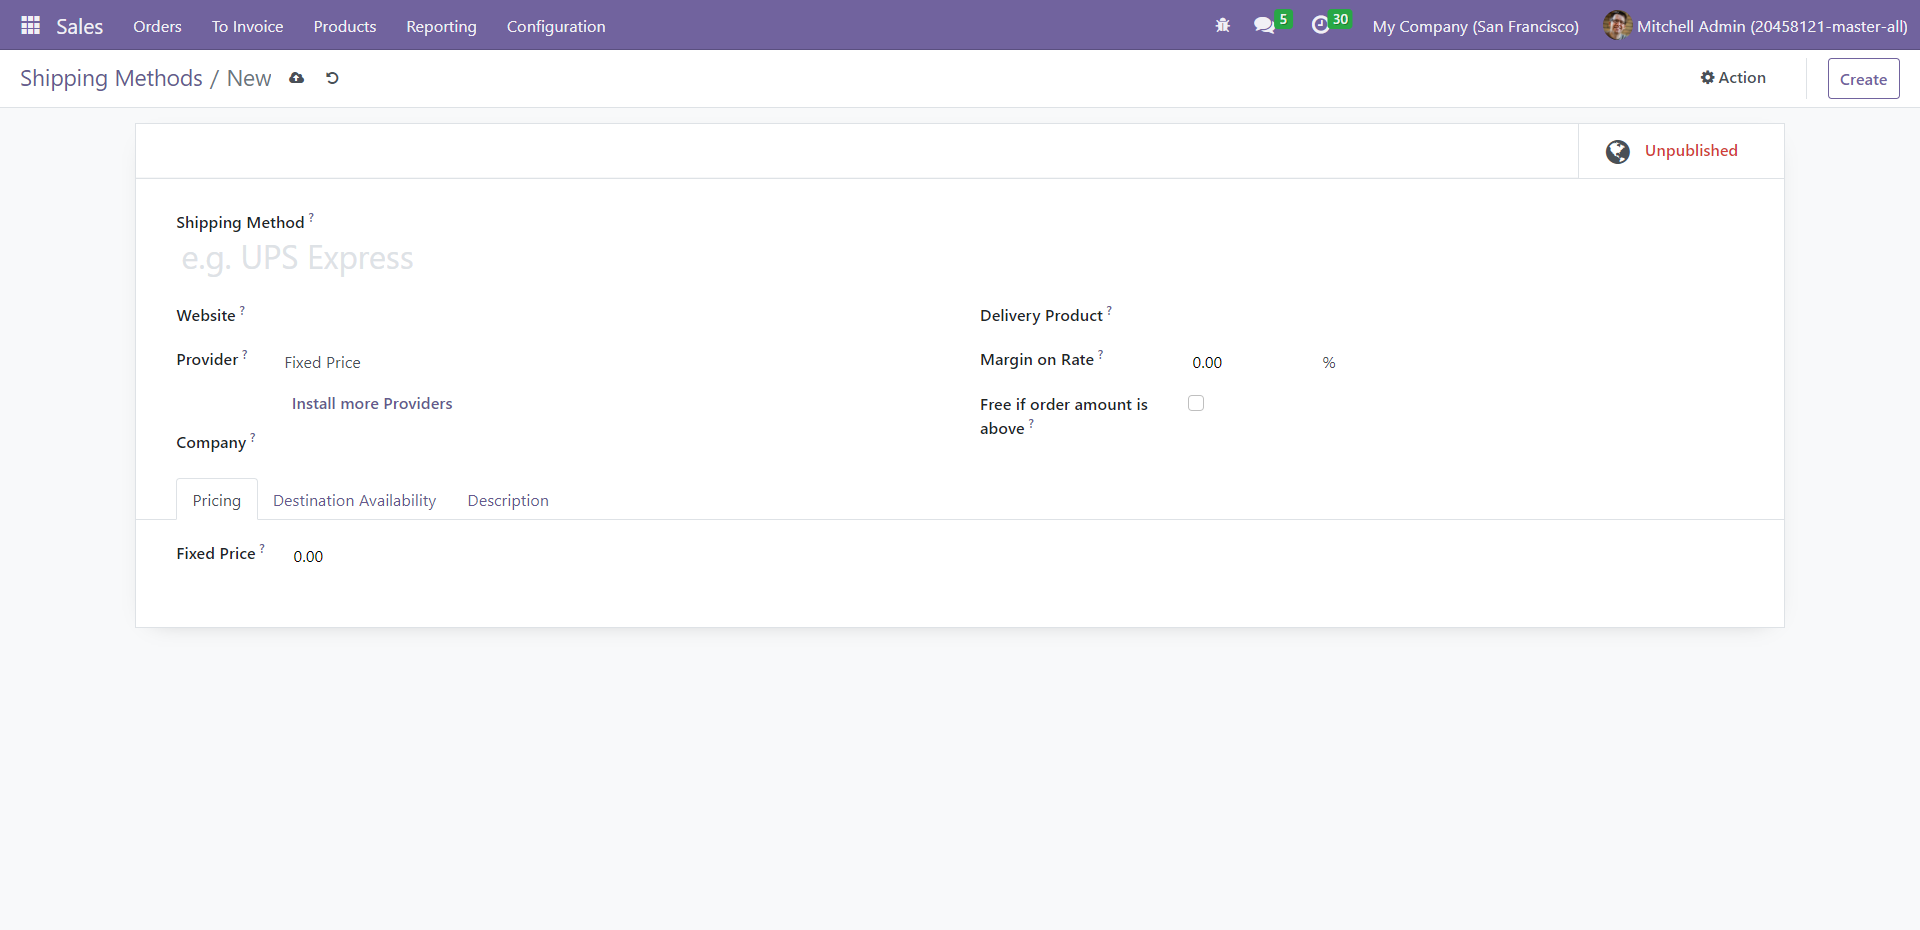
Assign a name for the Shipping Method and select your Website from the dropdown list. The dropdown list of ‘Provider’ has three options – Fixed Price, Based on Rules, and Pickup in Store. If the shipping price is the same throughout the entire shipment process, choose ‘Fixed Price,’ and if it depends on some rules, select ‘Based on Rules.’ The Pickup in Store option requires the customer to collect the product from the store. Add your Company, Delivery Product, and Margin on Rate (Odoo will add this percentage to the shipping price). If you want to make the shipment free of cost over a particular amount, activate ‘Free if order amount is above’ and specify that price in the Amount field.
Under the Pricing tab, set the shipment’s ‘Fixed Price.’ This feature will allow you to set a base price for product shipping. You can define the location of the delivery under the Destination Availability tab.
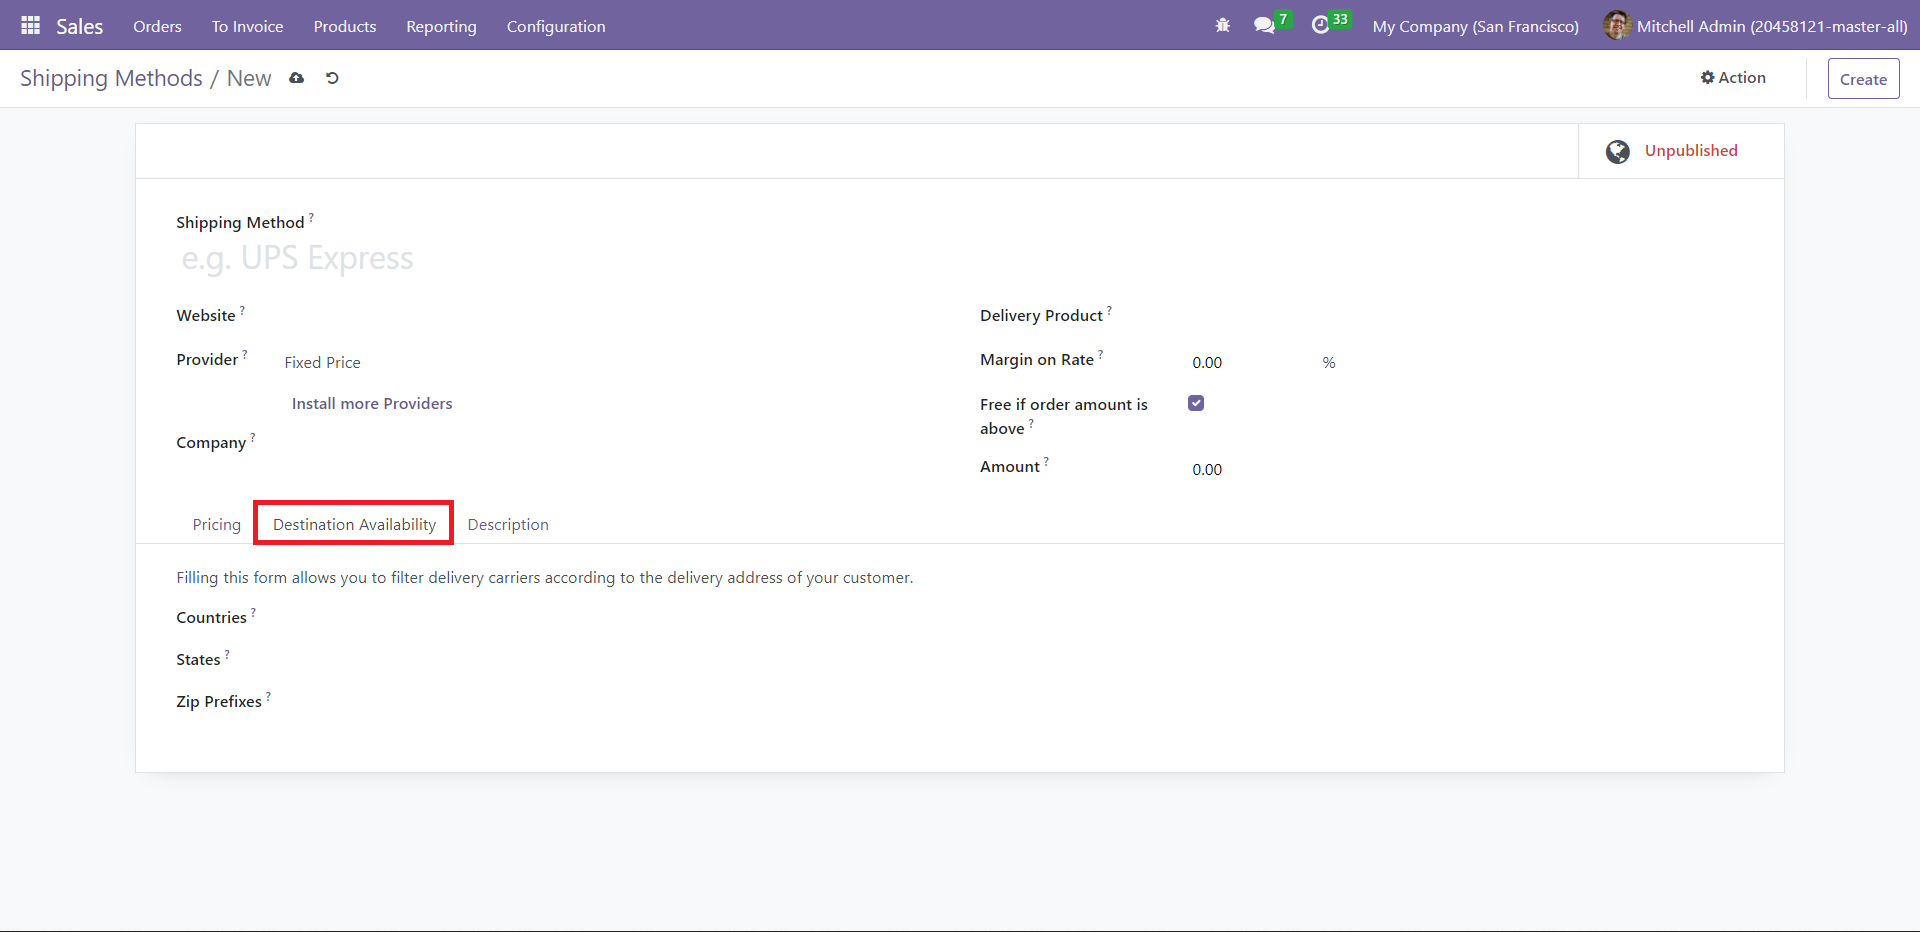
Here, Odoo filters delivery carriers based on your customer’s delivery address. Fill in the details like Countries, States, and Zip Prefixes.
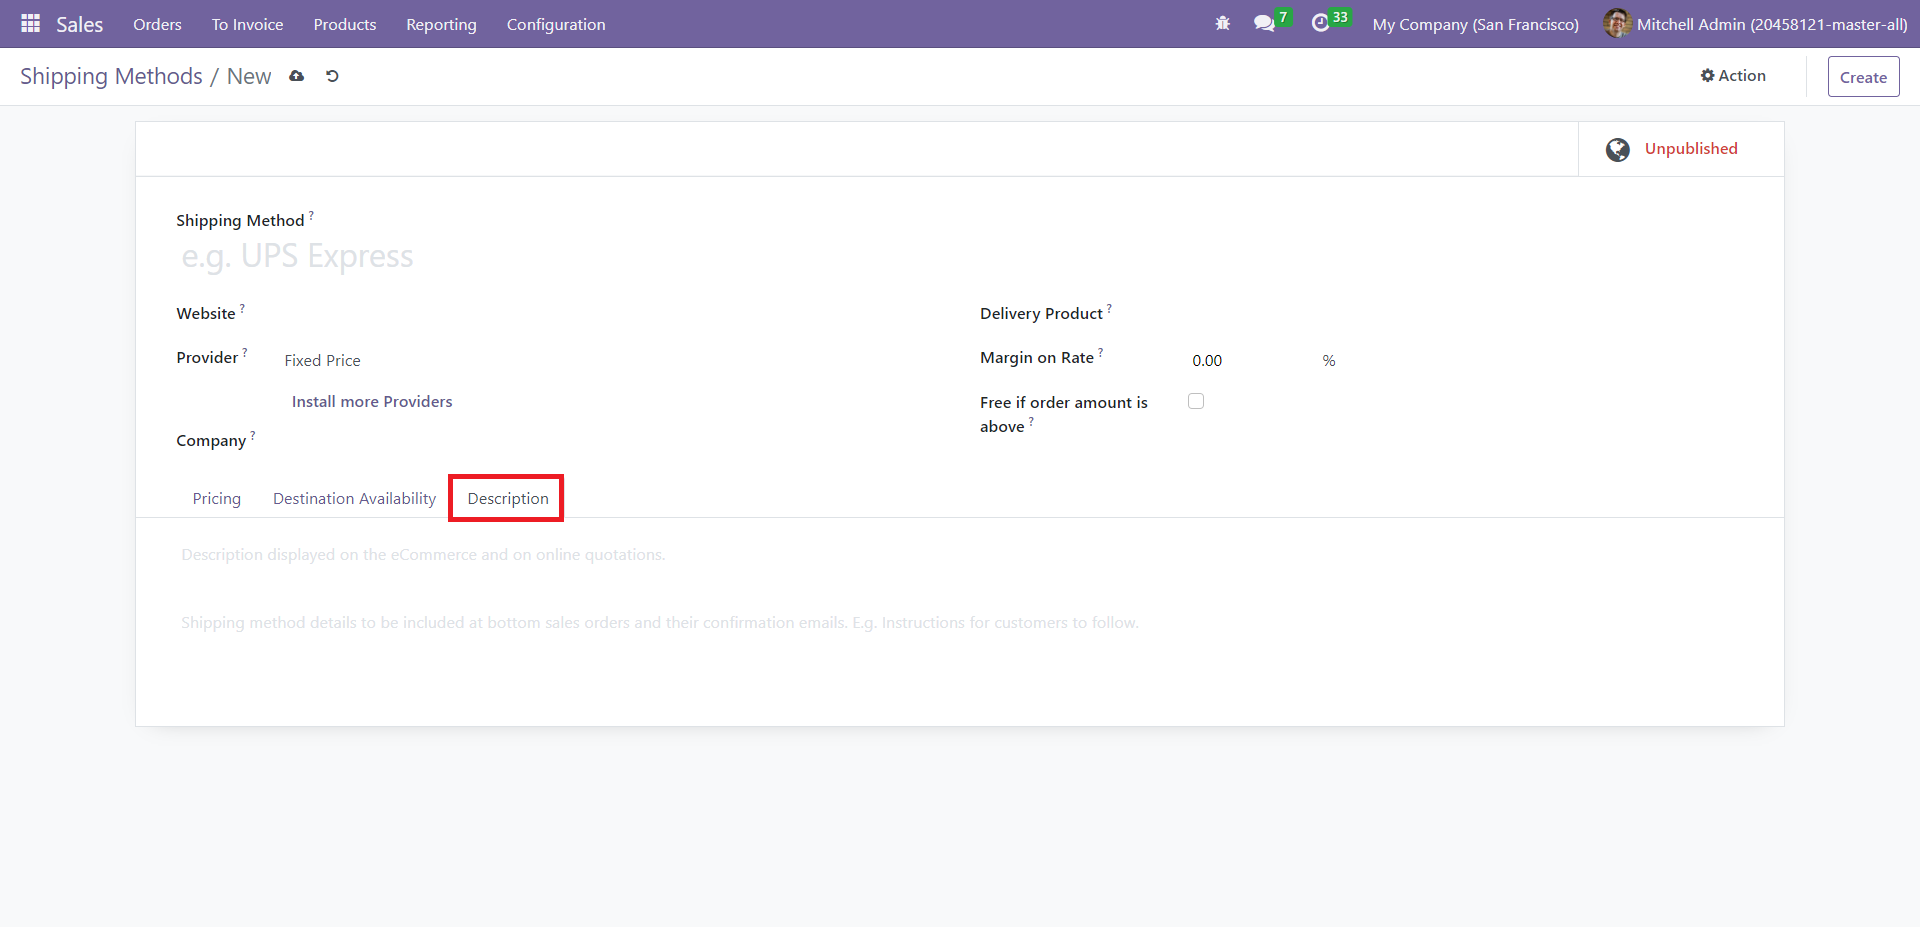
The Description tab allows you to specify notes to display on eCommerce and online quotations. You can also add notes to include at the bottom of sales orders and their confirmation emails.
Next, we shall move to the analysis of sales in the Odoo 16 sales module.
Sales Analysis
You can evaluate your company’s sales performance under the Reporting tab of the Sales module. You can also scale this obtained data for a specified period, which will benefit your company by enhancing productivity and overall sales performance. Based on these reports, you may enforce necessary adjustments to influence your business growth. The tracking of sales reports can be done on a daily, weekly, monthly, and yearly basis. Click on the Reporting tab to get the Sales Analysis window.
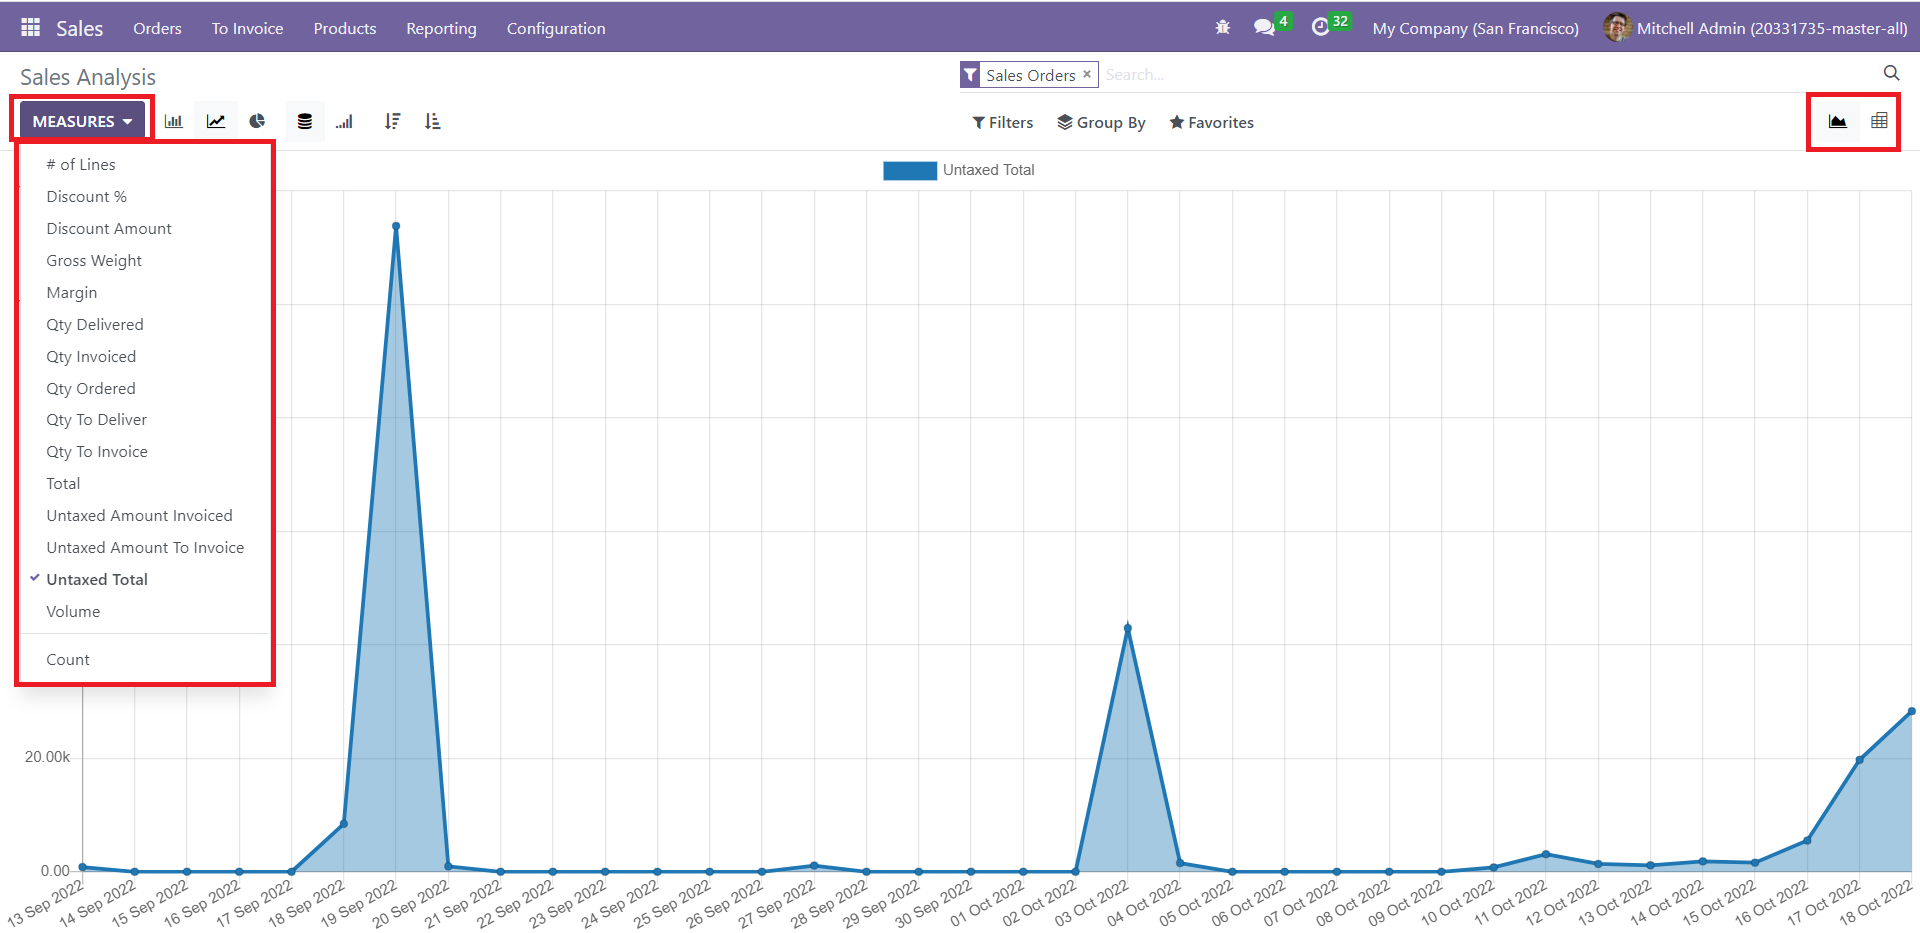
Click on ‘Measures’ and select the category you want to display on the graph from the dropdown list, as shown above. You can also switch the view from ‘Graph’ to ‘Pivot’ using the icon in the window’s top right corner. This view gives a tabular detailing of your sales report.
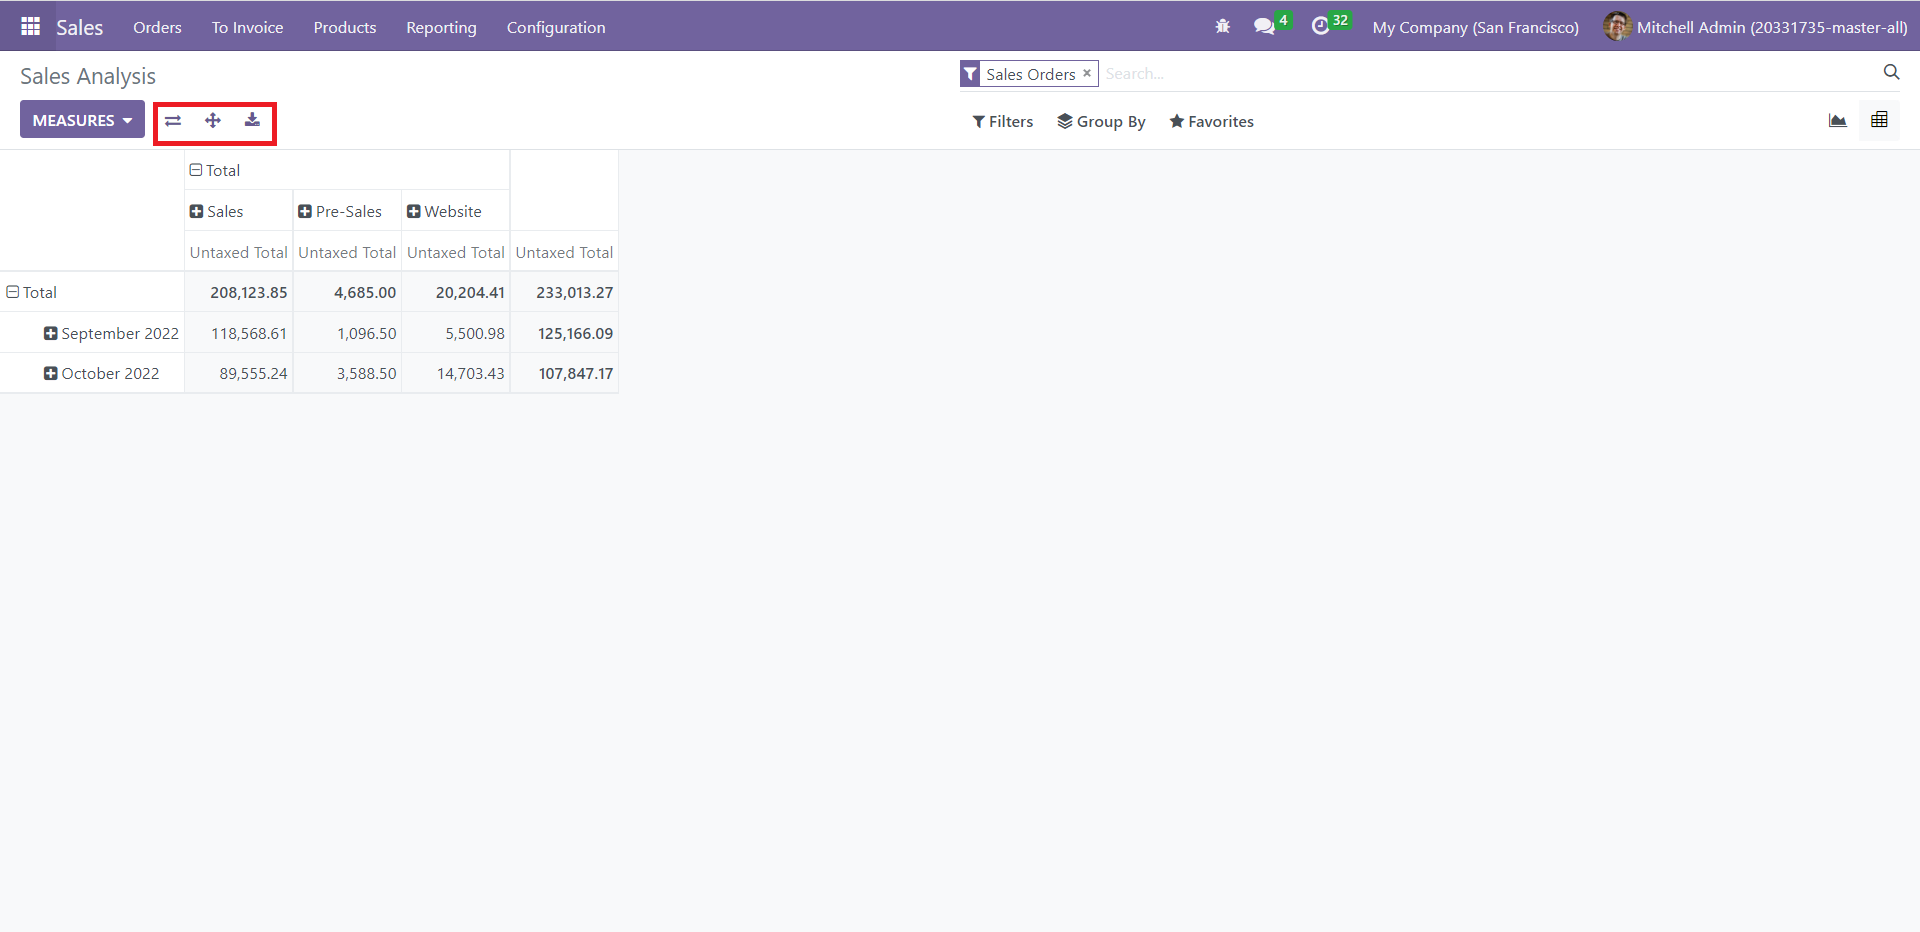
If you want to interchange the axes, click on the Flip axis icon. ‘Expand all’ allows you to expand the content of the records, whereas ‘Download xlsx’ exports your data to an Excel sheet. All these icons are highlighted above.
You can apply Filters to generate reports on Quotations and Sales Orders. If you click on ‘Order Date’ under Filters, you can obtain sales and quotations reports for a particular day, week, month, or year. Similarly, select ‘Add Custom Filter’ to customize your data.

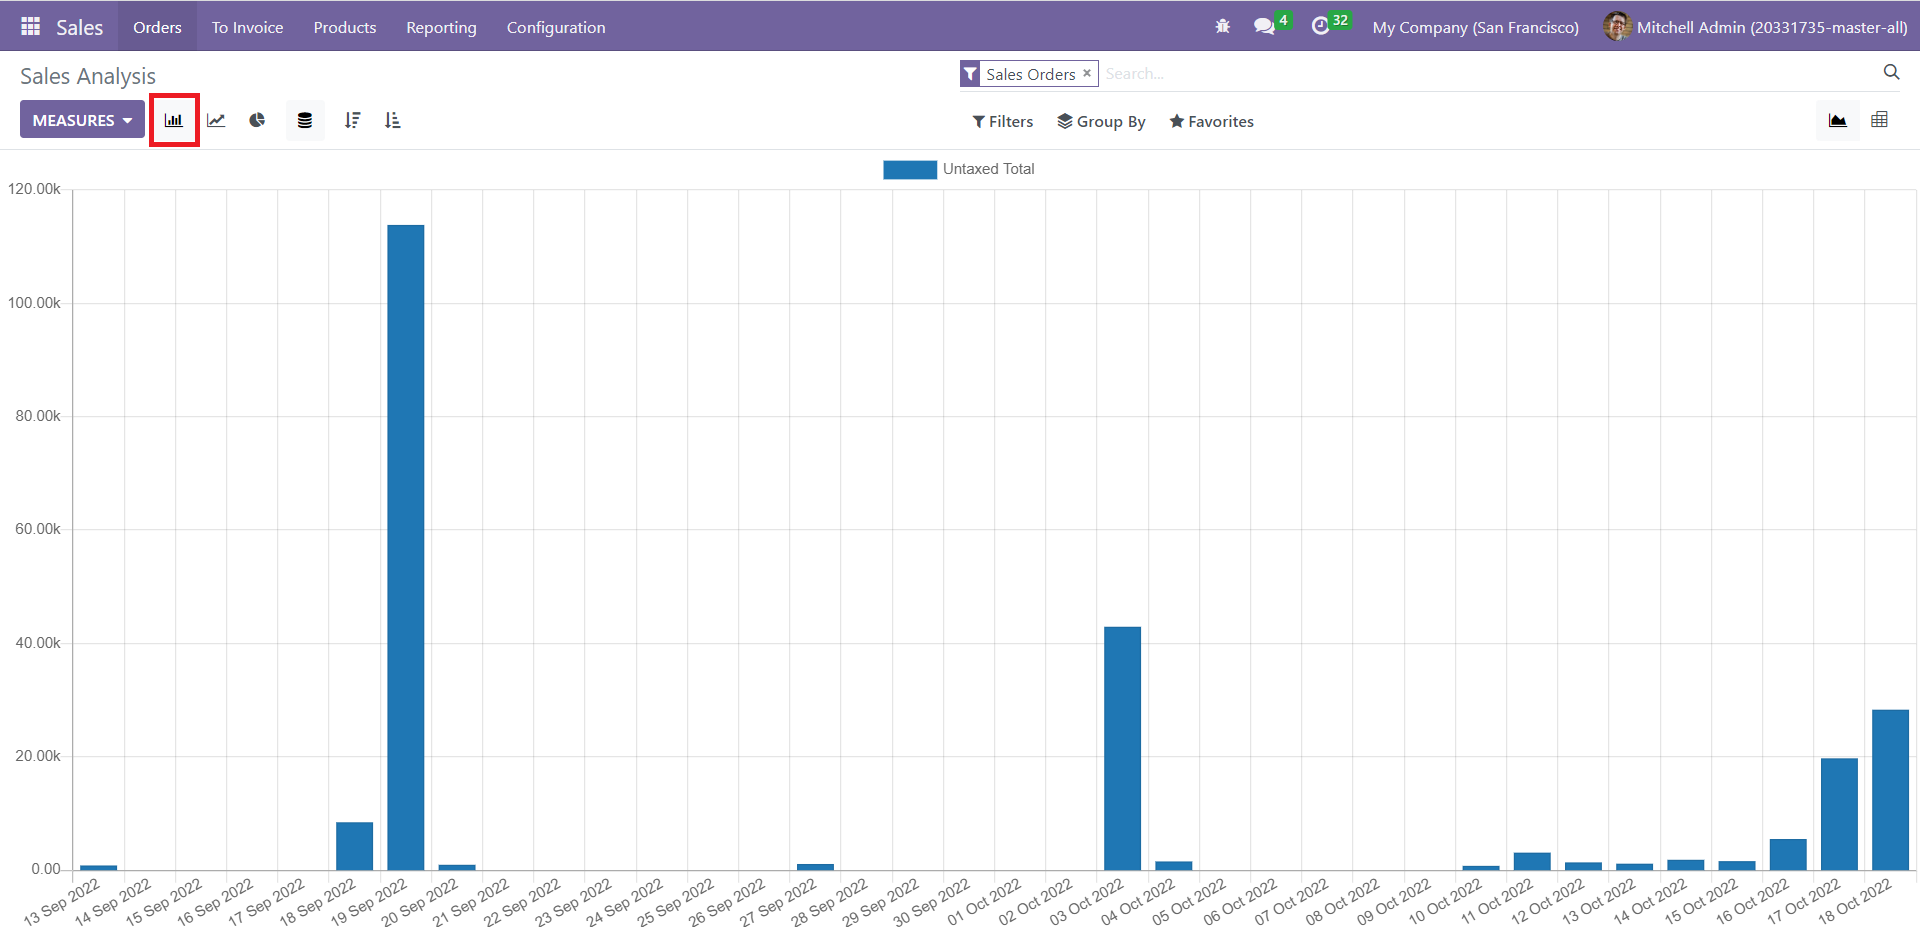
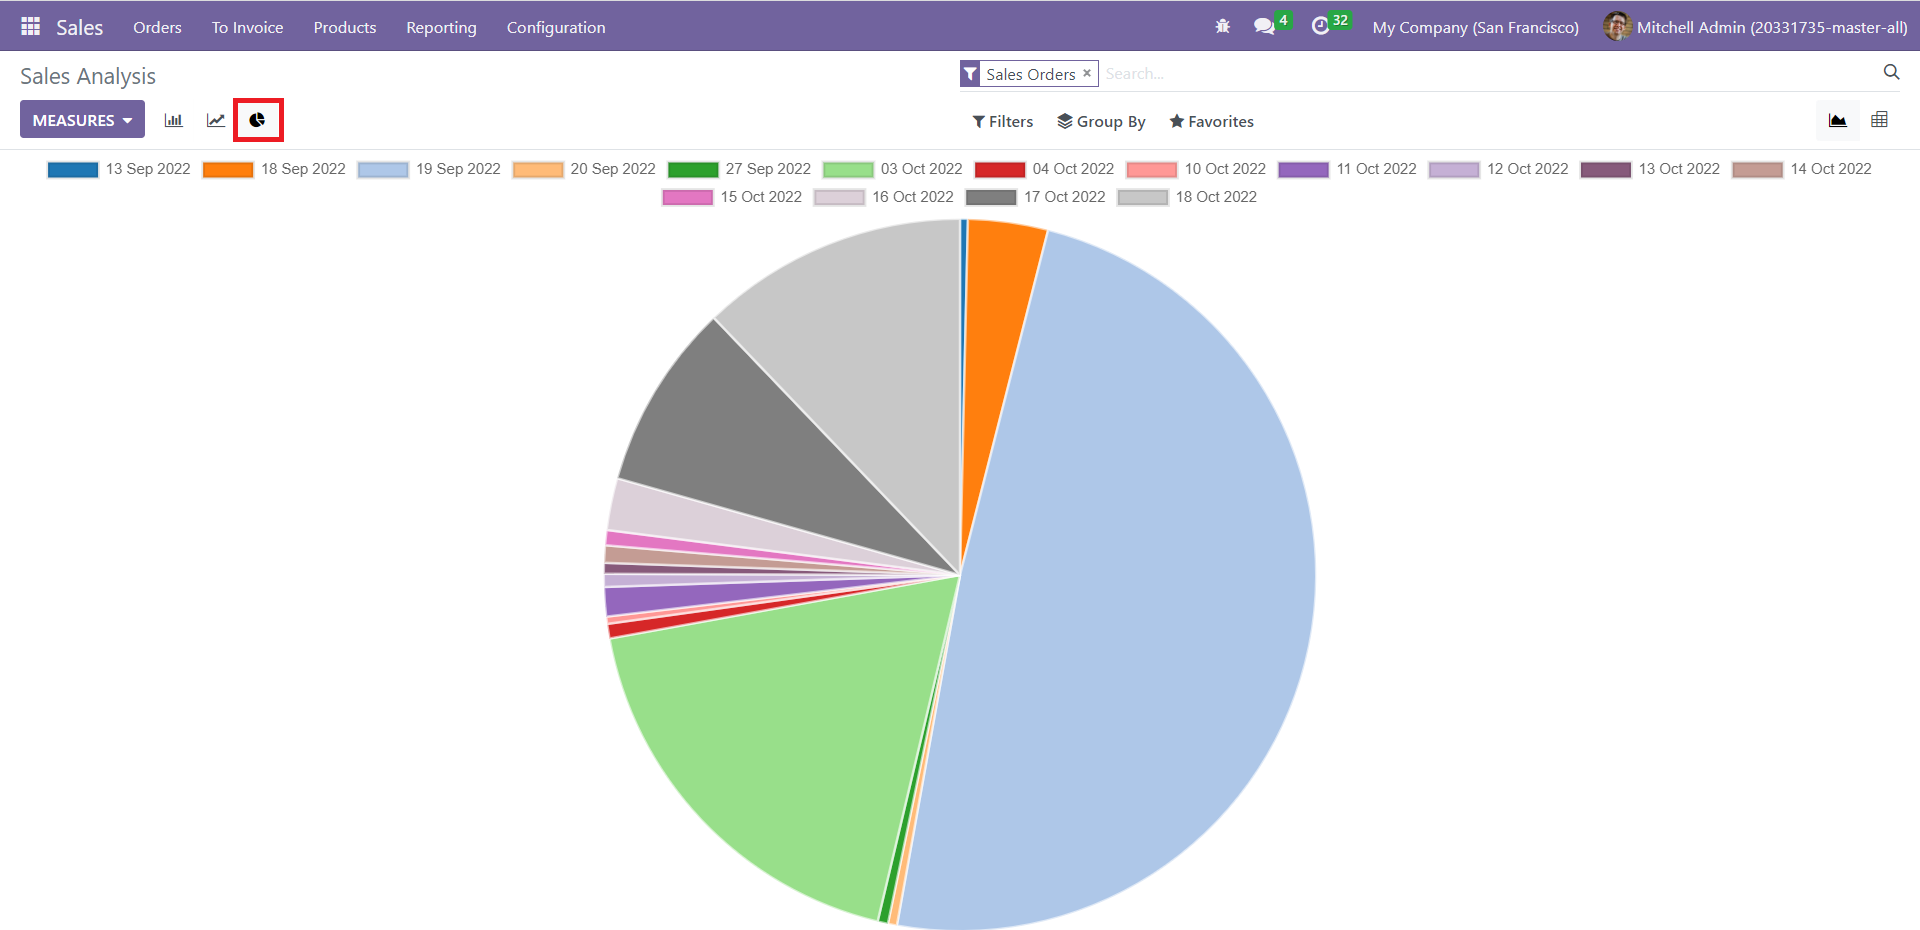
Odoo 16 has provisions for viewing the reports in both Pivot and Graphical views. The Graphical view has three modes: Bar Chart, Line Chart, and Pie Chart. The sample images of each of these views are shown below.
Bar Chart
Line Chart
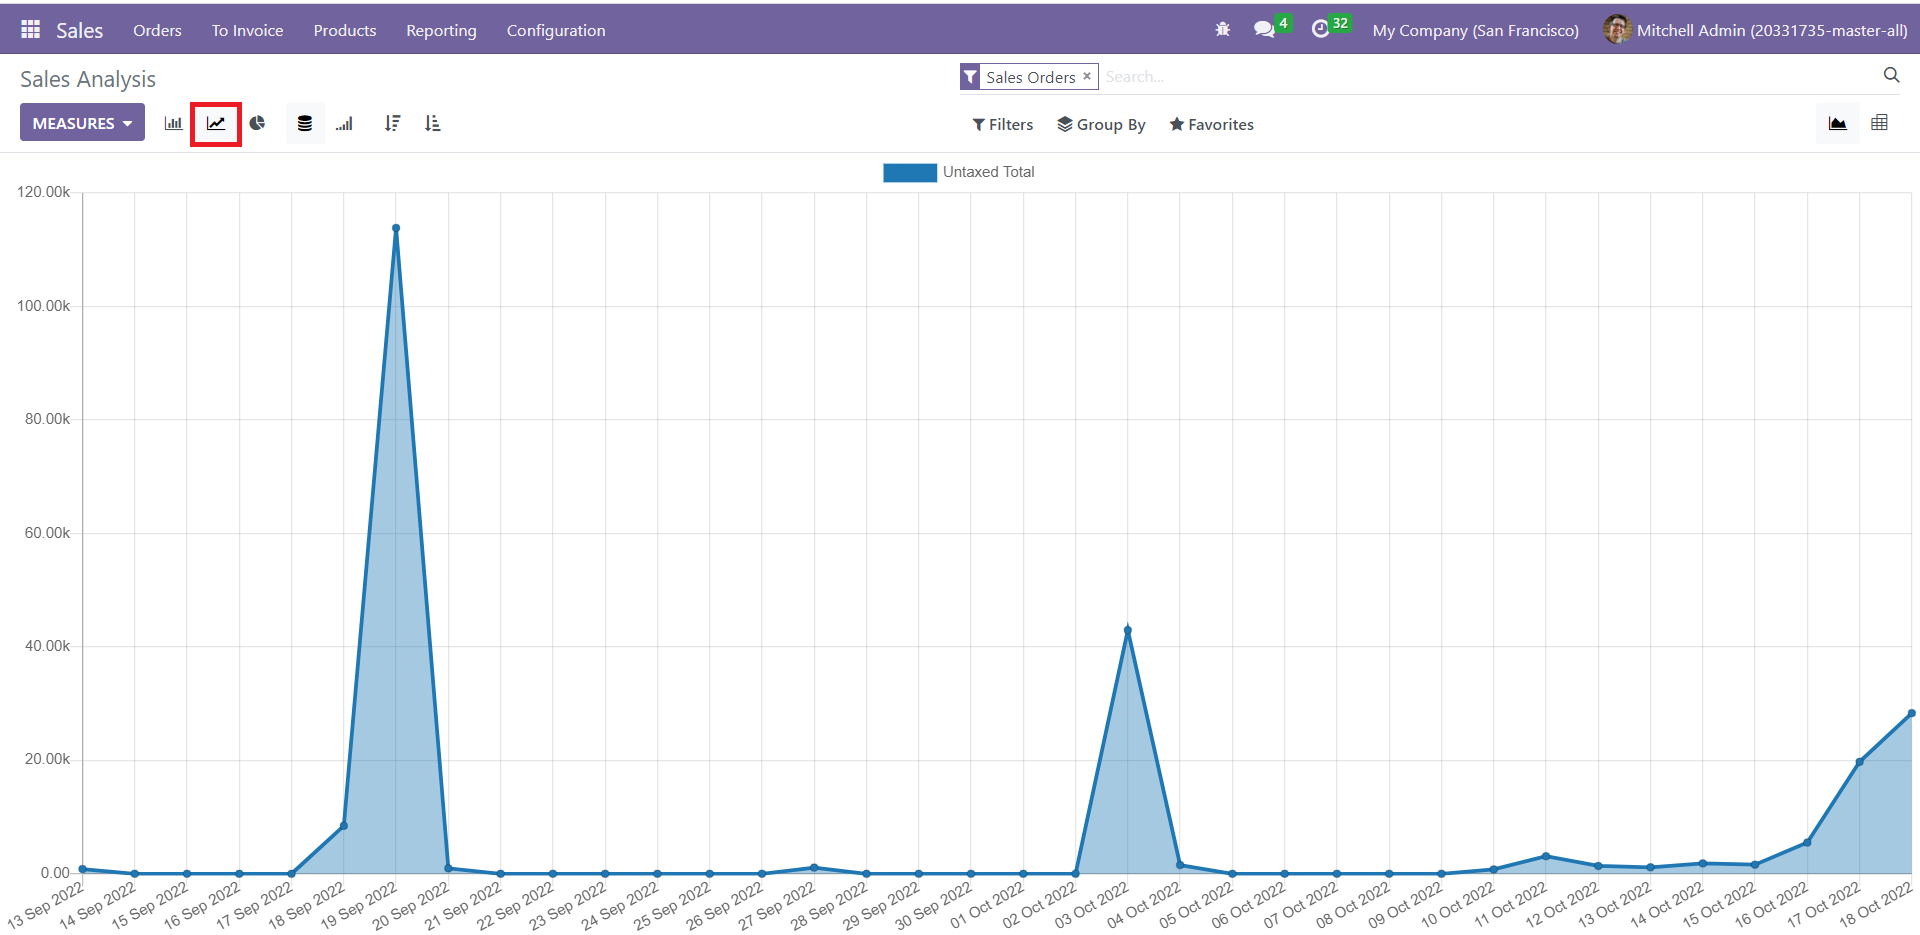
Line Chart
The Odoo 16 Sales module facilitates the smooth functioning of all sales-related activities in your company. Besides, it also acts as a unique system for micromanaging your quotations.