Odoo 16 Community Book
INVENTORY
The Inventory module of the Odoo 16 Community version allows you to categorize and manage your company’s inventory-related functions. Apart from organizing and tracking product stock, it executes different inventory tasks. Moreover, using this module, you can easily manage your product’s quantity and keep tabs on all the orders. The Inventory module can productively influence your firm’s profit margin by integrating with the modules like Sales, Point of Sale, Purchase, Accounting, Manufacturing, Repairing, etc.
To begin with, you need to configure all the products into the module. Let us look at the configuration, cataloging, and management of products in the Inventory module.
Products
The Inventory module in Odoo 16 is an excellent platform for storing and configuring product-related data. The Products tab allows you to add new products and their variants to the module. You can also edit or delete these records if required. Select ‘Products’ from the dropdown list of the Products tab. The Products window, by default, will project the Kanban view of all the products configured in the module. You can switch the display to a list view using the List view icon on the window's top right corner.
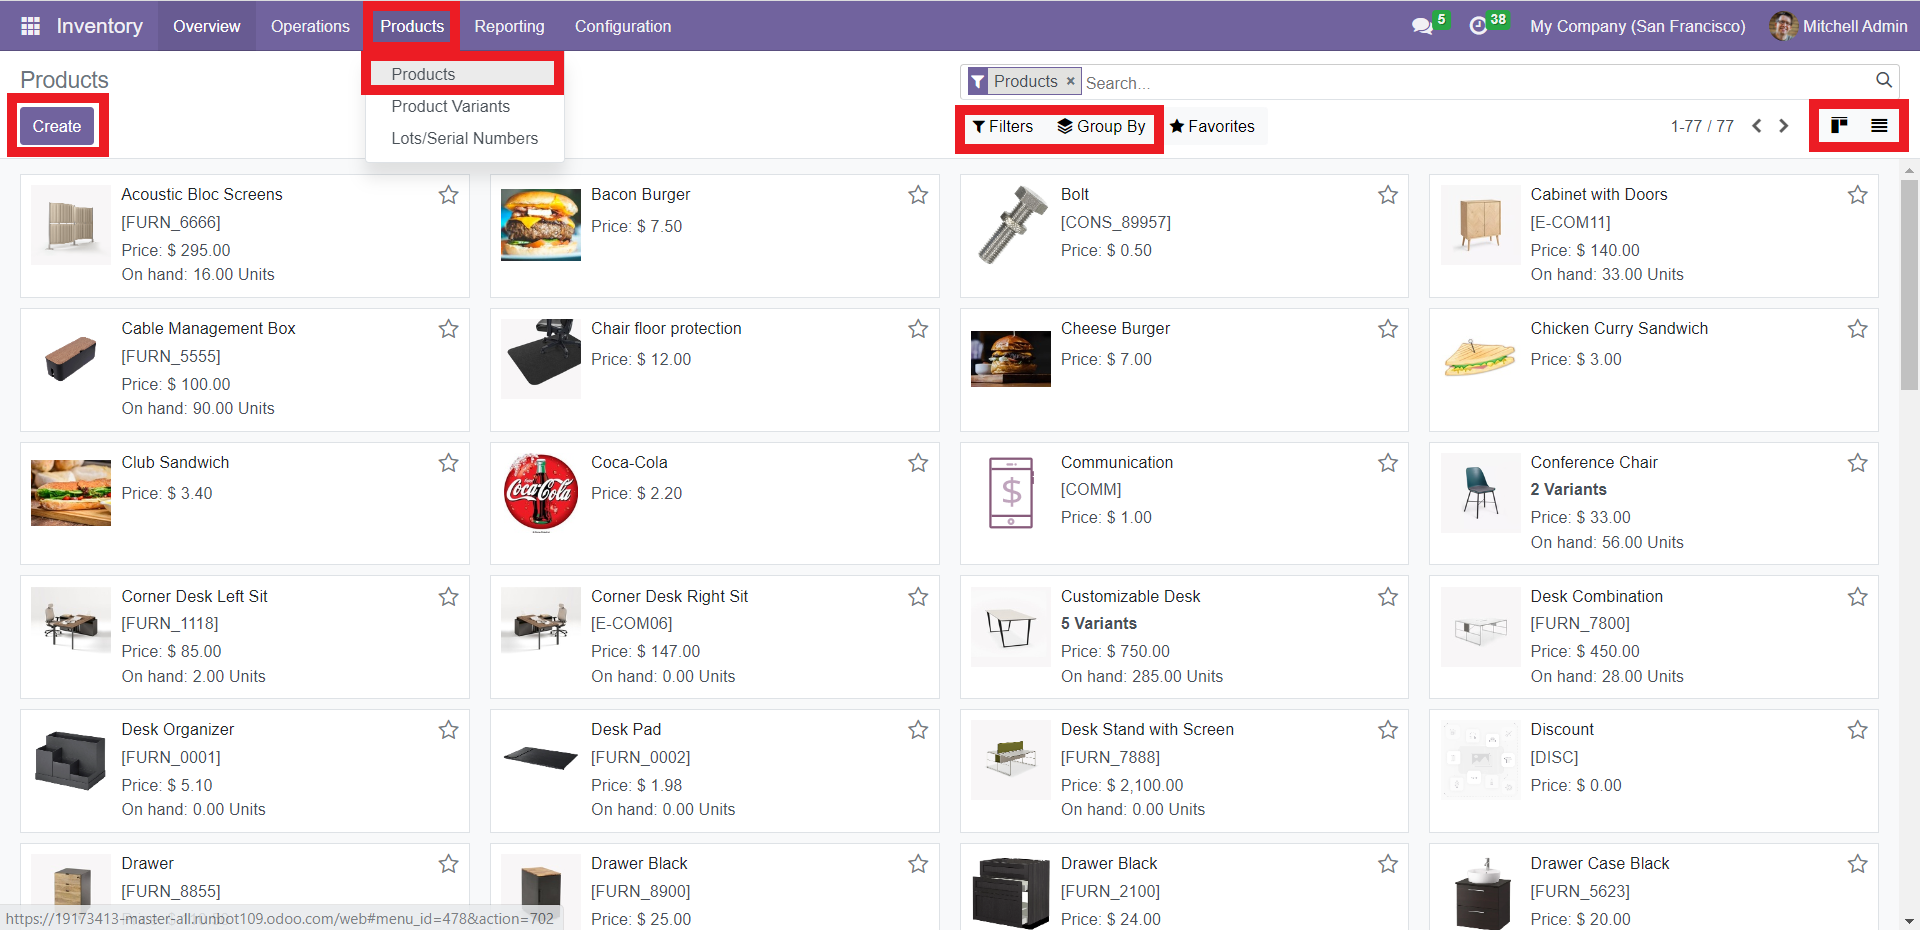
This module allows you to separate and analyze specific product records using the Filters and Group By options. You can apply the desired filter from the dropdown list of ‘Filters,’ which has the options like Services, Products, Published, Available in POS, Can be Sold, Can be Purchased, Can be Subcontracted, Can be Expensed, Available Products, Negative Forecasted Quantity, Favorites, Warnings, Archived, and Add Custom Filter.
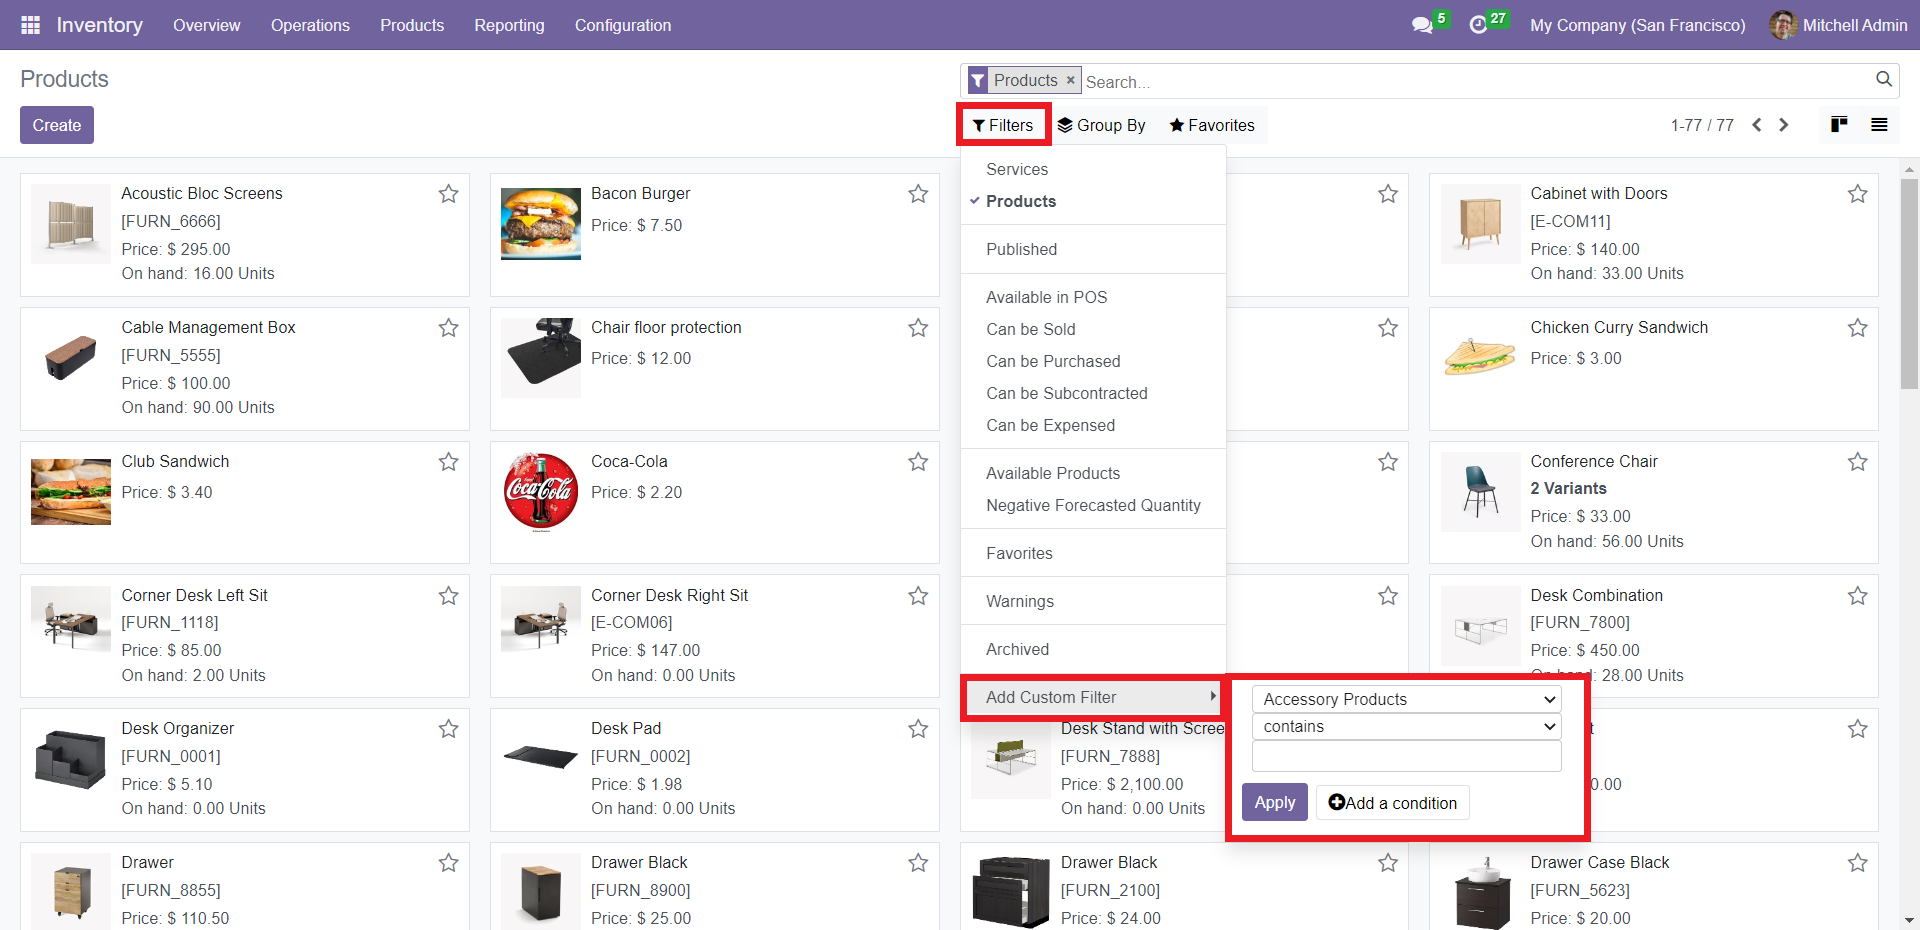
If you want to add custom filters, select the required parameters from the two dropdown boxes and enter the condition in the third box. Finally, click on Apply.
You can use ‘Group By’ to categorize the records according to specific groups. Select the appropriate group from Product Type, Product Category, POS Product Category, and Add Custom Group.
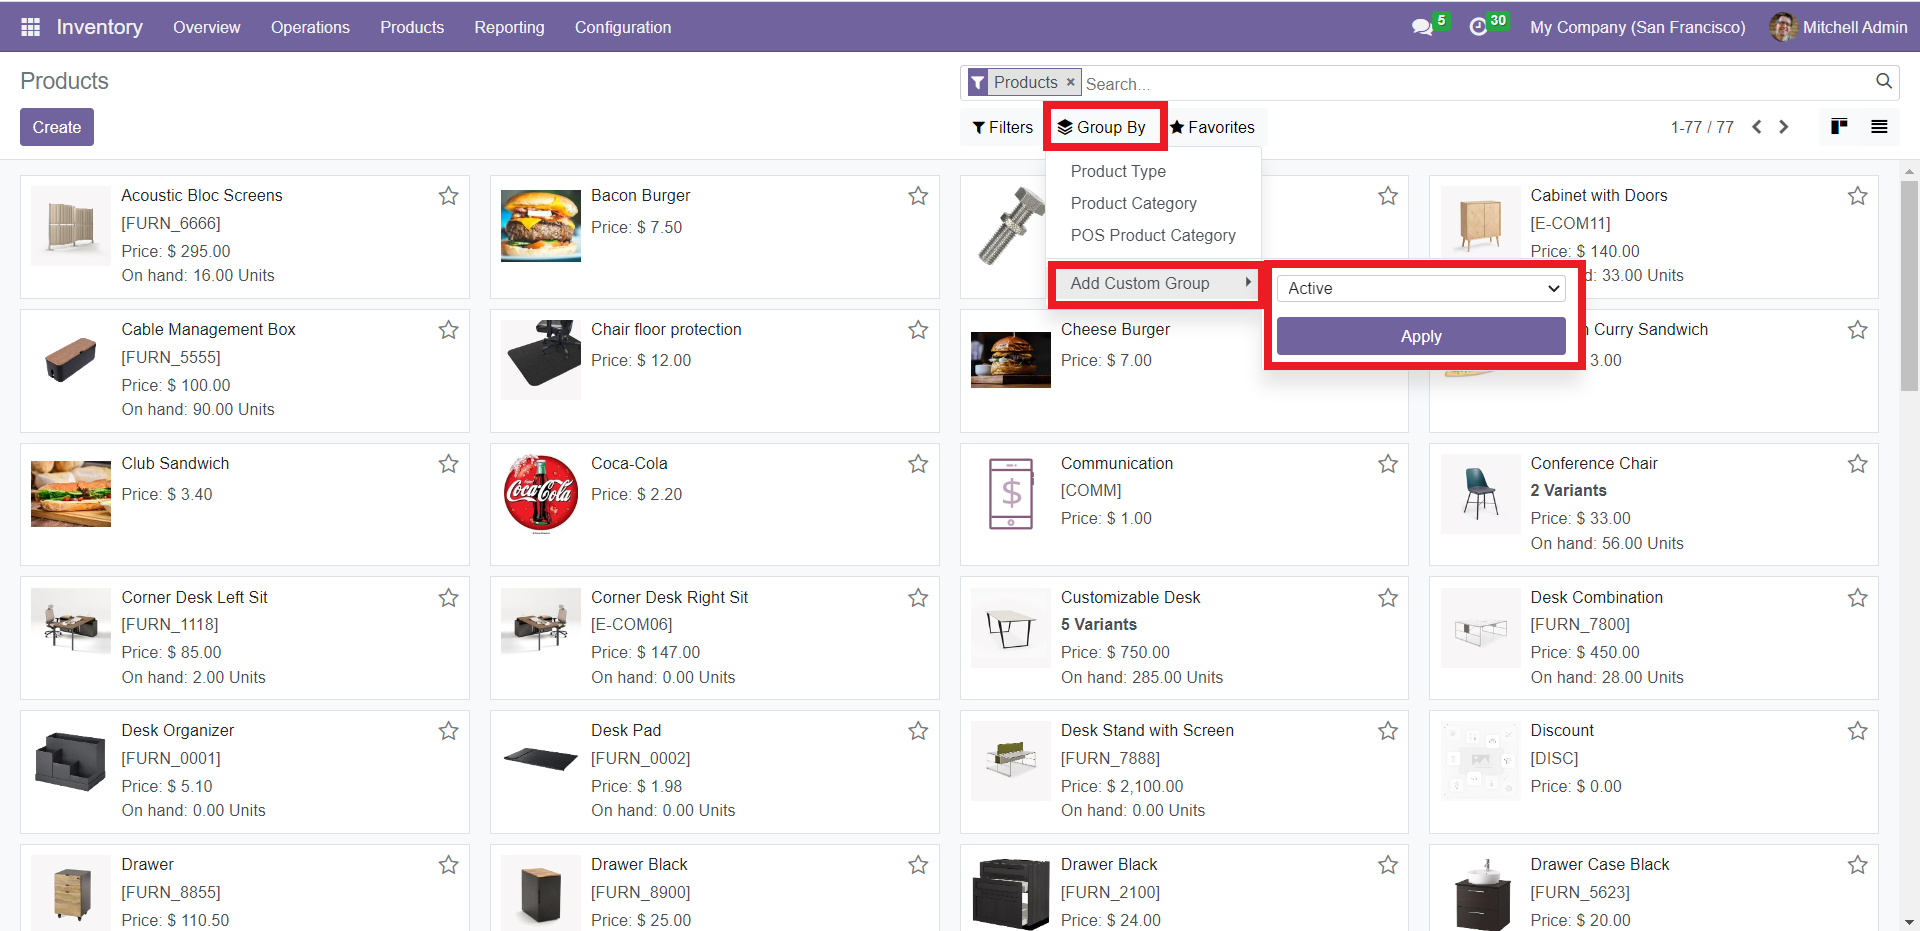
To add a custom group, pick the suitable group from the dropdown list and click on ‘Apply.’
Using the Favorites section, you can save the filters of your choice so that you don’t have to apply them all over again. The dropdown list of this section offers the options like ‘Save current search,’ ‘Import Records,’ and ‘Add to my dashboard.’
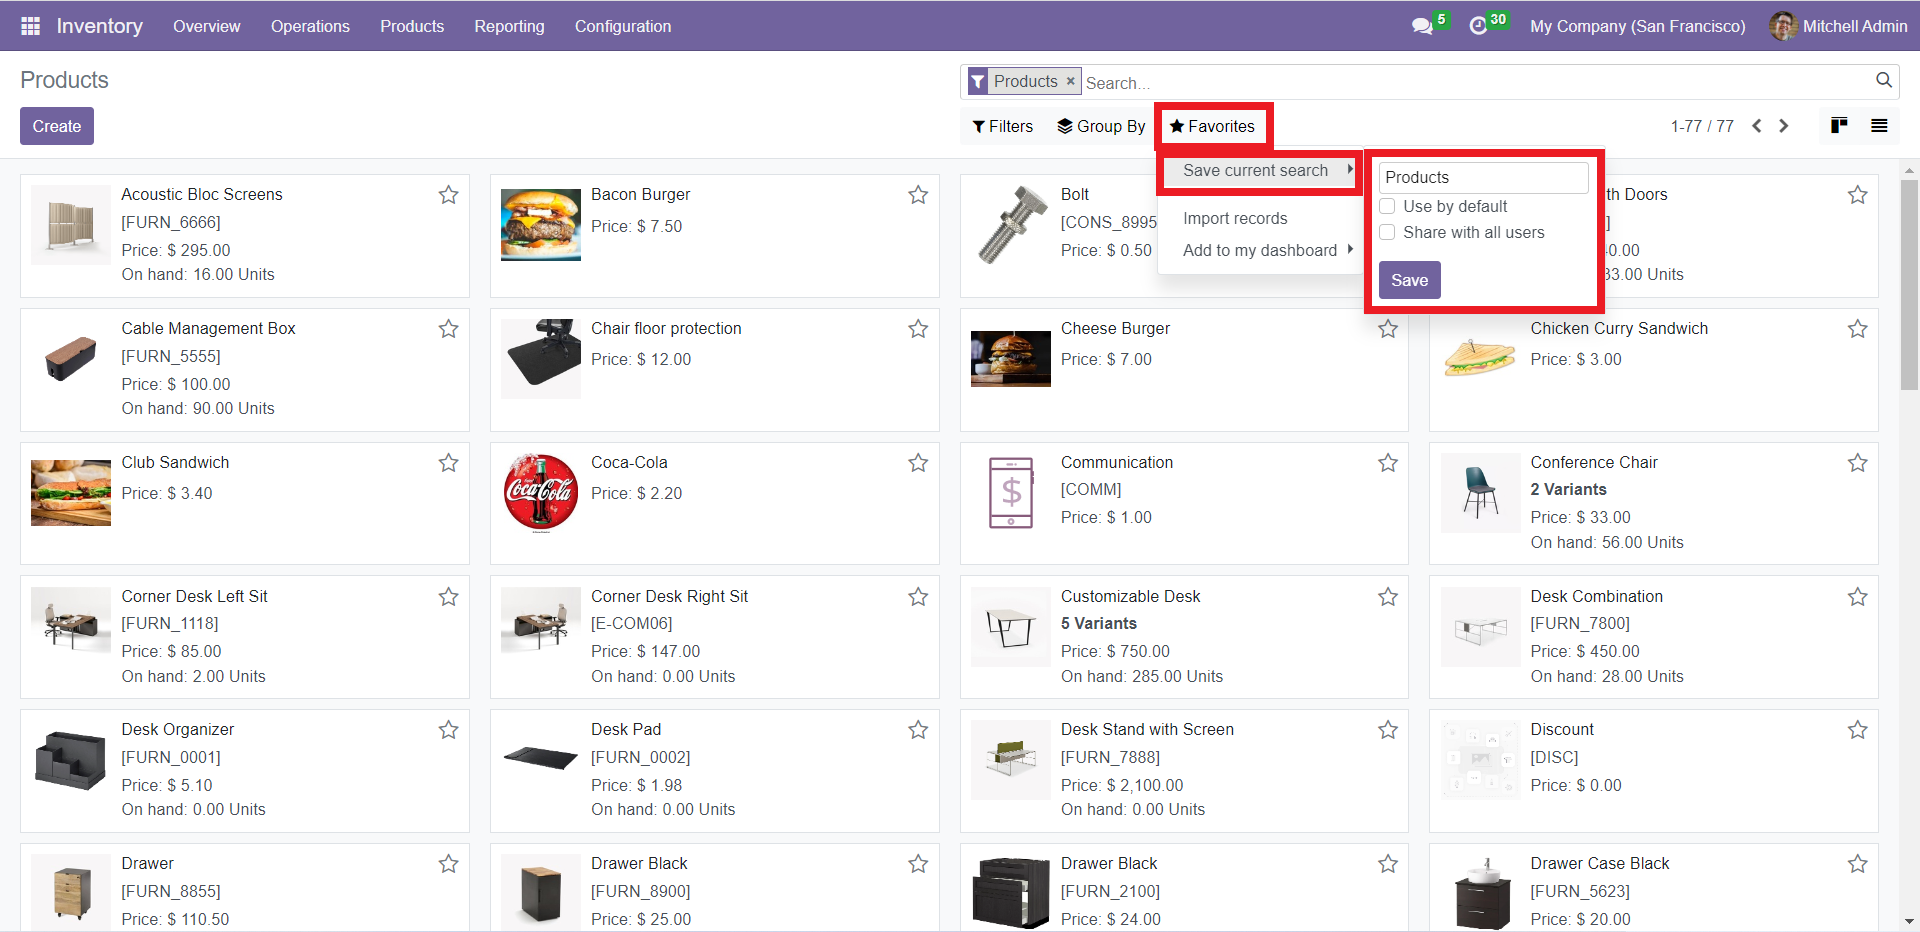
‘Save current search’ has a sub-section where you can provide a name for your applied filters. If you check the ‘Use by default’ box, the Products window will show only those products by default. ‘Share with all users’ will help you share this filter with the rest of the users. Click on ‘Save’ to bring these modifications into effect. The ‘Import records’ option will feed the product data into the system from the form view, easing the labor of entering individual records manually.
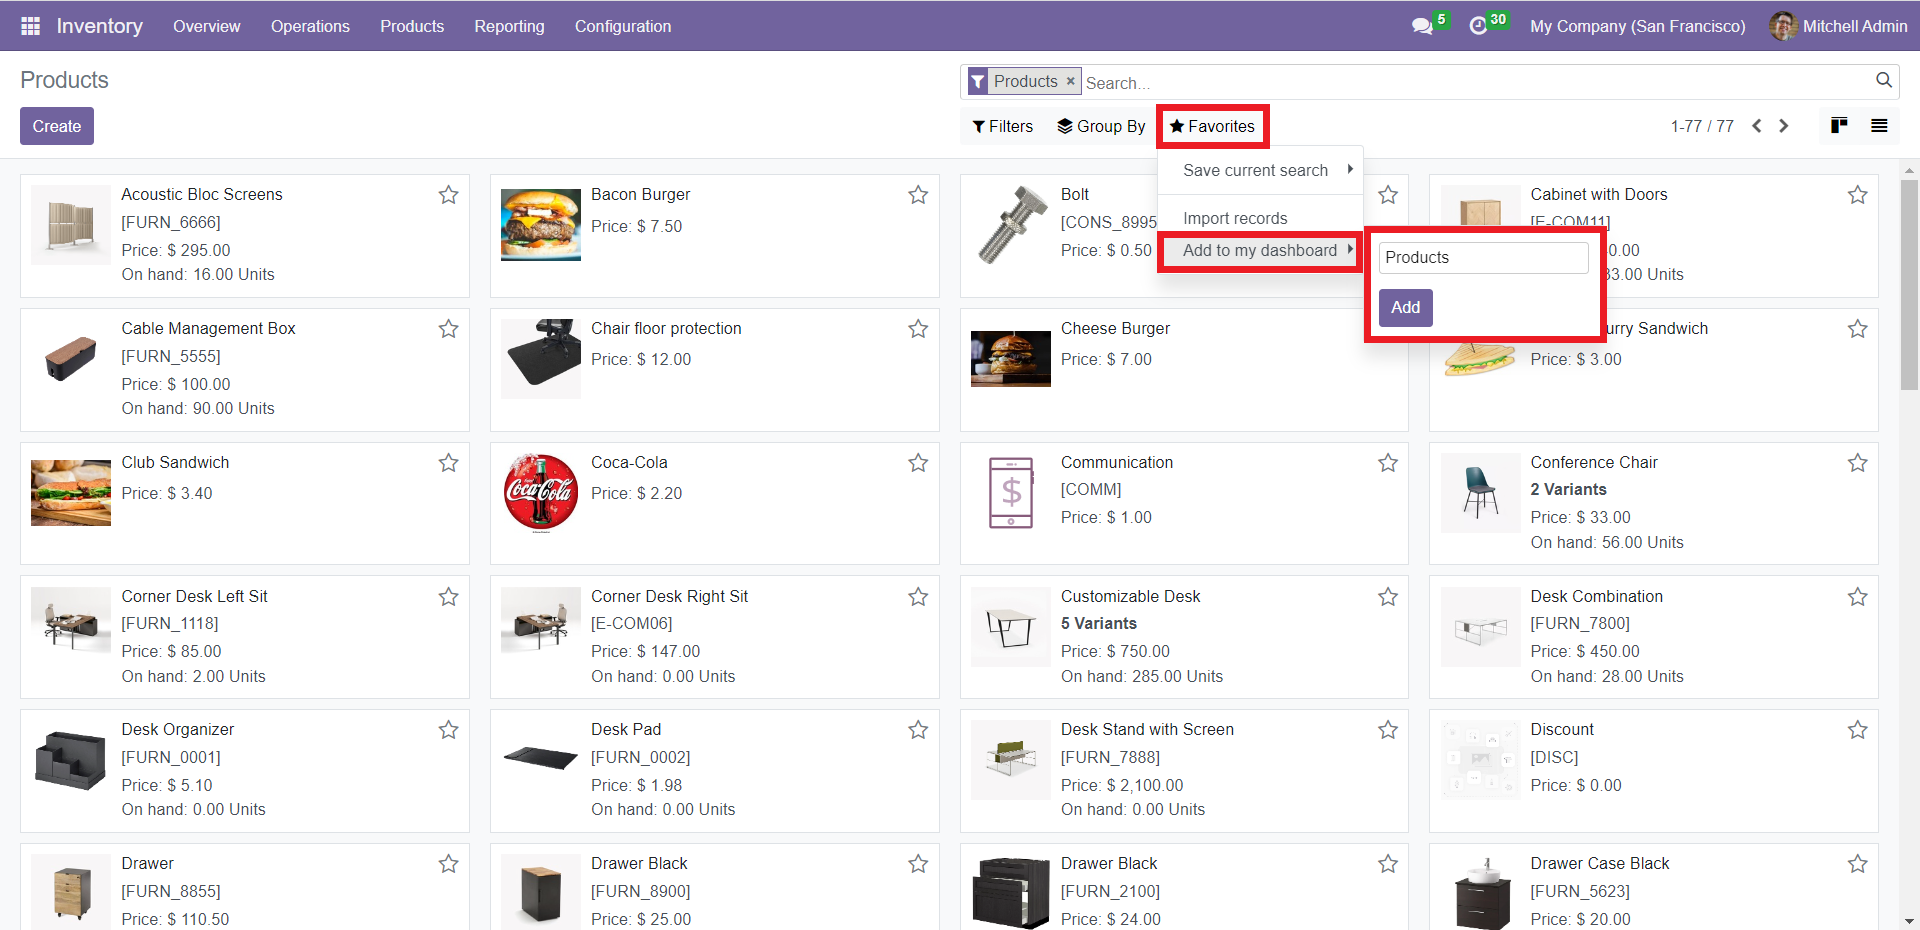
If you want your filtered data to be visible in the Dashboard module, click on ‘Add to dashboard.’ The existing filter will appear in the text box by default. You can change the name of the filter according to your preference. Finally, click on ‘Add.’ Open the Dashboard module to see these filtered records.
The preview of each product will showcase its name, image, and price. Click on a particular product’s preview to get its detailed overview. Odoo 16 allows you to directly edit a specific record in its form view without using a separate Edit button. This feature is a timely update to the new version.
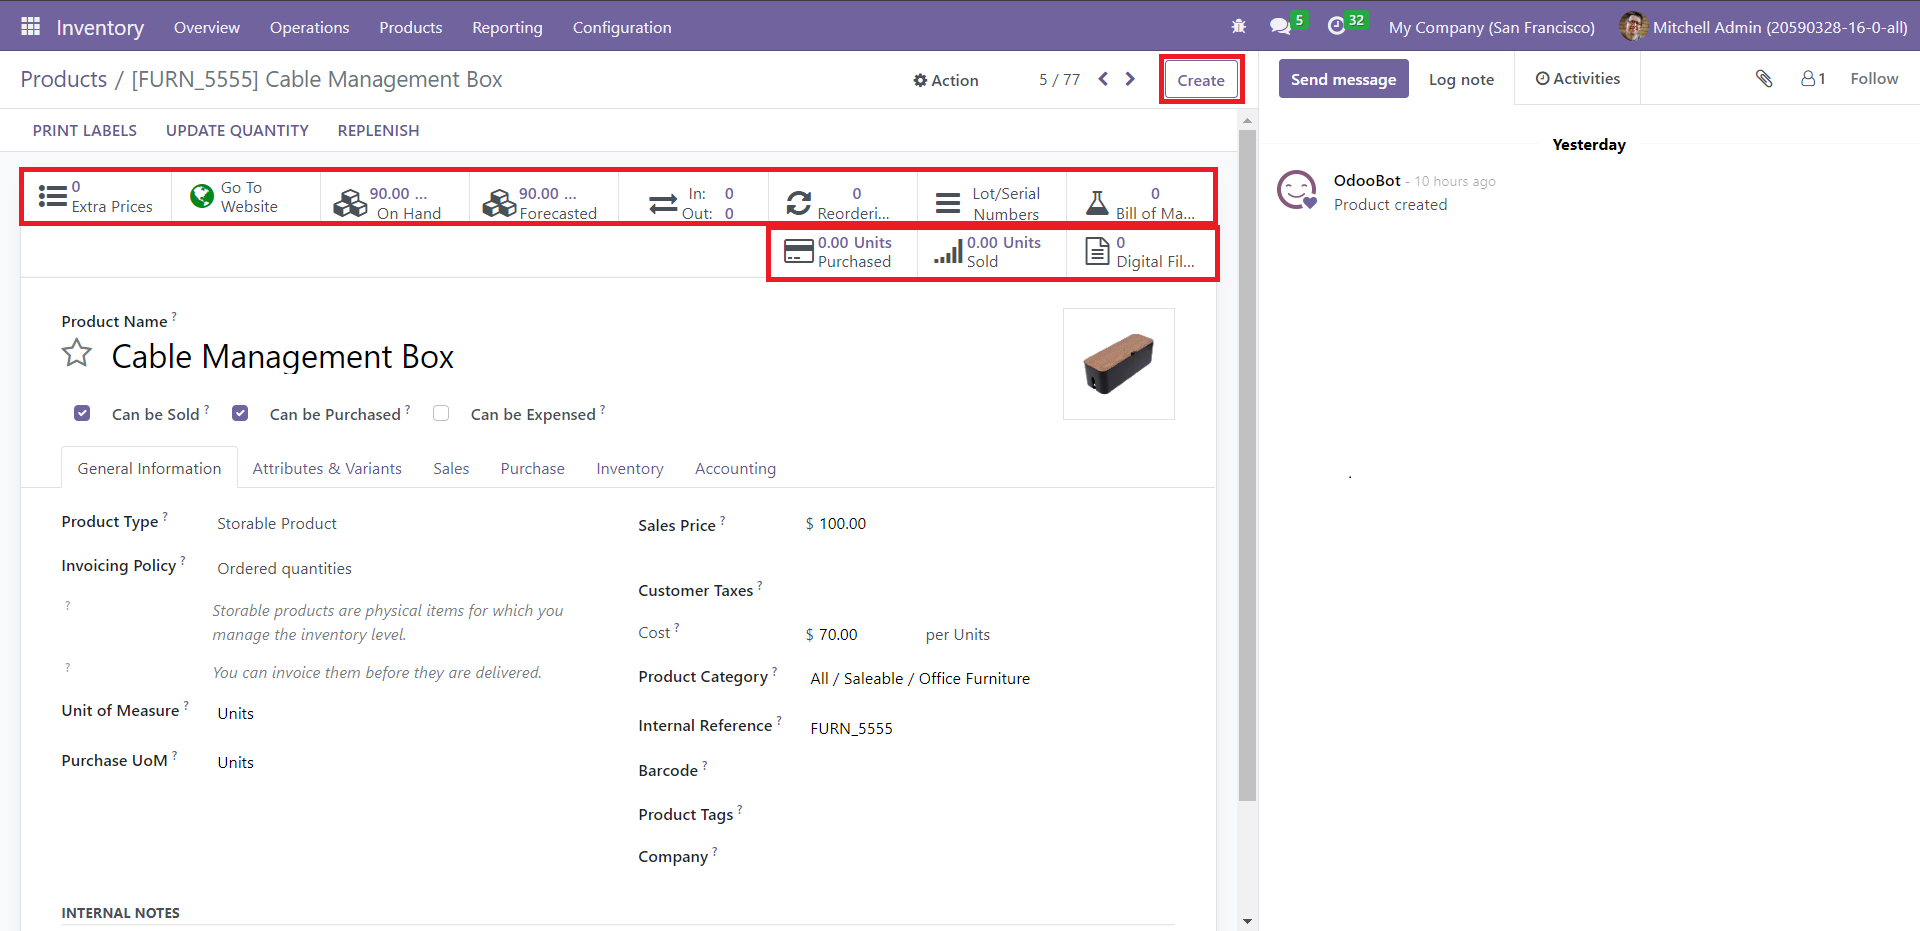
The window has the provision for monitoring and administering the sections – Extra Prices, Go to Website, Number of Units On Hand, Number of Units Forecasted, In and Out (Product Moves), Reordering Rules, Lot/Serial Numbers, Bill of Materials, Purchase Analysis, Sales Analysis, and Digital Analysis. Additionally, you can notice that the placement of the Create button has shifted to the right in the form view. This feature is one of the new updates of Odoo 16. To perform additional operations, you can go to ‘Action.’
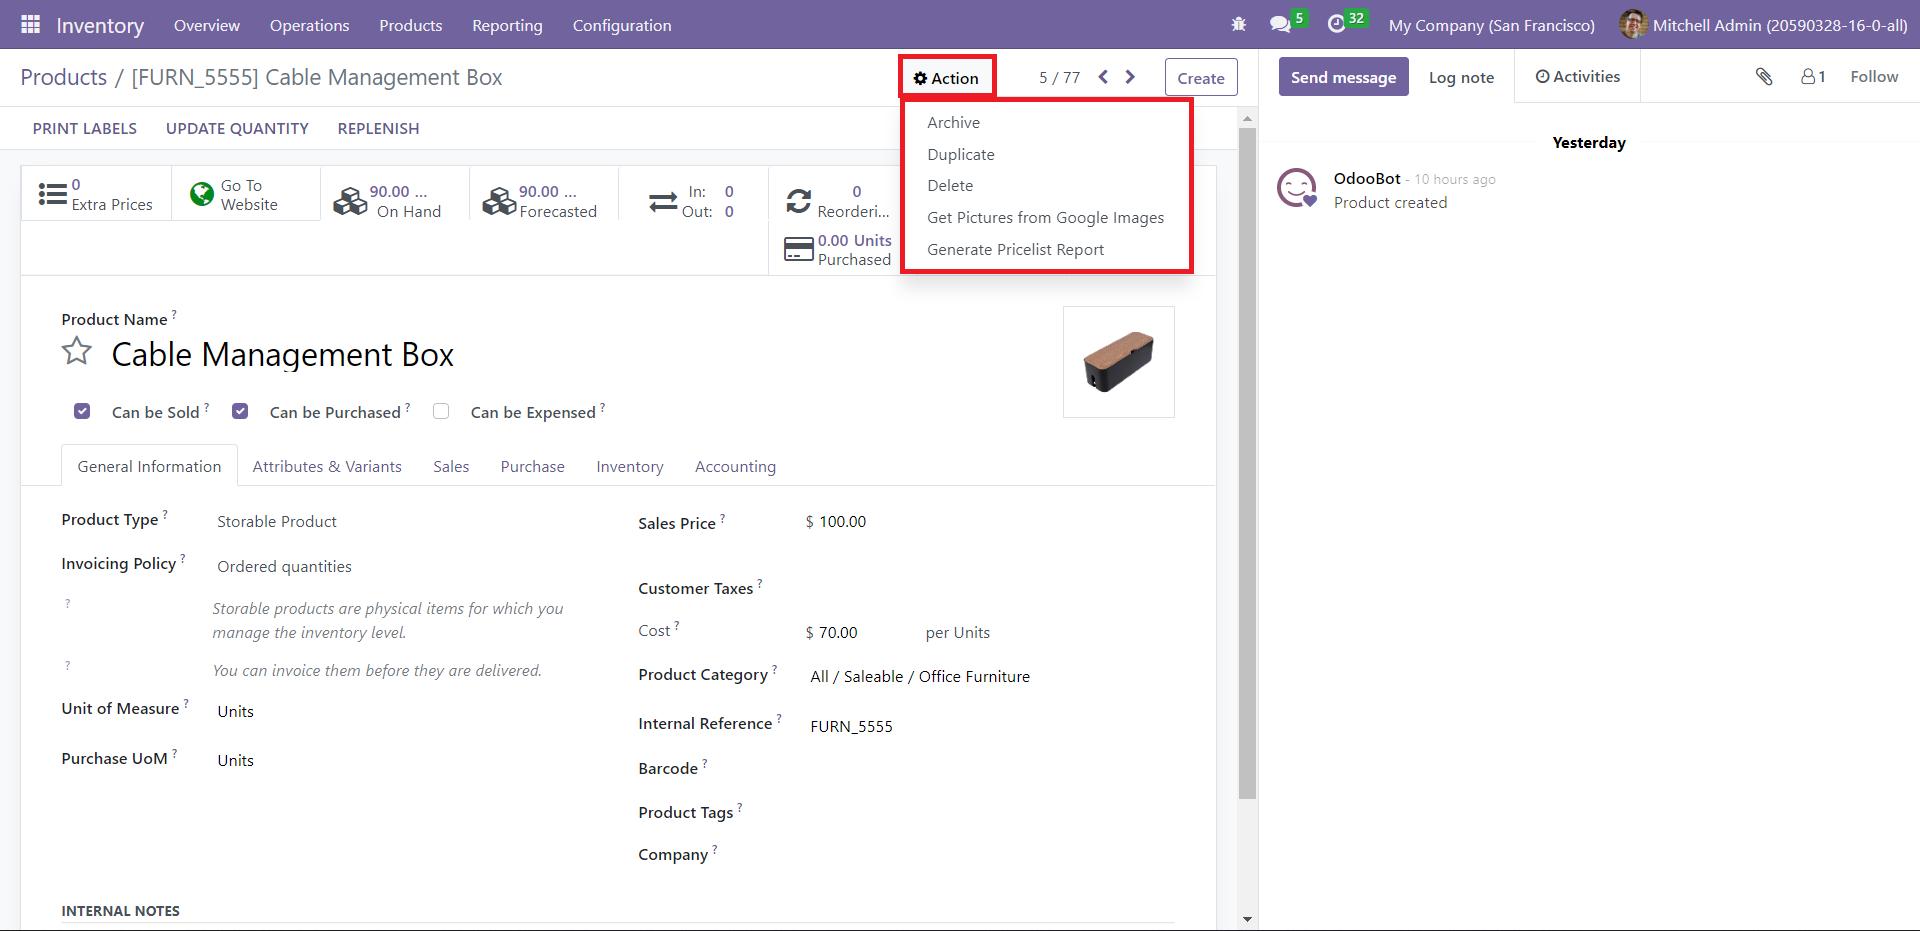
You can perform various actions according to the options – Archive, Duplicate, Delete, Get Pictures from Google Images, and Generate Pricelist Report.
Click on ' Create' to add and configure a new product to the system. You will get a window to enter the product’s details with sections like General Information, Attributes & Variants, Sales, Purchase, and Inventory. You can add this product to your Favorites by clicking on the star icon next to the product’s name.
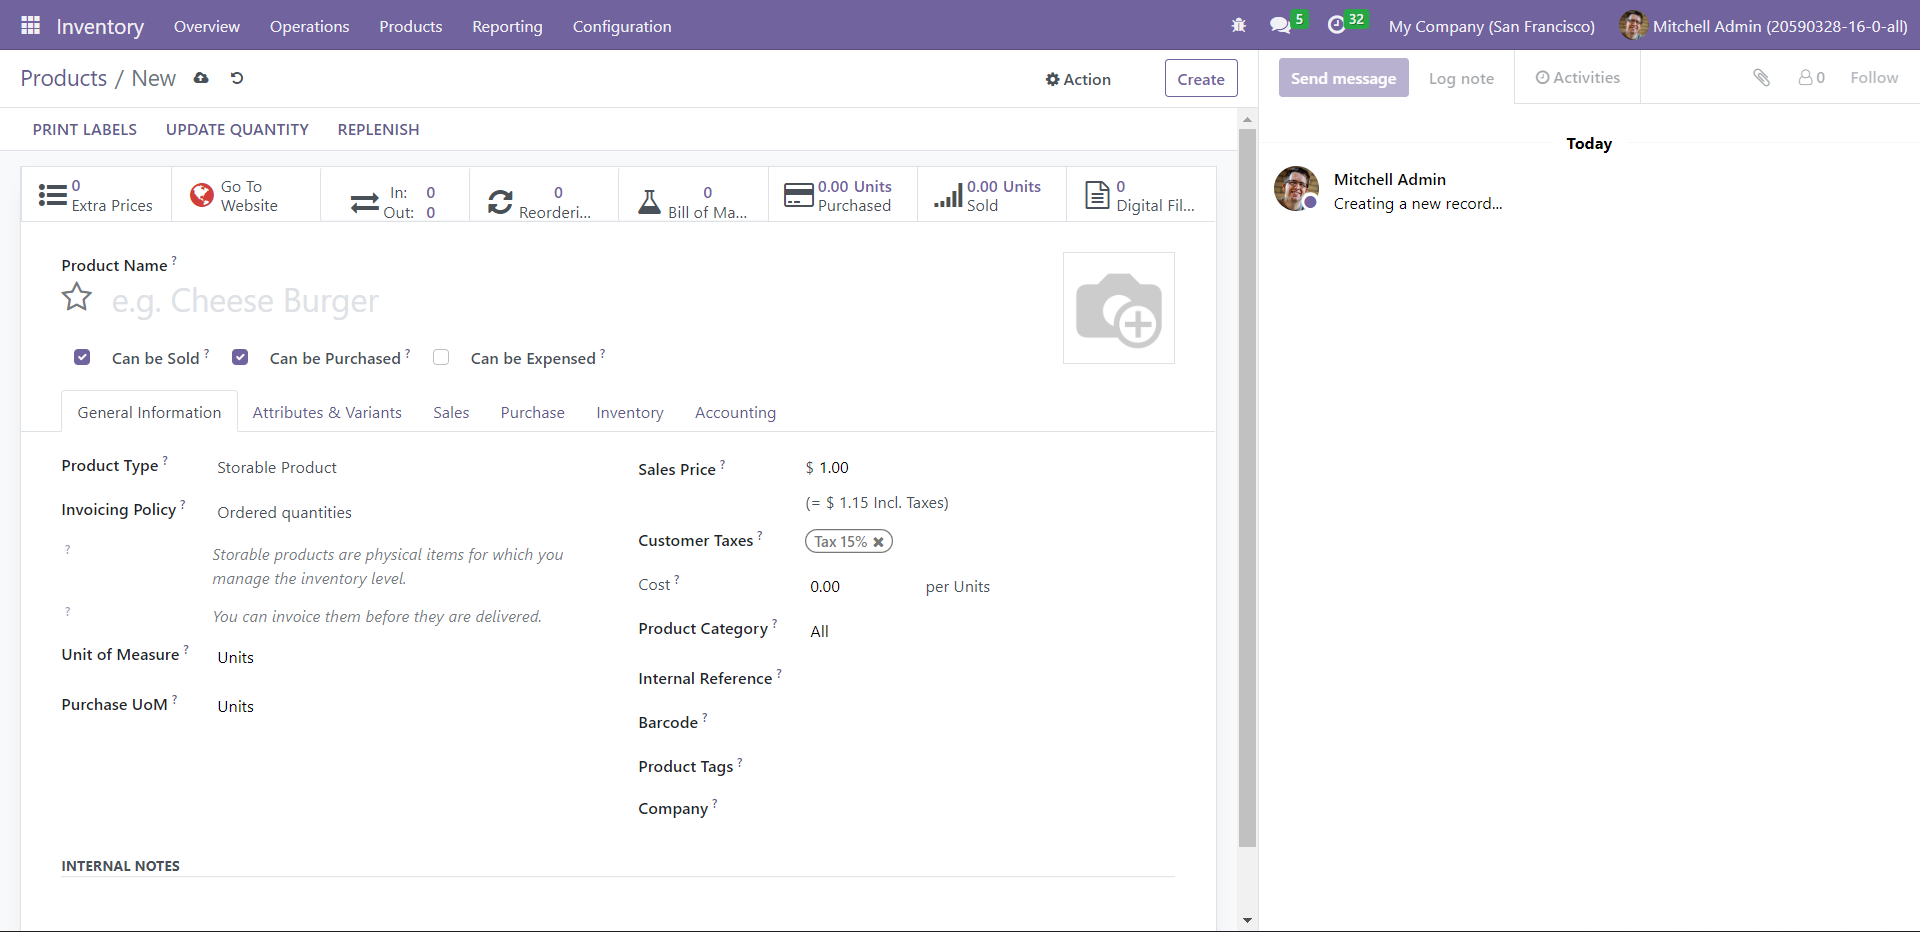
You can assign your product’s name in the Product Name field and insert an image by clicking on the camera icon. Besides, you can also check the boxes applicable to your product from the options – Can be Sold, Can be Purchased, and Can be Expensed. You can decide the Product Type under the General Information tab. It will show a dropdown list with options like Consumable, Service, Storable Product, Event Ticket, Course, and Event Booth. Each of these sections is explained below.
Consumable Product: This is a physical product that can be received and delivered. This product’s stock is not managed.
Service Product: The type of non-physical product that your company provides.
Storable Product: You can manage the stocks of these products.
Event Ticket: These are products that have tickets for an event.
Course: This option allows you to sell different courses as products.
Event Booth: You can list these stalls as products and sell them.
Under Invoicing Policy, you can choose whether you want to generate invoices on Ordered Quantities or Delivered Quantities. The former will create invoices for ordered products after the Order for Quotation is confirmed by Sales, whereas the latter will create invoices for the delivered products. You can assign the Unit of Measure, Purchase UoM, Sales Price, Customer Taxes, Cost, Product Category, Internal Reference, Products, Barcode, Product Tags, and Company name.
The Attributes & Variants tab allows you to configure the product’s variants to the record.
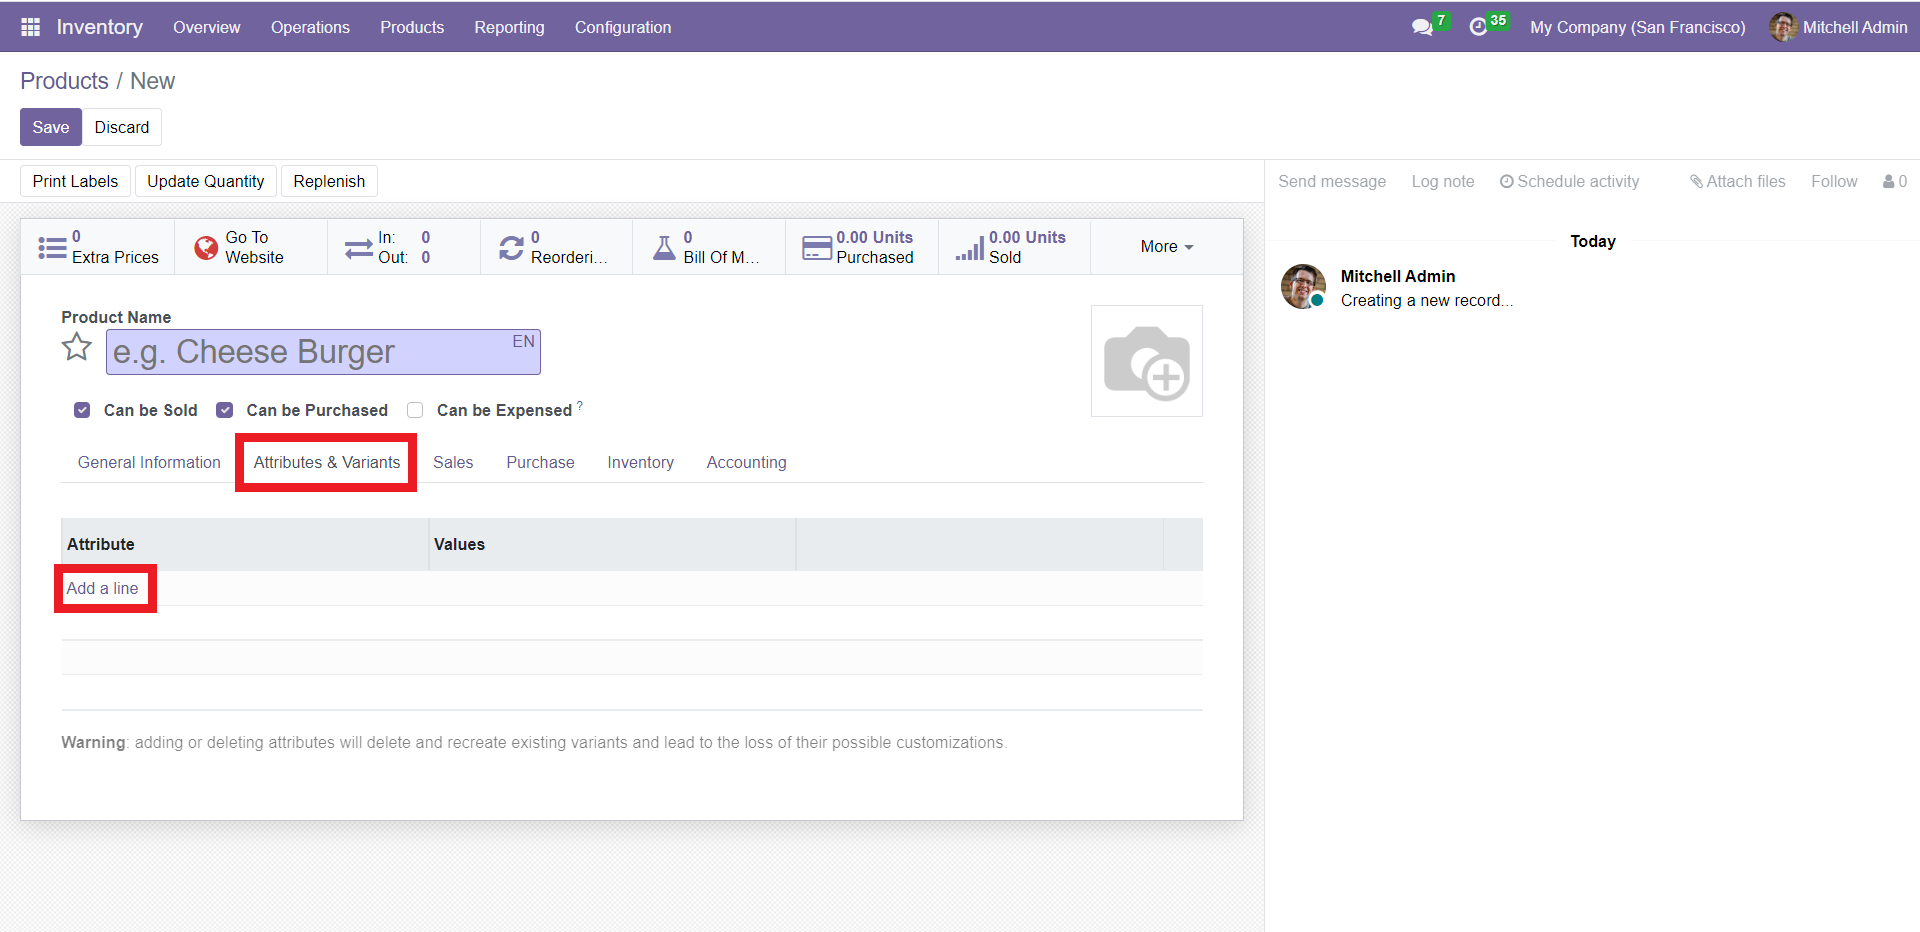
Click on ‘Add a Line’ to enter the variants and their corresponding attributes.
You may configure the details of the product associated with its sales under the Sales tab.
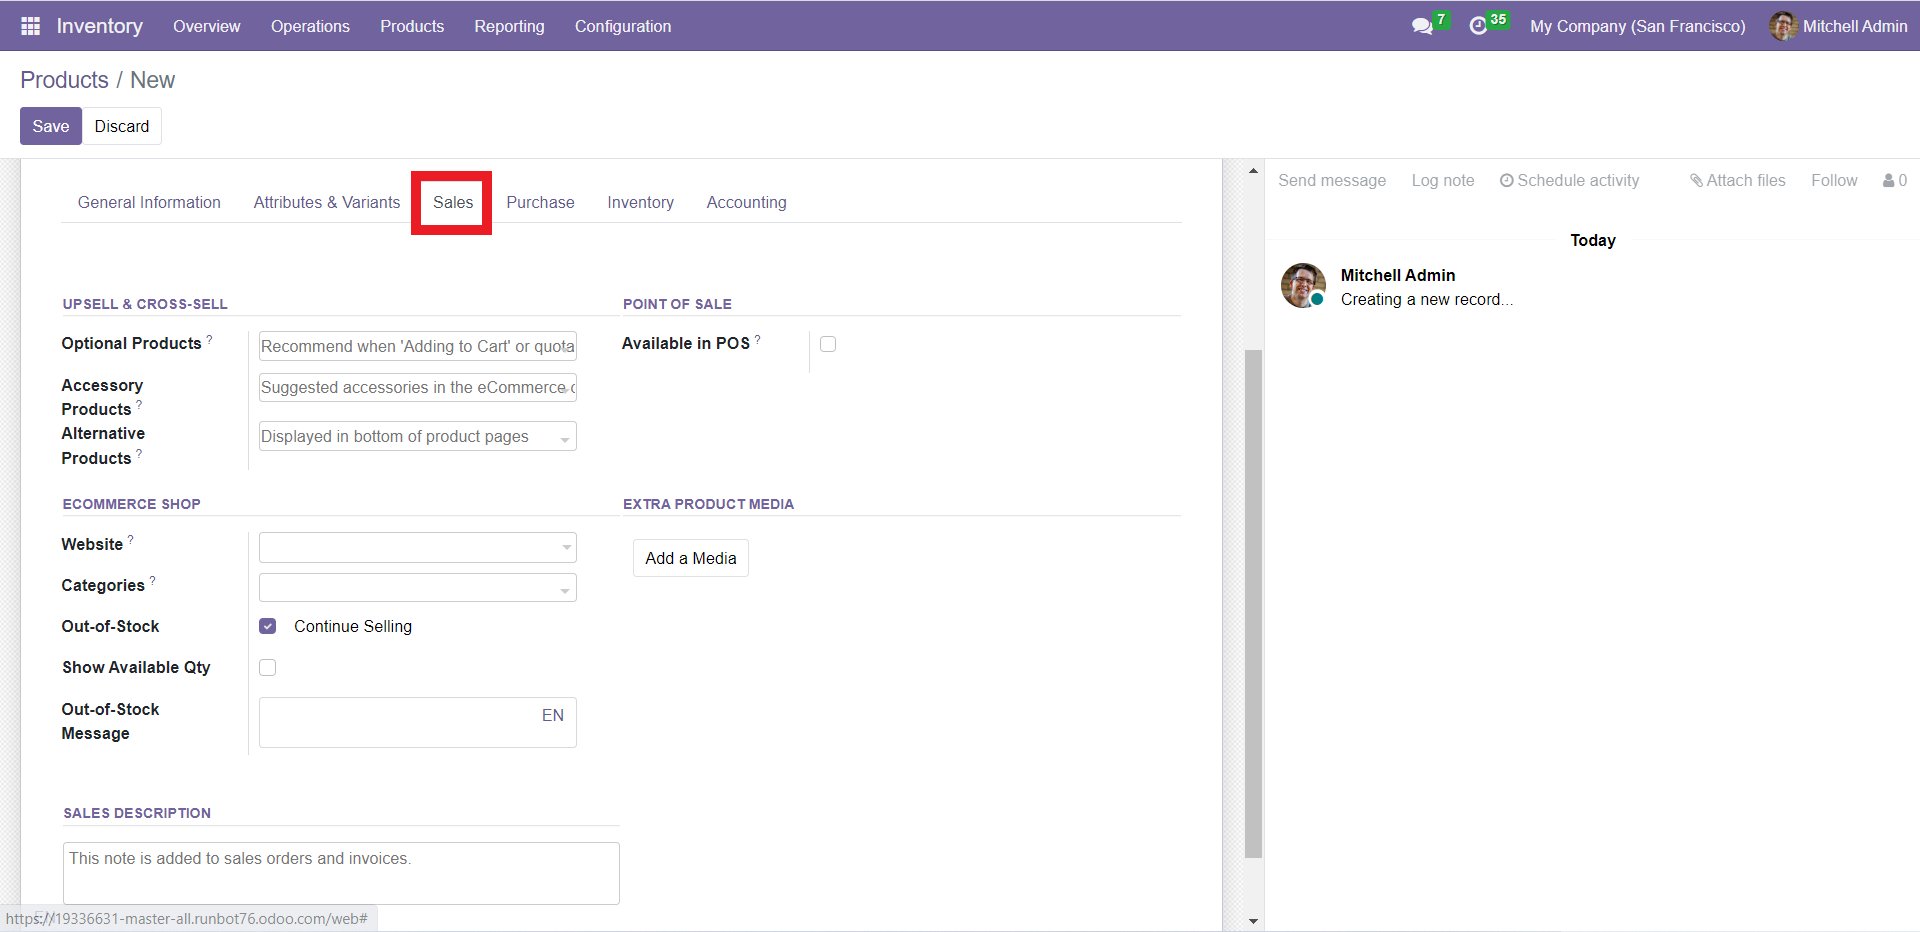
If you want to offer additional products along with the original product, you can specify them in the Optional Products section. The system will recommend this product when the customer adds the main product to their cart. This suggestion will also occur when you create a new quotation with the parent product. Under ‘Accessory Products,’ you can add the products you want to appear when the customer reviews their cart before payment. The Alternative Products section suggests alternative options for the main product.
You can publish this product on your eCommerce shop by mentioning the name of the Website in the given space. In the Categories field, you can add eCommerce product categories to easily filter the products. If you want to sell the product in eCommerce, even if it is out of stock, you can activate the Continue Selling option. In order to show the availability of quantity on the eCommerce page, activate the Show Available Quantity option. You can set a message in the given space to show that the product is out of stock. Activate the Available in POS option to make the product available in your PoSsession. Any extra media can be added to the Extra Product Media session. In the Sales Description section, you can add a sales note which will appear on the sales order and invoice of the product.
In order to generate warning messages while selling this product, you can activate the Waring feature from the Settings menu of the Inventory module.
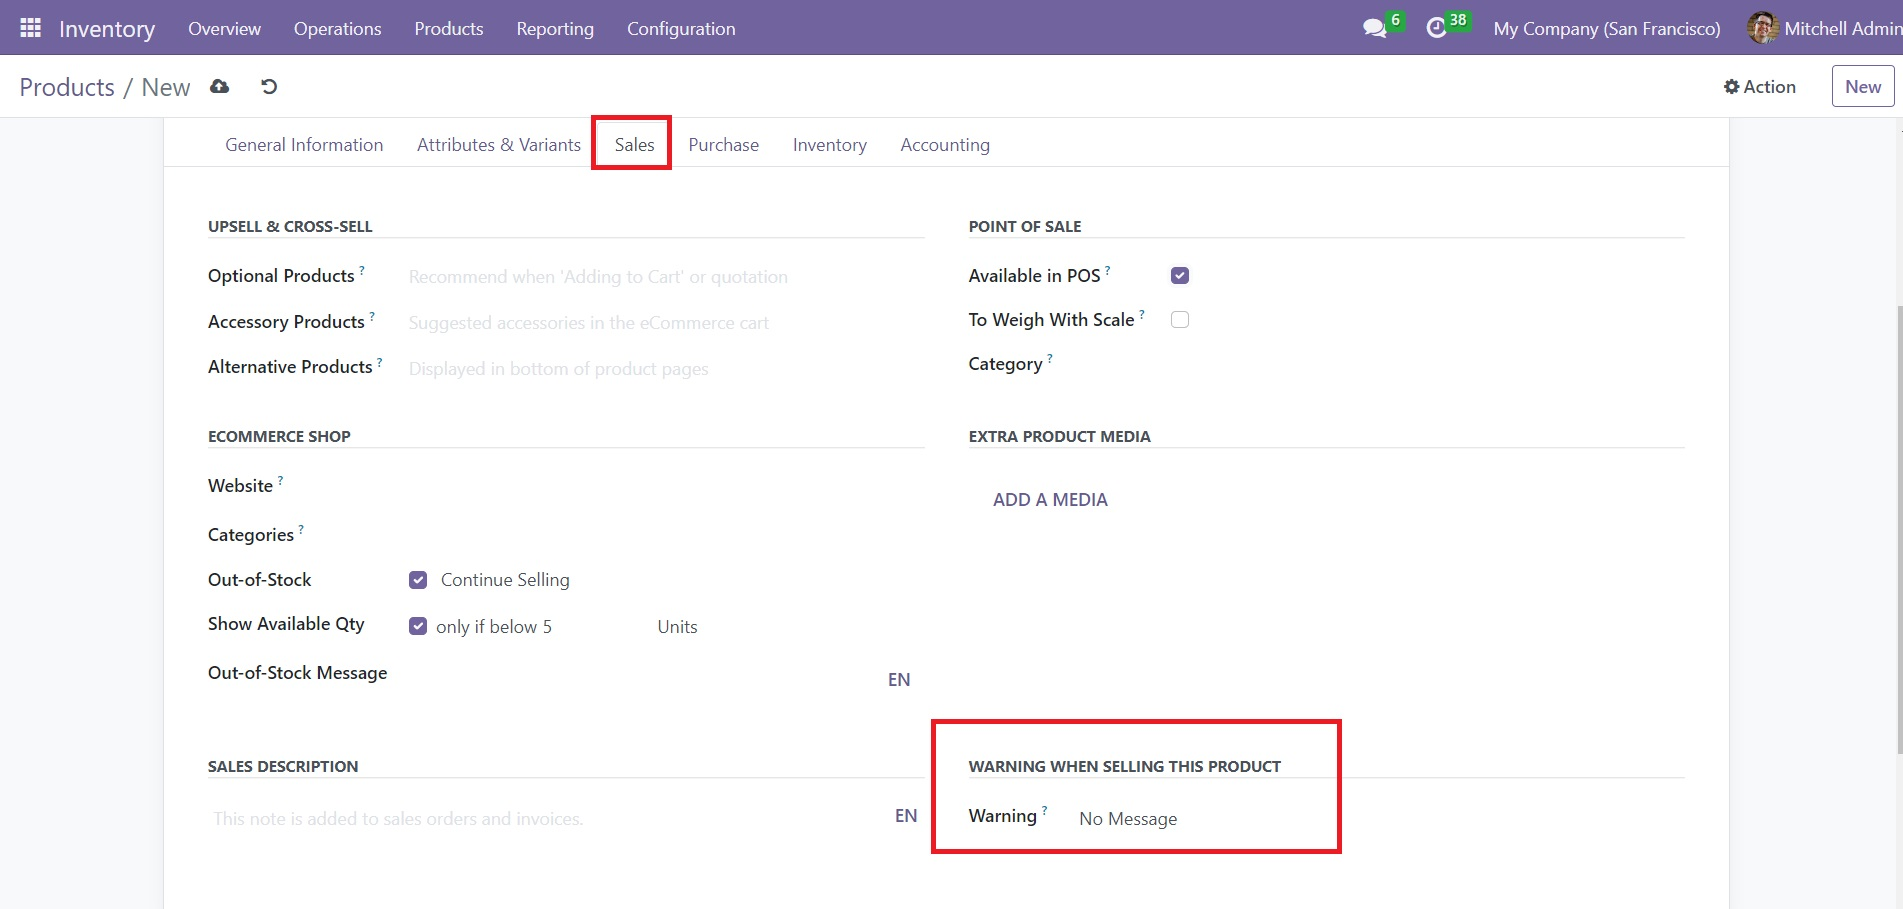
After activating this feature, you will get a new field under the Sales tab of the product form view as shown below, where you can set a warning message which will be sent to the respective customer while creating a sales order using this product.
To add purchase-related details, you can select the Purchase tab. The name of the Vendors can be added one by one using the Add a Line button.
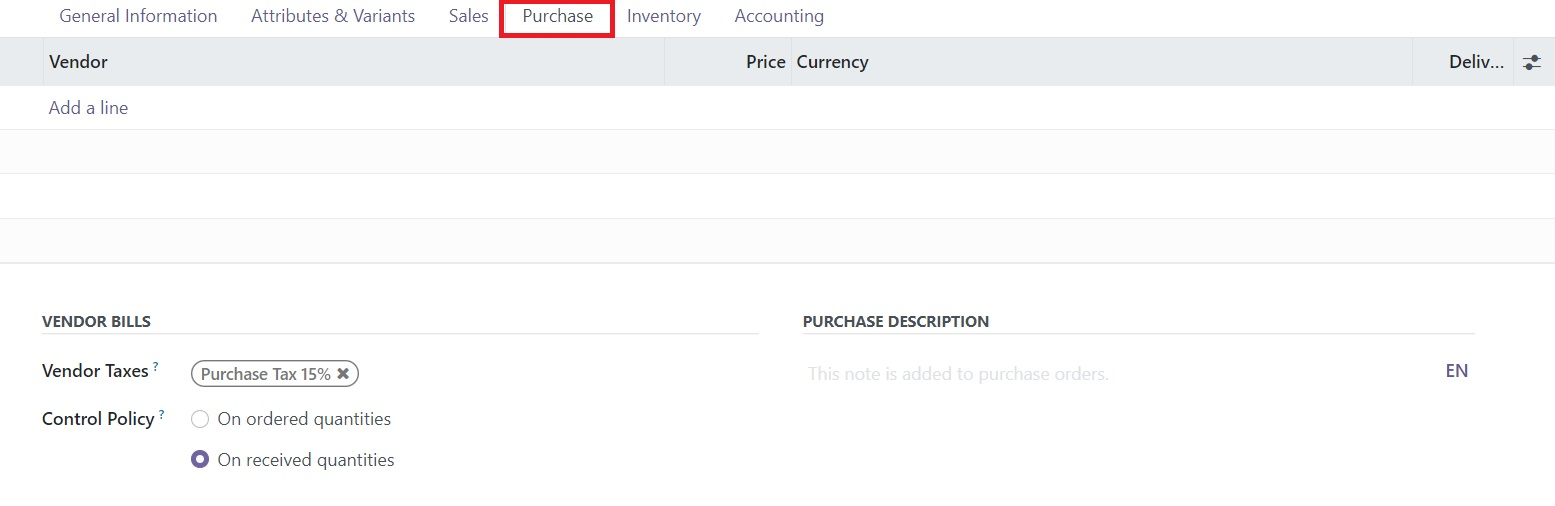
Here, you can add multiple vendors for a product and compare their prices. The default tax used while purchasing this product can be specified in the Vendor Taxes field. The Control Policy for vendor bills can be set as based on ordered quantities or received quantities. In the Purchase Description field, you can add notes which will appear on the purchase orders with this product.
In the Inventory tab, you can define the Routes of Operation of a product from the given option. The route can be set as Buy, Dropship Subcontractor on Order, Manufacture, Resupply Subcontractor on Order, and Dropship.
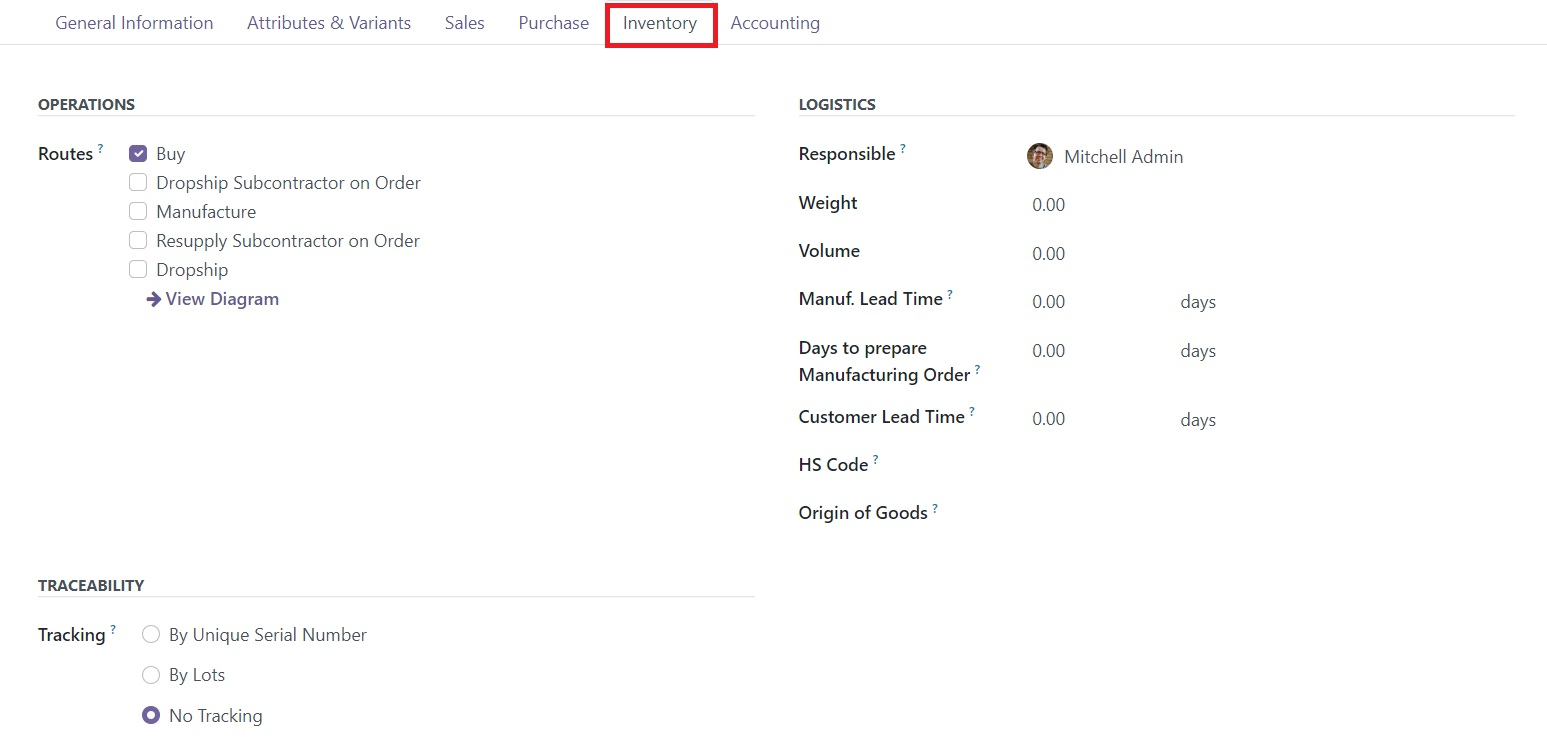
In the Traceability field, you can specify how to track the products in your warehouses. You can track products by a unique serial number or by lots. It is also possible to disable tracking by selecting the No Tracking option. To manage the logistics operations of the product, you can assign an employee in the Responsible field. In the respective fields, you can specify Weight, Volume, Manufacturing Lead Time, Days to Prepare Manufacturing Order, Customer Lead Time, HS Code, and Origin of Goods. Manufacturing Lead Time indicates the average time required to manufacture the product. The average number of days between the confirmation of the sales order and the delivery date defines the Customer Lead Time.
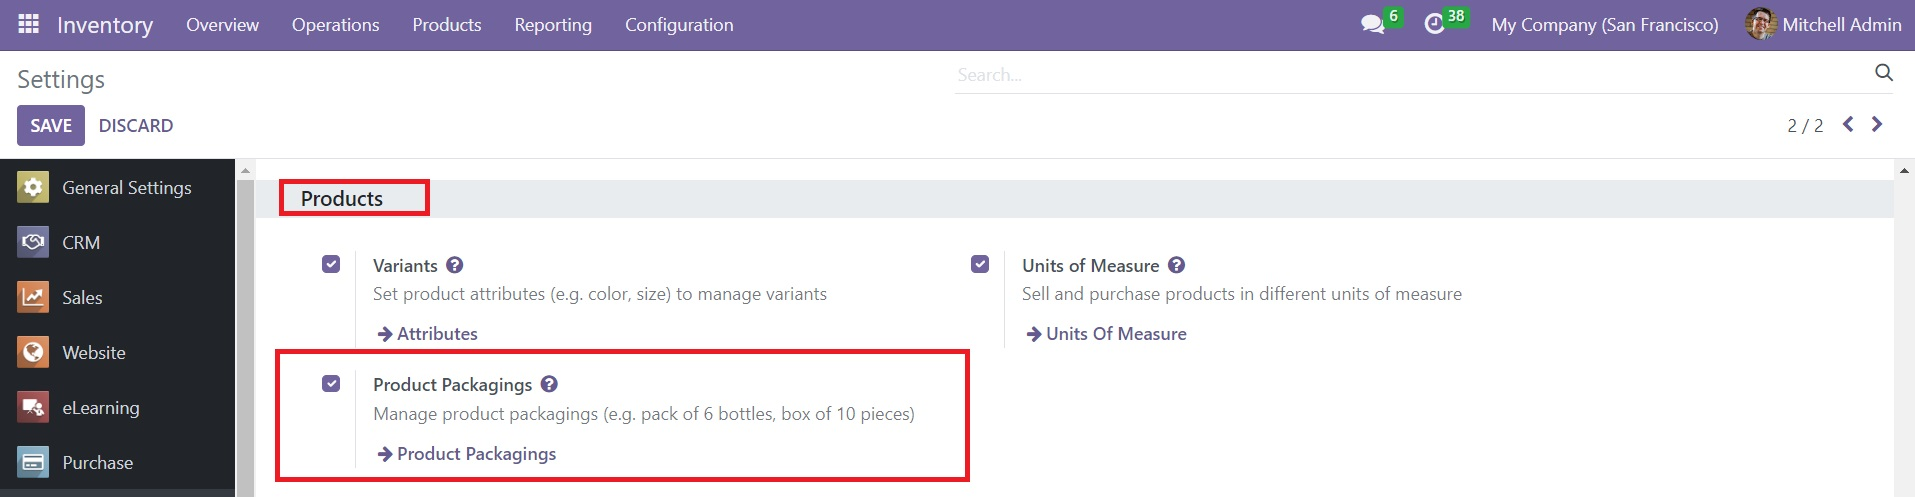
From the Settings menu of the module, you can activate the Product Packagings option, which can be used to define the packaging type for products.
Once you activate this option, you will be able to get a specified section in the Inventory tab of the product form view to configure the packing type for the product.
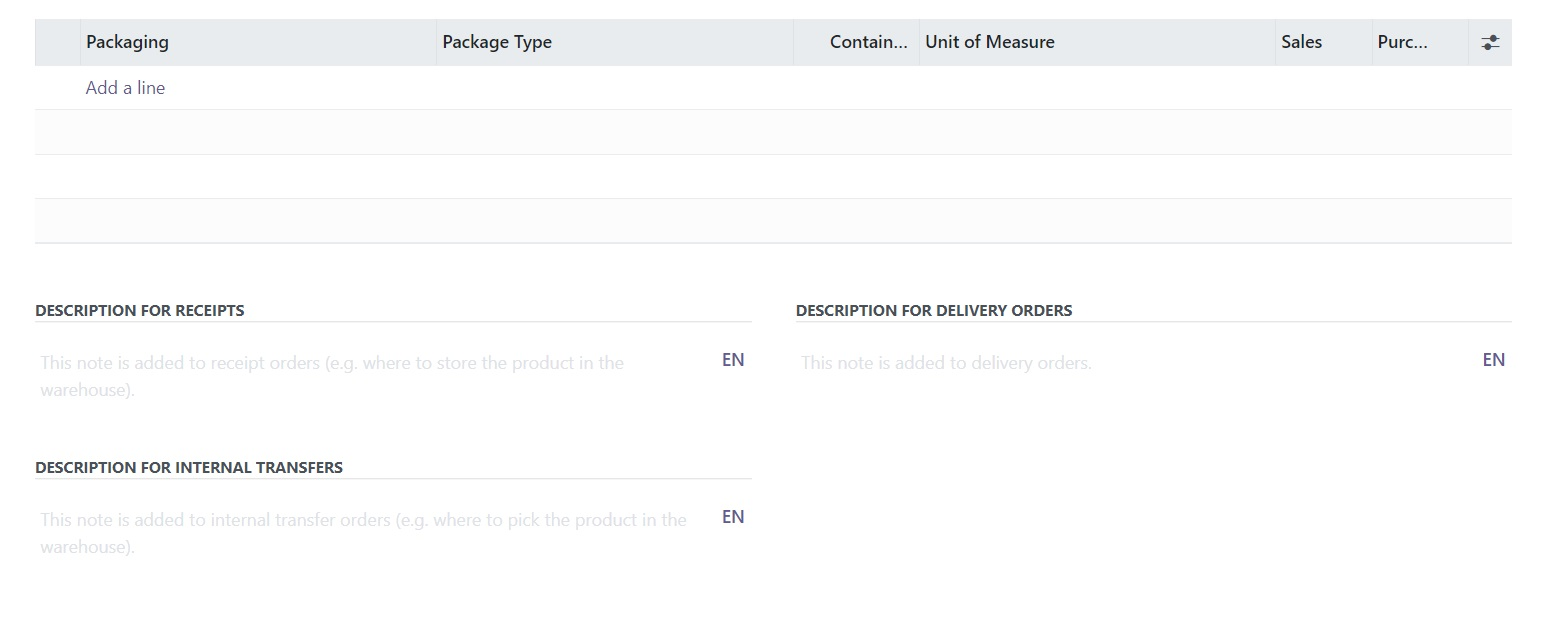
Here, you can add the Packaging for the product using the Add a Line button. The suitable Package Type can be selected from the given options. Mention the quantity of the product included in the package in the given space. If you want to use these packages in the Sales and Purchase orders, you can activate the corresponding fields. Additionally, you will get dedicated fields to add description for receipts, delivery orders and internal transfers. Add necessary details in the corresponding sessions.
The Accounting tab can be used to mention the accounting details of the product. You can specify an Income Account and Expense Account in the Receivable and Payable field to record the incoming and outgoing cash flow.
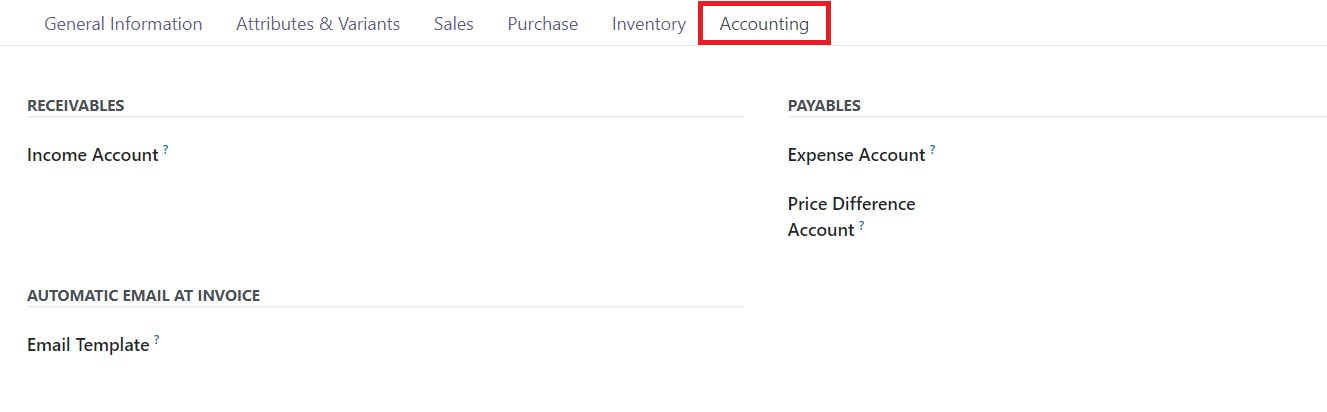
The Price Difference Account is used in automated inventory valuation to record the price difference between a purchase order and its related vendor bill when validating this vendor bill. You can set automatic email at invoice by mentioning an Email Template in the given space.
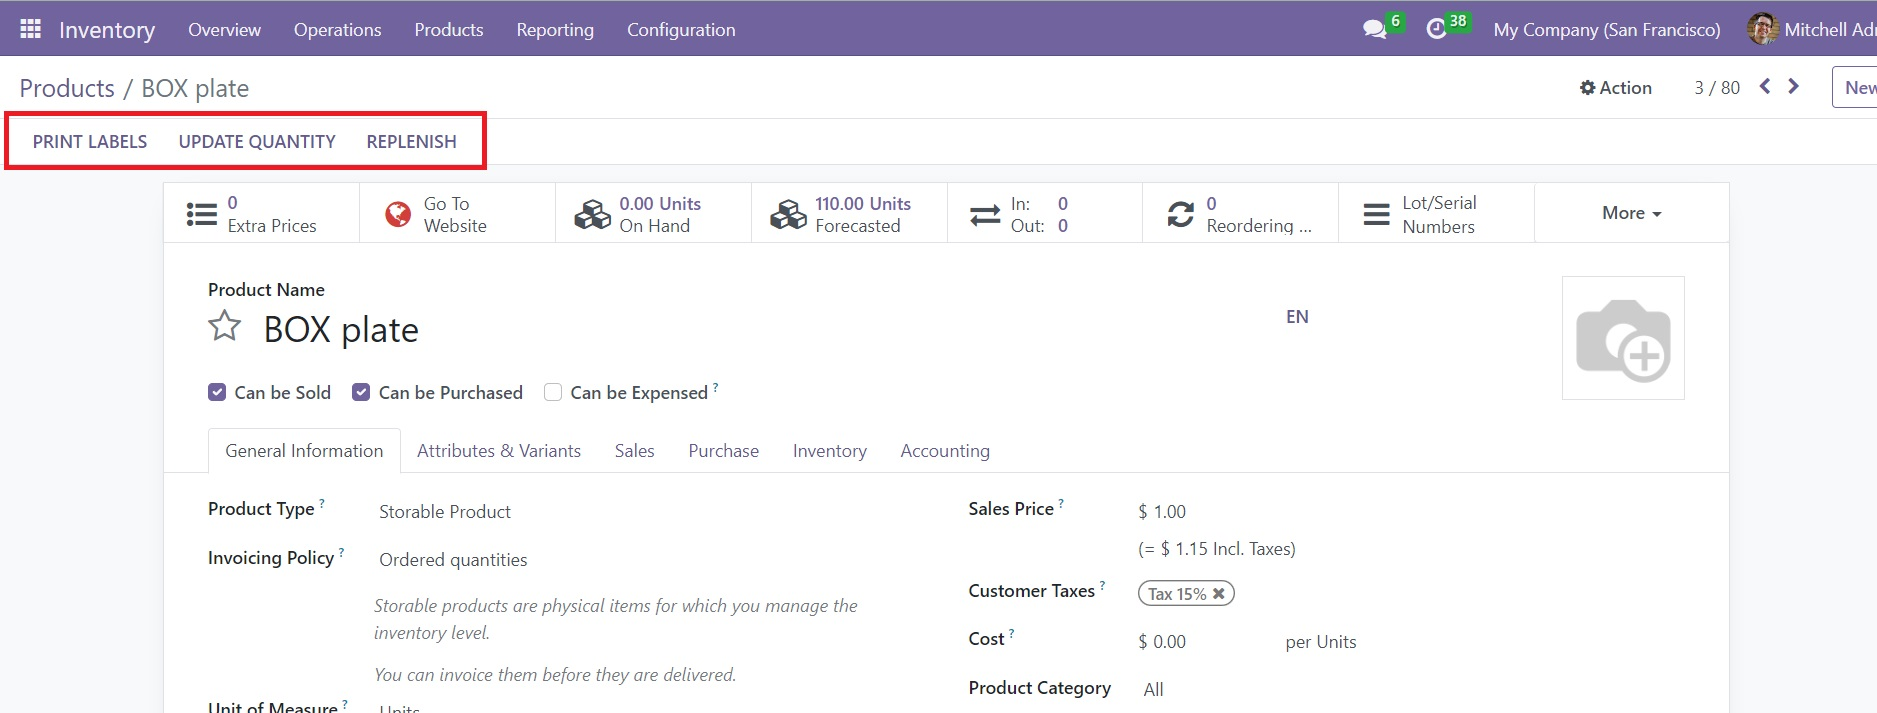
Once you complete the configuration of the product, you can use the Print Labels button to print labels, the Update Quantity button to automatically update the inventory, and Replenish button to replenish this product in inventory.
Clicking on the Print Label button will open a pop-up as shown below.
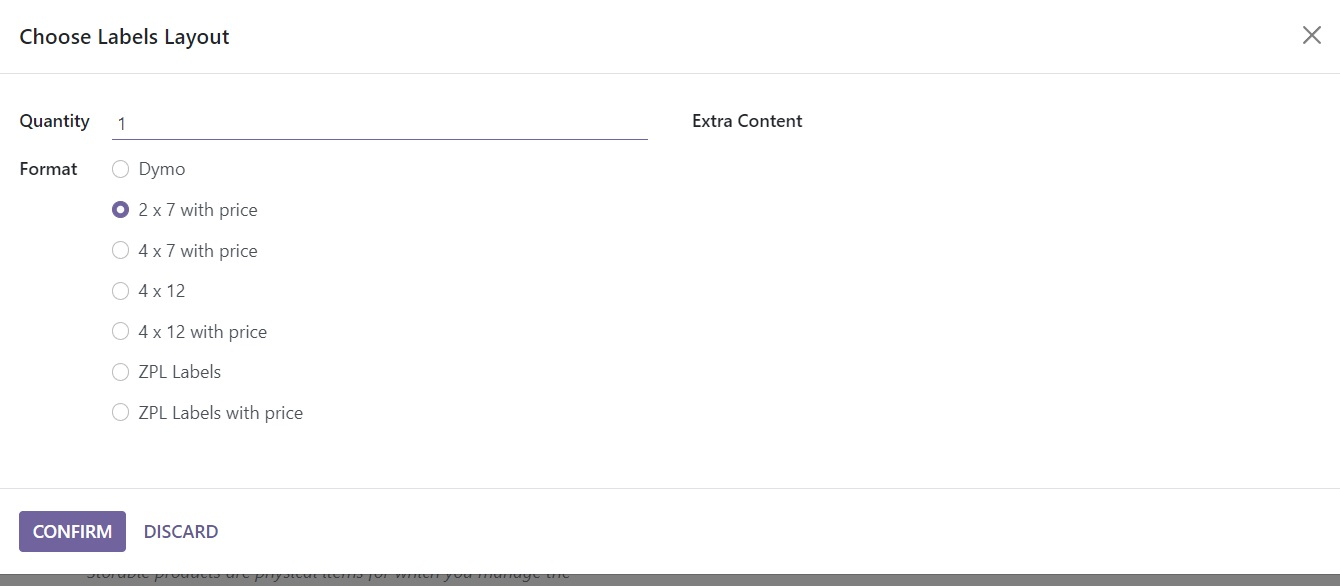
Here, you can mention the total Quantity of labels required. In the Extra Content field, you can mention extra content that will appear on the label while taking printouts. After selecting suitable Format, you can click on the Confirm button.
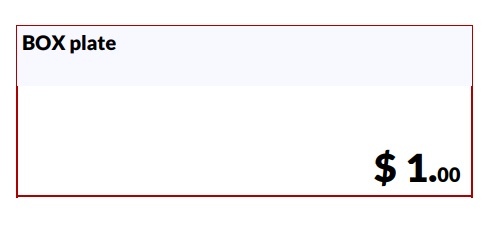
The screenshot shown above is an example of such labels. You can use it on packages of the product.
Stock report
Use the stock report in Odoo Inventory for a detailed list of all stored products, including those reserved, purchased and in transit, as well as those delivered to customers.
Note
The reporting feature is only accessible to users with admin access.
To access the stock report, go to Inventory app ‣ Reporting ‣ Stock.

Navigate the stock report
On the stock report, the left sidebar includes several groupings to narrow down what is being shown. The default groupings are Warehouses, which filters products by specific warehouses, and Category, which shows products within a selected product category.
Note
The Warehouse grouping is only available when there are multiple warehouses in the database. Refer to the Créer un deuxième entrepôt documentation for more details.
In the report itself, the columns represent:
Product: name of the product.
Unit Cost: average inventory valuation per unit, adjusted based on the cost to purchase and/or manufacture the product.
Total Value: Total inventory valuation of the product, calculated by multiplying unit cost by on-hand quantity.
Pour plus d'infos
On Hand: current quantity of products. Click the (pencil) icon to modify the on-hand quantity.
Free to Use: on-hand quantity that are not reserved for delivery or manufacturing orders, and are available to sell or use.
Incoming: items expected to arrive at the warehouse. Number of products is based on quantities in confirmed purchase orders.
Outgoing: items expected to leave the warehouse or be consumed in manufacturing orders. Number of products is based on quantities in confirmed sales or manufacturing orders.
Click the buttons to the right of each row item to access additional information:
History: access the stock move history of the product, displaying information about the quantity and description of why the product was moved from one location to another.
Replenishment: access the reordering rules page for the product to create or manage methods of procuring the product.
Locations: break down of on-hand quantity at multiple storage locations. Only available when the product is stored in multiple locations.
Forecast: access the forecasted report to view on-hand, incoming, and outgoing quantities. Report also contains links to confirmed purchase, sales, or manufacturing orders. Only available when there are confirmed sales, purchase, or manufacturing orders for the product.
Search options
FiltersGroup ByFavoritesThe Filters section allows users to search among pre-made and custom filters to find specific stock records.
Published: display products published on the website. Only available with the Website app installed.
Available in POS: display products available through the Point of Sale app.
Available in Self: display products available in self order through the Point of Sale app. Appears in the search because the Available in Self Order checkbox was ticked in the Point of Sale section of a product form’s Sales tab. The option is only available when the Available in POS checkbox is ticked.

Not available in Self: display products available in PoS, but not available in self order.
Pour plus d'infos
Can be Sold: display products that can be sold to customers. Appears in the search because the Can be Sold checkbox is ticked on the product form.
Can be Purchased: display products that can be bought from vendors. Appears in the search because the Can be Purchased checkbox is ticked on the product form.
Can be Recurring: show subscription products, indicated by ticking the Recurring checkbox on the product form. Only available with the Subscription app activated.
Can be Rented: show products that can be loaned to customers for a certain time. Appears in the search because the Can be Rented checkbox was ticked on the product form. Only available with the Rental app installed.
Can be Subcontracted: display products that can be produced by a third-party manufacturer. Available only with the Manufacturing app installed.
Can be Expensed: show items that can be expensed. Only available with the Expenses app installed.
Product Variants & Attributes
In order to improve your sales, you can provide different variants of a product to your customers. This strategy will benefit you to enhance sales. You can add multiple variants of a product in the Inventory module just like we detailed in the Sales and Purchase modules. In order to get the Variants options under the Products menu, you can go to the Settings menu of the module.
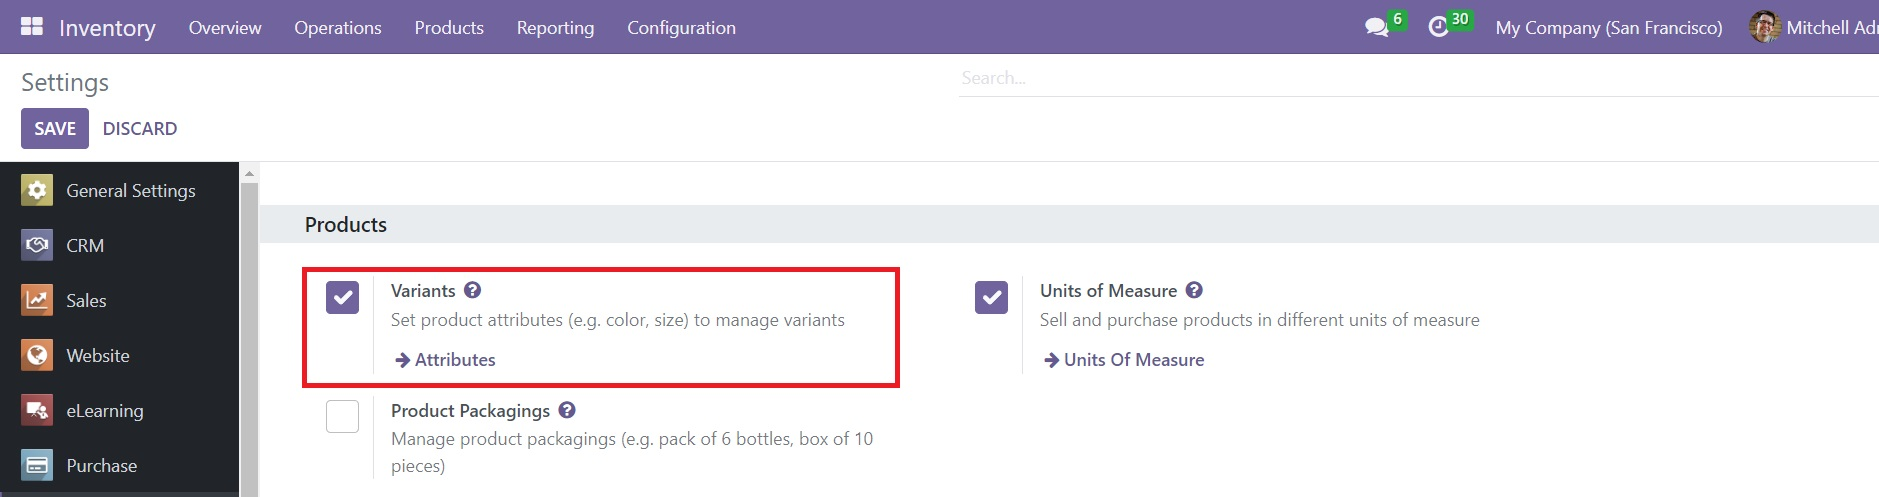
As shown in the screenshot above, activate the Variants option from the Products tab. Now, you can go to the Products menu and select the Product Variants option. The configuration of the product variant is the same as that of the Product configuration.
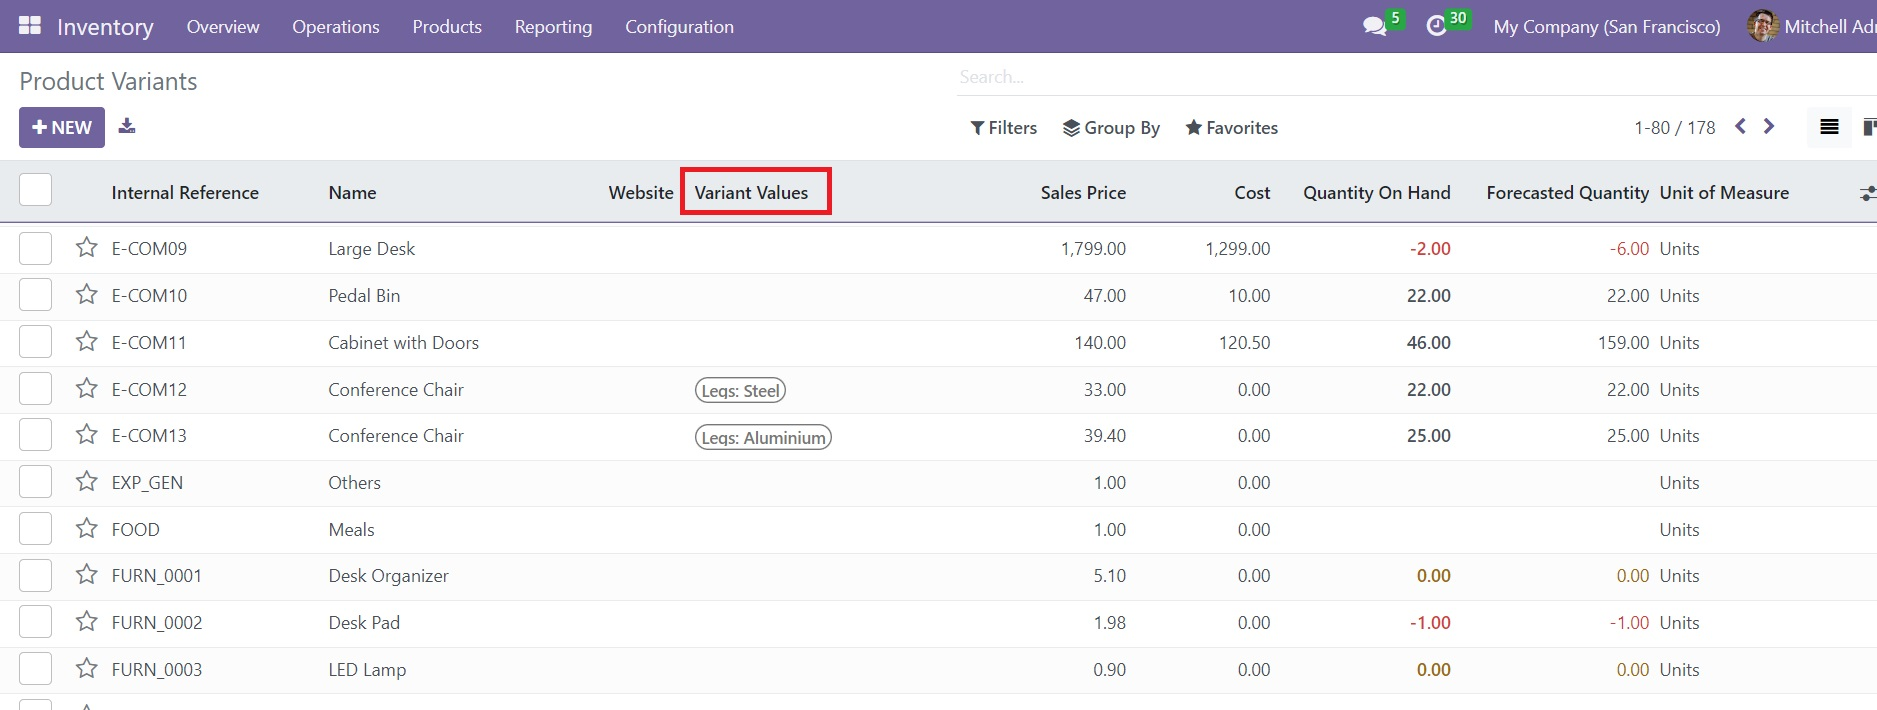
The screenshot displays the variants of different products in the Inventory module. The Variant Value of each product can be observed from this window. You can use the New button to configure a new variant of a product. Once you complete the configuration you can go to the form view of the respective product where you can add this variant under the Attributes & Variants tab.
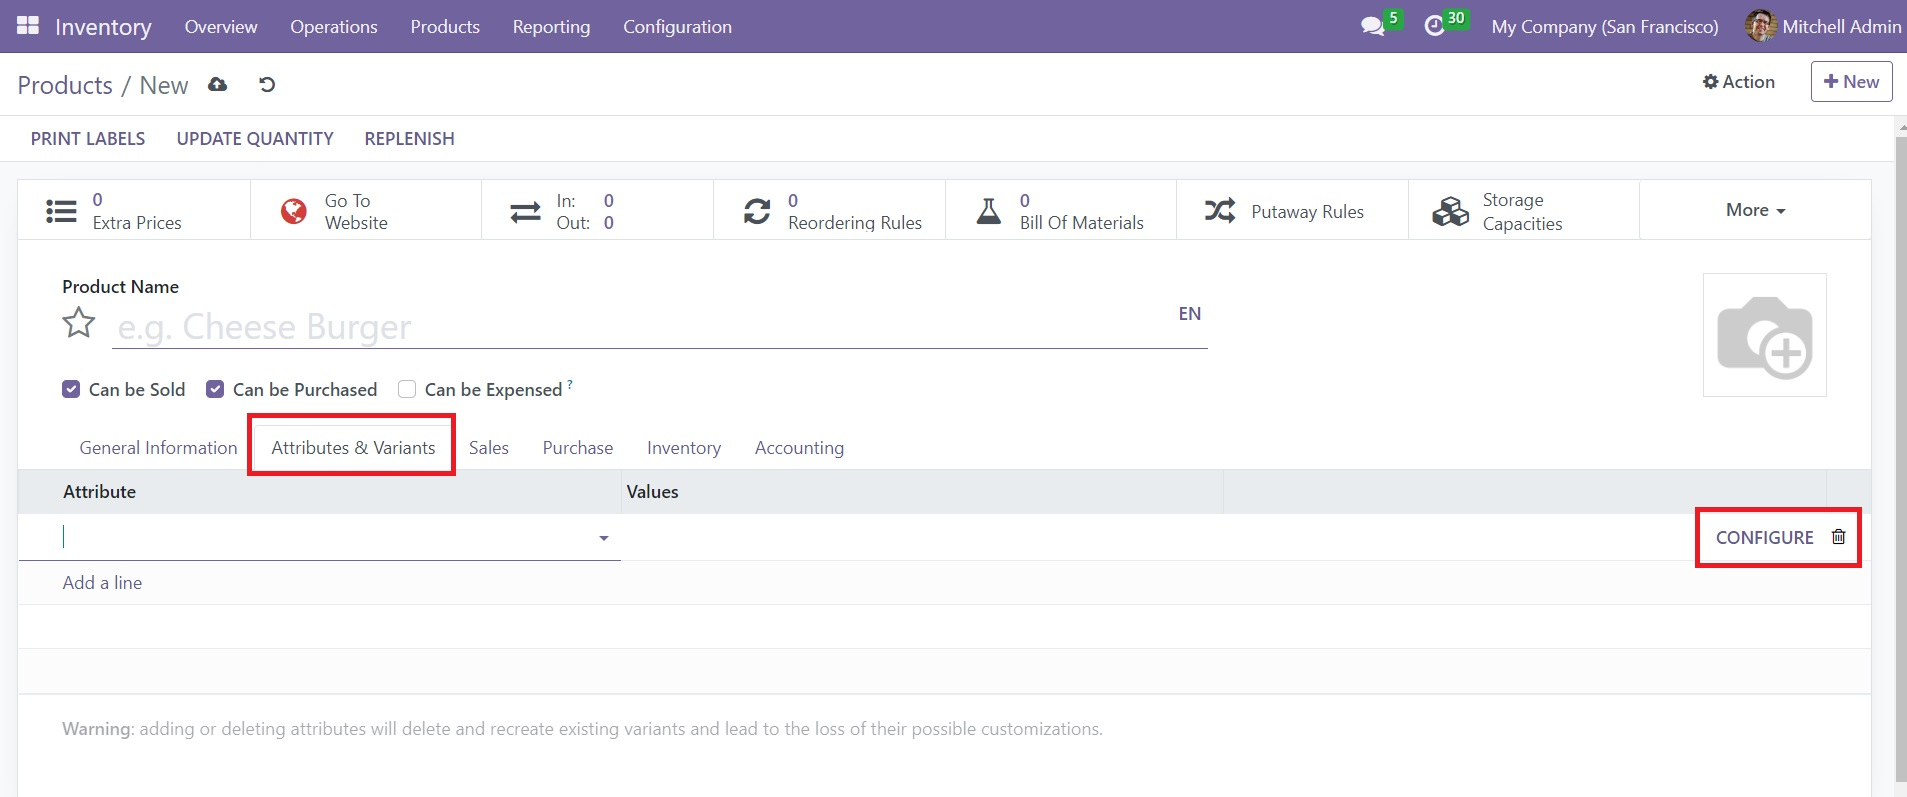
Using the Configure button, you can mention the Attributes and corresponding Values of the variant in the given fields.
You can use the Product Attributes option from the Configuration menu to configure different attributes to the variant of a product. Clicking on this option will open a new window where you can observe already created attributes, as shown in the image below.
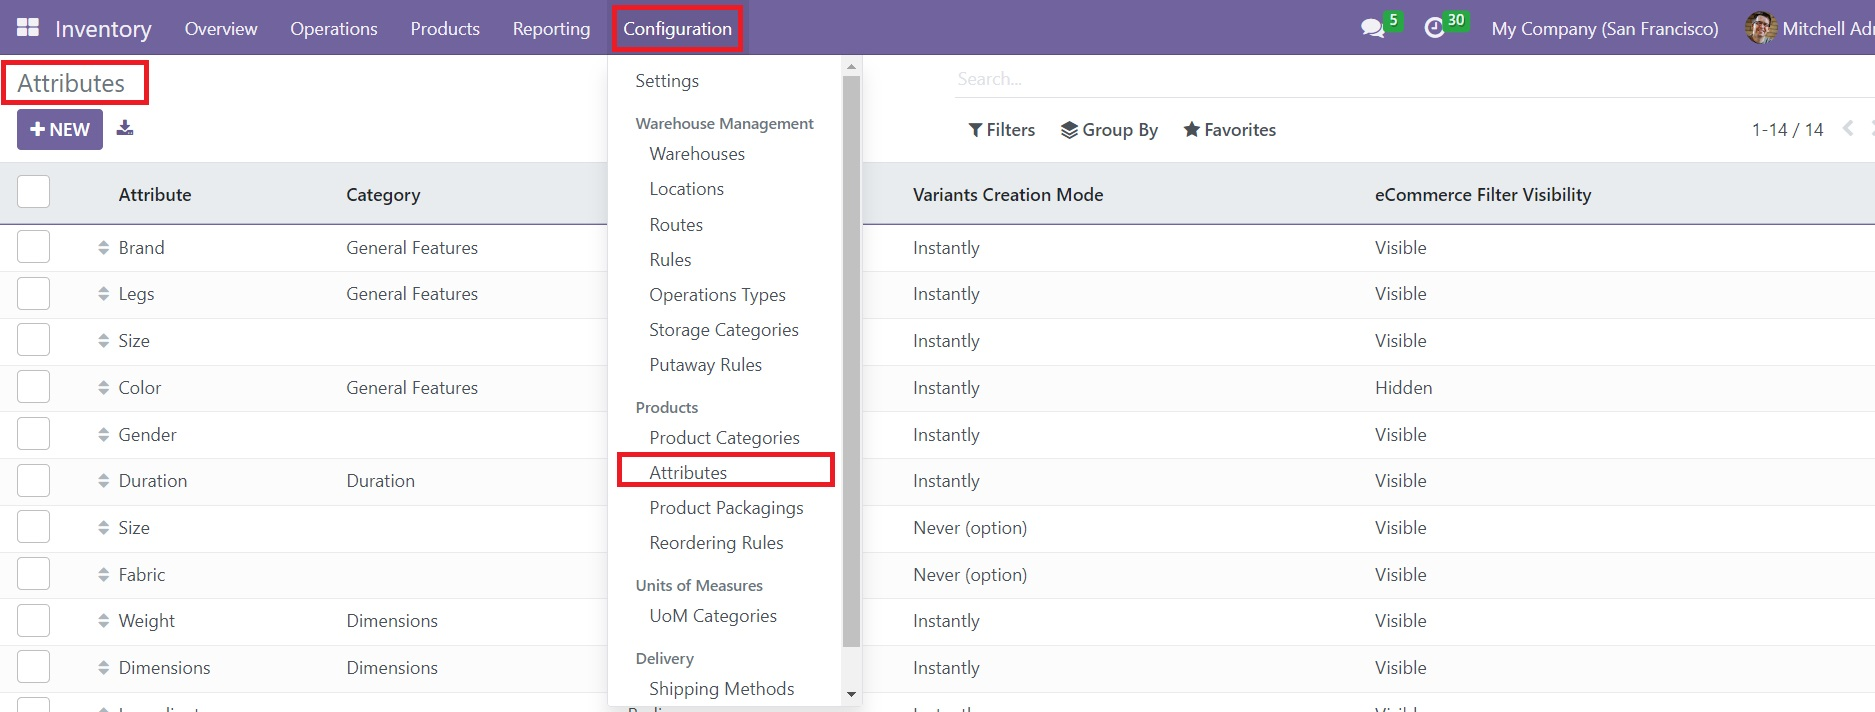
The list view displays the details of Attribute, Category, Display Type, Variants Creation Mode, and eCommerce Filter Visibility. Use the New button to add a new attribute for products.
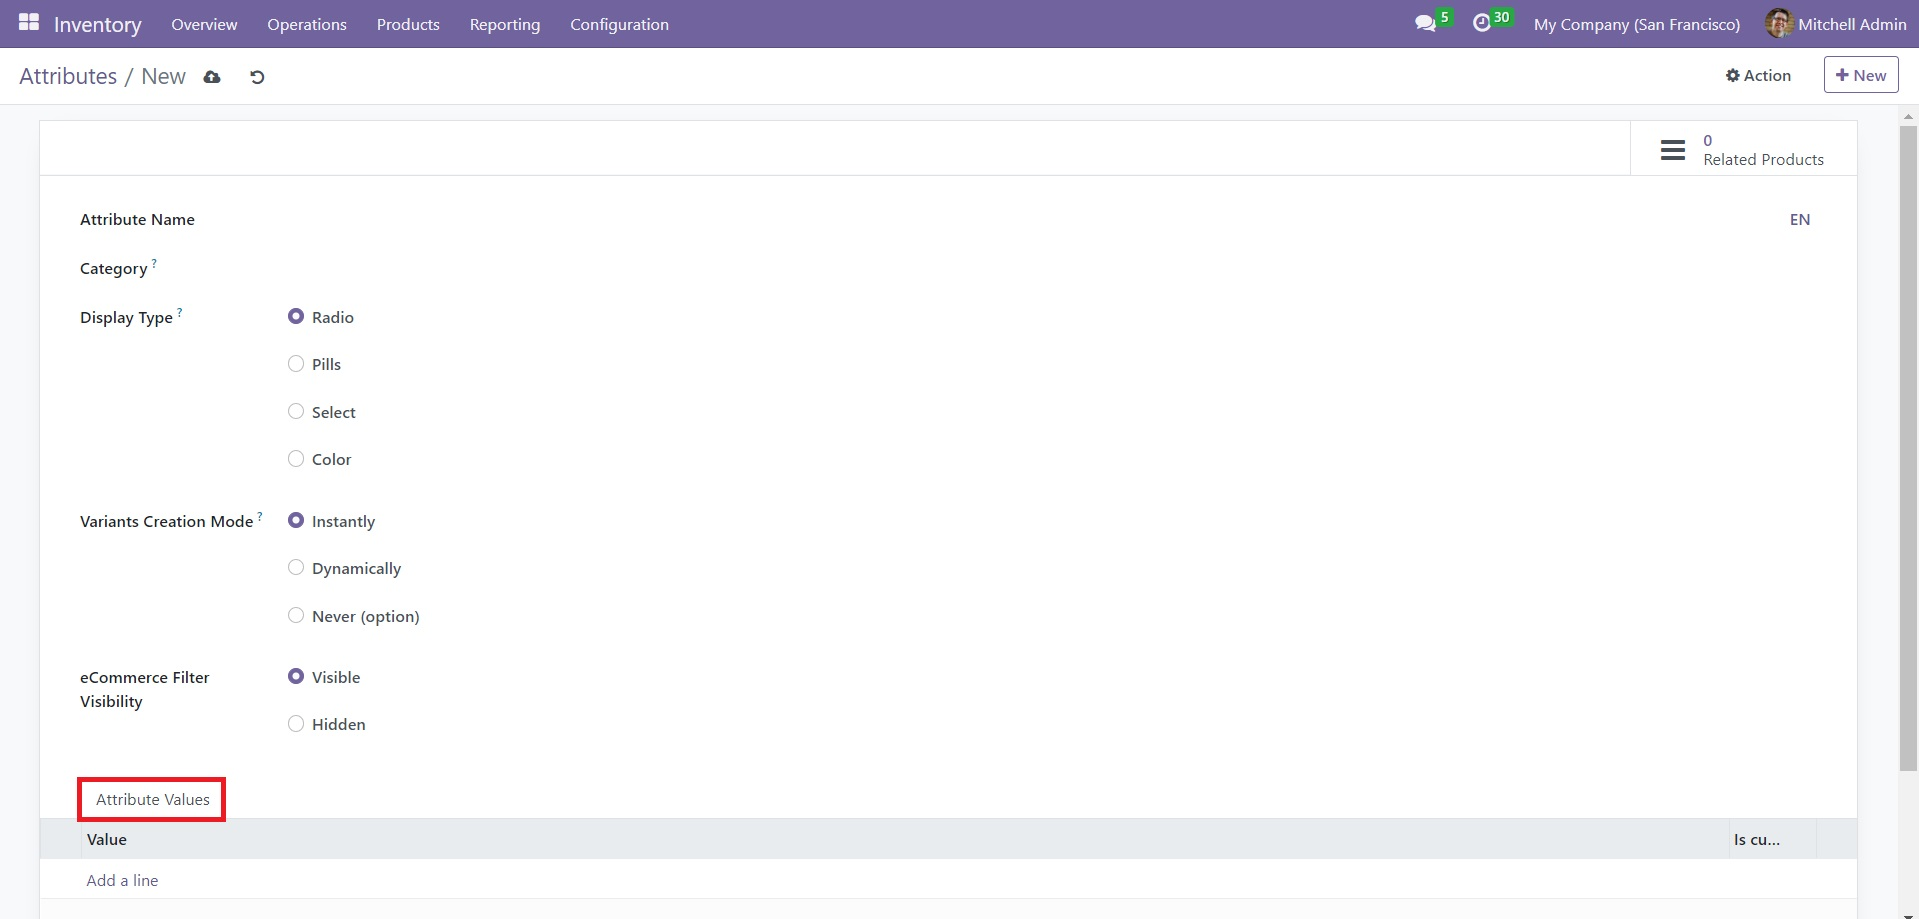
Provide a suitable name for the attribute in the Attribute Name field. By mentioning Category, it is possible to group similar attributes under the same section in the Comparison page of eCommerce. You can select a suitable Display Type from the given options, such as Radio, Pills, Select, and Color, which will be used in the Product Configurator window.
In order to define the methods of the creation of variants in Odoo, you can use the Variants Creation Mode field. The available options are;
Instantly: This option can be used to create all possible variants when you add attributes and their values while configuring a product.
Dynamically: By selecting this option, the variant will be created only when you use the corresponding attributes and values in a sales order.
Never: If you don’t want to create any variants for the attributes, you can select the Never option.
In order to make this attribute visible on the eCommerce page as a filter, you can select the Visible option from the eCommerce Filter Visibility field. Selecting the Hidden option will hide this attribute from the available filters. Now, you can add Values under the Attribute Values tab using the Add a Line button.
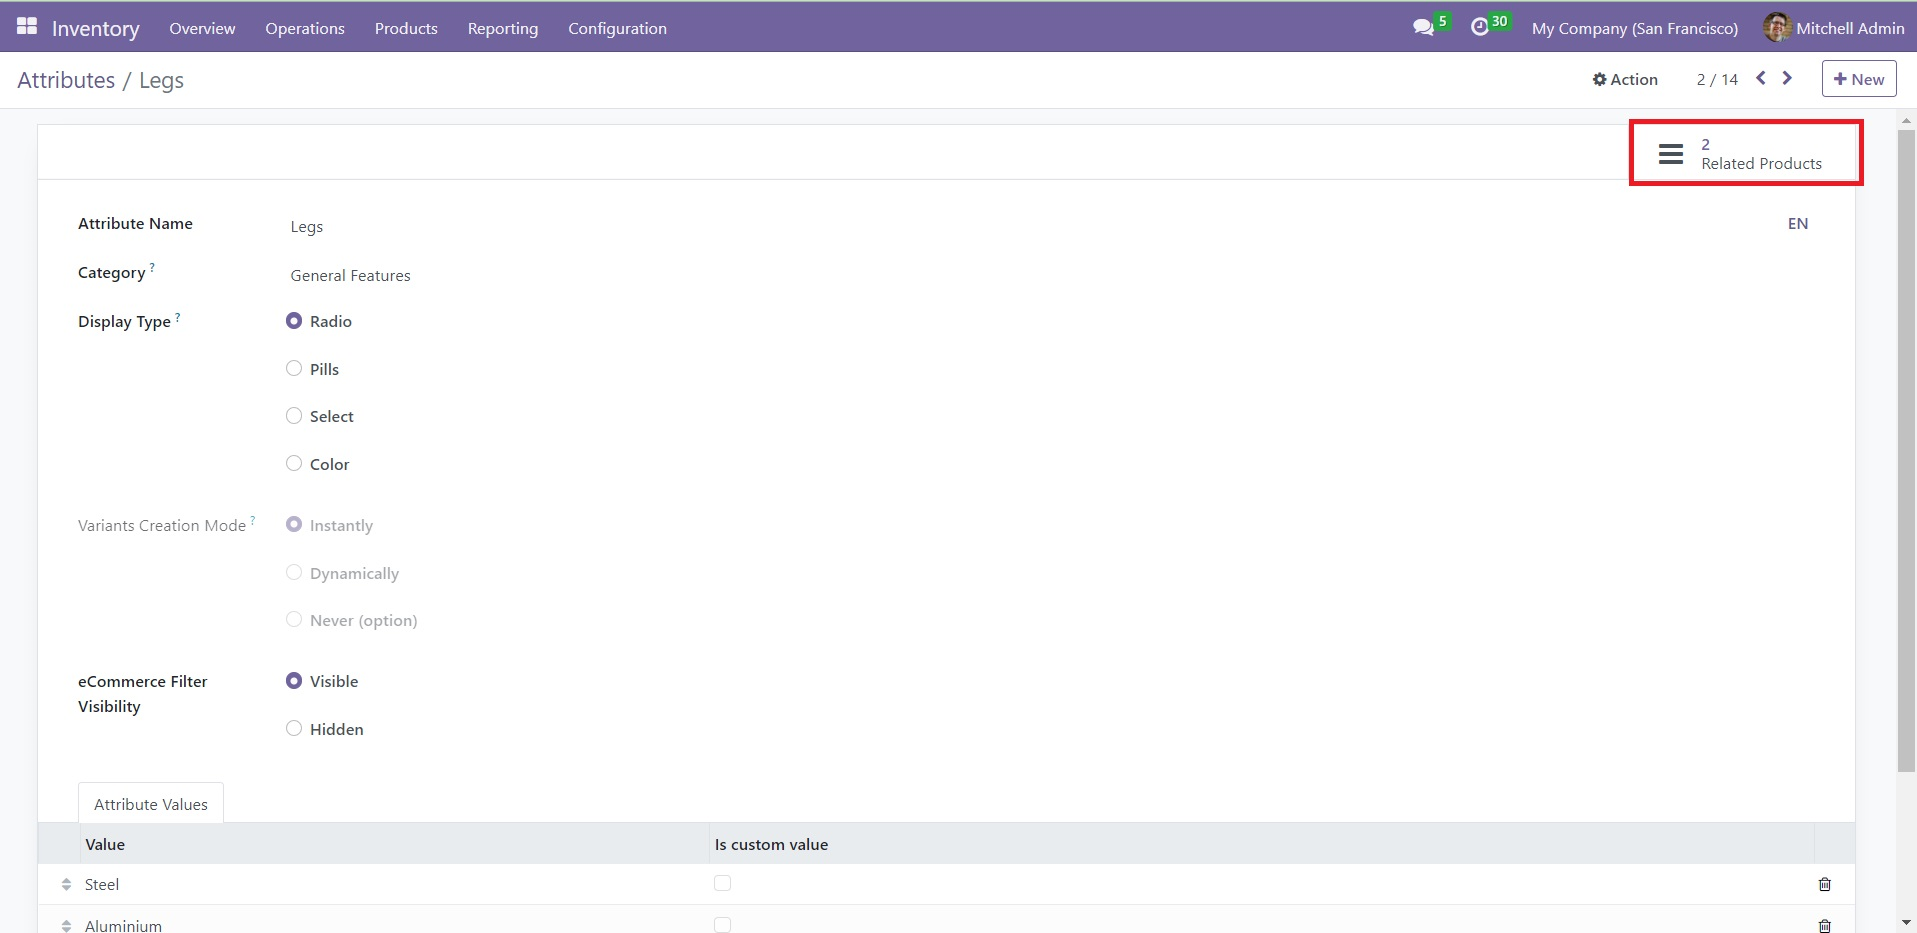
After configuration, you can use this attribute to products in the form view. The Related Products smart button will show the products with this particular attribute.
Product Categories
Configuring categories for products will enable you to categorize and group products under different categories. Defining product categories is an important step to manage various operations related to a product. It is also possible to filter products based on the product categories. You can find the Product Categories option under the Configuration menu of the Inventory module.
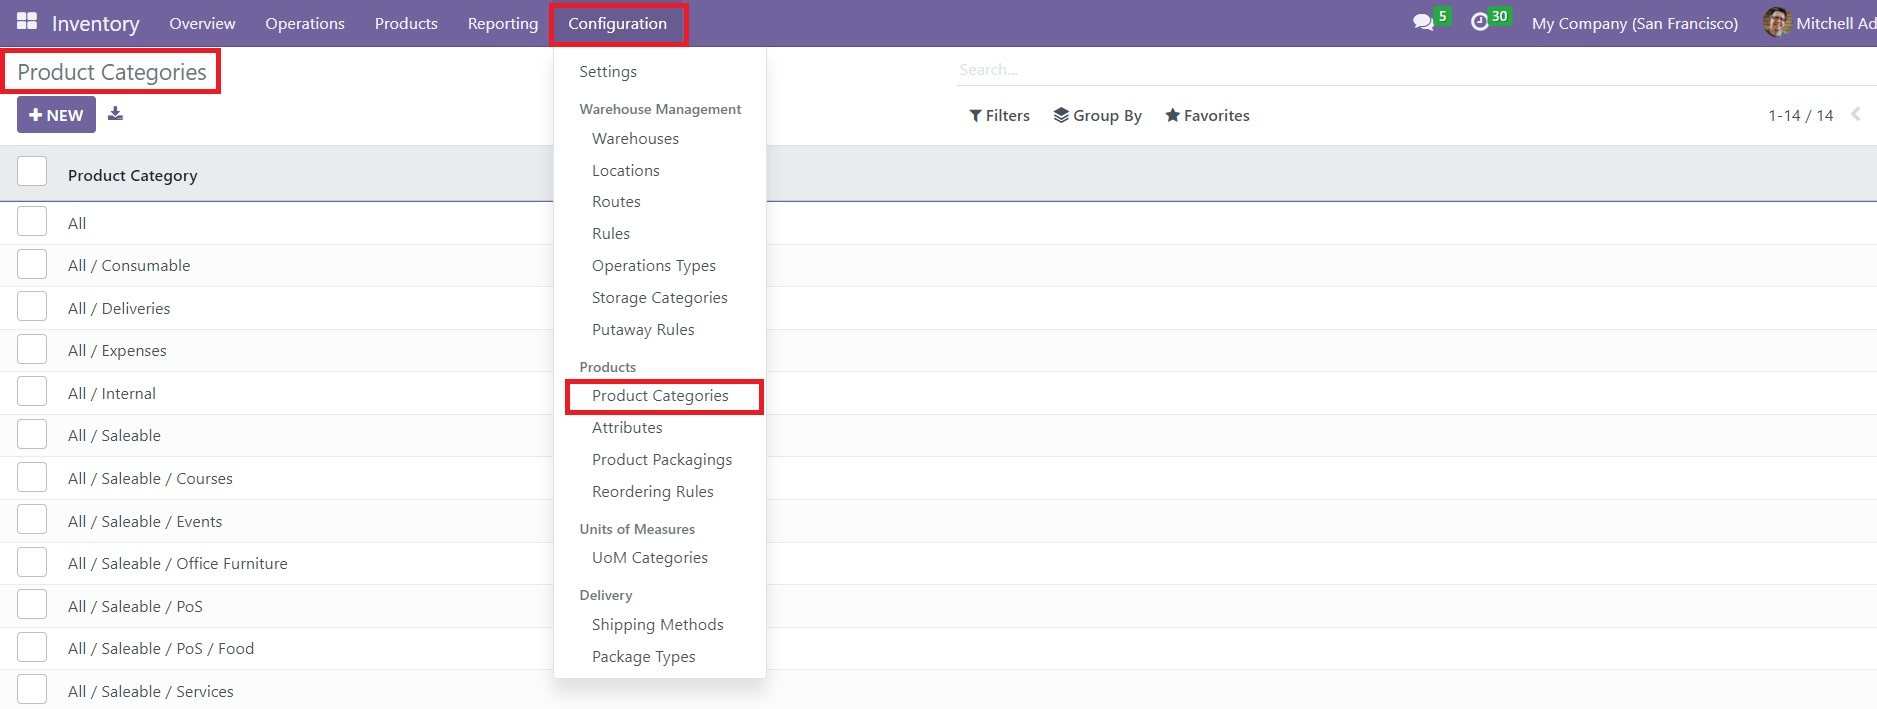
When you enter this platform, you can view different types of product categories configured in the Inventory module. Using the New button, you can effortlessly create a new category.
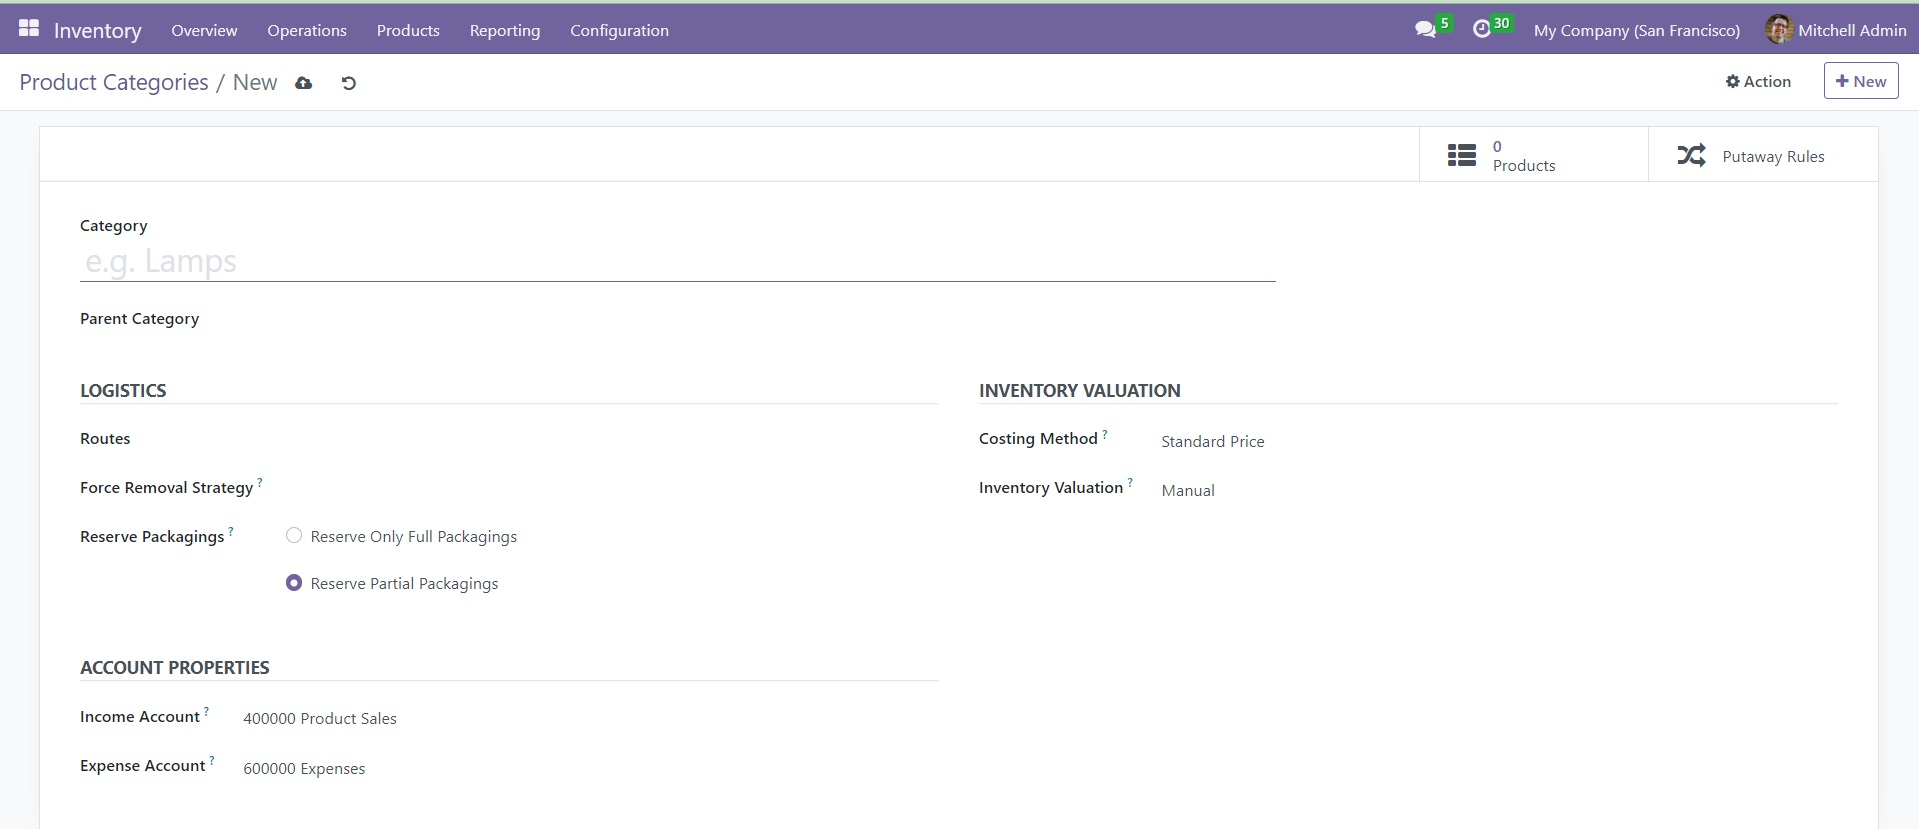
Set a name for the new category in the given space. If this category belongs to any Parent Category, you can specify it in the respective field. The Route of this particular category can be specified in the Route field available under the Logistics tab. The Force Removal Strategy will define the removal strategy to remove a product from the source location. The Reverse Packaging field offers two options such as Reserve Only Full Packaging or Reserve Partial Packaging. Using the Reserve Only Full Packaging will allow you to reserve full packaging only. But in the case of the Reserve Partial Packaging, it is possible to reserve partial packages of the products.
The accounts used while validating a customer invoice and vendor bill can be specified in the Income Account and Expense Account, respectively. In the Inventory Valuation tab, you can define the Costing Method used to calculate the cost of the product under this category.
● Standard Price: The cost of the products will be calculated based on the standard price specified on each of them.
● Average Cost (AVCO): The cost of the products will be calculated based on the weighted average cost.
● First in First out (FIFO): The cost of the products will be calculated supposing that entering the company first will also leave it first.
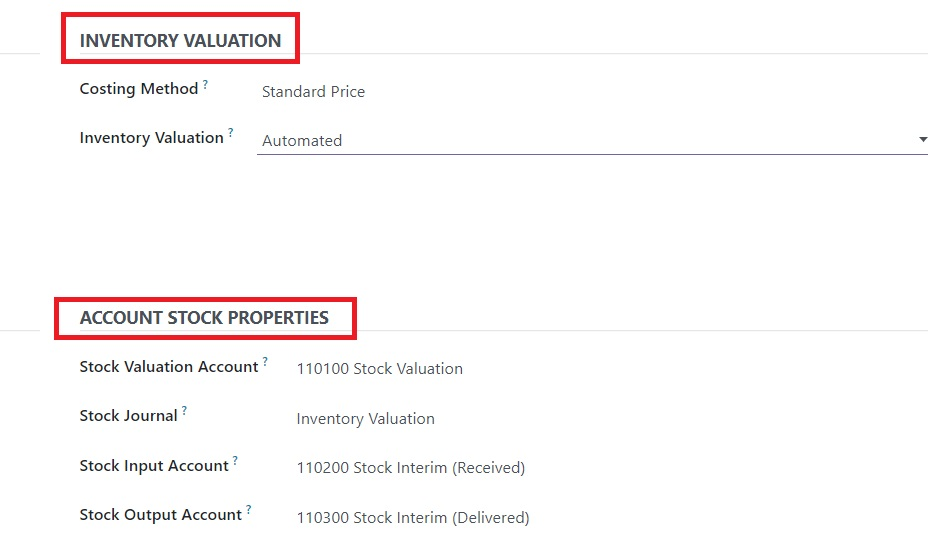
The Inventory Valuation can be set as Automated and Manually. By selecting the Manually option, the accounting entries to value the inventory should be posted manually. But in the case of Automated Inventory Valuation, an accounting entry will be automatically created for valuing the inventory when a product enter or leaves the inventory. As soon as you select Automated Inventory Valuation, you will get some additional fields to define under the Account Stock Properties.
● Stock Valuation Account: When automated inventory valuation is enabled on a product, this account will hold the current value of the products.
● Stock Journal: When doing automated inventory valuation, this will be the account journal in which entries will be automatically posted when stock moves are processed.
● Stock Input Account: Counterpart journal items for all incoming stock moves will be posted in this account unless there is a specific valuation account set on the source location. This is the default value for all products in this category. It can also be set directly on each product.
● Stock Output Account: When doing automated inventory valuation, counterpart journal items for all outgoing stock moves will be posted in this account unless there is a specific valuation account set on the destination location.
Once you complete the configuration of the new product category, you will get the Products smart button to view the products under this category and the Putaway Rules smart button to manage the putaway rules of this product category.
Product Packaging
The Odoo Inventory Management software offers an adequate platform to define the methods to put your products in packs and track their location. Packages will ensure secured transportation of products throughout the inventory. It is also beneficial for protecting the product from damage. Delivering products safely without any damage is a crucial task and needs to be managed with utmost care. In the Odoo 16 Inventory module, you will be able to define two types of packaging methods. You can create multiple packages for a single product and a single pack for different products.
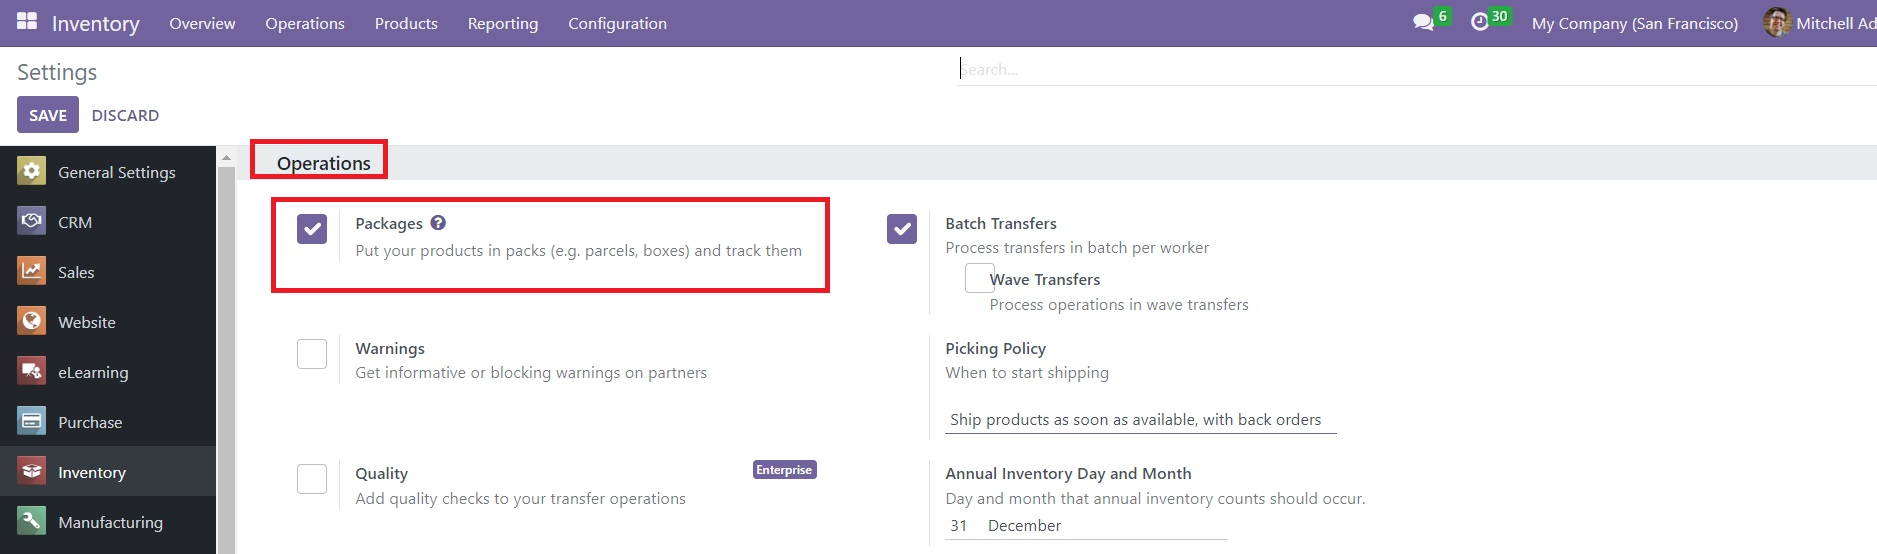
To get access to the packaging platform, you can go to the Settings menu of the module. As depicted in the screenshot below, you must activate the Packages option from the Operations tab and the Product Packagings option from the Products tab.

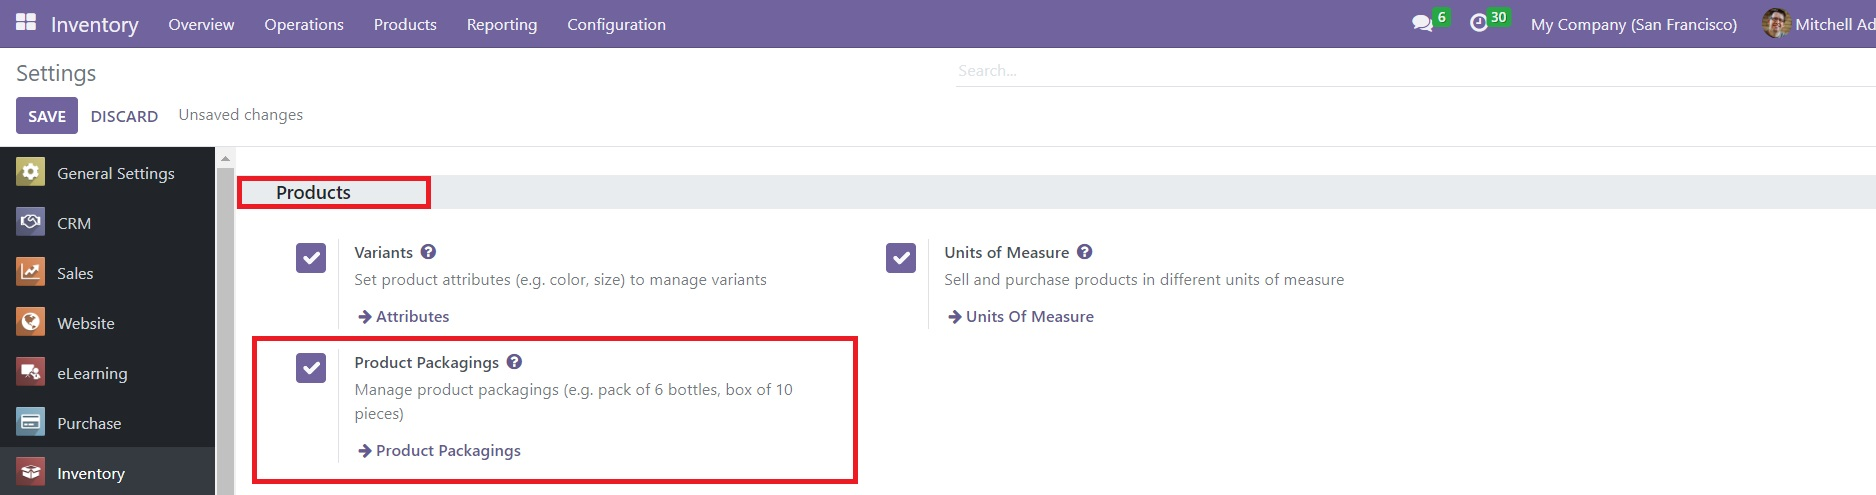
Here, the Packages and Product Packagings options are used for separate functions. The Packages option is used to define packs of different products. Whereas Product Packaging will help you to pack different quantities of the same product. Let’s check these options in detail.
Packages
The Packages feature will help you to create packs of various products. It is possible to put various products in a pack using this feature.
Once you activate the Packages feature from the Settings menu, you can find the Packages sub-menu under the Products menu. Already created Packages can be observed under this menu.

To create a new package, you can use the new button. This will lead you to a new form view as shown below.
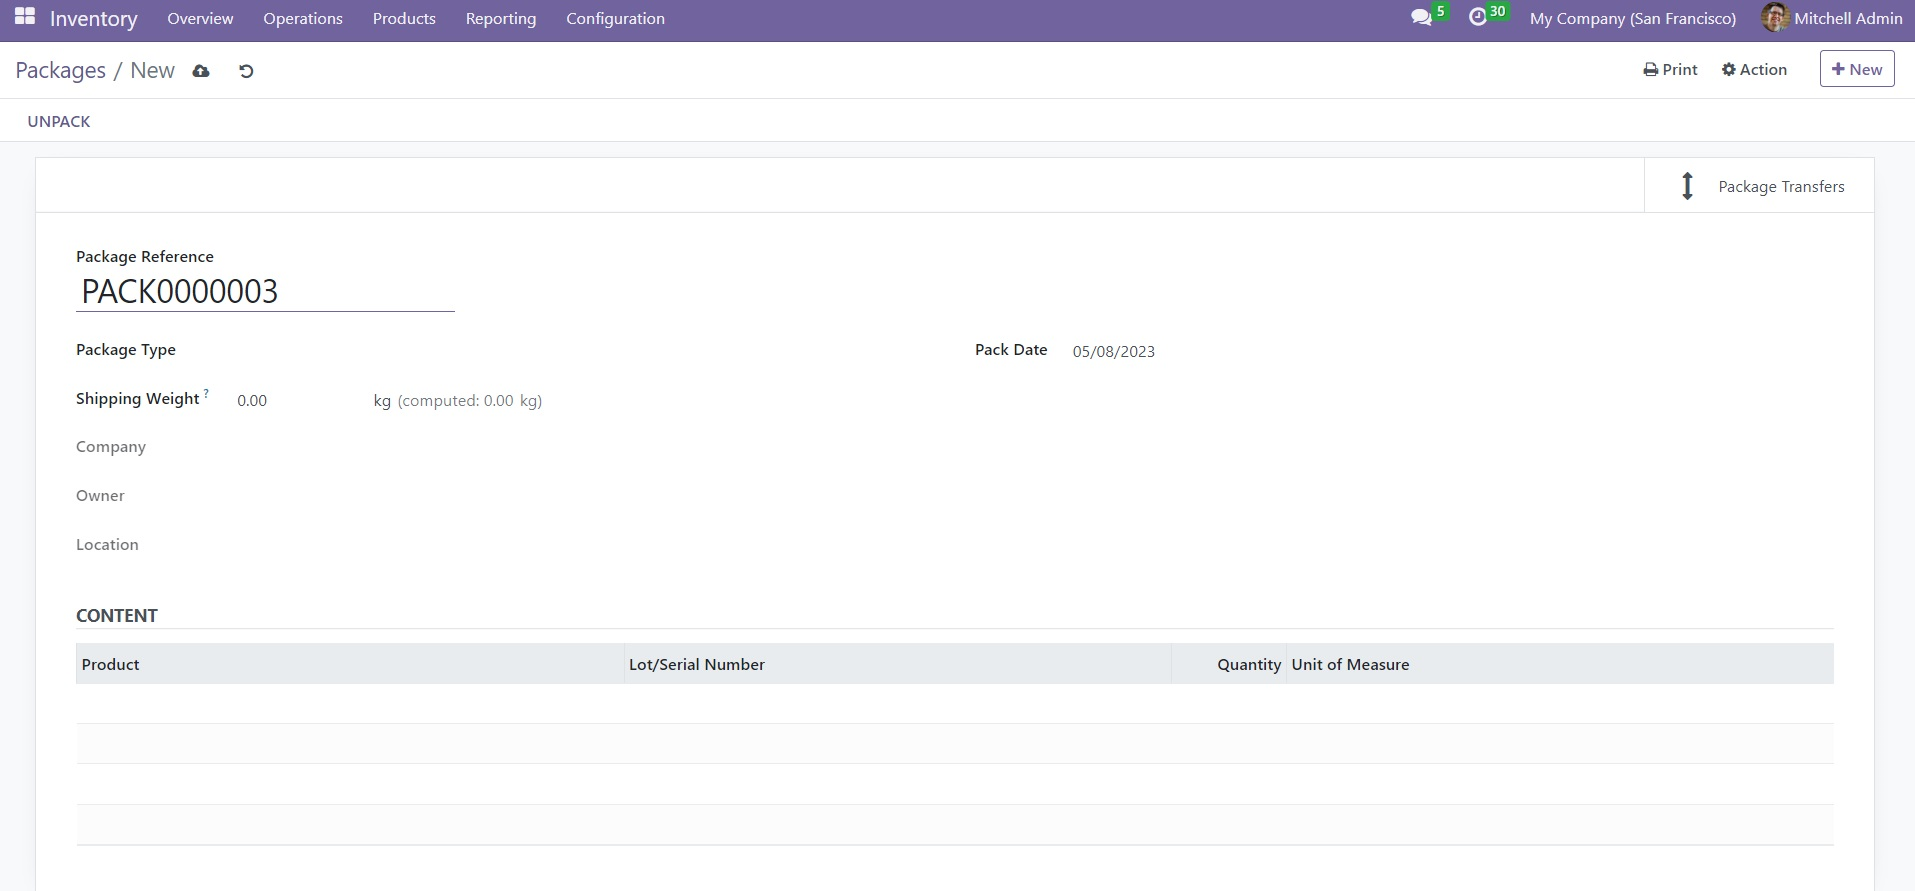
The Package Reference will be available in the given field. You can select a suitable Package Type from the given options. The total weight of the package can be added in the Shipping Weight field. In the respective fields, you can specify the Company, Owner, and Location of the package. The Pack Date will be available in the form. The Content tab will show the products included in this package. You can see the details of the Product, Lot/Serial Number, Quantity, and Unit of Measure once you use this package for stock movement.
While confirming a delivery order, you will get the option to put multiple products in a pack, as shown below.
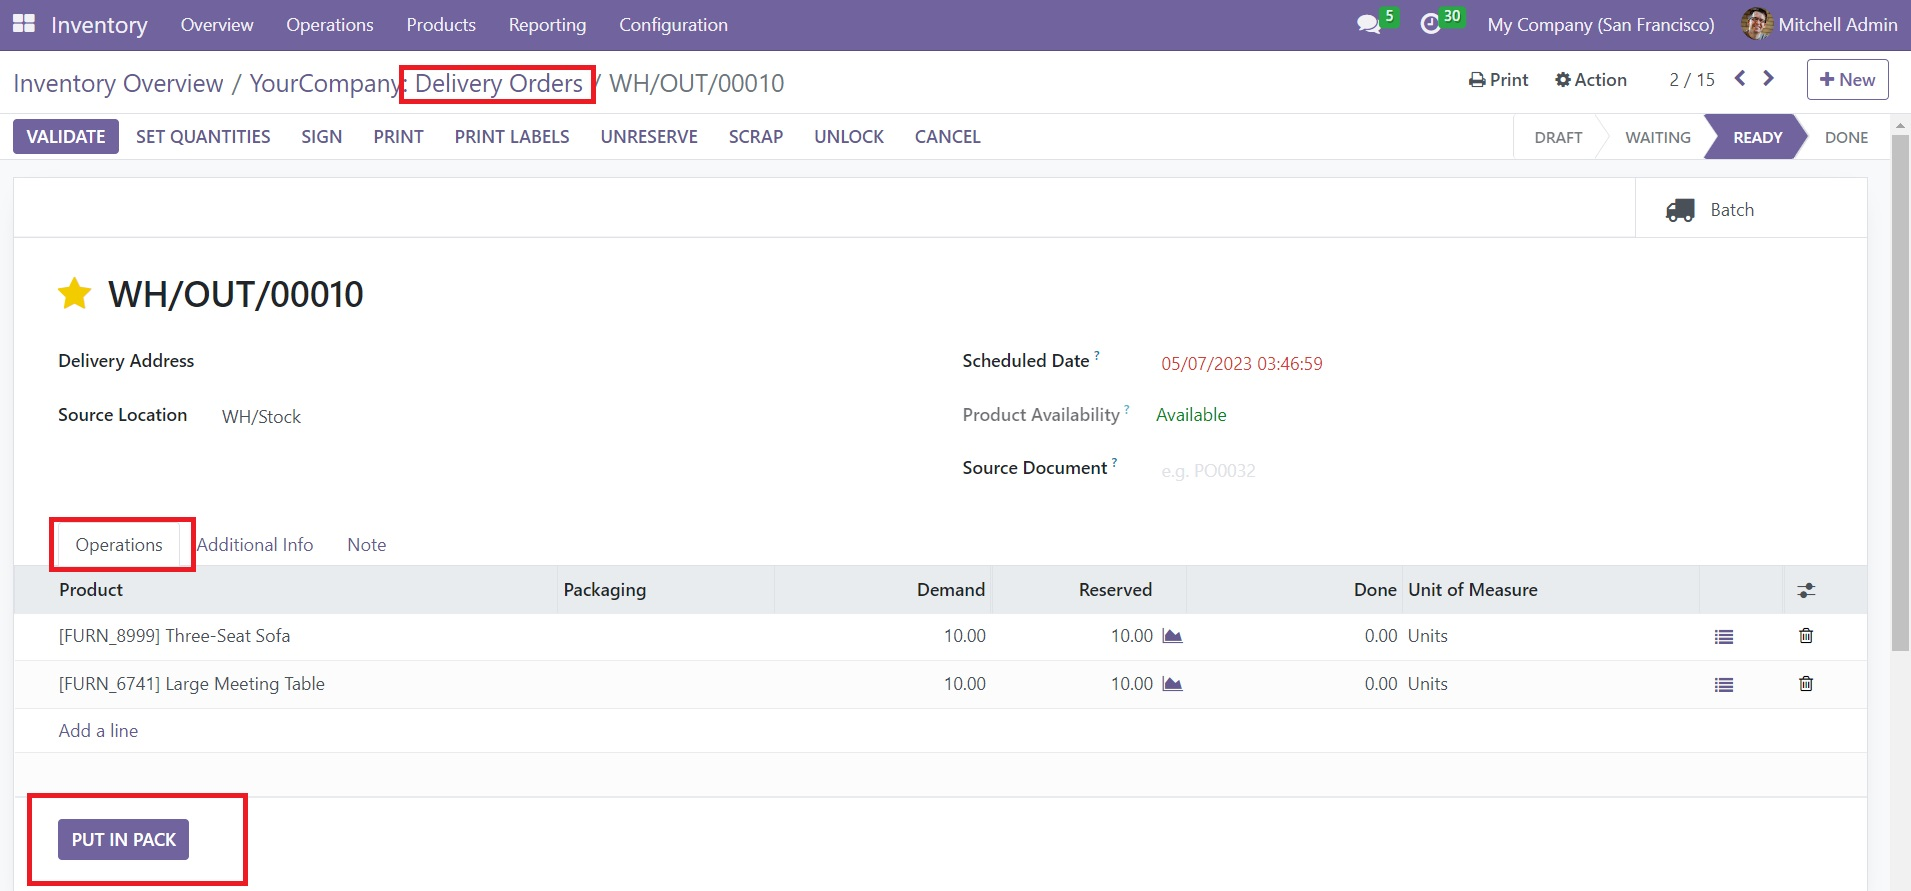
You can find the Put in Pack option under the Operations tab of the Delivery Order. Clicking on this button will put all products in the delivery order in a single pack.
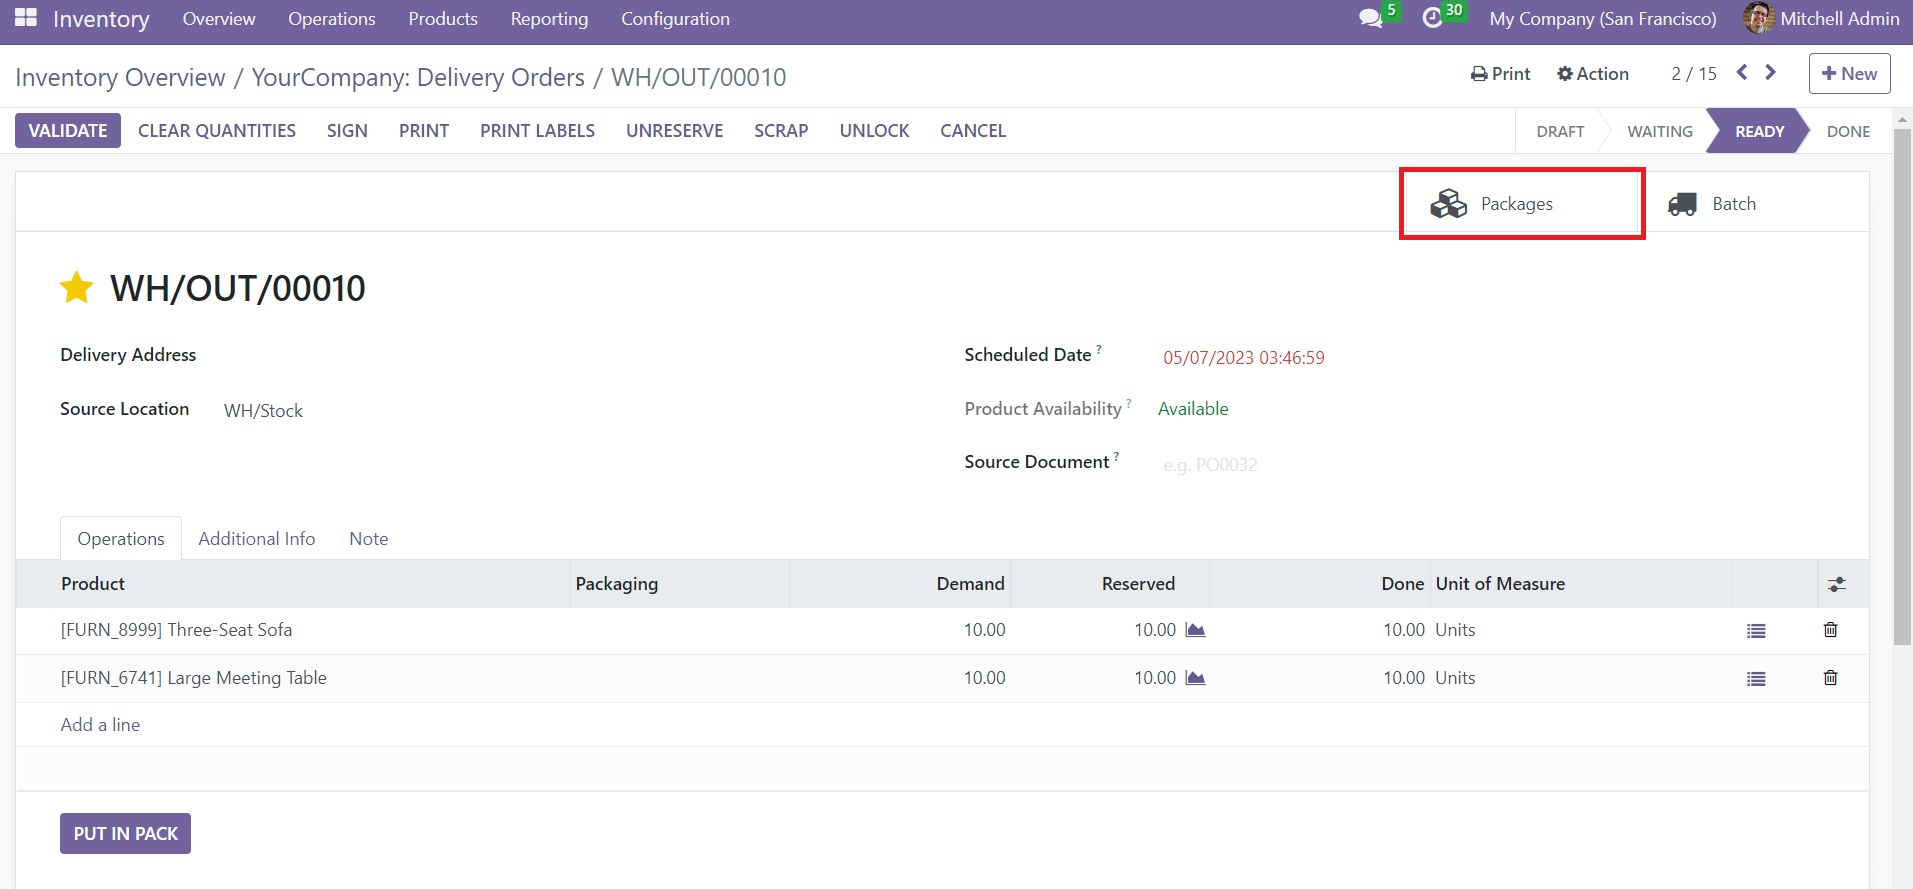
The Packages smart button can be used to observe the package of the corresponding delivery order.

This package will be automatically recorded in the Packages menu of the Inventory module.
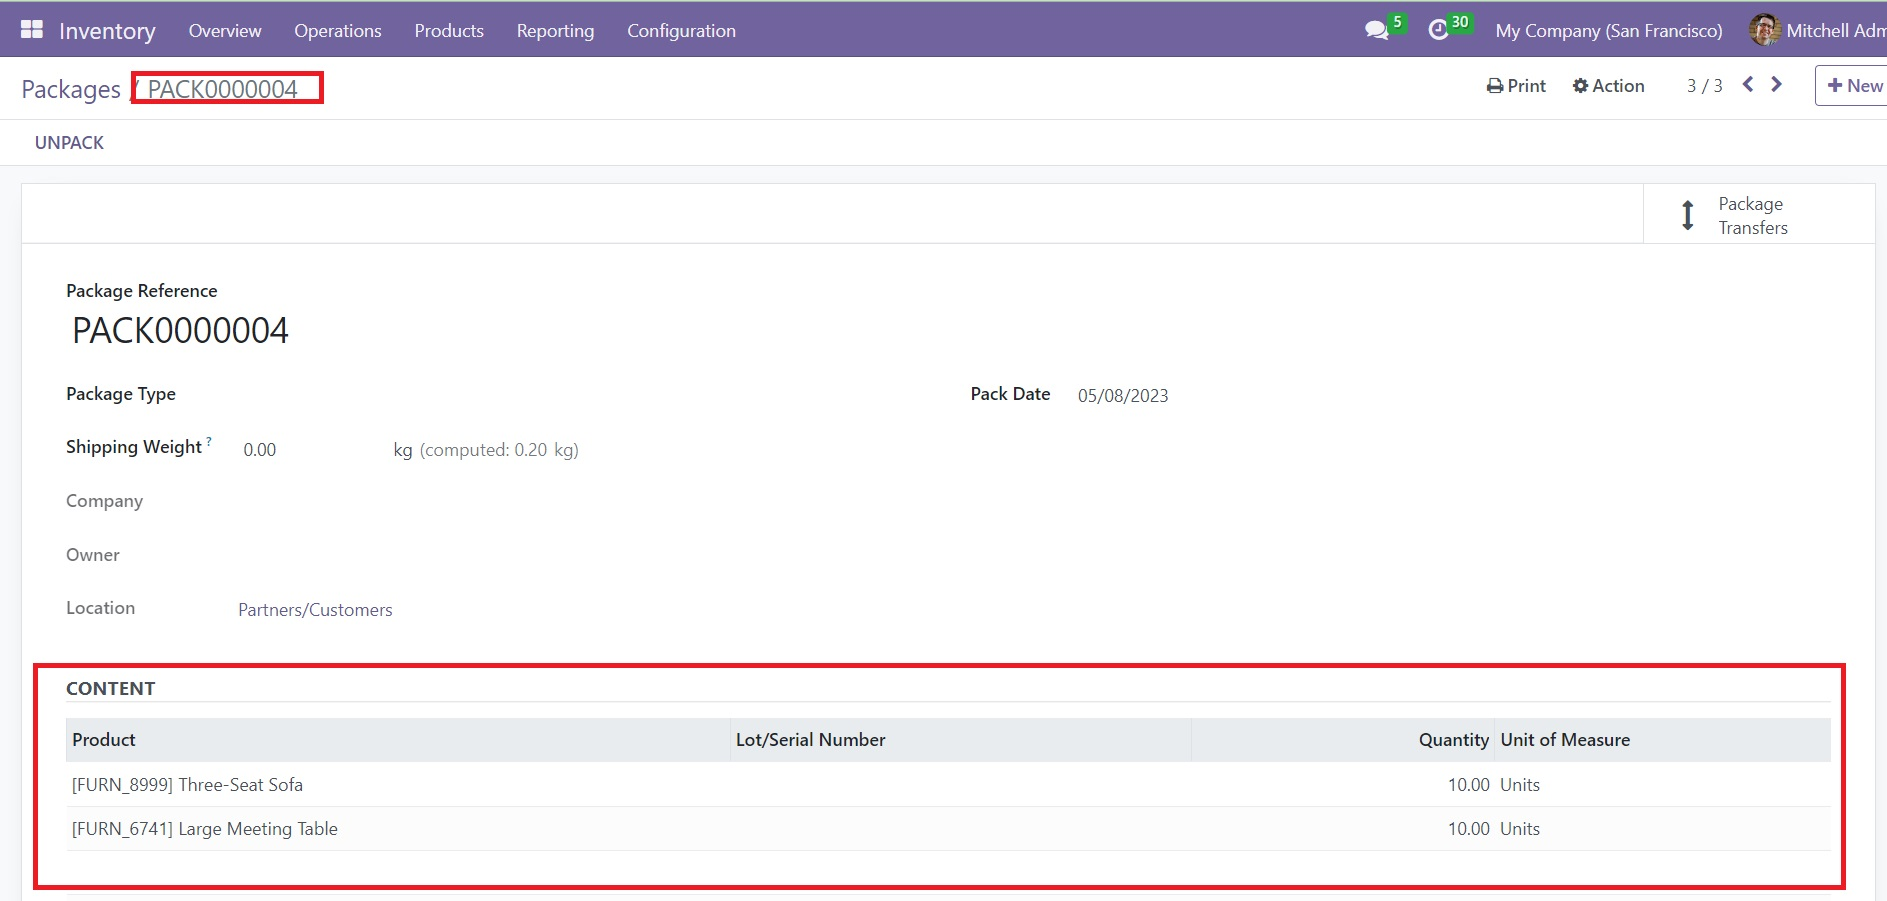
You can observe the products included in this package under the Content tab.

Product Packaging
The Product Packaging feature is used to pack different quantities of the same products. In a single pack, you can find multiple units of the same item. You can go to the Configuration menu to get access to this platform. The list view of this platform displays the details of the Product, Packaging, Package Type, Contained Quantity, Unit of Measure, Sales, and Purchase.
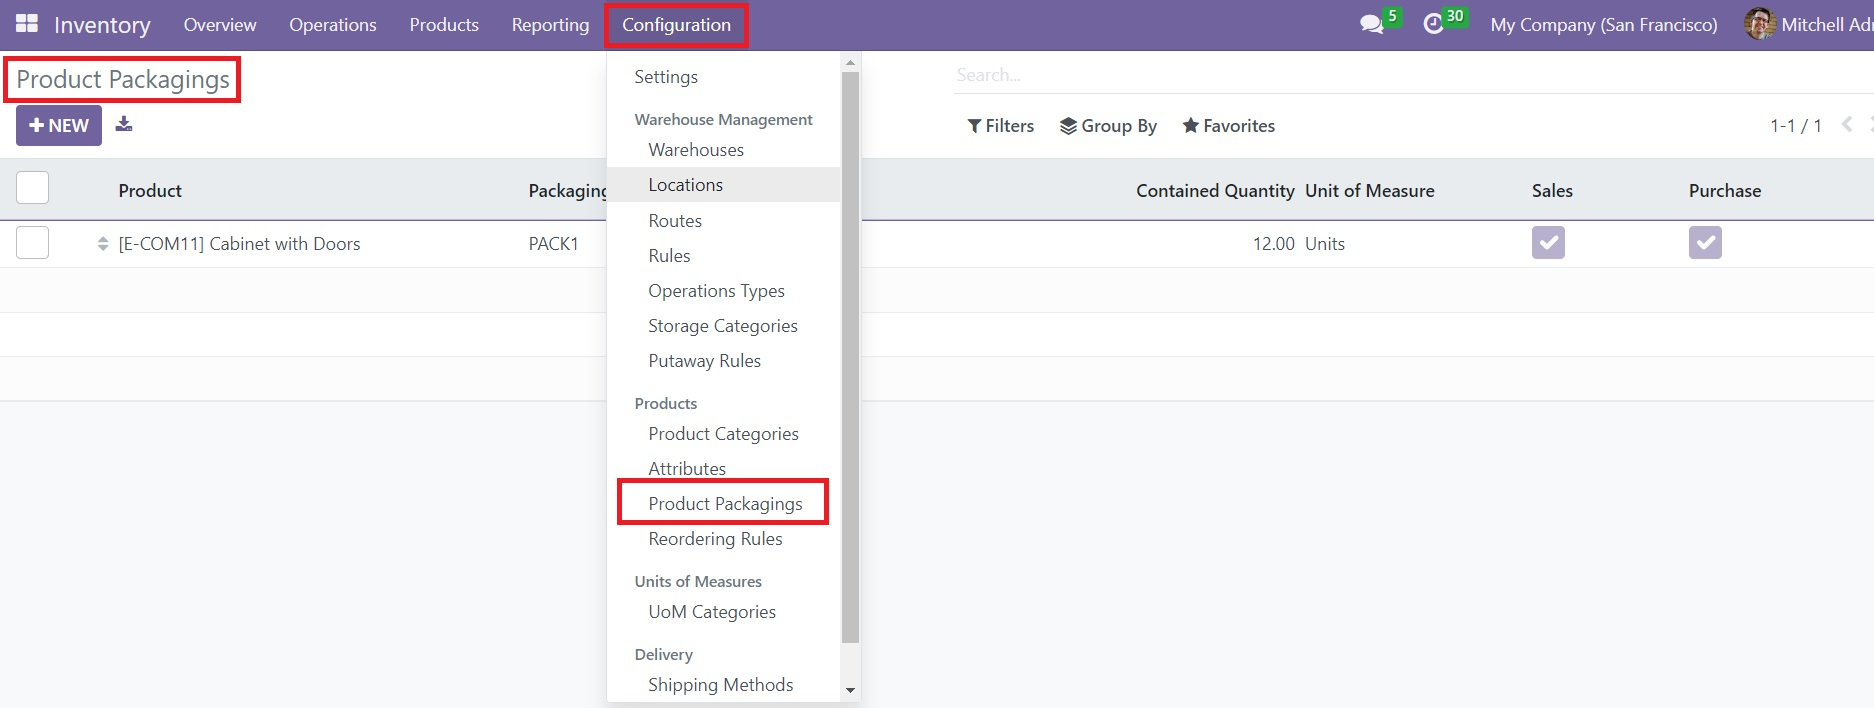
Click the New button to define a new Product Packaging.
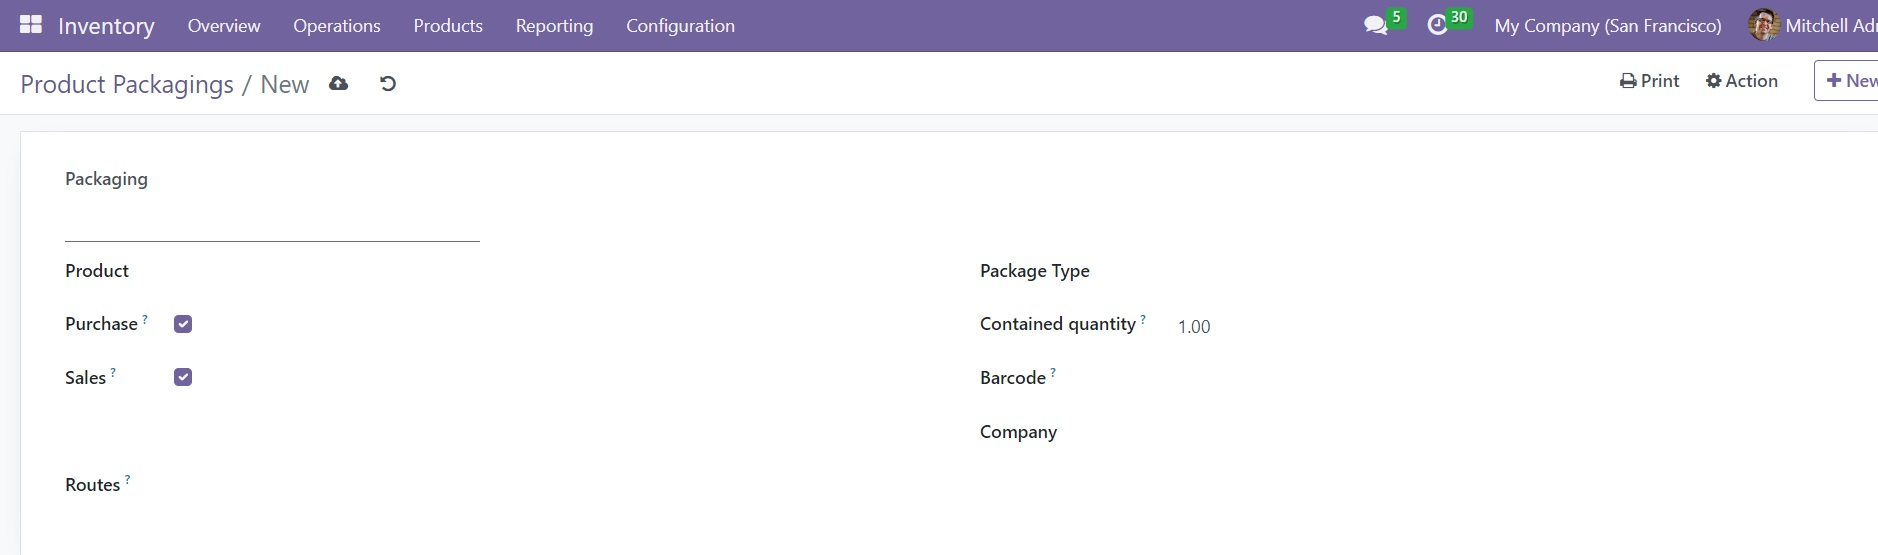
In the form view, you can mention a name for the Packaging in the given space. In the Product field, you can specify the product that you want to add to this package. If you want to use this packaging in purchase and sales orders, you can activate the Purchase and Sales fields respectively. Select a suitable Package Type for this Packaging from the given options. The quantity of the product contained in the package can be specified in the Contained Quantity field. Set a Barcode for packaging identification. You can scan this packaging barcode from a transfer in the Barcode app to move all the contained units. After mentioning the Company name, the configuration is completed.
Package Type
In order to configure multiple package types for delivery operations, you can go to the Configuration menu and select the Package Type option. This will open a window where you can observe various package types for inventory operations.
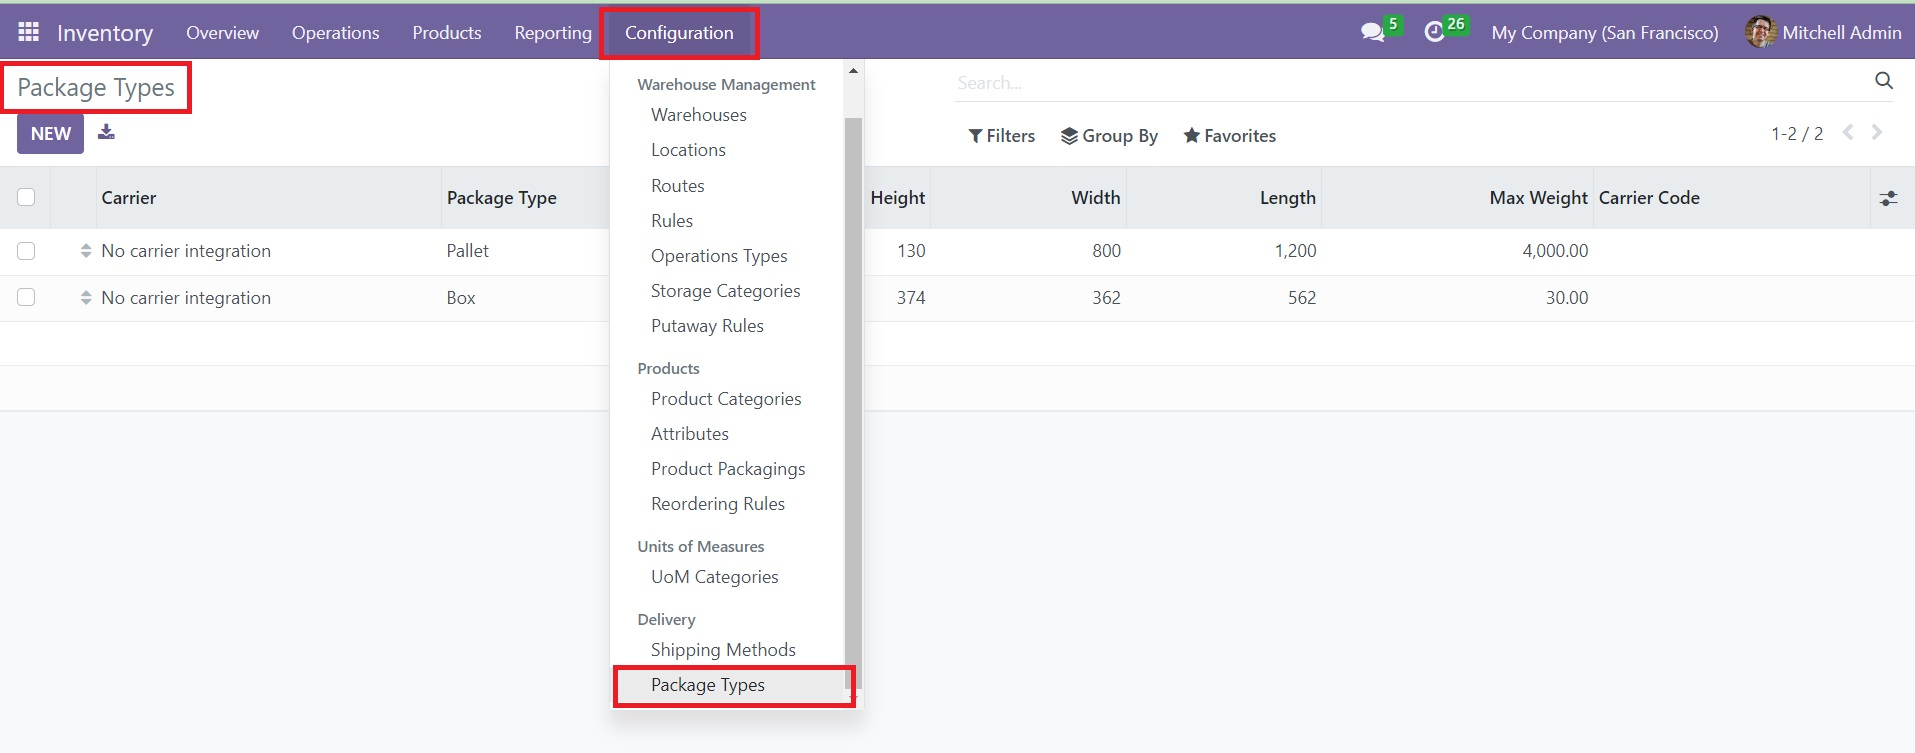
Here, the list view shows the details of the Carrier, Package Type, Height, Width, Length, Maximum Weight, and Carrier Code. Use the New button to create a new package type.
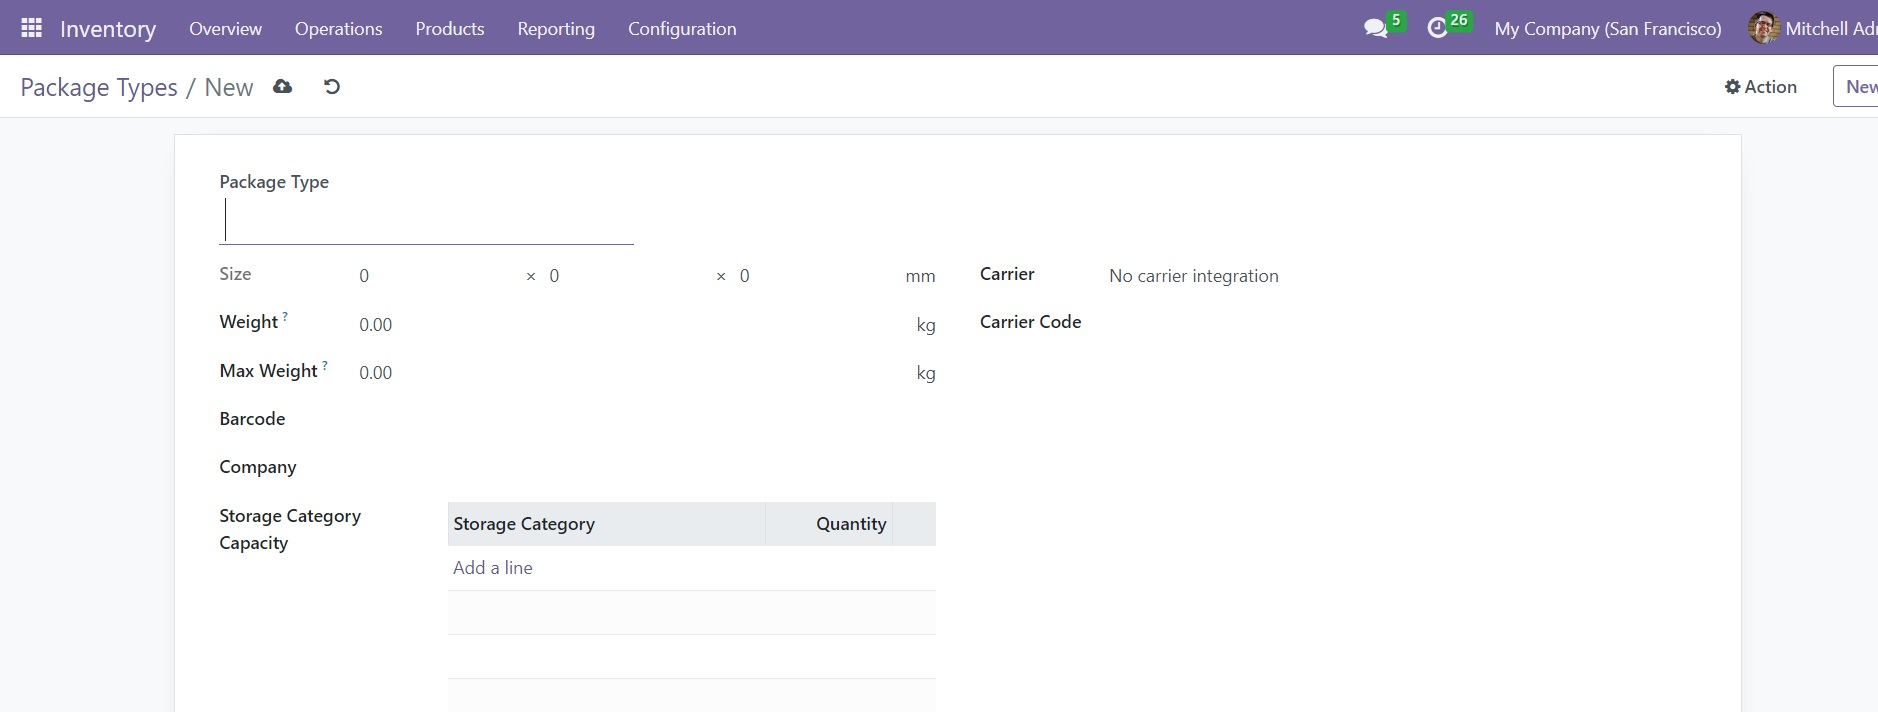
Mention the name of the Package Type in the specified field, along with the Size details. In the corresponding fields, you can mention the Weight of the package type, Maximum Weight shippable in this package, Barcode, Company, Carrier, and Carrier Code. When you activate the Storage Categories from the Settings menu, you will get an additional field named the Storage Category Capacity to mention the Storage Category and Quantity for this package type. This is how we configure a new package type in the Odoo Inventory module.
Product Traceability
Tracing and tracking the location of each component of a product at different stages of the inventory is a crucial part of inventory management. This process needs to be managed with utmost care so that you can ensure easy transfer throughout the inventory. The product traceability features available in Odoo 16 will simplify the tracking operations. These features will bring all inventory operations under control with advanced tracking.
We use lots and serial numbers for the purpose of effective tracing of stock movement in inventory. You can use them to keep track of a product from manufacturing to delivery. This will also improve the efficiency of stock management in your company. Using the lots and serial numbers, it is possible to easily locate the missing components, which is helpful in reducing the risk factors in stock movement. Odoo will keep a record of the stock movement of each component of a product as a traceability report.
In Odoo 16, you can use lots and serial numbers to track your products. Both these traceability features have a sight difference in their functions. In general, lots act as a unique identification number to identify a group of products under the same type. The products, which are comparatively small and difficult to count as single products, can be put together in a single pack and a lot number to the pack. The products will be picked as batches in the inventory. The serial numbers can be used for individual products in inventory. These numbers will perform the function of an identification number for individual products.
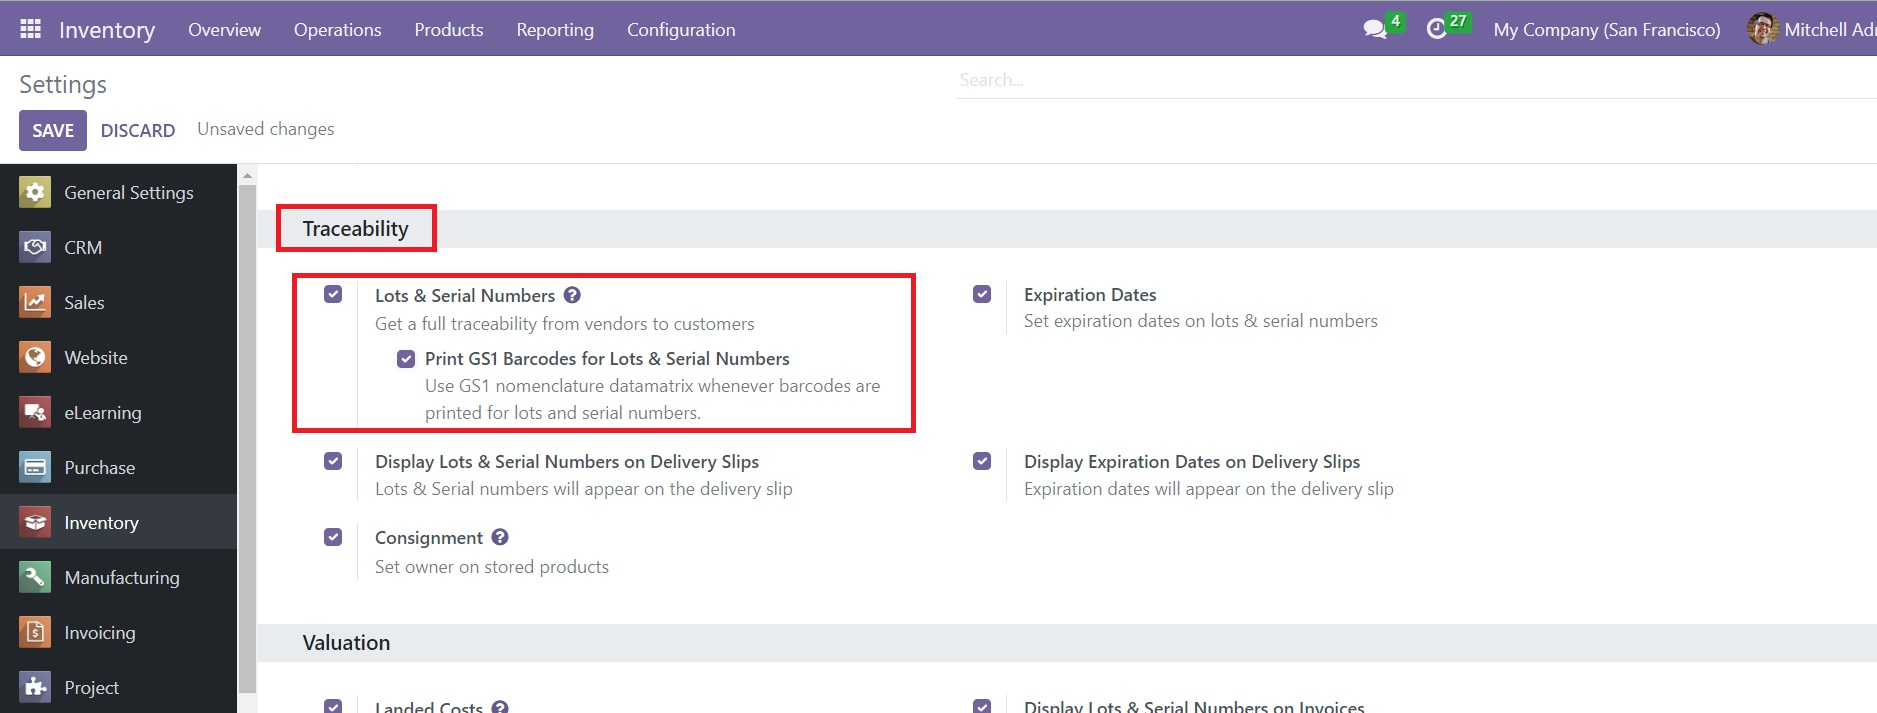
During the inventory management of products, you can assign lots and serial numbers on products. The advanced inventory management tools available in the Odoo Inventory module support these traceability features that will improve the efficiency of tracking. Now, let's go to the Settings menu to activate the complete features of the traceability in the Inventory module. Here, you can find the Lots & Serial Numbers option to activate under the Traceability tab.
Once you activate this feature, you can find the corresponding sub-menu under the Products menu of the Inventory module, as shown in the image below.
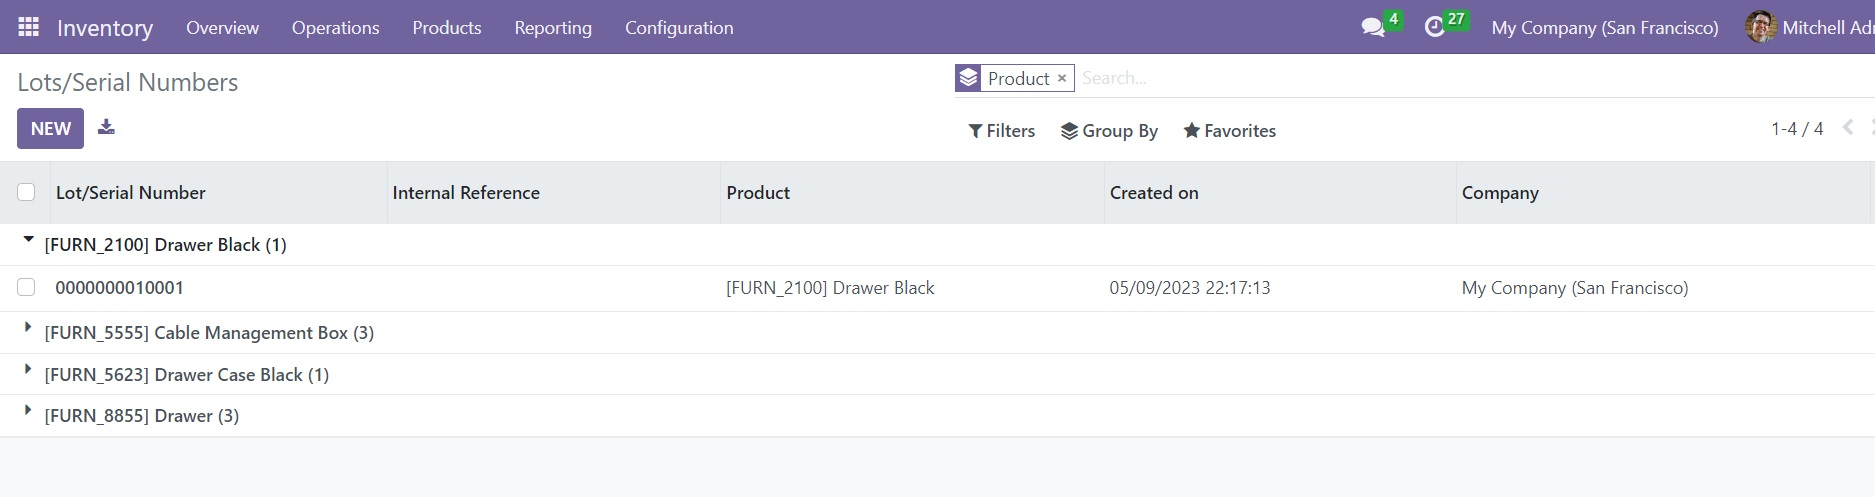
The pre-configured list of lots and serial numbers can be seen here. The list view will provide the details of Lots/Serial Number, Internal Reference Number, Product, Creation Date, and Company. In order to create new Lots/Serial Numbers, you can use the New button. This will lead you to a form view, as shown below, to configure a new lot/serial number.
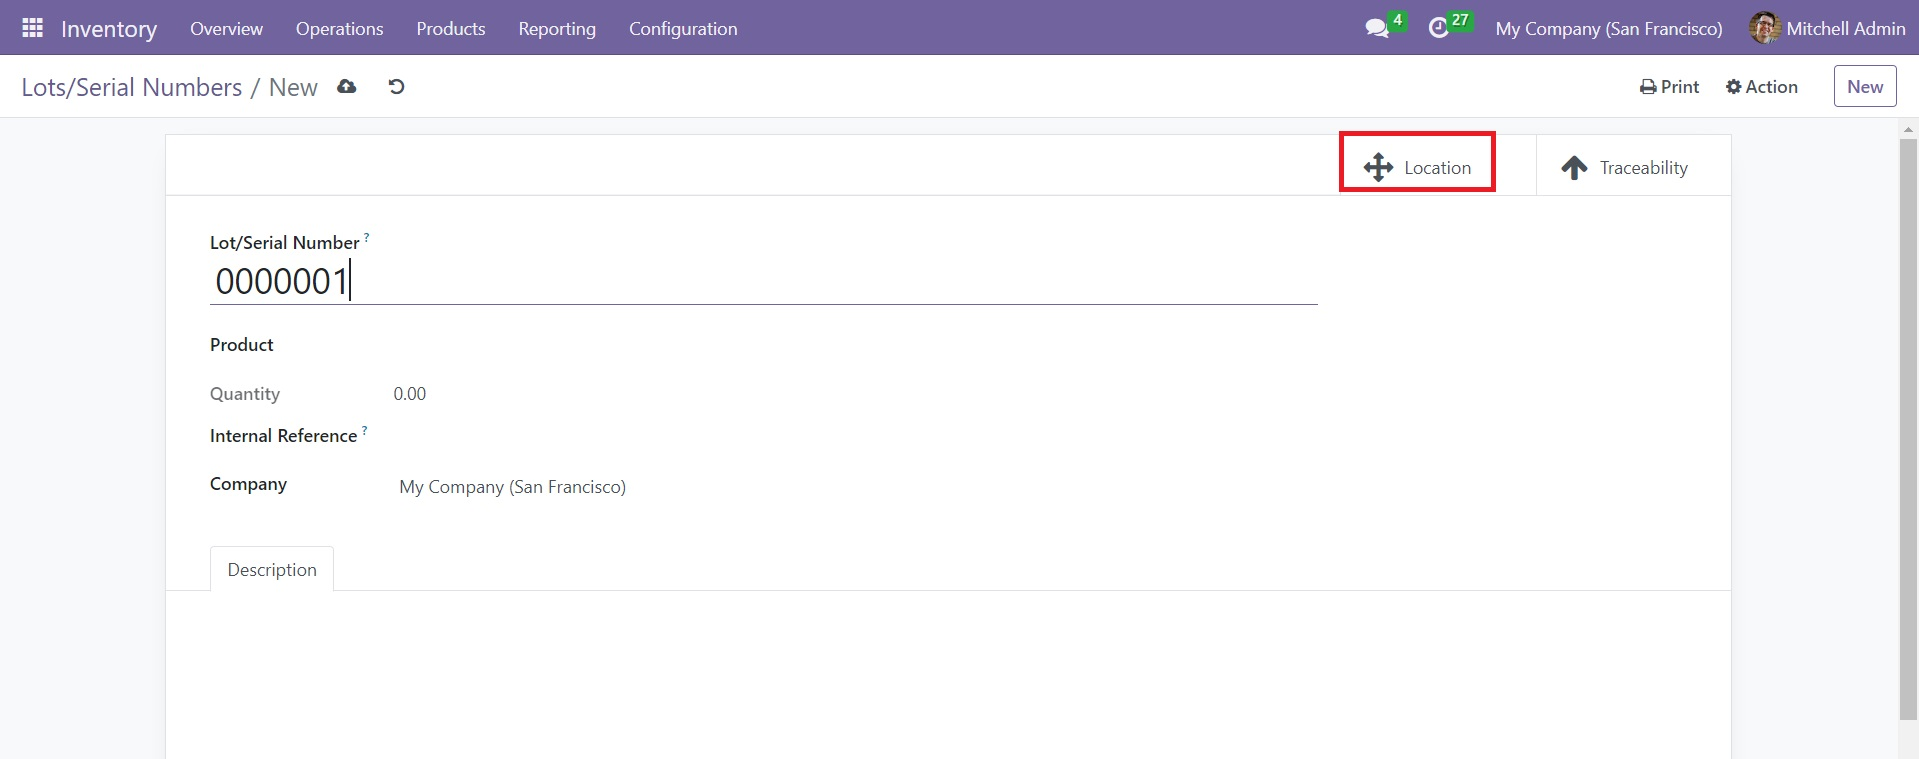
In the given space, you can add a unique Lot/Serial Number for a product. The corresponding product can be specified in the Product field. The Quantity of this product available in the inventory will automatically appear in the corresponding field once you mention the product. You can add Internal Reference in the form in case it varies from the manufacturer’s lot/serial number. After mentioning the Company, you can add a description related to this lot/serial number in the Description field. After configuring the new lot/serial number, you will get the Location smart button on the screen which can be used to observe the location of the product in your inventory.

It shows the details of Location, Product, Package, Lot/Serial Number, Owner, On Hand Quantity, Received Quantity, and Unit. Here, you can use the History button to get the movement history of this particular product. It is possible to replenish the product from this window using the Replenishment button. If you want to get the latest inventory details of the product, you can use the Inventory at Date button.
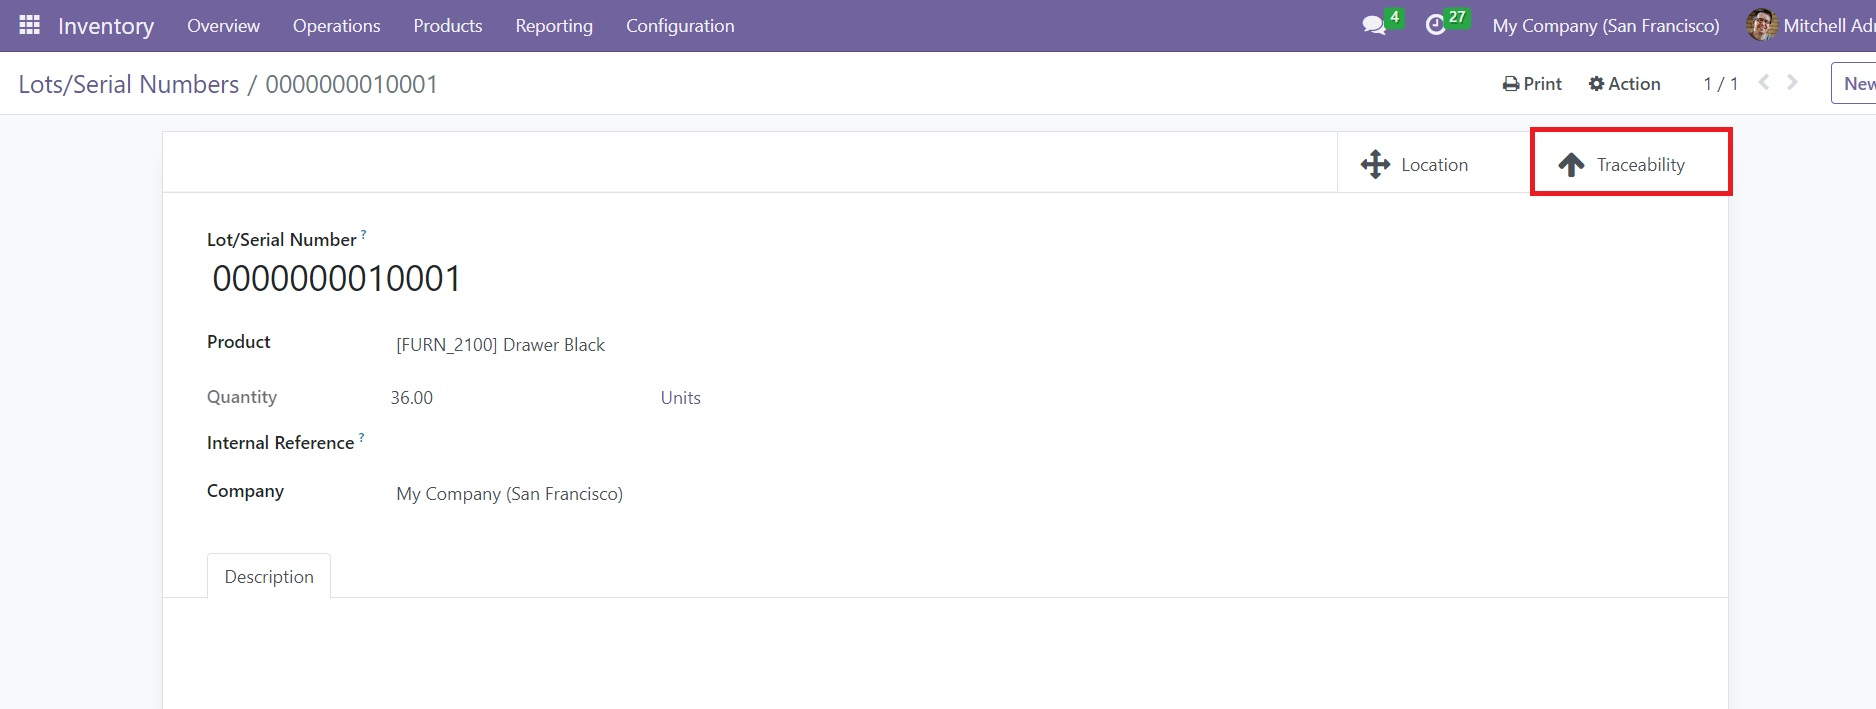
Traceability is another smart button available on the lot/serial number window. This button will open the tracking report of the product as shown in the screenshot below.
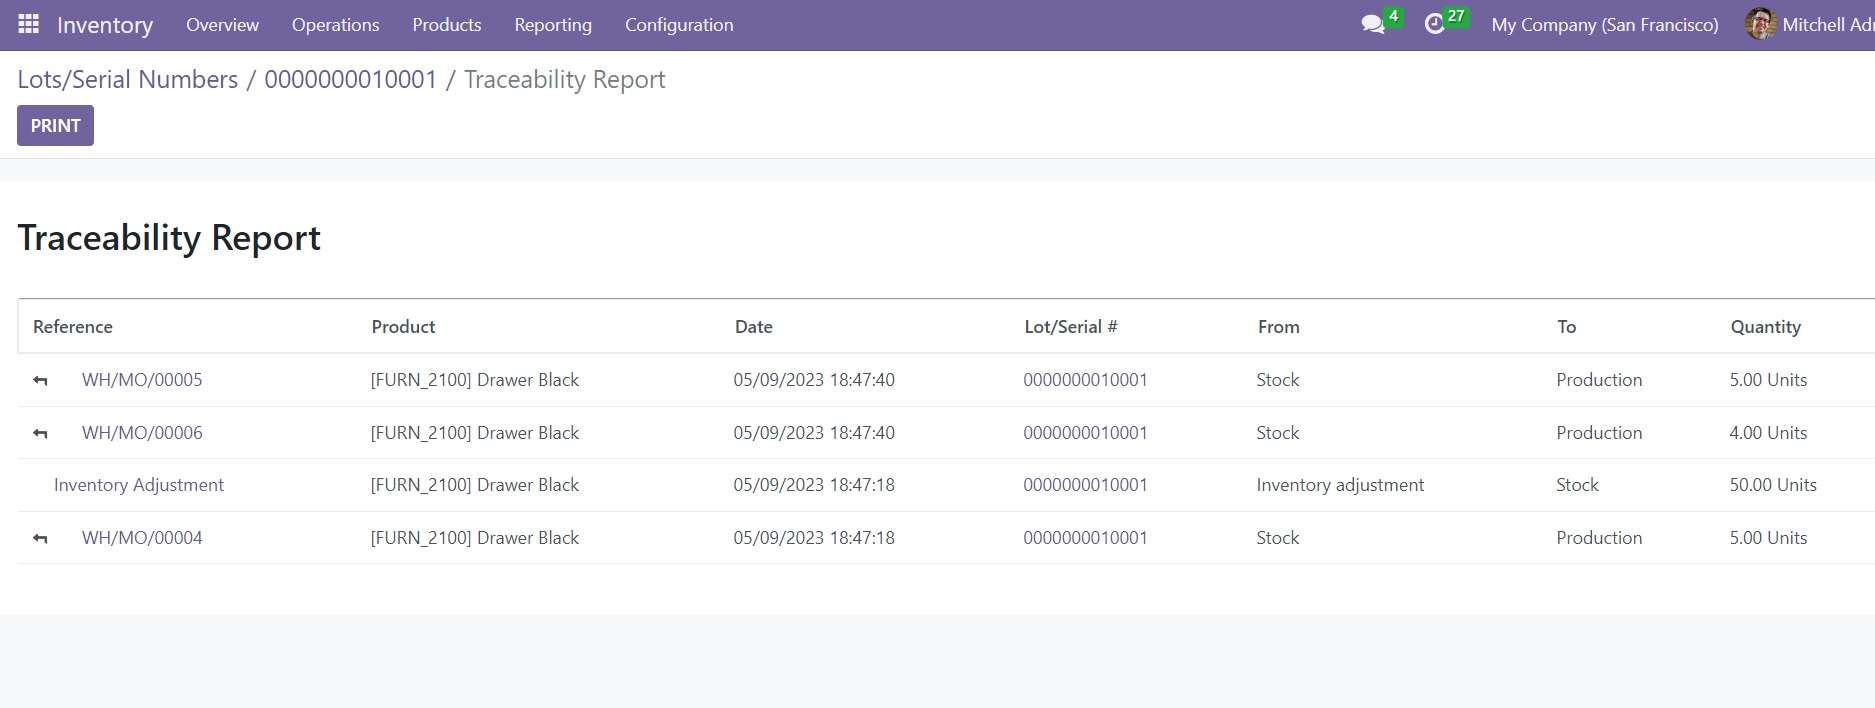
This report shows the Reference, Product, Date, Lot/Serial Number, From, To, and Quantity.
You can decide the traceability of a product from the product configuration window in the Inventory module. For this, you can select the Inventory tab from the product form view.
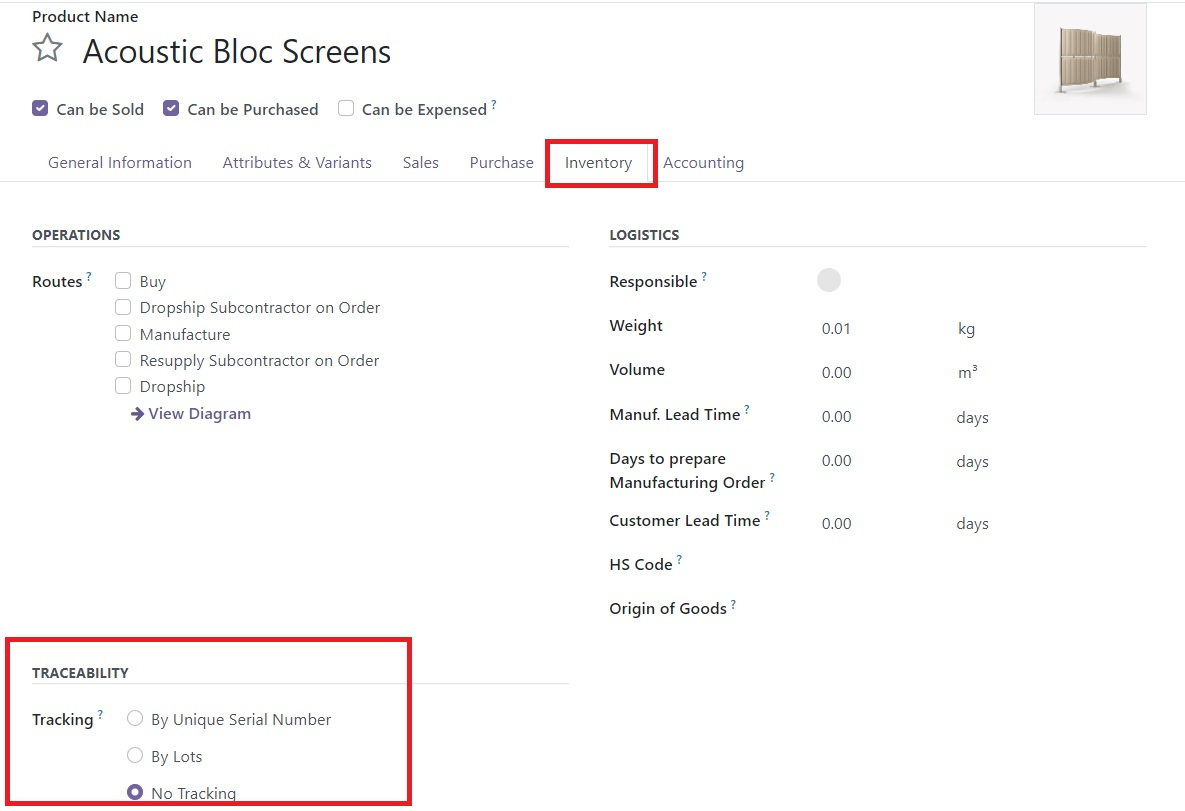
As shown in the screenshot, you will get the Traceability section here which will help you to define how to track that particular product. You can set the Tracking based on a Unique Serial Number or Lots. If you don’t want to set any tracking on the product, you can select the No Tracking option.
At the time of receiving a new product in your inventory, Odoo will allow you to allot a new lot/serial number to that product. This can be done on a confirmed purchase order. The product will reach your company within the expected arrival date mentioned in the purchase order.
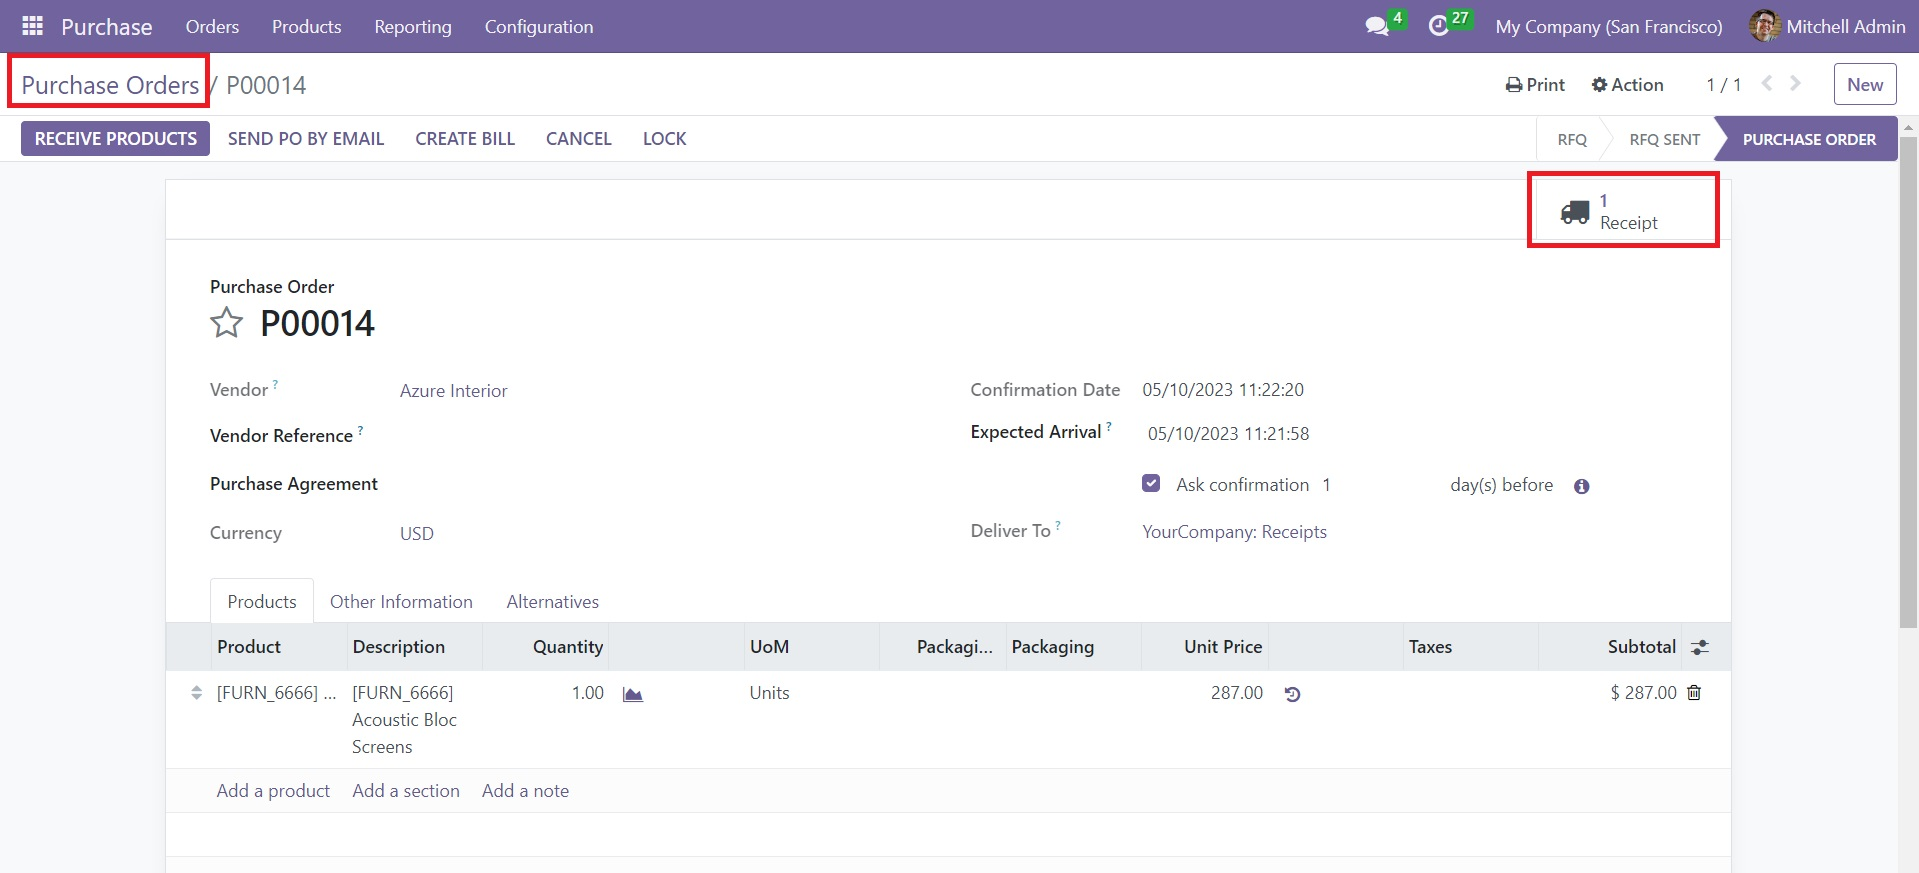
To allow a new lot/serial number to the product, you can click on the Receipt smart button available on the purchase order.
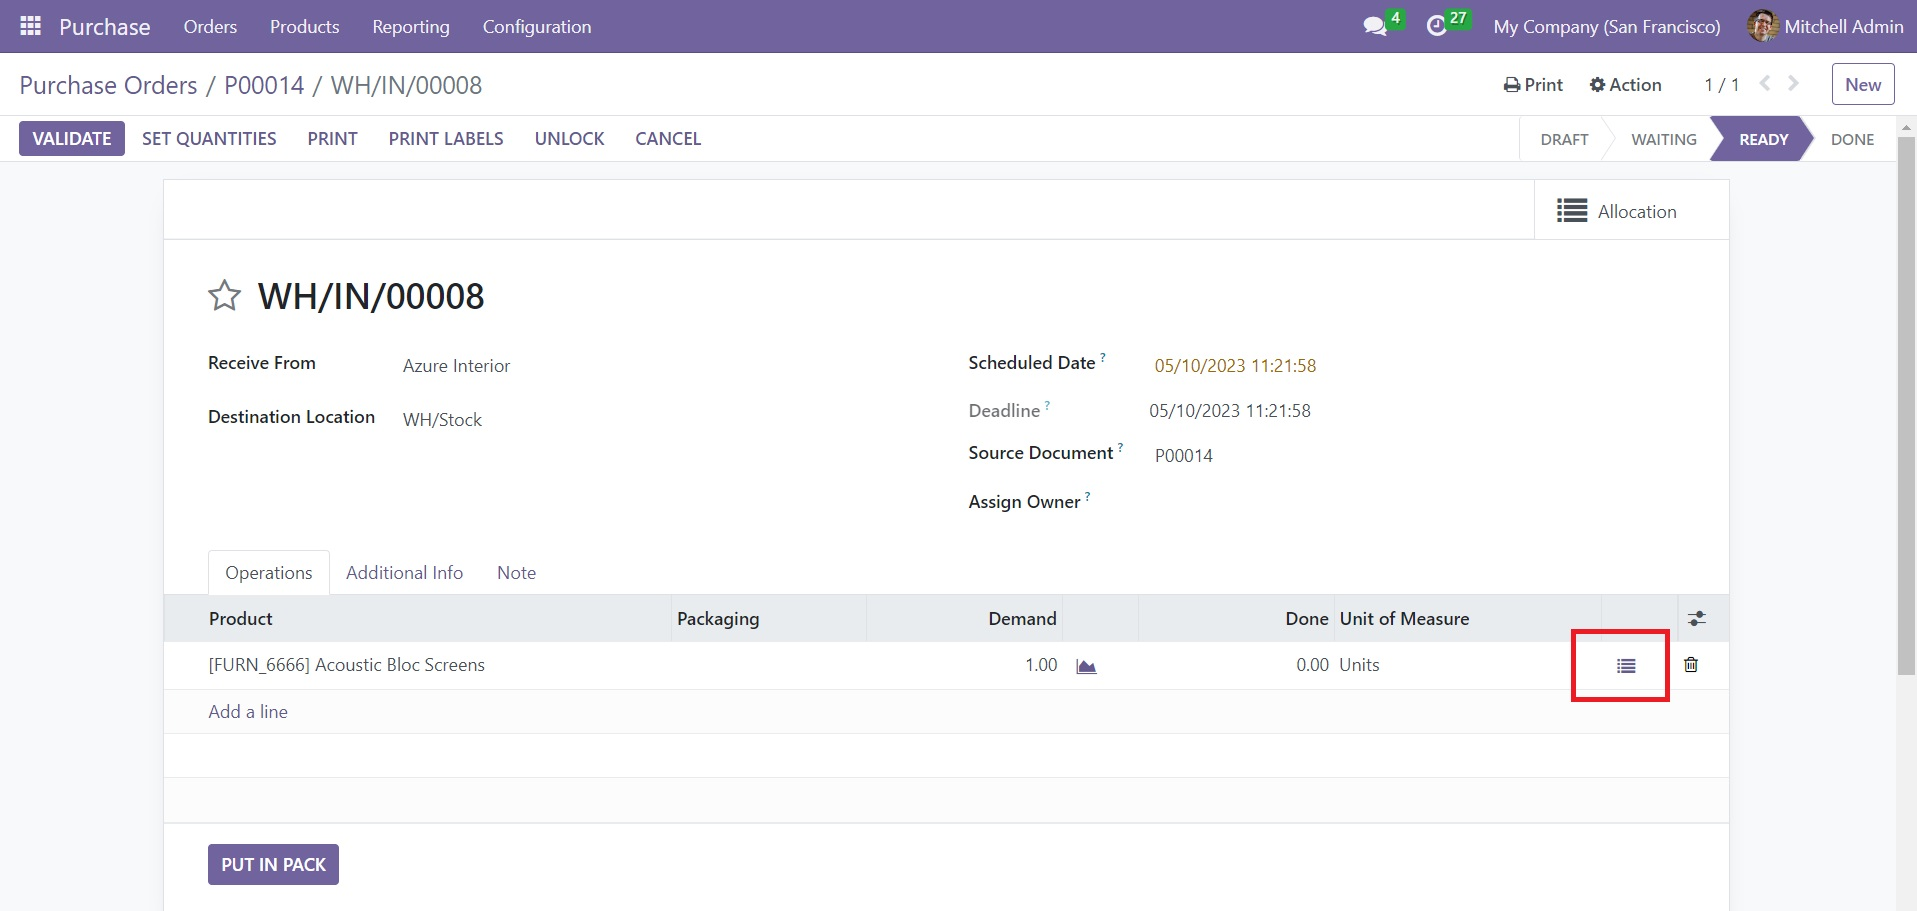
In the Receipt window, you can observe the purchased product under the Operation tab. Here, you will see an advanced icon to get the detailed operation window.
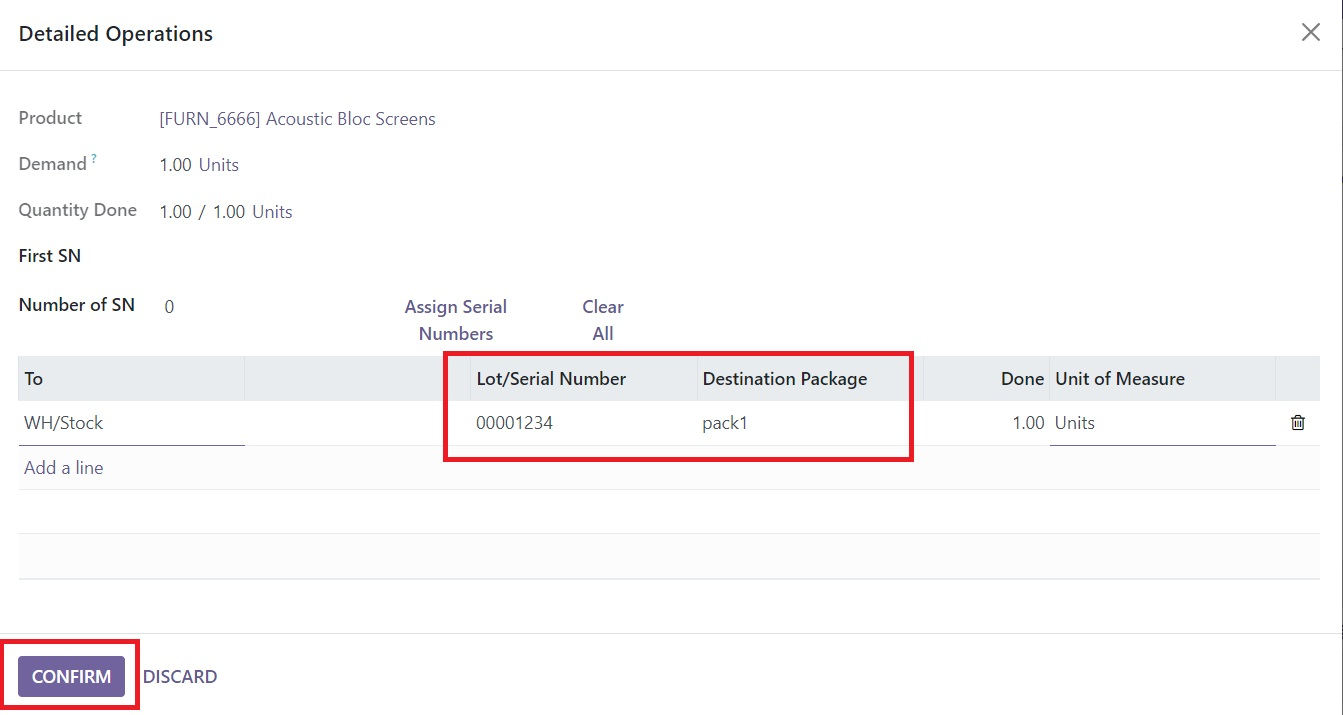
This pop-up window can be used to mention the lot/serial number for the new product. Along with this, you can mention the Destination Location also so that the product will be moved to this location once it reaches your inventory. Now, click on the Confirm button. Later, you can validate the receipt and click on the Receive Product button when the product arrives at your location. When you check the product form of that particular product, you can see the new lot/serial number.
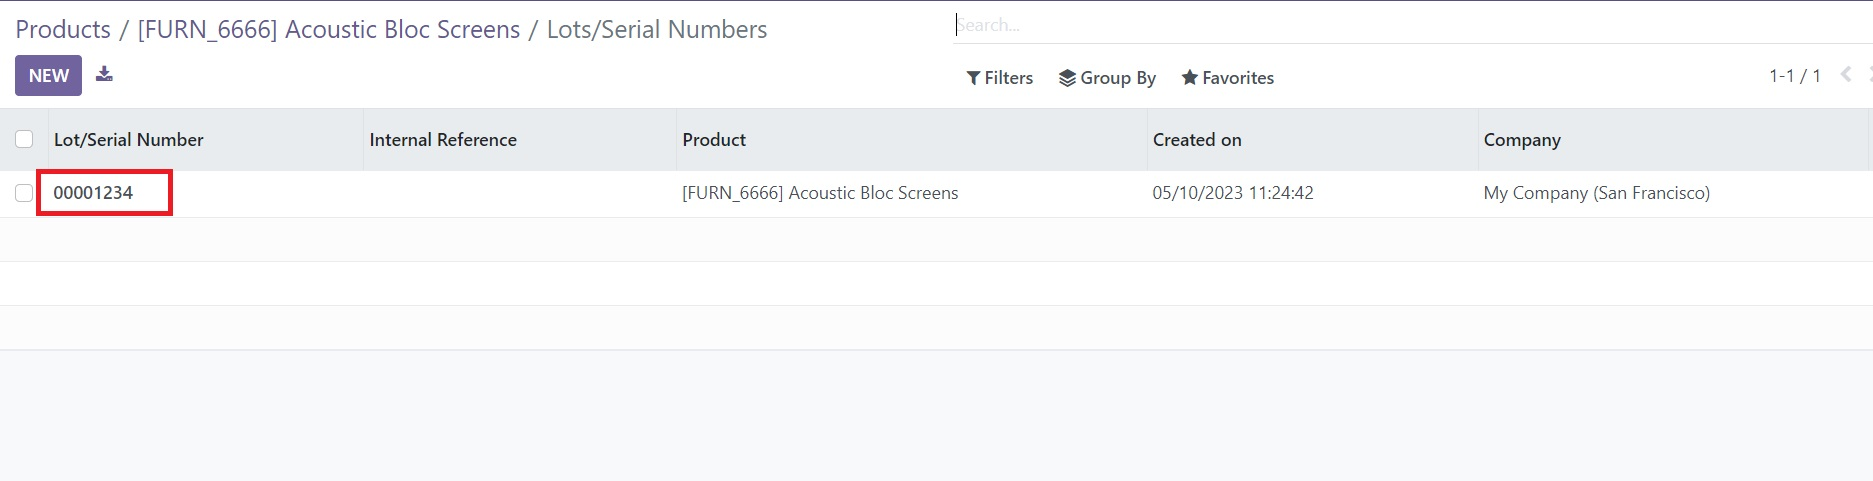
For this, select the product from the Product menu.
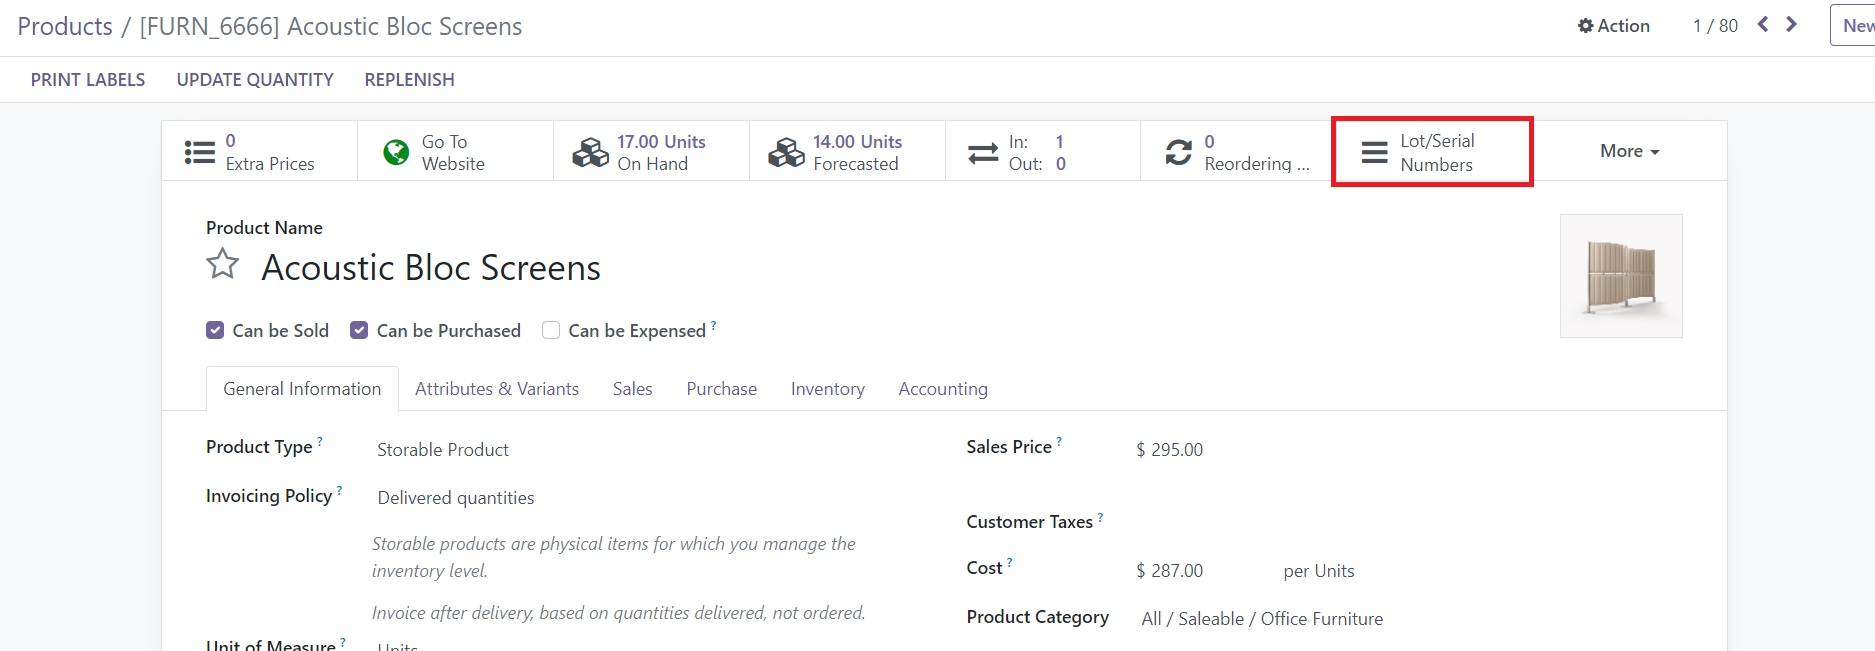
Click on the Lot/Serial Number smart button. As shown in the image above, the new lot/serial number for the product will be shown in this window.
In order to display lots/serial numbers on the delivery slips, you can activate the Display Lots & Serial Numbers on Delivery Slips option from the Traceability tab available in the Settings menu.
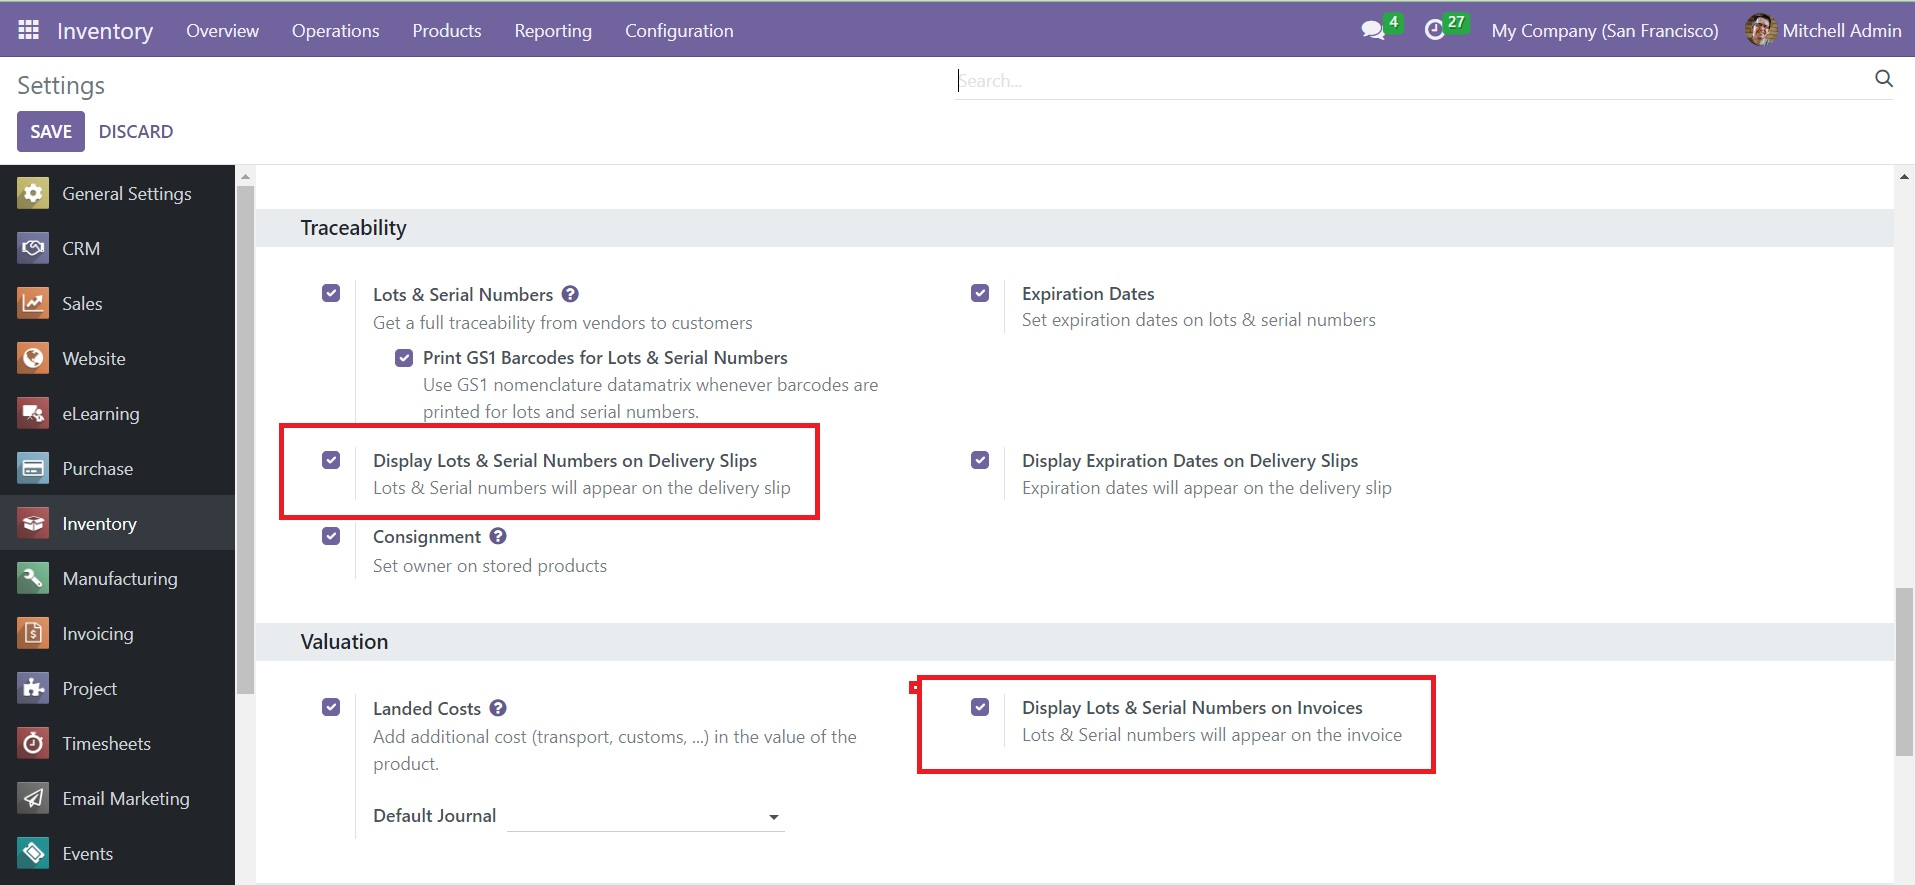
Activating the Display Lots & Serial Numbers on Invoices from the Valuation tab will show lots & serial numbers on invoices.
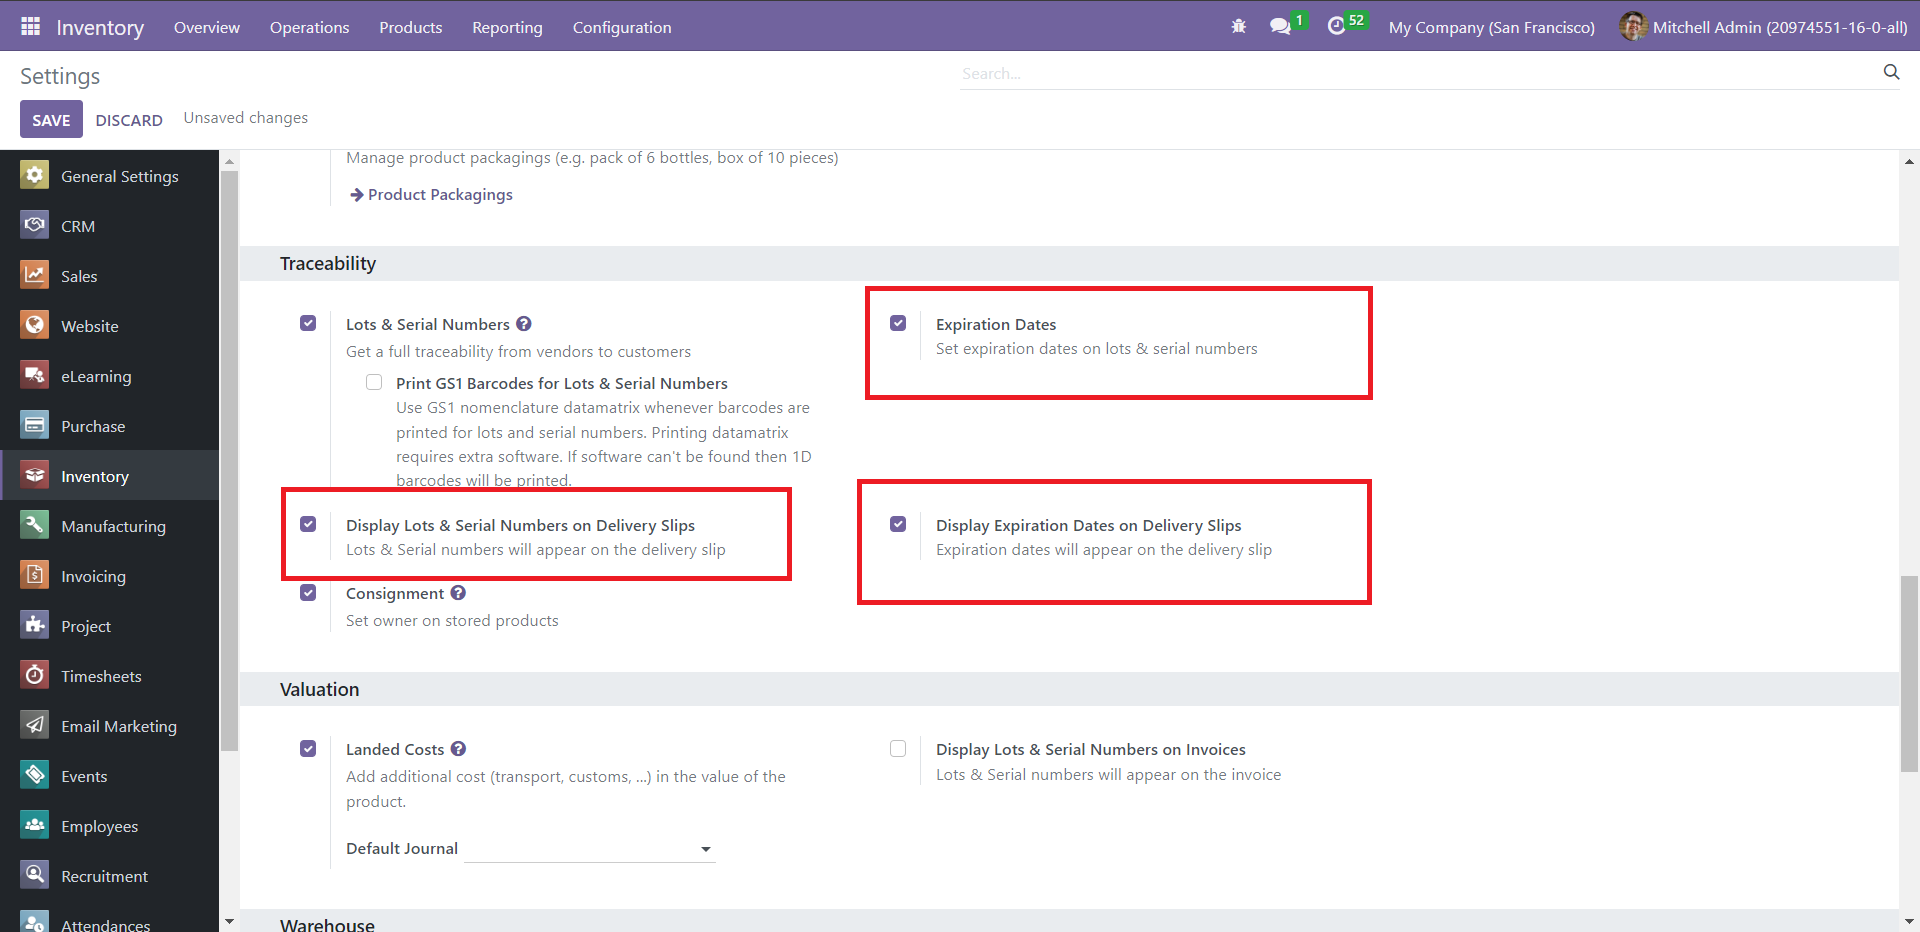
Expiration Date
To maintain a healthy business relationship with your customers and prosper your business, you need to ensure that you don’t send expired products to your customers. Hence, you must check the expiration date of your products before selling them. Enable ‘Expiration Dates’ and ‘Display Lots & Serial Numbers on Delivery Slips.’ After enabling the latter, the option ‘Display Expiration Dates on Delivery Slips’ appears. Check the box next to it to activate it.
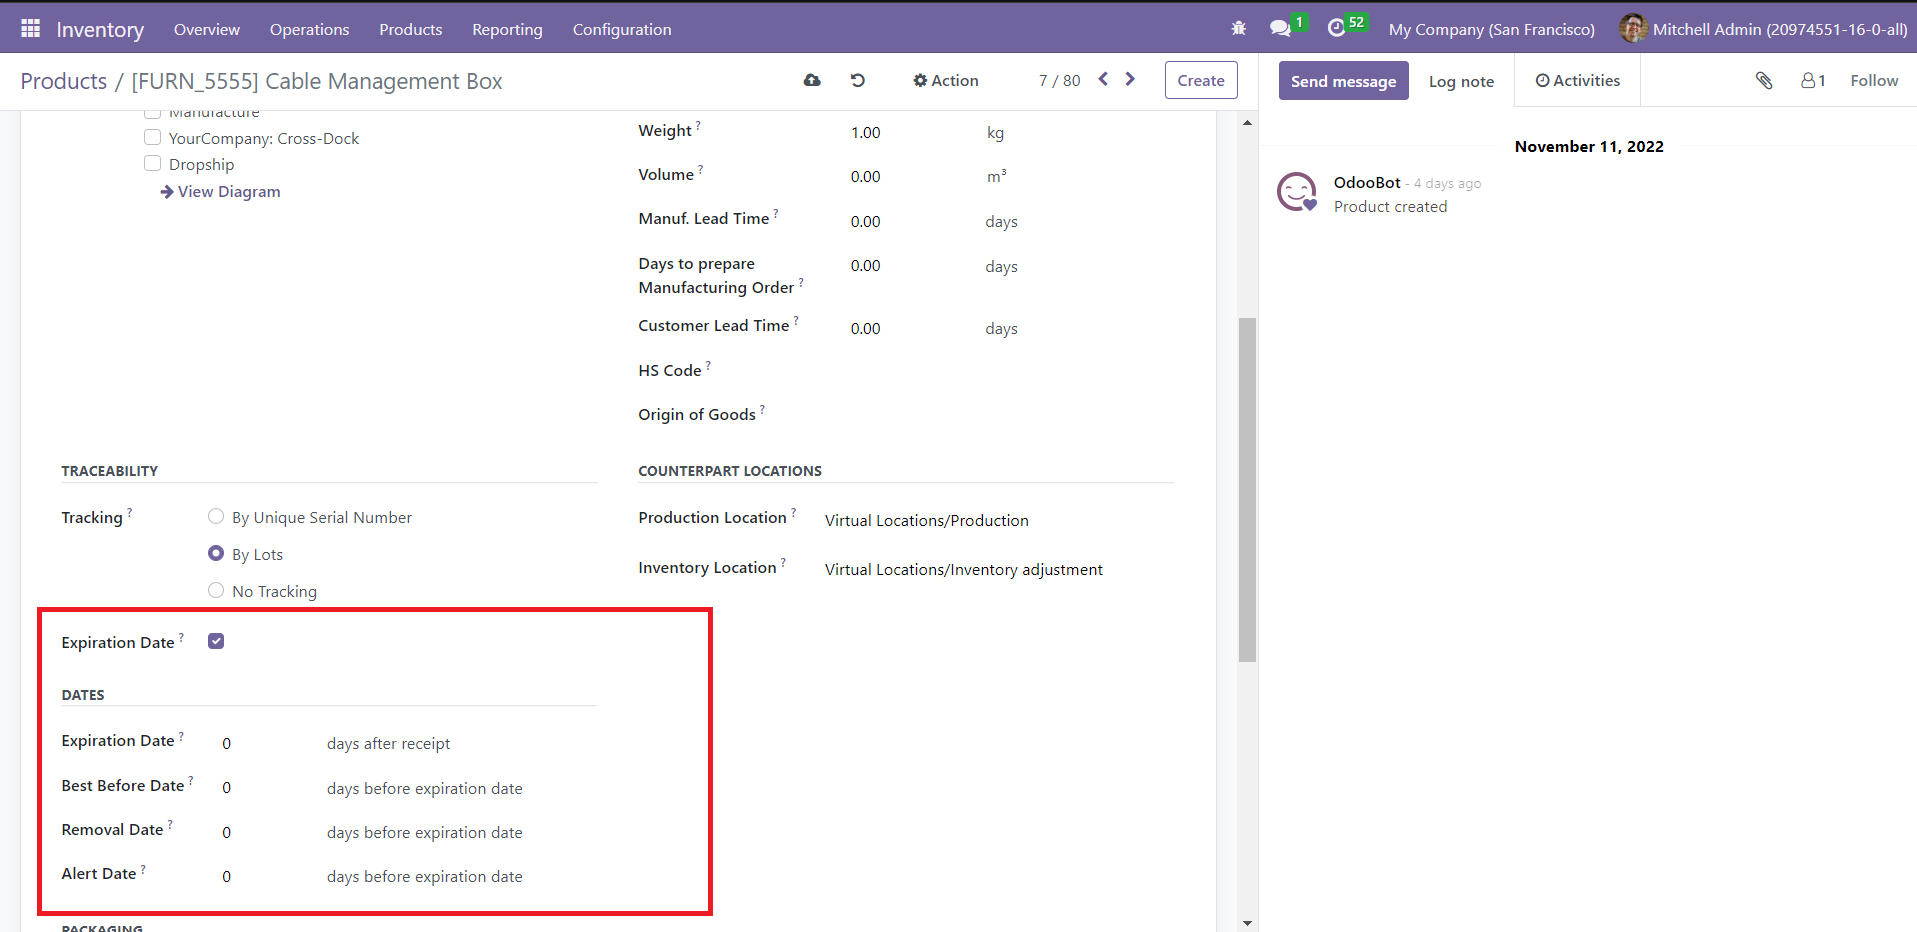
To set a product’s expiration date, head to the form view of any product; under the Inventory tab, enable the Expiration Date option. New fields to enter expiry details will appear below it.
Inventory Operations
If you are searching for a business solution for the effective and advanced management of all your inventory operations, then the Odoo Inventory module is the best option for you. Inventory management plays an important role in running a business flawlessly. When you enter the Inventory module, you will get a dedicated dashboard where you can observe almost all operations managed by the module. The Overview window of the Inventory module is shown below.
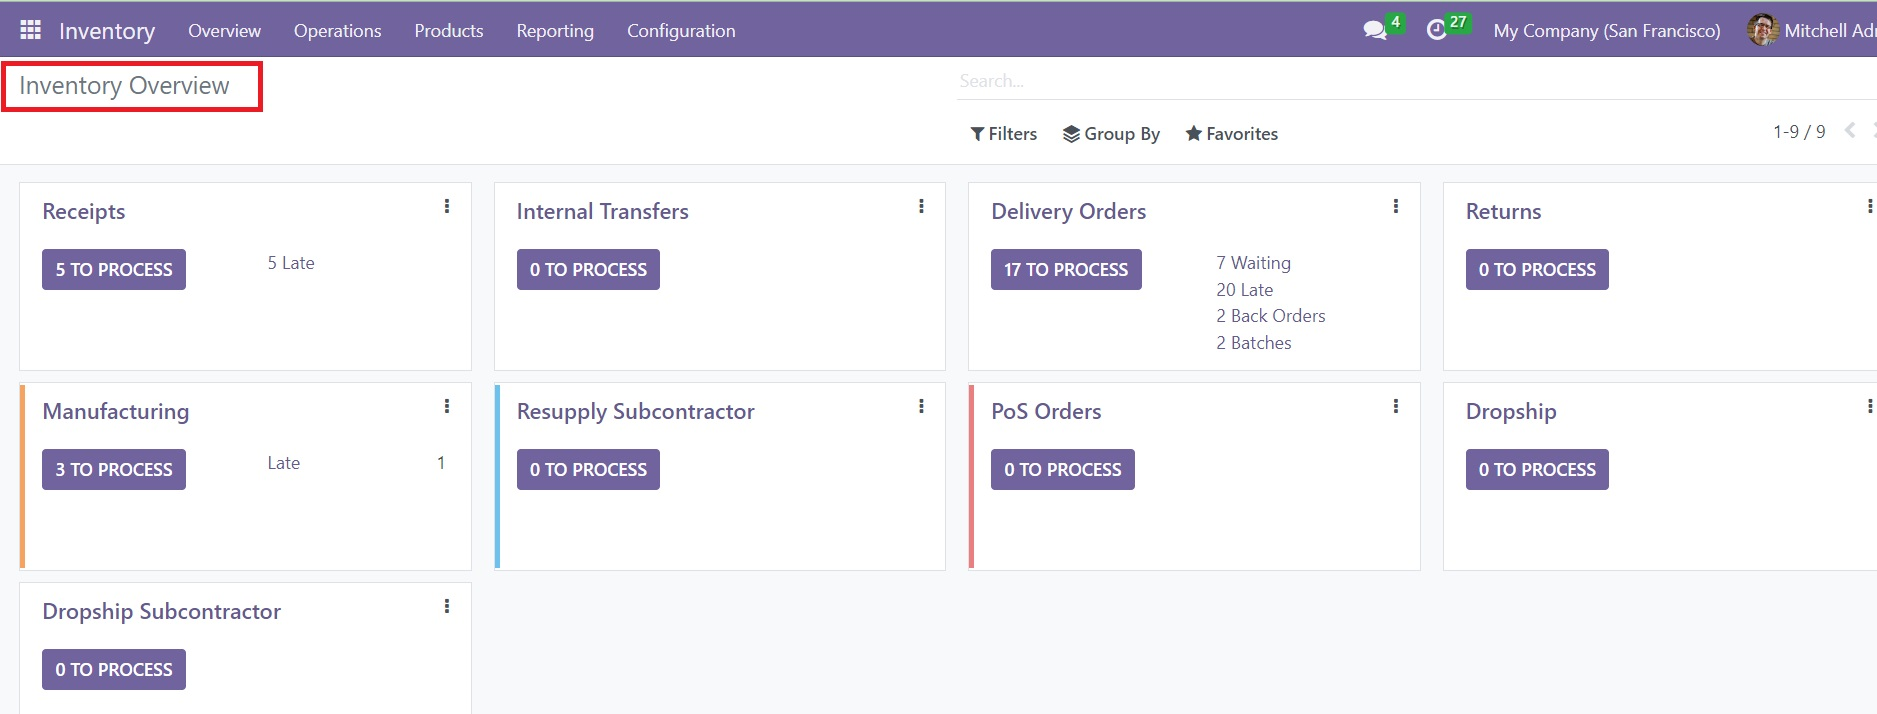
This is the Kanban view of the Inventory Overview. This window will allow you to manage Receipts, Internal Transfers, Delivery Orders, Returns, Manufacturing, Resupply Subcontractor, PoS Orders, Dropships, Dropship Subcontractor, and many more. At a glance, you can easily observe all major operations managed in the Inventory module from this window. To get additional tools to manage each operation available on this window, you can click on the three small vertical dots given in the top right corner of each operation tab.
Operations Types
Operations Types help you configure various methods to shift stocks between locations. Click on ‘Operations Types’ from the dropdown list of the Configuration tab.
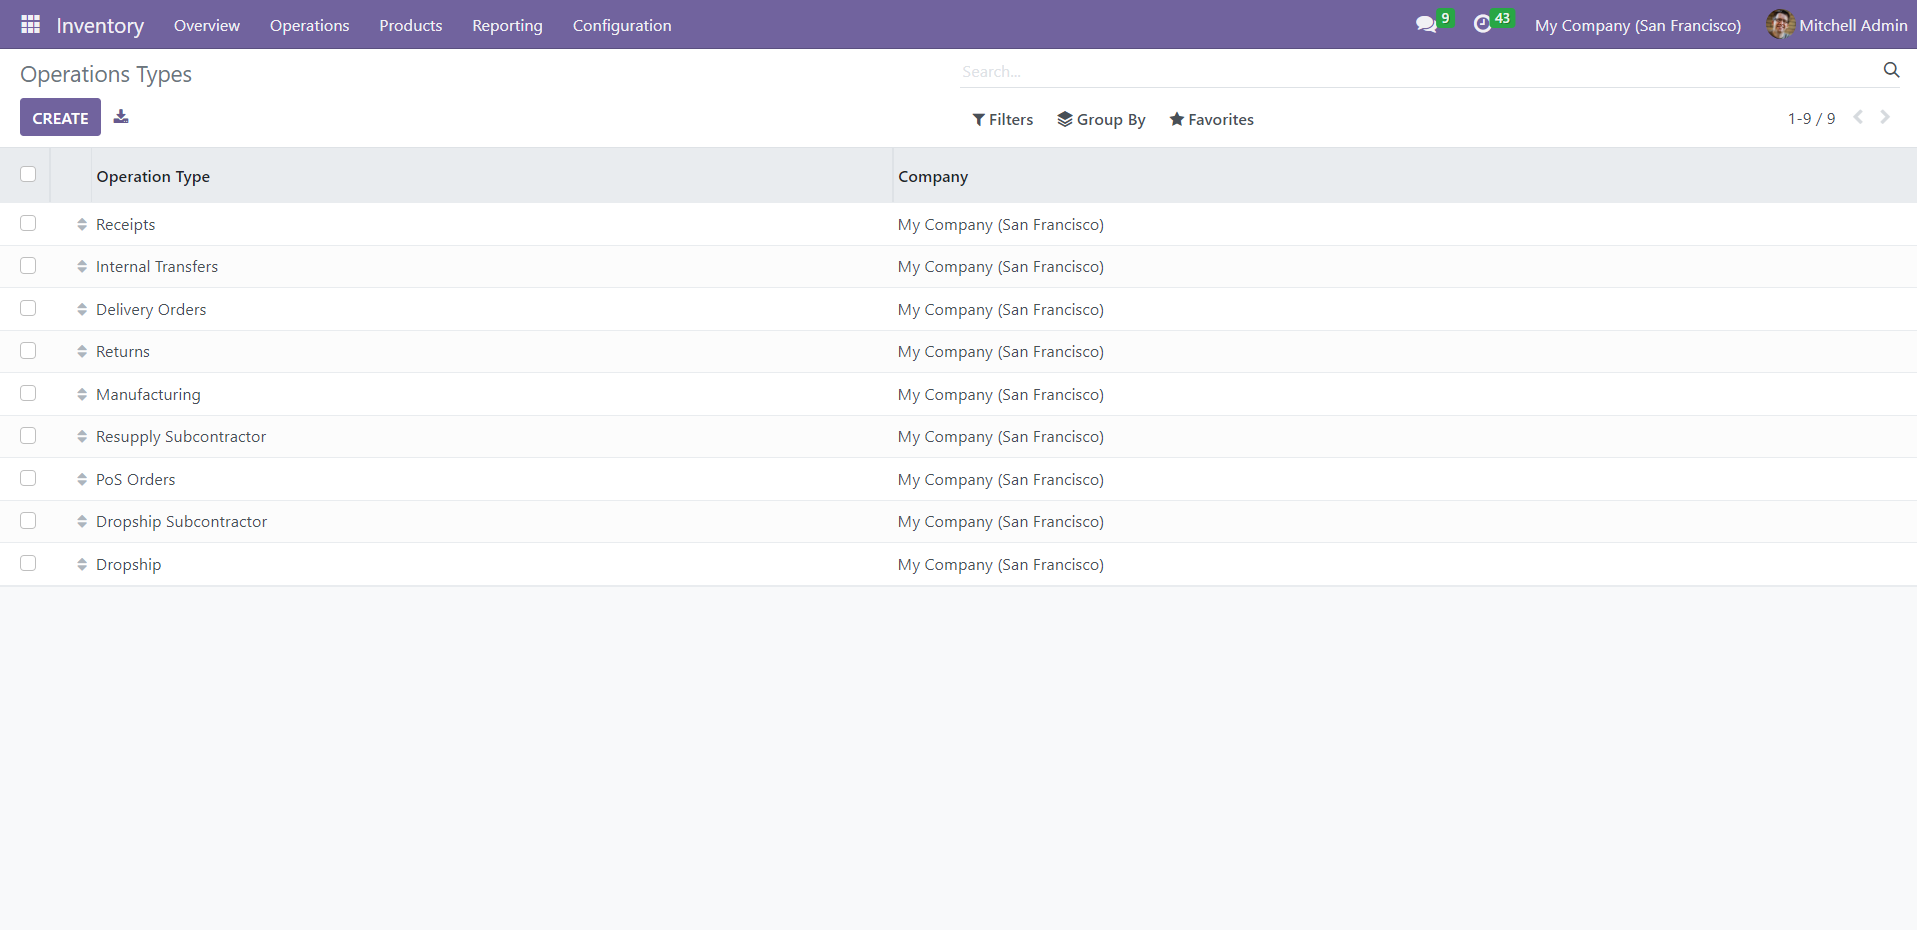
This window shows all the Operation Types available in the Inventory module. You can click on individual records to edit them or use the Create button to add a new Operation Type. When you click on ‘Create,’ the following window will appear.
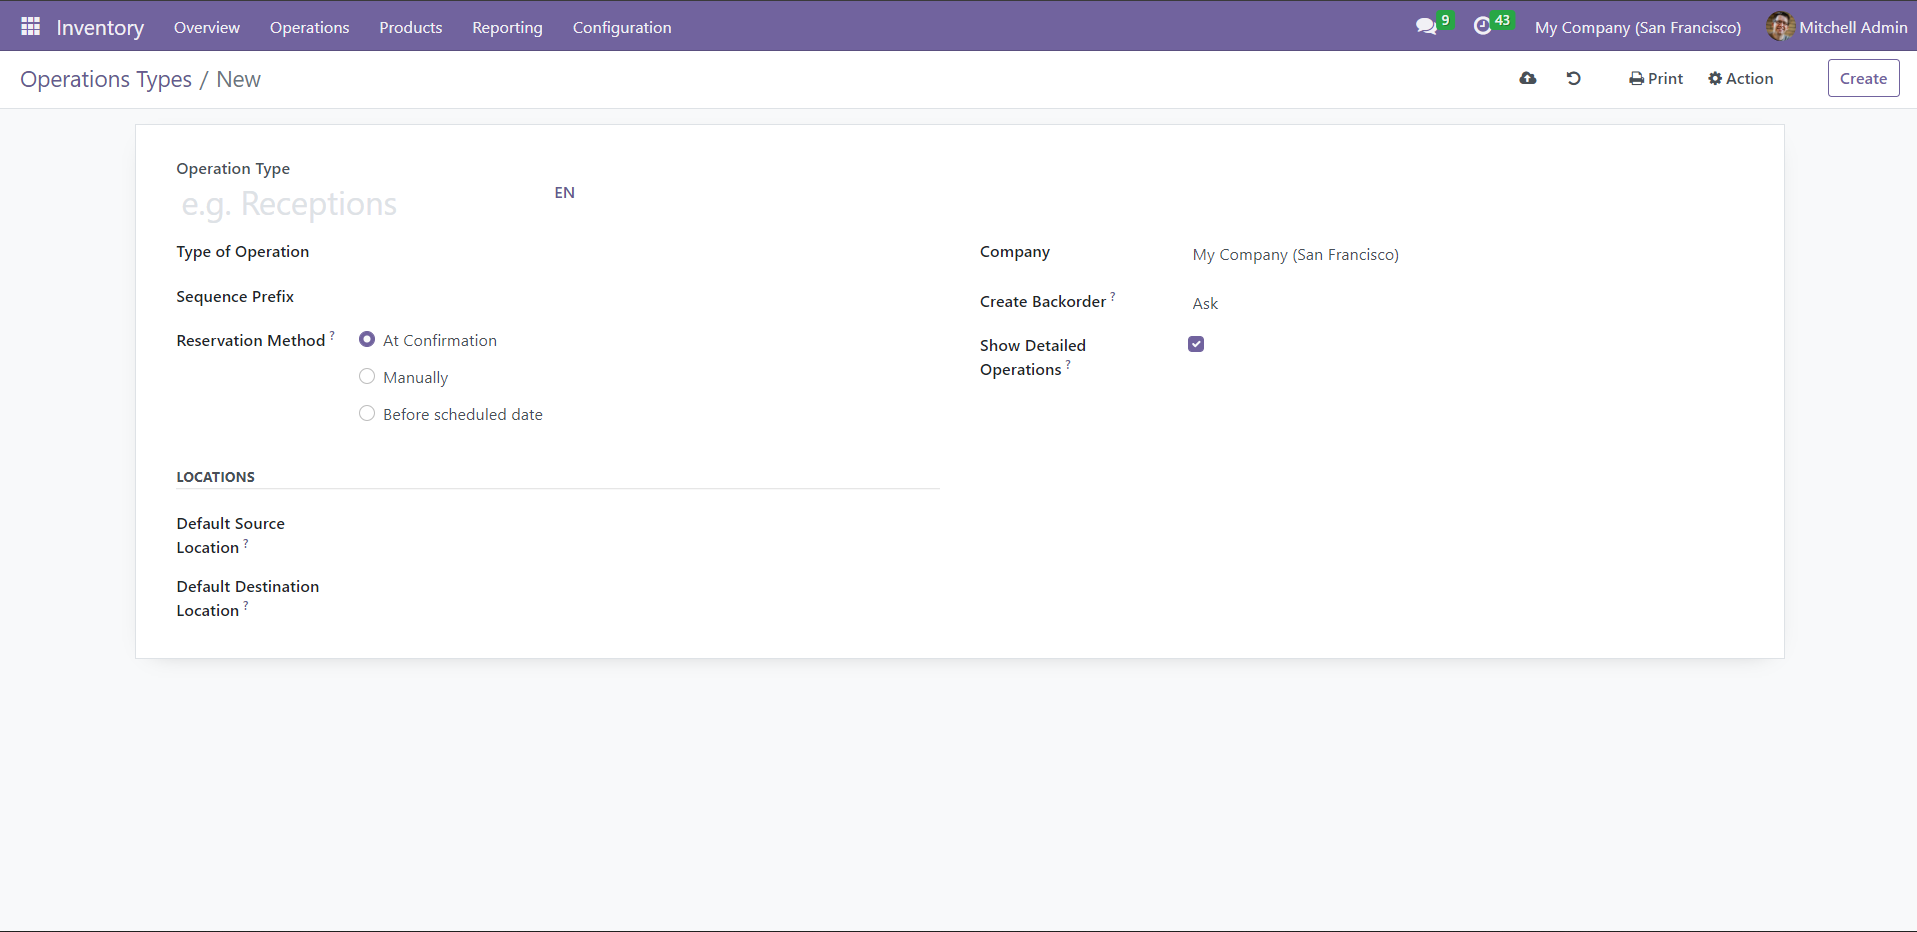
Give a name for the Operation Type in the appropriate field. The dropdown list of ‘Type of Operation’ shows four options – Receipt, Delivery, Internal Transfer, and Manufacturing. Select a suitable Type of Operation from the given options. There will be changes in the fields according to the Type of Operation you select. Set Sequence Prefix in the given field. The Reservation Method field will define how products in transfers of this particular operation type should be reserved. You can reserve products At Confirmation, Manually, or Before Scheduled Date. In the case of Before Scheduled Date, you will get an additional field to schedule the date for reservation.
The name of your company will be auto-populated in the Company field. The Create Backorder field can be used to define how to create backorders while validating a transfer. In the Ask option, the users are asked to select if they want to make a backorder for the remaining products. The Always option will create backorders automatically for the remaining products. The remaining products will be canceled if you select the Create Backorder as Never.
Set a Default Source Location and Default Destination Location for the products of this operation type in the Location section.
Transfers
If your company owns multiple warehouses to store products or different branches at different locations, then it is important to pay attention to the management of product transfer from one location to another. The Transfers feature offered by the Odoo Inventory module can assist you in managing product transfer effortlessly. There are various types of transfers to be managed when it comes to inventory management. It includes the movement of products from one warehouse to another, outside the warehouse, and internal transfers within the company. You will get the Warehouse management feature in the Odoo Inventory module to configure all your company warehouses which we will discuss later. Once you complete the configuration of warehouses and product locations, the Transfers option will help you to define various product transfers between such configured warehouses and locations.
The Transfers window helps you oversee and assess the movement of products from one location to another. To access this window, click on ‘Transfers’ from the Operations menu.
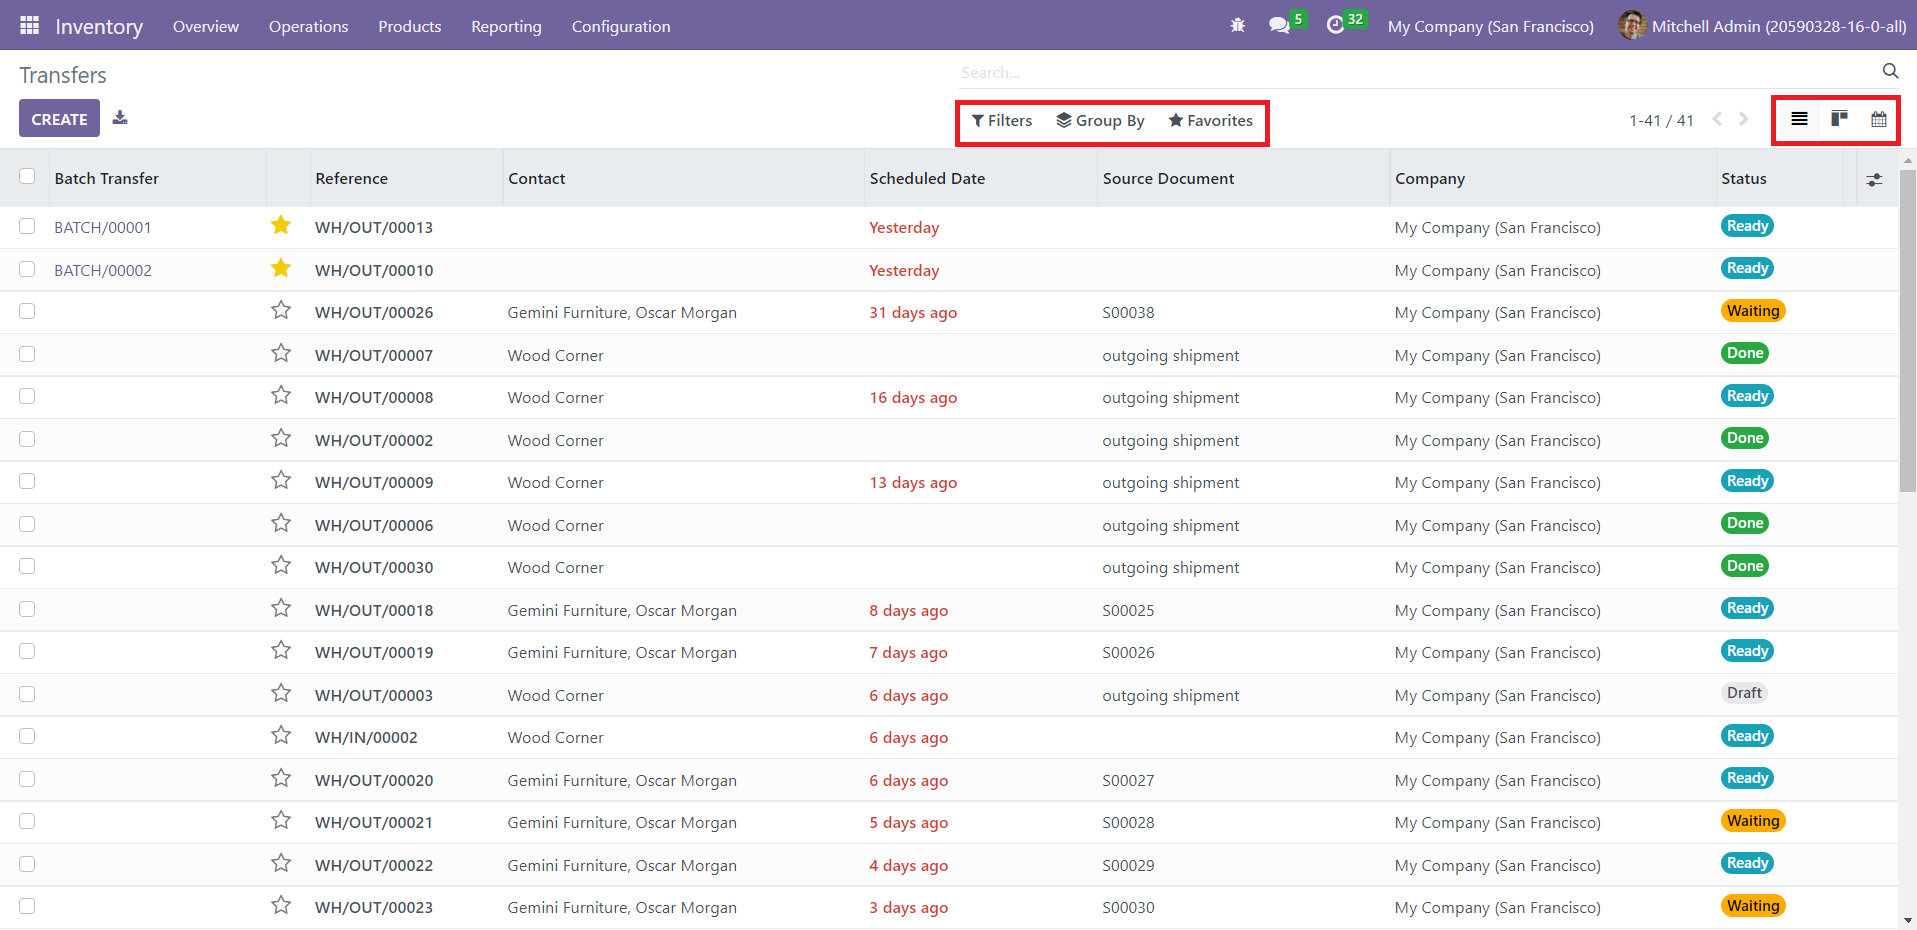
You can see a detailed overview of your company's product transfers here. The window will display these details in a List view by default. You can change this mode to Kanban or Calendar view by clicking on the respective icons. The Filters and Group By options declutter your transfer tracking process by identifying and locating specific records based on various criteria. You can save these filters or set them as a default using the Favorites option. The window shows info like Batch Transfer, Reference, Contact, Scheduled Date, Source Document, Company, and Status. To reveal more details, click on the button in the top right corner, as highlighted below.

Click on the Create button to add a new transfer.
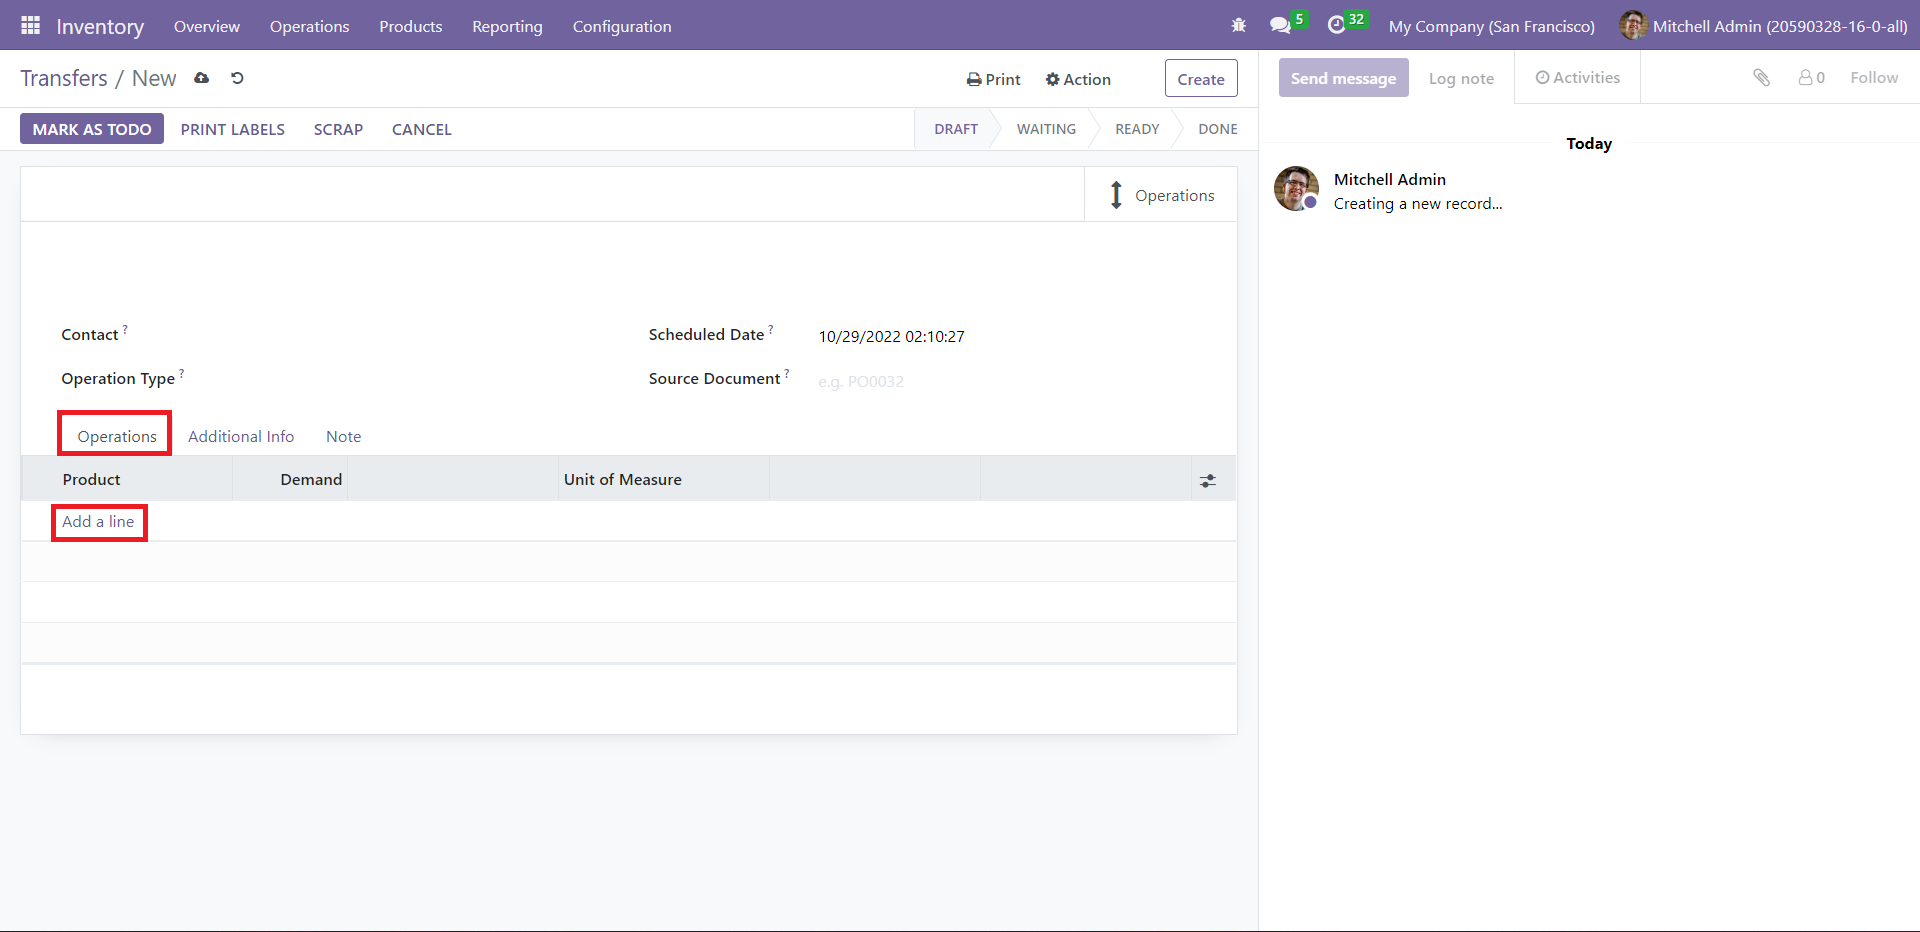
Fill in the details like Contact, Scheduled Date for the first part of the shipment, Operation Type, and Source Document. To specify the products to be transferred, click on ‘Add a line’ under the Operations tab.
You can enter the details related to shipping under the Additional Info tab.
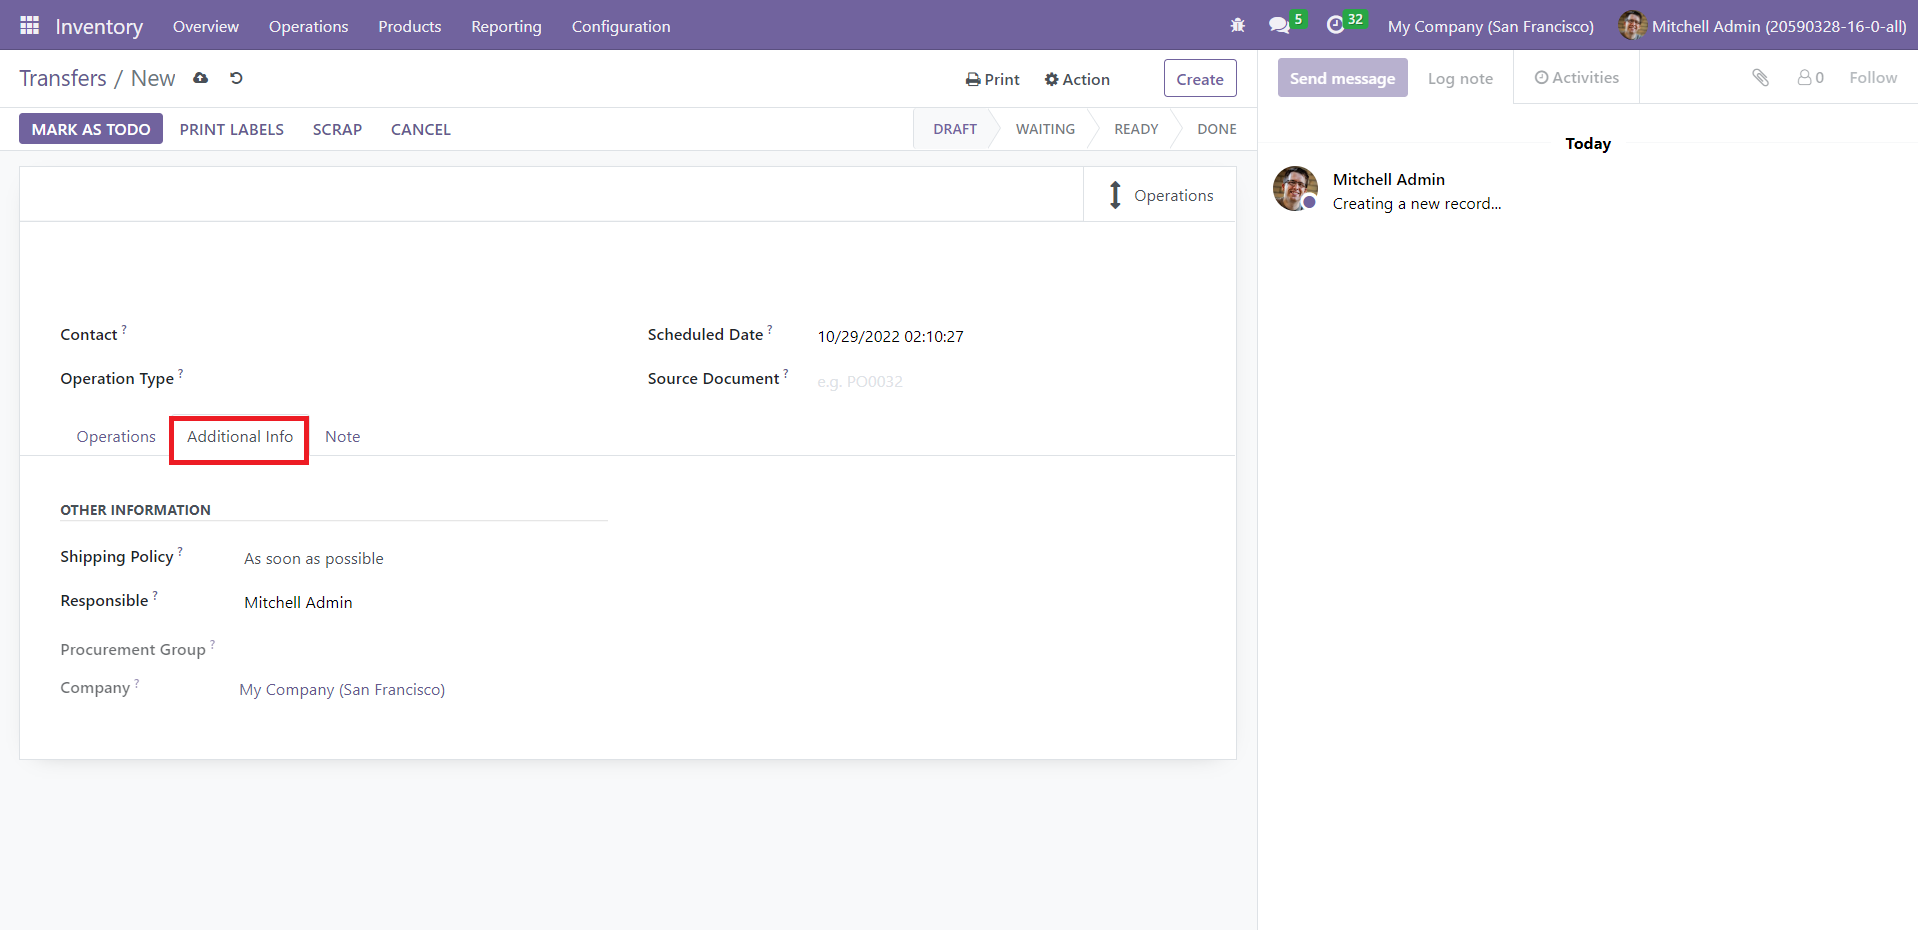
In the Shipping Information section, you can specify the fields like Carrier, Tracking Reference, Weight, and Weight for Shipping. Under ‘Other Information,’ add info like Shipping Policy, Responsible (officer), Procurement Group, and Company. ‘Shipping Policy’ decides whether to deliver the goods partially or entirely. The dropdown list of this field shows two options – ‘As soon as possible’ and ‘When all products are ready.’ If you select the first choice, it will send all the available products swiftly, and the remaining products will get delivered as a backorder. You can dispatch all the products together if you opt for the second option. This implies that even if the On Hand Quantity does not suffice, the system will wait for them to replenish.
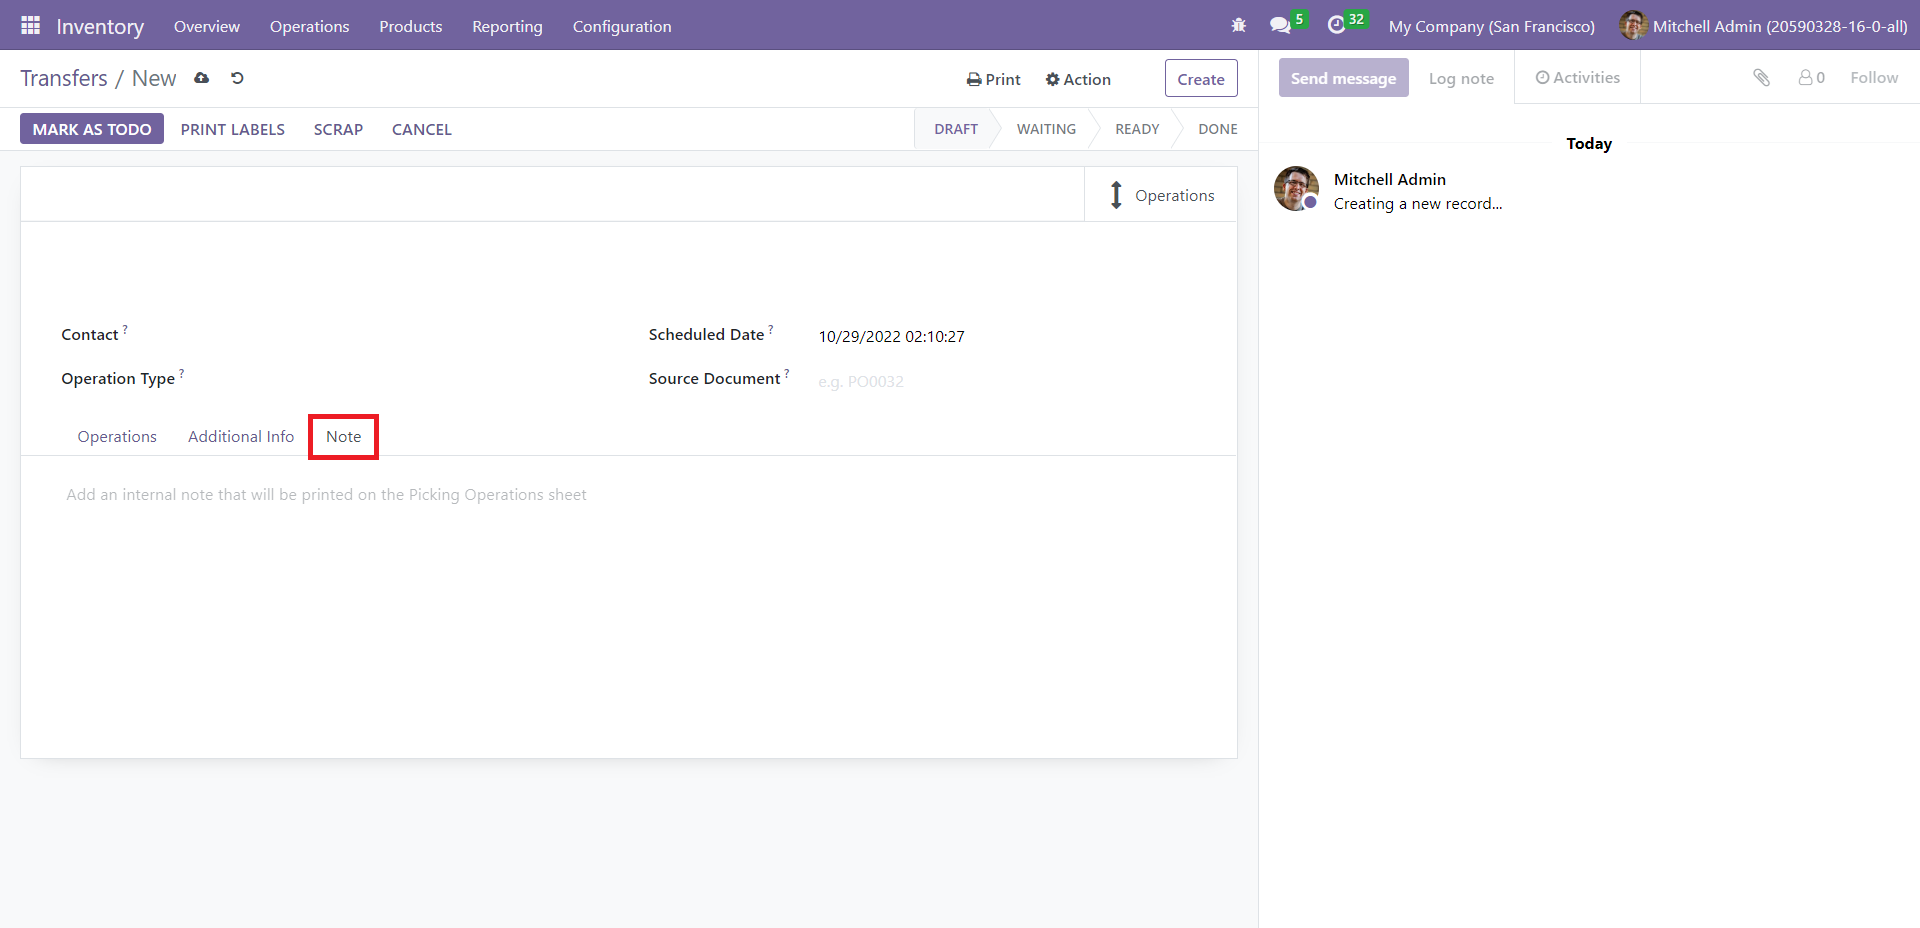
Under the Notes tab, you can create some internal notes. These notes will get printed on the Picking Operations sheet. Click on the Mark as Todo button after entering these details. The system will change the stage to ‘Waiting’ or ‘Ready’ based on the availability of the products listed in the transfer. The Mark as ToDo button can be used to move the transfer to the Ready stage.
Batch Transfer
Odoo helps you minimize transportation costs and maximize efficiency by allowing you to transfer multiple orders simultaneously. To activate this feature, click on the Configuration tab and select ‘Settings.’ Enable the Batch Transfers option under ‘Operations.’ This feature allows you to add transfers to a batch and process them together.
Now, click on the Operations tab and choose ‘Batch Transfers’ from the dropdown list.
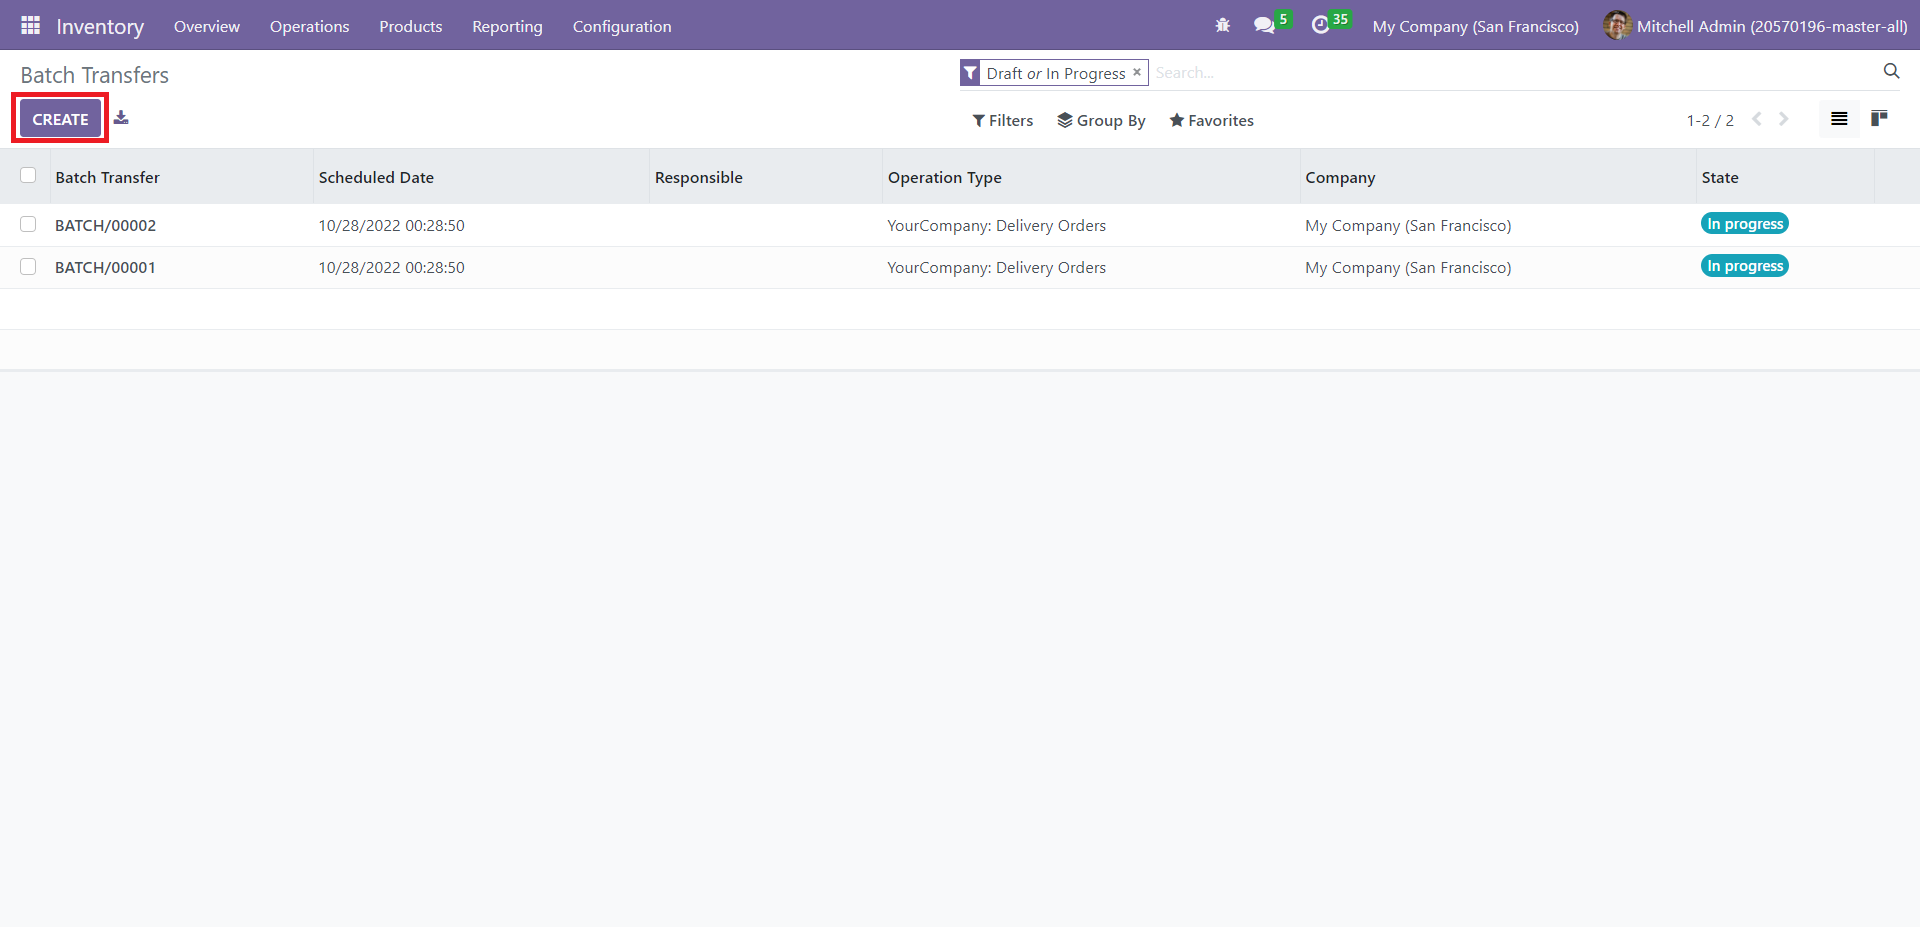
In the Batch Transfers window, you can see the details like Batch Transfer (reference number), Scheduled Date, Responsible, Operation Type, Company, and Status. Click on the Create button to add a new batch transfer.
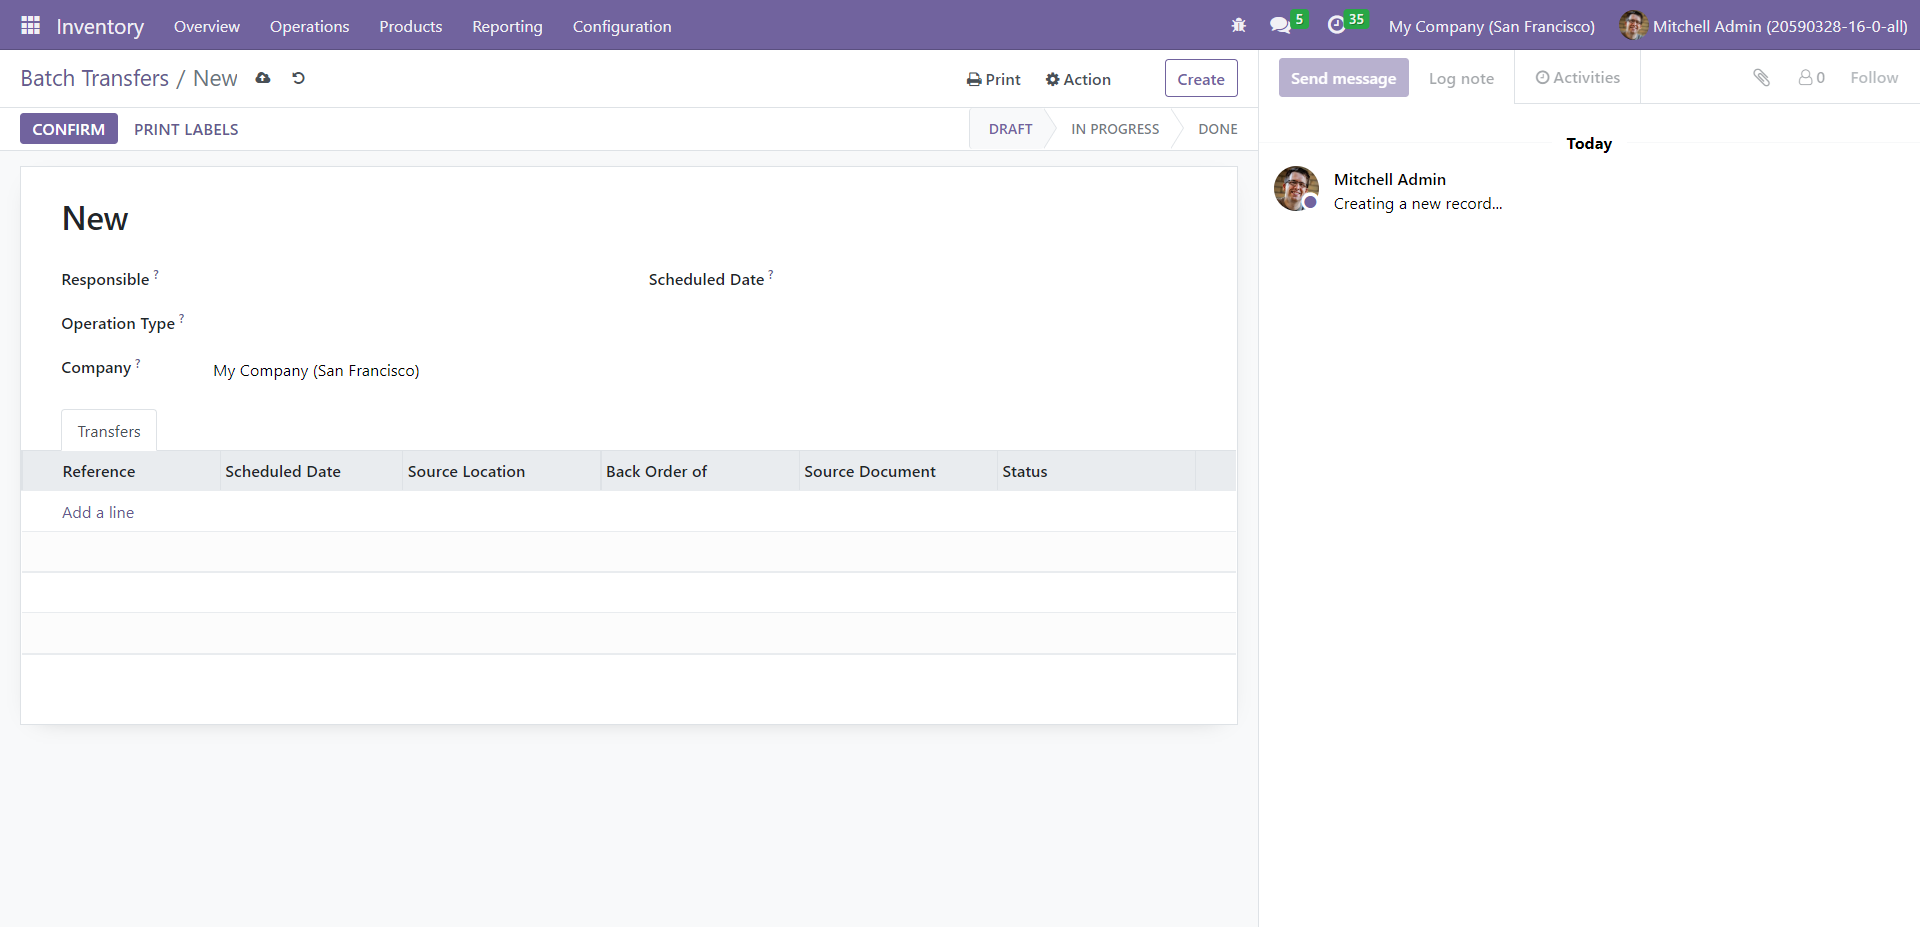
In the ‘Responsible’ field, give the name of the person to whom the task is assigned. Define Operation Type, Company, and Scheduled Date. Click on ‘Add a line’ under the Transfers tab to enter more info about the transfer. A pop-up window will appear as below.
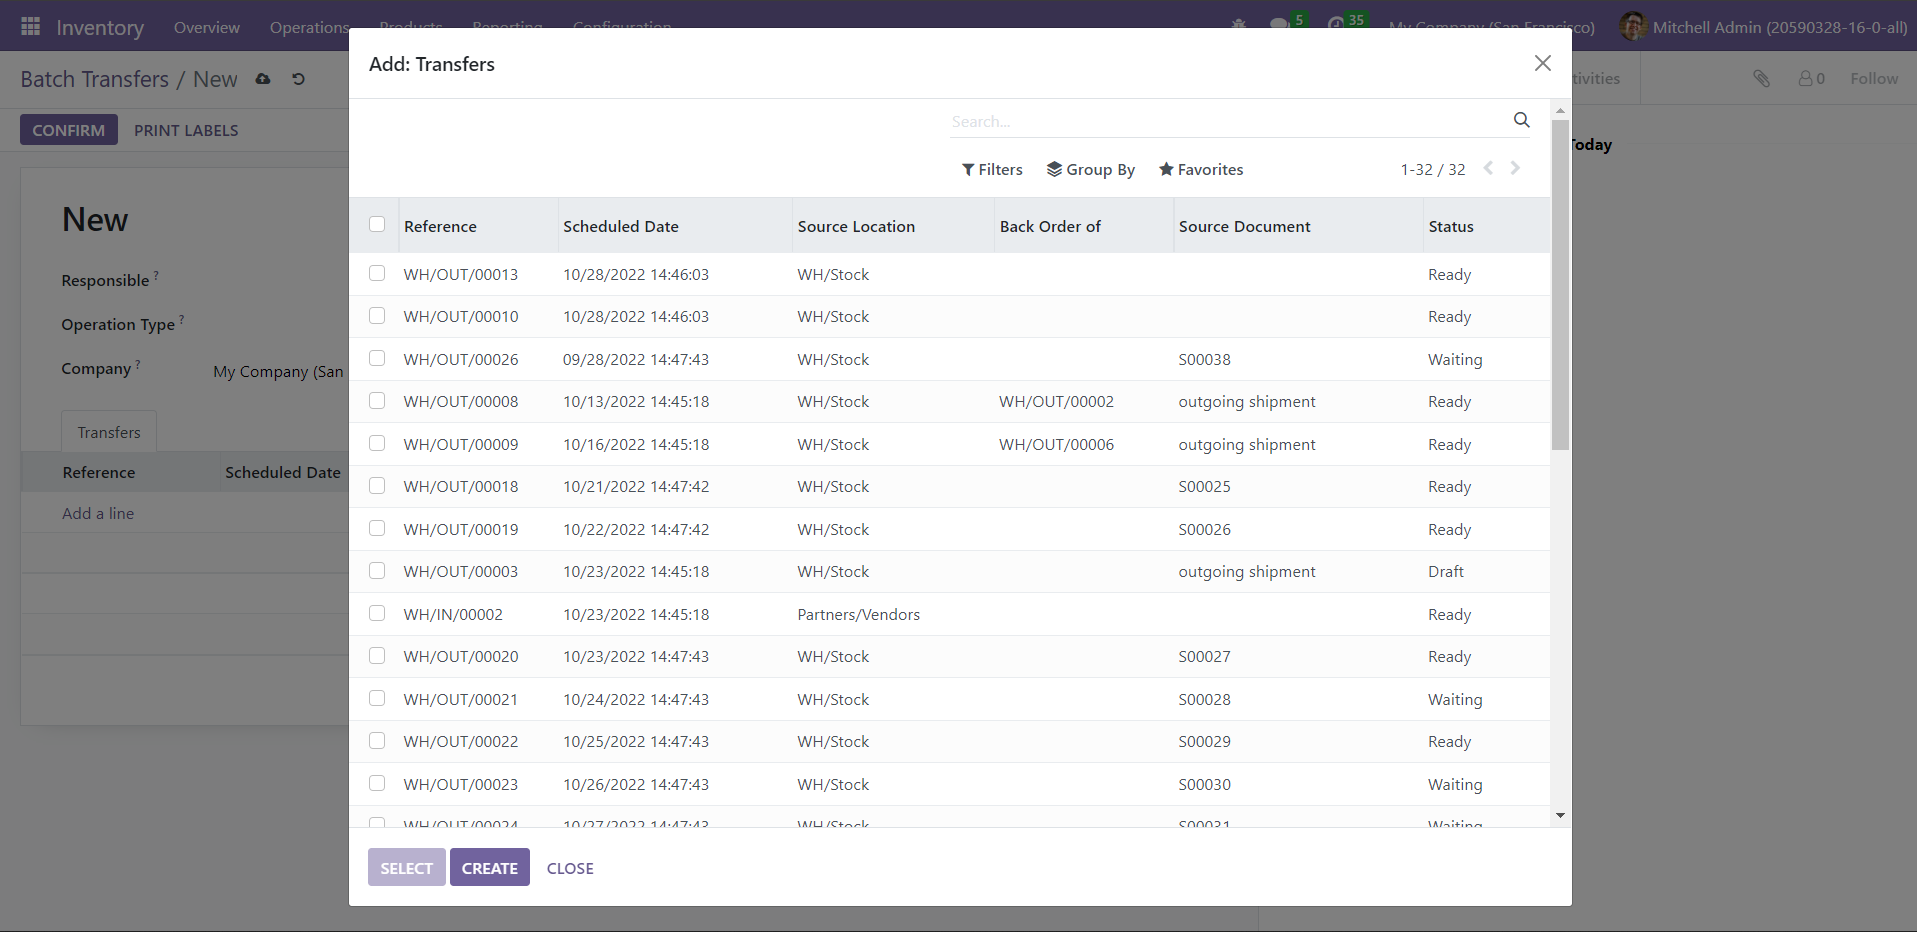
Select only those drafts that have their status as ‘Ready’ or ‘Draft.’ You can’t opt for the transfers with the ‘Waiting’ status since they lack the products or certain operations required to complete the action. If you want to create a new transfer from this window, click on ‘Create.’
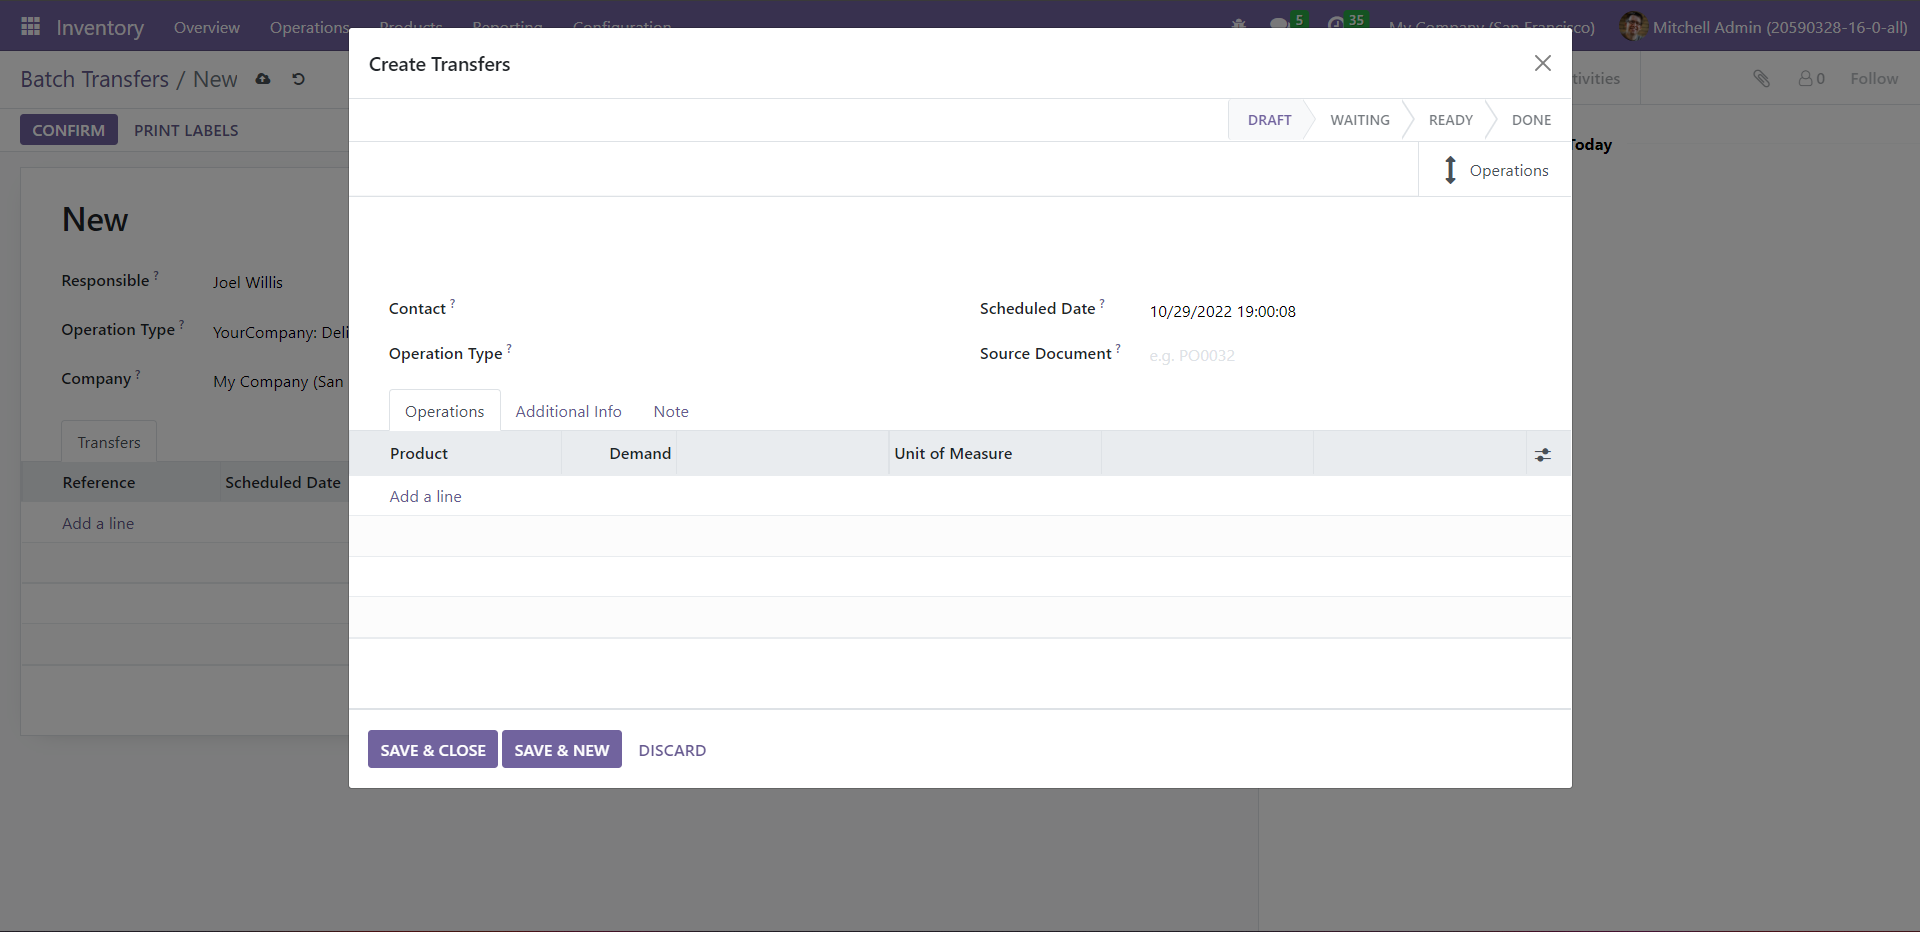
This window is similar to the one you get while adding a new transfer, as discussed in the previous topic. Fill in all the details required and click on ‘Save and Close.’
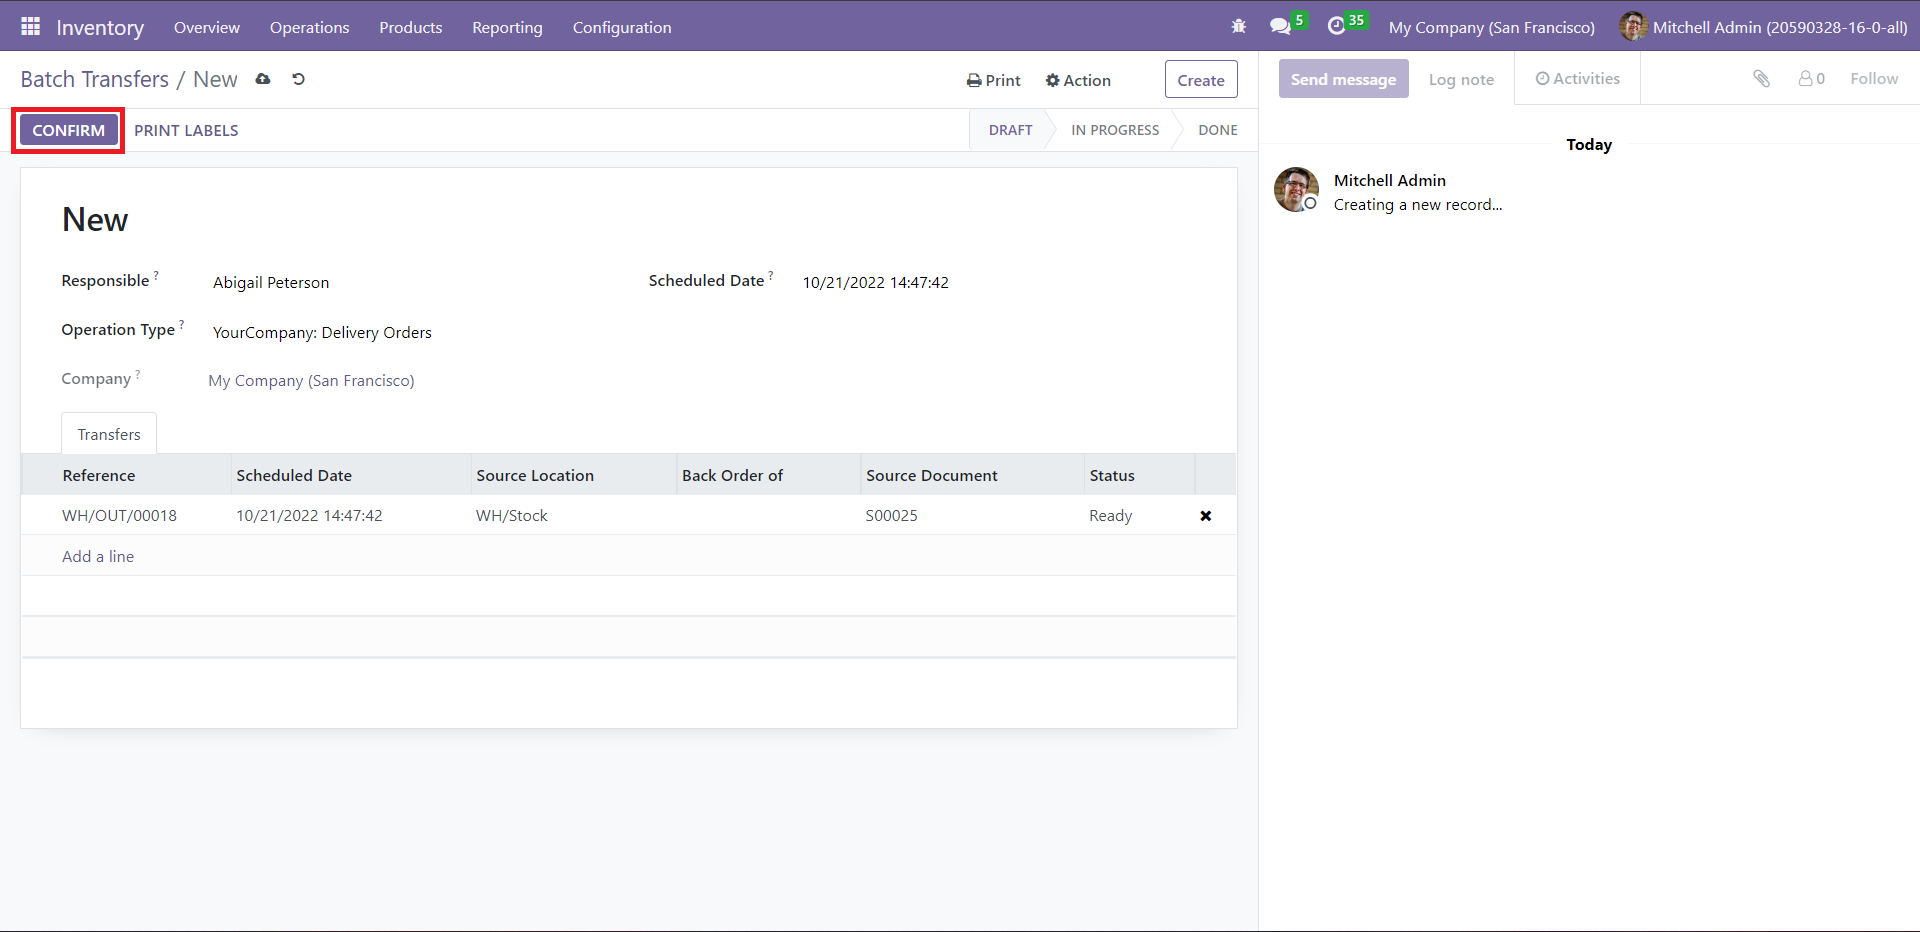
Now, click on ‘Confirm.’
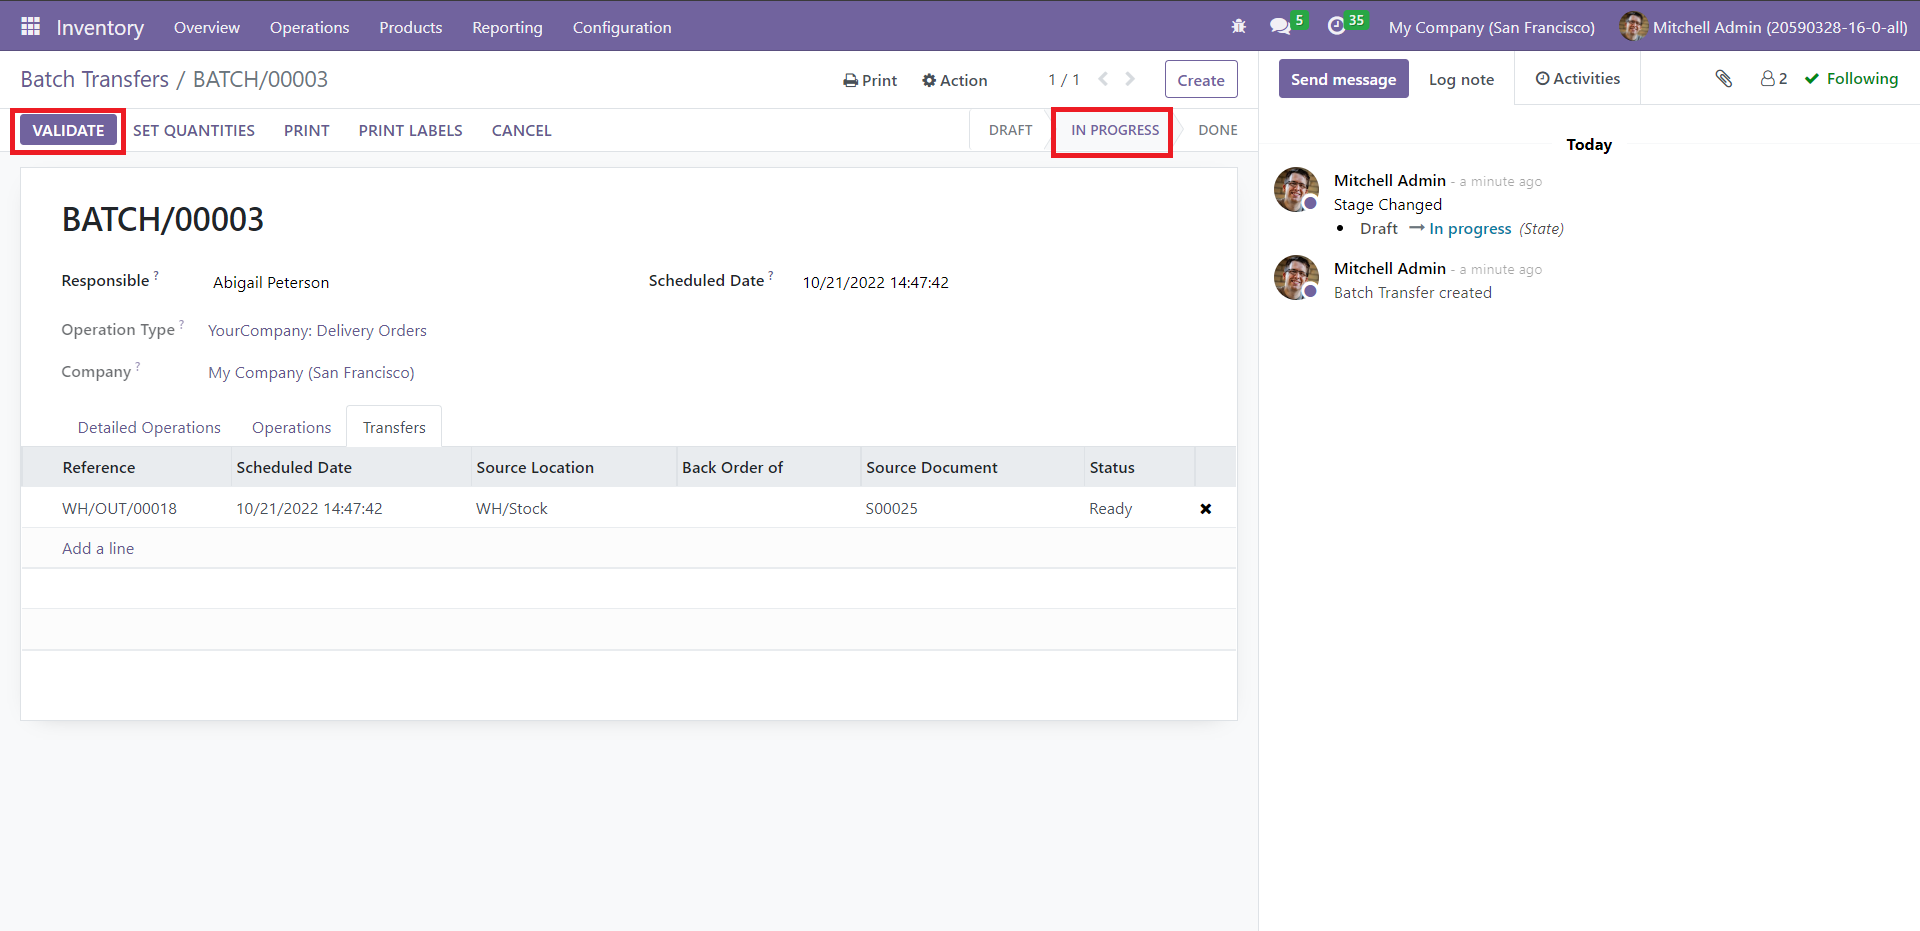
The state changes from ‘Draft’ to ‘In Progress.’ Click on the Validate button to mark the state ‘Done.’ This action will complete the batch transfer process.
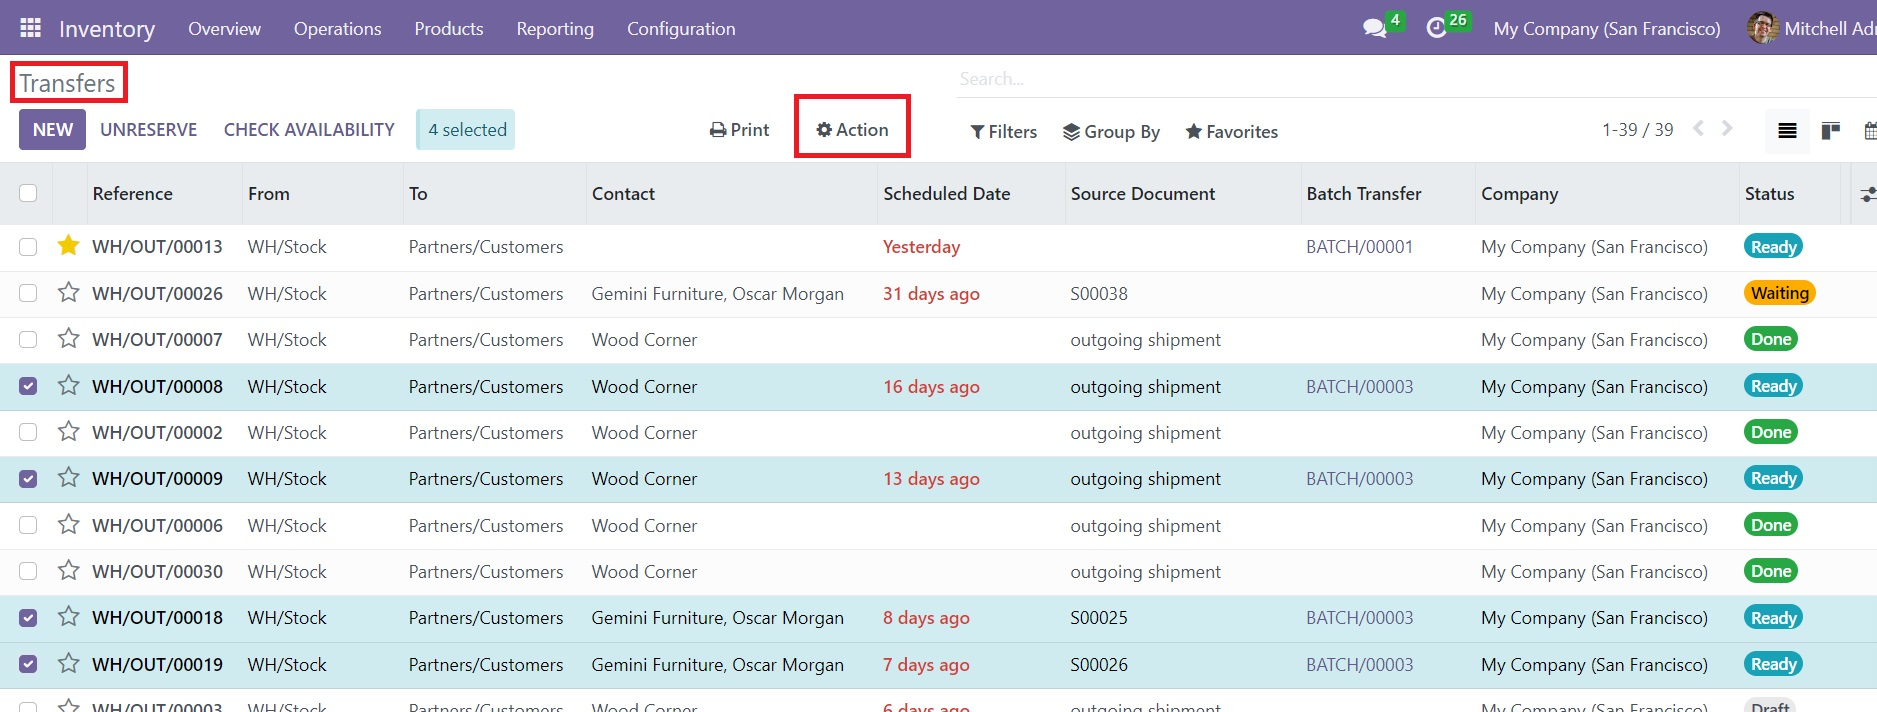
It is possible to create Batch Transfers from the Transfers window also. For this, go to the Transfers menu and select the transfers which you want to add to a batch transfer as shown in the image below.
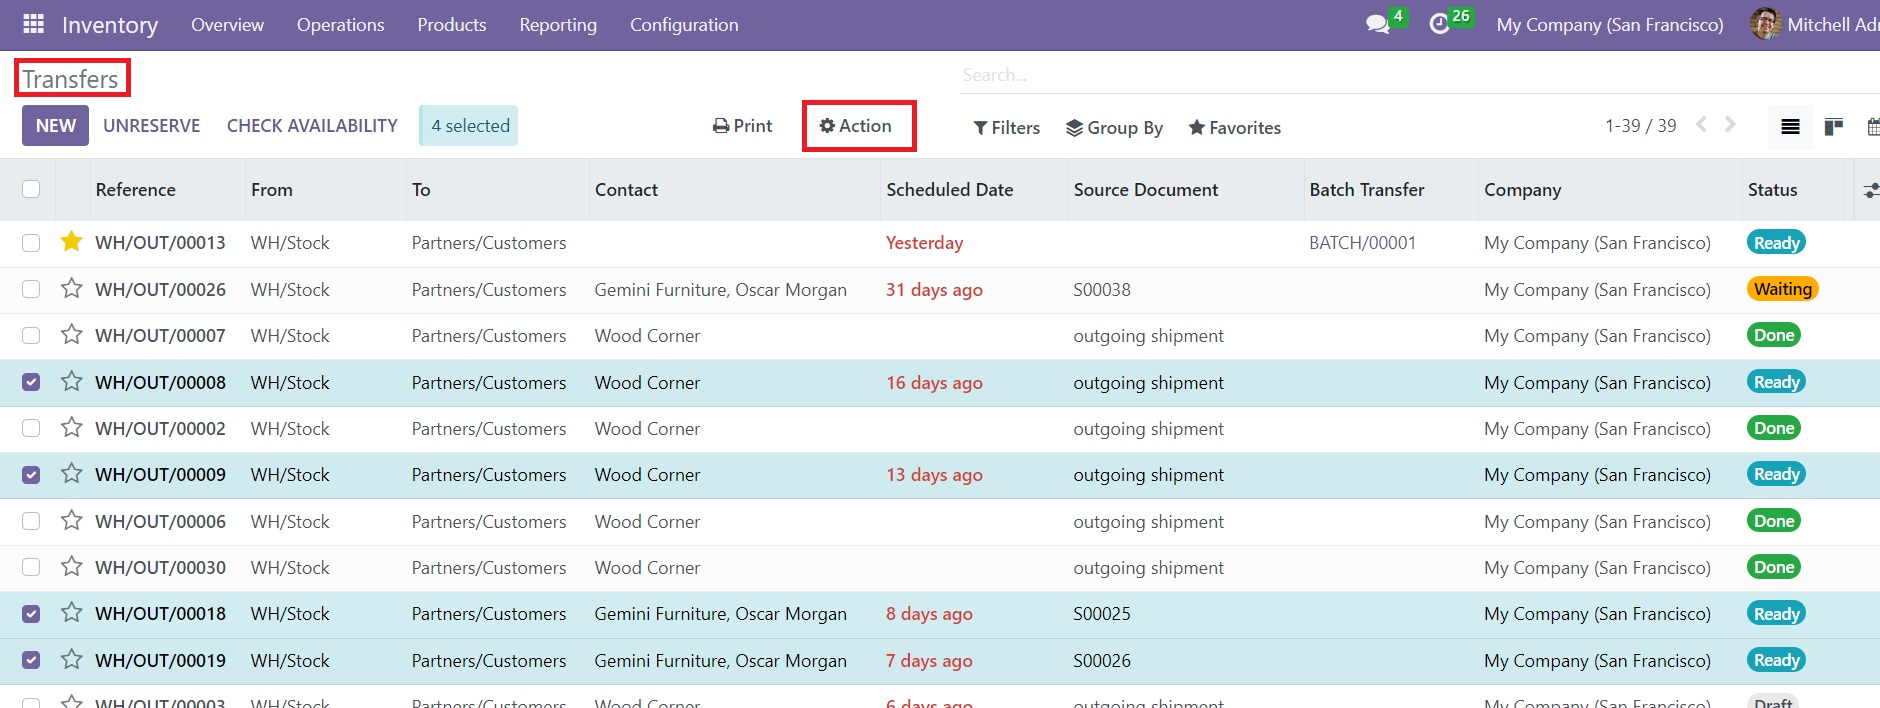
After selecting transfers from the list, you can click on the Actions button.
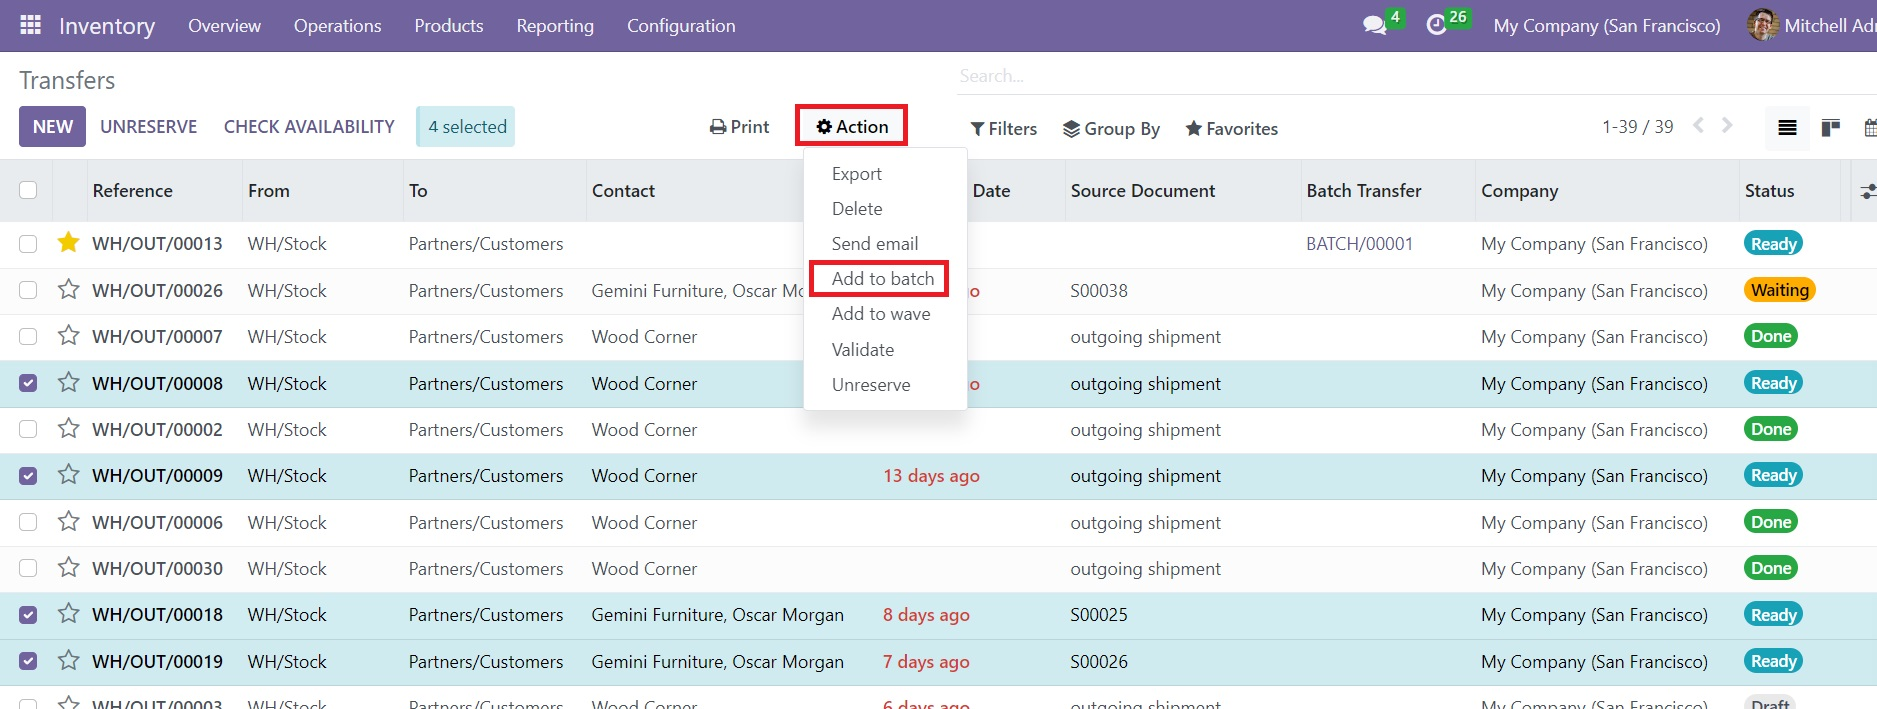
This will show the option Add to Batch. Clicking on this button will open a new pop-up.
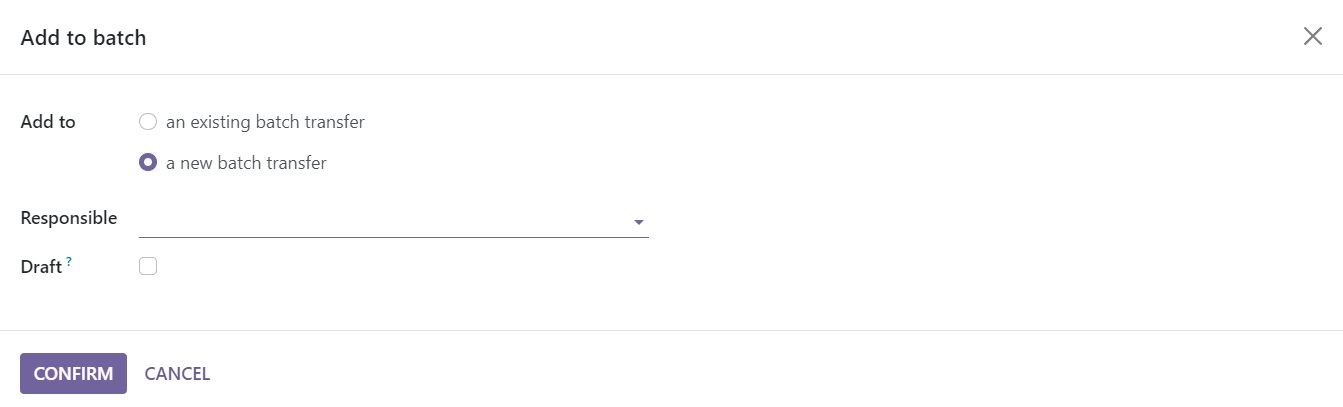
Here, you will get the option to decide where to add the selected transfers. You can add it to an existing batch transfer or to a new batch transfer. After selecting a suitable option, you can assign an employee in the Responsible field and click on the Confirm button. This will confirm the Batch Transfer of the selected transfers.
Wave Transfers
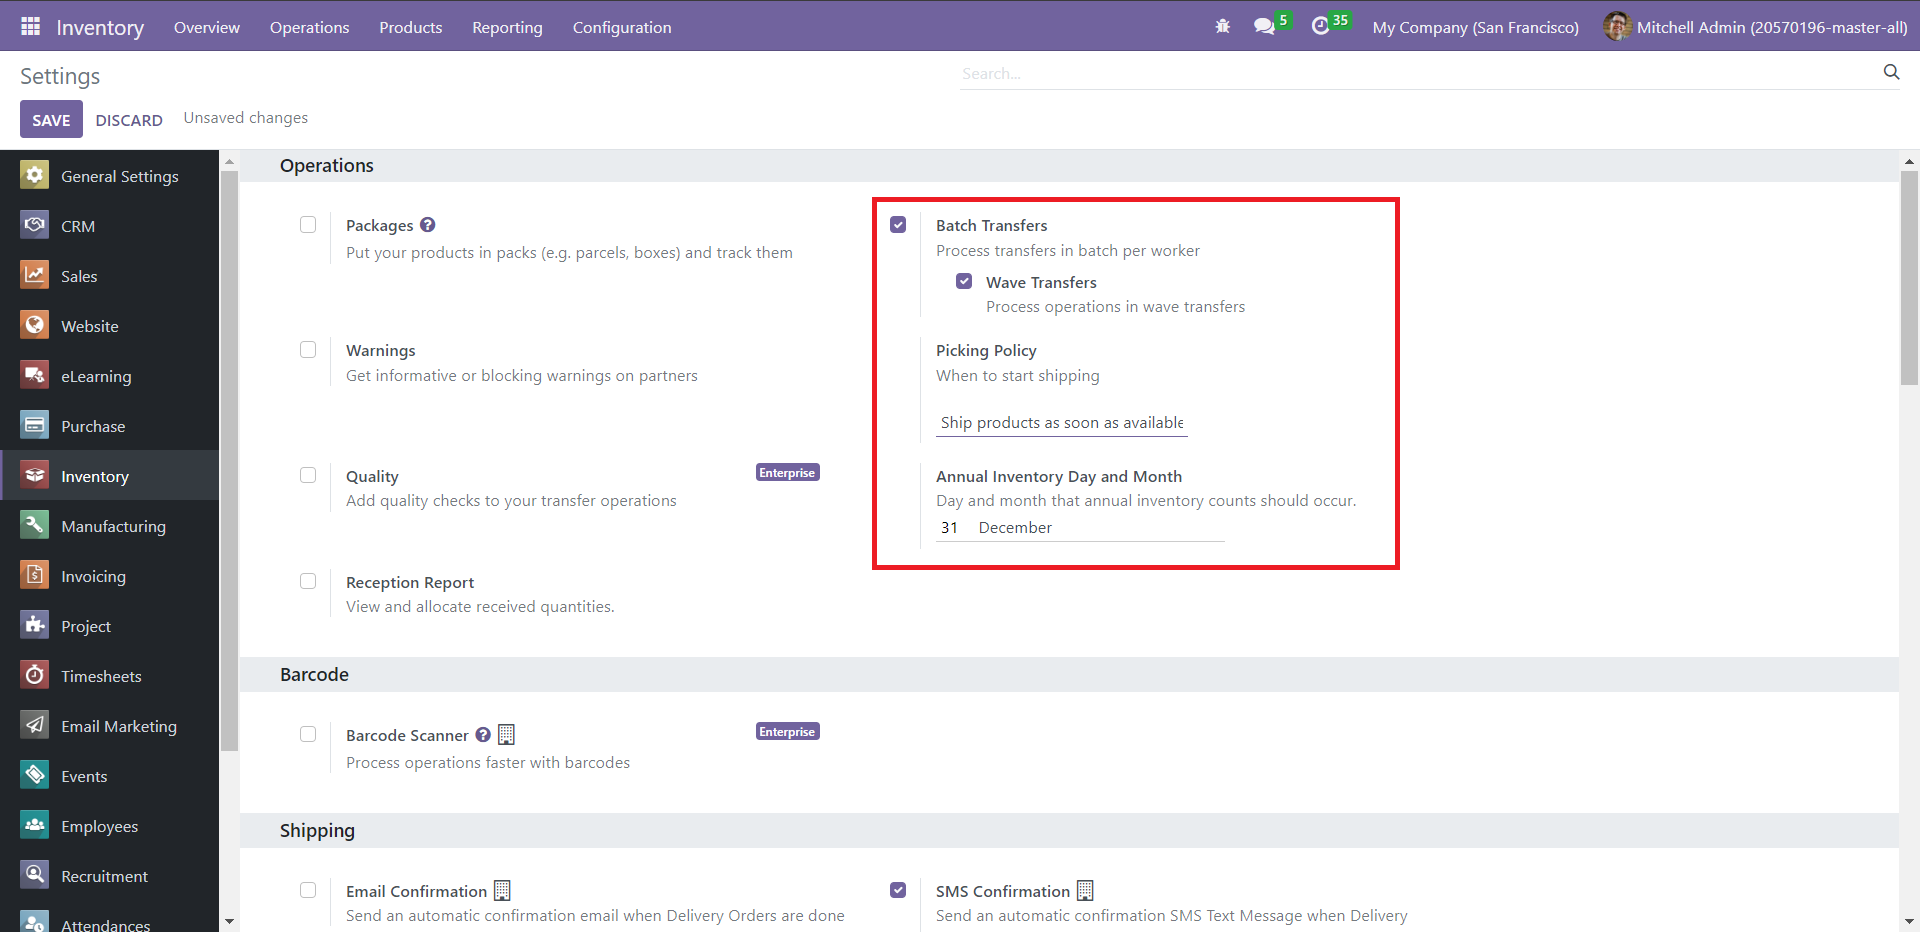
Wave Transfer assists you in grouping a set of operations related to product moves, thereby processing them together to boost their efficacy. To avail of this feature, click on ‘Settings’ from the dropdown list of the Configuration tab. Then, enable ‘Batch Transfers’ and ‘Wave Transfers’ under the Operations section, as shown below.

You can also set ‘Picking Policy’ and ‘Annual Inventory Day and Month.’ This way, you can combine multiple operations and prompt them to function as one.
The Wave Transfer feature will help you to move a large number of products from one place to another. You can not remove a transfer from a wave after adding it to the wave transfer. It is considered more advanced than the batch transfer. After activating this feature from the Settings menu, you can go to the Transfers menu.
From this window, select the transfers that you want to add to a wave transfer. Make sure to select the transfers with the same status and operation type.
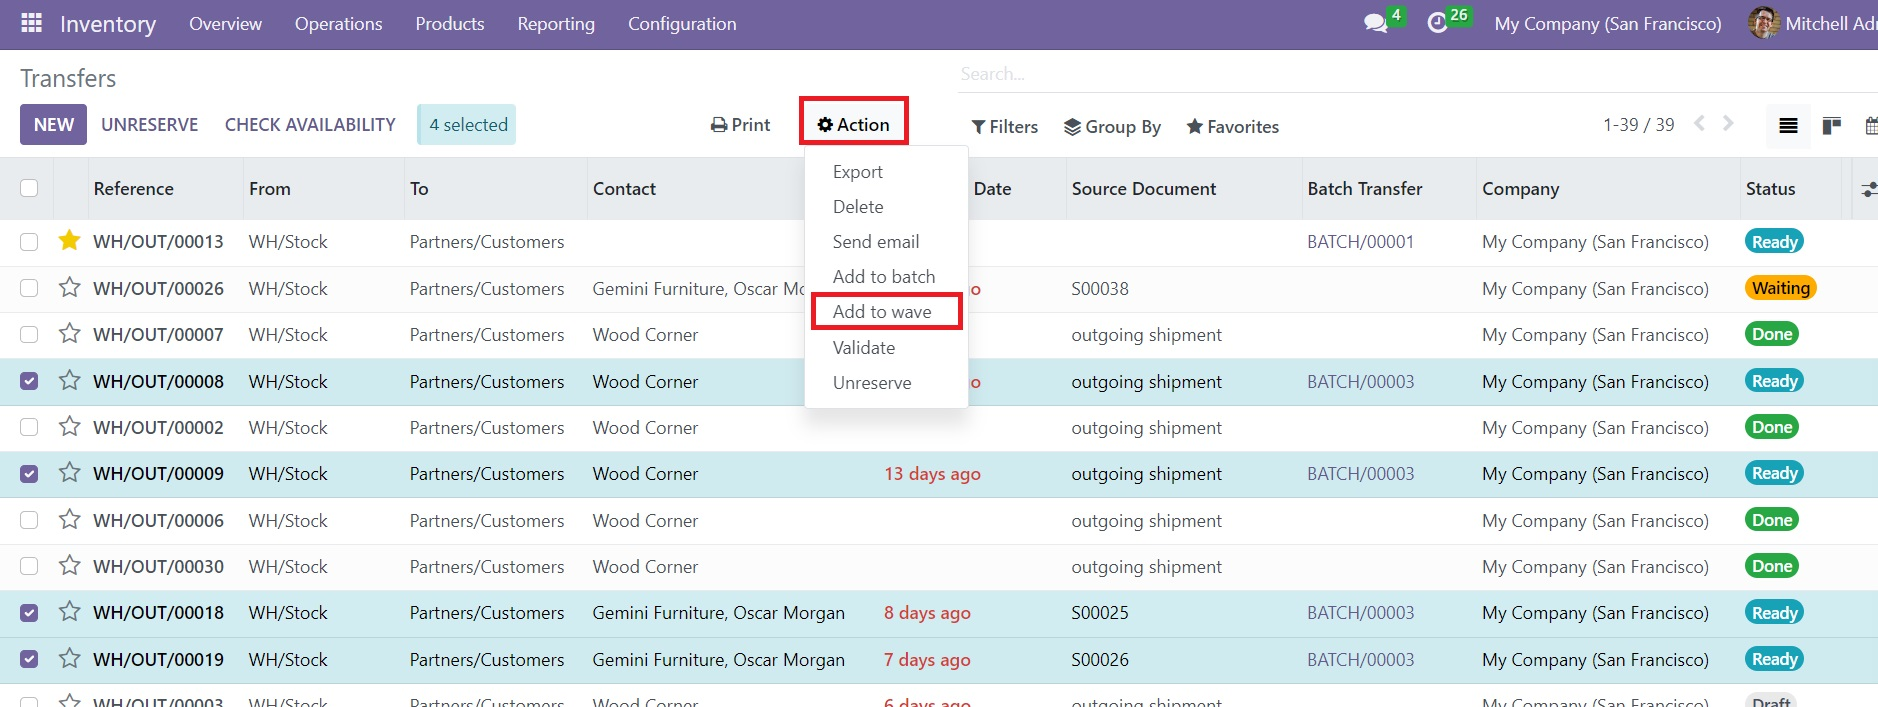
After selecting the transfers, you can click on the Action button where you can find the option Add to Wave. Clicking on this option will give a new pop-up window.
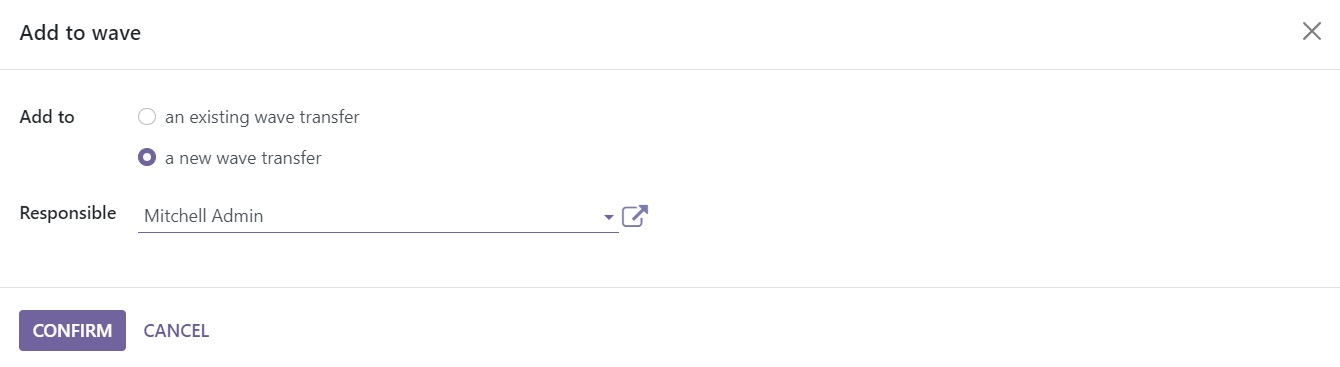
You can add the selected transfers to an existing wave transfer or create a new wave transfer. Here, we are selecting the ‘a new wave transfer’ option in the Add to field. You can assign an officer to manage this transfer in the Responsible field. Then, click on the Confirm button. This will show a new pop-up with the list of selected transfers.
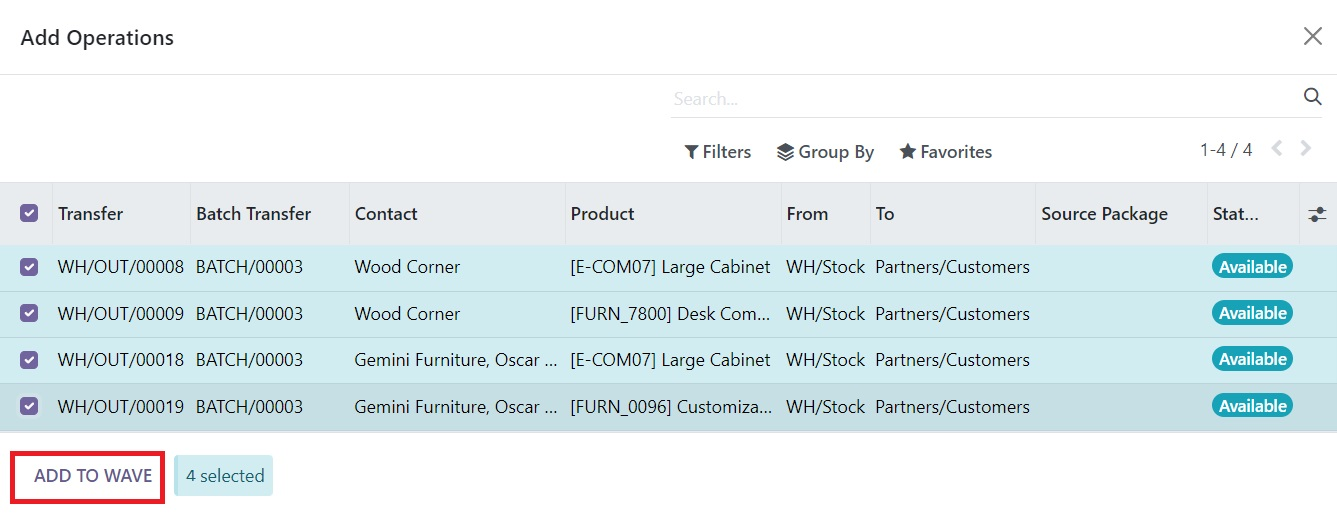
From this window, you can select the required transfers for the wave transfer and click on the Add to Wave button. This will create a new wave transfer. You can manage it from the Wave Transfer platform by selecting the corresponding sub-menu from the Operations menu.

As you can see in the screenshot above, the list will show the details of the Batch Transfer, Scheduled Date, Responsible, Operation Type, Company, and State. You can click on the newly created wave transfer from this window.
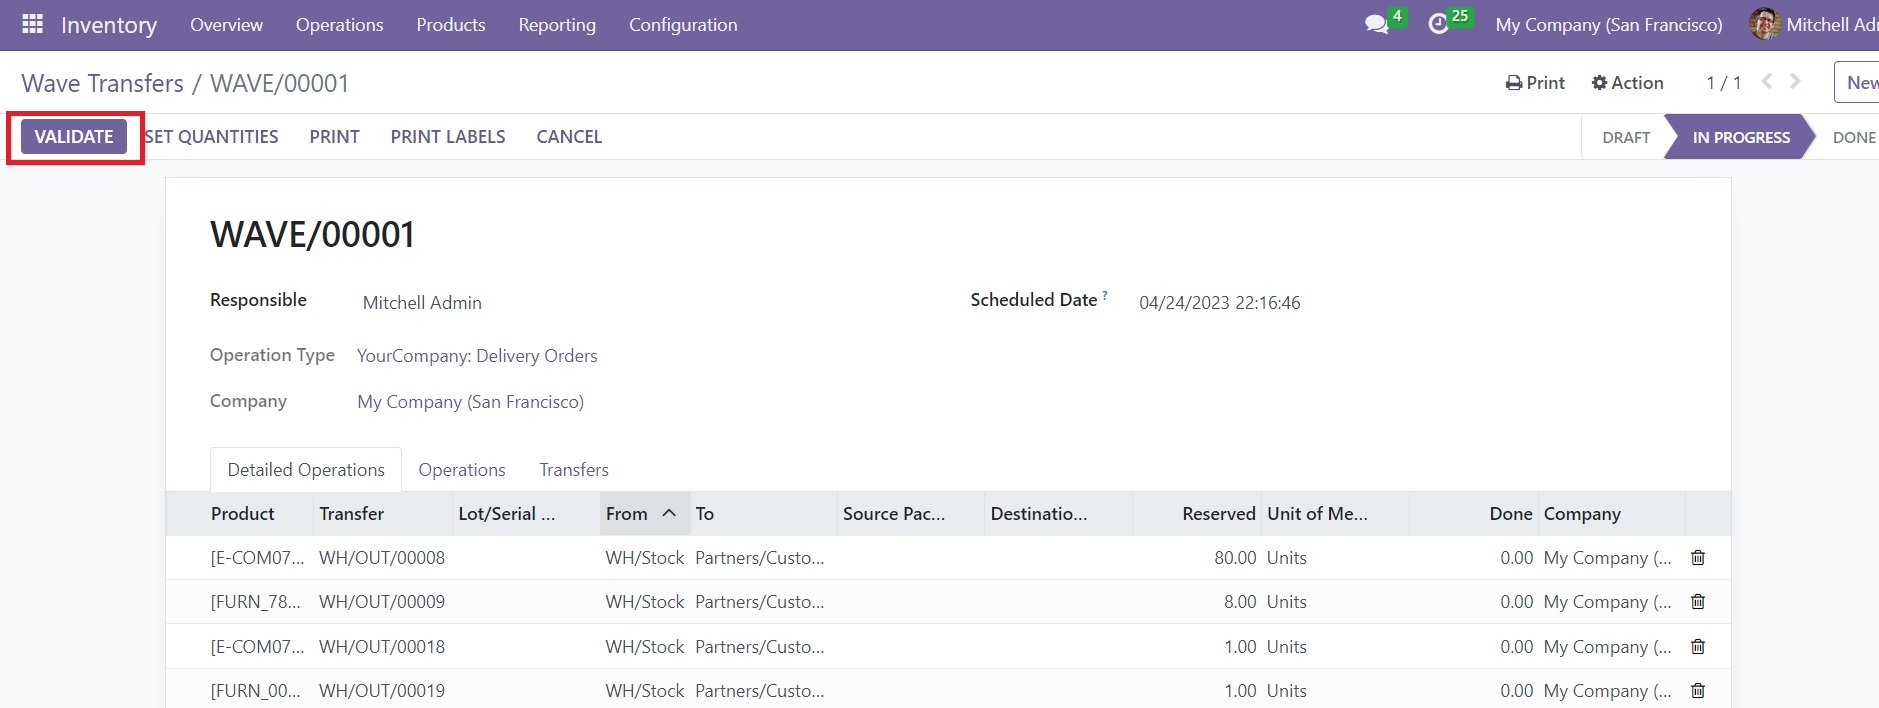
Here, you can use the Validate button to complete the process of a wave transfer.
Warehouse Management
When it comes to the inventory management of a company, warehouse management is one of the crucial activities that should be monitored and organized properly. For the seamless functioning of stock management and product moves, warehouse management plays an impactful role. Being an excellent inventory management software, Odoo offers an advanced platform for handling the operations related to your company warehouses hassle-free. This platform will manage and monitor multiple warehouses simultaneously.
The Configuration menu of the Inventory module displays the options to manage Warehouses, Locations, Routes, Rules, Operation Types, Storage Categories, and Putaway Rules in the Warehouse Management tab.

These options will assist you in performing various operations to make warehouse management effortless. By selecting the Warehouses option from the Configuration menu, you can create a record of the warehouses owned by your company.
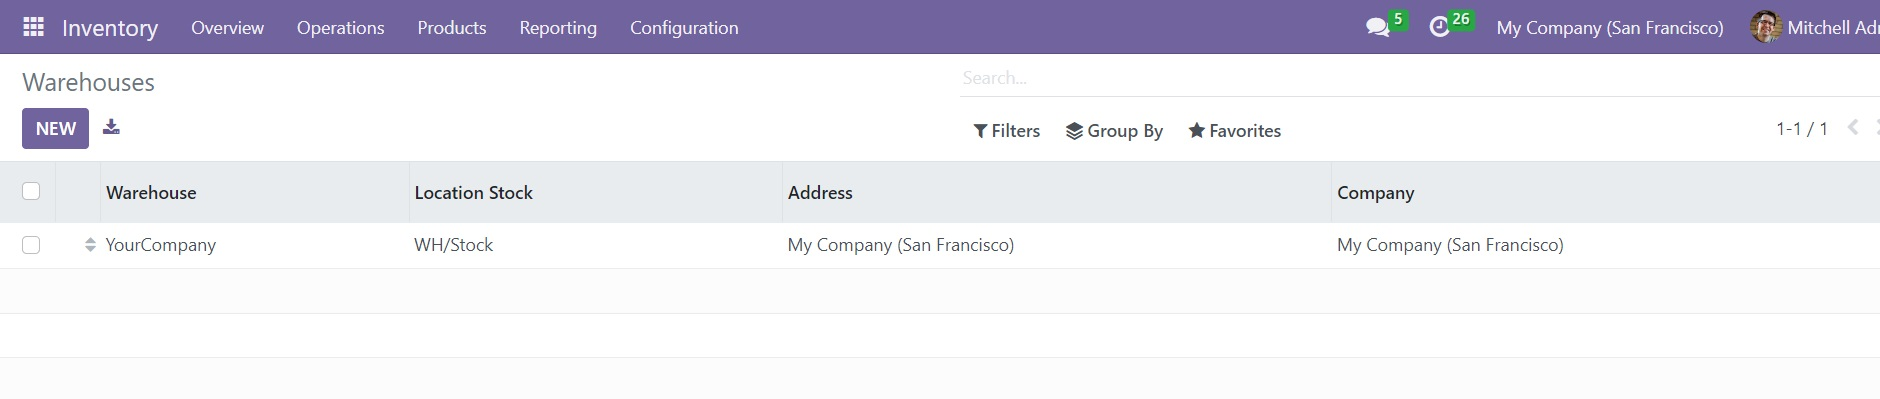
Clicking on the Warehouse option will open a list view of the warehouses as shown in the image above. The list displays the name of the Warehouse, Location Stock, Address, and Company. Use the New button to create a new warehouse for your company.
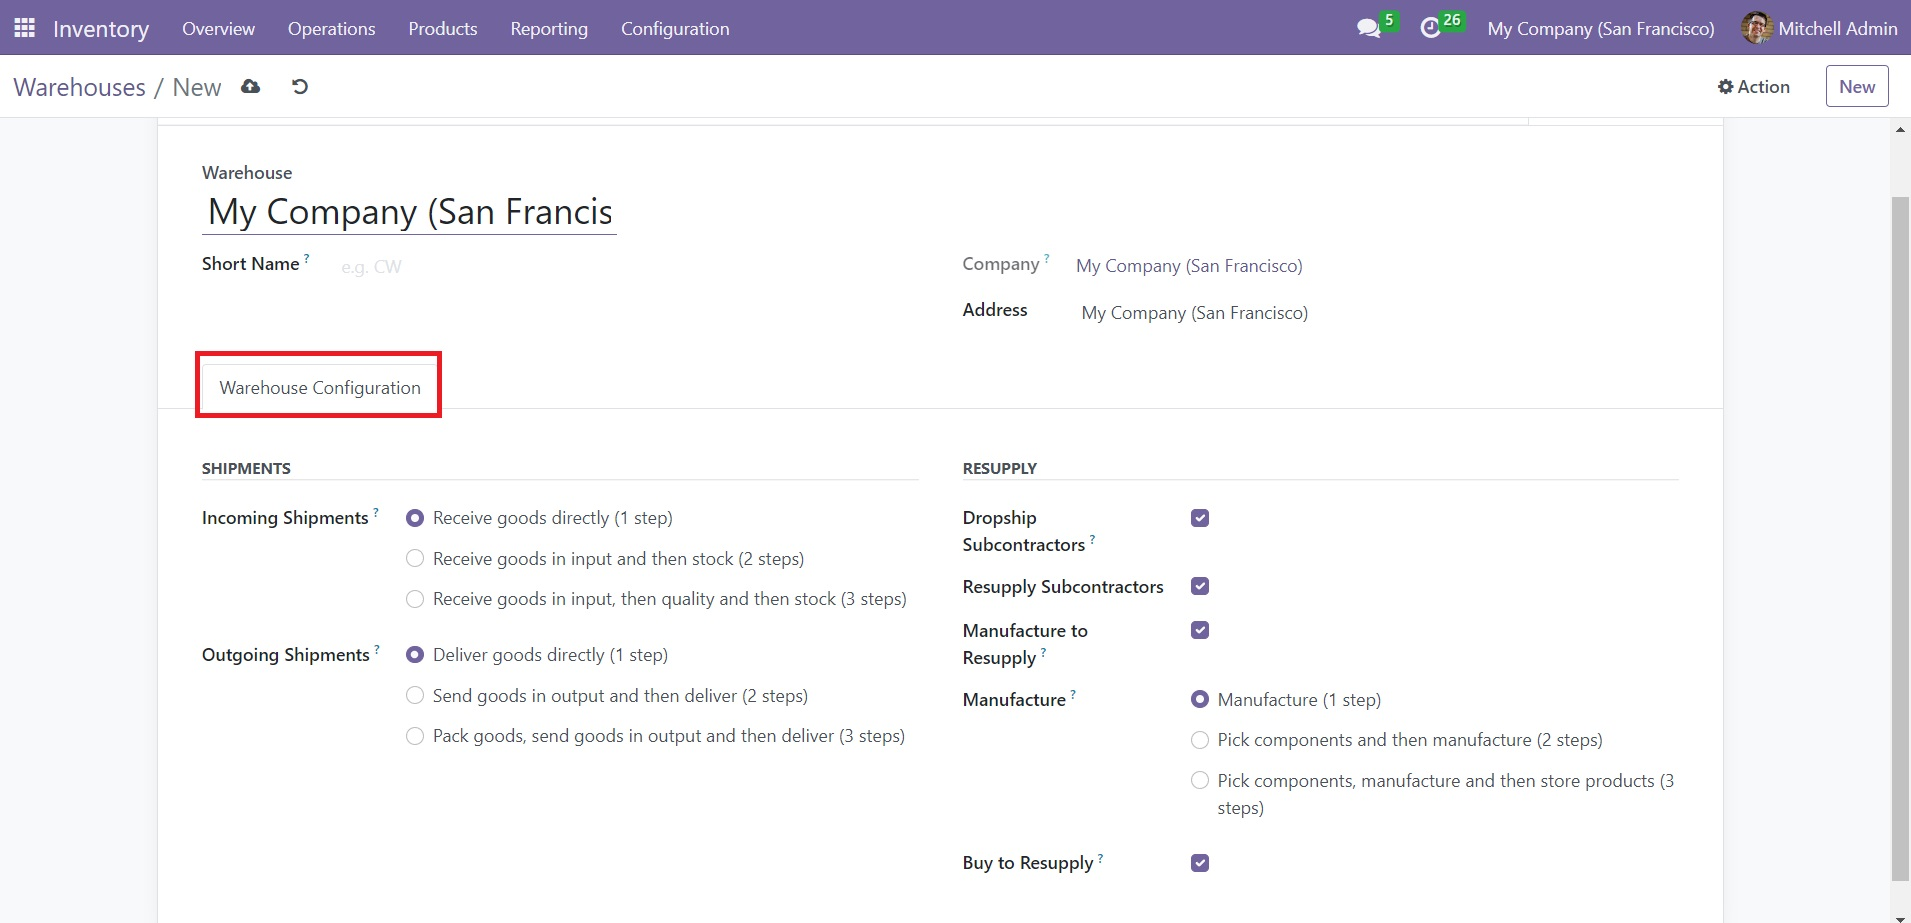
In the warehouse form view, you can mention the name of the Warehouse, Short Name, Company, and Location of the warehouse in the respective fields. The Shipment and Resupply details can be specified under the Warehouse Configuration tab.
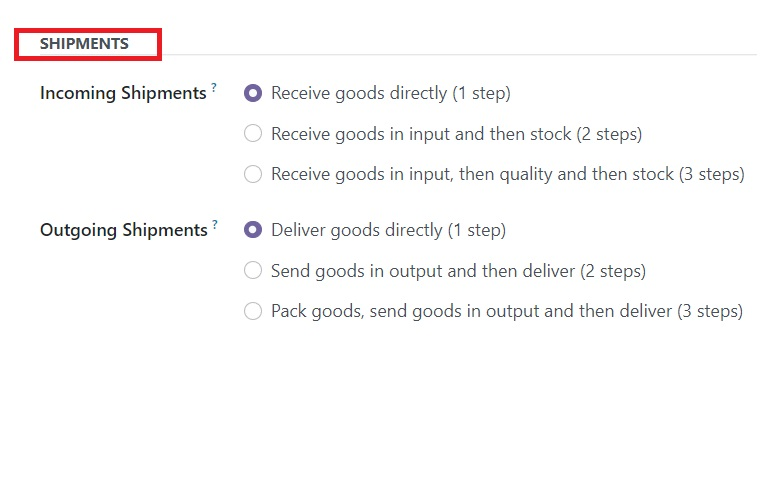
You can use the Incoming Shipments field to define the incoming route to follow during the incoming shipment of the product to this particular warehouse. You can receive products directly to the warehouse by selecting the 1 step option. In the 2 steps option, the product will be received first and then moved to the respective stock. The 3 steps include receiving goods, quality checks of the products, and moving them to corresponding stocks. The Outgoing Shipments will define the default outgoing route to follow during an outgoing shipment. The first option contains only one step which is delivery of goods directly from the warehouse. The second option includes sending goods in output and then delivering. In the third option, you need to pack goods, send them in output, and the deliver.
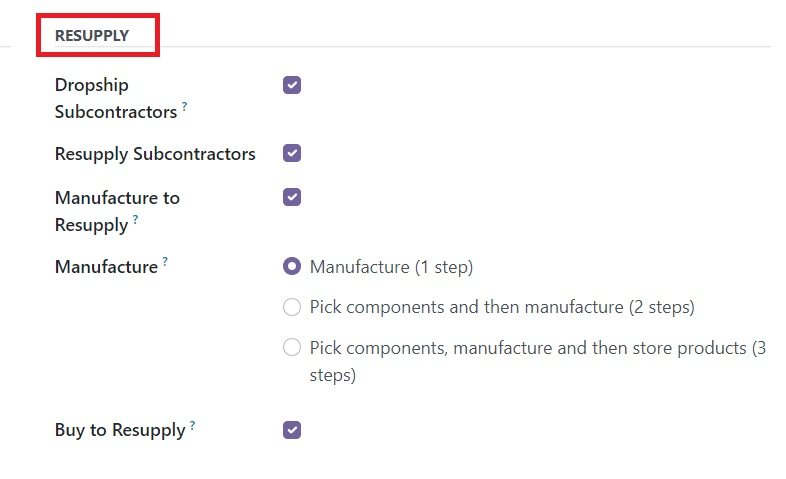
In order to dropship subcontractors with components, you can enable the Dropship Subcontractor feature from the Resupply tab. In case, if you want to resupply the subcontractors with components, you can activate the Resupply Subcontractor feature. When raw materials are in demand, you can easily resupply them in warehouses. When products are out of stock, you can manufacture them in the warehouse for resupply by activating the Manufacture Resupply option. In the Manufacture field, you will get three options to define the steps involved in the manufacturing process. The first option will allow you to manufacture the product directly. In the second option, you have to unload the components from the stock to the input location and then move to the production location for manufacturing. After picking the components and manufacturing the products, you can store them in the warehouse using the third option option. It is possible to buy rew materials to resupply and store in the warehouse by enabling the Buy Resupply feature.
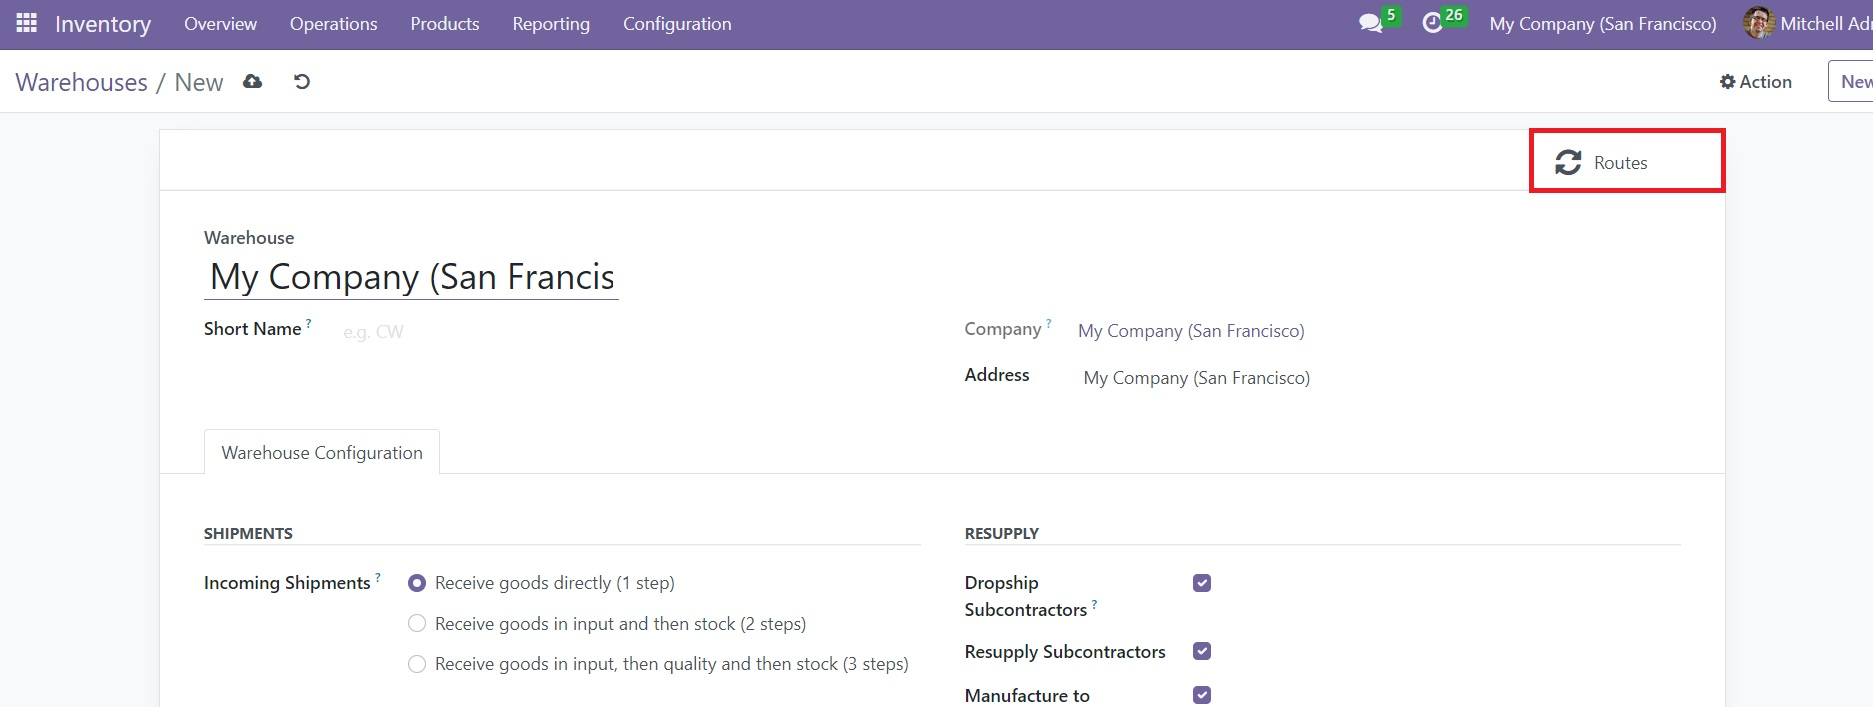
You can use the Routes smart button available on the window to get details of the routes of operations of this warehouse.
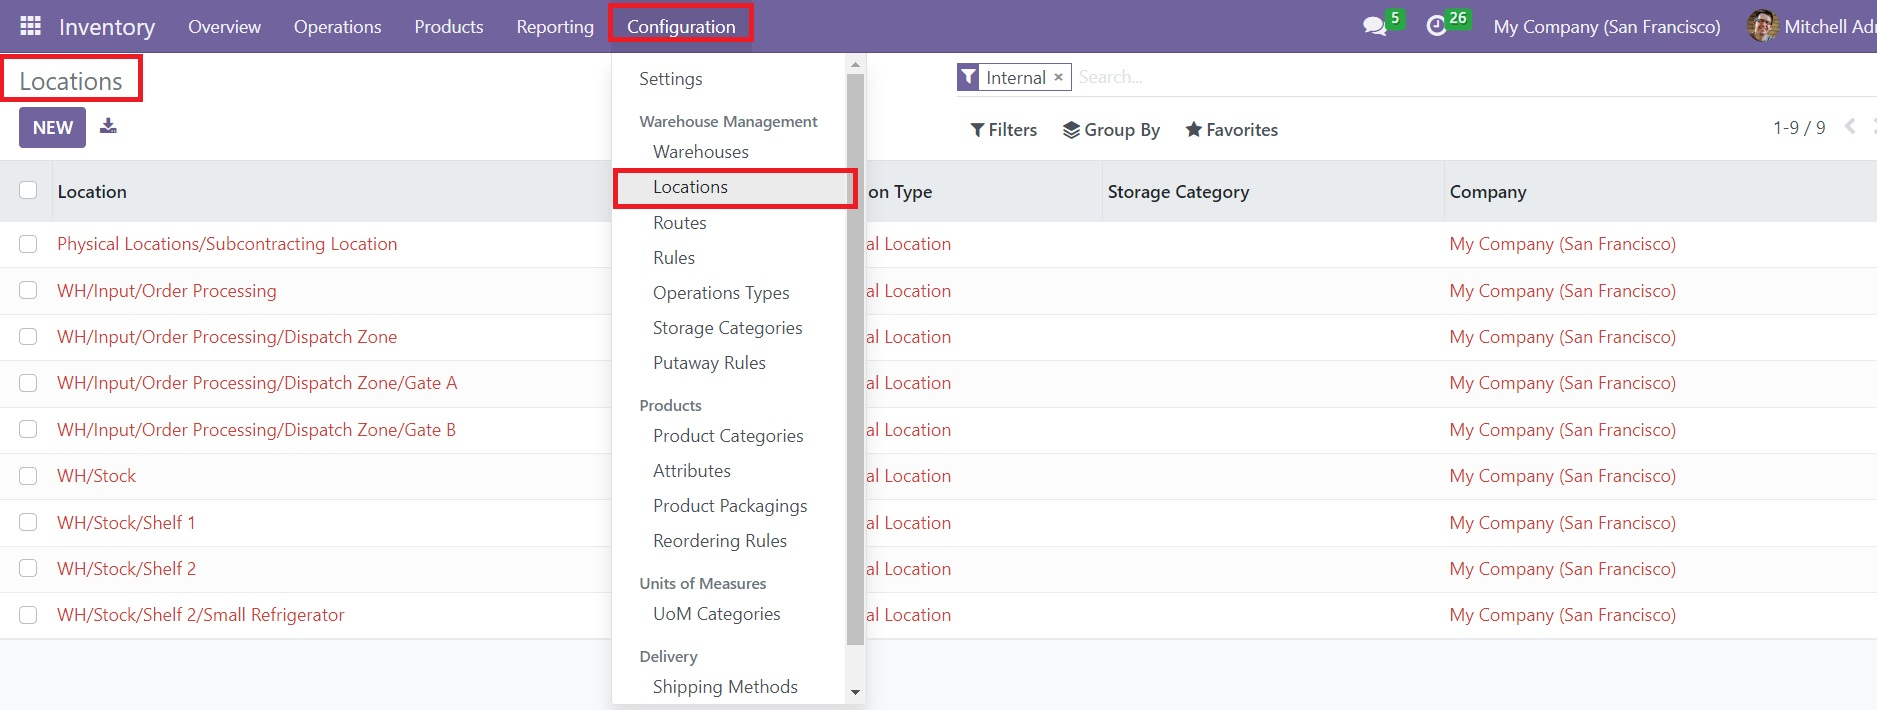
Locations
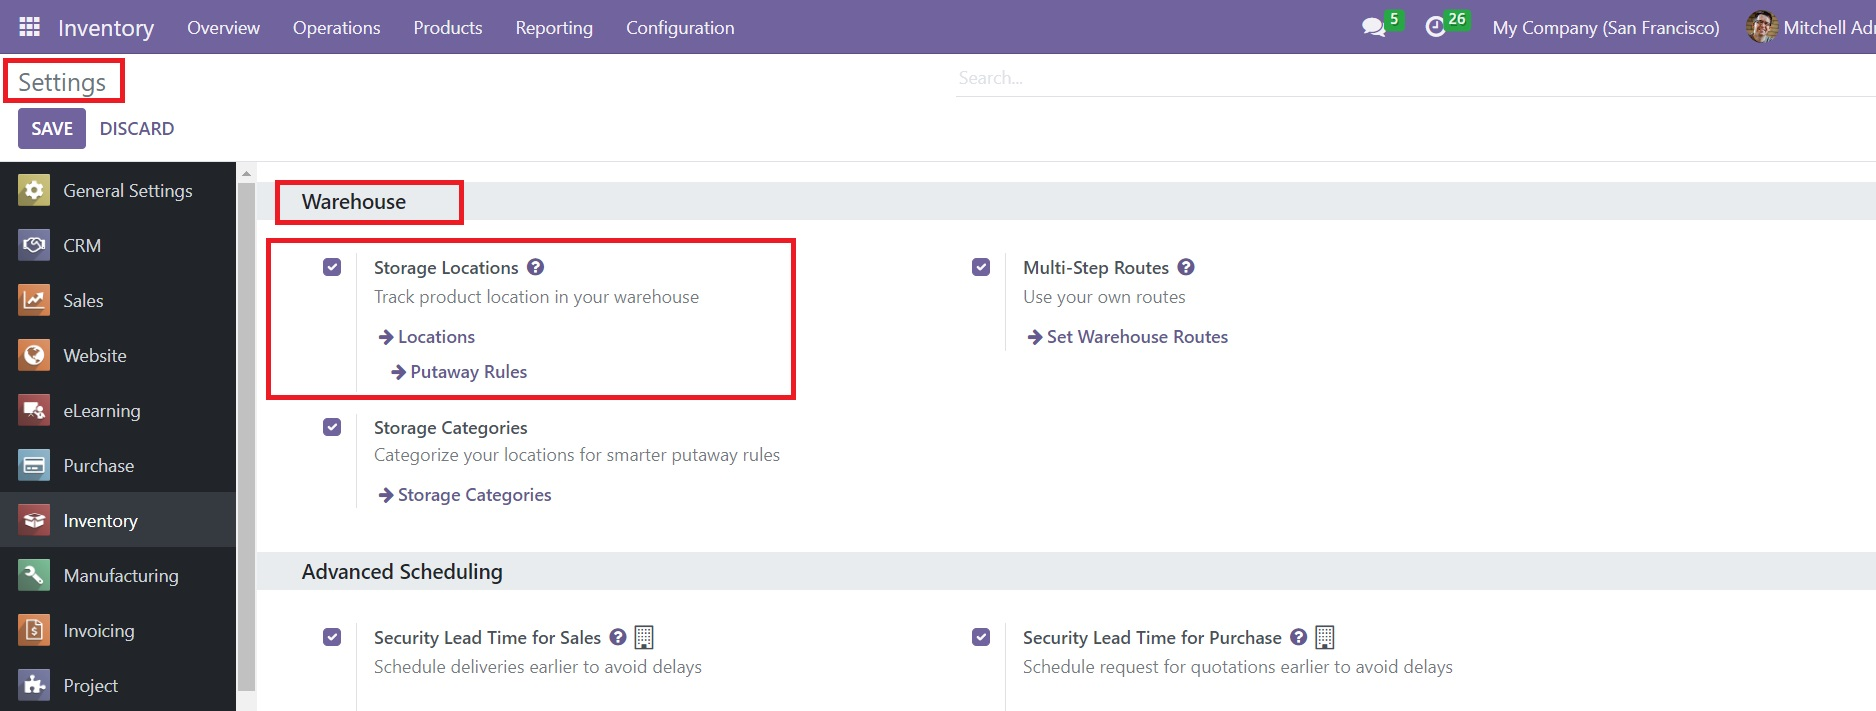
The places in the warehouses where the products are meant to be stocked can be configured in the Locations platform available in the Odoo Inventory module. This platform will allow you to configure multiple locations for your stocks within the same warehouse. In order to get this feature, first you need to go to the Settings menu of the module and activate Storage Locations option from the Warehouse tab as shown below.
Once you activate this option, you will get the corresponding sub menu under the Configuration menu.

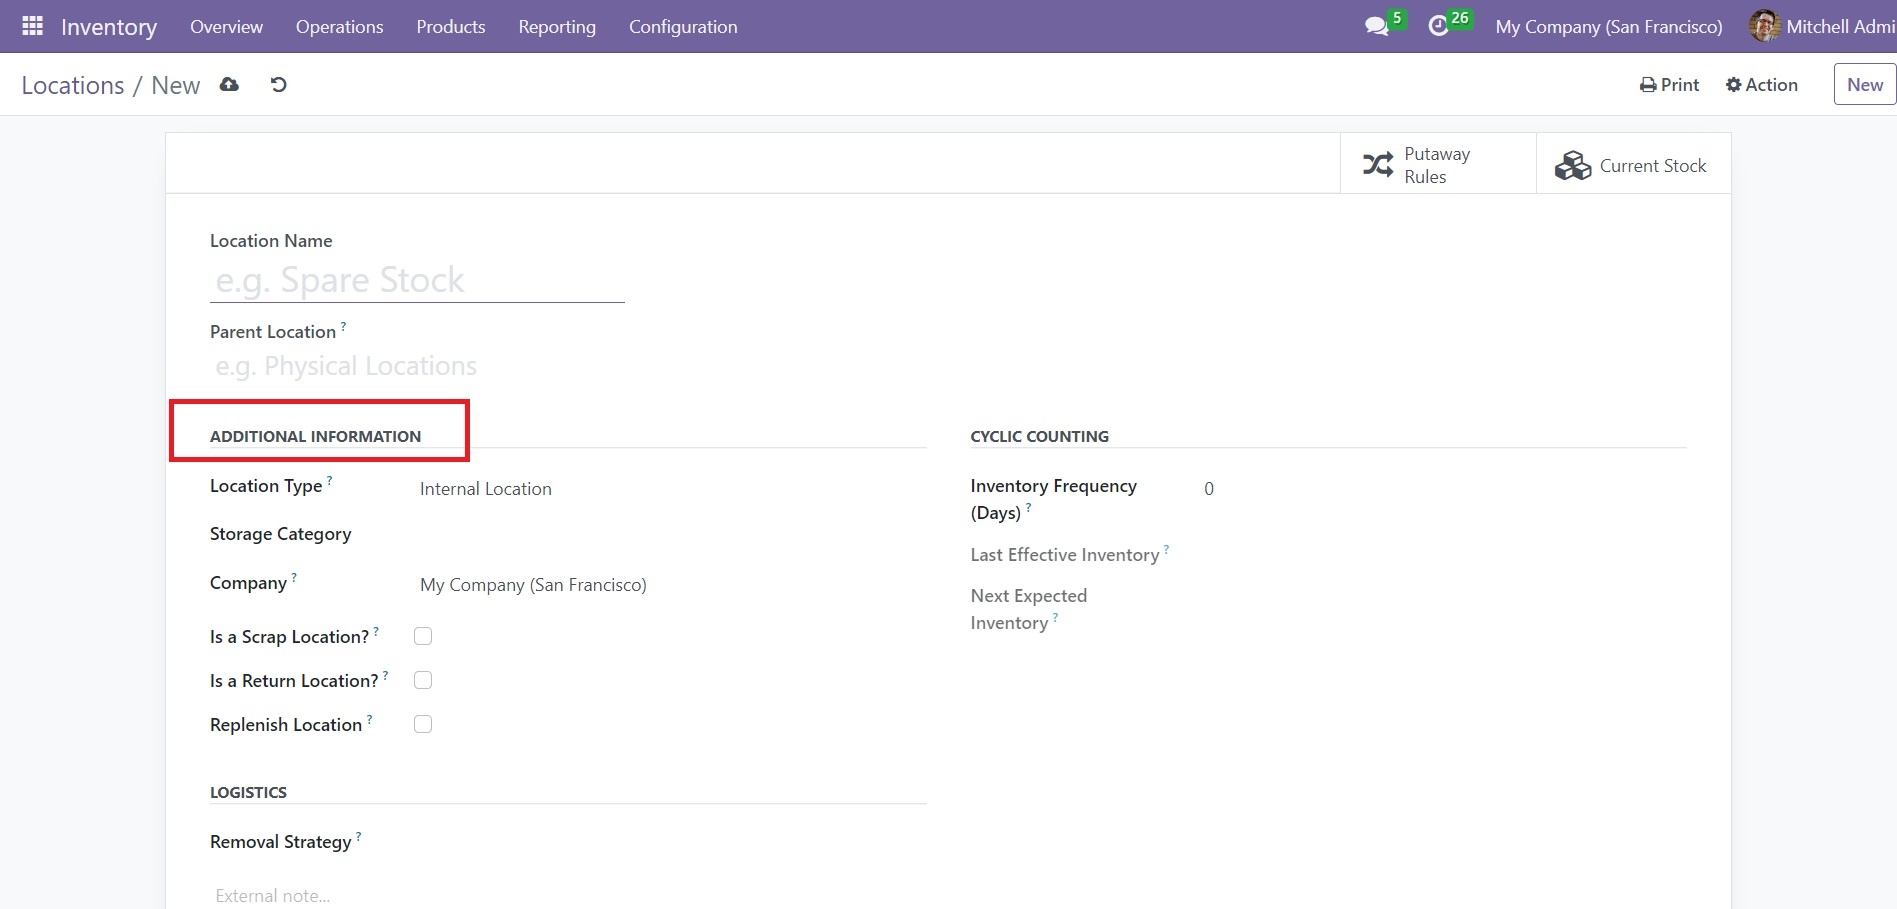
As shown in the image above, the list view provides details regarding the Location, Location Type, Storage Category, and Company. Use the New button to configure a new location in the Inventory module.

This is the form view of the new location creation window. Provide a name for the location in the Location Name field and set Parent Location in the given space. In the Additional Information tab, you can select a suitable Location Type for this location. The available location types are listed below.
Vendor Location: It is as a kind of virtual location which is considered as the source location for the products that come directly from vendors.
View: This virtual location is used to create a hierarchical structure for your warehouse which can’t directly store products.
Internal Location: These are the actual or physical locations obtainable in your warehouse.
Customer Location: This is another virtual location which is considered as the destination location for the products sent to customers.
Inventory Loss: This virtual location serves as a counterpart for inventory operations used to balance stock levels.
Production: This is a virtual counterpart location used for the operations of production. By consuming components from this location, you can produce finished products.
Transit Location: The Transit Location is a counterpart location used in intercompany or inter-warehouse operations.
Specify the Storage Category and Company of the location in the respective fields. By enabling the Is a Scrap Location field, you can assign this location as a place to store scrap and damaged products. In case if you want to use this location as a place to store returned products, you can activate the Is a Return Location feature. To replenish all quantities at this particular location, activate the Replenish Location option.
In the Cyclic Counting tab, you can specify the Inventory Frequency. When the difference is more than zero, the inventory count date for the products stored at this location will be automatically set at the defined frequency. The date of last inventory at this location will be shown in the Last Effective Inventory field. The date of the next planned inventory based on cyclic schedule will appear in the Next Expected Inventory field.
The Removal Strategy for this location can be defined in the Logistics tab.
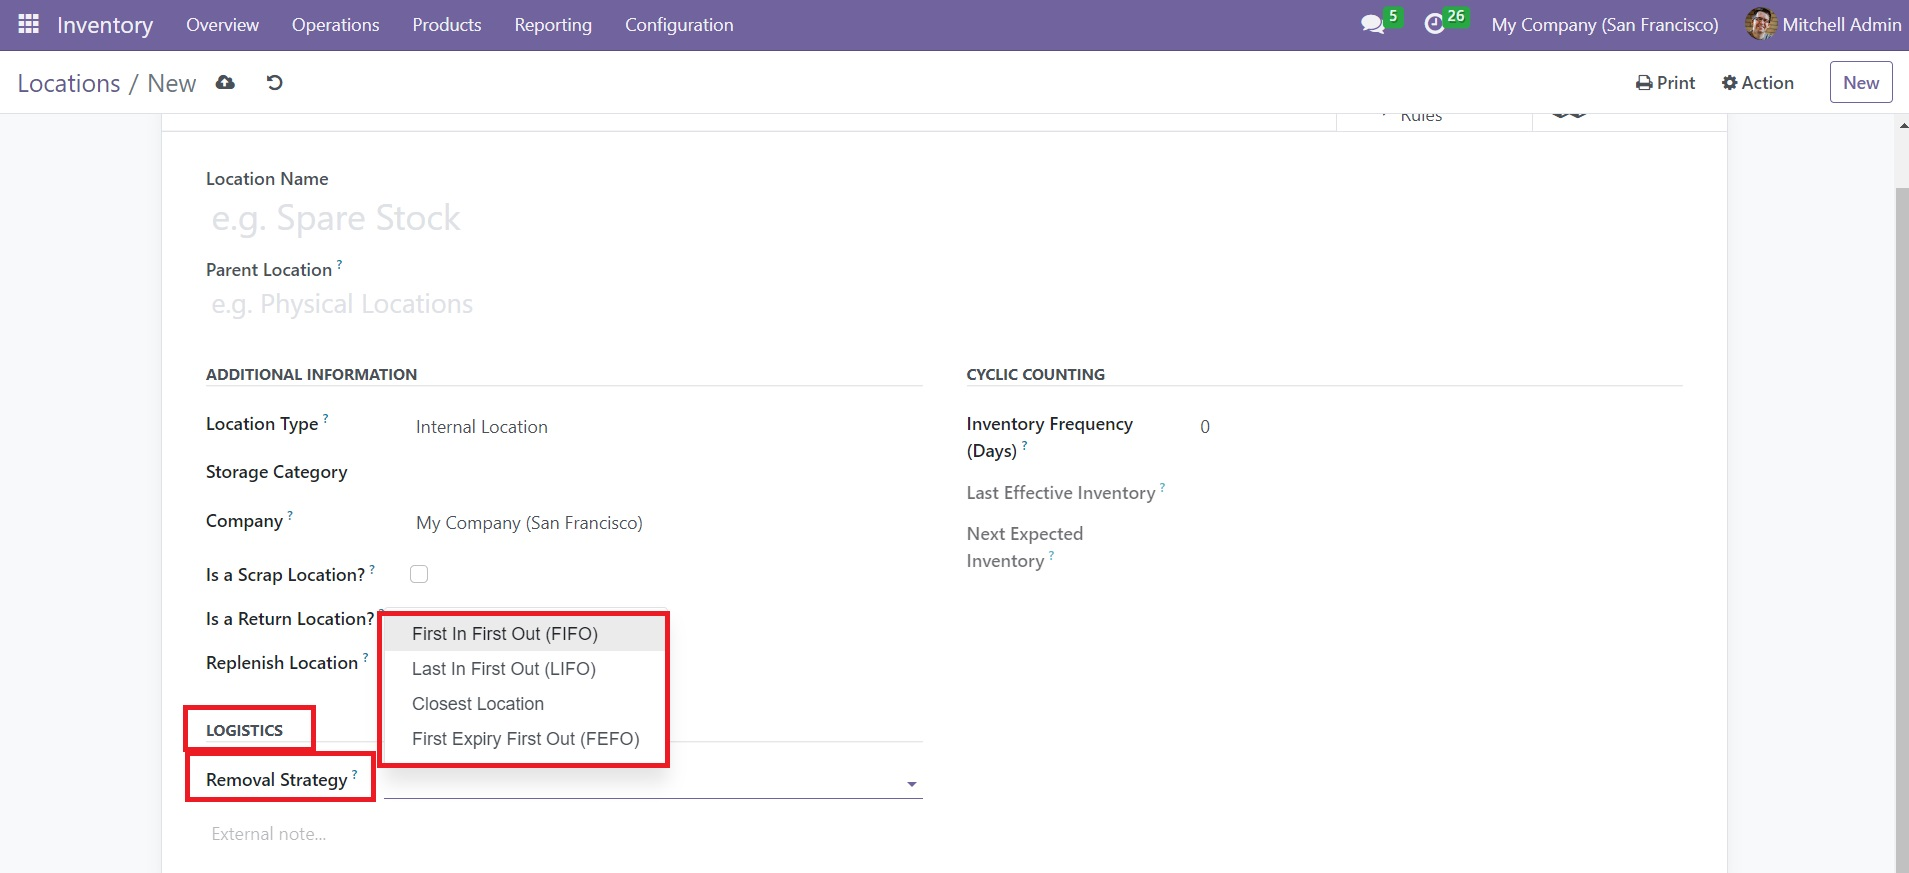
It will define the default method used for proposing the exact location where to take the products from, which lot etc, for this location. This method can be enforced at the product category level, and a fallback is made on the parent locations if none is set here. The available removal strategies are,
FIFO: Products/lots that were stocked first will be moved out first.
LIFO: Products/lots that were stocked last will be moved out first.
Closest Location: Products/lots closest to the target location will be moved out first.
FEFO: Products/lots with the closest removal date will be moved out first.
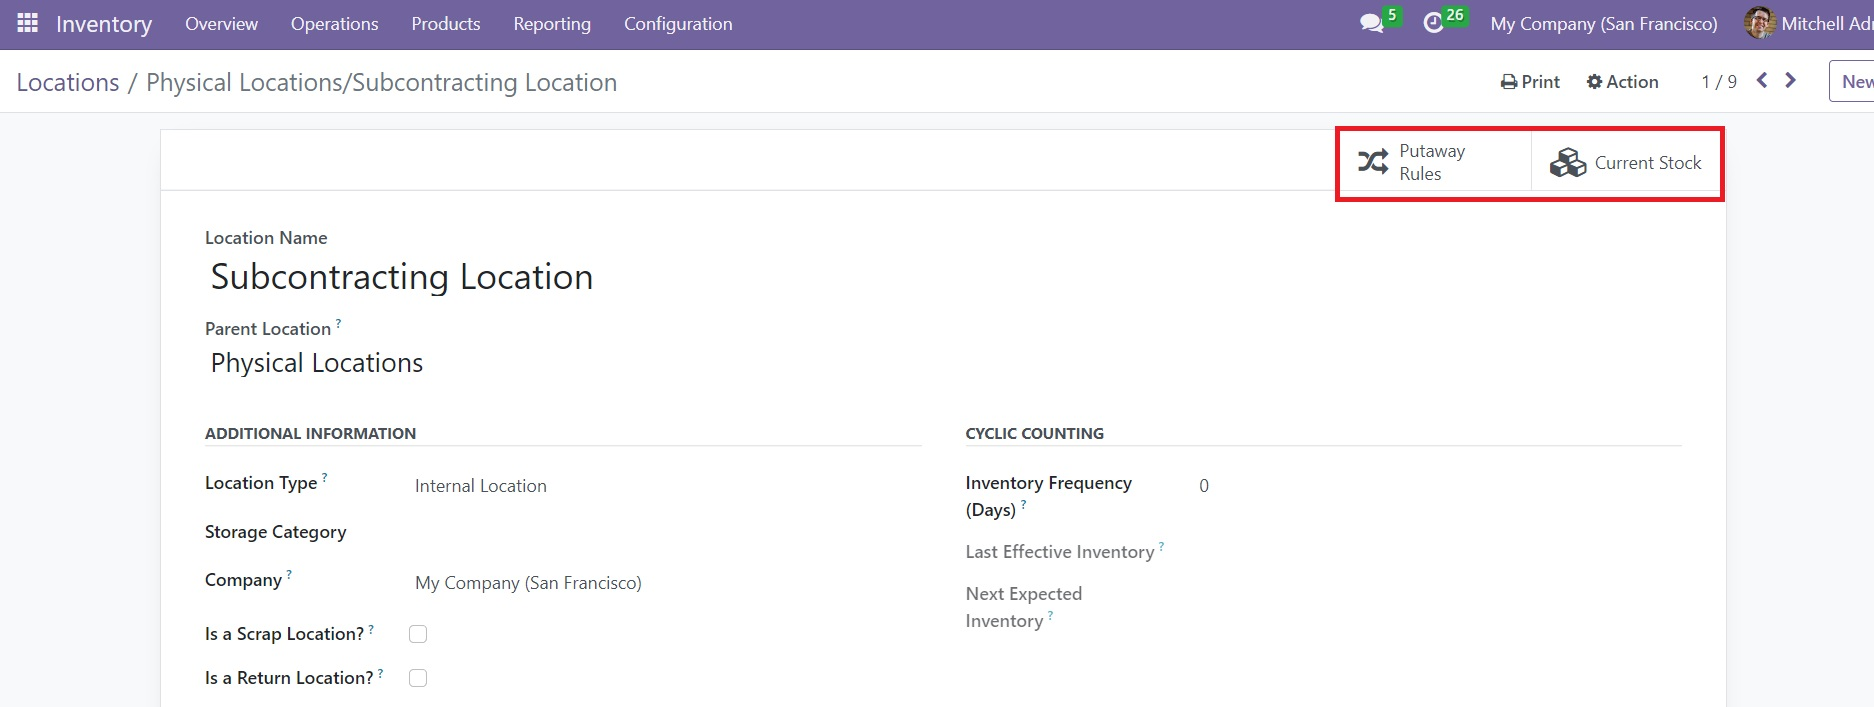
The smart buttons available on the location window will show the Putaway Rules and Stocks of this location.
Rules and Routes
In order to ensure proper tracking of each movement of products, it is essential to define routes on them. The routes will define the paths of operations involved in every inventory movement in a company. According to your company policies, it is possible to set particular rules of operations for the inventory movements. You can use these rules to configure multiple routes for the product movements. This is how we manage effective inventory management in a company.
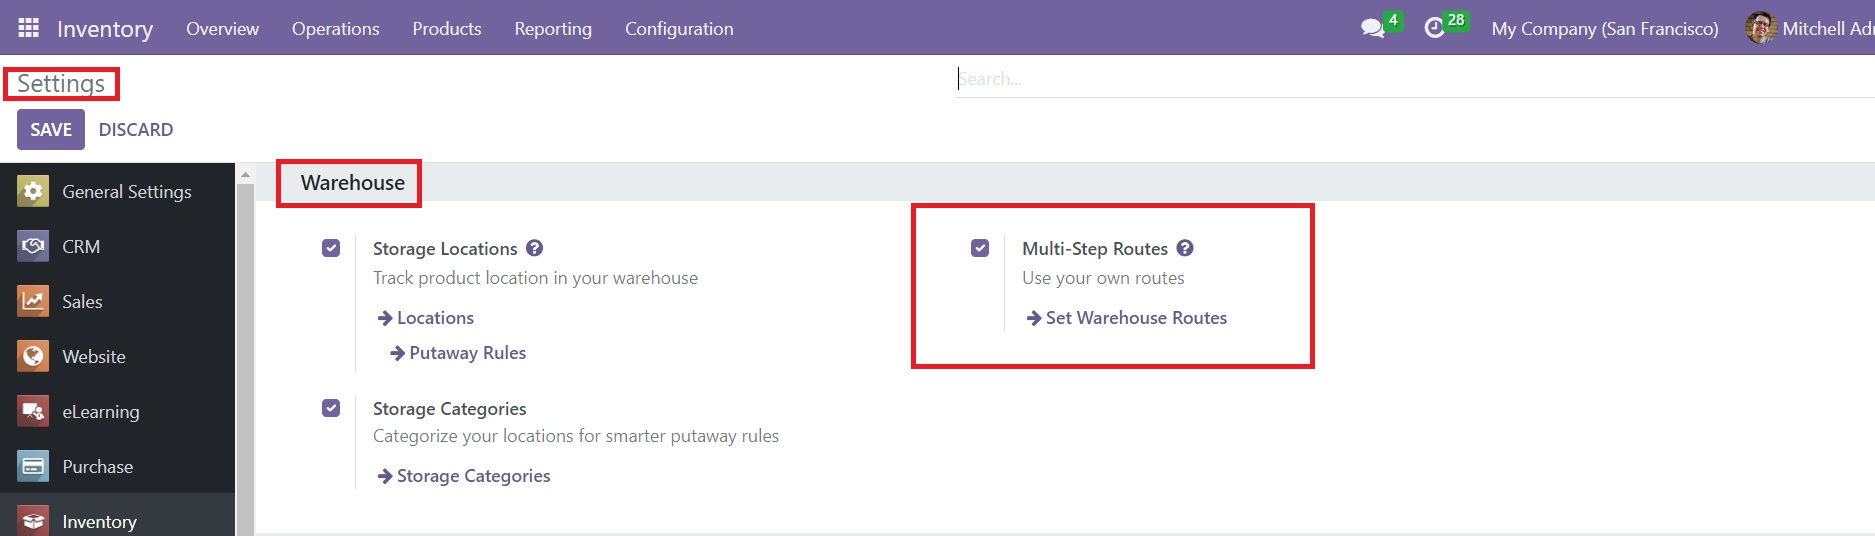
For configuring appropriate routes and rules, you will get dedicated platforms in the Odoo Inventory module. Is is essential to configure suitable work locations and warehouses before configuring routes because all these features work together in Odoo to give better management of inventory movement. First, go to the Setting menu and activate the Multi-Step Routes option from the Warehouse tab.
Once you activate this feature, you will get the Routes option under the Configuration menu. Before creating new routes, let’s create new rules for the routes and product movement from the Configuration menu.
Creating Rules
From the Configuration menu, you can select the Rules option under the Warehouse Management tab. This will open a new window where you can observe the pre-configure list of different rules in the Inventory module.
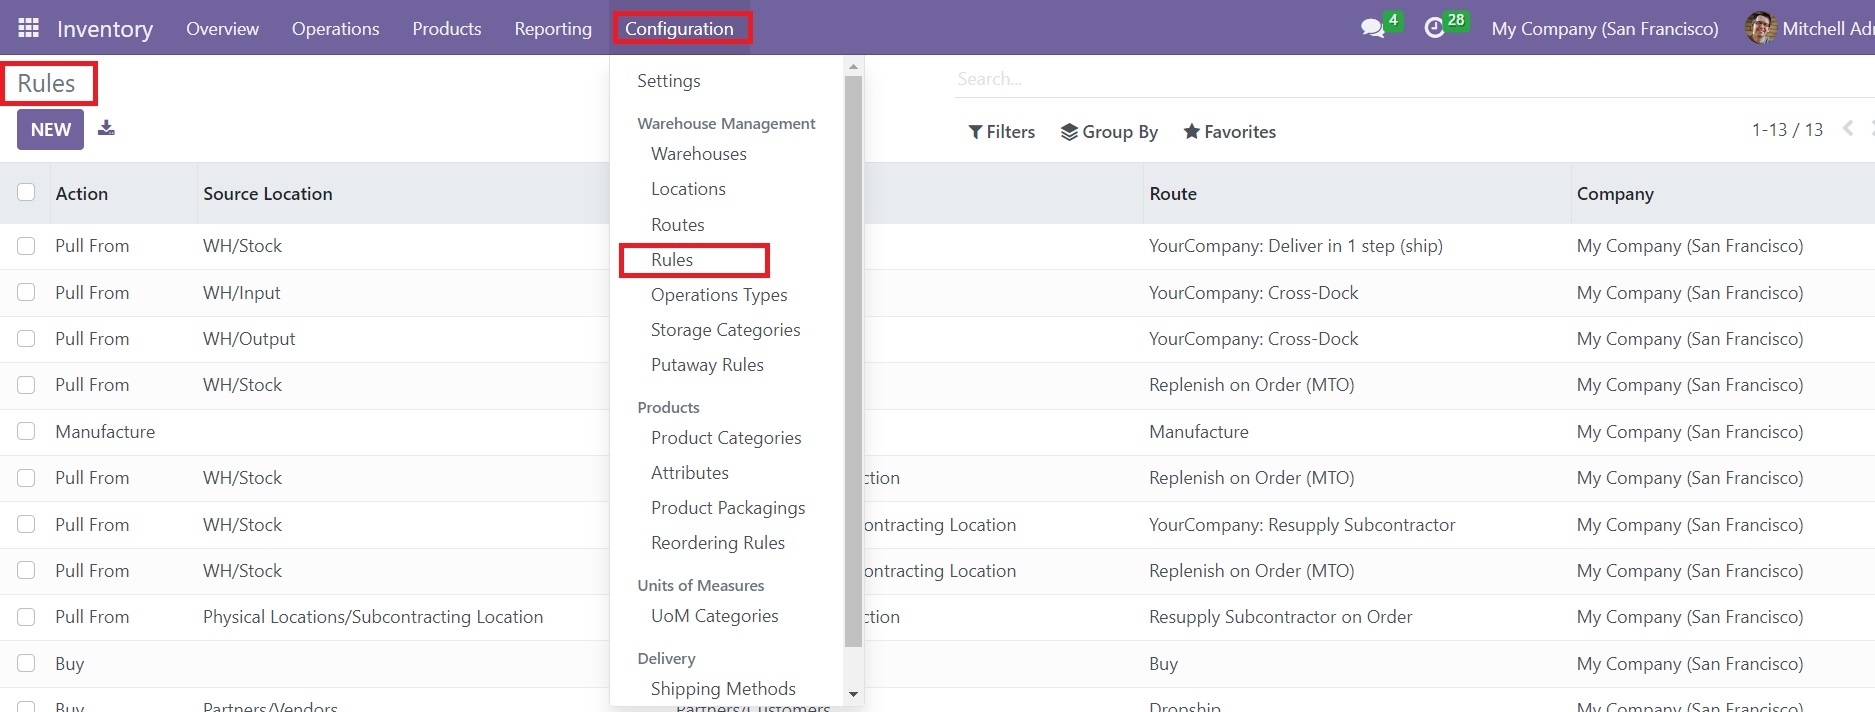
The preview of the list shows the details of the Action, Source Location, Destination Location, Route, and Company each Rule. You can use the default and customizable Filters and GroupBy options to simplify the searching operations. Click the New button to create a rule in the Inventory module.
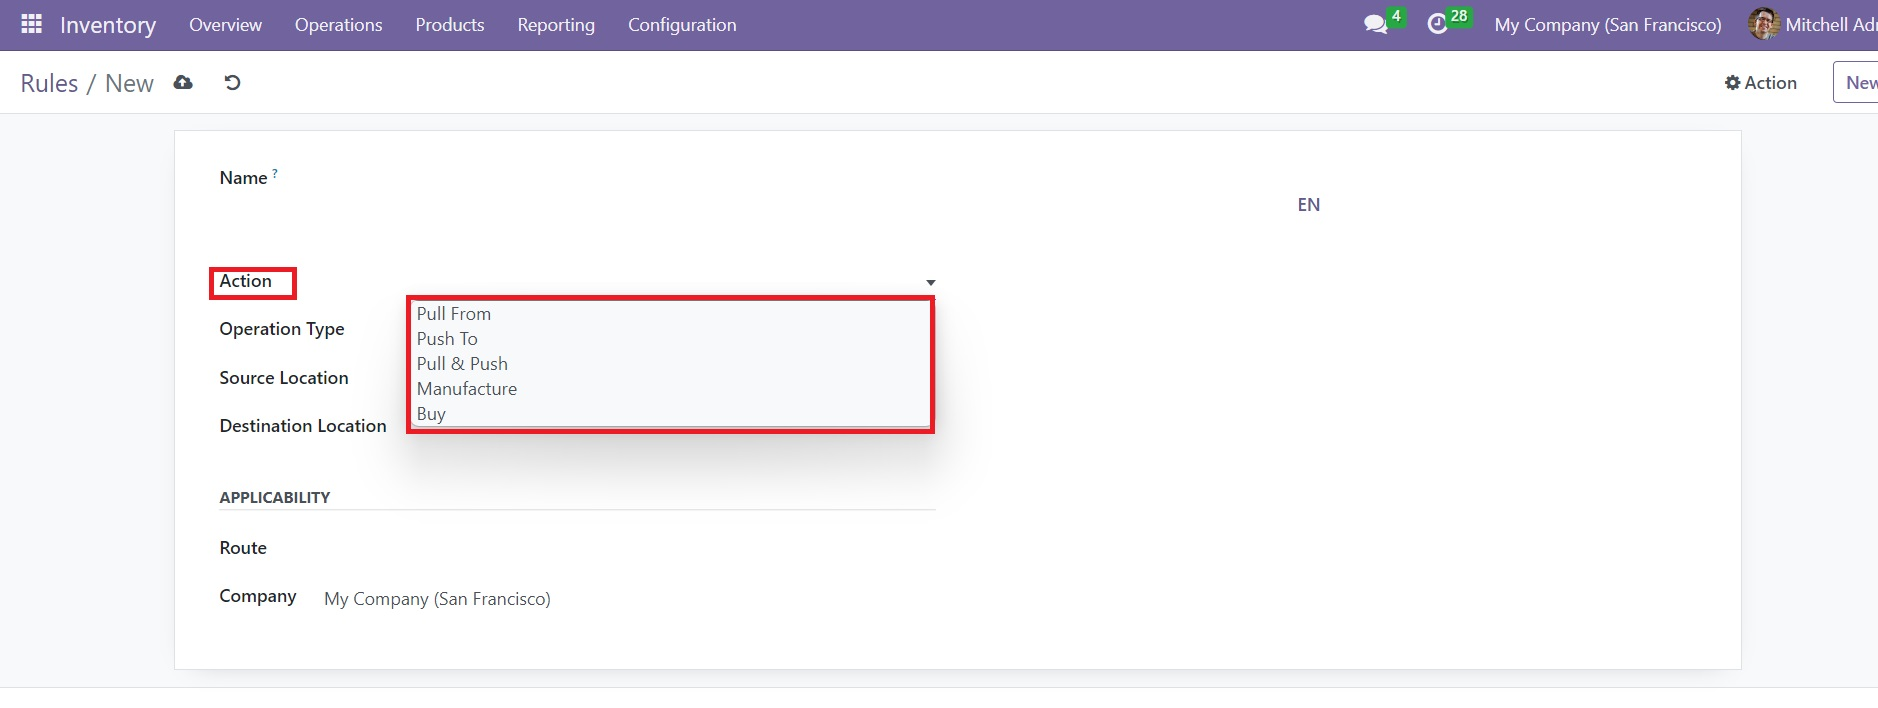
Provide a suitable title for the new rule in the Name field. You can define the action for this particular rule in the given space. You can select a suitable activon form the drop-down as highlighted in the screenshot. The available options are,
Pull From: You can set this action when products are needed in the destination location. It can be either from a sales order or a manufacturing order. When the demand for a product happens in the destination location, Odoo will generate a picking operation type from the source location to complete the requirement.
Push To: You can use this rule to move a product to another location. When products arrive in the source location, you can move them to another location using this action. In this case, Odoo will generate a picking operation type to send them to the destination location.
Push & Pull: This action can be used in both cases explained above. When products are needed in the destination location a picking is generated from the source location to fulfill the need. This demands product requirements in the source location. Once the source location is fulfilled with the requirement, the products will be pushed to the destination location to fulfill the needs of the destination location.
Manufacture: Using this action, you can directly generate manufacturing orders to complete the requirements of the source location.
Buy: When products are needed at the destination location, Odoo will generate a request for quotation to buy the product to fulfill the need with the help of this action.
The Operation Type, Source Location, and Destination Location can be mentioned in the respective fields. In the Applicability tab, specify the Route and Company on which this particular rule is applicable.
Creating Routes
In order to create new routes for the inventory movements, you can go to the Configuration menu and select the Routes option. This will open the list of already created Routes in the Inventory module.
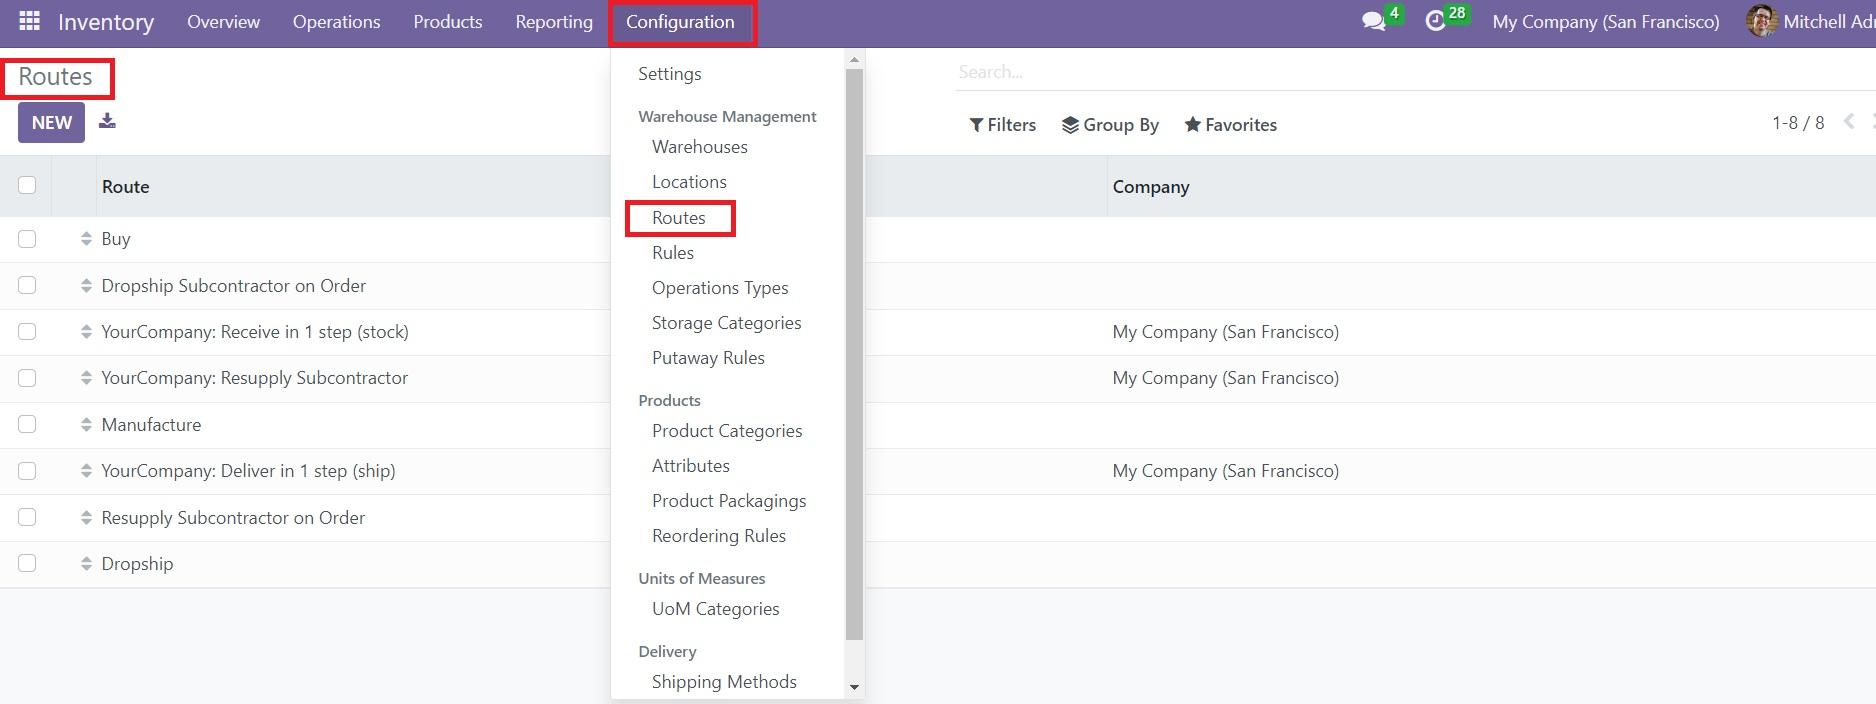
You are allowed to use the New button to create a new route for inventory.
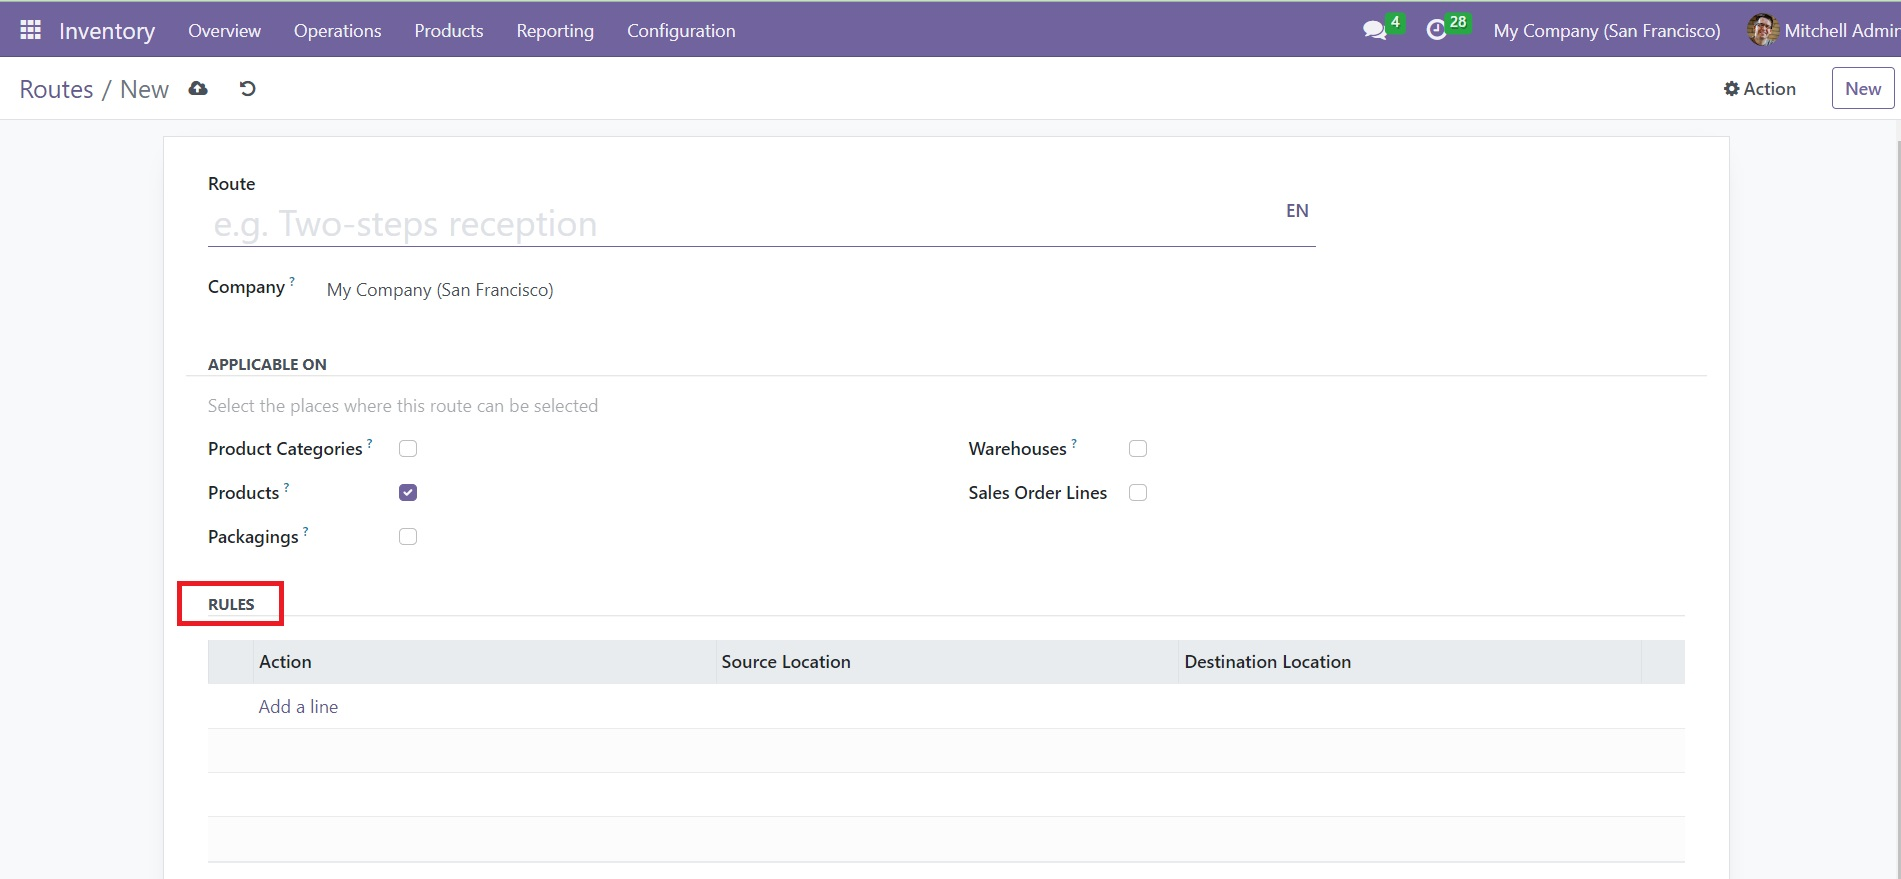
Mention the name of the inventory route in the Route field. The name of the Company will be available in the corresponding field. In the Applicable on field, select the places where you want to use this route. It can be Product, Product Categories, Packaging, Warehouses, or Sales Order Lines. Under the Rules tab, mention the rules for this particular route of operation.
It is possible to define the route of operation for the products in your inventory while configuring the details in the Odoo product configurator. In the product form view, you can find the Routes option under the Inventory tab which can be used to specify the routes of operation of that particular product.
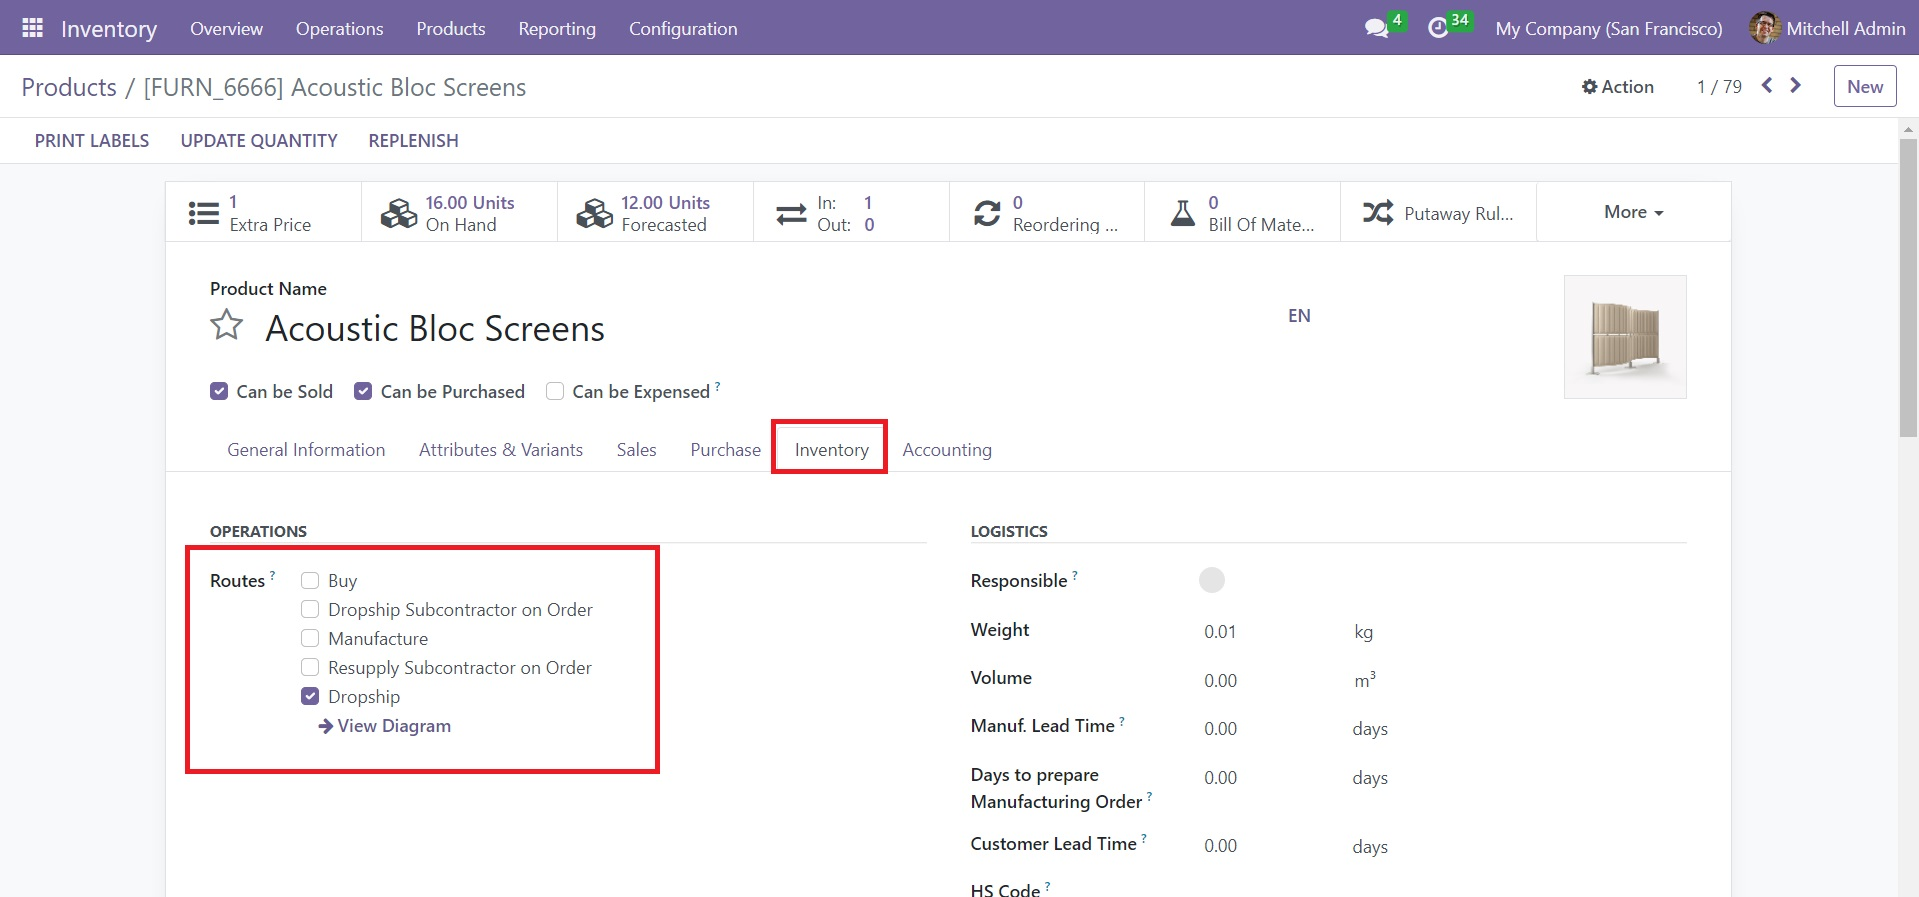
Based on the module you installed in your Odoo database, it will allow you to set the route of a product. It can be bought, manufactured, replenished on order, etc, based on the route you select.
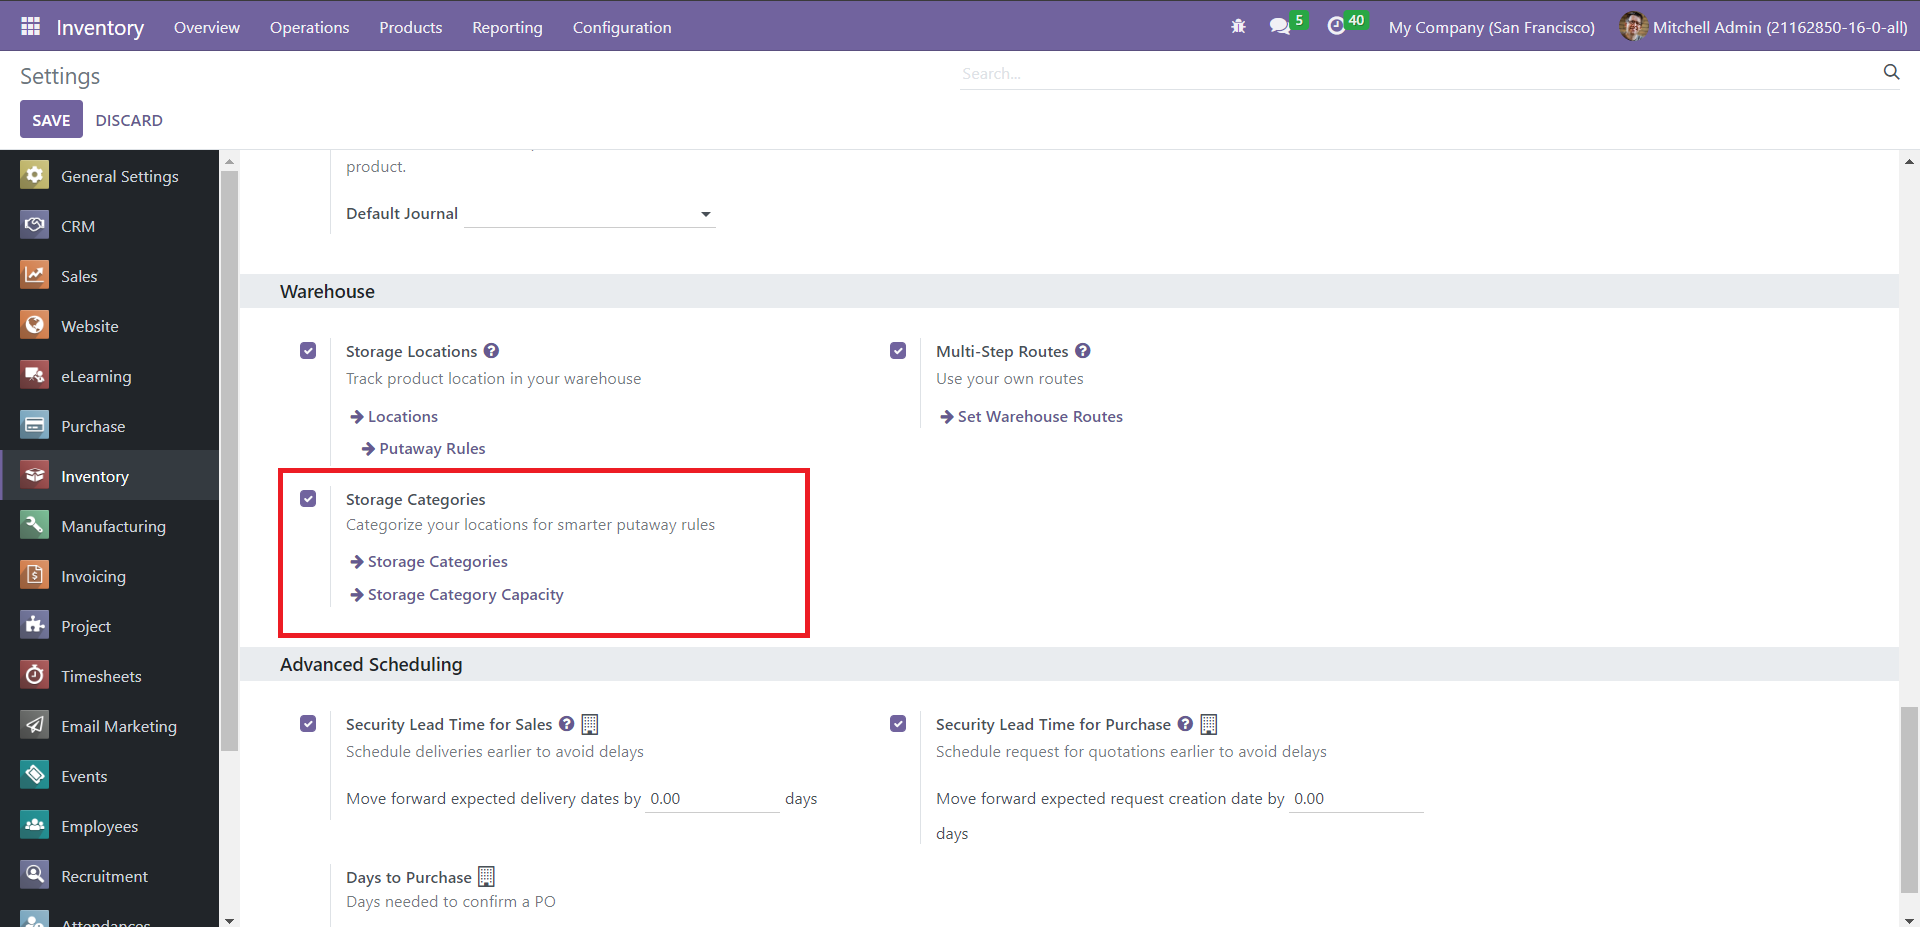
Storage Categories
The Storage Categories function is the most efficient way of micromanaging storage locations in the Inventory module, which aids the smooth performance of ‘Putaway Rules.’ We shall elaborate on the operation of ‘Putaway Rules’ in the upcoming section.
Go to the Settings menu and check the Storage Categories option under ‘Warehouse.’
Now, click on the Storage Categories option from the Configuration menu. You will get a window previewing all the default and manually configured categories.
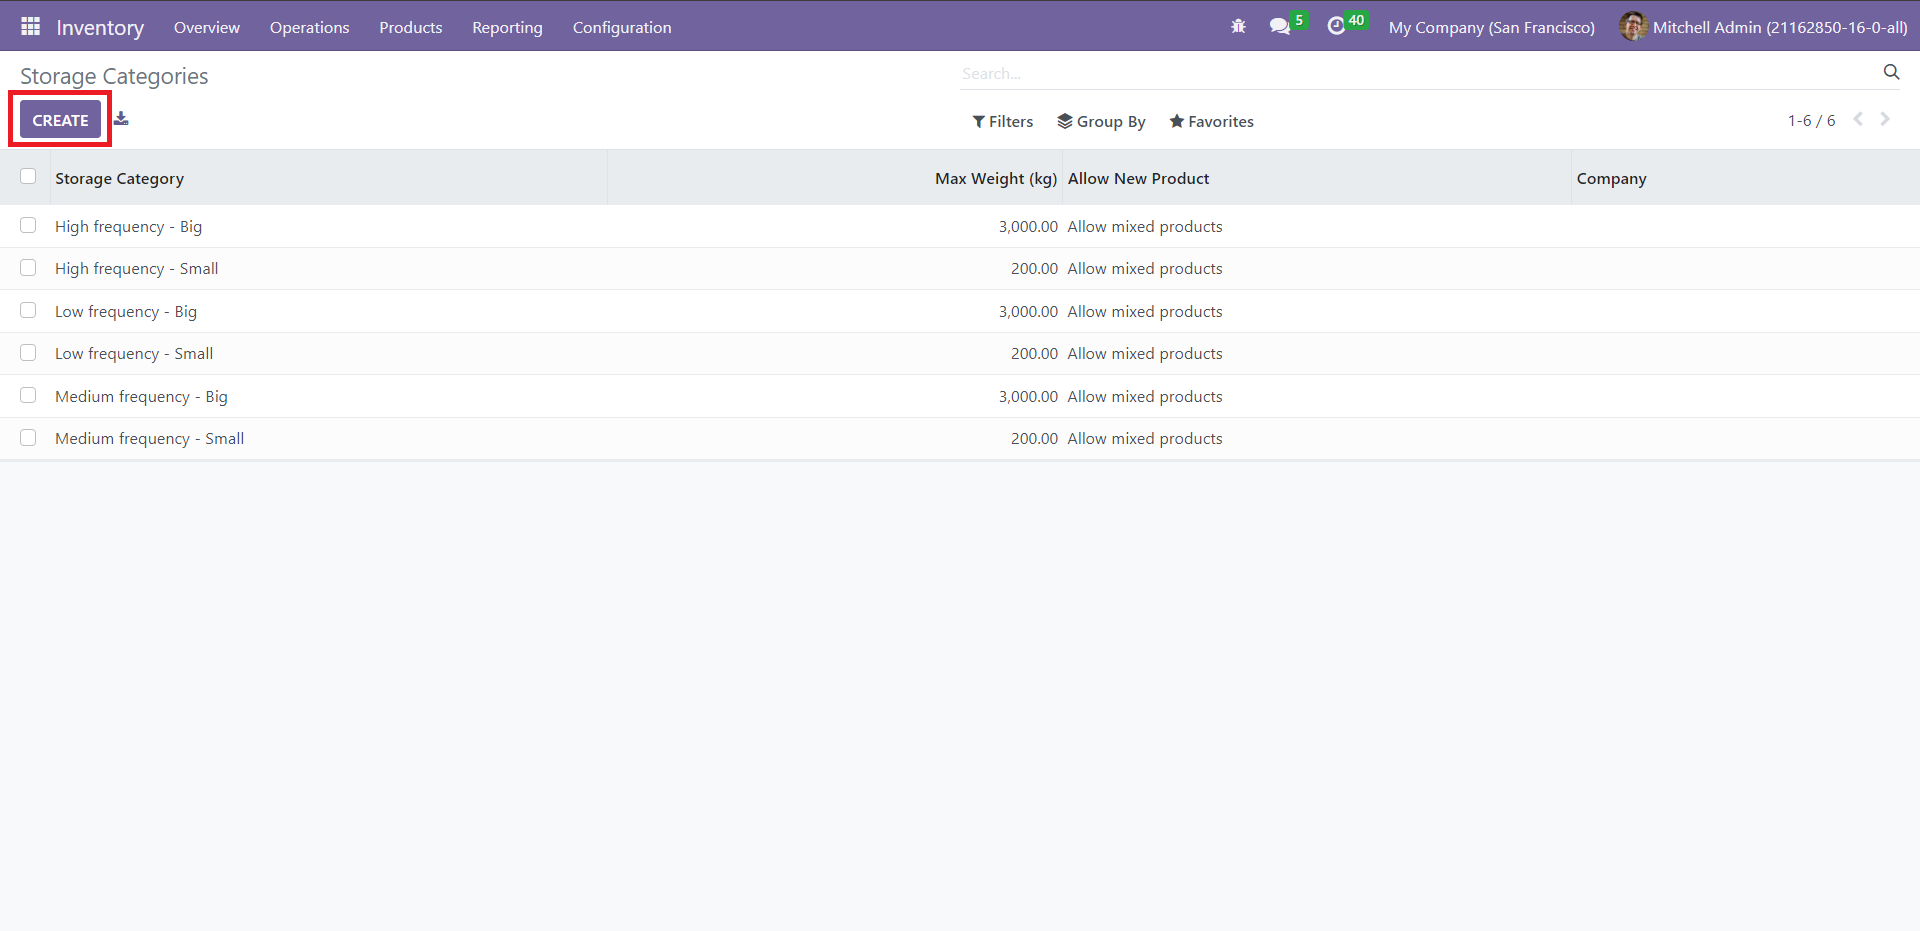
Click on the Create button to add a new storage category to the existing set of configurations
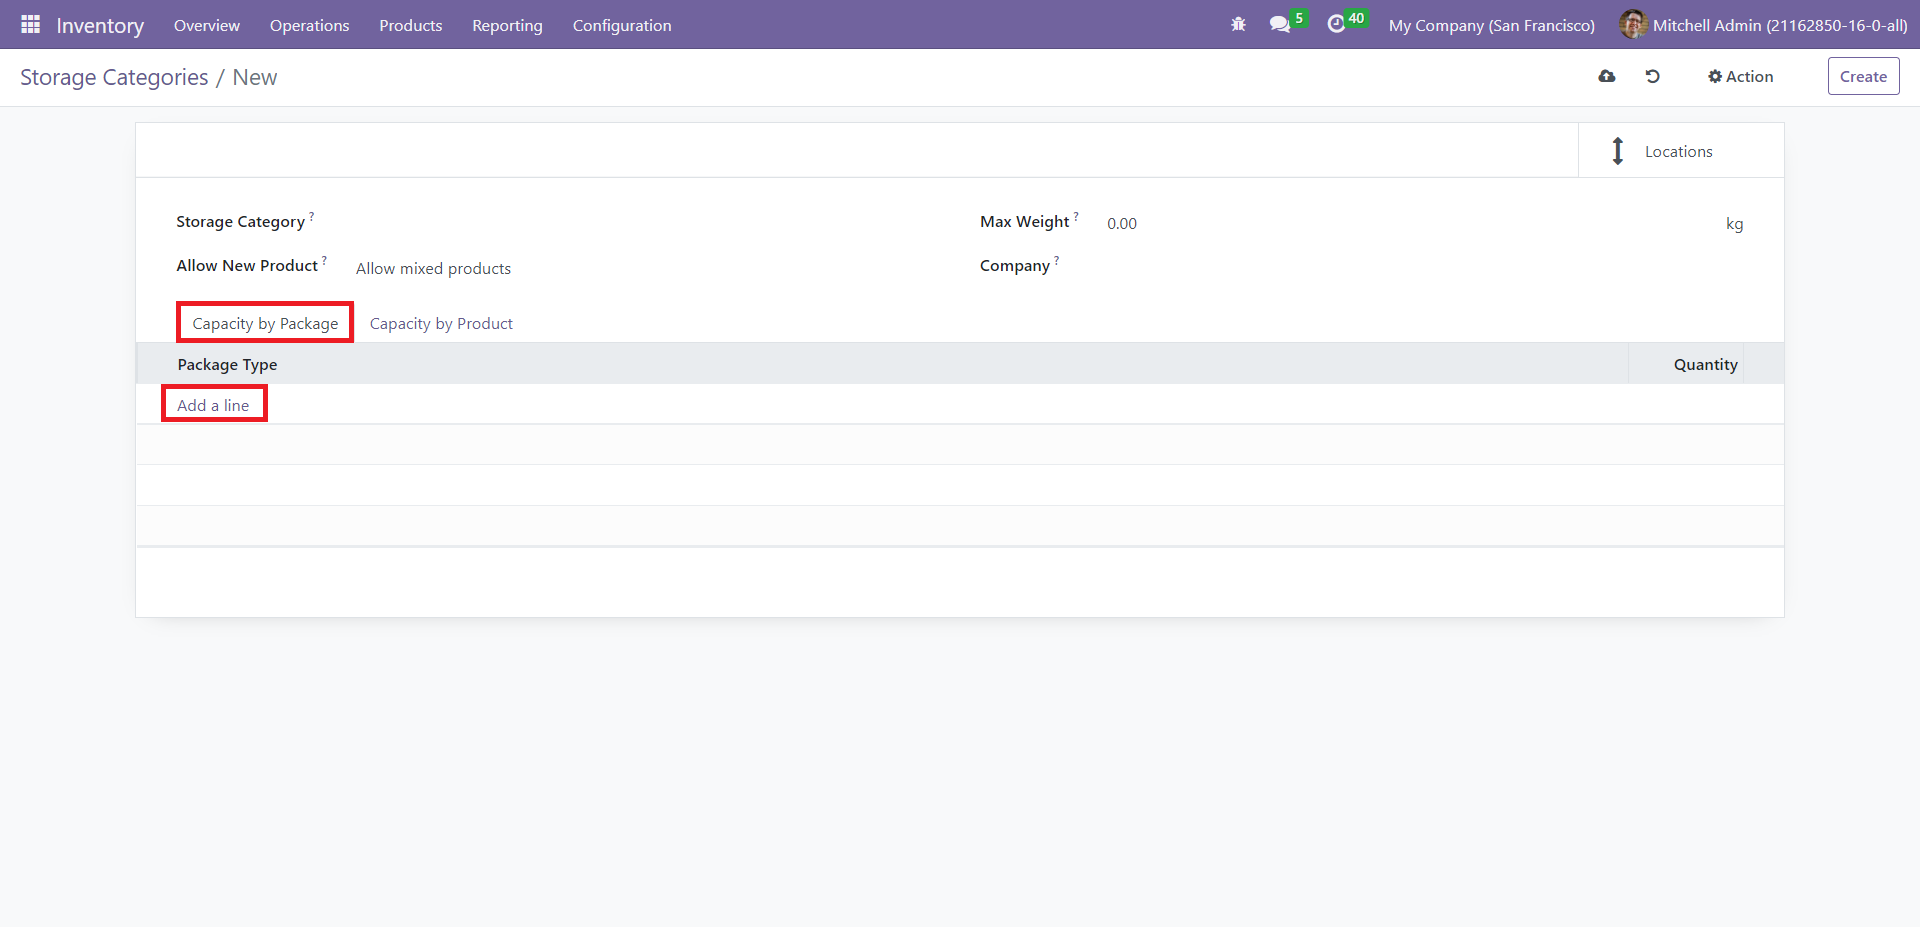
Assign a name for the new record in the Storage Category field. Select any of the three options of ‘Allow New Product’ – ‘If the location is empty,’ ‘If all products are the same,’ or ‘Allow mixed products’ – to indicate the instance where you want to allow a new product. Fill in the fields like Max Weight and Company. You can define the attributes like Package Type and Quantity under ‘Capacity by Package.’
The Capacity by Product section allows you to define a Product, its Quantity, and its Unit of Measure.

You can also define storage locations using these categories.
Putaway Rules
Putaway Rules make sure that the company stores its stocks in appropriate places. Since the product’s physical/chemical nature governs its storage situation, assigning the apt storage location is imperative. This feature will avoid the wrong storage of products in your inventory. Using the putaway rules, you can shift products from the receiving locations to the most appropriate place within the warehouse itself.
To access this feature, go to Configuration → Putaway Rules.
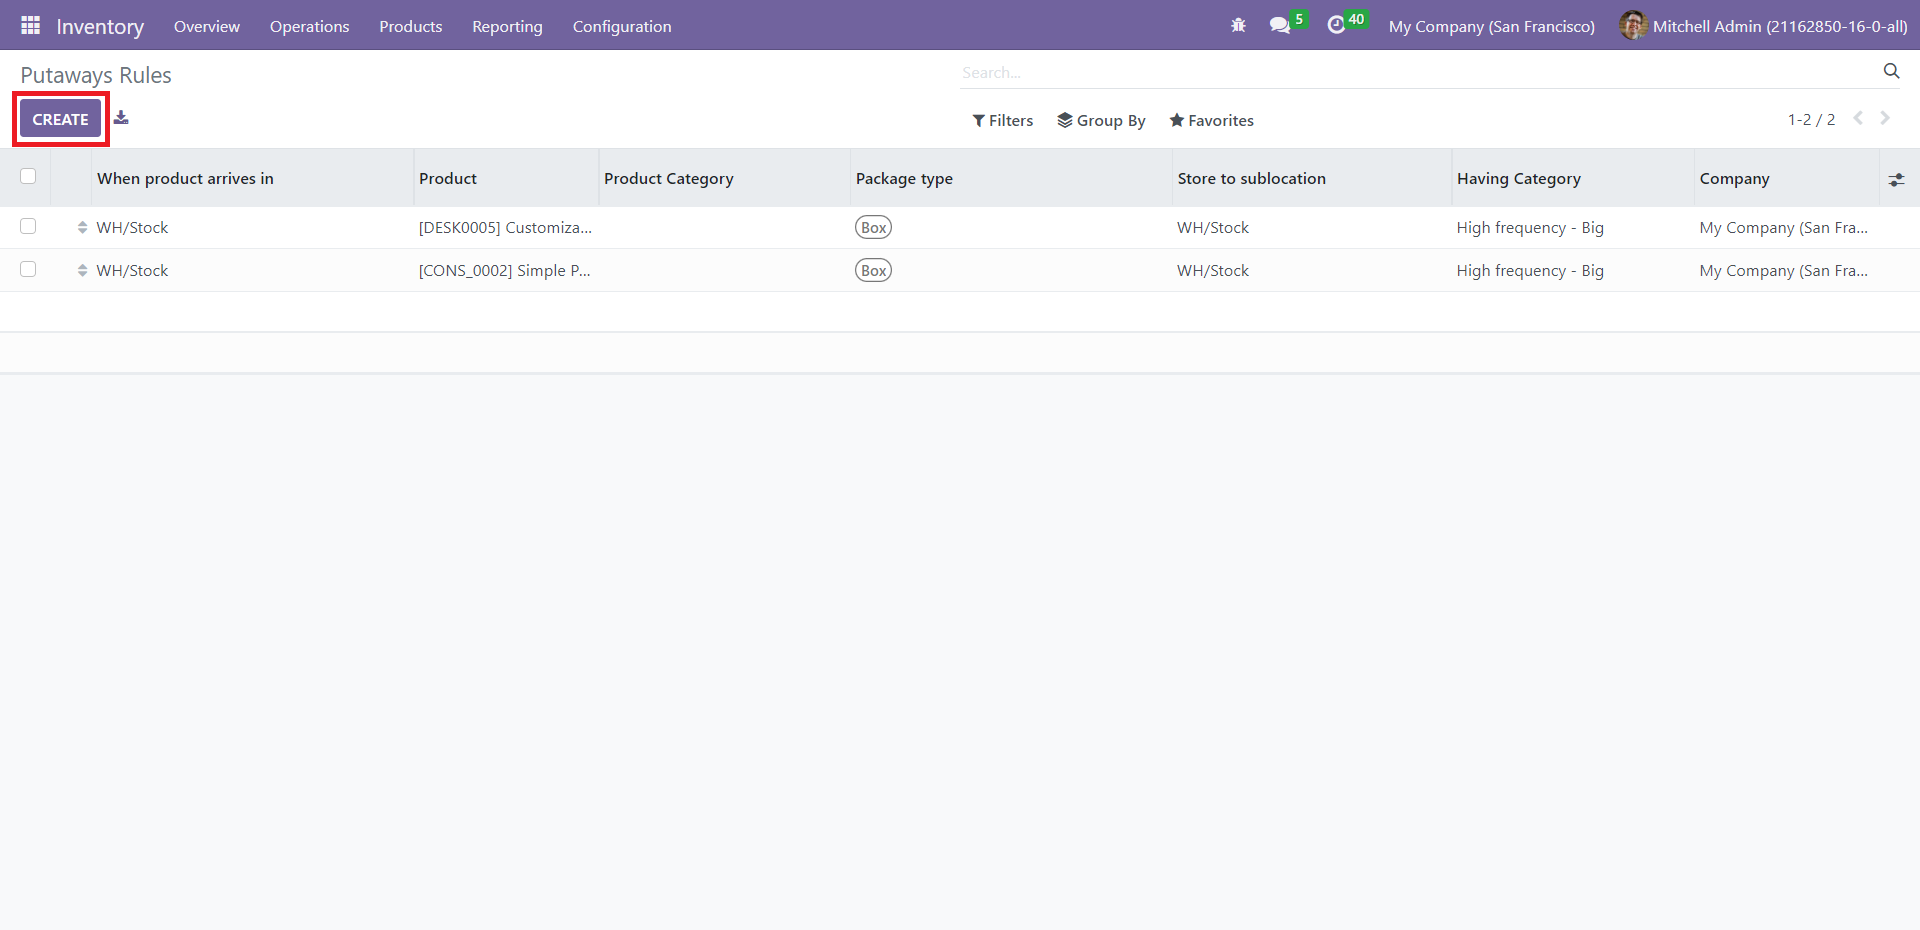
In this window, you can see the list of the putaway rules added in the module along with the fields: When Product Arrives in, Product, Product Category, Package Type, Store to Sublocation, Having Category, and Company. The system will move the product to the location indicated in ‘Store to Sublocation’ when it reaches the one specified in the ‘When Product Arrives in’ field. Click the Create button to add a new putaway rule to the existing records set. You will get a domain below the last line of the preview, where you can enter the corresponding data.
Putaway Rules come in handy when you define storage locations in this module.
Inventory Adjustments
The Inventory Adjustments feature equips you with a unique platform to keep track of the company’s stocks and update their quantity efficiently. With this attribute, you can ensure that you have enough products to perform the required inventory operations. To access this window, click on ‘Inventory Adjustments’ from the dropdown list of the Operations tab.
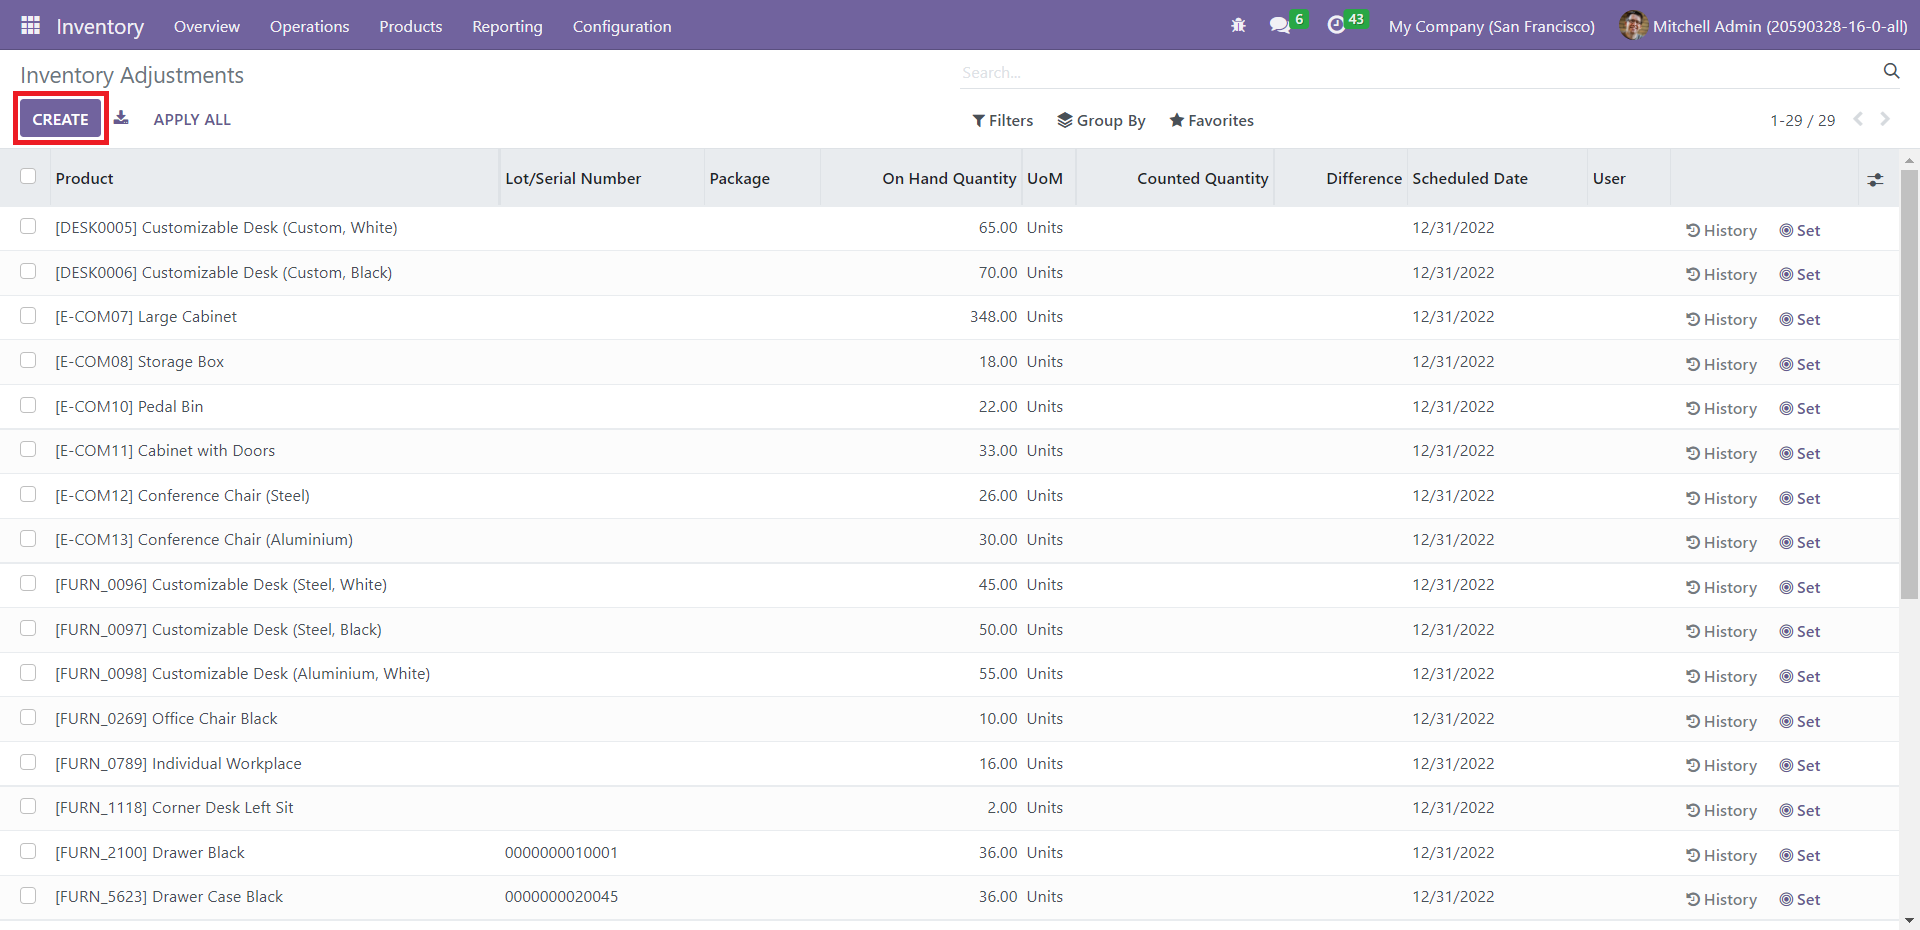
In this window, the product’s name is listed with its info like Lot/ Serial Number, Package, On Hand Quantity, UoM, Counted Quantity, Difference, Scheduled Date, and User. Here, ‘Difference’ indicates the gap between the product’s theoretical and counted quantities. ‘Scheduled Date’ determines the next date to measure the On Hand quantity.
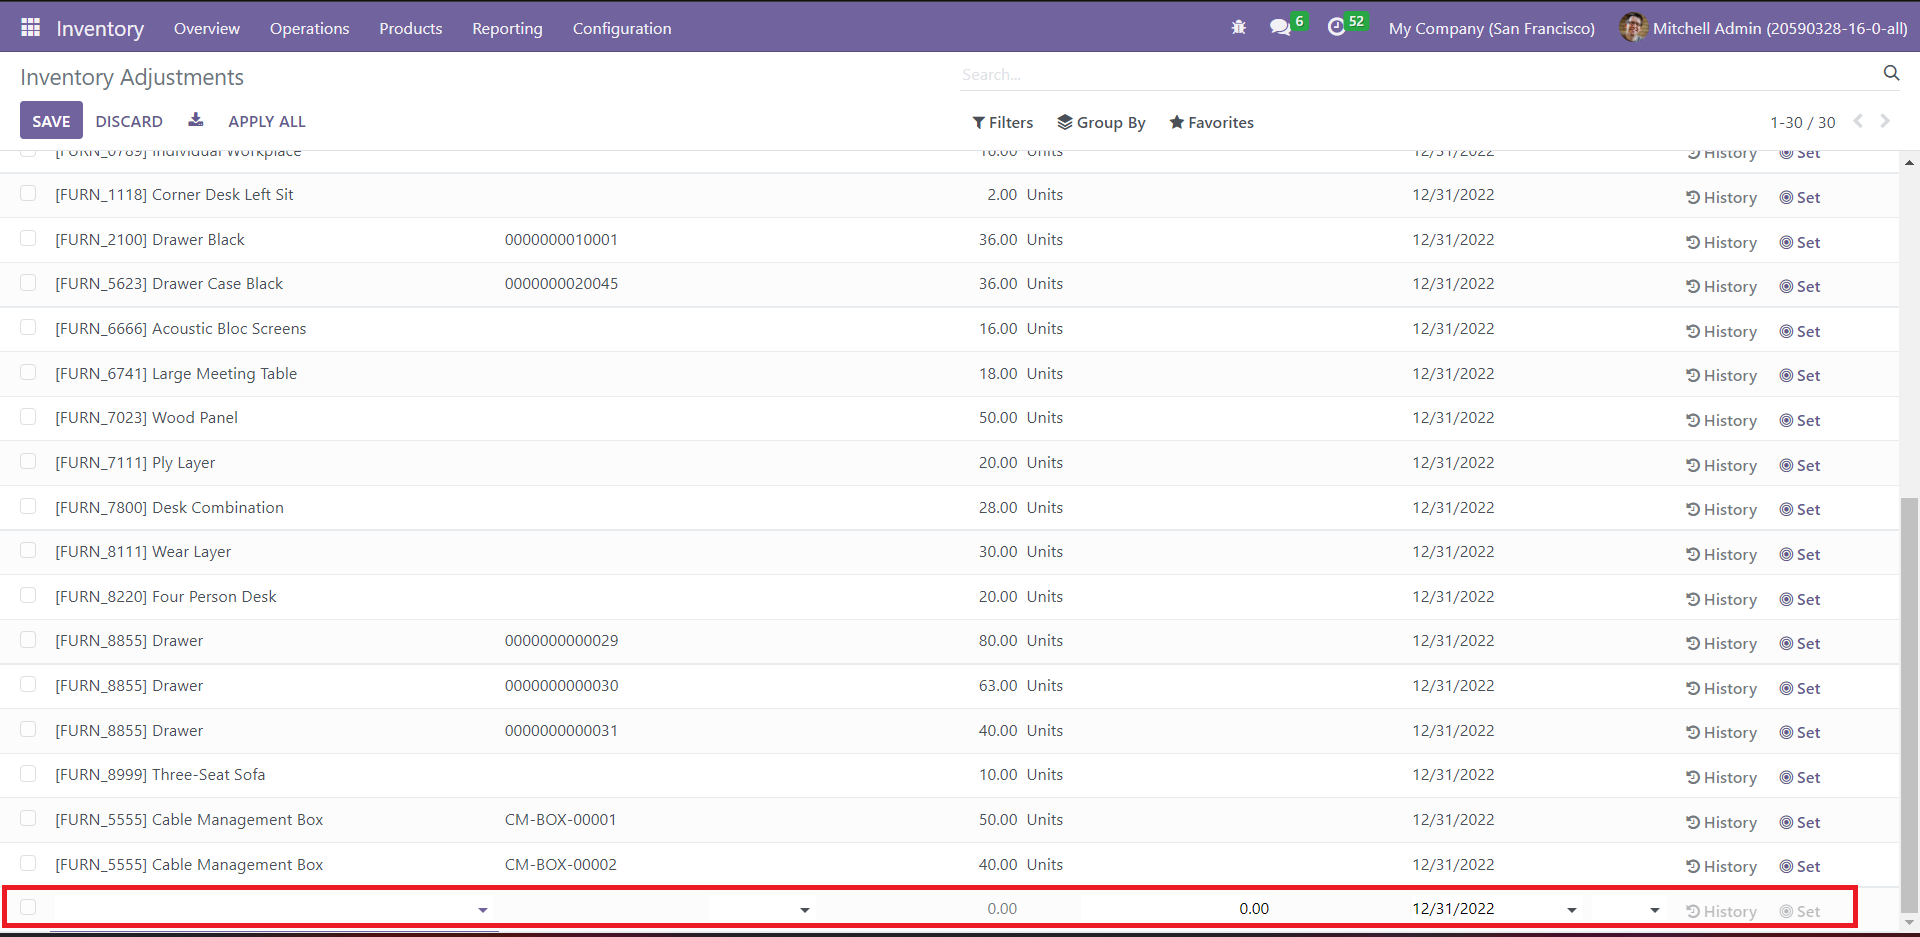
Click on the Create button to add a new Inventory Adjustment operation. You will get a line below the existing list to mention the necessary details.
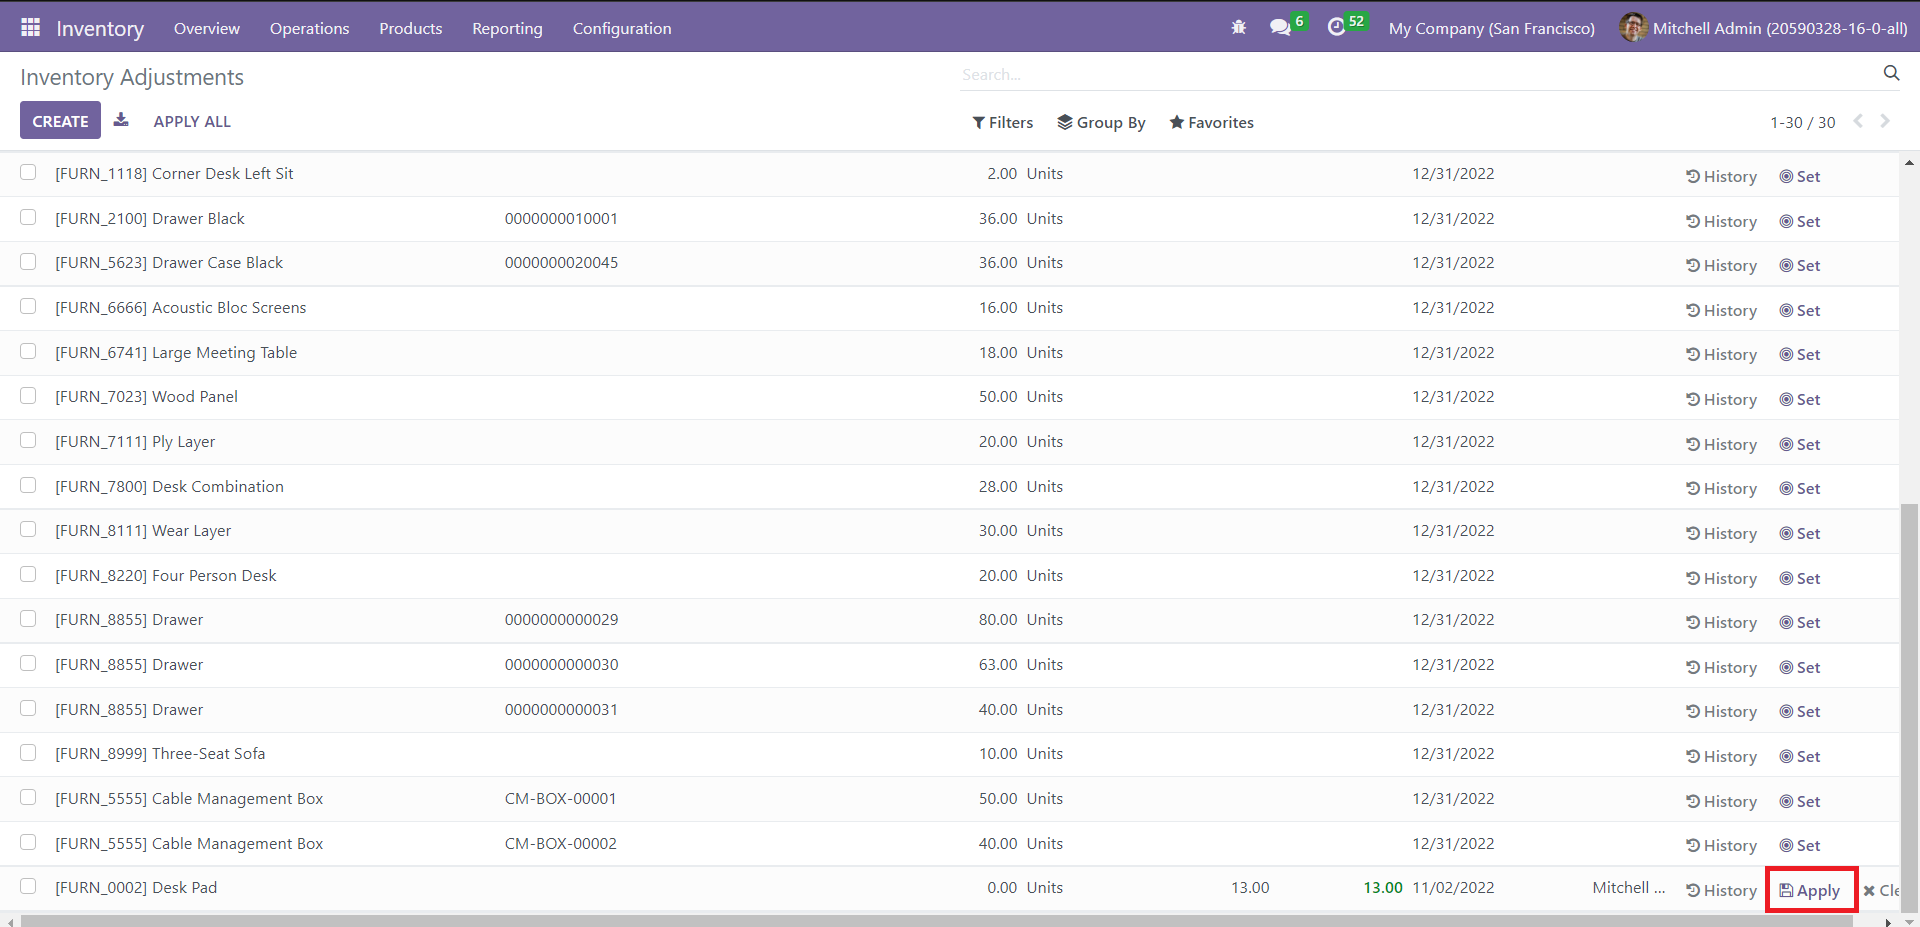
Indicate ‘Counted Quantity,’ and the corresponding ‘Difference’ field will be automatically filled. You can apply this new adjustment by clicking on ‘Apply,’ as shown below.
To view the details of the inventory adjustments done on a particular product, click on the History icon corresponding to that item. A model of the Inventory Adjustments History window is shown below.
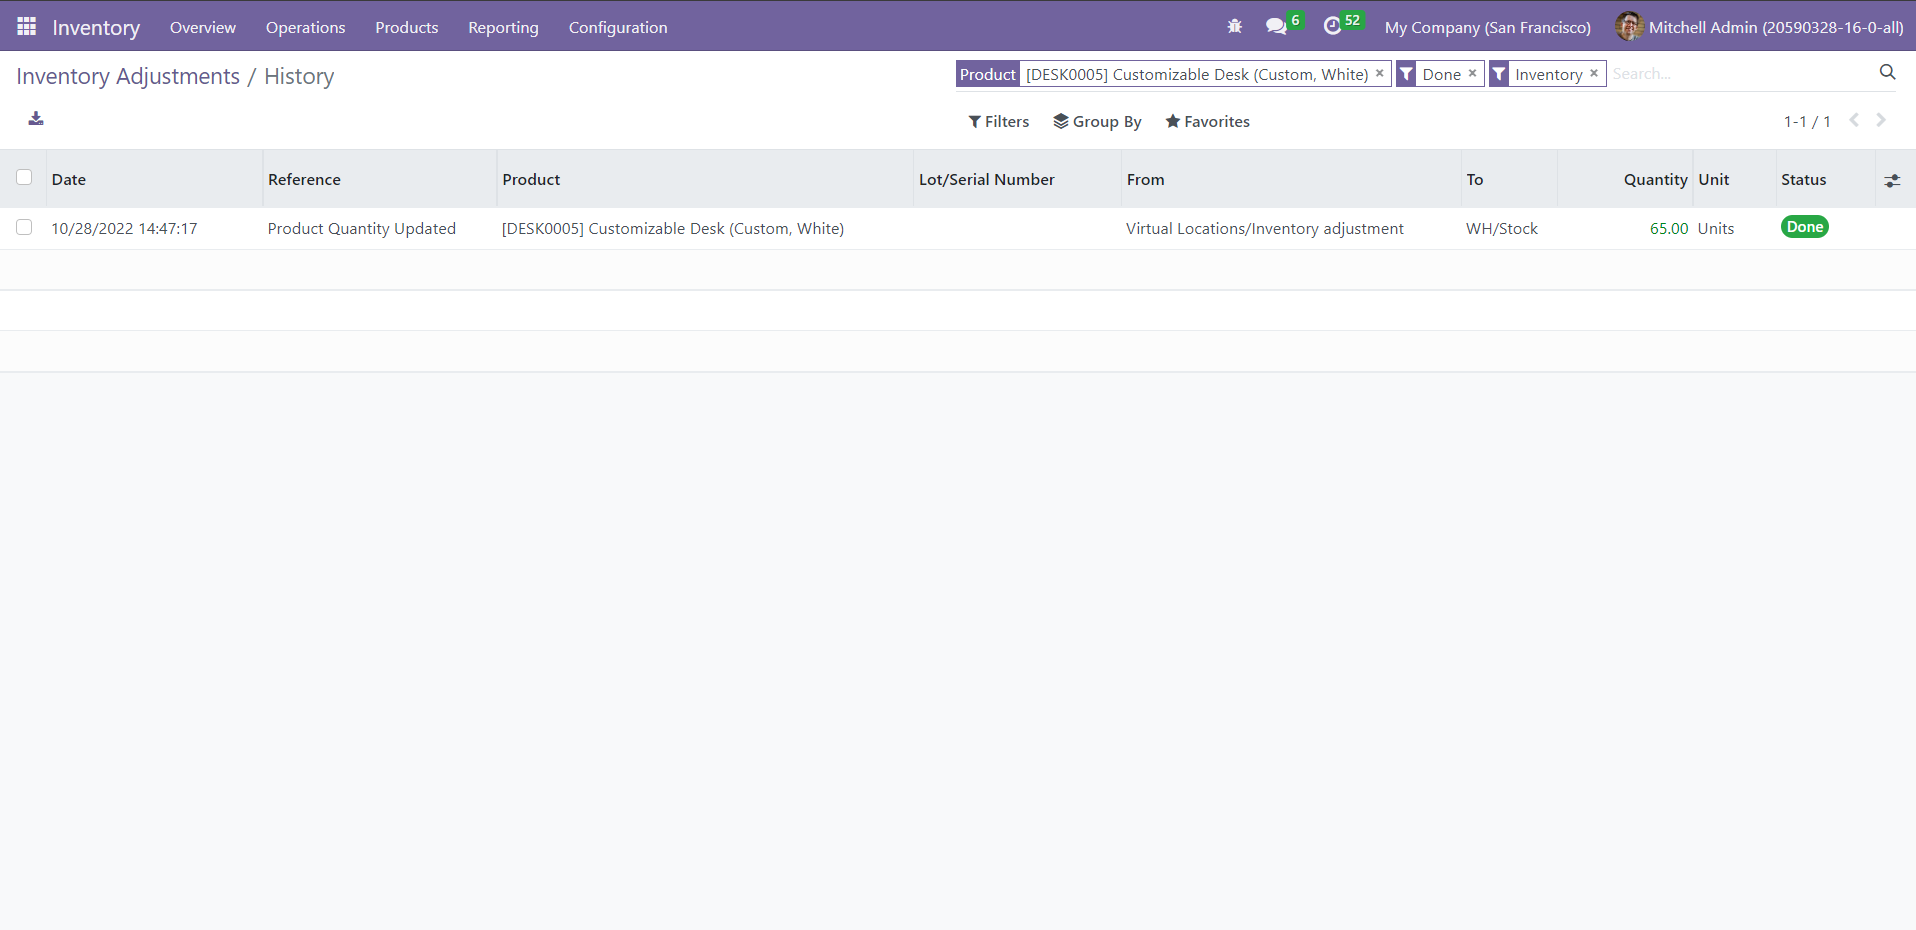
To reset the recent stock update on any product, click on the Set icon associated with it
The Odoo 16 Inventory module allows you to plan the day and month of annual inventory counts. Go to ‘Settings’ from the Configuration tab to adjust this timing. Under the Operations section, you can see ‘Annual Inventory Day and Month.’
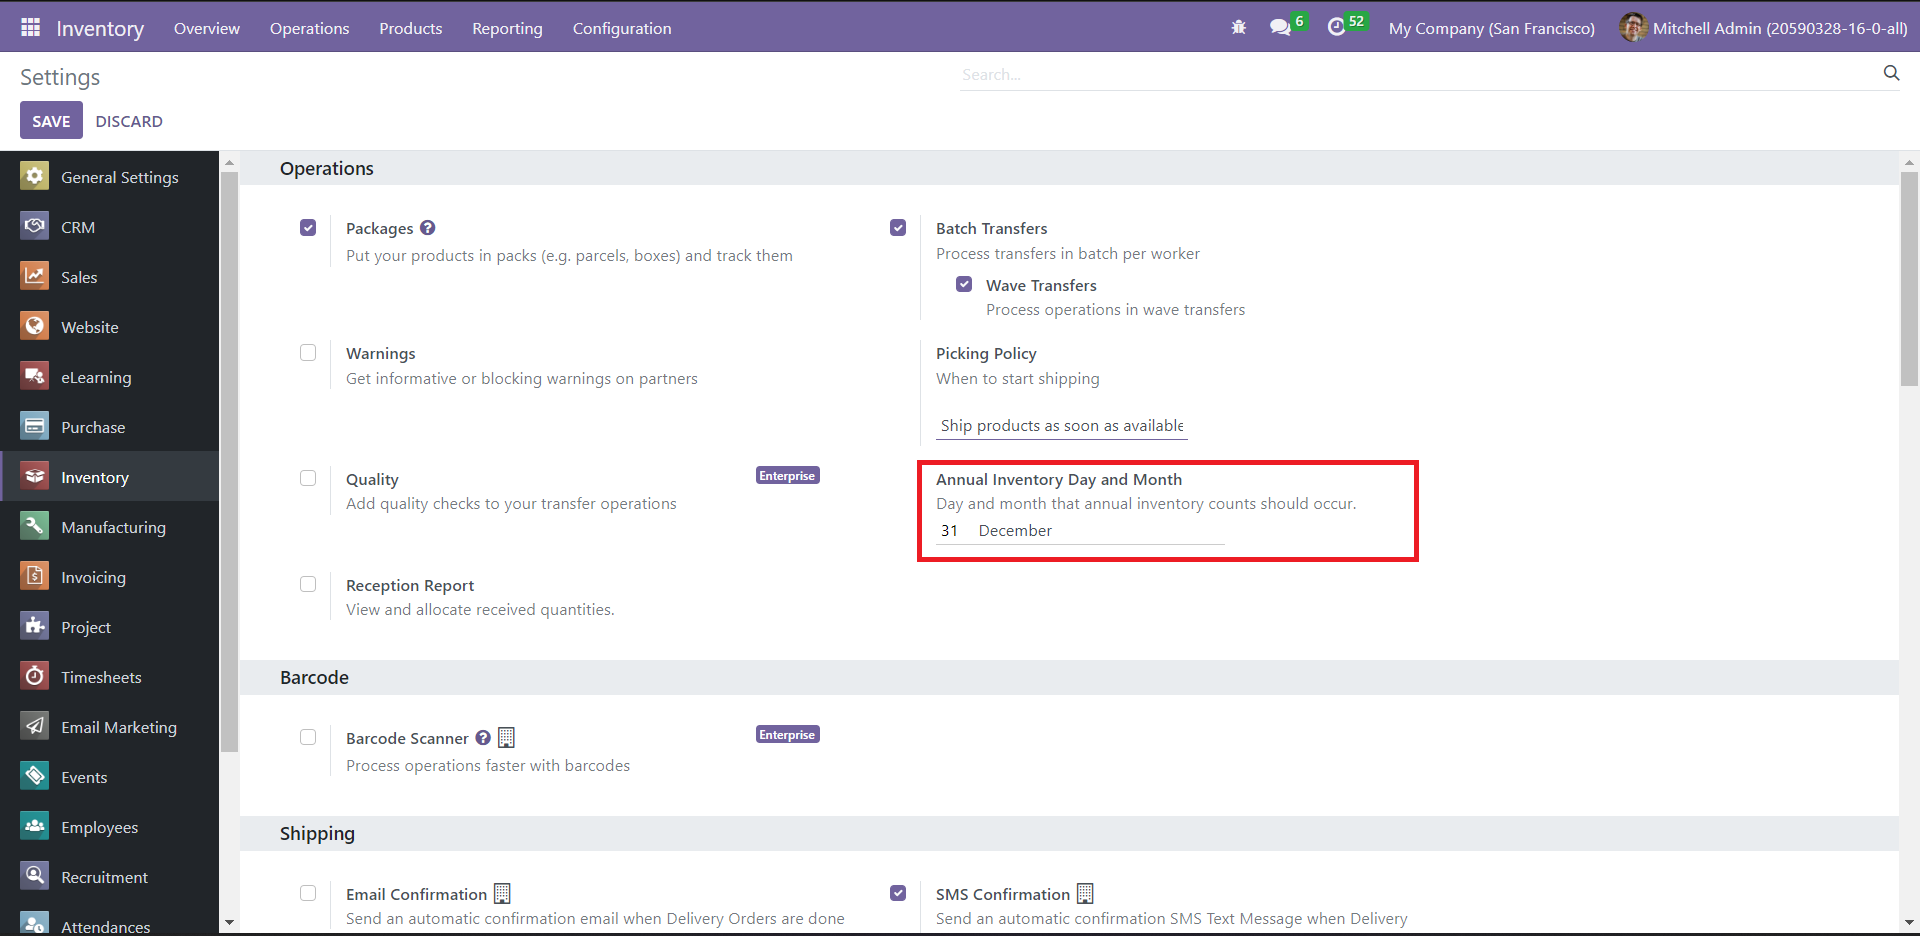
The system will automatically choose the month’s first day as the count day if the count is negative or zero. If it exceeds the month’s last day, the system will select the last day of the month.
Update Quantity
You can quickly update a particular product quantity from the Products window itself. For this feature, click on ‘Products’ from the Products tab. Click on any product preview to view its form view.

The Update Quantity button will lead you to a window where you can enter the quantity of the product available in the warehouse.
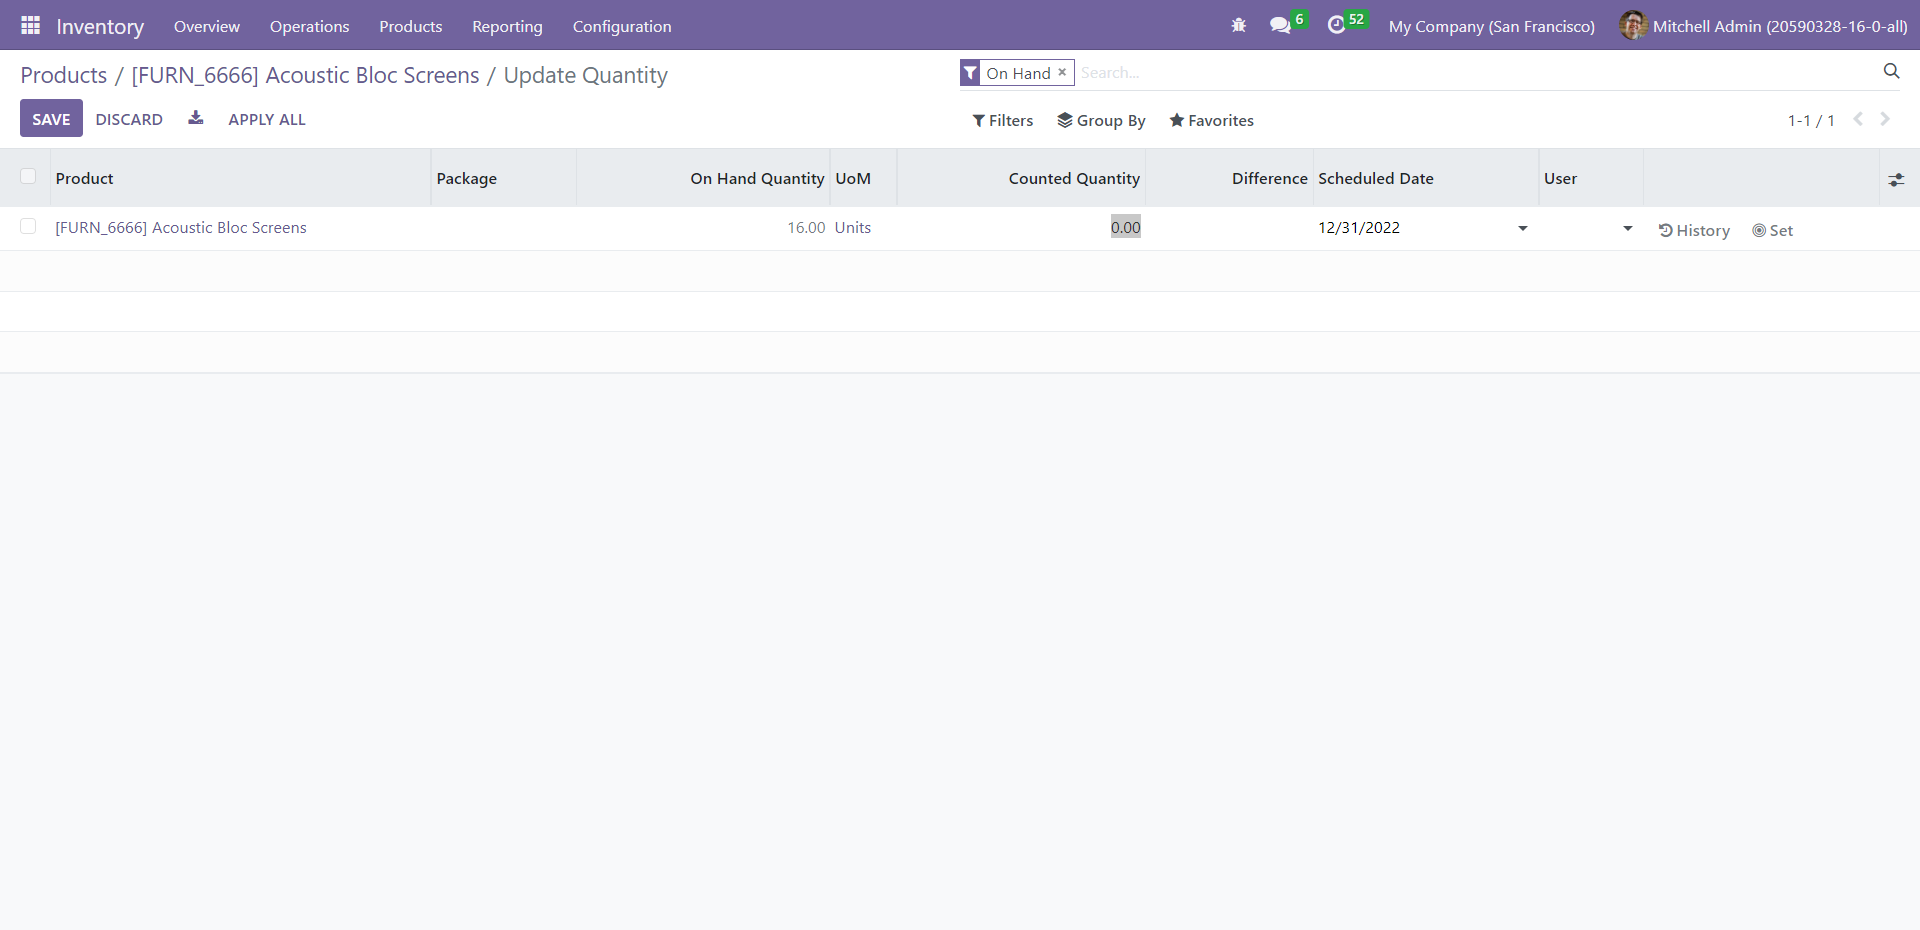
In this window, state ‘Counted Quantity,’ after which you will get the difference between the counted and on-hand quantities in the Difference field. After adding the required data, click on ‘Save.’
Scrap Management
Every business indubitably generates scrap, which is waste with little to no economic value. Odoo has a well-facilitated platform for scrap management. Adding a product to scrap will remove it from the company’s stock. It is essential to remove damaged or expired products from the stock as soon as possible. You can later use the reusable parts of the scrap for recycling operations. You can store the scrap in a scrap location. In the storage location in Odoo, you can assign a location for scrap.
Let’s look at how to create a location for scrap to ensure effective scrap management using Odoo. Odoo helps you to manage scrap locations in your storage. We discussed the configuration of storage locations in the Odoo Inventory module earlier. You can follow the same method to configure a location for scrap also. Go to the Locations menu available under the Configuration menu.
You can click the New button to create a new location for scrap.
Mentioned the location name as Scrap Location in the specified field. You can follow the same steps just like we mentioned in the Location configuration section earlier. Now, activate the Is a Scarp Location field to consider this location as a scrap location. This will record the location as a scrap location. You can create more scrap locations like this by following the same method.
Now, let’s check how to manage scrap in Odoo and add products to the scrap location. Click on ‘Scrap’ under the Operations tab. You will get the Scrap Orders window, as shown below.
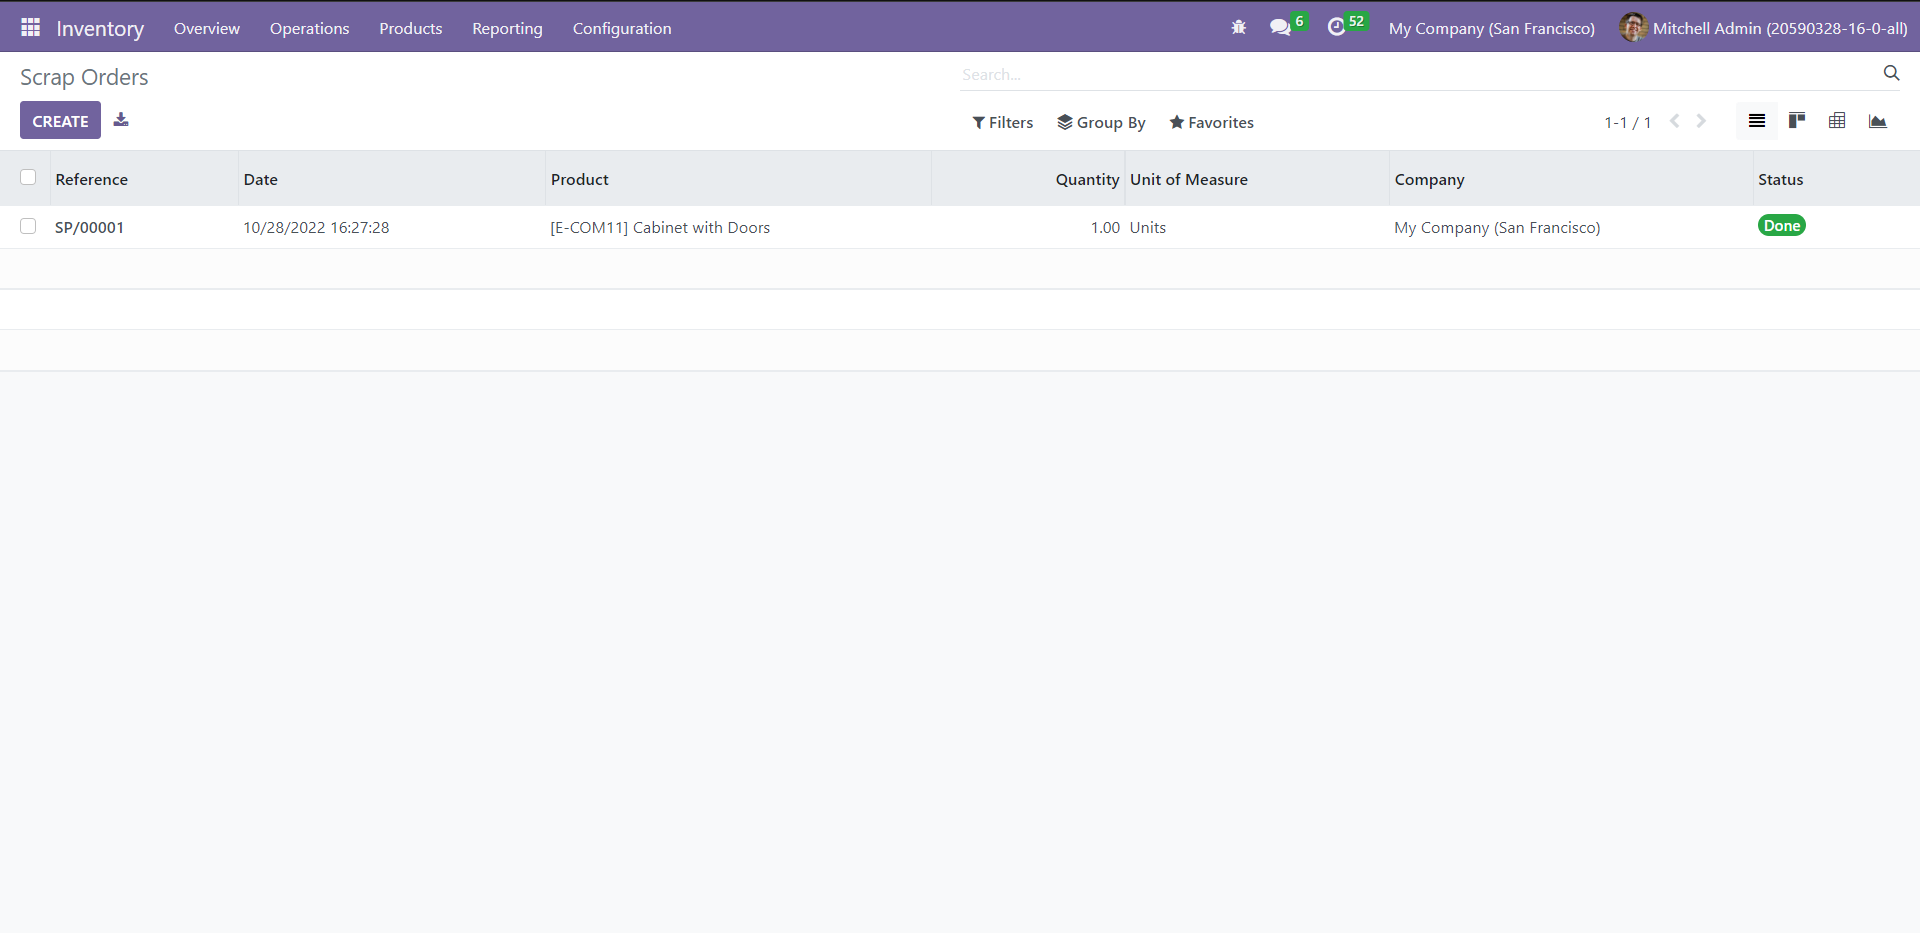
This window displays the scrap order’s Reference, Date, Product (name), Quantity, Unit of Measure, Company, and Status. Click on the Create button to add a new scrap order.
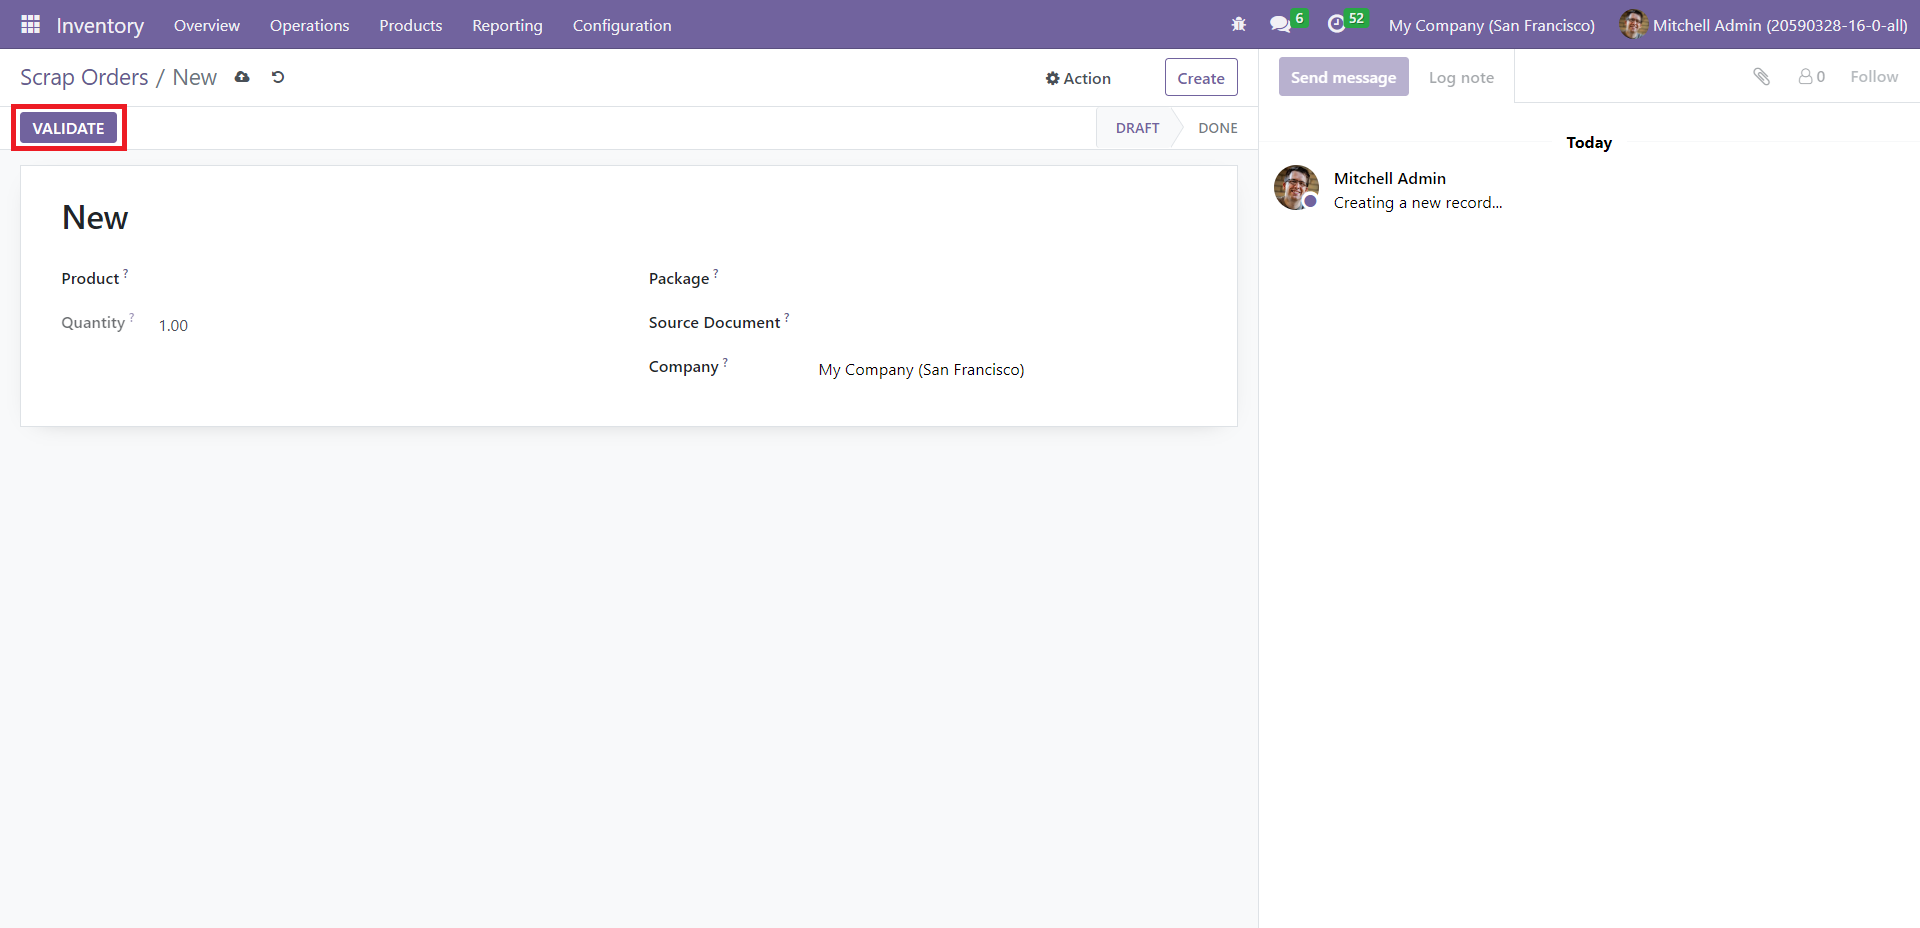
Select the product's name from the dropdown list of ‘Product.’ Define the fields like Quantity, Package, Source Document, and Company. After adding this info, click on ‘Validate.’
Odoo helps you create scrap orders from Inventory’s different operations like Internal Transfers, Manufacturing, Receipts, etc. The model of a validated Receipt is shown below.
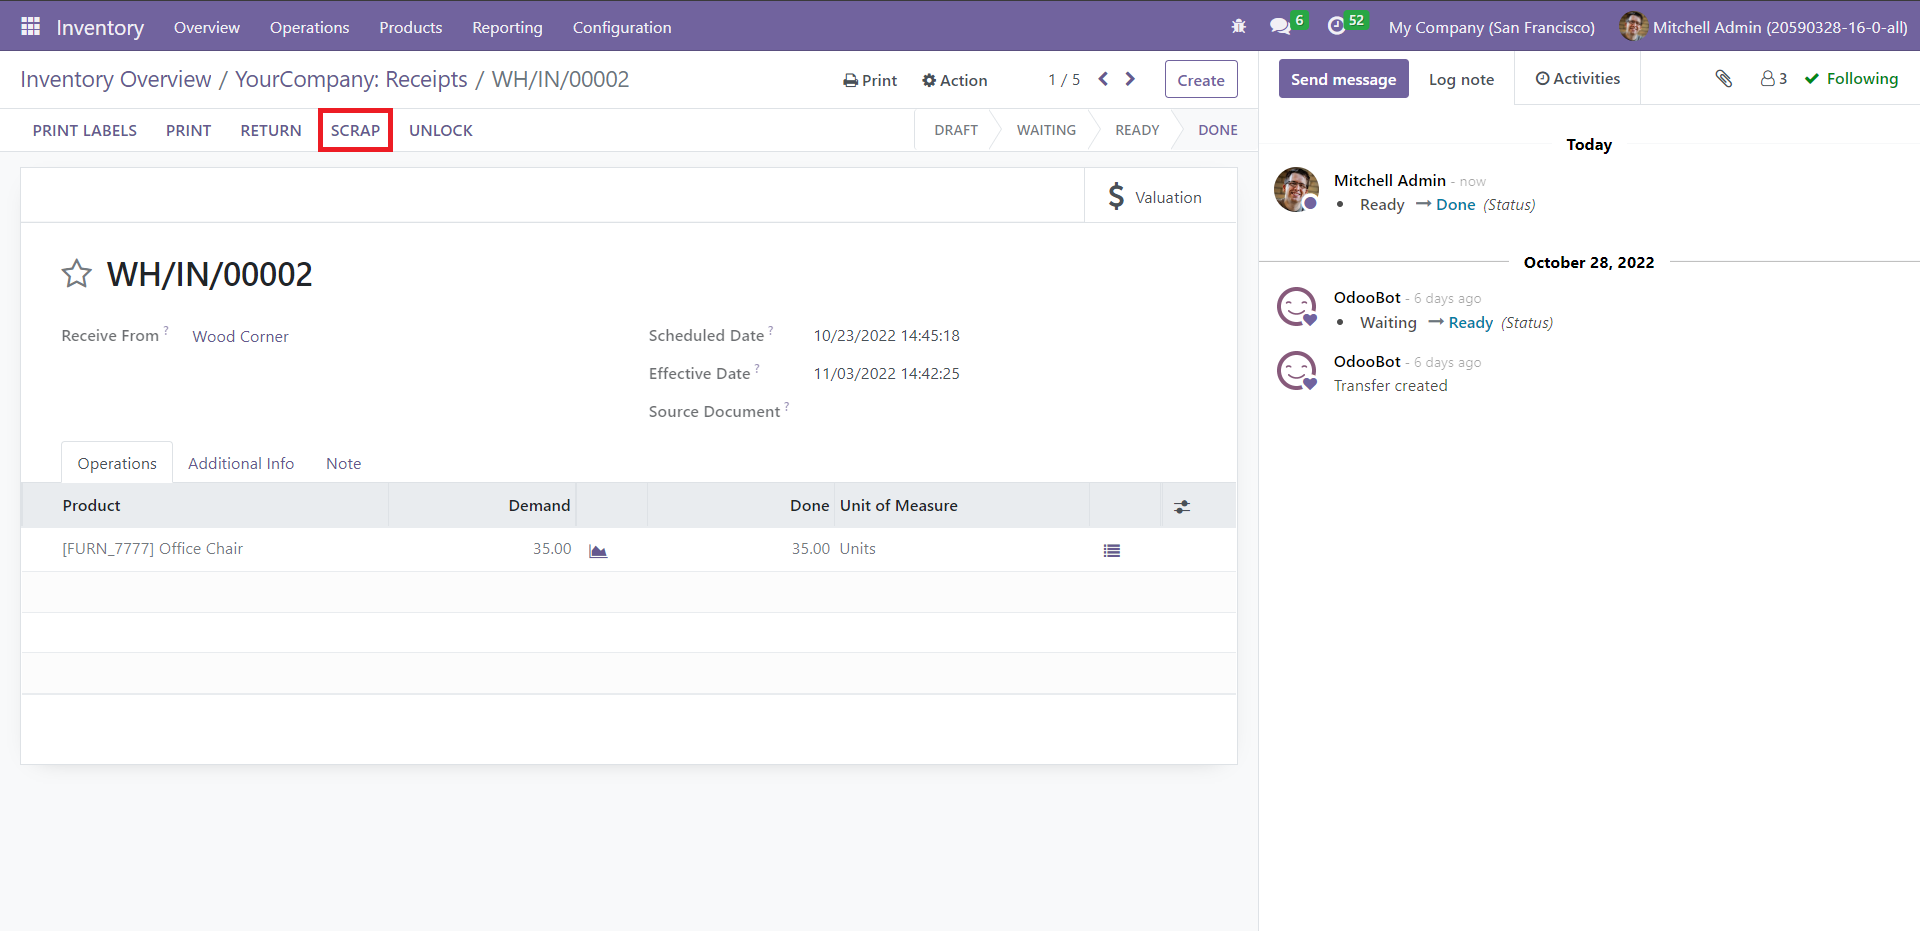
Click the Scrap button to remove this product from the company stock to the scrap area.
Landed Costs
The landed cost of a product is the total price you charge the buyer after considering all the related expenses, which include the product’s cost, shipping cost, delivery charges, etc. This cost determines the original selling price of the product. Since the Landed Cost of a product fluctuates depending on the company policies and operations, two companies might not have the same Landed Cost for the same product.
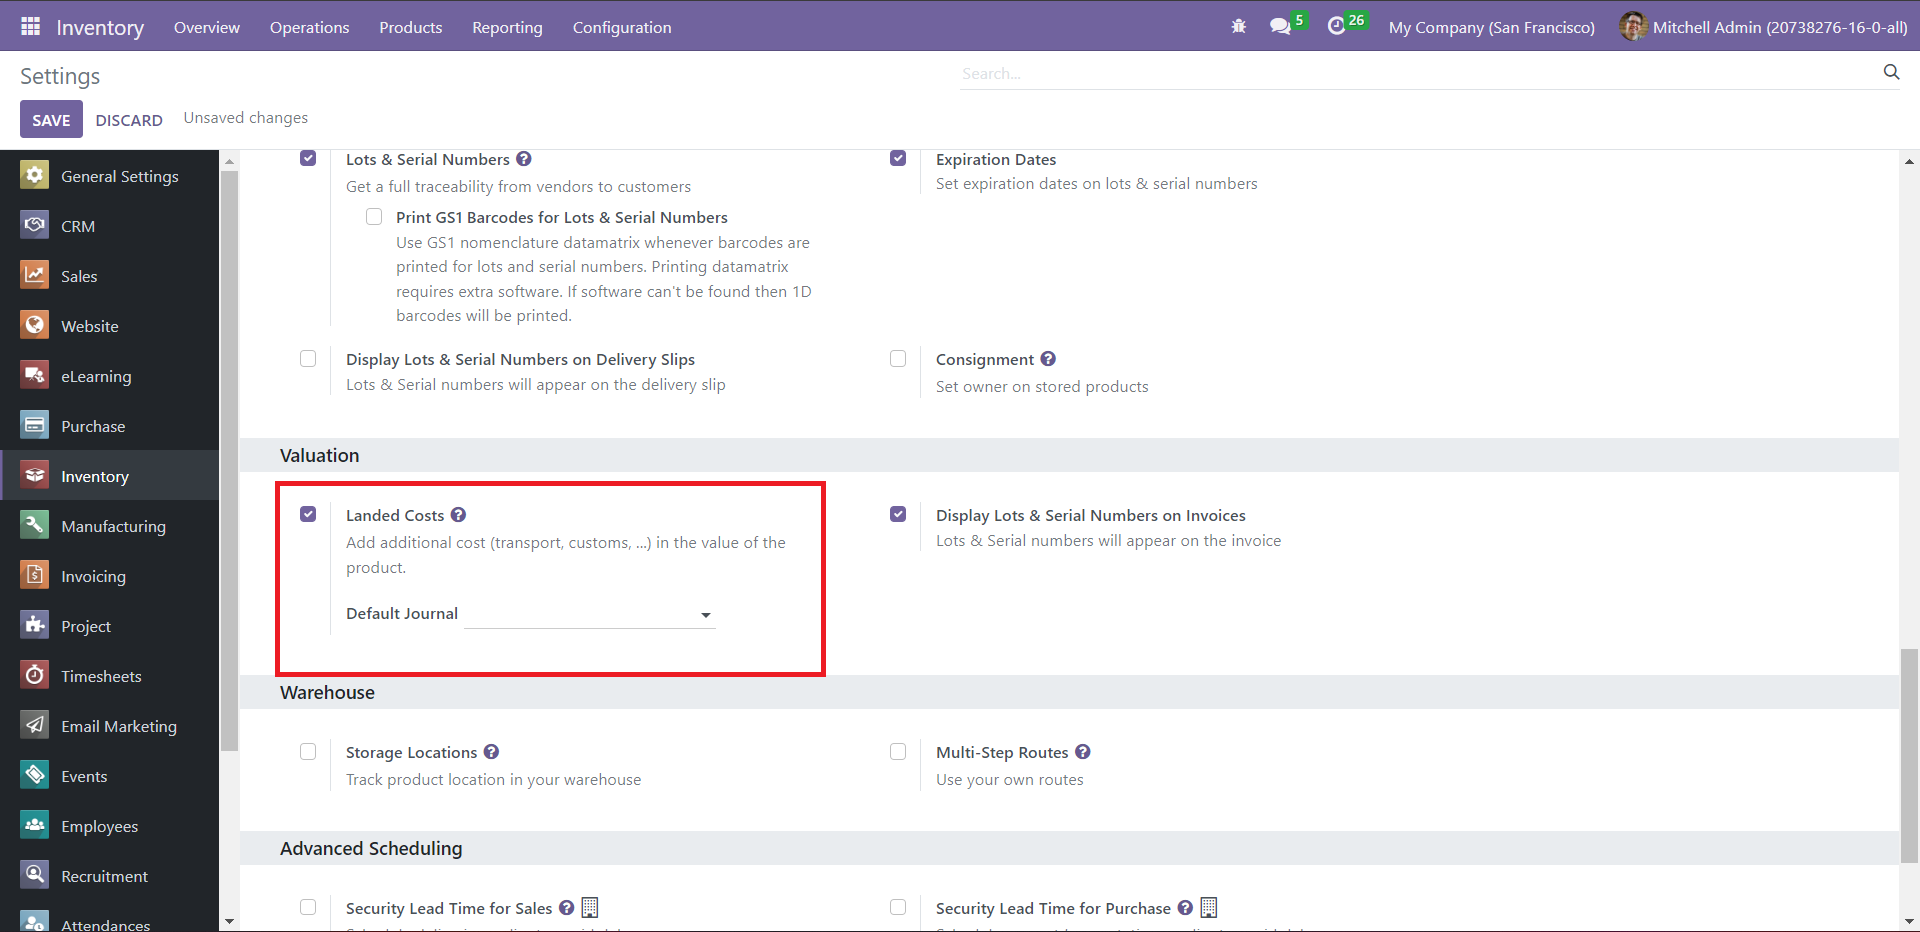
You can activate ‘Landed Costs’ under the Valuation section in the Settings window.
Now, you will get the Landed Costs menu in the dropdown list of the Operations tab. Click on it to view the Landed Costs window.
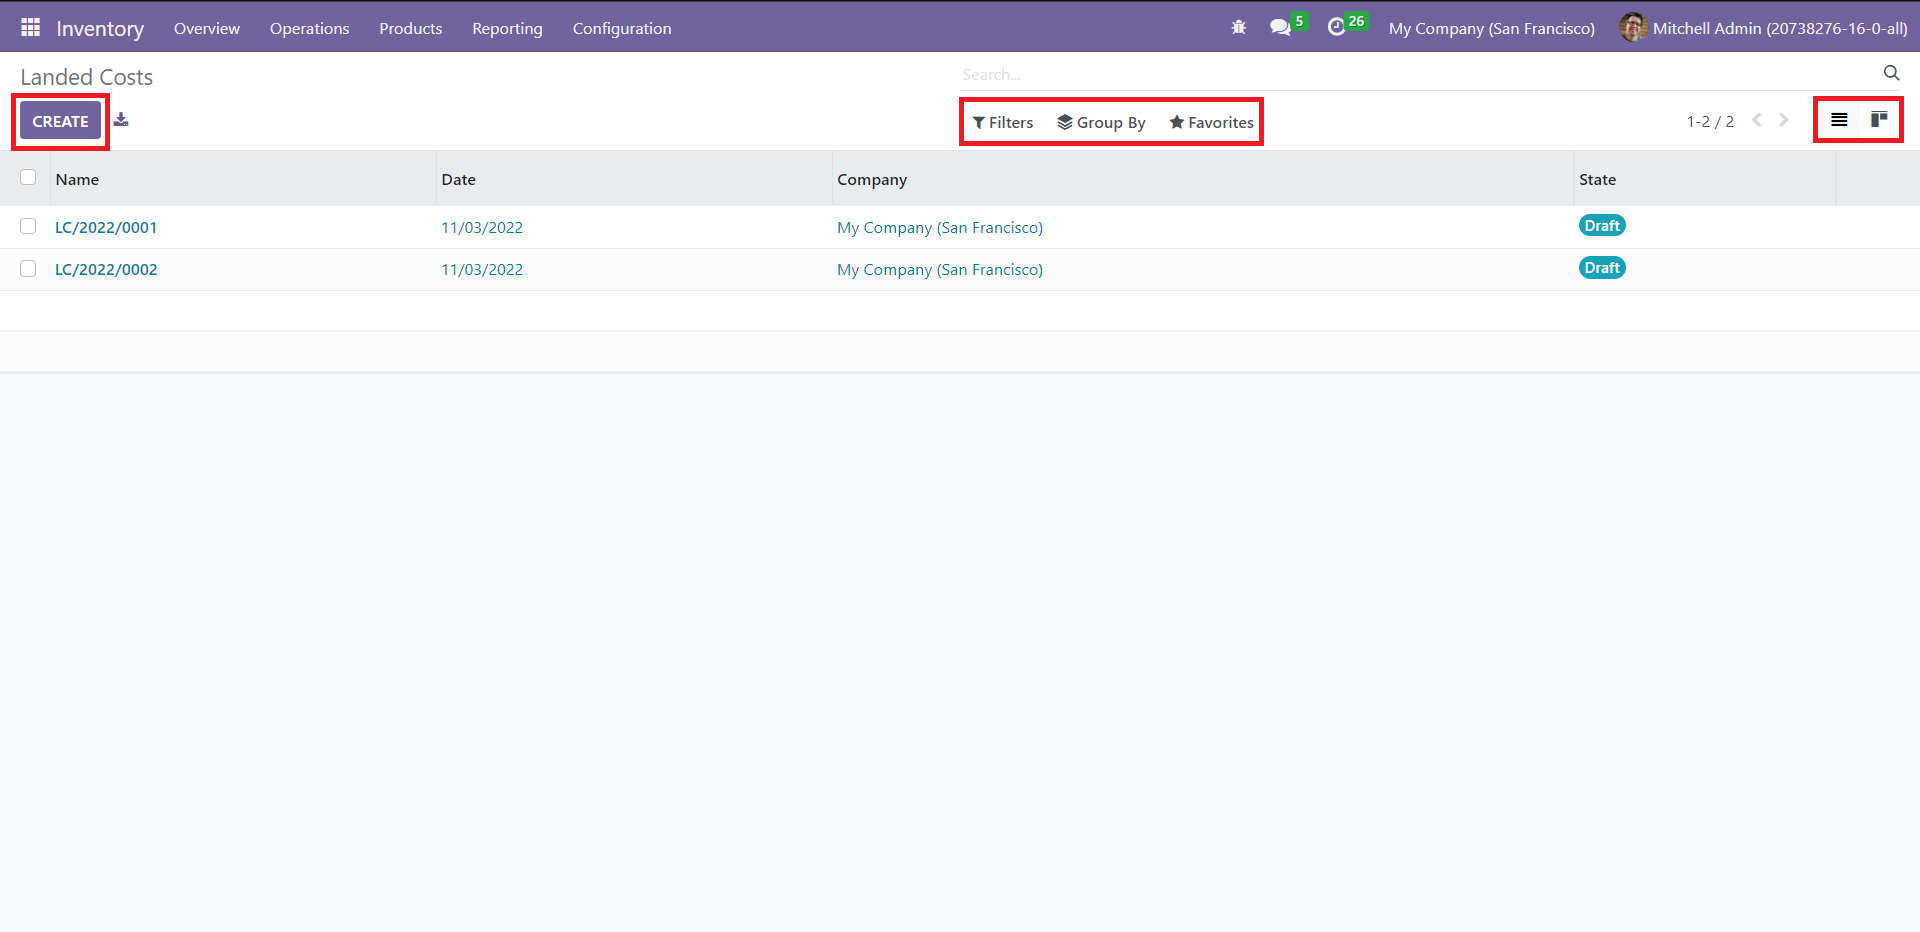
Here, you can see all Landed Costs added to the module. The window displays all the details in a List view by default, which you can shift to a Kanban view by clicking on the corresponding icons in the window's top right corner. Use the Filters and Group By options to identify, sort, and categorize the records quickly. If you have a most used filter or criteria, add it to ‘Favorites.’
Before creating a new Landed Cost, go to ‘Product Categories’ from the Configuration tab. Select any category from the list that appears.
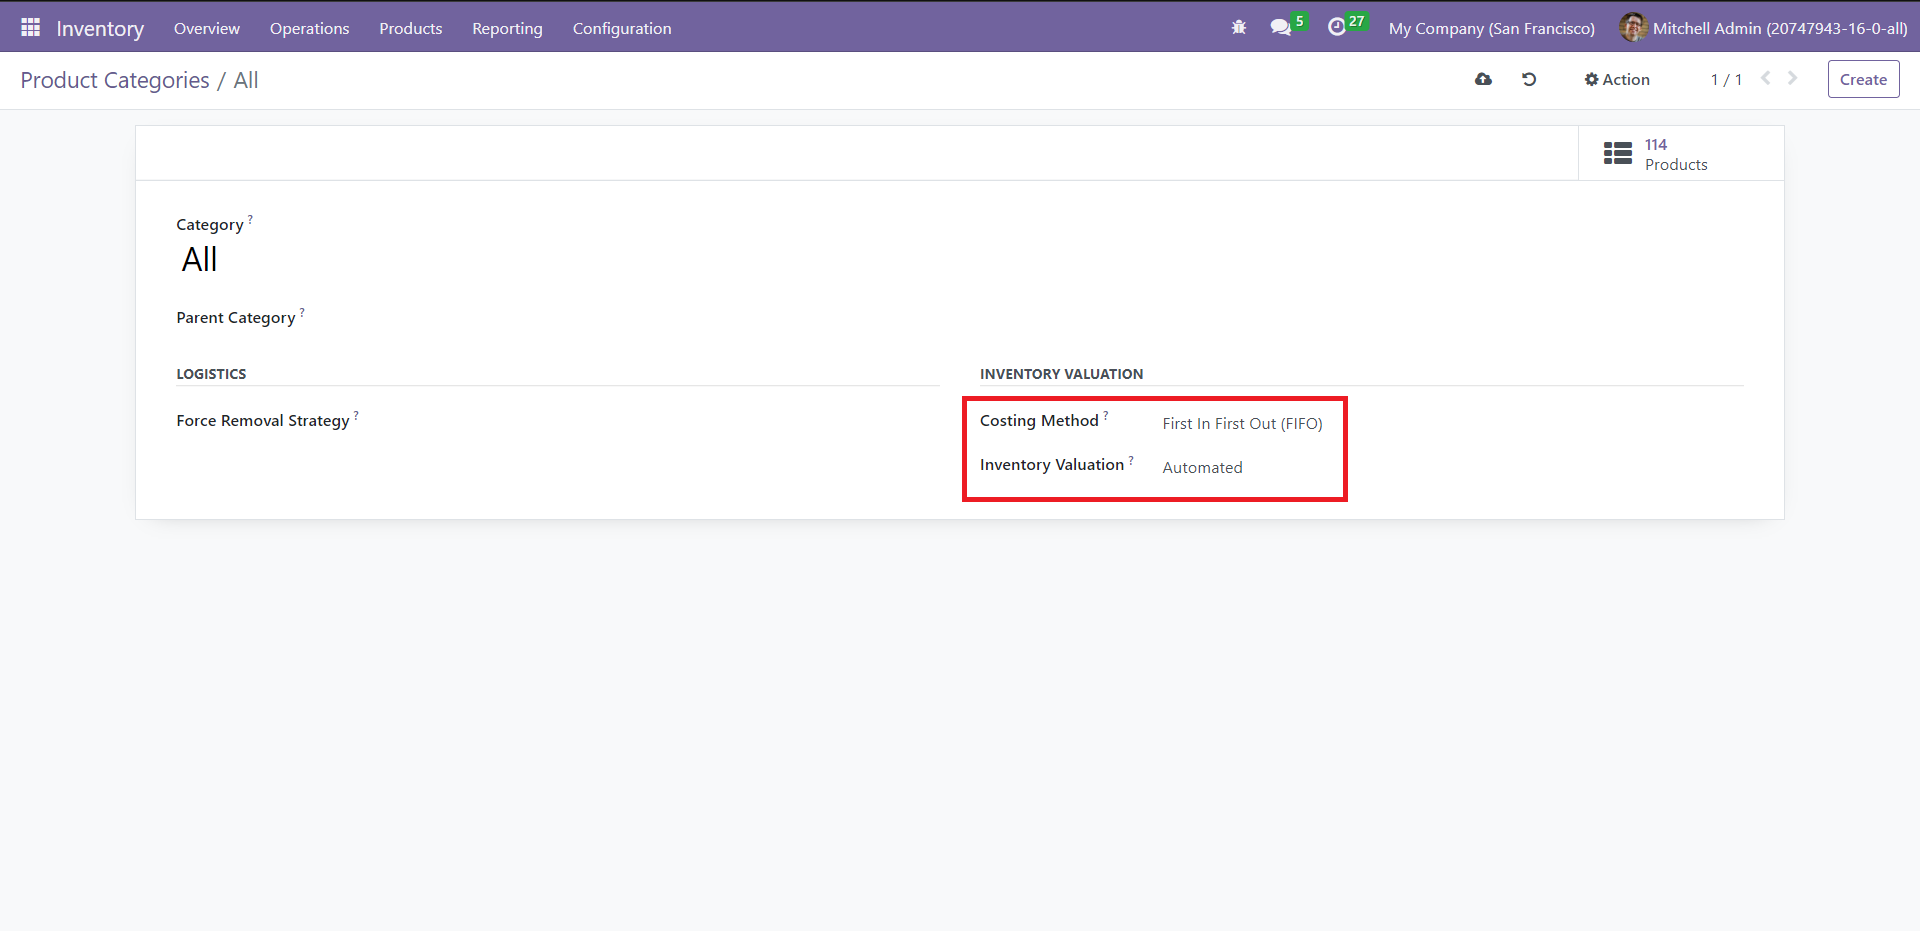
Set ‘Costing Method’ as ‘Standard Price,’ ‘First In First Out (FIFO),’ or ‘Average Cost (AVCO).’ Standard Price allows you to fix an estimated expense as the cost since it is difficult for the manufacturers to predict the actual cost in advance. If the goods produced first are also sold first, choose FIFO as the costing method. Average Costing is where the cost assigned to the products is the cost of all the materials required divided by the total number of items.
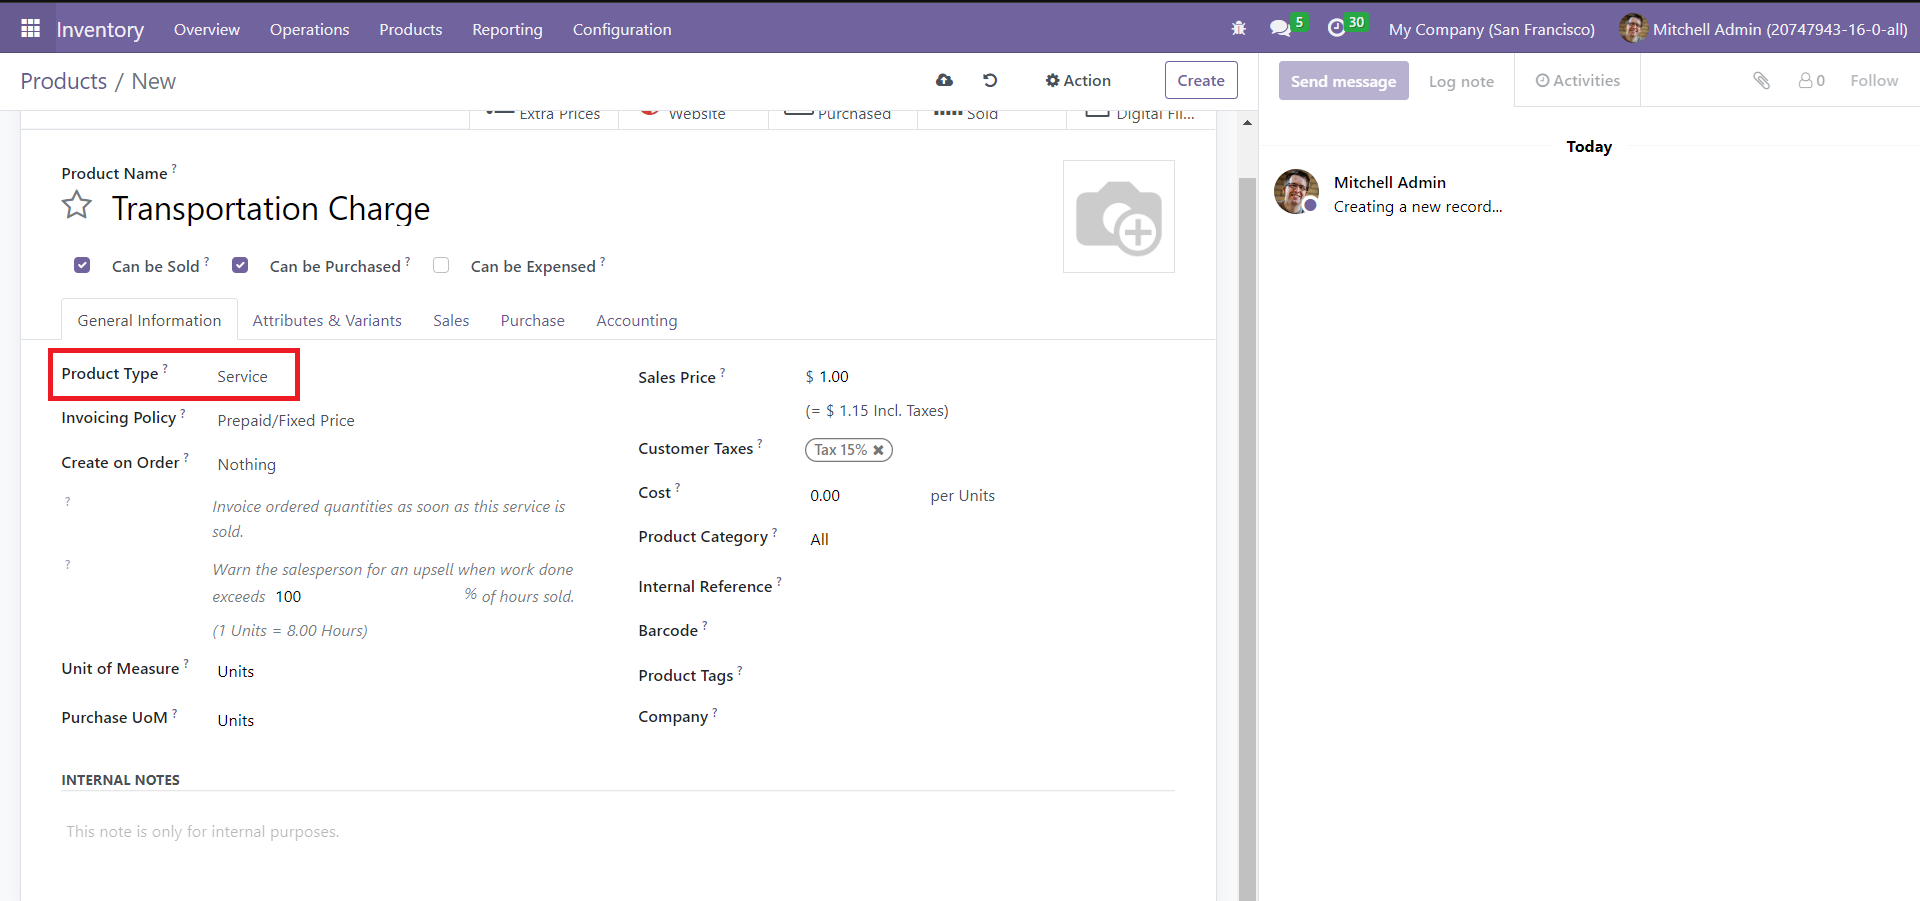
Now, go to the Products window and click on ‘Create’ to get its form view. Set ‘Product Type’ as ‘Service.’ to configure a service defining Landed Costs.
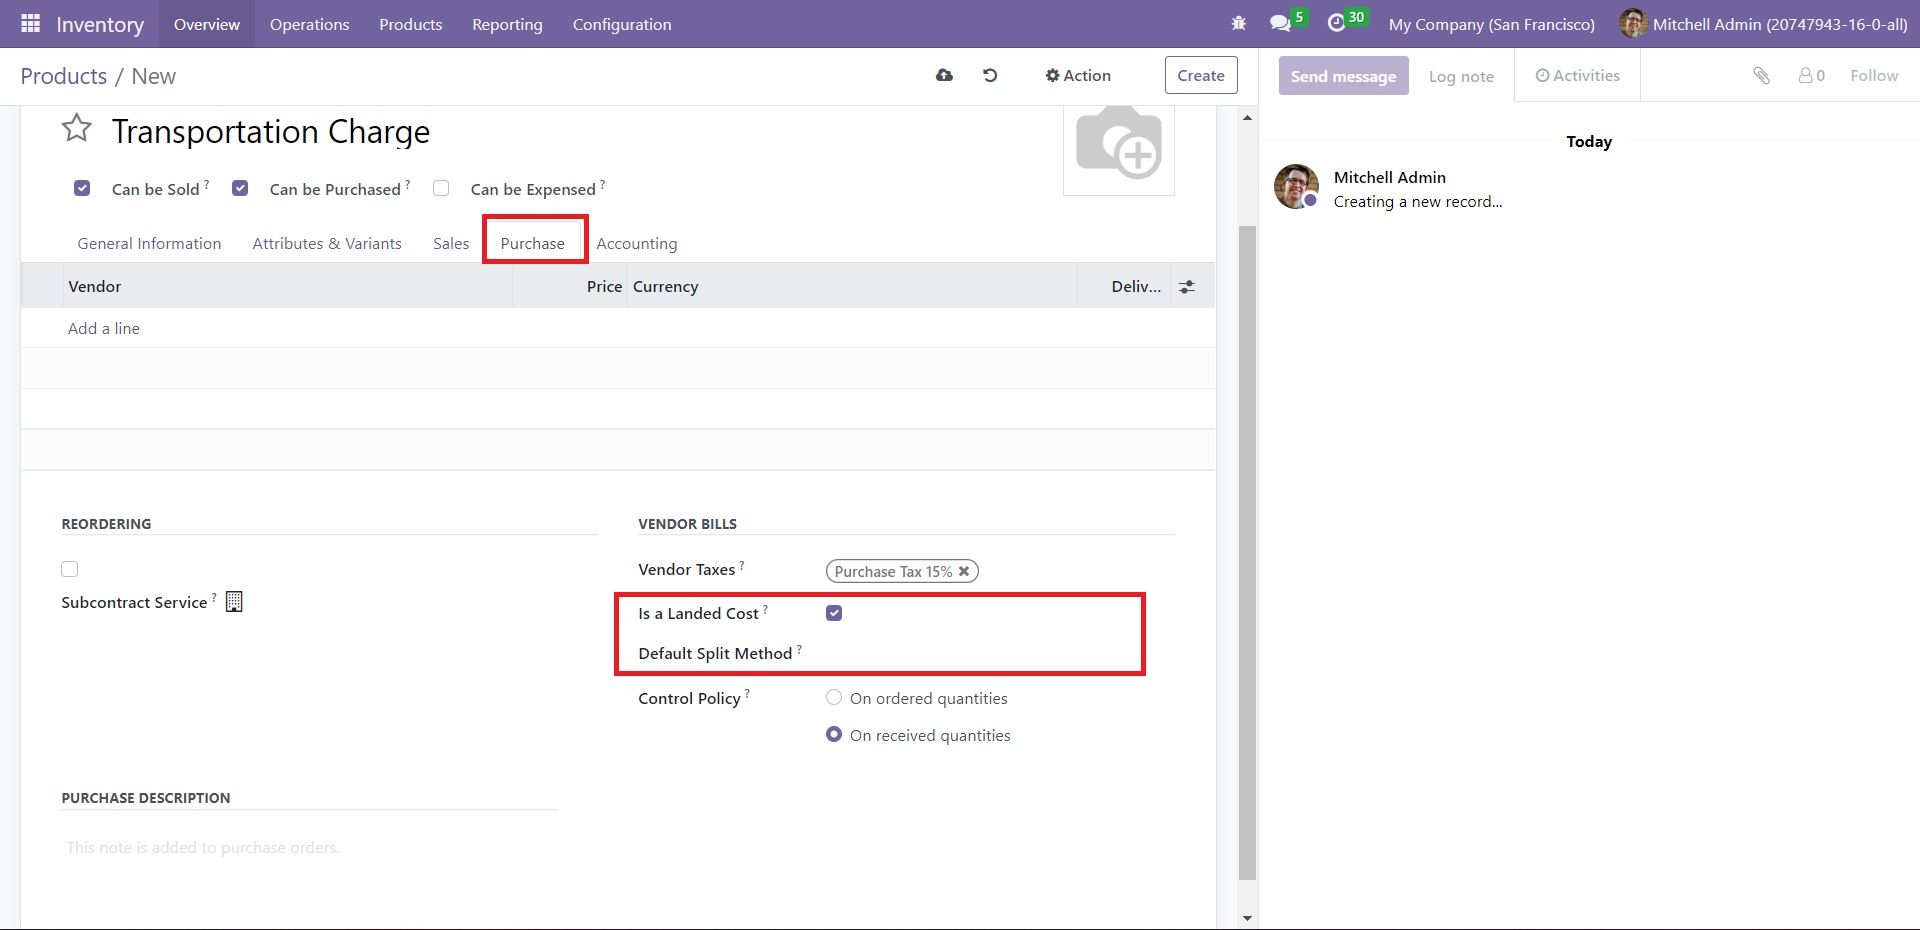
Activate the ‘Is a Landed Cost’ option under the Purchase tab to allocate costing methods to this service. In the Default Split Method field, you can indicate how you want to split the cost.
To create a new Landed Cost, click on the Create button in the Landed Costs window.
Specify the fields like Date, Transfers, Journal, Company, and Vendor Bill. The ‘Apply On’ attribute has two options – Transfers and Manufacturing Orders. It determines the domains in which you want to apply Landed Costs.
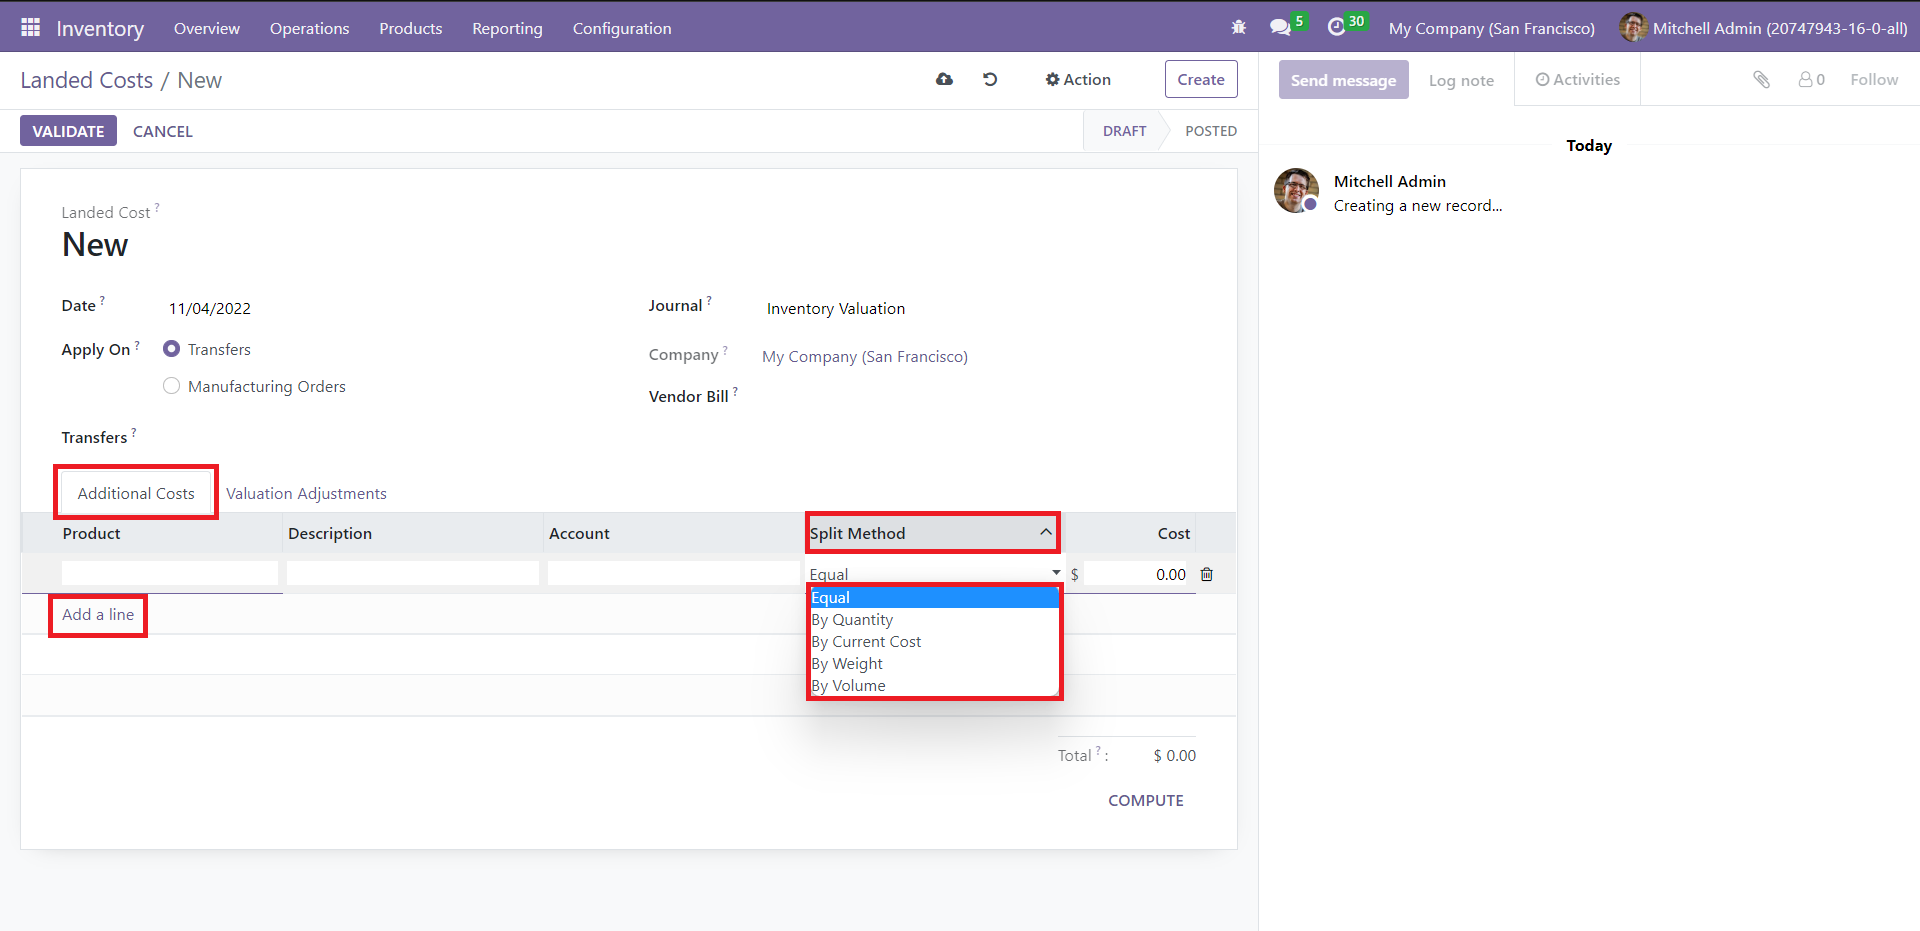
Under ‘Additional Costs,’ click on the Add a Line button. You can select the product from the dropdown list in the Product field. Add the details like Description, Account, Split Method (how Landed Costs are split), and Cost.
When you click ‘Compute,’ you can see different values under the Valuation Adjustments tab.
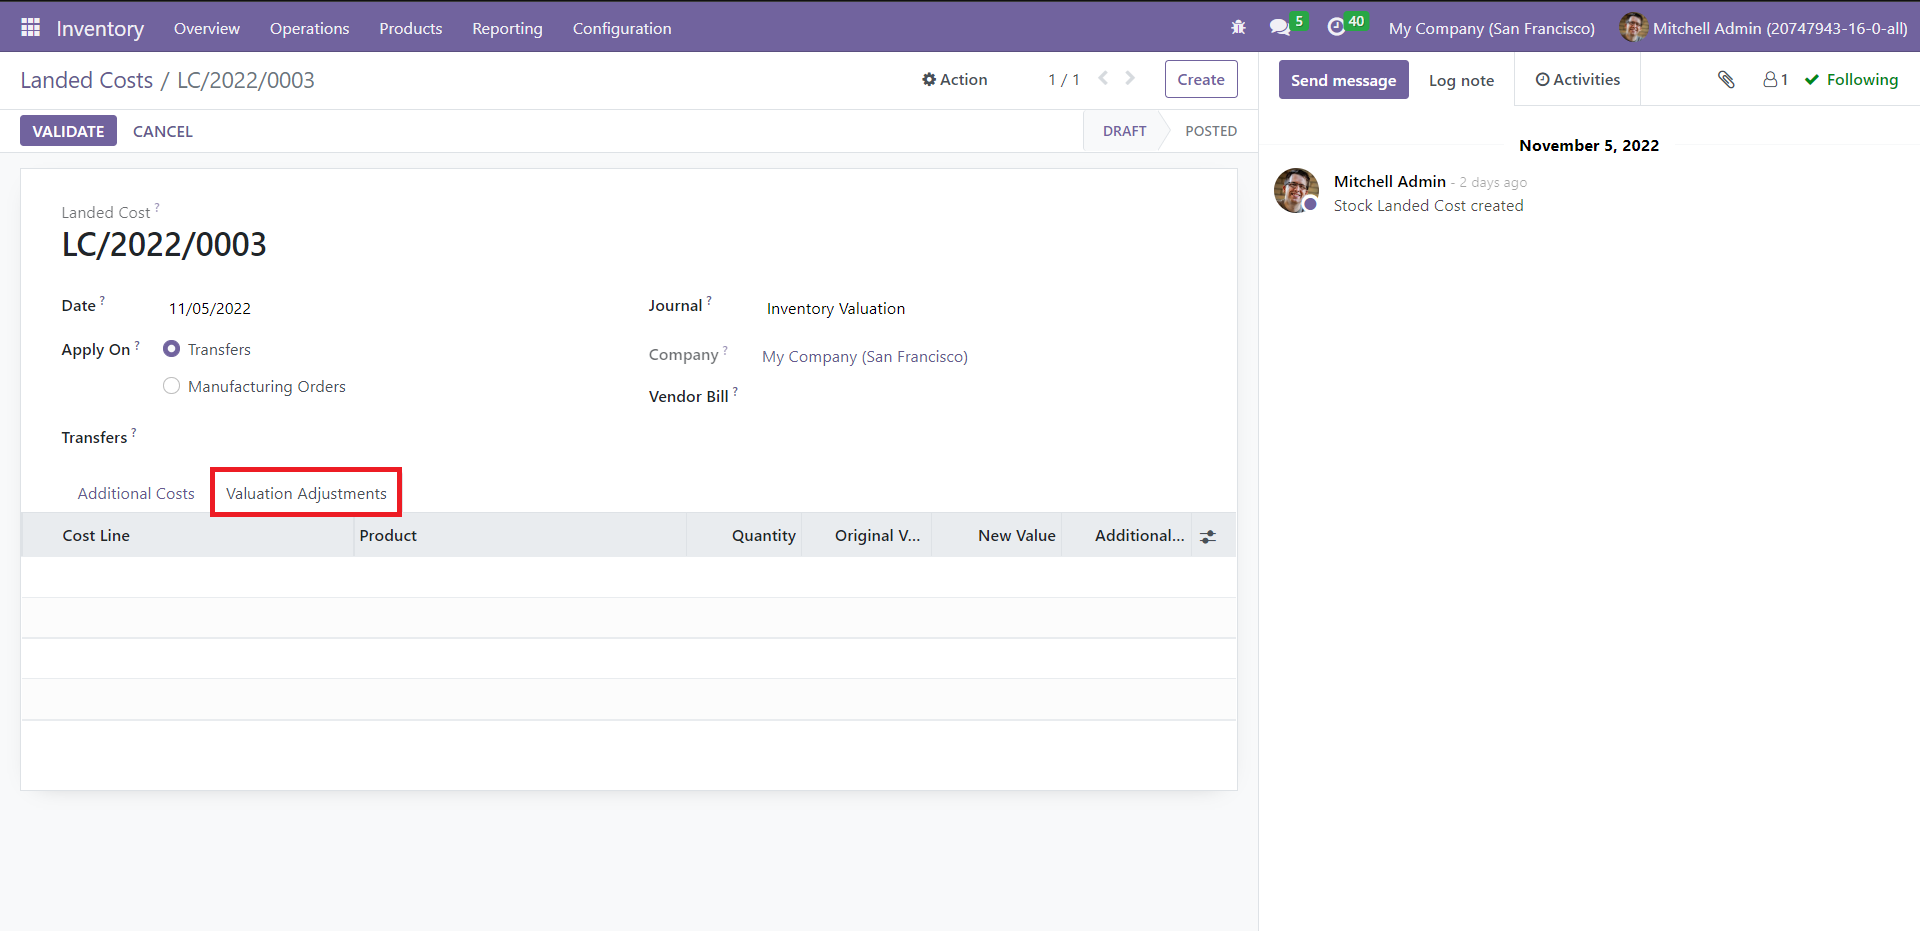
Here, you can see the info like Cost Line, Product (name), Quantity, Original Value, New value, and Additional Landed Cost. Click on ‘validate’ to post the Landed Cost.
Run Scheduler
You can effectively employ the Odoo schedulers to mechanize your firm’s purchasing and manufacturing transactions. The scheduler allows you to customize intervals to trigger these operations automatically or manually. To access this feature, click on ‘Run Scheduler’ from the Operations menu. You will get the following pop-up window.
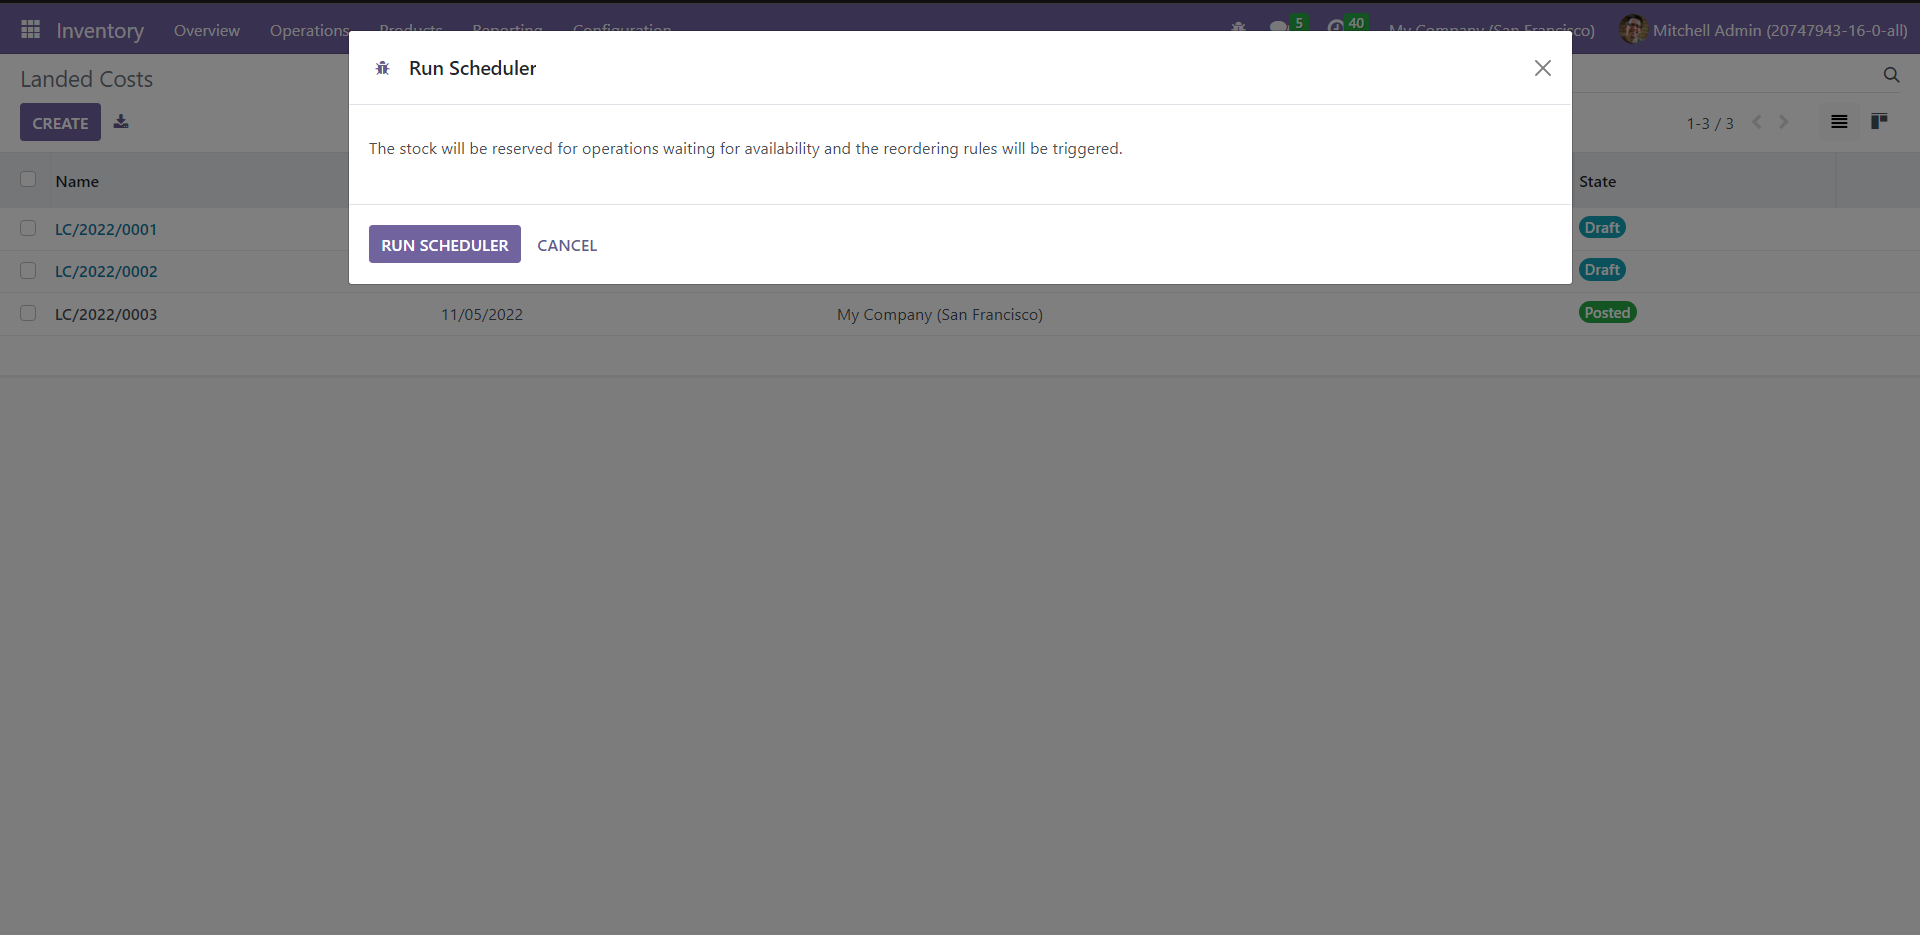
Click on the Run Scheduler button to activate this operation.
Reordering Rules
Setting up Reordering Rules ensures that your company stock is not depleted of the necessary goods. You can automatically restock the products if you create a new sales order or encounter an empty reserve.
Click on ‘Reordering Rules’ from the Configuration tab.
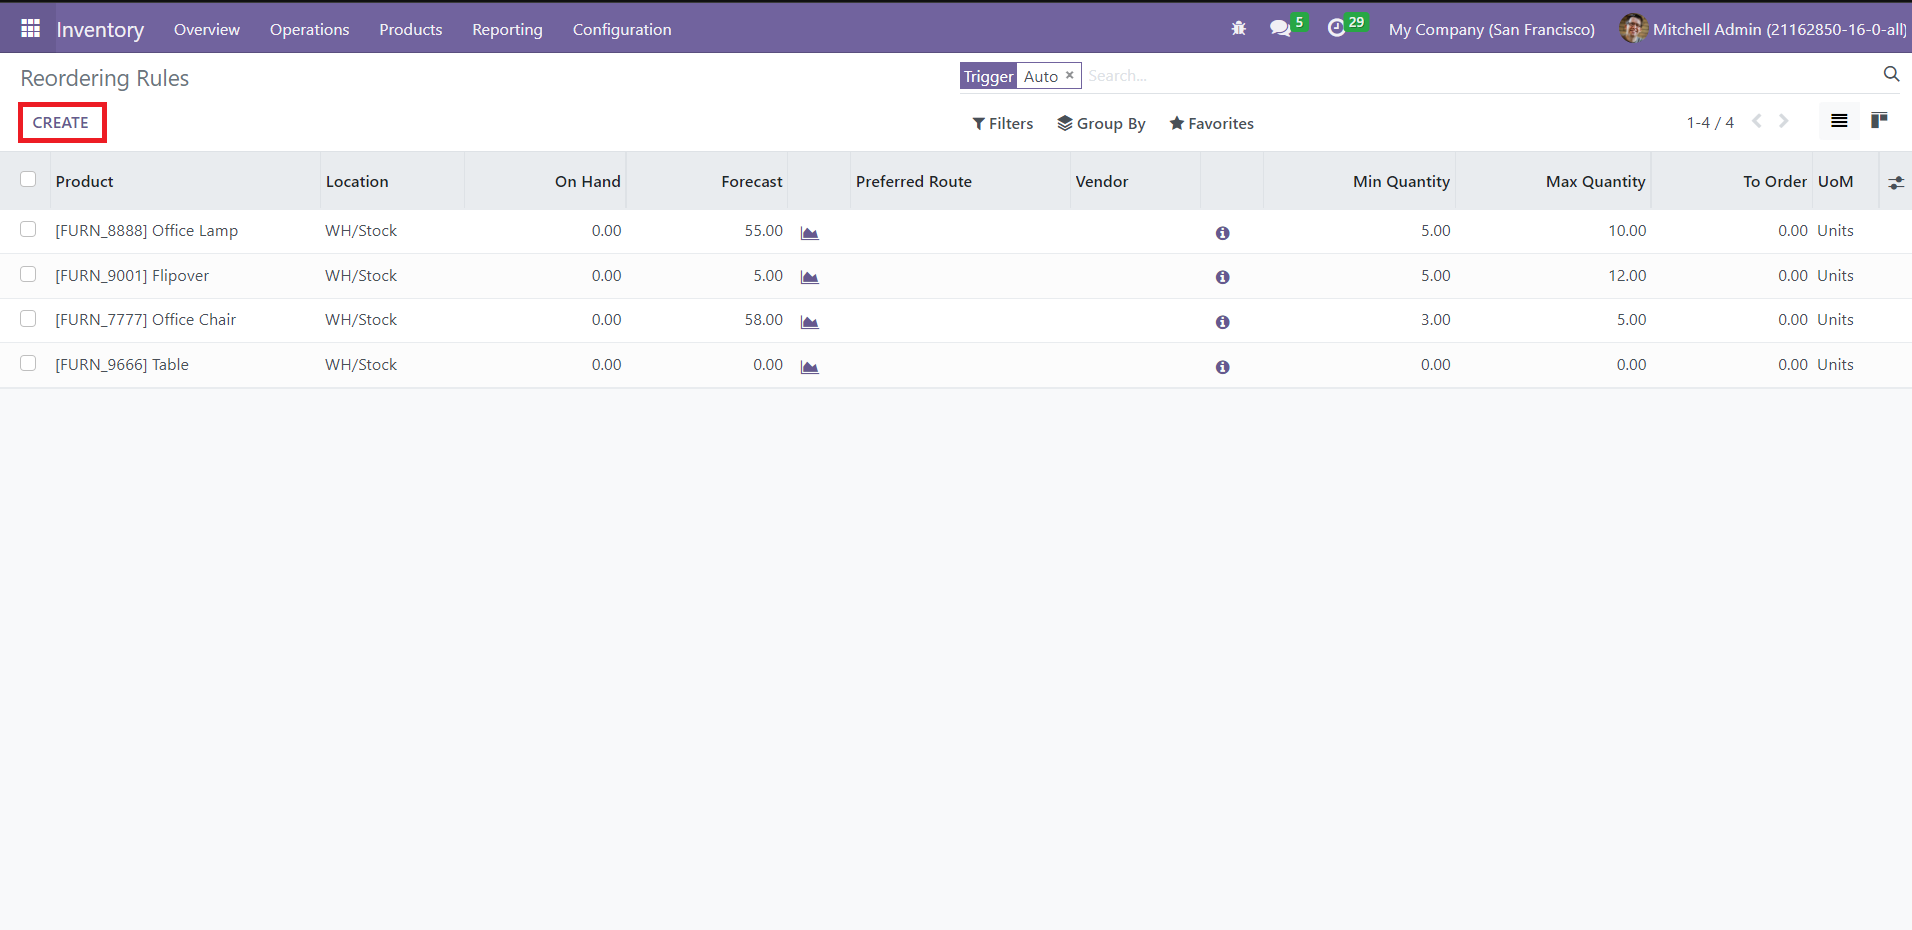
The window displays the data, including Product, Location, On Hand (quantity), Forecast, Preferred Route, Vendor, Min Quantity, Max Quantity, To Order, and UoM. In the Location field, indicate where you want the product to reach. ‘Min Quantity’ governs the minimum quantity of the item the stock must contain at all times. If this quantity dips below the assigned value, the system will send a purchase order to their suppliers to restock the depleted products.
You can add more fields to the existing preview by clicking on the button in the top right corner of the window.
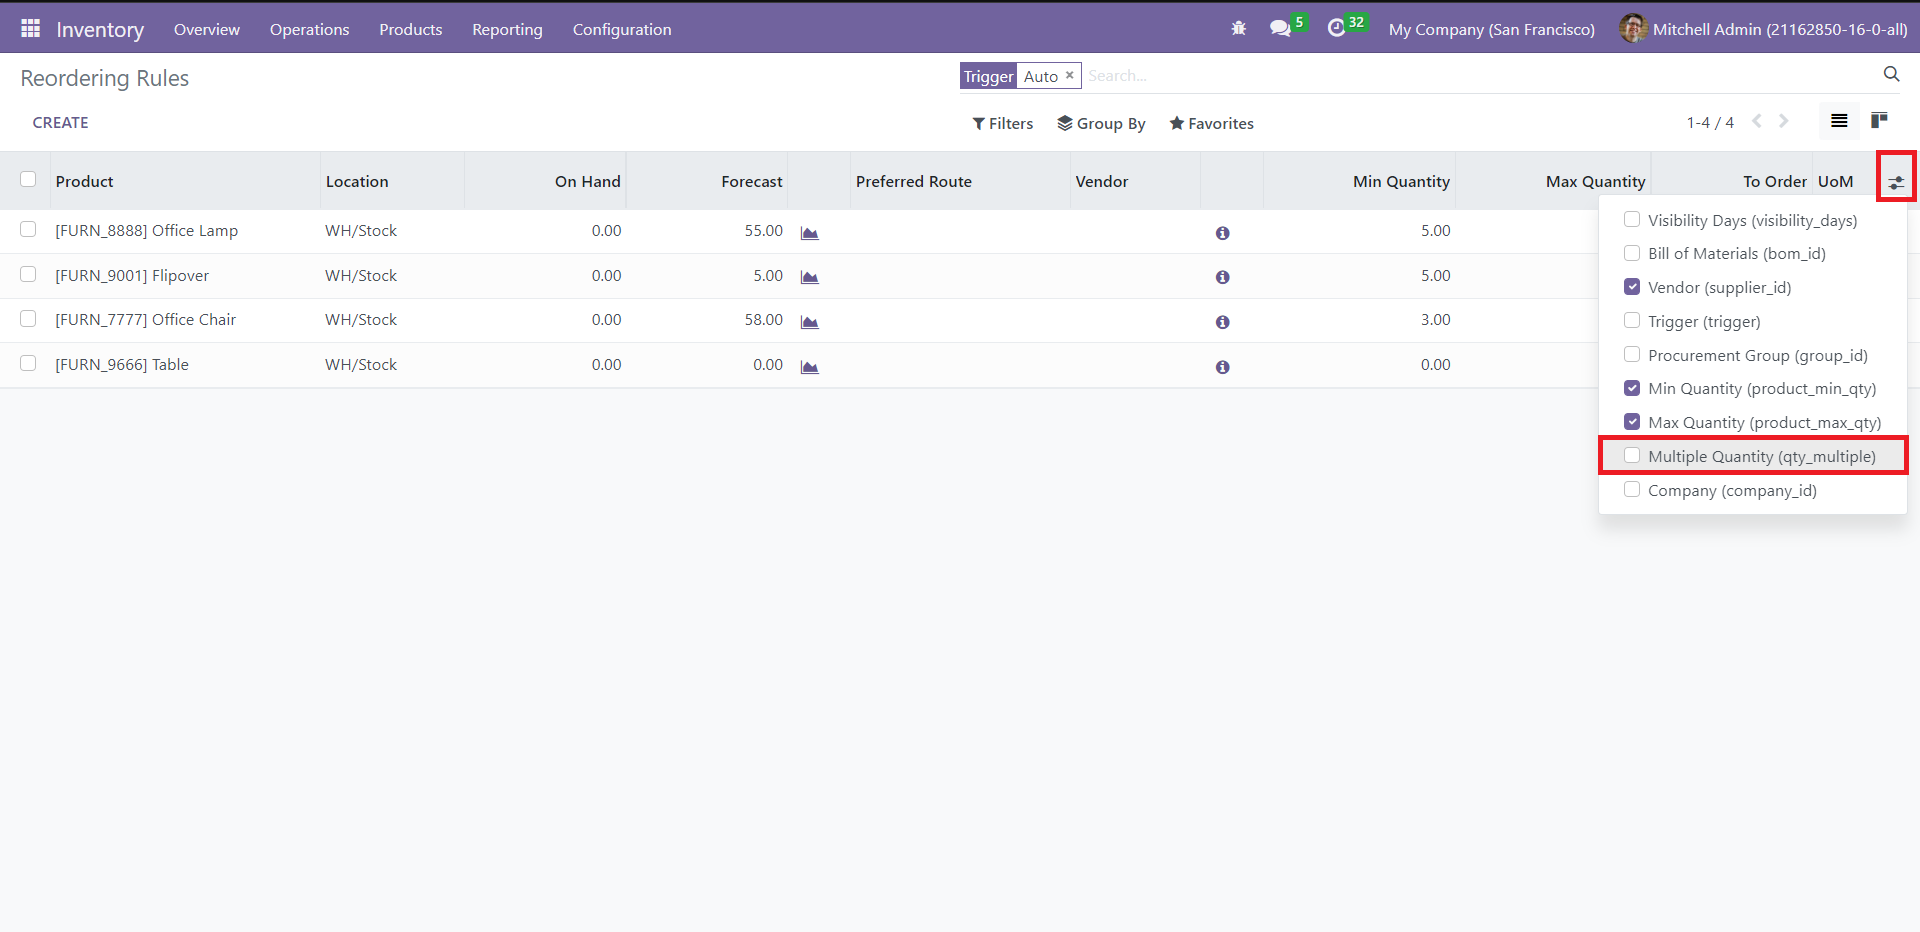
Let us add ‘Multiple Quantity’ to this list. You will get a new field in the window.
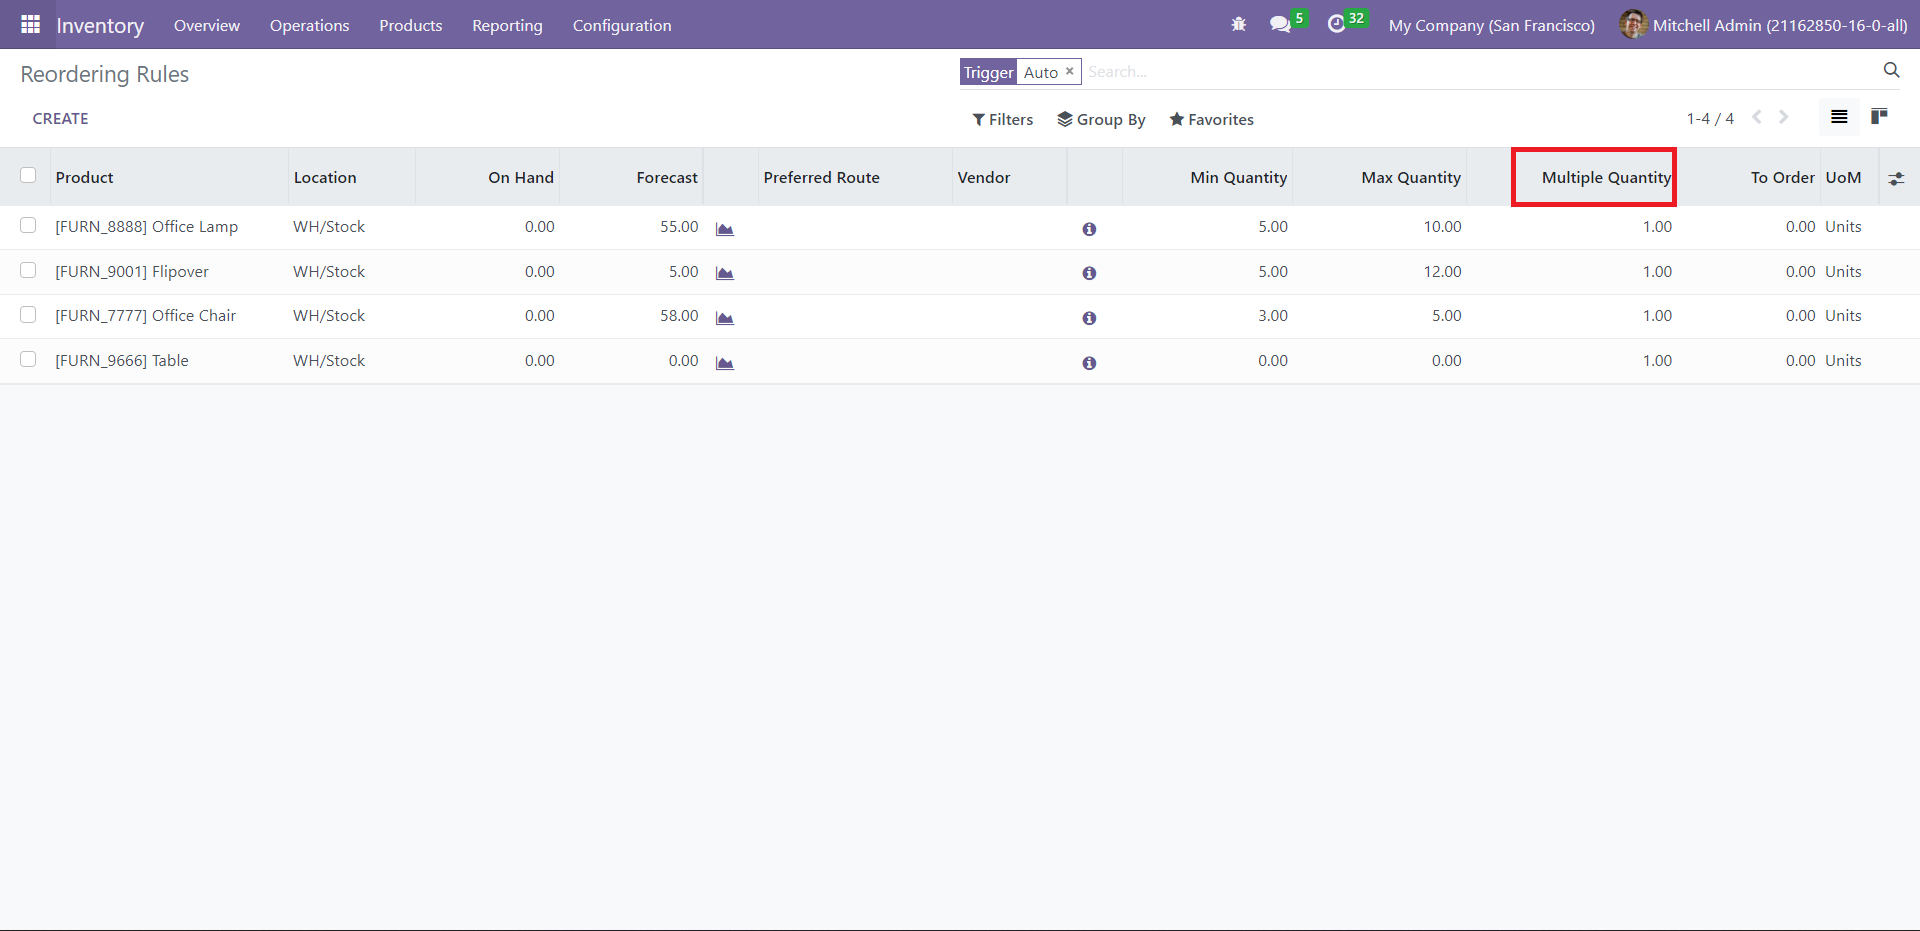
‘Multiple Quantity’ indicates the lowest quantity of the items you can buy from its supplier/vendor. The system will round up the procurement quantity to the multiple you specify in this field. For example, if you give this value as 0, Odoo will use the exact amount.
You can adjust the trigger preferences, i.e., auto or manual, in the Replenishment window.
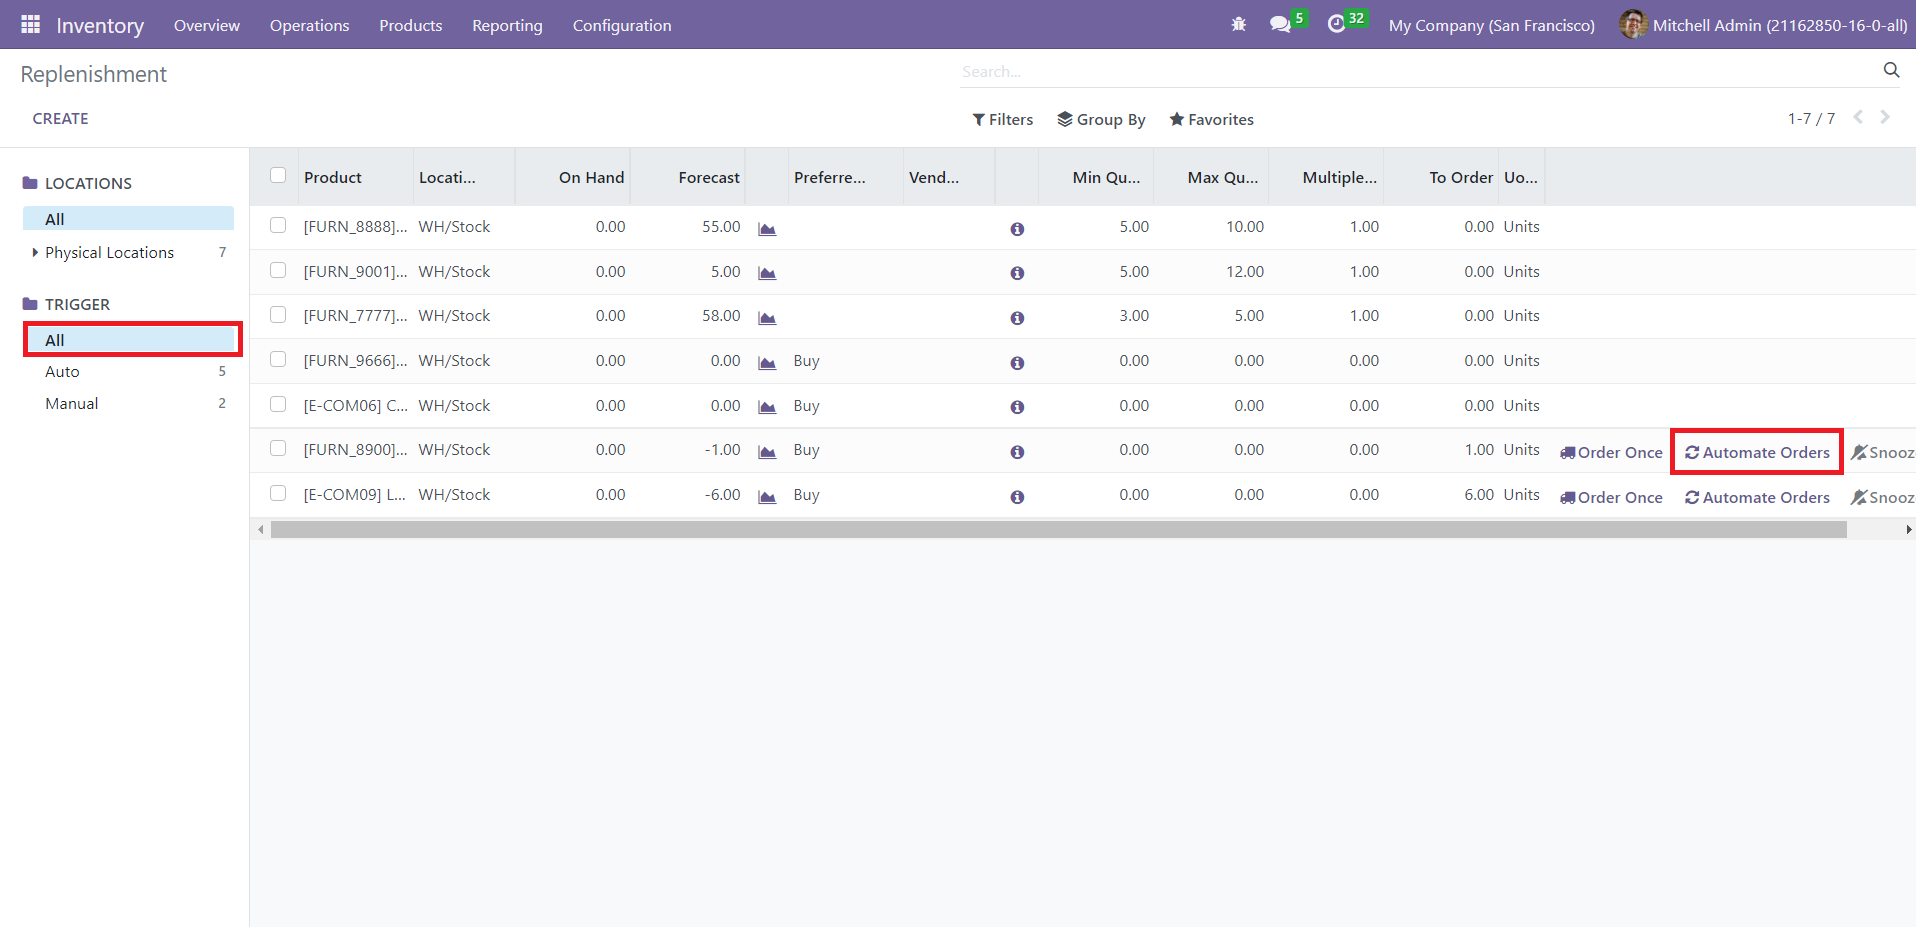
The window displays the Auto and Manual triggers separately. Click on ‘Automate Orders’ to shift from manual to automatic trigger. You can also use ‘Run Scheduler’ to reorder stocks automatically. Besides, Odoo allows you to configure reordering rules using the Reordering smart button in the respective product’s form view.

Shipping Method
The Shipping Method feature available in the Odoo Inventory module can be used in the same pattern as we discussed in the Sales module. A company can deliver products directly to their customers or can seek help from third-party shipping connectors. To get this feature in the Odoo Inventory module, you can go to the Settings menu and activate the Delivery Methods option.
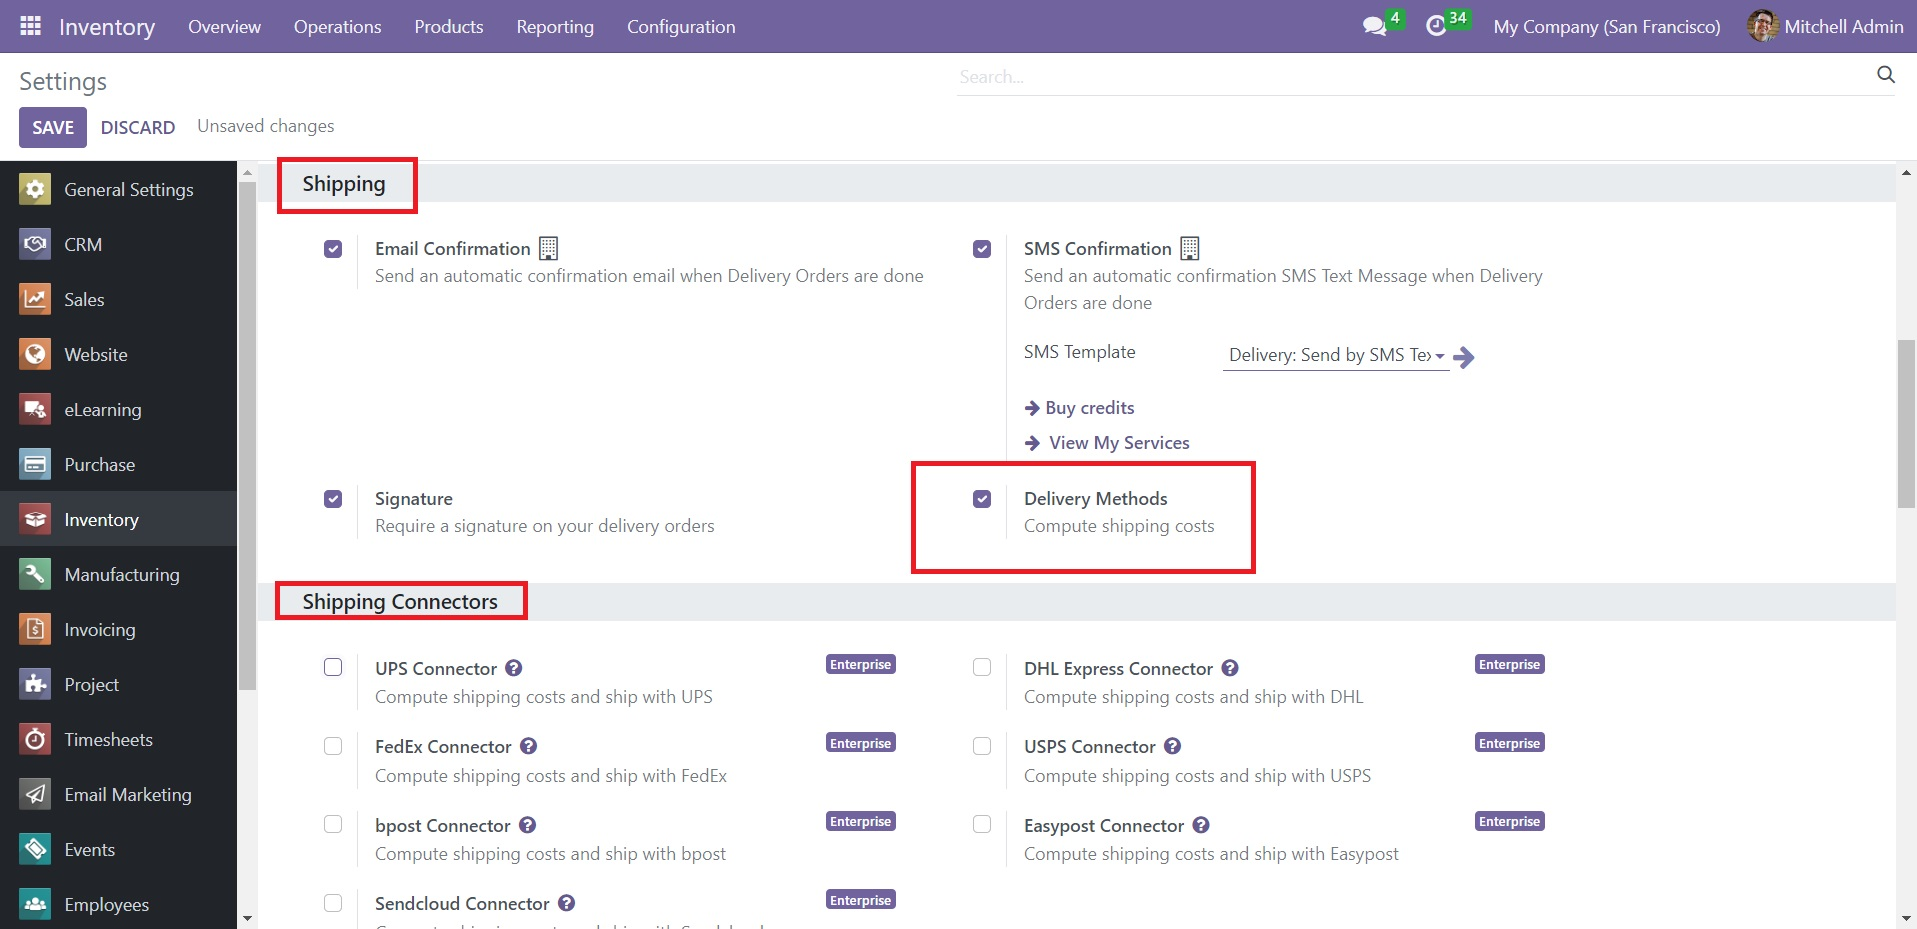
The Delivery Methods feature can be used to calculate the shipping costs of delivery. In order to get third-party assistance for delivery operations, you can activate Shipping Connectors from the Settings menu as shown in the screenshot. The available shipping connectors are UPS Connector, FedEx Connector, bpost Connector, Sendcloud Connector, DHL Express Connector, USPS Connector, and Easypost Connector. This feature is available in the Enterprise edition of Odoo.
Now, select the Shipping Methods option available under the Configuration menu to add new delivery methods. The list will show the already configured Shipping Methods with the details of the Delivery Method, Provider, Company, and Countries.
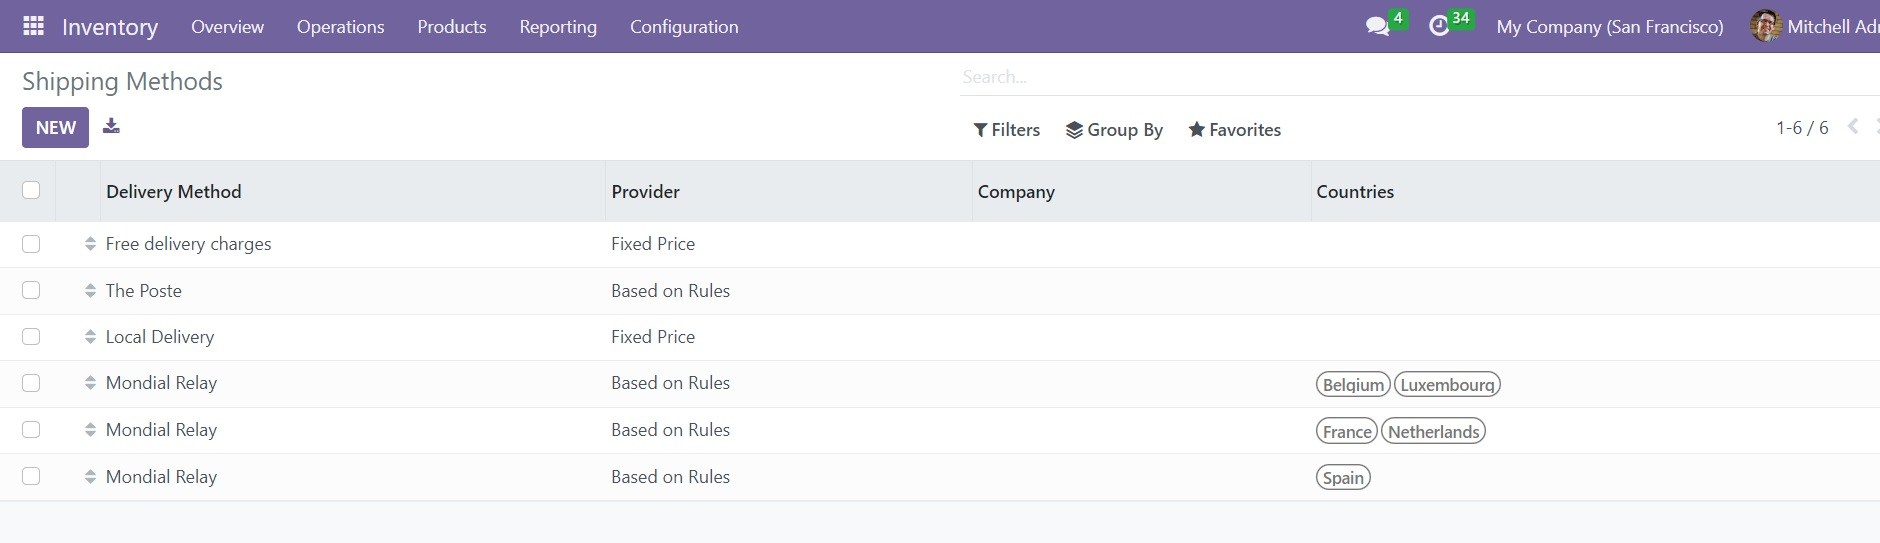
In order to create a new delivery method, use the New button.

The name of the shipping method can be added in the given space. You can set the Provider as Fixed Price or Based on Rules. The name of the Company and Delivery Product can be specified in the respective fields. The percentage you mention in the Margin on Rate will be added to the shipping cost. You can activate the ‘Free if the order amount is above’ field to give free shipping for orders with an amount equal to or more than the value mentioned in the Amount field. The Pricing tab will change in accordance with the option you select in the Provider field. Here, we selected the option Fixed Price. Under the Pricing tab, you can add the fixed rate of the shipping.

Mention the Countries, States, and Zip Prefixes in the corresponding fields. If you want to add additional notes to the shipping method, you can specify them in the Description field. Once you complete the configuration of the shipping method, you can use it while confirming a sales order.
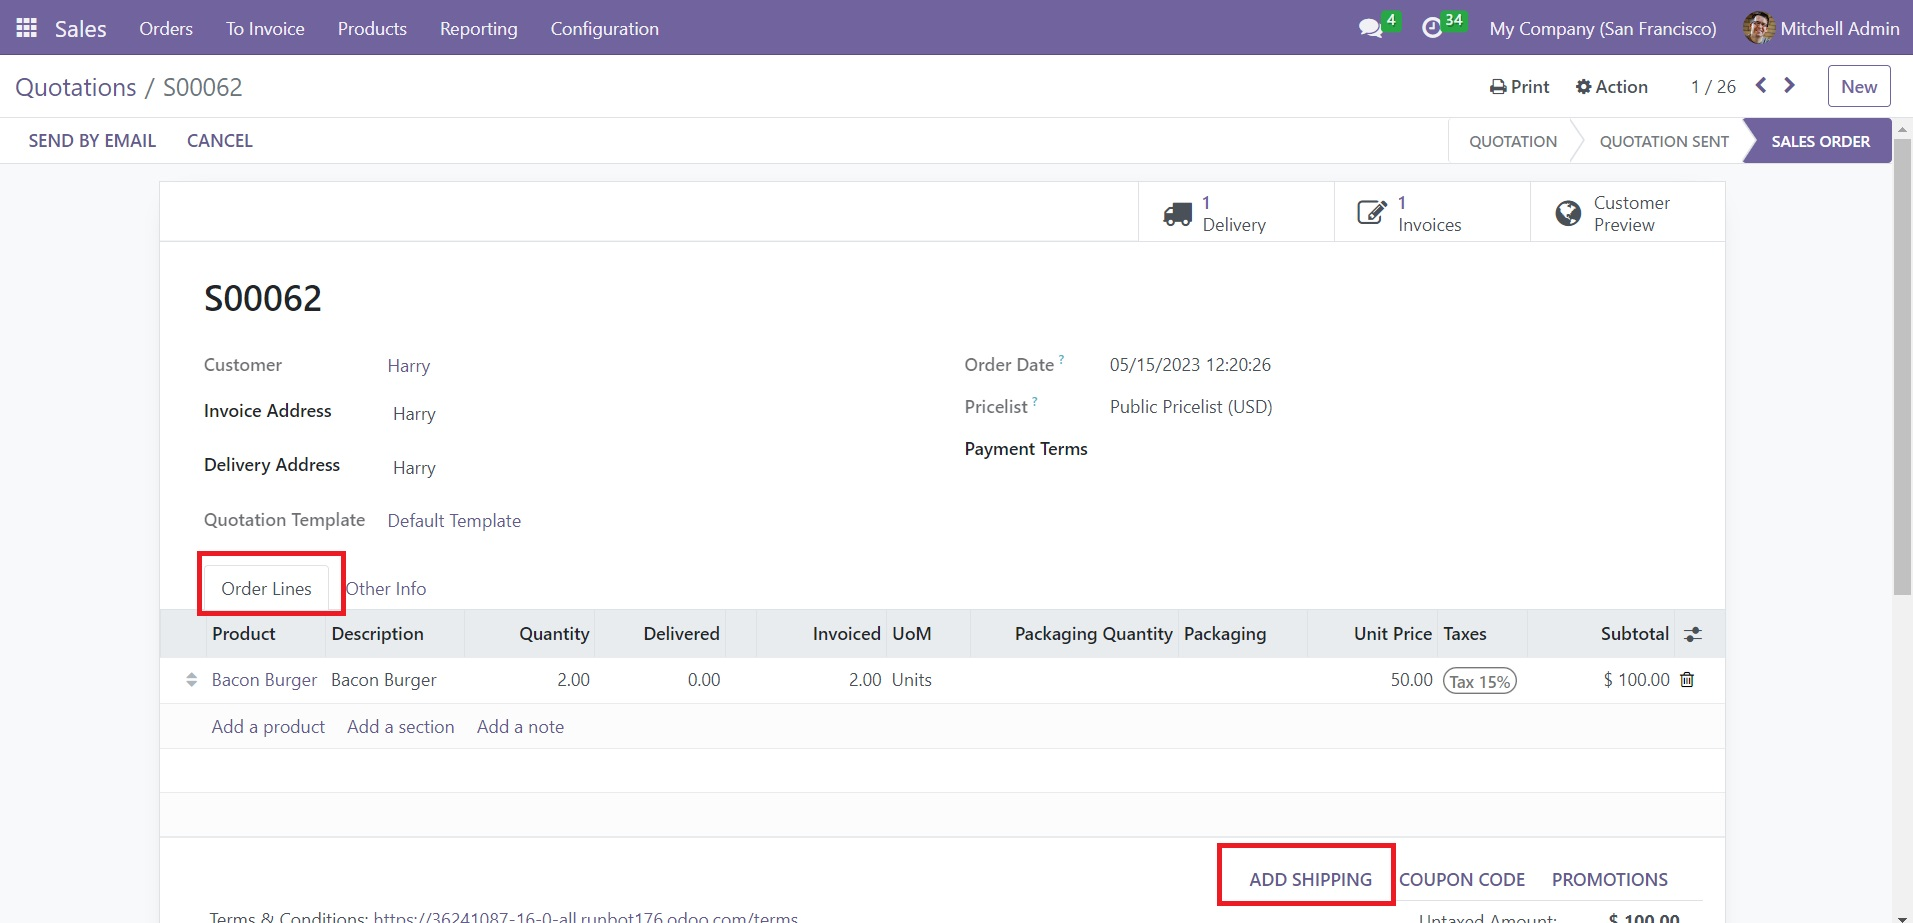
You can click on the Add Shipping button from the Order Lines tab of a sales order to add a shipping method to the corresponding order.
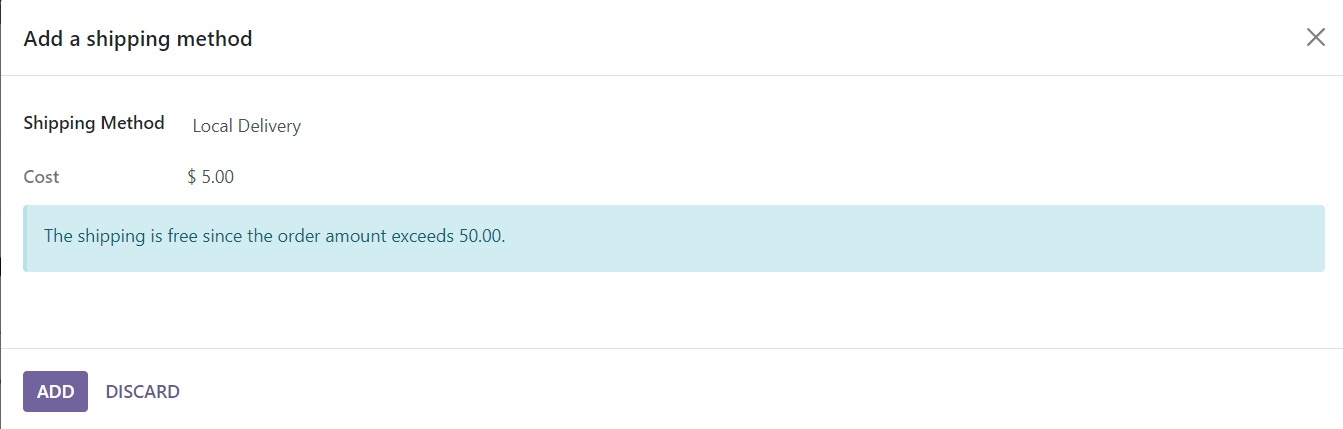
This will open a new pop-up to select a suitable shipping method for the products included in this particular sales order. The Cost of the shipping will automatically appear as soon as you select the shipping method.
Signature
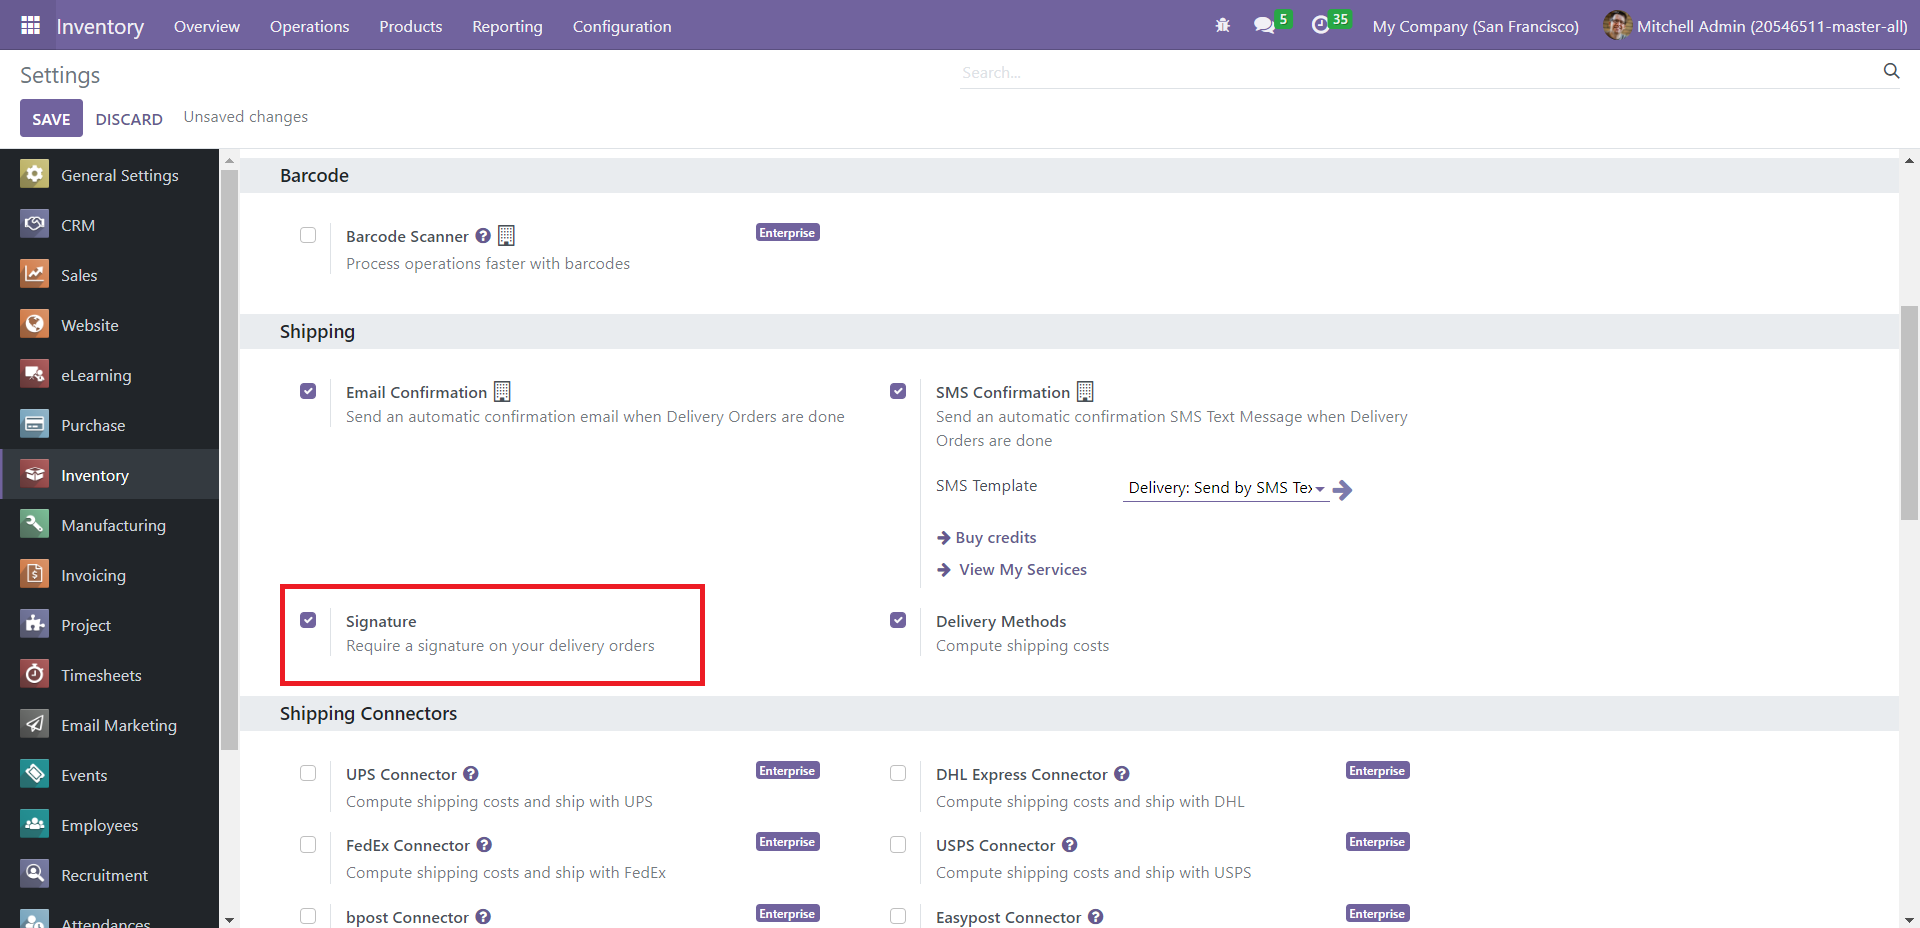
The Signature option enables you to demand a signature from the customer after receiving the product. This way, you can efficiently confirm the product delivery. To avail of this feature, click on ‘Settings’ from the Configuration menu. Activate the Signature option under ‘Shipping.’
After you confirm a delivery order, you will get the Sign button, as shown below.
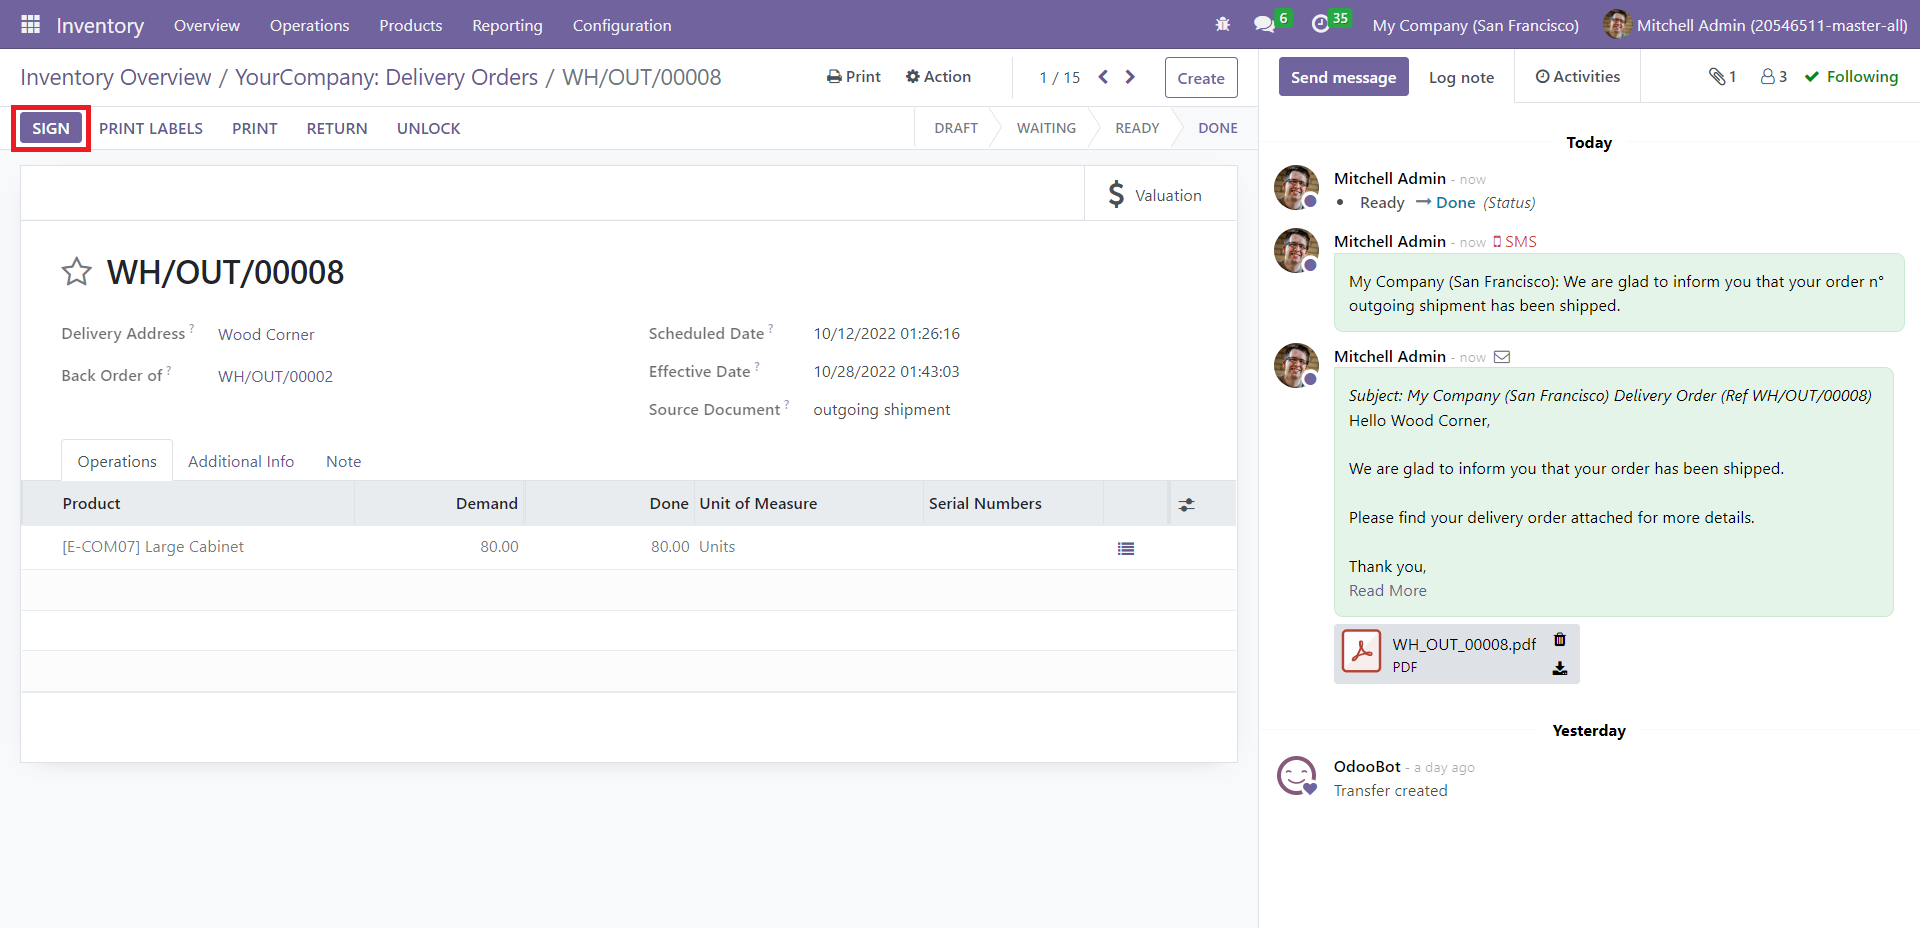
Click on ‘Sign’ to get a window to record your drawn, auto-generated, or uploaded signature
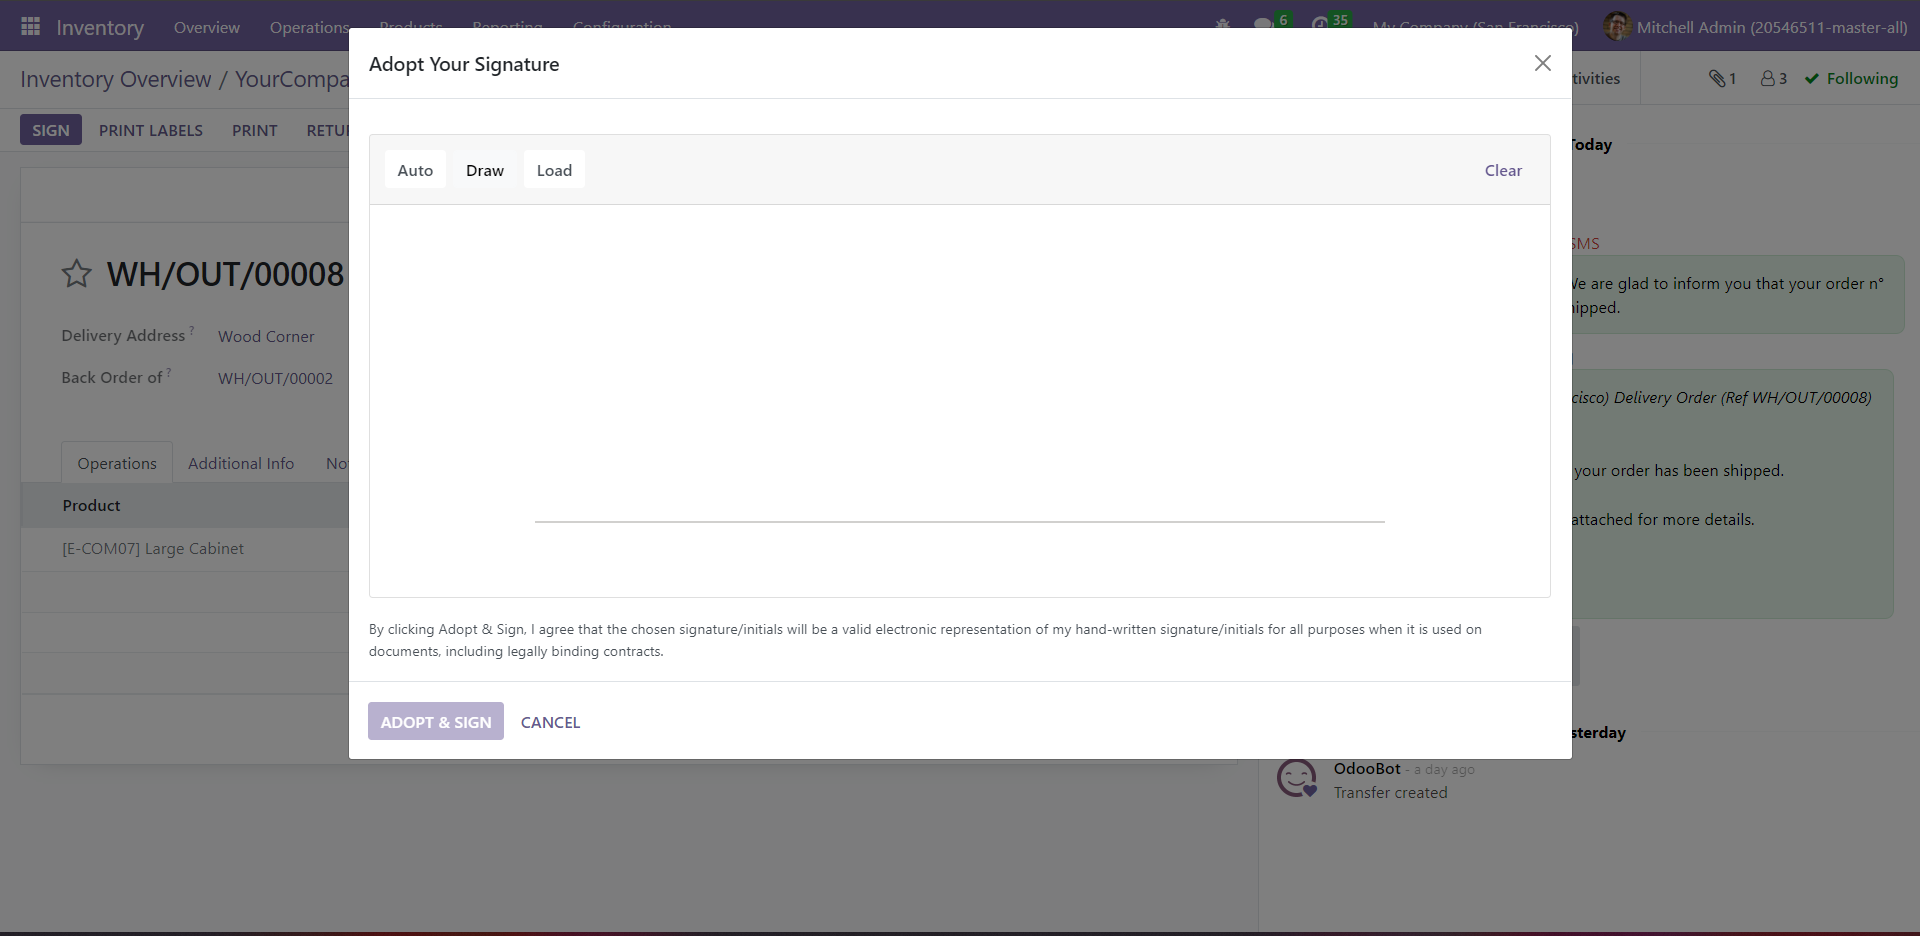
After adding your signature, click on ‘Adopt and Sign.’
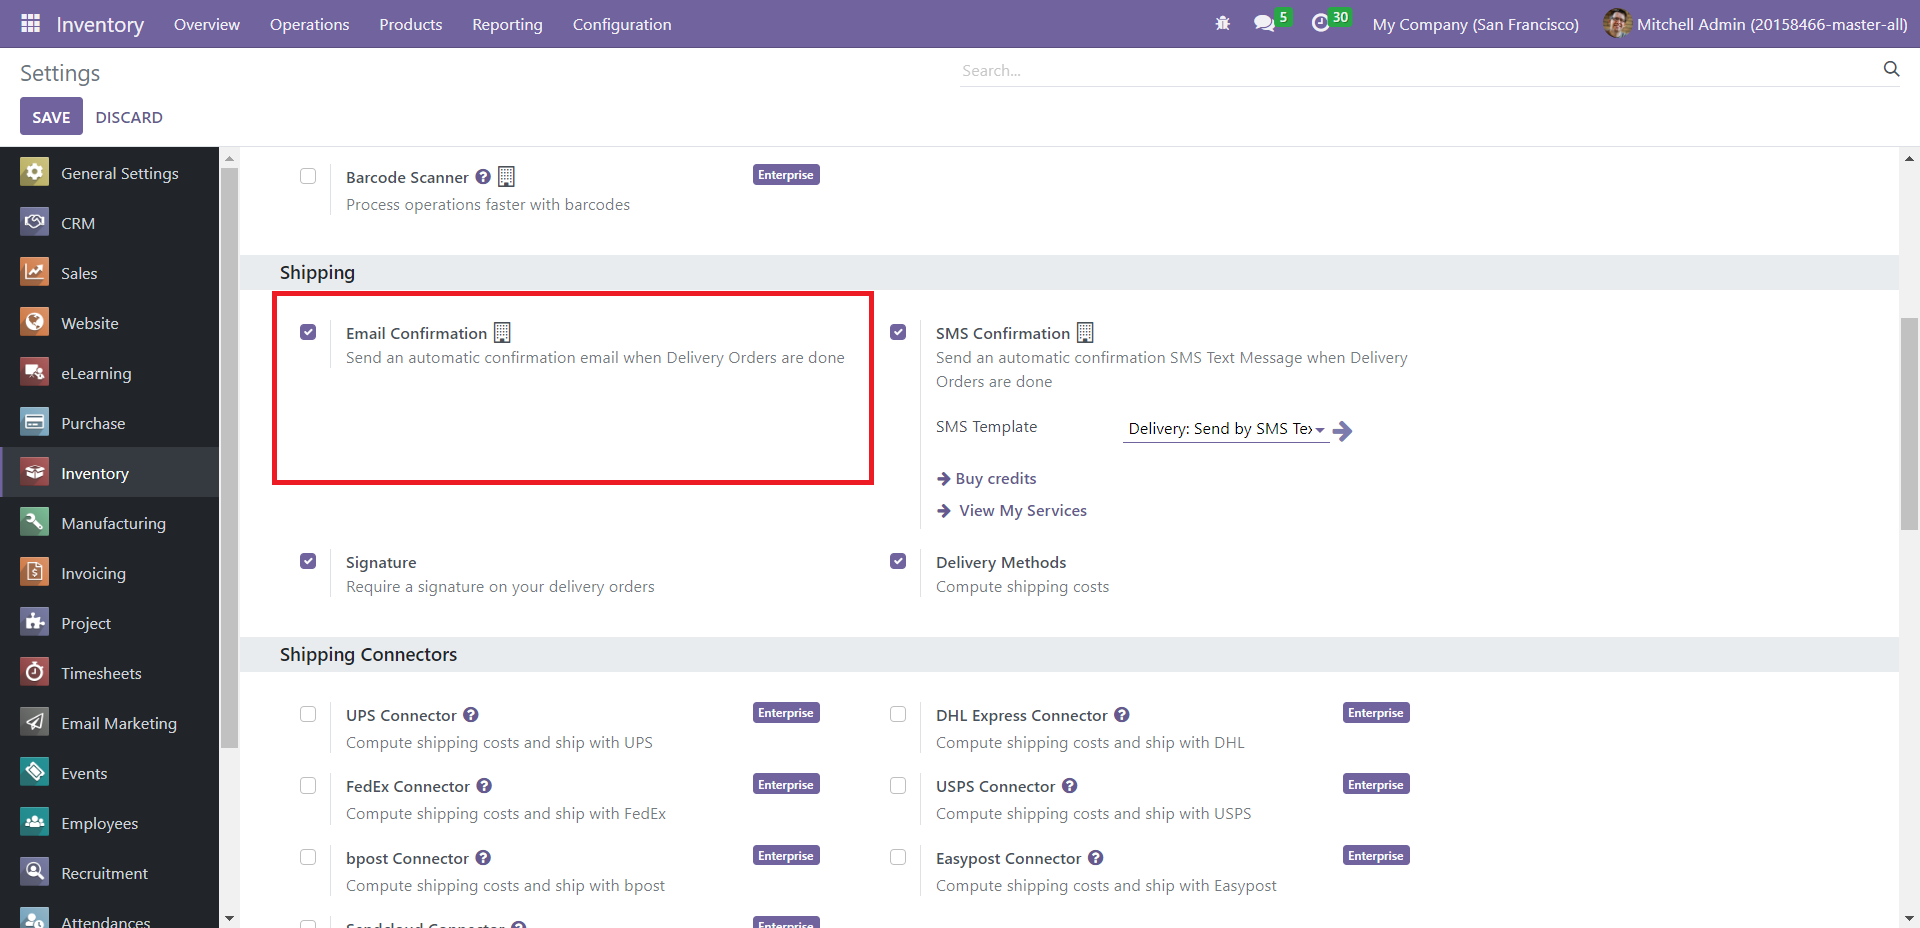
Email Confirmation
Once a delivery order has been confirmed, Odoo will send the customer an automated confirmation email with the attached delivery order. To avail of this feature, select ‘Settings’ from the dropdown list of the Configuration tab. Then, activate ‘Email Confirmation’ under the Shipping section.
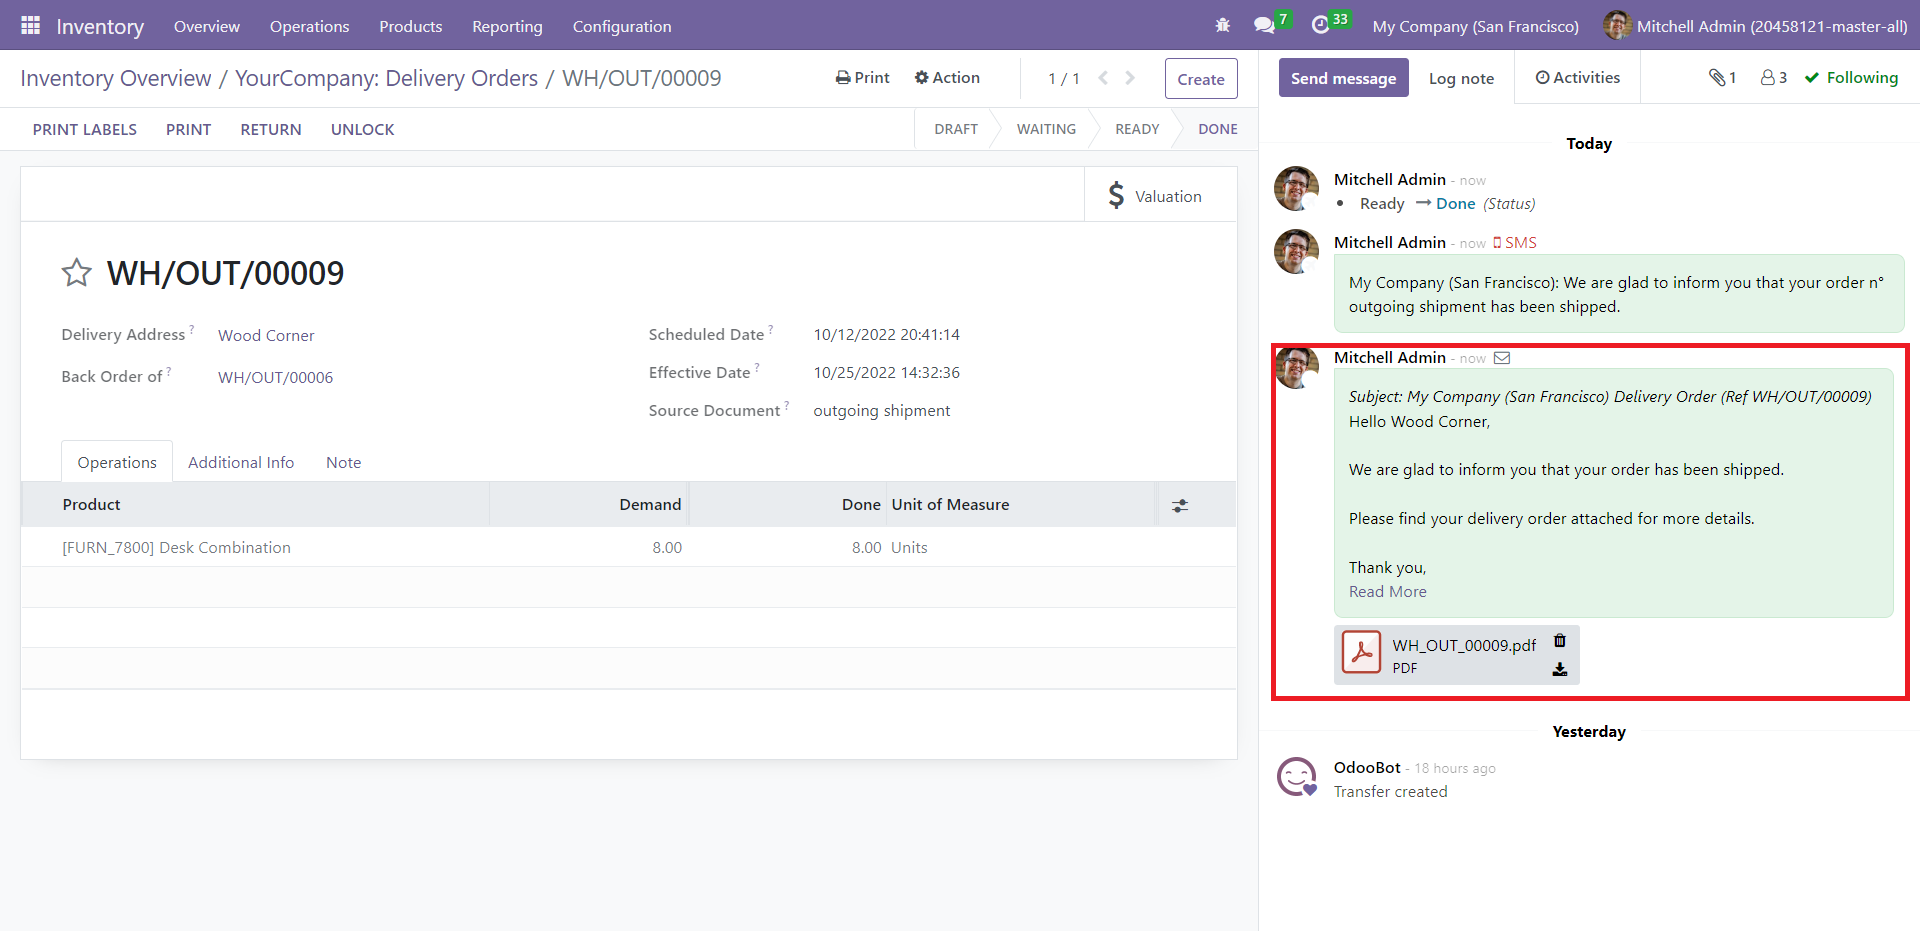
When you verify your delivery orders, Odoo will send email confirmations to respective customers. You can see this email under the Log note tab of its form view.
SMS Confirmation
This In-App-Purchase (IAP) service allows you to send SMS to your customers only if you buy enough credits. Opt for ‘Settings’ to enable this feature under the Configuration tab. This In-App-Purchase (IAP) service allows you to send SMS to your customers only if you buy enough credits. Opt for ‘Settings’ to enable this feature under the Configuration tab. You will get the Settings window where you may activate ‘SMS Confirmation’ under the Shipping section.
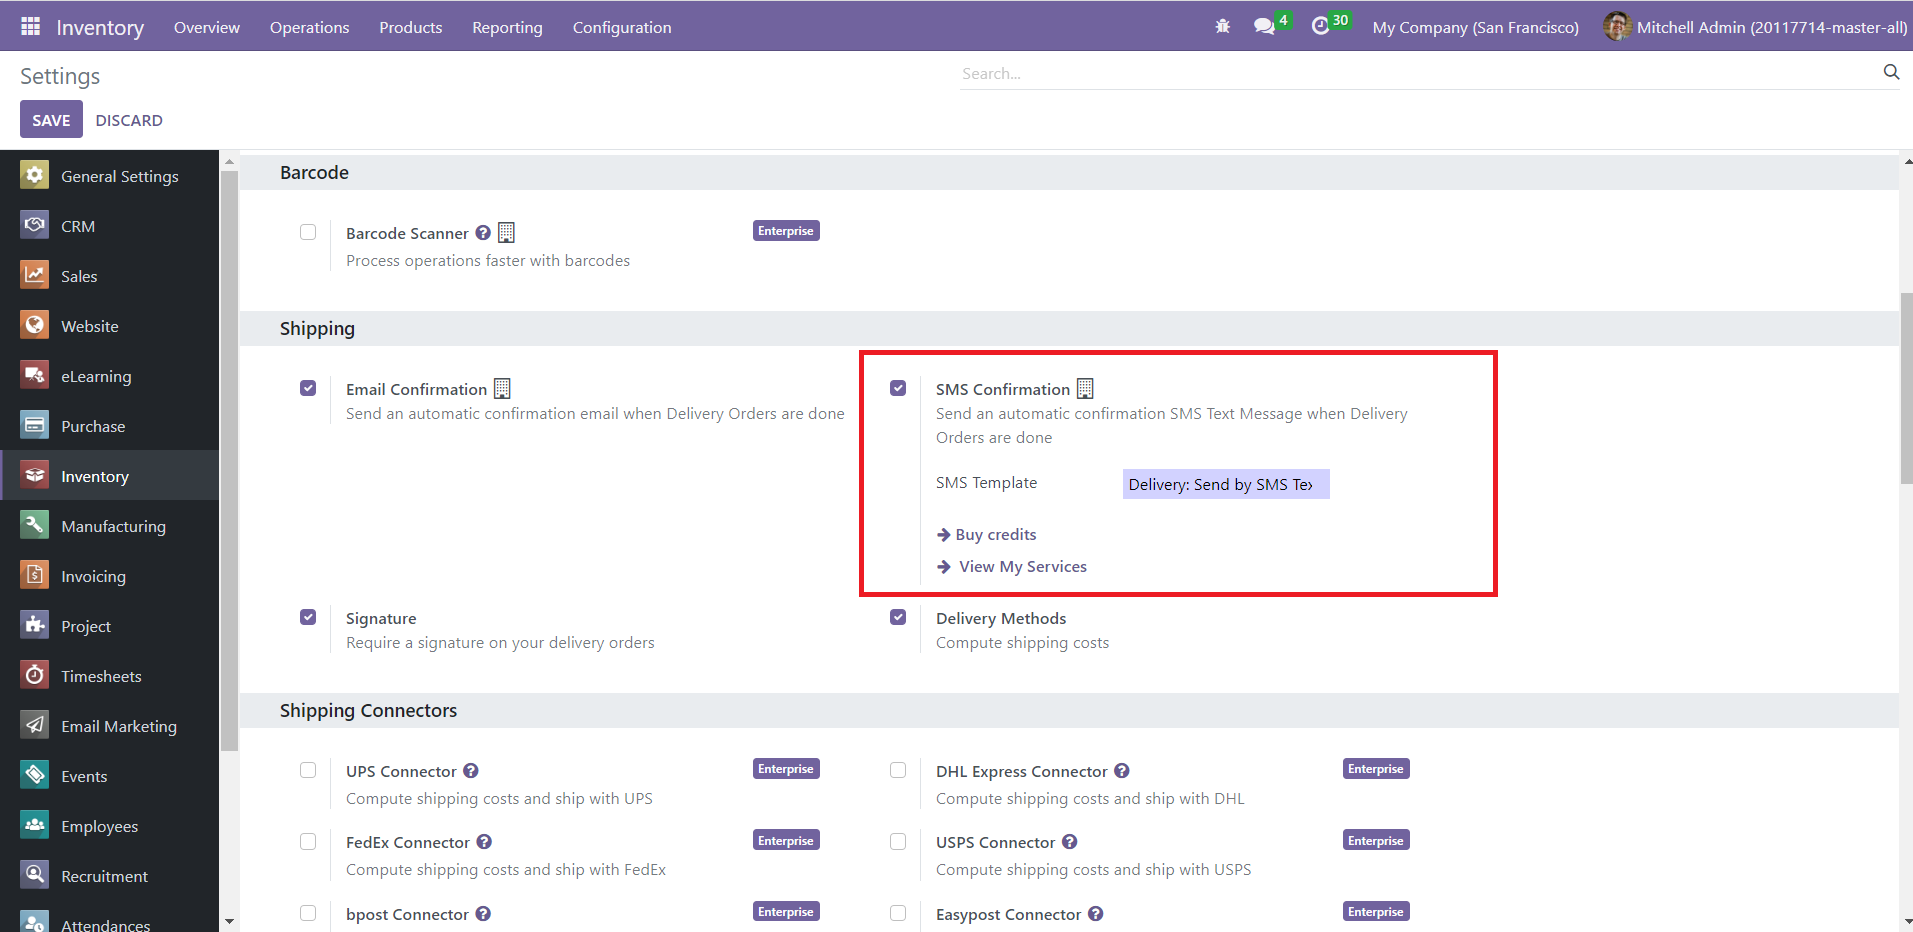
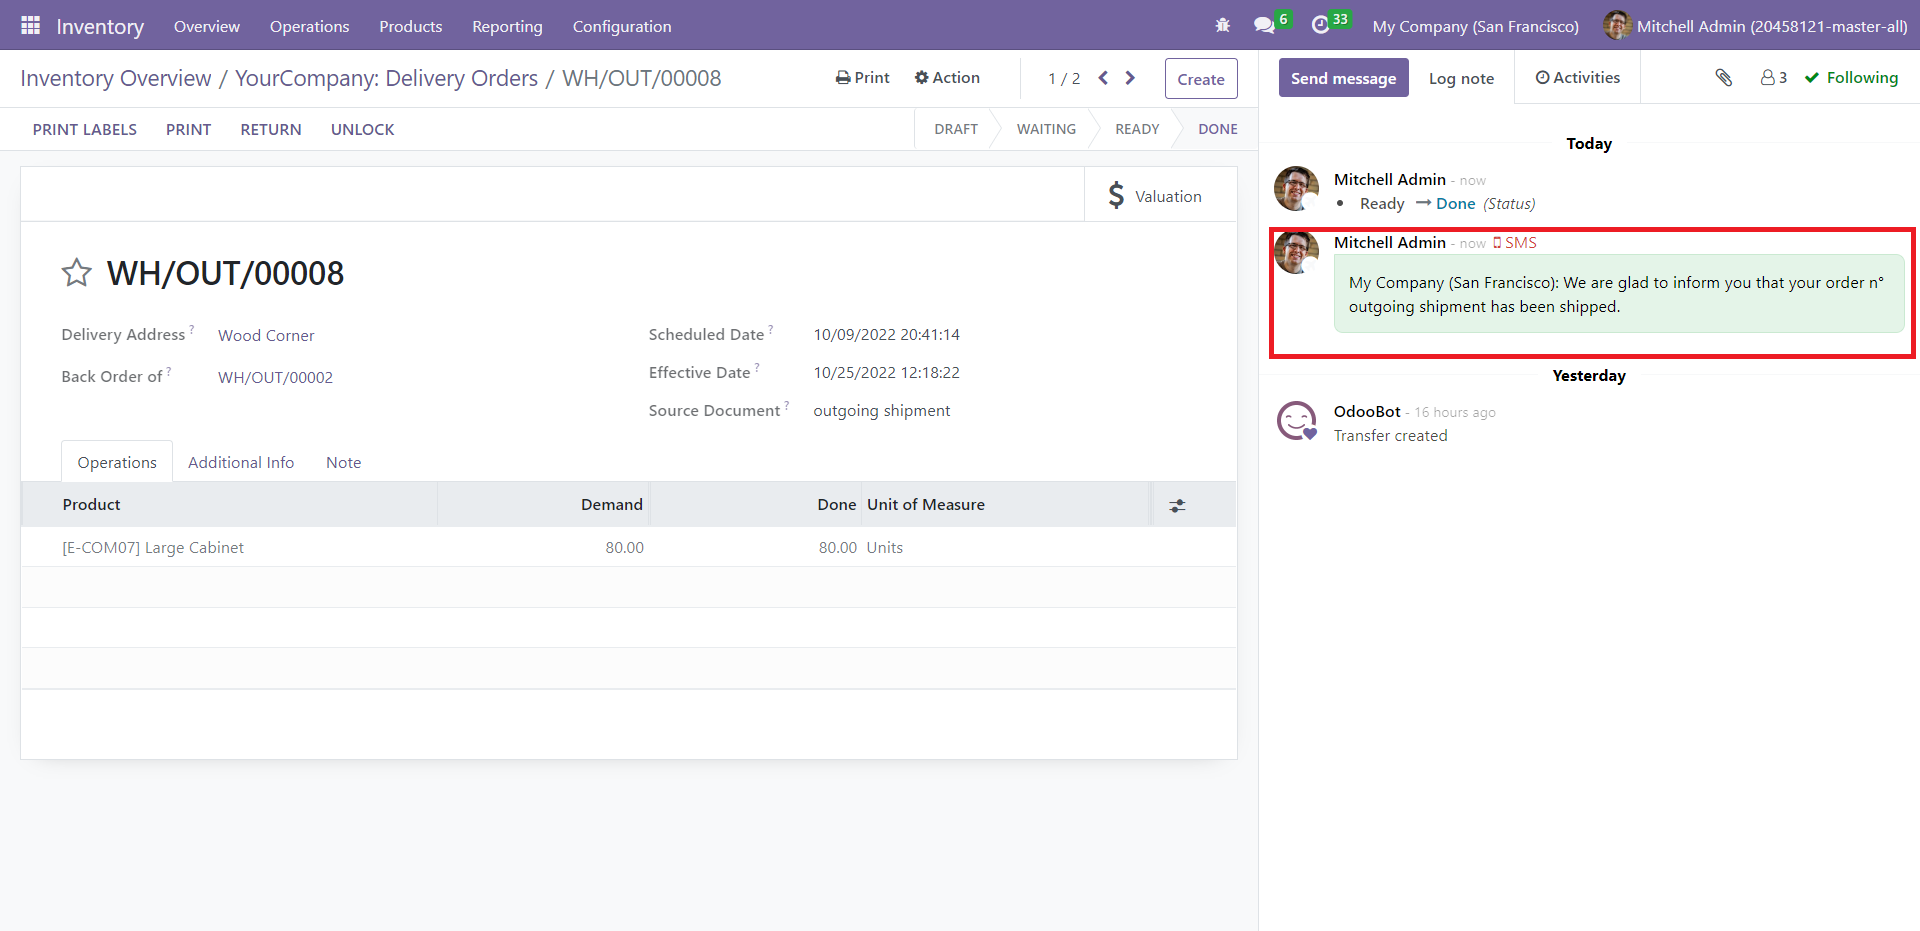
This window allows you to edit the existing template and create a new one. Upon confirming a delivery order, Odoo will send a system-generated SMS to the customer. You can see these text messages under the Log note tab in the form view of delivery orders after verification.
Advanced Scheduling
The Advanced Scheduling section in Odoo 16 saves you time by efficiently planning the purchase and sales-related activities. Select the Settings menu from the Configuration tab’s dropdown list to access this feature.
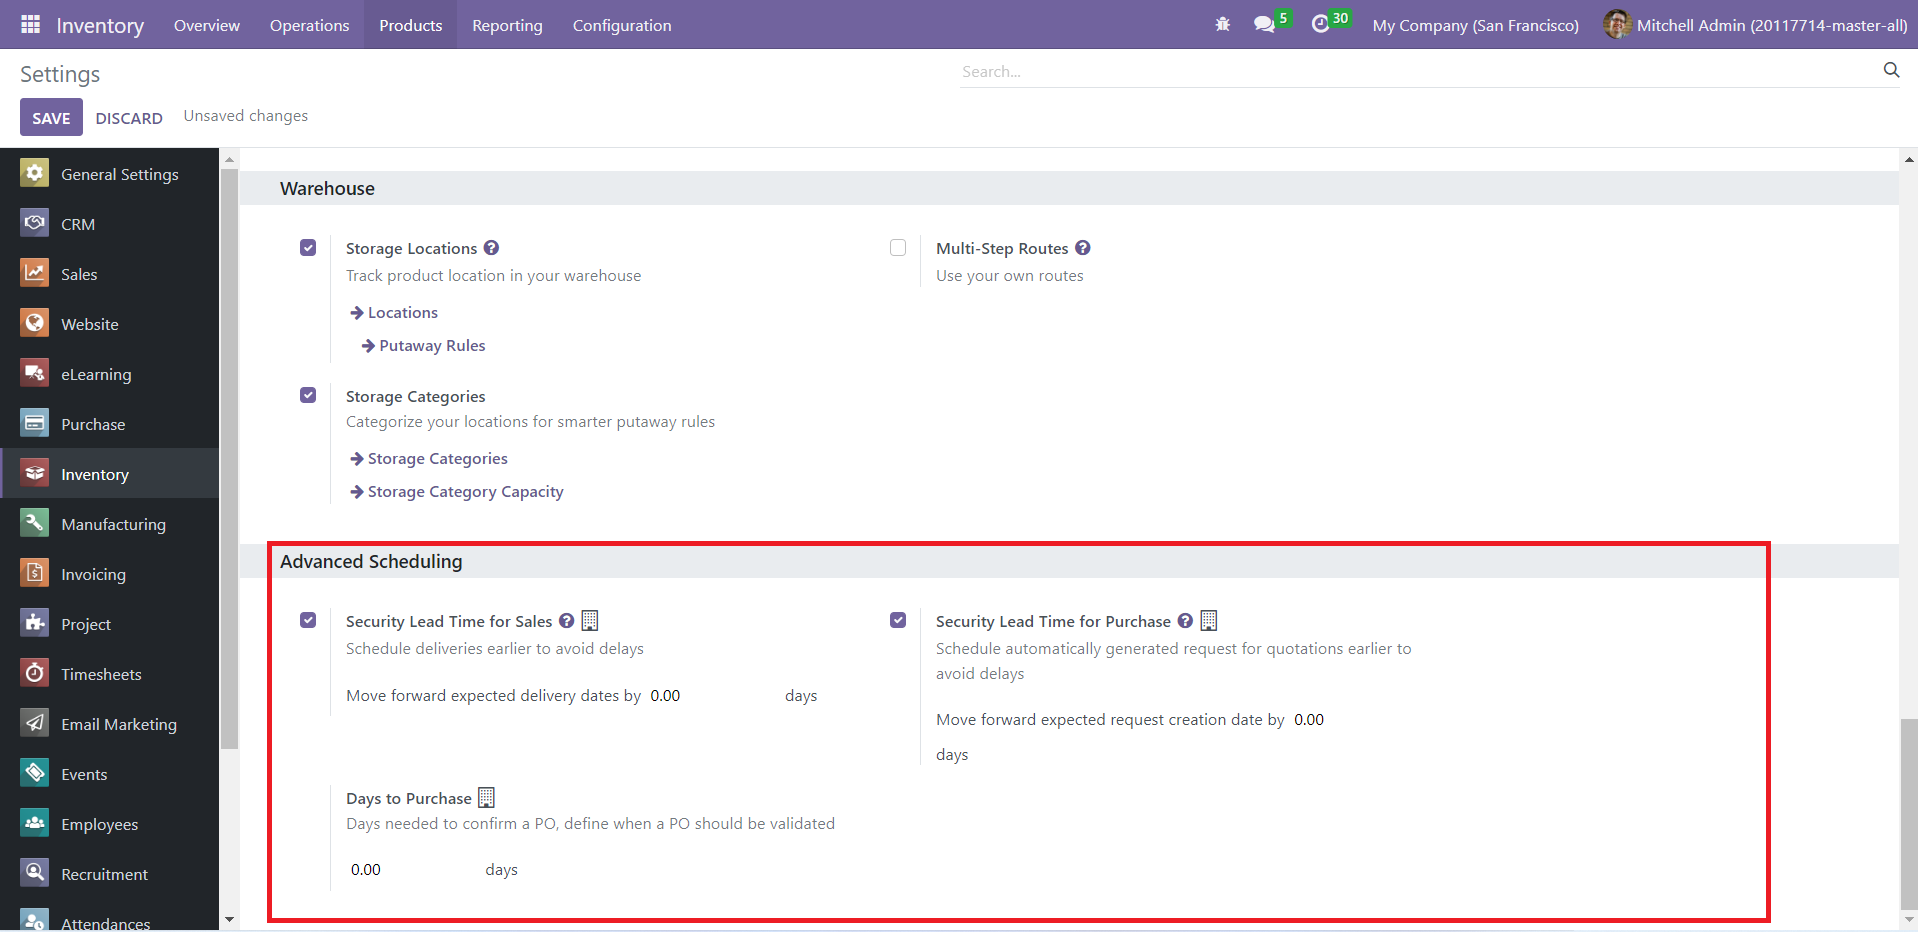
Check the Security Lead Time for Sales option to schedule the deliveries earlier. You can specify the number of days you want the delivery date moved forward. Activate ‘Security Lead Time for Purchase’ to plan the purchase order date earlier than the original date. You can also indicate the number of days for this activity under the same option. Under ‘Days to Purchase,’ add the number of days required to confirm a purchase order.
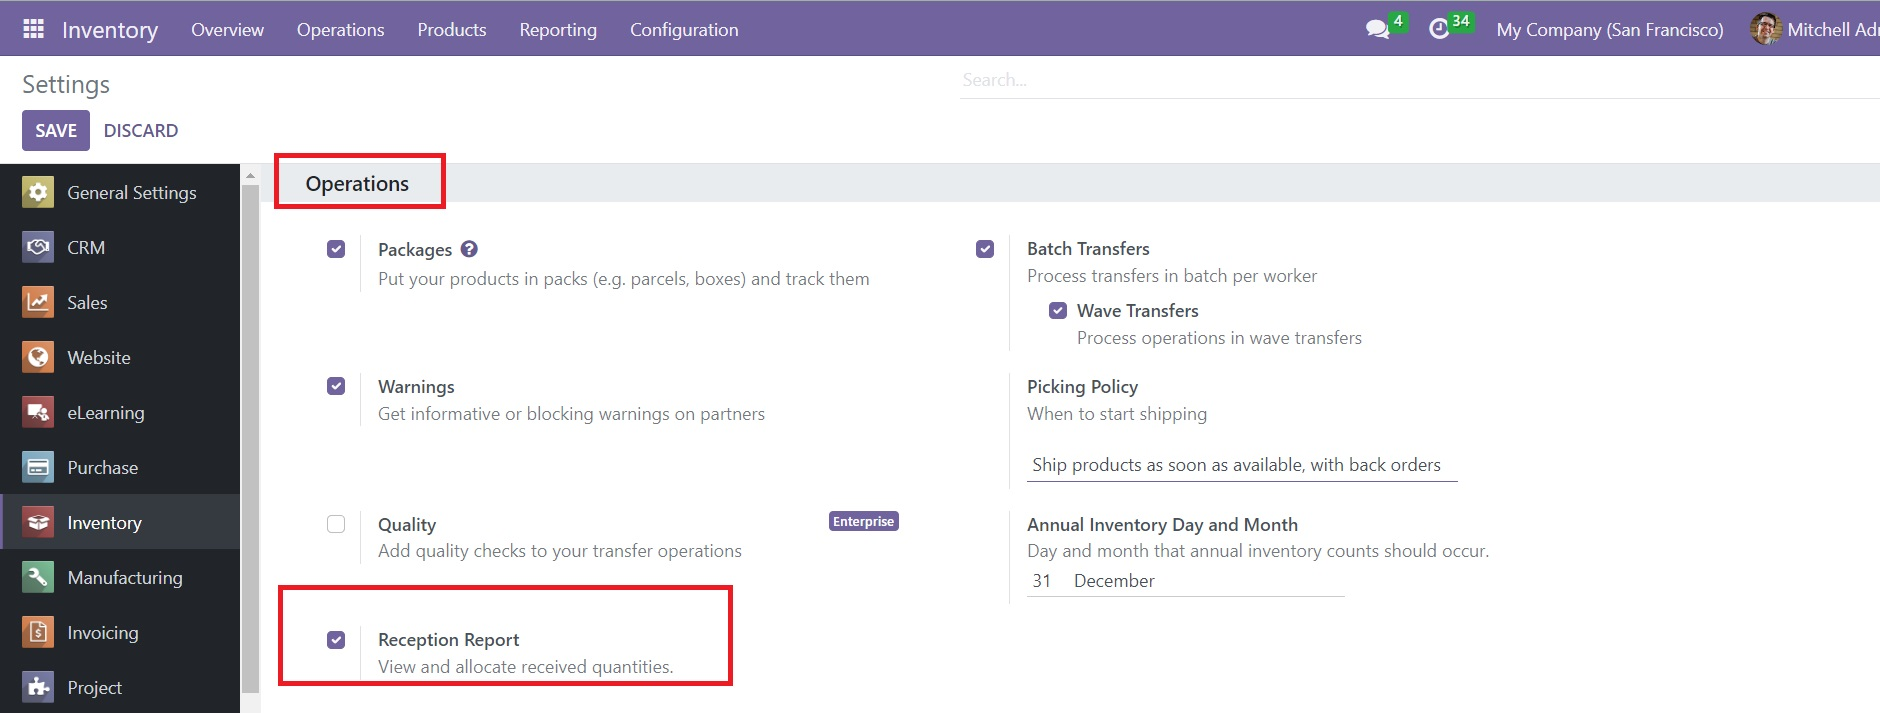
Reception Report
The Reception Report feature available in Odoo can be used to view and allocate received quantities in the Inventory module. To activate this feature, go to the Settings menu and select the Reception Report option from the Operations tab.
Save the changes and go to the Purchase module to create a new purchase order. Use the Confirm button to confirm the purchase order. Now, you can receive this product in your inventory using the Receive Product button.
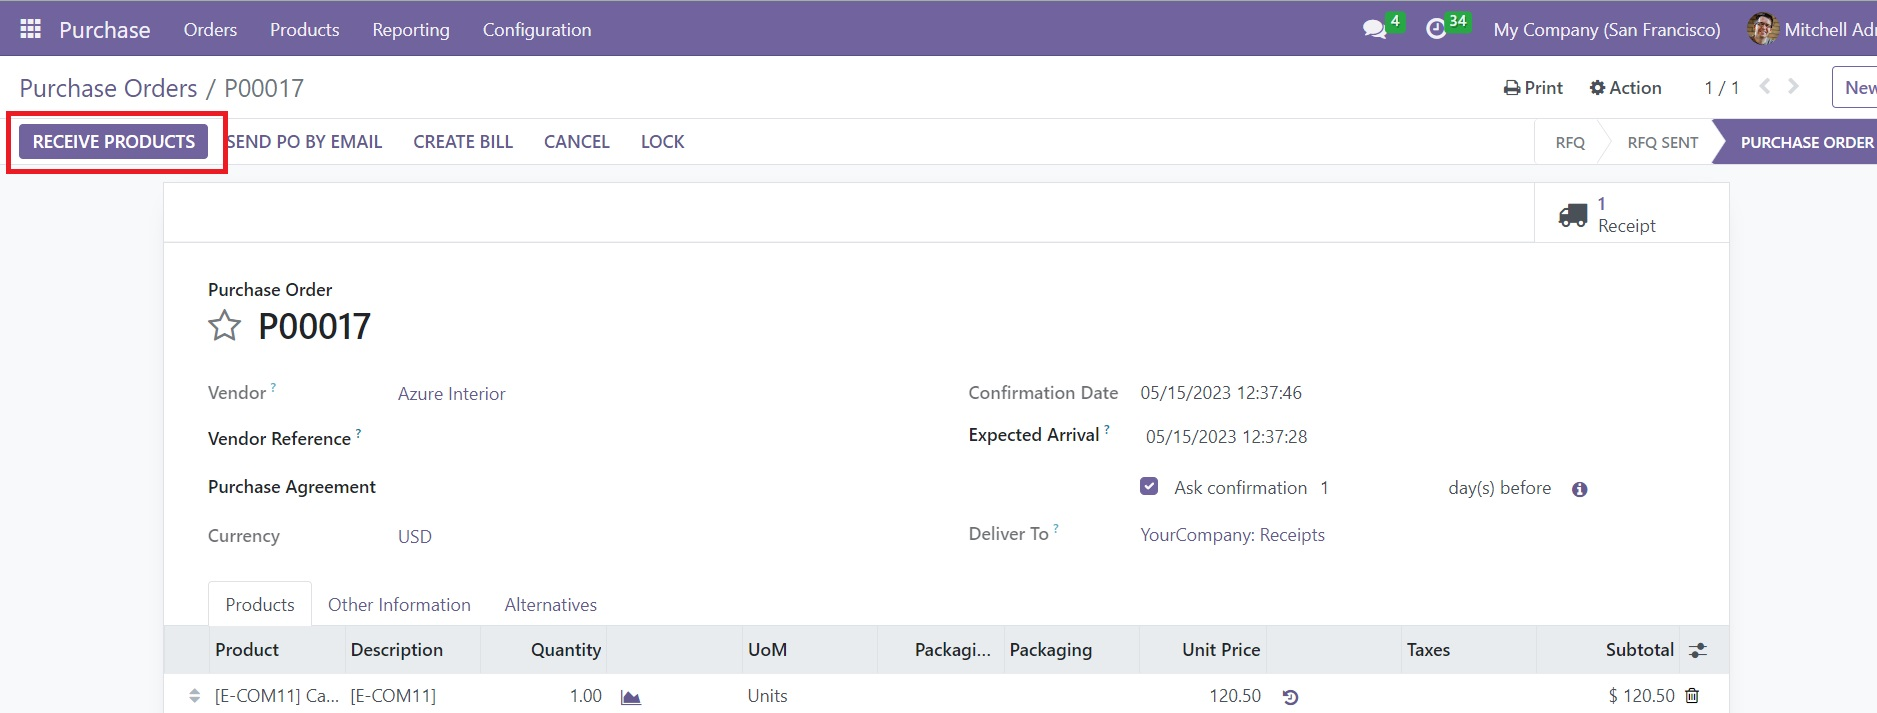
Once you click on this button, you will get a new window to validate the receipt of the purchase, where you will get the Allocation smart button, as shown below.
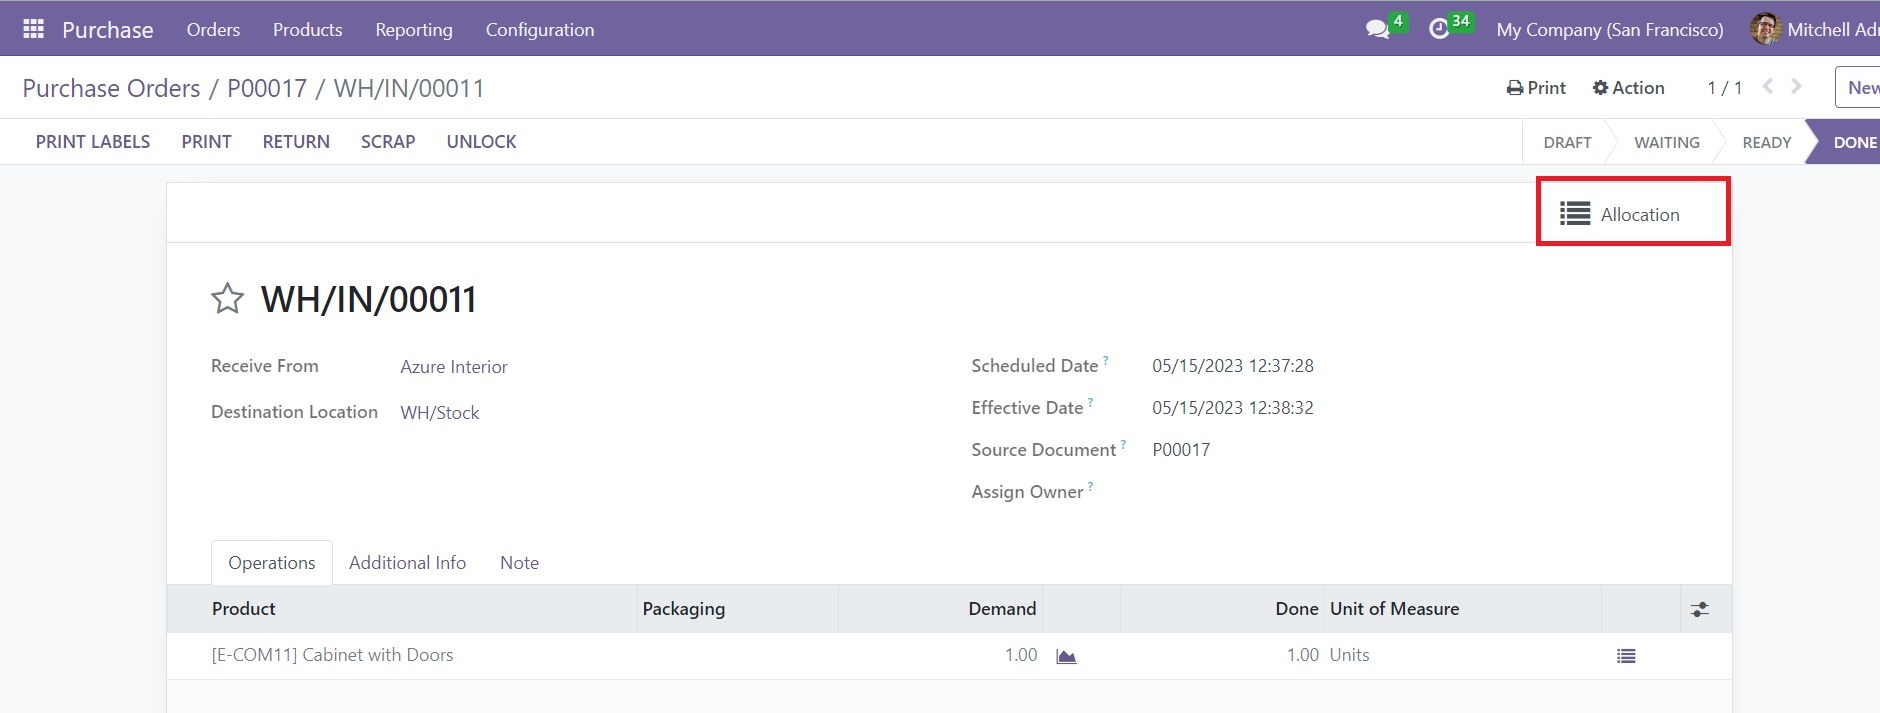
Click the Allocation button.
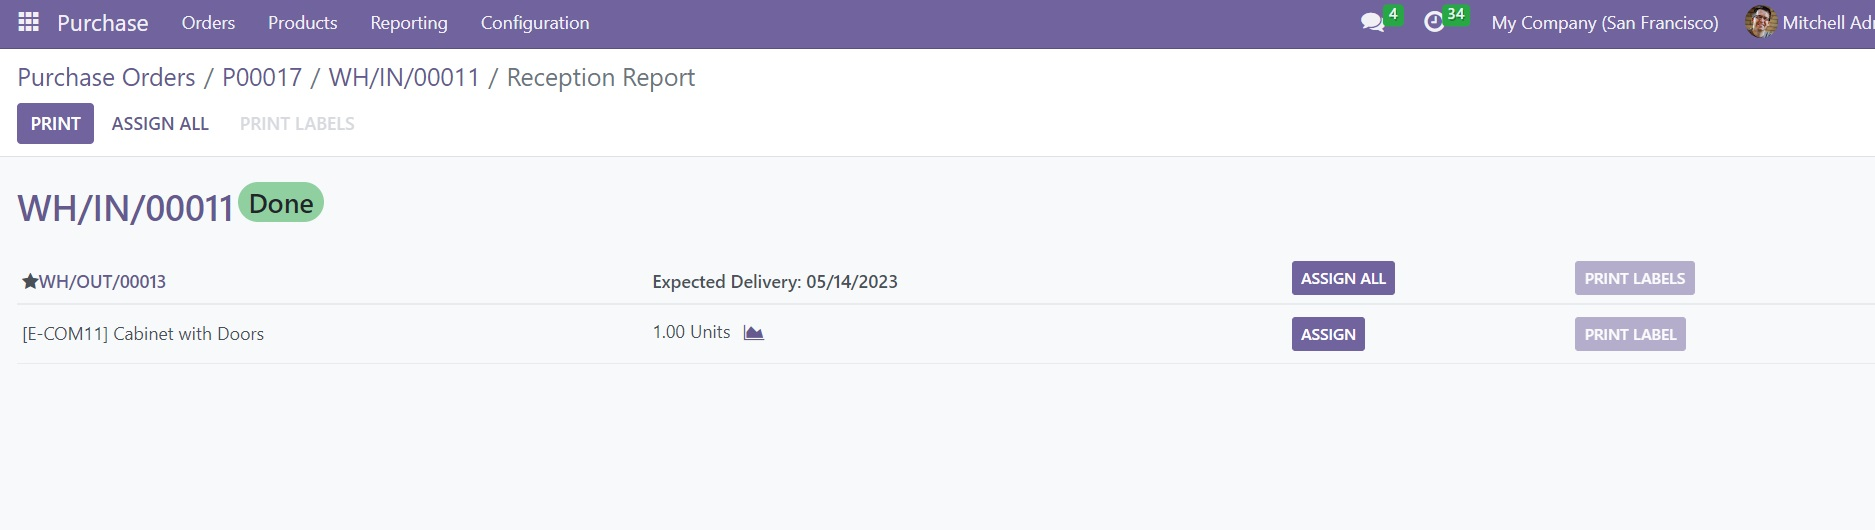
As soon as you click on this button, you will get the reception report of this order. The product allocation can be viewed in this window, along with the expected delivery date of the product. Use the Assign button to allocate the product. The Unassign button can be used to cancel the allocation. The Print Label button will help you to print labels for the assigned quantities.
Consignment
Consignment is the process of selling our products/ services via a third party. The consignor (the third party) will store them before selling them to their customers. Online stores and eCommerce employ the principle of consignment. The retailers don’t need to keep a permanent inventory in the case of consignment.
Open the Settings menu from the Configuration tab. Under the Traceability section, activate ‘Consignment.’
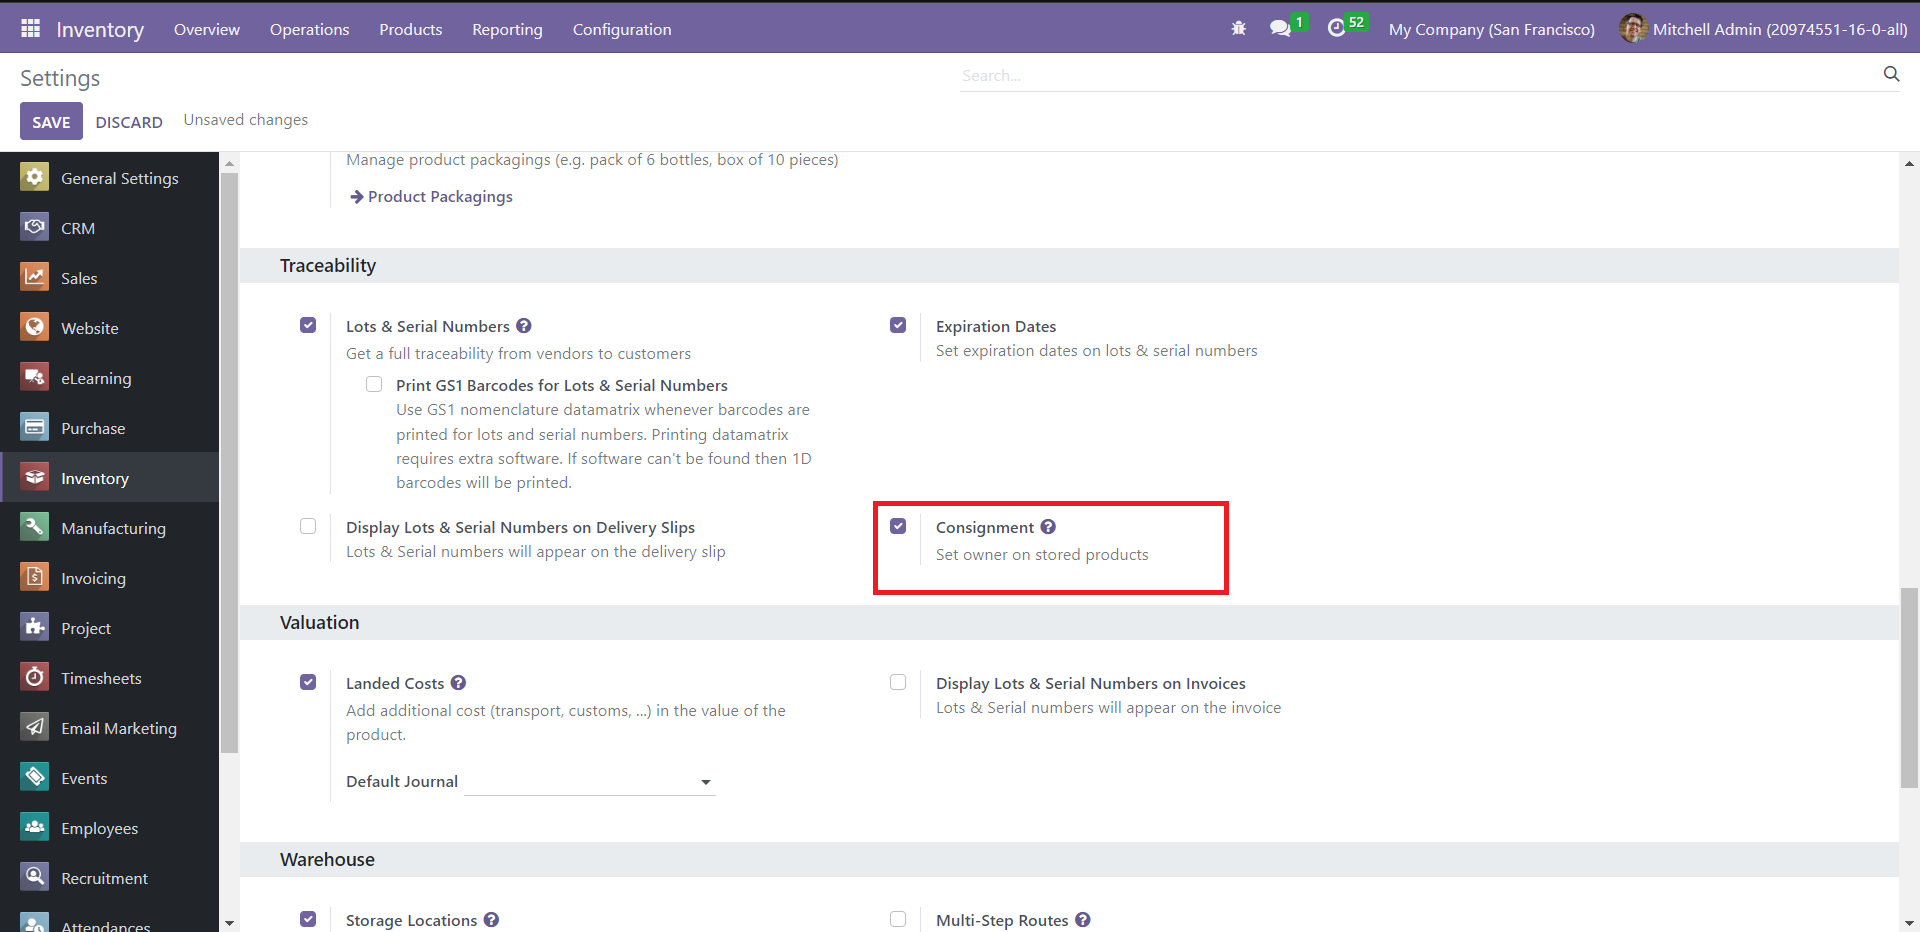
Enabling this option will allow you to set an owner for the products/ consignees while creating receipts. The system will assign the products to the respective consignees when you validate these receipts.
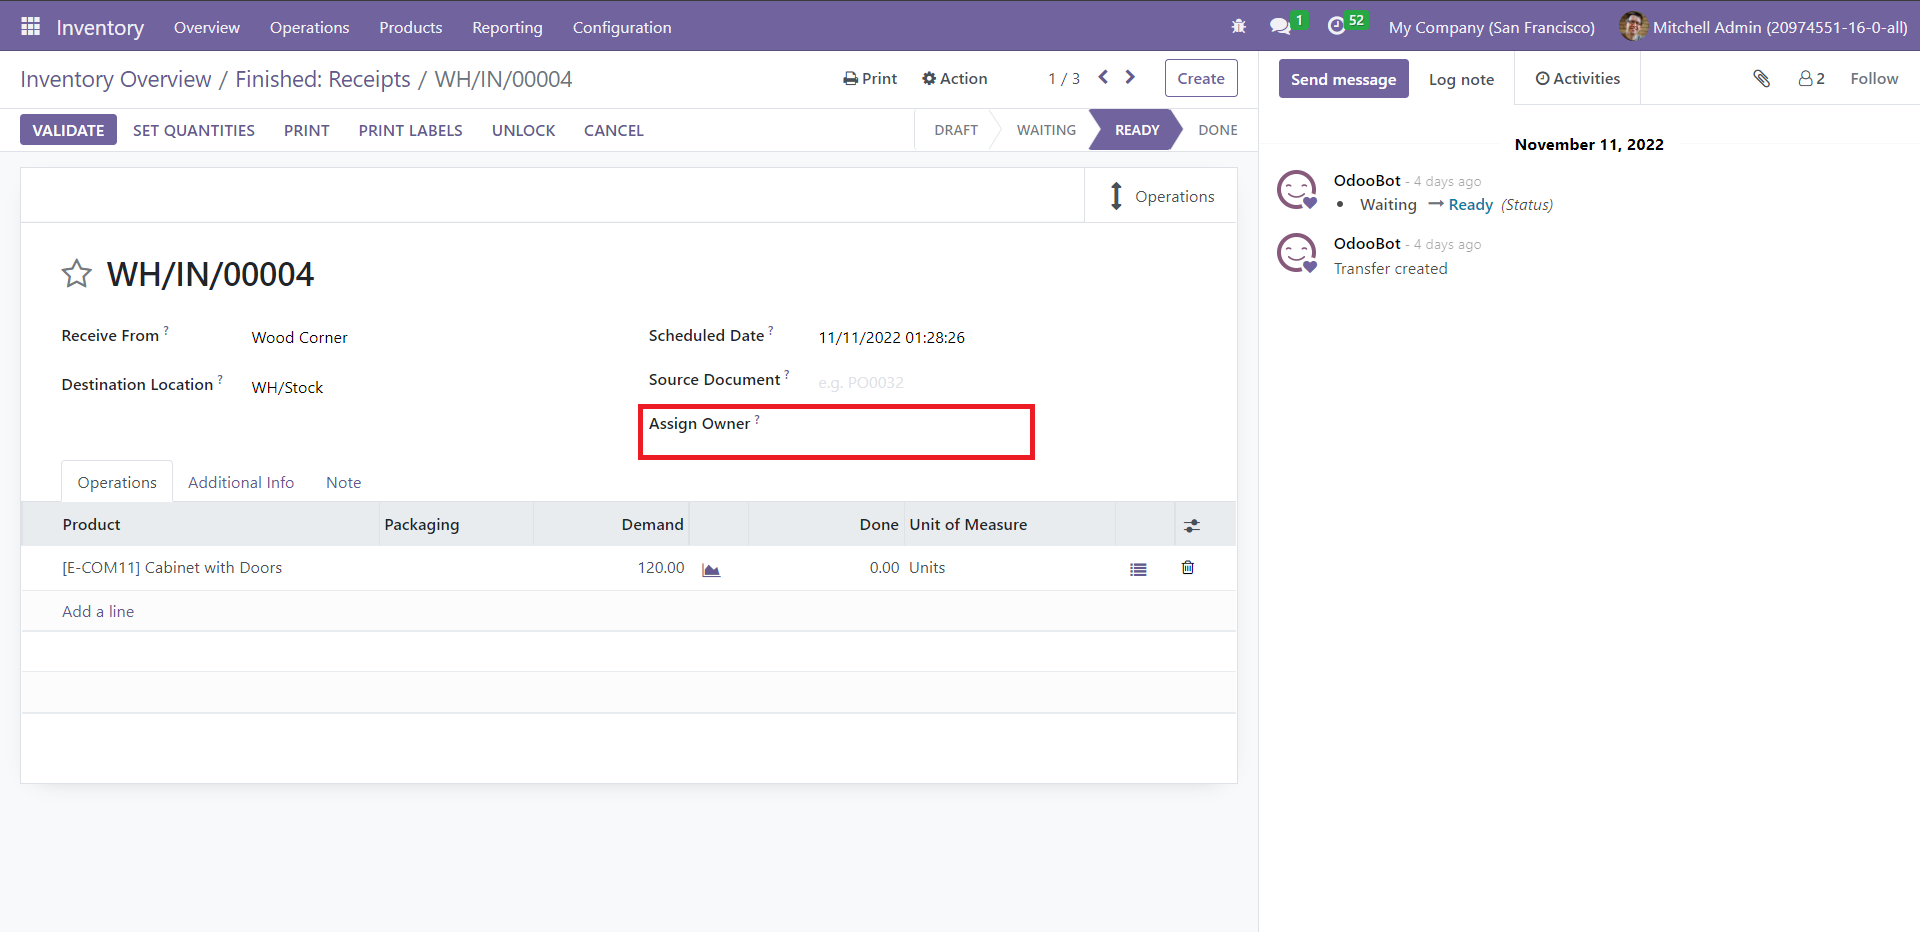
Give the consignee's name in the Assign Owner field and click on ‘Validate.’
Now, let us delve into the functionalities of the Reporting feature.
Reporting
Odoo ERP allows you to effectively generate comprehensive reports of various records configured in its modules, both analytical and quantitative. They foster a platform to catalyze the employees' overall performance and devise strategic inputs for the company’s business growth. While creating these reports, you can choose to go with default or customizable ones. The Filters and Group By options make your reports precise and legible.
Stock
The Stock window displays every stock configured in the system, along with the details like Product name, Unit Cost, Total Value, On Hand (current quantity of products), Free to Use (quantity of products on hand excluding the reserved quantity), Incoming (quantity of planned incoming goods), Outgoing (quantity of planned outgoing goods), and Unit (of measurement). To access this window, click on the Stock menu from the Reporting tab’s dropdown list.
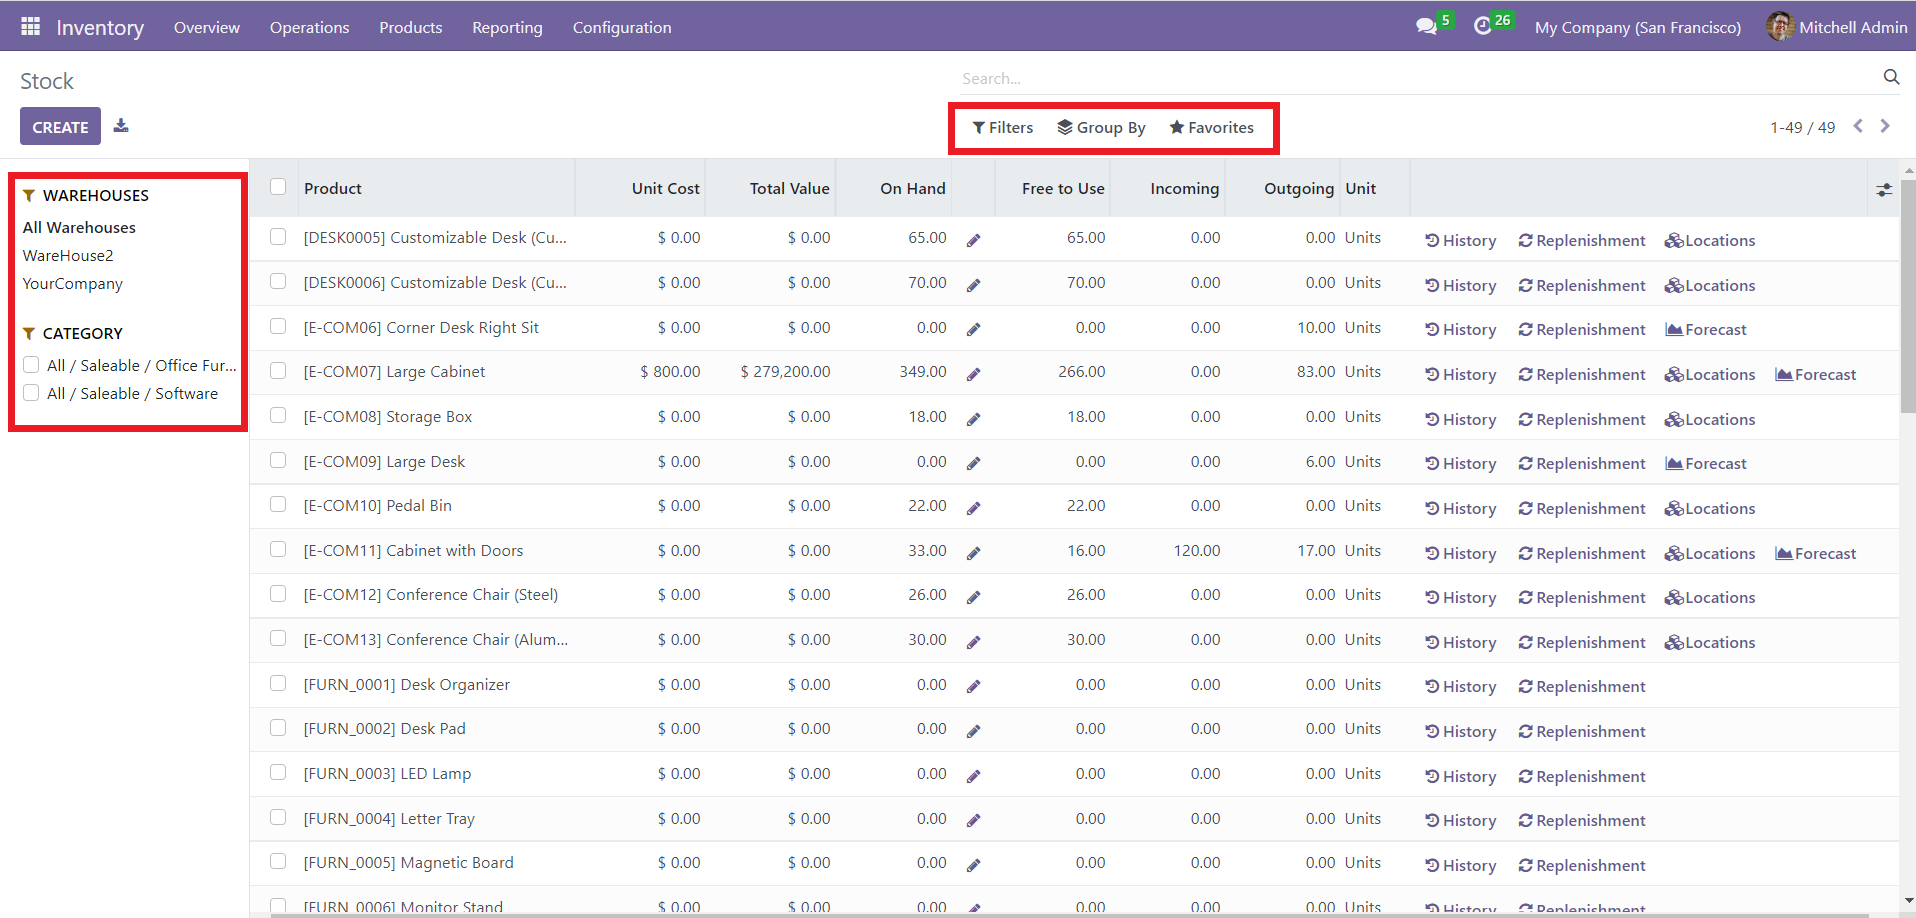
The classification criteria of the products listed in the system will appear on the left side of this window. In this section, you can see two such divisions – Warehouses and Category. To filter out the stock based on a particular category, you can simply check the box next to that category. The resulting window will show only the products fitting that description. Similarly, you can select a warehouse for the window to display its associated items.
Use the Filters, Group By, and Favorites options to filter and categorize the products based on different criteria.
If you click on the button in the window's top right corner, you will get various sections, as shown below.
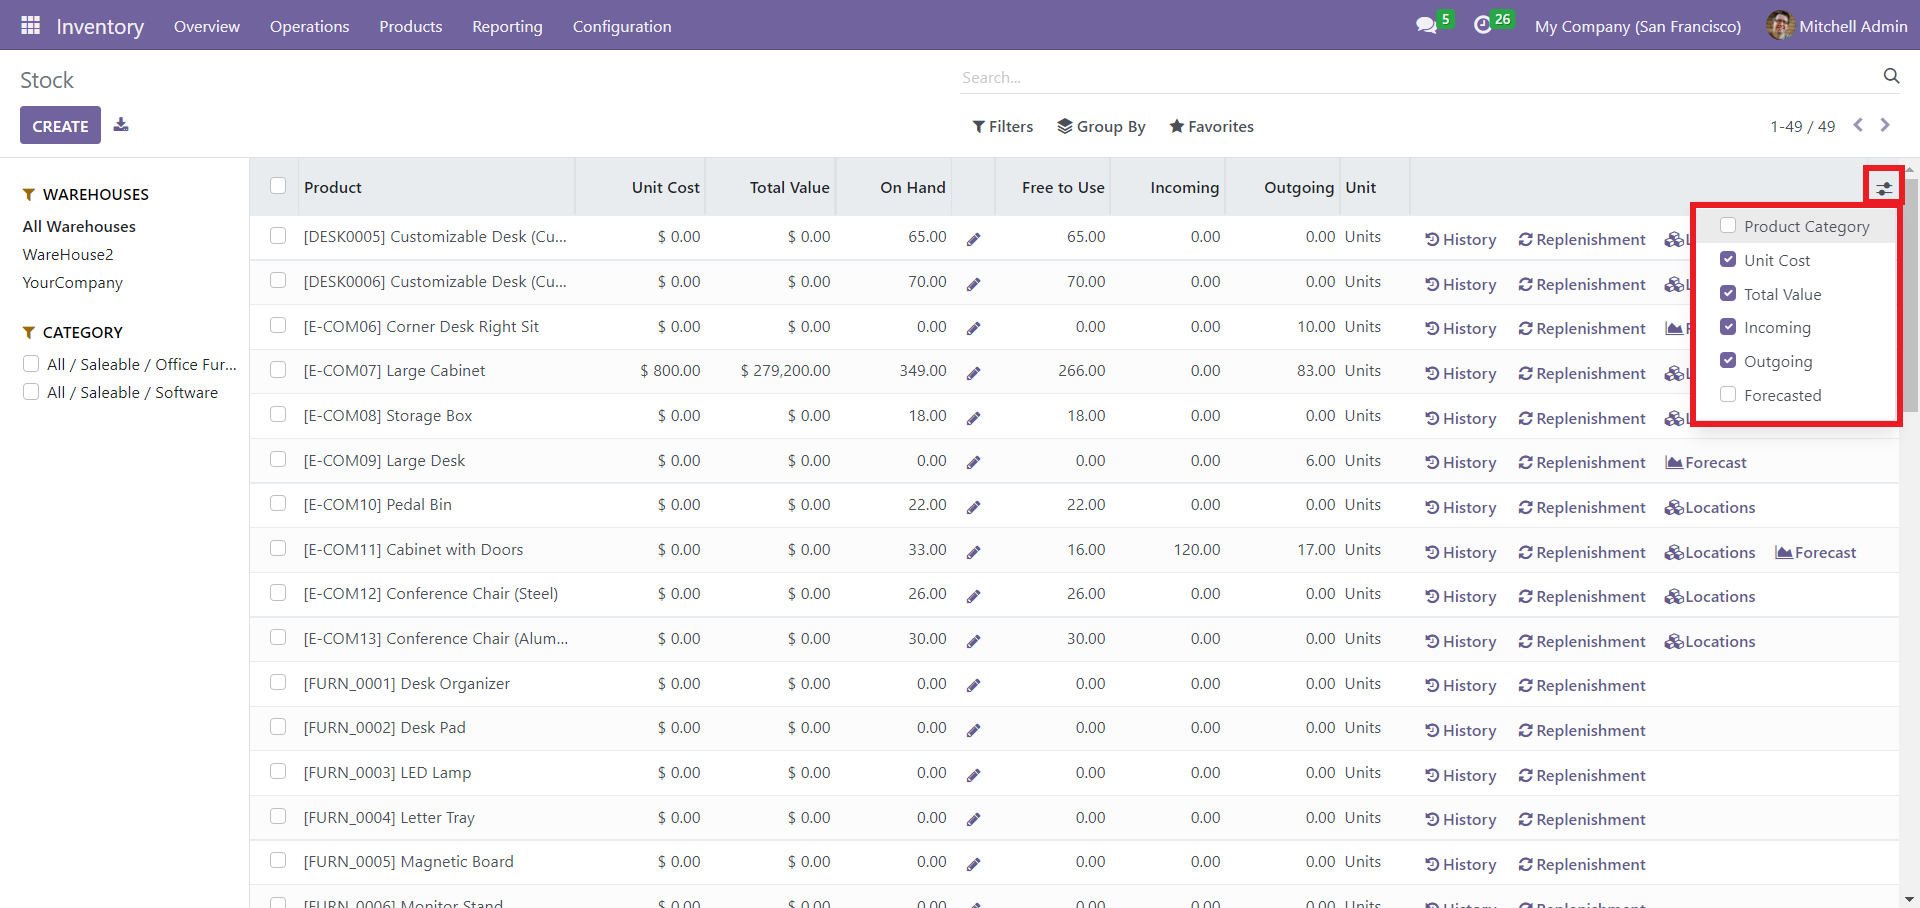
You can check the required fields, the details of which you want to appear in the window.
Locations
The Locations window displays all the products in the system against their warehouse locations. Click on ‘Locations’ from the dropdown list of the Reporting tab.
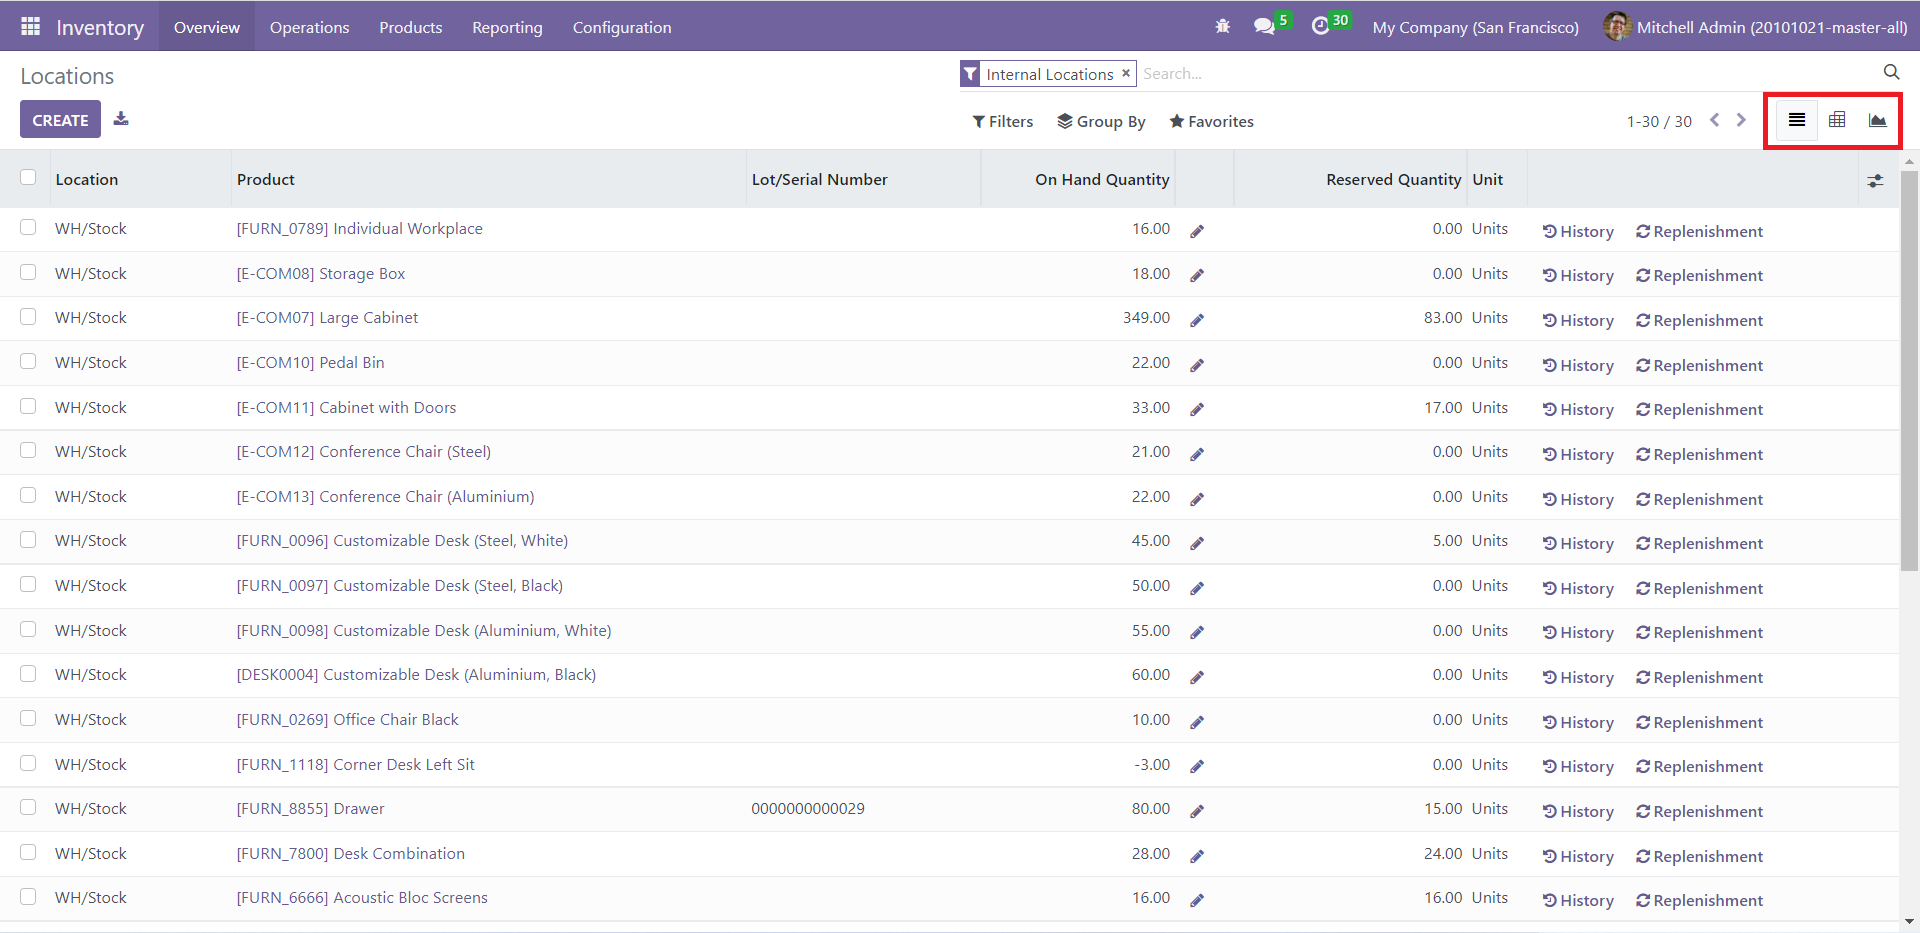
Here, you can see the details of all the products, like their name, Location, Lot/Serial Number, On Hand Quantity, Reserved Quantity, and Unit. The window has a List view by default, but you can change this to Pivot or Graph view by clicking on the icons highlighted above. Use the Filters, Group By, and Favorites options to sort and segregate your records according to the desired criteria.
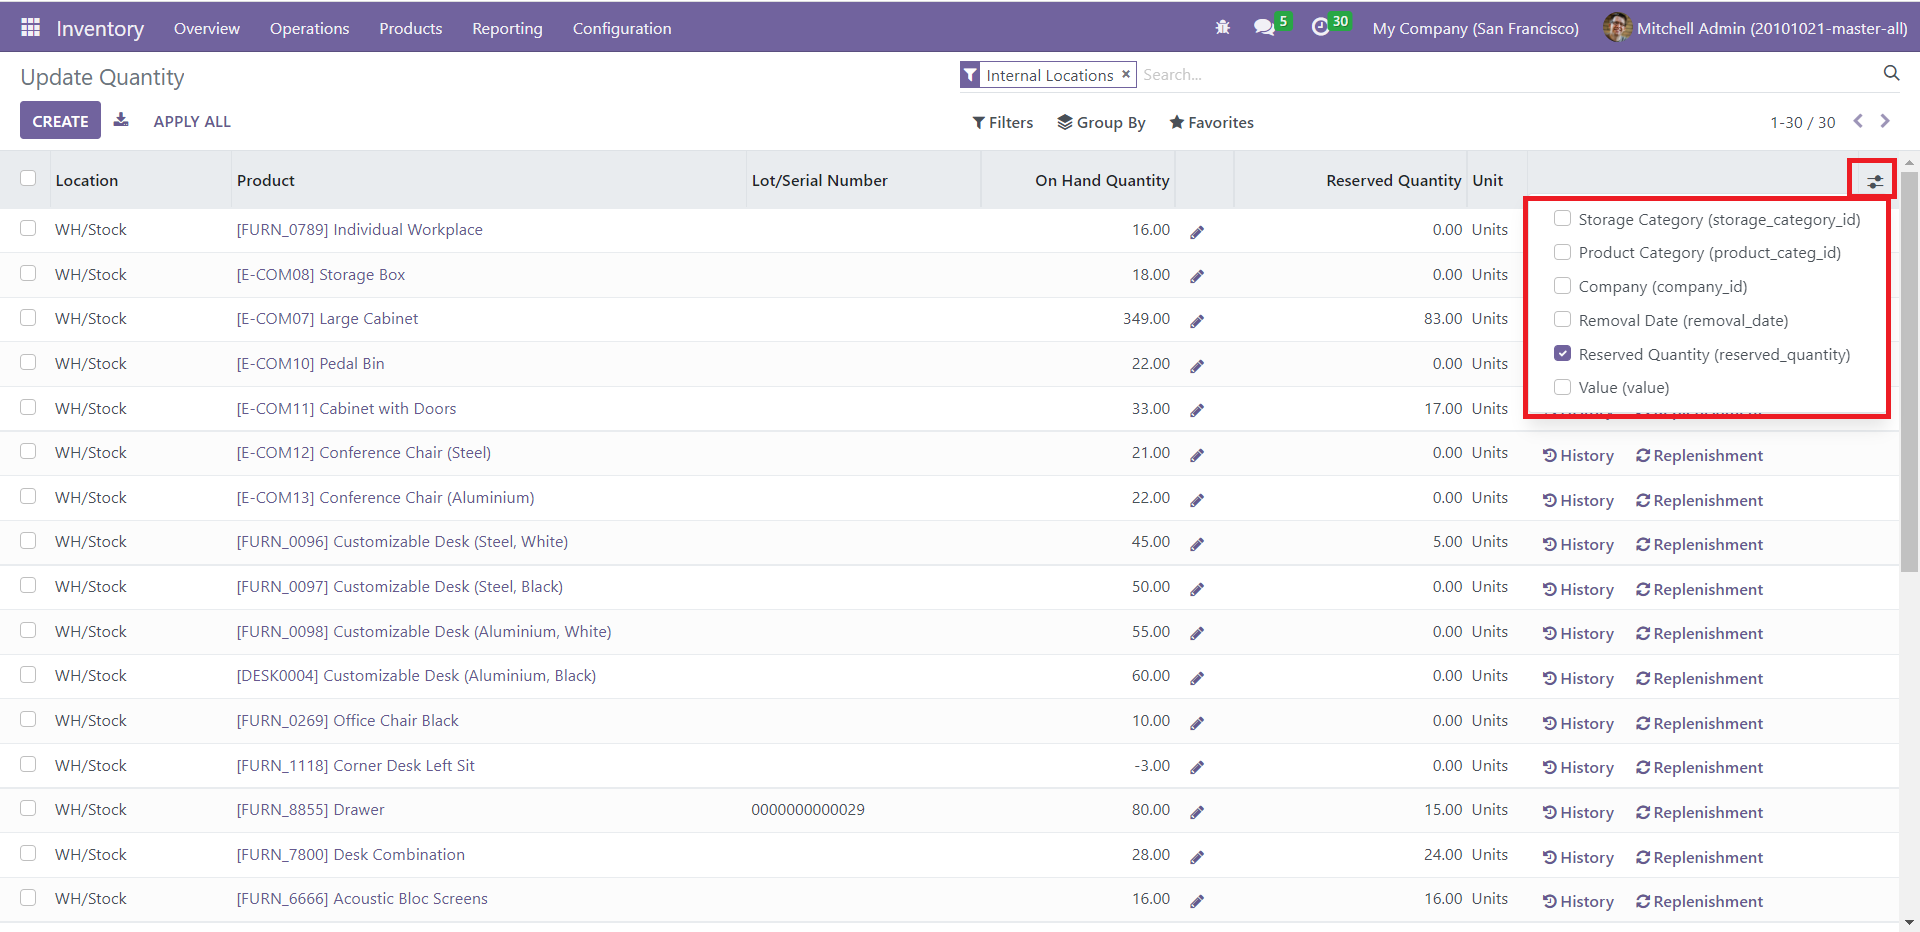
When you click on the button in the top right corner of the window, you will get a list of options from which you can select the details you want to see.
To create a new product, you can click on the Create button. A new line will appear at the bottom of the window.
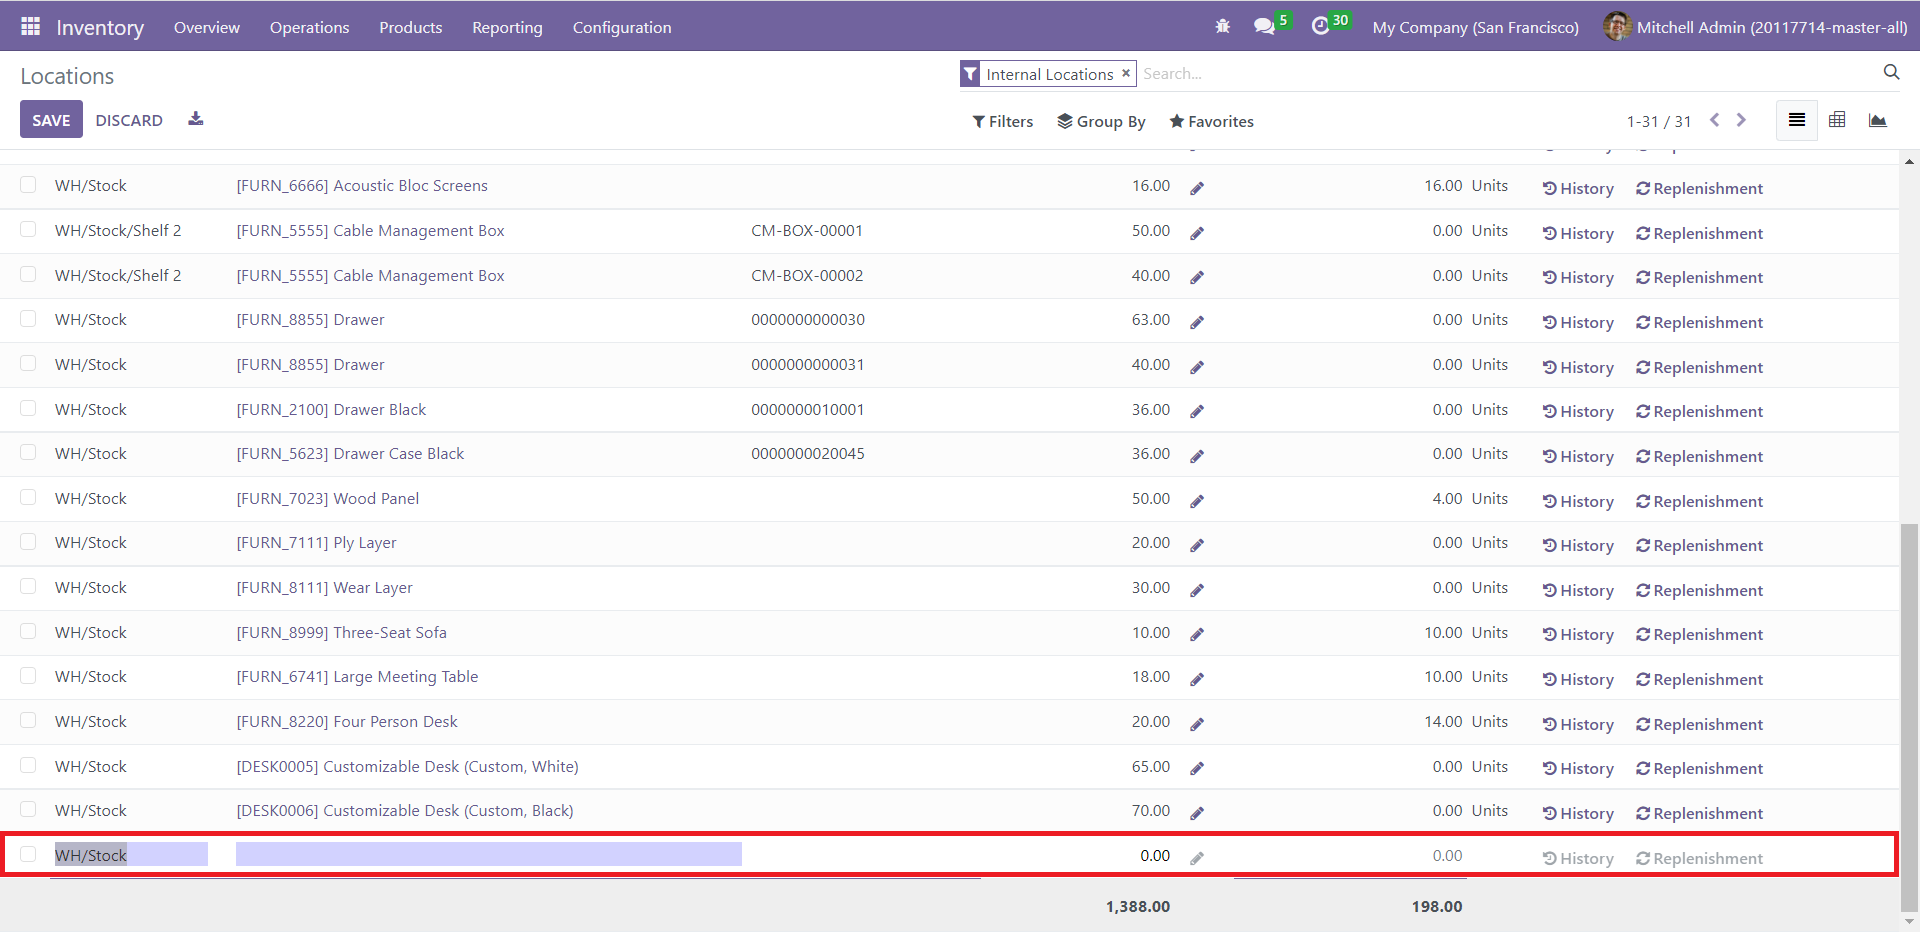
You can add the required details and directly include this entry in the system.
Moves History
The Moves History window tracks all the operations related to product movements and records them meticulously. Select ‘Moves History’ from under the Reporting tab.
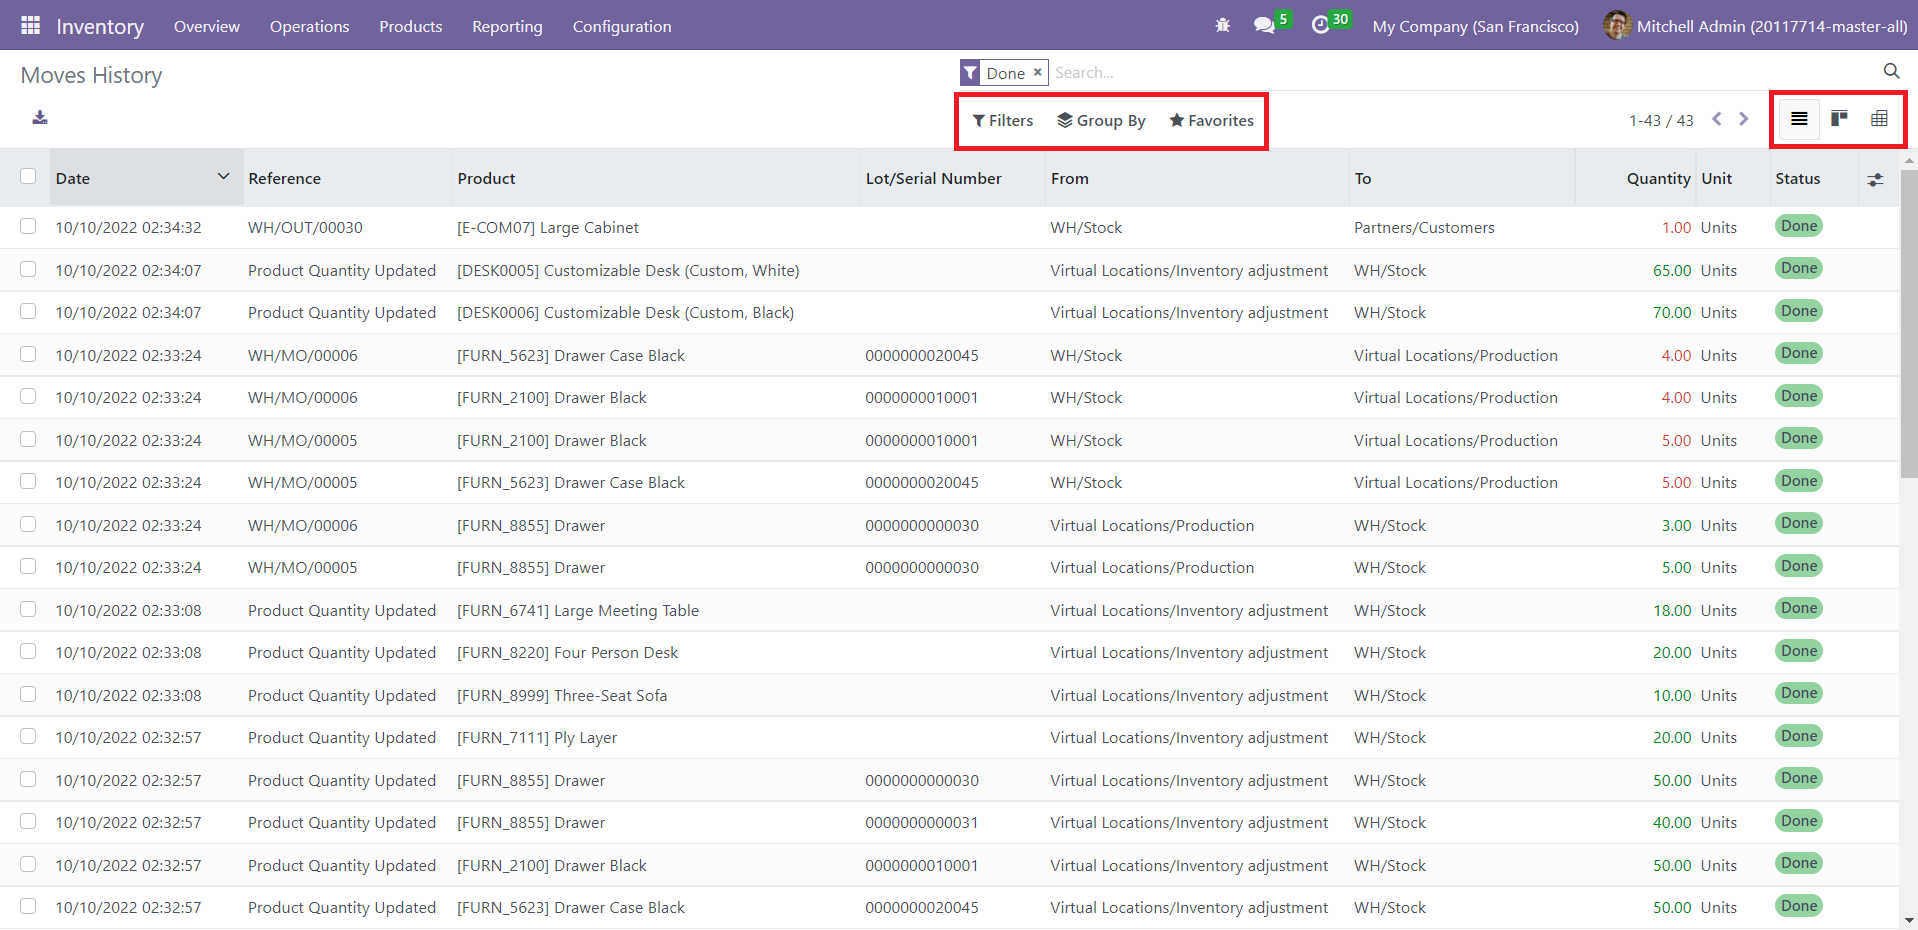
The window shows details like Date of movement, Reference, Product name, Lot/Serial Number, From (the location from which the product is shifted), To ( the location to which the product is shifted), Quantity, Unit, and Status.
You can use ‘Filters,’ ‘Group By,’ and ‘Favorites’ to apply various criteria and single out the required data. You can view this window in the List, Kanban, or Pivot mode by selecting the respective icon from the window's top right corner.
Valuation
You can carry out various stock valuations under the Valuation menu. Select ‘Valuation’ from the dropdown list of the Reporting tab.

The Stock Valuation window lists the details like Date, Reference, Product, Company, Moved Quantity, Unit Value, Remaining Quantity, Unit of Measure, and Remaining Value. You can sort and classify these records using the Filters, Group By, and Favorites options. Besides, the window offers two modes of view – List and Pivot. Opt for the required mode by clicking on the respective icons as shown above.
With this feature, we conclude the detailed analysis of the Inventory module. You can assign this module to track and manage all operations related to your company’s inventory.